This is the Android SDK of adjust™. You can read more about adjust™ at adjust.com.
There is an example app inside the example directory. You can open
the Android project to see an example on how the adjust SDK can be integrated.
These are the minimal steps required to integrate the adjust SDK into your Android project. We are going to assume that you use Android Studio for your Android development and target an Android API level 9 (Gingerbread) or later.
If you're using the Maven Repository you can start with step 3.
Download the latest version from our releases page. Extract the archive in a folder of your choice.
In the Android Studio menu select File → Import Module....

In the Source directory field, locate the folder you extracted in step 1.
Select and choose the folder ./android_sdk/Adjust/adjust. Make sure the
module name :adjust appears before finishing.

The adjust module should be imported into your Android Studio project
afterwards.

Open the build.gradle file of your app and find the dependencies block. Add
the following line:
compile project(":adjust")

If you are using Maven, add this line instead:
compile 'com.adjust.sdk:adjust-android:4.2.3'
Since the 1st of August of 2014, apps in the Google Play Store must use the Google Advertising ID to uniquely identify devices. To allow the adjust SDK to use the Google Advertising ID, you must integrate the Google Play Services. If you haven't done this yet, follow these steps:
-
Open the
build.gradlefile of your app and find thedependenciesblock. Add the following line:compile 'com.google.android.gms:play-services-analytics:8.3.0' -
Skip this step if you are using version 7 or later of Google Play Services: In the Package Explorer open the
AndroidManifest.xmlof your Android project. Add the followingmeta-datatag inside the<application>element.<meta-data android:name="com.google.android.gms.version" android:value="@integer/google_play_services_version" />


In the Package Explorer open the AndroidManifest.xml of your Android project.
Add the uses-permission tag for INTERNET if it's not present already.
<uses-permission android:name="android.permission.INTERNET" />If you are not targeting the Google Play Store, add both of these permissions instead:
<uses-permission android:name="android.permission.INTERNET" />
<uses-permission android:name="android.permission.ACCESS_WIFI_STATE" />
If you are using Proguard, add these lines to your Proguard file:
-keep class com.adjust.sdk.plugin.MacAddressUtil {
    java.lang.String getMacAddress(android.content.Context);
}
-keep class com.adjust.sdk.plugin.AndroidIdUtil {
    java.lang.String getAndroidId(android.content.Context);
}
-keep class com.google.android.gms.common.ConnectionResult {
    int SUCCESS;
}
-keep class com.google.android.gms.ads.identifier.AdvertisingIdClient {
    com.google.android.gms.ads.identifier.AdvertisingIdClient$Info
        getAdvertisingIdInfo (android.content.Context);
}
-keep class com.google.android.gms.ads.identifier.AdvertisingIdClient$Info {
    java.lang.String getId ();
    boolean isLimitAdTrackingEnabled();
}
If you are not targeting the Google Play Store, you can remove the
com.google.android.gms rules.

In your AndroidManifest.xml add the following receiver tag inside the
application tag.
<receiver
    android:name="com.adjust.sdk.AdjustReferrerReceiver"
    android:exported="true" >
    <intent-filter>
        <action android:name="com.android.vending.INSTALL_REFERRER" />
    </intent-filter>
</receiver>
We use this broadcast receiver to retrieve the install referrer, in order to improve conversion tracking.
If you are already using a different broadcast receiver for the
INSTALL_REFERRER intent, follow these instructions to add the
Adjust receiver.
To start with, we'll set up basic session tracking.
We recommend using a global android Application class to initialize the SDK. If don't have one in your app already, follow these steps:
-
Create a class that extends
Application. -
Open the
AndroidManifest.xmlfile of your app and locate the<application>element. -
Add the attribute
android:nameand set it to the name of your new application class pefixed by a dot.In our example app we use an
Applicationclass namedGlobalApplication, so the manifest file is configured as:<application android:name=".GlobalApplication" ... > ... </application>
-
In your
Applicationclass find or create theonCreatemethod and add the following code to initialize the adjust SDK:import com.adjust.sdk.Adjust; import com.adjust.sdk.AdjustConfig; public class GlobalApplication extends Application { @Override public void onCreate() { super.onCreate(); String appToken = "{YourAppToken}"; String environment = AdjustConfig.ENVIRONMENT_SANDBOX; AdjustConfig config = new AdjustConfig(this, appToken, environment); Adjust.onCreate(config); } }
Replace
{YourAppToken}with your app token. You can find this in your dashboard.Depending on whether you build your app for testing or for production, you must set
environmentwith one of these values:String environment = AdjustConfig.ENVIRONMENT_SANDBOX; String environment = AdjustConfig.ENVIRONMENT_PRODUCTION;
Important: This value should be set to
AdjustConfig.ENVIRONMENT_SANDBOXif and only if you or someone else is testing your app. Make sure to set the environment toAdjustConfig.ENVIRONMENT_PRODUCTIONjust before you publish the app. Set it back toAdjustConfig.ENVIRONMENT_SANDBOXwhen you start developing and testing it again.We use this environment to distinguish between real traffic and test traffic from test devices. It is very important that you keep this value meaningful at all times! This is especially important if you are tracking revenue.
-
Add a private class that implements the
ActivityLifecycleCallbacksinterface. If you don't have access to this interface, your app is targeting an Android api level inferior to 14. You will have to update manually each Activity by following this instructions. If you hadAdjust.onResumeandAdjust.onPausecalls on each Activity of your app before, you should remove them. -
Edit the
onActivityResumed(Activity activity)method and add a call toAdjust.onResume(). Edit theonActivityPaused(Activity activity)method and add a call toAdjust.onPause(). -
Add on the
onCreate()method where the adjust SDK is configured and add callregisterActivityLifecycleCallbackswith a instance of the createdActivityLifecycleCallbacksclass.import com.adjust.sdk.Adjust; import com.adjust.sdk.AdjustConfig; public class GlobalApplication extends Application { @Override public void onCreate() { super.onCreate(); String appToken = "{YourAppToken}"; String environment = AdjustConfig.ENVIRONMENT_SANDBOX; AdjustConfig config = new AdjustConfig(this, appToken, environment); Adjust.onCreate(config); registerActivityLifecycleCallbacks(new AdjustLifecycleCallbacks()); //... } } private static final class AdjustLifecycleCallbacks implements ActivityLifecycleCallbacks { @Override public void onActivityResumed(Activity activity) { Adjust.onResume(); } @Override public void onActivityPaused(Activity activity) { Adjust.onPause(); } //... }


You can increase or decrease the amount of logs you see in tests by calling
setLogLevel on your AdjustConfig instance with one of the following
parameters:
config.setLogLevel(LogLevel.VERBOSE);   // enable all logging
config.setLogLevel(LogLevel.DEBUG);     // enable more logging
config.setLogLevel(LogLevel.INFO);      // the default
config.setLogLevel(LogLevel.WARN);      // disable info logging
config.setLogLevel(LogLevel.ERROR);     // disable warnings as well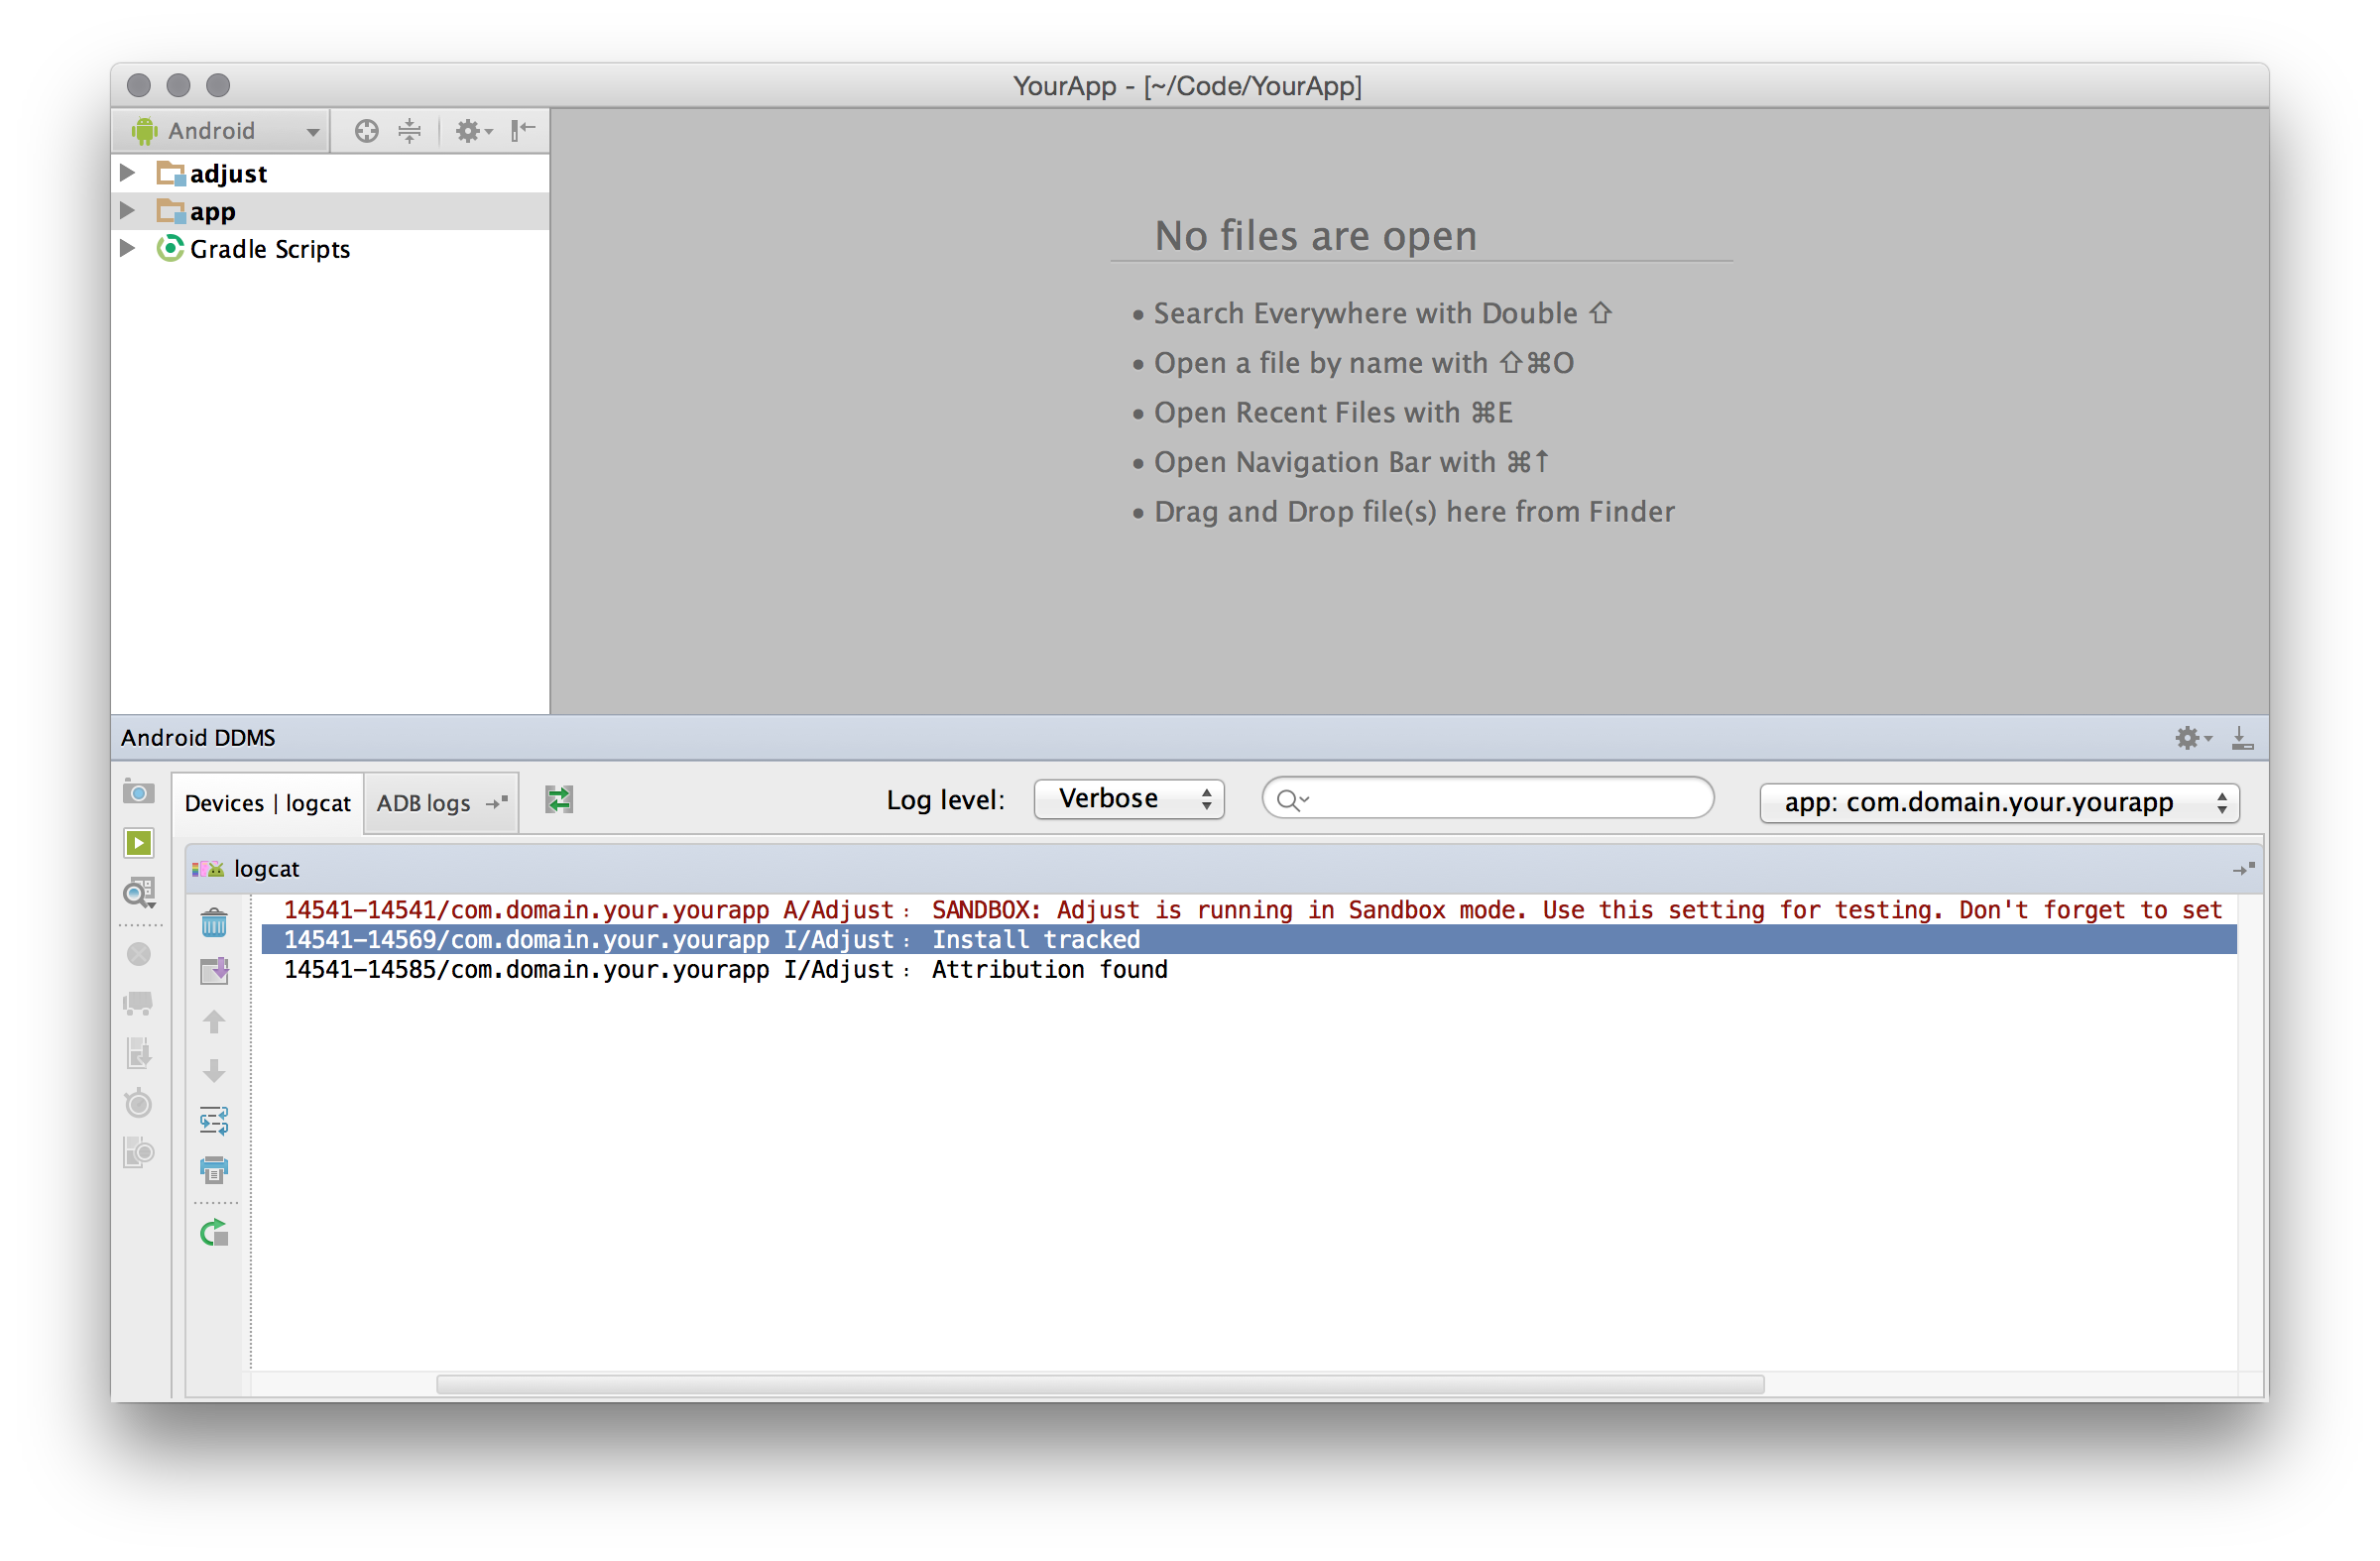
config.setLogLevel(LogLevel.ASSERT); // disable errors as wellBuild and run your Android app. In your LogCat viewer you can set the filter
tag:Adjust to hide all other logs. After your app has launched you should see
the following Adjust log: Install tracked
Once you have integrated the adjust SDK into your project, you can take advantage of the following features.
You can use adjust to track any event in your app. Suppose you want to track
every tap on a button. You would have to create a new event token in your
dashboard. Let's say that event token is abc123. In your button's onClick
method you could then add the following lines to track the click:
AdjustEvent event = new AdjustEvent("abc123");
Adjust.trackEvent(event);
The event instance can be used to configure the event even more before tracking it.
You can register a callback URL for your events in your dashboard. We will
send a GET request to that URL whenever the event gets tracked. You can add
callback parameters to that event by calling addCallbackParameter on the
event instance before tracking it. We will then append these parameters to your
callback URL.
For example, suppose you have registered the URL
http://www.adjust.com/callback then track an event like this:
AdjustEvent event = new AdjustEvent("abc123");

event.addCallbackParameter("key", "value");
event.addCallbackParameter("foo", "bar");

Adjust.trackEvent(event);
In that case we would track the event and send a request to:
http://www.adjust.com/callback?key=value&foo=bar
It should be mentioned that we support a variety of placeholders like
{android_id} that can be used as parameter values. In the resulting callback
this placeholder would be replaced with the AndroidID of the current device.
Also note that we don't store any of your custom parameters, but only append
them to your callbacks. If you haven't registered a callback for an event,
these parameters won't even be read.
You can read more about using URL callbacks, including a full list of available values, in our callbacks guide.
You can also add parameters to be transmitted to network partners, for the integrations that have been activated in your adjust dashboard.
This works similarly to the callback parameters mentioned above, but can be
added by calling the addPartnerParameter method on your AdjustEvent instance.
AdjustEvent event = new AdjustEvent("abc123");

event.addPartnerParameter("key", "value");
event.addPartnerParameter("foo", "bar");

Adjust.trackEvent(event);
You can read more about special partners and these integrations in our guide to special partners.
If your users can generate revenue by tapping on advertisements or making in-app purchases you can track those revenues with events. Lets say a tap is worth one Euro cent. You could then track the revenue event like this:
AdjustEvent event = new AdjustEvent("abc123");
event.setRevenue(0.01, "EUR");
Adjust.trackEvent(event);
This can be combined with callback parameters of course.
When you set a currency token, adjust will automatically convert the incoming revenues into a reporting revenue of your choice. Read more about currency conversion here.
You can read more about revenue and event tracking in the event tracking guide.
You can set up the adjust SDK to handle deep links that are used to open your app. We will only read certain adjust specific parameters. This is essential if you are planning to run retargeting or re-engagement campaigns with deep links.
For each activity that accepts deep links, find the onCreate method and add
the folowing call to adjust:
protected void onCreate(Bundle savedInstanceState) {
    super.onCreate(savedInstanceState);

    Intent intent = getIntent();
    Uri data = intent.getData();
    Adjust.appWillOpenUrl(data);
    //...
}If your app makes heavy use of event tracking, you might want to delay some
HTTP requests in order to send them in one batch every minute. You can enable
event buffering with your AdjustConfig instance:
AdjustConfig config = new AdjustConfig(this, appToken, environment);

config.setEventBufferingEnabled(true);

Adjust.onCreate(config);You can register a listener to be notified of tracker attribution changes. Due to the different sources considered for attribution, this information can not be provided synchronously. The simplest way is to create a single anonymous listener:
Please make sure to consider our applicable attribution data policies.
With the AdjustConfig instance, before starting the SDK, add the anonymous listener:
AdjustConfig config = new AdjustConfig(this, appToken, environment);

config.setOnAttributionChangedListener(new OnAttributionChangedListener() {
    @Override
    public void onAttributionChanged(AdjustAttribution attribution) {
    }
});

Adjust.onCreate(config);
Alternatively, you could implement the OnAttributionChangedListener
interface in your Application class and set it as listener:
AdjustConfig config = new AdjustConfig(this, appToken, environment);
config.setOnAttributionChangedListener(this);
Adjust.onCreate(config);
The listener function will be called when the SDK receives the final attribution
information. Within the listener function you have access to the attribution
parameter. Here is a quick summary of its properties:
String trackerTokenthe tracker token of the current install.String trackerNamethe tracker name of the current install.String networkthe network grouping level of the current install.String campaignthe campaign grouping level of the current install.String adgroupthe ad group grouping level of the current install.String creativethe creative grouping level of the current install.String clickLabelthe click label of the current install.
You can disable the adjust SDK from tracking any activities of the current
device by calling setEnabled with parameter false. This setting is
remembered between sessions.
Adjust.setEnabled(false);You can check if the adjust SDK is currently enabled by calling the function
isEnabled. It is always possible to activate the adjust SDK by invoking
setEnabled with the enabled parameter as true.
You can put the adjust SDK in offline mode to suspend transmission to our servers, while retaining tracked data to be sent later. While in offline mode, all information is saved in a file, so be careful not to trigger too many events while in offline mode.
You can activate offline mode by calling setOfflineMode with the parameter true.
Adjust.setOfflineMode(true);Conversely, you can deactivate offline mode by calling setOfflineMode with false.
When the adjust SDK is put back in online mode, all saved information is send to our servers
with the correct time information.
Unlike disabling tracking, this setting is not remembered bettween sessions. This means that the SDK is in online mode whenever it is started, even if the app was terminated in offline mode.
The adjust SDK is licensed under the MIT License.
Copyright (c) 2012-2015 adjust GmbH, http://www.adjust.com
Permission is hereby granted, free of charge, to any person obtaining a copy of this software and associated documentation files (the "Software"), to deal in the Software without restriction, including without limitation the rights to use, copy, modify, merge, publish, distribute, sublicense, and/or sell copies of the Software, and to permit persons to whom the Software is furnished to do so, subject to the following conditions:
The above copyright notice and this permission notice shall be included in all copies or substantial portions of the Software.
THE SOFTWARE IS PROVIDED "AS IS", WITHOUT WARRANTY OF ANY KIND, EXPRESS OR IMPLIED, INCLUDING BUT NOT LIMITED TO THE WARRANTIES OF MERCHANTABILITY, FITNESS FOR A PARTICULAR PURPOSE AND NONINFRINGEMENT. IN NO EVENT SHALL THE AUTHORS OR COPYRIGHT HOLDERS BE LIABLE FOR ANY CLAIM, DAMAGES OR OTHER LIABILITY, WHETHER IN AN ACTION OF CONTRACT, TORT OR OTHERWISE, ARISING FROM, OUT OF OR IN CONNECTION WITH THE SOFTWARE OR THE USE OR OTHER DEALINGS IN THE SOFTWARE.