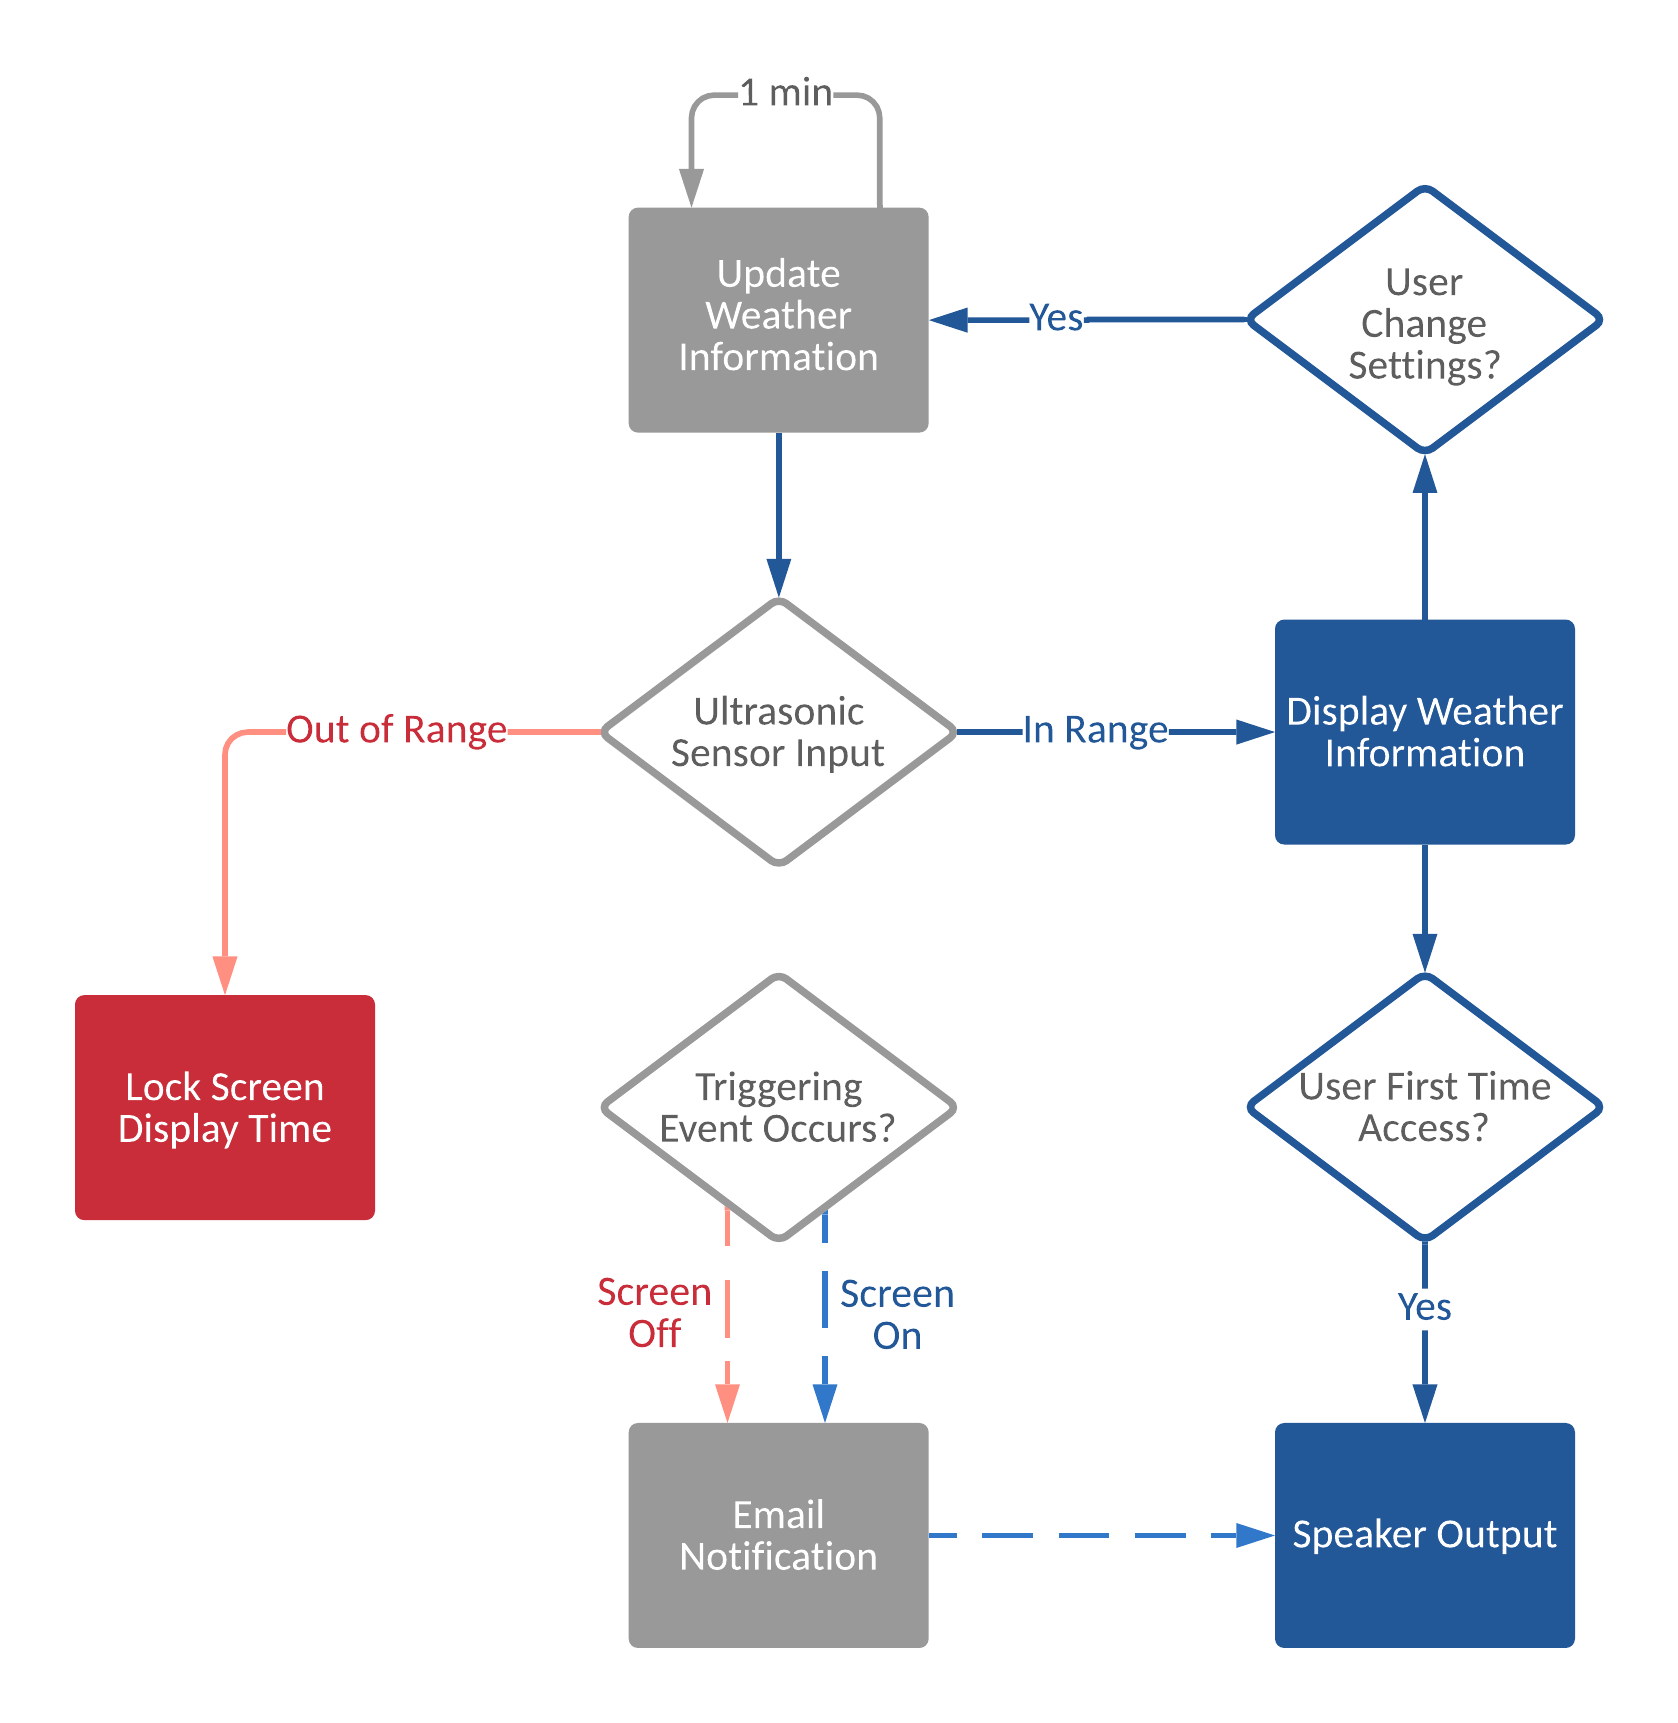
This project aims to develop an IoT weather widget on Raspberry Pi 4 and set up a GUI for users to interact with. The weather information will be extracted from the internet and update every minute. Users can change the city and the temperature threshold setting through the GUI, and once the temperature drops below that threshold, Pi will send out an email notification through AWS to inform the users. A sonar sensor detects whether a user is standing in front of the display or not. If a user is present, the screen will be on and show weather information; if a user is absent, the display will show a lock screen with the current time. Weather information will also be announced through a PCB-mount speaker when the display wakes up everytime or when the trigger event occurs while the display is on. The RGB LED will light up with specific colors depending on the weather status.
Hardware and parts used in the project:
- Raspberry Pi 4 Model B:
- Micro HDMI cable and monitor*
- Distance sensor:
- Ultrasonic distance sensor HC-SR04
- Voltage divider resistors: 330 Ω and 510 Ω
- Audio output:
- Mono audio amp breakout TPA2005D1
- PCB-mount speaker 8ohm 0.1W
- Gain resistors:2x 100 kΩ
- LED display:
- LED - RGB clear common cathode
- Dropping resistors: 3x 330Ω
*HDMI connection is optional if a virtual desktop is set up for pi
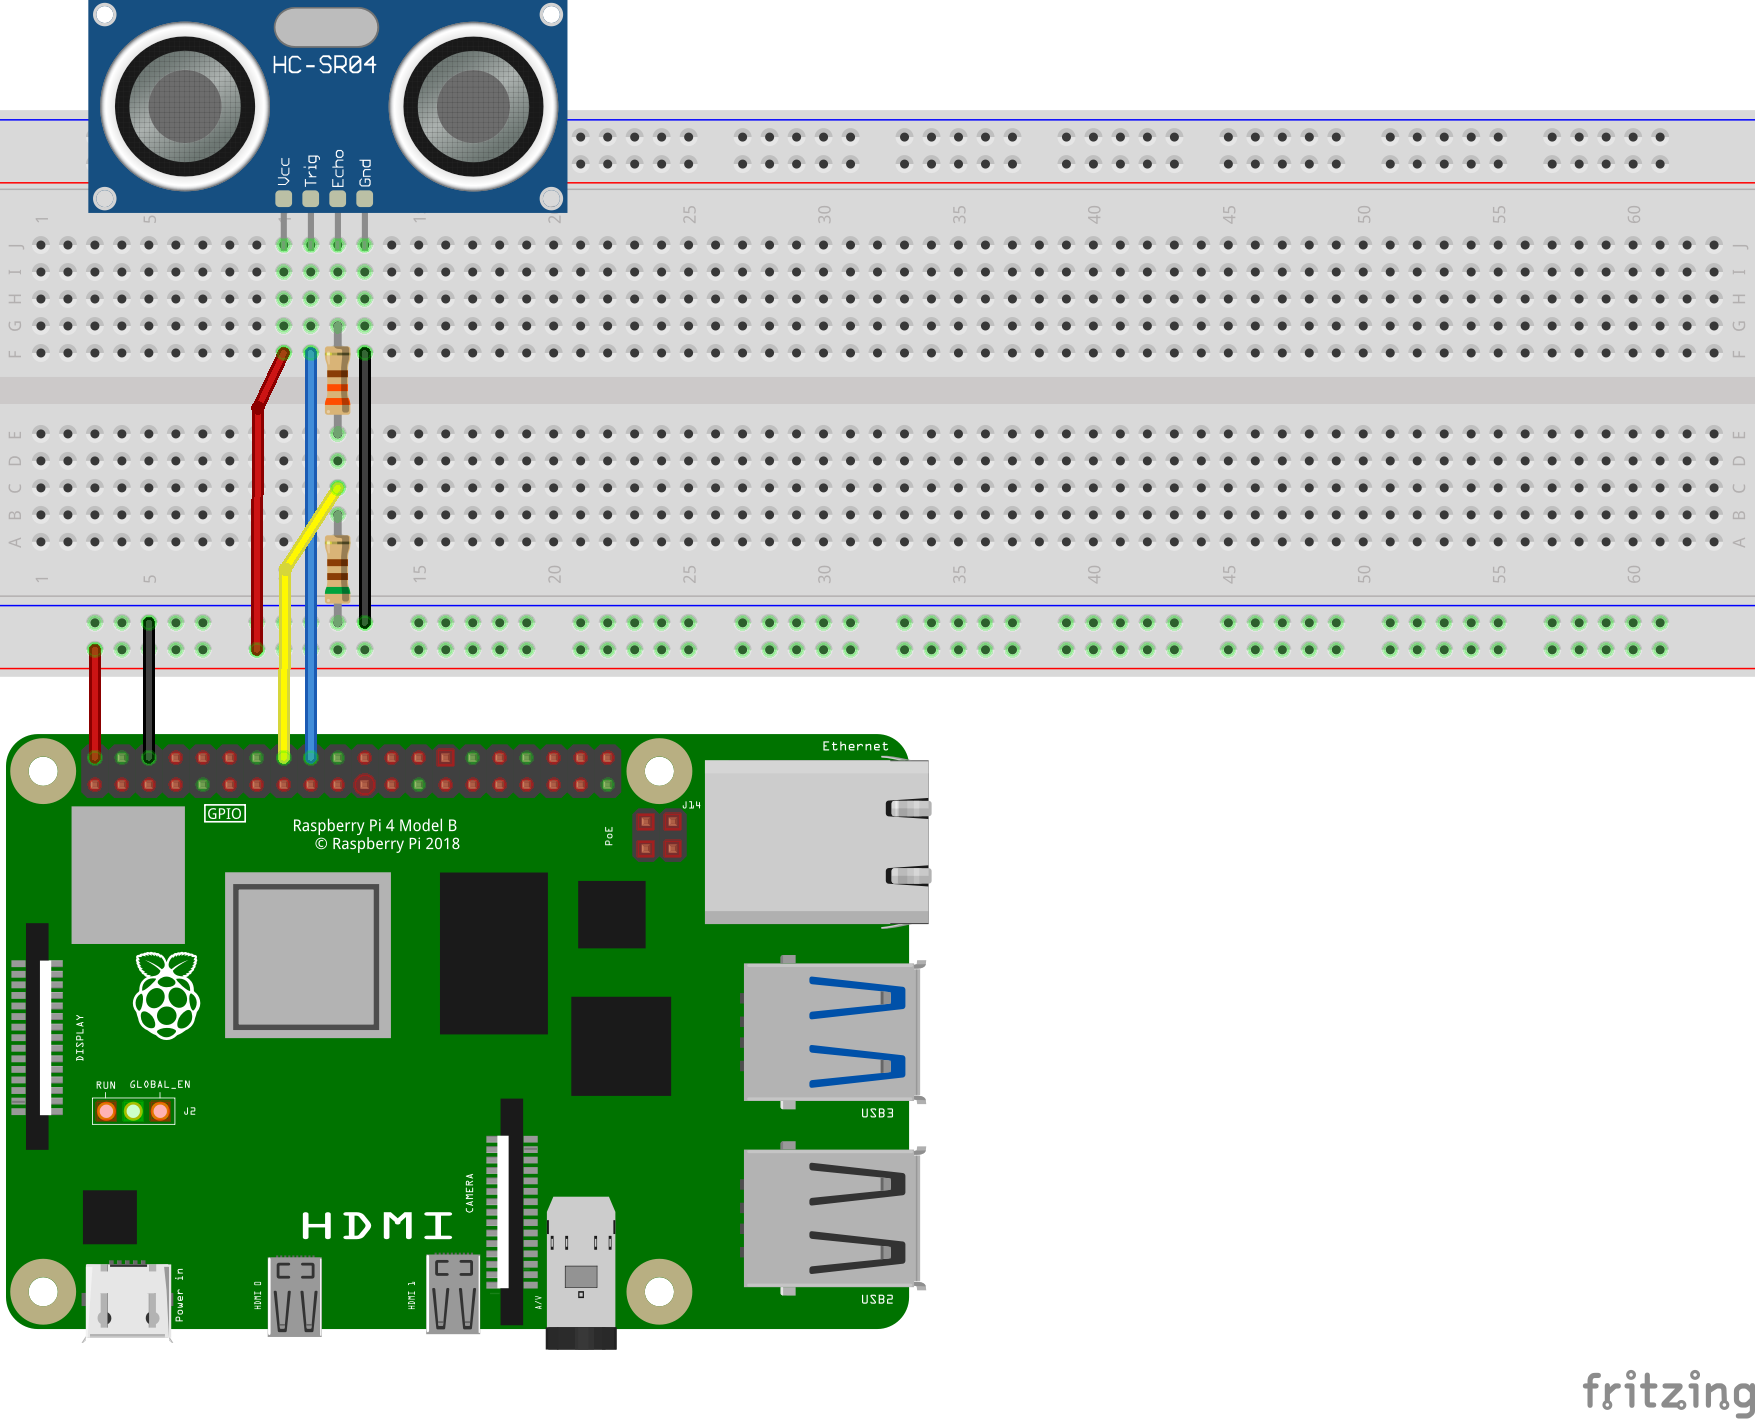
| Sonar Sensor | |
|---|---|
| Vcc | 5V |
| Trig | GPIO 24 |
| Echo | GPIO 23* |
| Gnd | Gnd |
*The GPIO pins on Pi are only 3.3V tolerant so a voltage divider is required to drop the voltage from 5V to 3.3V. Connect the 330 Ω resistor to Echo and the 510 Ω resistor in series from 330 Ω to gnd. Then connect the junction to pin 16 (GPIO 23). Refer to the picture below.
Using the GPIO Zero library makes it easy to control GPIO devices on Pi with Python, and HC-SR04 can be represented by the DistanceSensor class:
class gpiozero.DistanceSensor(echo, trigger, max_distance=1, threshold_distance=0.3)
The parameter threshold_distance sets the distance in meter which will trigger the in_range and out_of_range events when crossed. Functions can be attachted to the events to run when the device changes states between active and inactive.
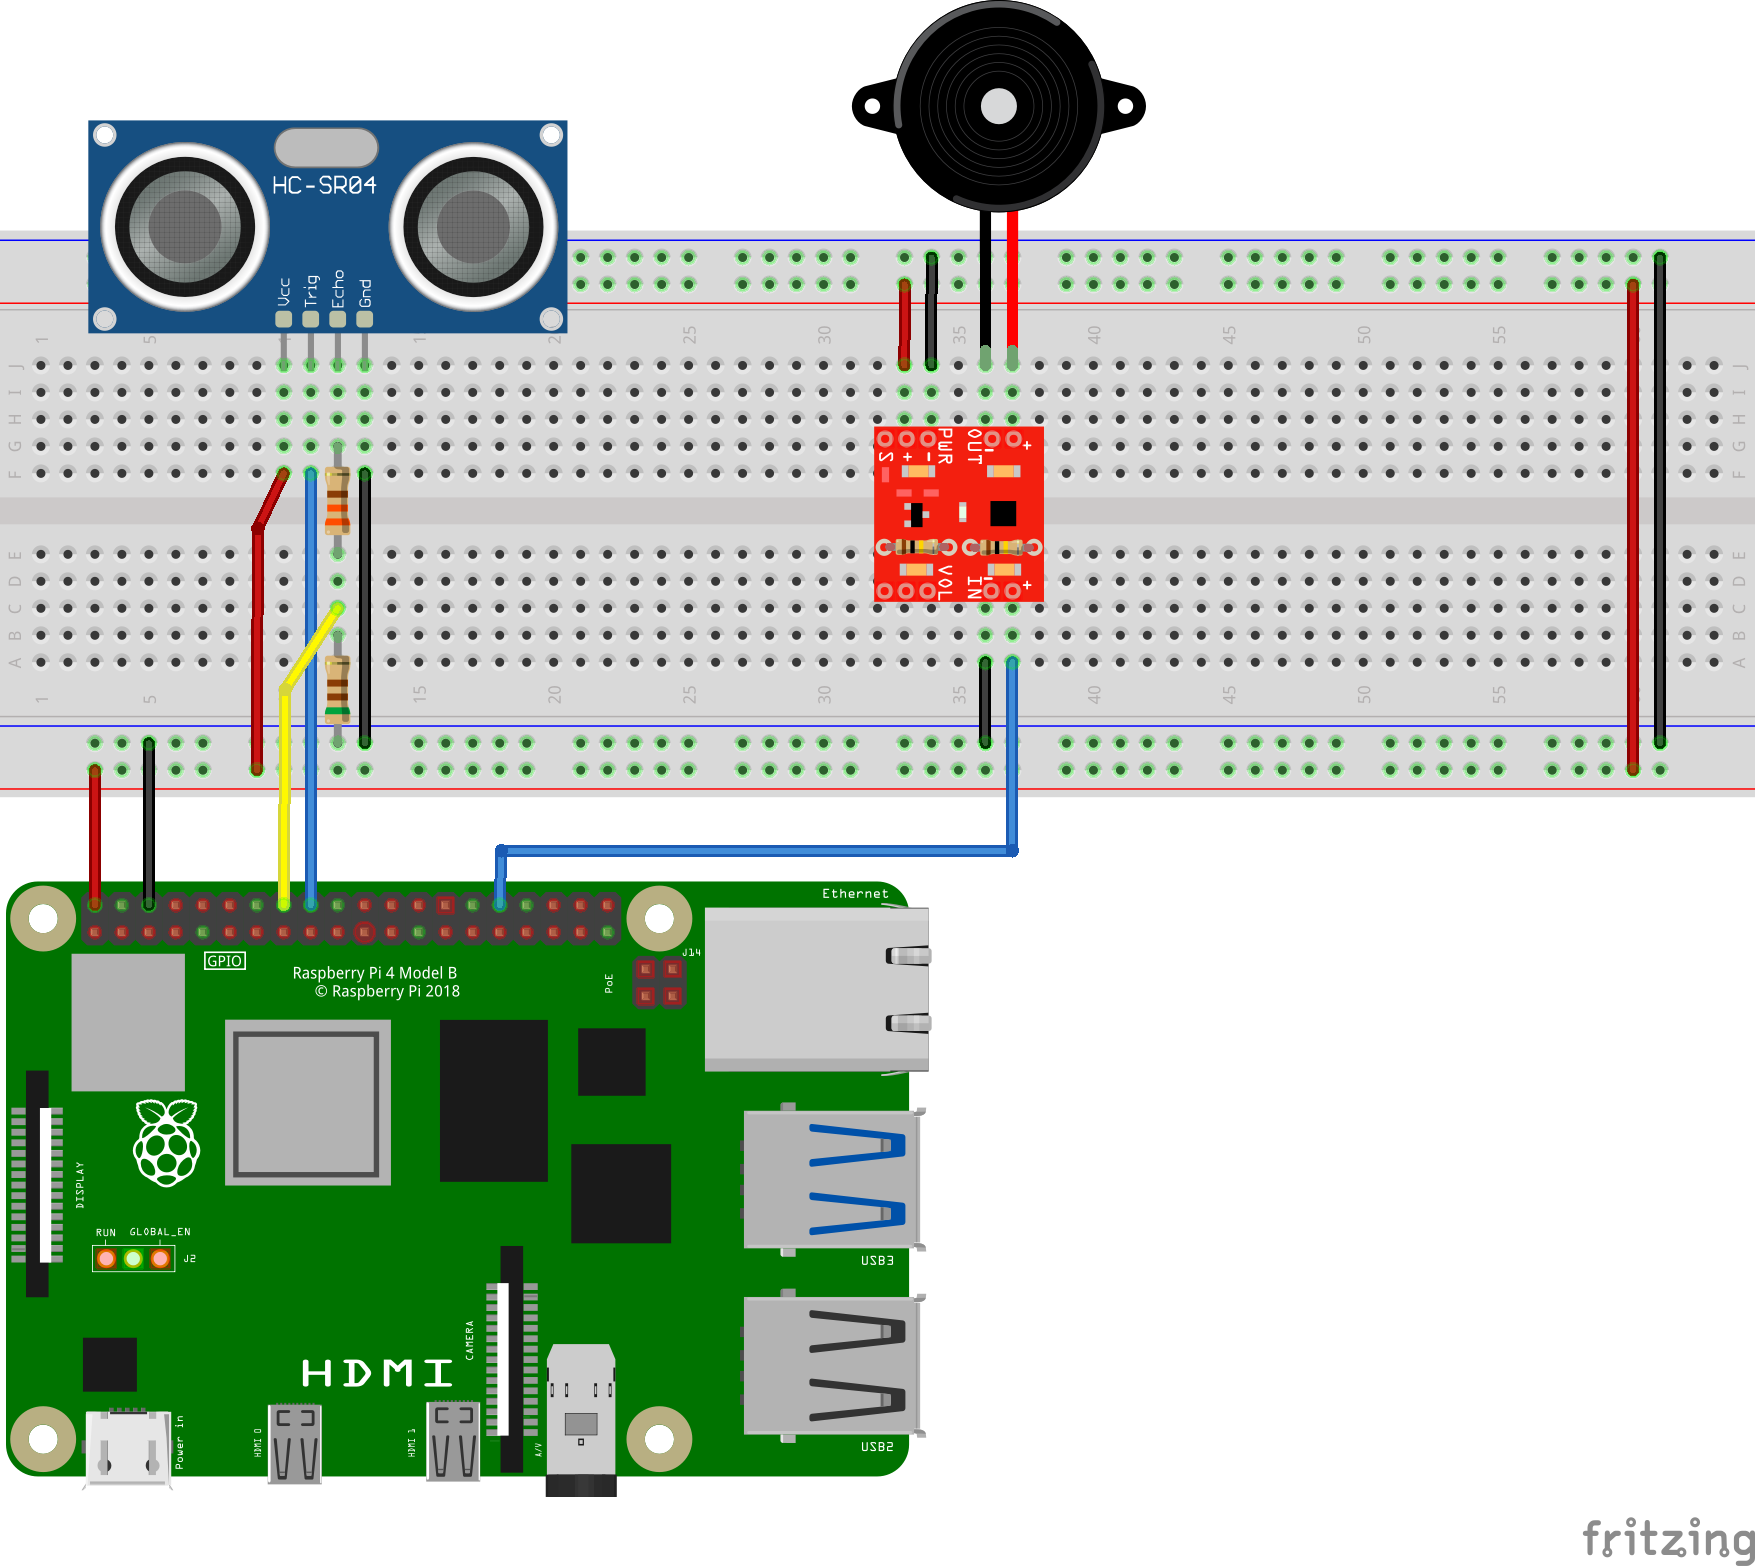
| Audio Amp | |
|---|---|
| PWR+ | 5V |
| PWR- | Gnd |
| IN+ | GPIO 12 |
| IN- | Gnd |
| OUT+ | Speaker + |
| OUT- | Speaker - |
Raspberry Pi has two PWM channels and each channel has two output pins:
- PWM0: GPIO 12 and GPIO 18
- PWM1: GPIO 13 and GPIO 19
The Pi has three audio output modes: HDMI 1 and 2, and a headphone jack which uses PWM. The Pi needs to be configured to reroute the audio output to GPIO PWM pins.
- Select headphone jack as the output option
- Open the terminal and type in command
sudo raspi-config - Select System Options > Audio, then select Headphones. Please note that the order and arrangment might be different for different models.
- Open the terminal and type in command
- Use Device Tree Overlay to assign audio outputs
- Open and edit config.txt file
cd /bootsudo nano config.txt
- under the
# Enable audiosection, add the following codedtparam=audio=on audio_pwm_mode=2 dtoverlay=audremap,pins_12_13 - Write to the file and quit
- Reboot Pi for the changes to take effect
- Open and edit config.txt file
Now that the audio GPIO output is set up. The GPIO pins' current functions can be checked via gpio readall and all possible functions can be looked up on the datasheet. With the audio amp and speaker wired up, now all system sounds can be played through the speaker.
There are several ways to adjust the output volumn through the speaker if it is too soft/loud.
- Adjust the system sound output level from the GUI or
alsamixerin the terminal. - Add resistors to the audio amp to adjust the gain.
- In this project, the audio output is not loud enough so gain resistors are added to the amplifier. There are two identical resistors, indicated in the white rectangles on the amplifier board, that set the gain of the board. Two additional resistors can be added in parallel to reduce the resistor value. 100 kΩ resistors are added (shown below) to boost the gain from 2 to 3. For more detailed information and restrictions, please consult the datasheet and this guide.
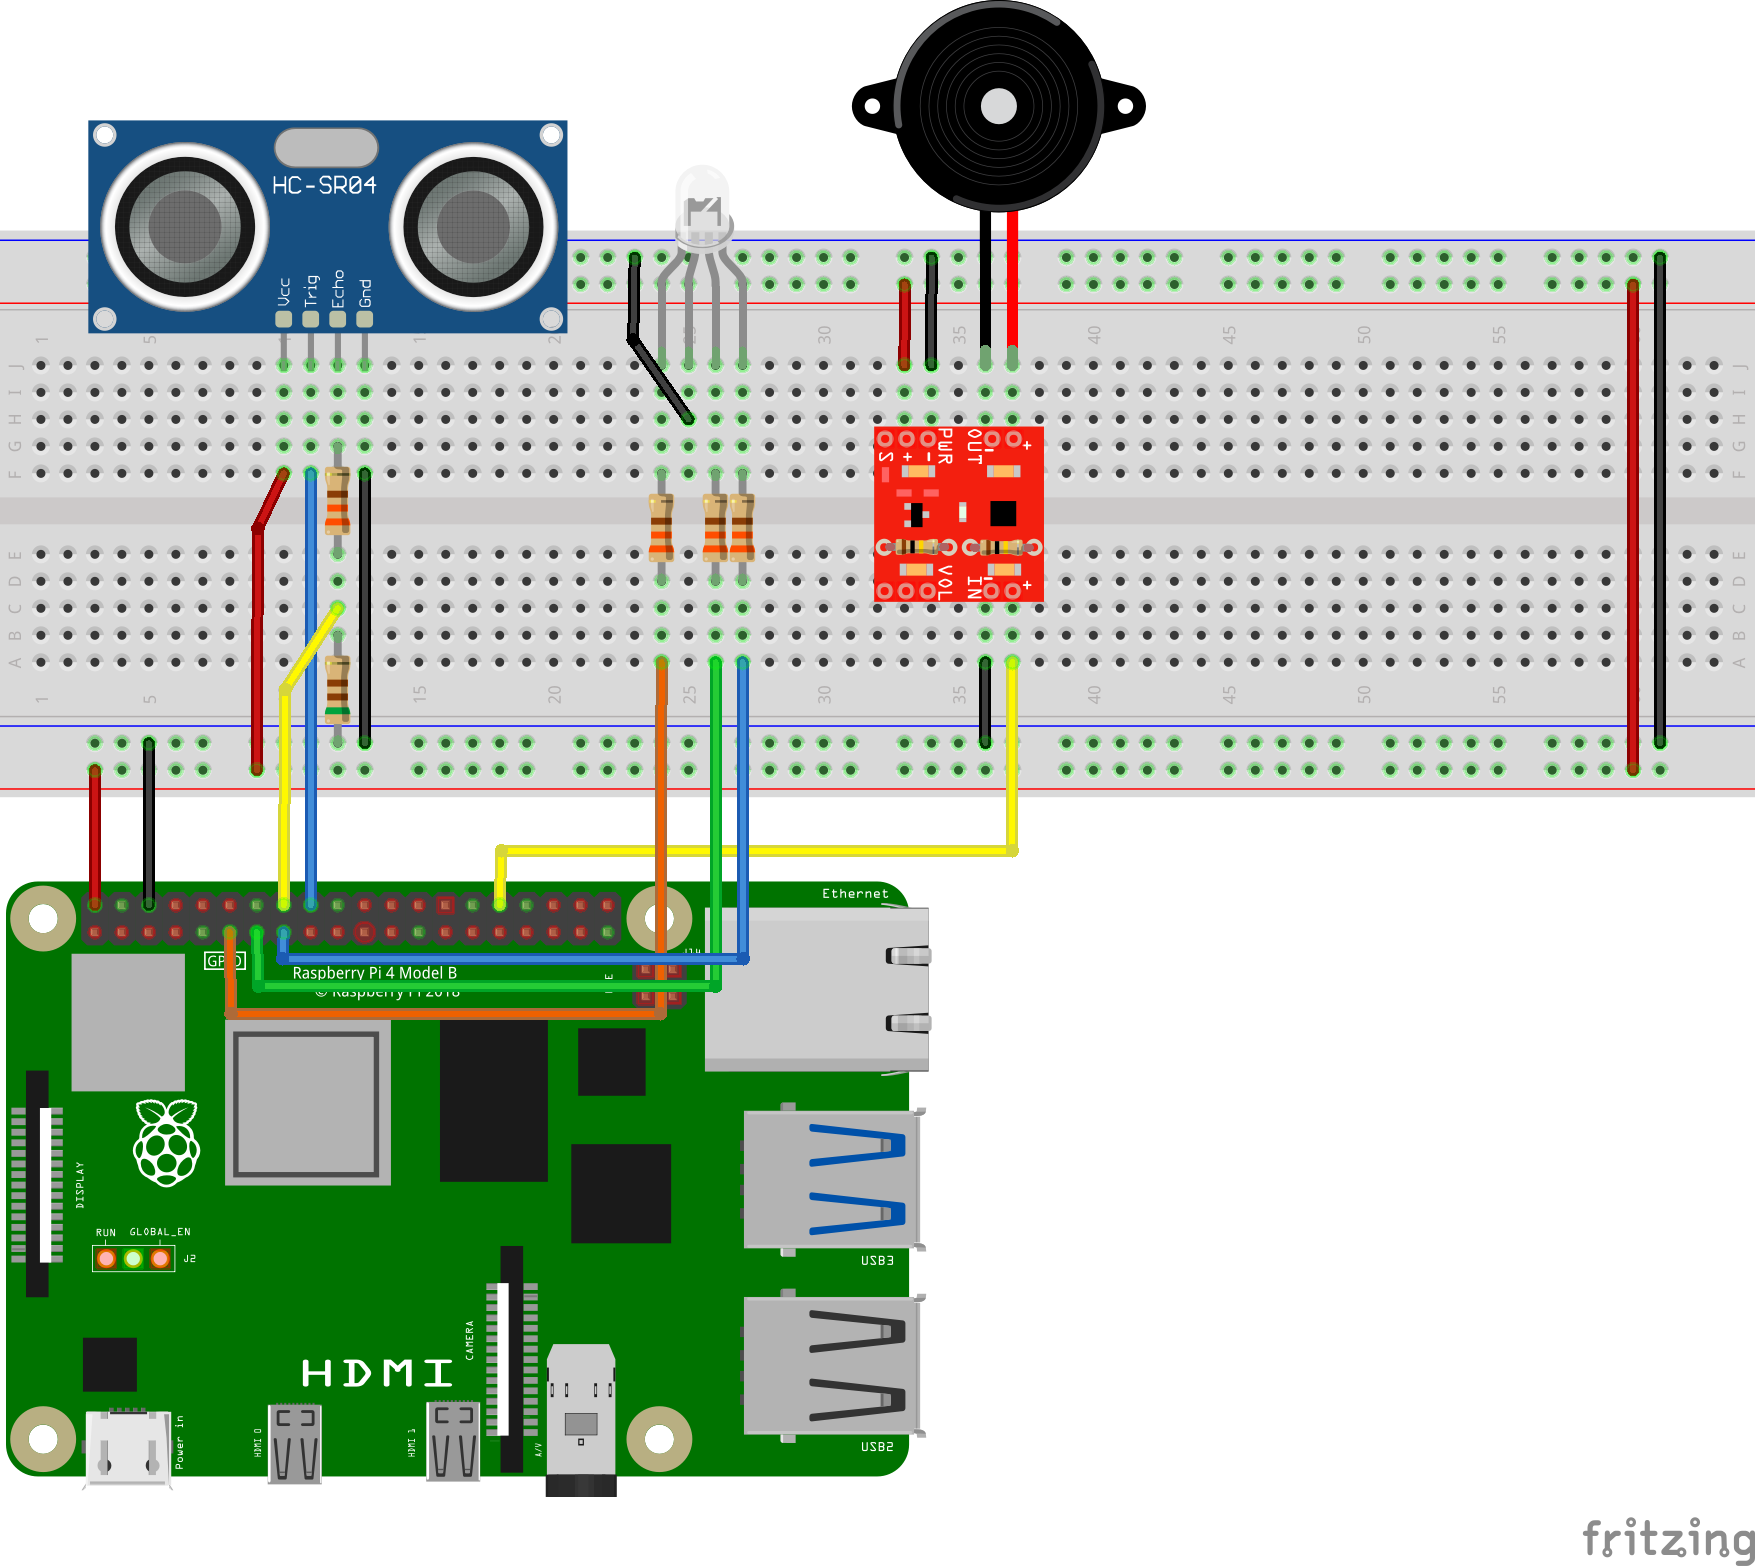
| RGB LED | |
|---|---|
| R | GPIO 17 |
| Gnd (longest) | Gnd |
| G | GPIO 27 |
| B | GPIO 22 |
Please note that dropping resistors need to be connected in series to limit the voltage drop across the LEDs.
The RGBLED class in GPIO Zero library is used to set up the weather LED patterns. Functions blink and pulse make the device turn on and off or fade in and out repeatedly.
classgpiozero.RGBLED(red, green, blue)
blink(on_time=1, off_time=1, fade_in_time=0, fade_out_time=0, on_color=(1, 1, 1), off_color=(0, 0, 0), n=None, background=True)
pulse(fade_in_time=1, fade_out_time=1, on_color=(1, 1, 1), off_color=(0, 0, 0), n=None, background=True)
The parameter background is set to True (the default) to start a background thread to continue blinking/pulsing and return immediately so that the program will not halt. 9 LED lighting patterns are designed and assigned to distinct weathers, and the demo program shows all the effects at once.
The application is written in Python.
AWS is used to send an email notification to the user is a certain threshold has been met. It uses the AWSIotMQTT Client to send messages to an AWS account that is configured to send those messages to a given endpoint (which in this case is an email address)
The application retrieves real-time weather information from OpenWeather which provides a free weather API for the public. Create an account and subscribe the Current Weather Data API.
Obtained API key is stored in config.ini file.
GUI display is developed with Python tkinter package.
- When a user is not nearby, the sonar is inactive and the
out_of_rangeevent is set. The screen will only show current time and date.
-
When a user is nearby, the sonar is active and the
in_rangeevent is set. The screen will display weather. -
Users can search weather information by entering city name and select a threshold temperature below which user will receive an email alert. Users will have to input both city name and threshold temperature, or there will be an error message. Users will also receive an error message if the city name is invalid. After entering information in the input box, user can search by clicking the green search button.
-
Information displayed on the GUI includes: City name and Country, weather, weather icon, temperature in both Celcius and Fahrenheit.
-
The weather information is updated every minute in the background by using tkinter
after()callback function. When theupdate_GUI()function is called, new weather information is fetched from OpenWeather, and is compared to the trigger value. The LED and GUI display is updated along with weather information, and the previous callback handle will be canceled to prevent accidental accumulations of the callback function.
A TTS engine is needed to announce the weather through the speaker. eSpeak provides offline text-to-speech conversions with easy access. Developed code is included in notification.py.
tkinter: pip3 install tk
configparser: pip3 install configparser
PIL: pip3 install pillow
time: pip3 install times
requests: pip3 install requests
datetime: pip3 install DateTime
num2words: pip3 install num2words
gpiozero: GPIO Zero is installed by default in the Raspberry Pi OS desktop image. If in case reinstallation is needed, run the following commands.
sudo apt update
sudo apt install python3-gpiozero
eSpeak:
sudo apt-get update
sudo apt-get install espeak
- Navigate to AWS and create an account
- Create an IoT Thing and its relevant certificate files. Download these files to the Raspberry Pi
- Create an IoT Rule that sends messages recieved from the Raspberry Pi as an SNS push notification
- Create the SNS Topic and Subscription that will send these SNS pushes to a given email address
- The server side of AWS should now be configured correctly. On the client side (which consists of your Rapsberry Pi), follow these instructions to download the necessary packages that are required to connect the Pi to the AWS account you created in step 1
- Configure the AWS connection with the medthod used in the file awsconnect.py
- the "payload1" variable defines the topic the Pi will publish to. This topic will also be the same one selected in step 3 to send as an SNS push
- "certPath" defines the folder in which you placed the certificate files in step 2. These files will be used to connect to the AWS server
- Provide more options for trigger settings (e.g. specific weather conditions, high temperature threshold, etc.)
- Include a secondary display device
- Select alternative audio output devices


