SmartHome System
This project was part of the Analysis and Design of Information Systems course at NTUA.


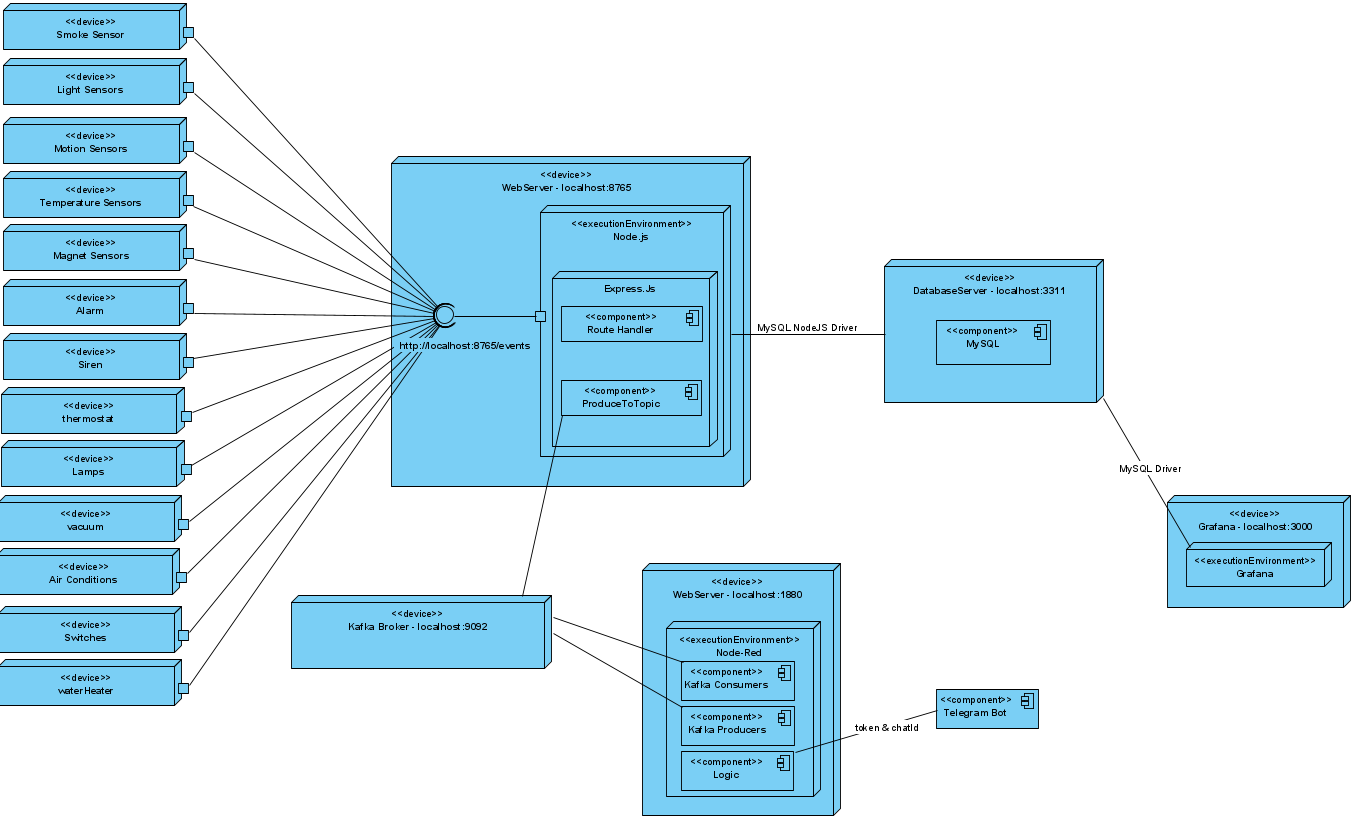
Technology Stack
- Apache Kafka as message broker
- Node-Red to handle the logic of our smart home
- NodeJS and ExpressJS to create a server and specifically a route to handle all incoming requests from the smart home's devices
- MySQL as the database
- Grafana as a simple user dashboard where the user (smart home owner) can see many details and monitor the IOT devices
- Telegram where we created a bot that will notify us (more info in upcoming sections)
- Python3 to create dummy data that represent the data from the smart home sensors and to create a simulation script which makes many api calls to the express server
Tools
- Docker to create a container for the database (here we could even create container for everything, but this would require a connection bridge)
- NVM as the Node Version Manager (so as we can have different versions of node in our pc)
- FlyWay as a database version control. Used for matters of ease when developing the system
- GitHub in order to keep track the versions of our code and for better collaboration
Kafka
We used Apache Kafka as a middleware for the communication between the smart-home events and node-red. Kafka uses topics to store incoming events. In order to achieve that, we created three topics. Our house consists of six major device categories. The name of each device is the concatenation of the device type and the room that it is located in. The smart-home events are stored in the smart-home topic with device type as key and some other device properties as value. By default Kafka stores events in topics using a Round-Robin partitioner. However, we decided to do it manually by producing each device event to specific partition according to its device category. We did this because the node-red-contrib-kafka library, which is used to connect Apache Kafka and Node-red, enabled us to consume messages from a certain partition of a topic. Of course, if this was a real large scale project, we would let Kafka handle the partitioning automatically. We also have two additional topics, general-events and lamps. In the first one, we produce messages that are triggered by node-red logic and more specifically events created by output devices(e.g siren). In the second one, each time the user turns on/off a lamp, a message is produced to the certain topic containing the action as value and room as key.
Installation
The following installation instructions are intended for Linux Distros. If you want to Install it in any other OS, you should know that not everything that follows will work.
Clone Project
git clonethe project- Open the folder that you git cloned and navigate to
kafka-apifolder - Open a terminal and execute
npm install
NodeJS
- Download NVM
curl https://raw.githubusercontent.com/creationix/nvm/master/install.sh | bash
- Install NodeJS
nvm install 16
Apache Kafka
- Download Apache Kafka
https://dlcdn.apache.org/kafka/3.0.0/kafka_2.13-3.0.0.tgz
-
Unzip it to the desired folder i.e Home (
cd ~/Kafka) -
Navigate to
cd ~/Kafkaand create 2 folders,dataandlogs -
Open
vim ~/Kafka/kafka_2.13-3.0.0/config/zookeeper.properties, and changedataDirto the directory wheredatafolder is. In our casedataDir=~/Kafka/data -
Open
vim ~/Kafka/kafka_2.13-3.0.0/config/server.properties, and changelog.dirsto the directory wherelogsfolder is. In our caselog.dirs=~/Kafka/logs -
Create aliases to use kafka easier. Navigate to
cd ~andvim .bashrc. Find the#some more aliasescomment and below add
#kafka-aliases
#start zookeeper
alias zookeeper="bin/zookeeper-server-start.sh config/zookeeper.properties"
#start kafka
alias kafka="bin/kafka-server-start.sh config/server.properties"
#topics commands
alias list-topics="bin/kafka-topics.sh --bootstrap-server localhost:9092 --list"
alias describe-topic="bin/kafka-topics.sh --bootstrap-server localhost:9092 --describe --topic"
alias consume-topic="bin/kafka-console-consumer.sh --bootstrap-server localhost:9092 --topic"
alias create-topic="bin/kafka-topics.sh --bootstrap-server localhost:9092 --create --topic"
alias delete-topic="bin/kafka-topics.sh --bootstrap-server localhost:9092 --delete --topic"

#grafana
alias grafana="sudo systemctl start grafana-server"
- Open a terminal and navigate to
cd ~/Kafka/kafka_2.13-3.0.0. Execute the commandzookeeper - Open a new terminal and navigate again to
cd ~/Kafka/kafka_2.13-3.0.0. Execute the commandkafkaas soon aszookeeperis finished - Open a new terminal and navigate again to
cd ~/Kafka/kafka_2.13-3.0.0. Execute the commandcreate-topic [name] --partitions [number] --replication-factor 1. In our case thenameissmart-homeandnumberis6
Docker
- Install docker with
sudo snap install docker
MySQL - Dbeaver - Flyway
- Open a new terminal and execute the command
docker run -p 3311:3306 --name smart-home-db -e MYSQL_ROOT_PASSWORD=root -d mysql:5.7
- Use a database management tool. In our case we used dbeaver which you can install by executing
sudo snap install dbeaver-ce
- Create a new database using the database management tool. The name of the database for this project is
smart_home - Install flyway
wget -qO- https://repo1.maven.org/maven2/org/flywaydb/flyway-commandline/8.4.1/flyway-commandline-8.4.1-linux-x64.tar.gz | tar xvz && sudo ln -s pwd/flyway-8.4.1/flyway /usr/local/bin
- Create the tables needed with Flyway (where
user=root,password=root,port=3311,database_name=smart_home)
flyway -user=[user] -password=[password] -url=jdbc:mysql://localhost:[port]/[database_name]
- Open the project folder, where you can see the
sqlfolder. Open a terminal and execute
flyway -user=root -password=root -url=jdbc:mysql://localhost:3311/smart_home migrate
Here you can use clean to clear the database and migrate to create it again.
Node-Red
- Install Node-Red. Open a new terminal and execute the command
sudo snap install node-red
- In the previous terminal execute the command which will start node-red
node-red.desktop-launch
- Open a browser and navigate to
http://localhost:1880/. Here you should see node-red running - From the top right corner press the hamburger menu and choose
import. Chooseselect a file to importand locatenode-red-flow.jsonwhich is in the folder which you git cloned
Node-Red Dependencies
- For the Bot
node-red-contrib-chatbot
- For Kafka
node-red-contrib-kafka-manager
- For MySQL
node-red-node-mysql
- For Node-Red Dashboard
node-red-dashboard
Grafana
- Install Grafana
wget https://dl.grafana.com/enterprise/release/grafana-enterprise_8.3.3_amd64.deb
sudo dpkg -i grafana-enterprise_8.3.3_amd64.deb
- If you followed the instructions, when we were setting up Kafka we set up some aliases. One of those aliases is for grafana. So now in order to start grafana you can simply open a terminal and execute
grafana - Open a browser and head over to
http://localhost:3000/. You should see the login screen of grafana - Enter the default
userandpasswordwhich are both the wordadmin - Import the
jsonfile that is the dashboard. This file is located in the project folder and it is calledgrafana-dashboard.json. To import it, there is a plus icon on your left. Follow the instructions and the dashboard will be imported - If everything went well you will see the dashboard in the
General Tab(if you ofcourse imported the dashboard in that tab and not in a new one that you created)
Telegram
- Download Telegram
snap install telegram-desktop
- We followed this tutorial to create our bot
- After that we created a group conversation (which includes all the family members that will get notified)
- We used the bot's
tokenwhich you'll find by following the tutorial we mentioned in step 2 or here
Python3
We only use python3 for the creation of the simulation data and the simulation script. These scripts are located in the project folder and specifically in data folder.
You should have Python3 preinstalled if you work on Ubuntu, in case you don't you should check it out.
Devices
Because this project will eventually be a simulation of a smart home system, we had to think of some devices that exist in a smart home system. After the placement in the house, we came up with different scenarios that trigger some specific flows in NodeRed.
The simulation consists of:
| Room ID | Room |
|---|---|
| 0 | Bedroom |
| 1 | Living Room |
| 2 | Kitchen |
| 3 | Bathroom |
| 4 | Balcony |
Each device that appears in the following table consists of its name plus a number. The number is in which room this device belongs. If no number exists, there's only one device of that kind in the house.
| Device | Name | Value | Value Range |
|---|---|---|---|
| Smoke sensor | sensorSmoke | bool state |
binary |
| Light sensor | sensorLight0 | int lm |
range 0...1000 (sunshine: >500, evening: 0 ~ 100, lighting: 100...500) |
| Light sensor | sensorLight1 | int lm |
" |
| Light sensor | sensorLight4 | int lm |
" |
| Motion sensor | sensorMotion1 | bool state |
binary |
| Motion sensor | sensorMotion4 | bool state |
binary |
| Temperature sensor | sensorTemp0 | int temp, int tempDif |
temp: range 10...35, tempDif example: +/- 4 |
| Temperature sensor | sensorTemp1 | int temp, int tempDif |
" |
| Window/Door magnet | sensorMagnet0 | bool state |
binary |
| Window/Door magnet | sensorMagnet1 | bool state |
" |
| Window/Door magnet | sensorMagnet2 | bool state |
" |
| Window/Door magnet | sensorMagnet3 | bool state |
" |
| Alarm | alarm | bool state |
binary |
| Siren | siren | bool state |
binary |
| Thermostat | thermostat | bool state, int temp |
state: binary, temp: range 10...35 |
| Lamp | lamp0 | bool state |
binary |
| Lamp | lamp1 | bool state |
" |
| Lamp | lamp2 | bool state |
" |
| Lamp | lamp3 | bool state |
" |
| Lamp | lamp4 | bool state |
" |
| Vacuum | vacuum | bool state |
binary |
| Air-Conditioner | ac0 | bool state, int temp |
state: binary, temp: range 18...30 |
| Air-Conditioner | ac1 | bool state, int temp |
" |
| Water Heater | waterHeater | bool state |
binary |
| Switch - Phone charger | switch0 | bool state |
binary |
| Switch - Coffee machine | switch1 | bool state |
" |
Scenario
Because this is a simulation, we had to create a scenario based on the life of an imaginary person, John.
John works on weekdays. More specifically:
- He wakes up at 07:30
- Eats breakfast at 08:00
- Works from 09:00 to 17:00
- He arms the alarm before leaving the house and disarms the alarm when he returns
- Takes a shower at 17:30
- Eats dinner at 20:00
- Sleeps at 24:00
On the weekends he has a more relaxed schedule:
- He wakes up at 09:00
- He sleeps at 02:00
John, on a daily basis has some demands for this smart home system. More specifically:
- He wants the Water heater to start boiling water at 17:00
- He wants the vacuum to clean every Monday - Wednesday - Friday from 10:00 to 12:00
- He wants his phone to get charged from 03:30 to 06:30
- He wants to have his coffee ready by 07:45
- He wants the living room lights to be turned on when its getting dark and he enters the appartment
- He wants the balcony lights to be turned on when its getting dark and motion is detected on the balcony
- He wants the lights in the bedroom, bathroom and kitchen to be switched off when he arms the alarm
- He wants the thermostat to be set on when the temperature drops below 22 degrees
- He wants the a/c in the bedroom to be turned on when the temperature rises above 29 degrees
- He wants the a/c in the living room to be turned on when the temperature rises above 29 degrees
- He wants door/window openings to be logged to the database
Also in case of an emegerncy, he wants to be notified from a bot. Such emergencies are:
- Fire
- Burglary
- Possible malfunction of any temperature sensor in the smart system
Based on the above a script was created, that simulates John's life for a period of a week. Unexpected events throughout the week:
- On Tuesday at 13:00 burglars broke into John's house using the door in the living room
- On Friday at 20:00 there was a fire in John's kitchen
- On Sunday at 16:00 a temperature sensor malfunctioned
Diagrams