This is a WIP port of Shivam Shriao's Diffusers Repo, which is a modified version of the default Huggingface Diffusers Repo optimized for better performance on lower-VRAM GPUs.
It also adds several other features, including training multiple concepts simultaneously, and (Coming soon) Inpainting training.
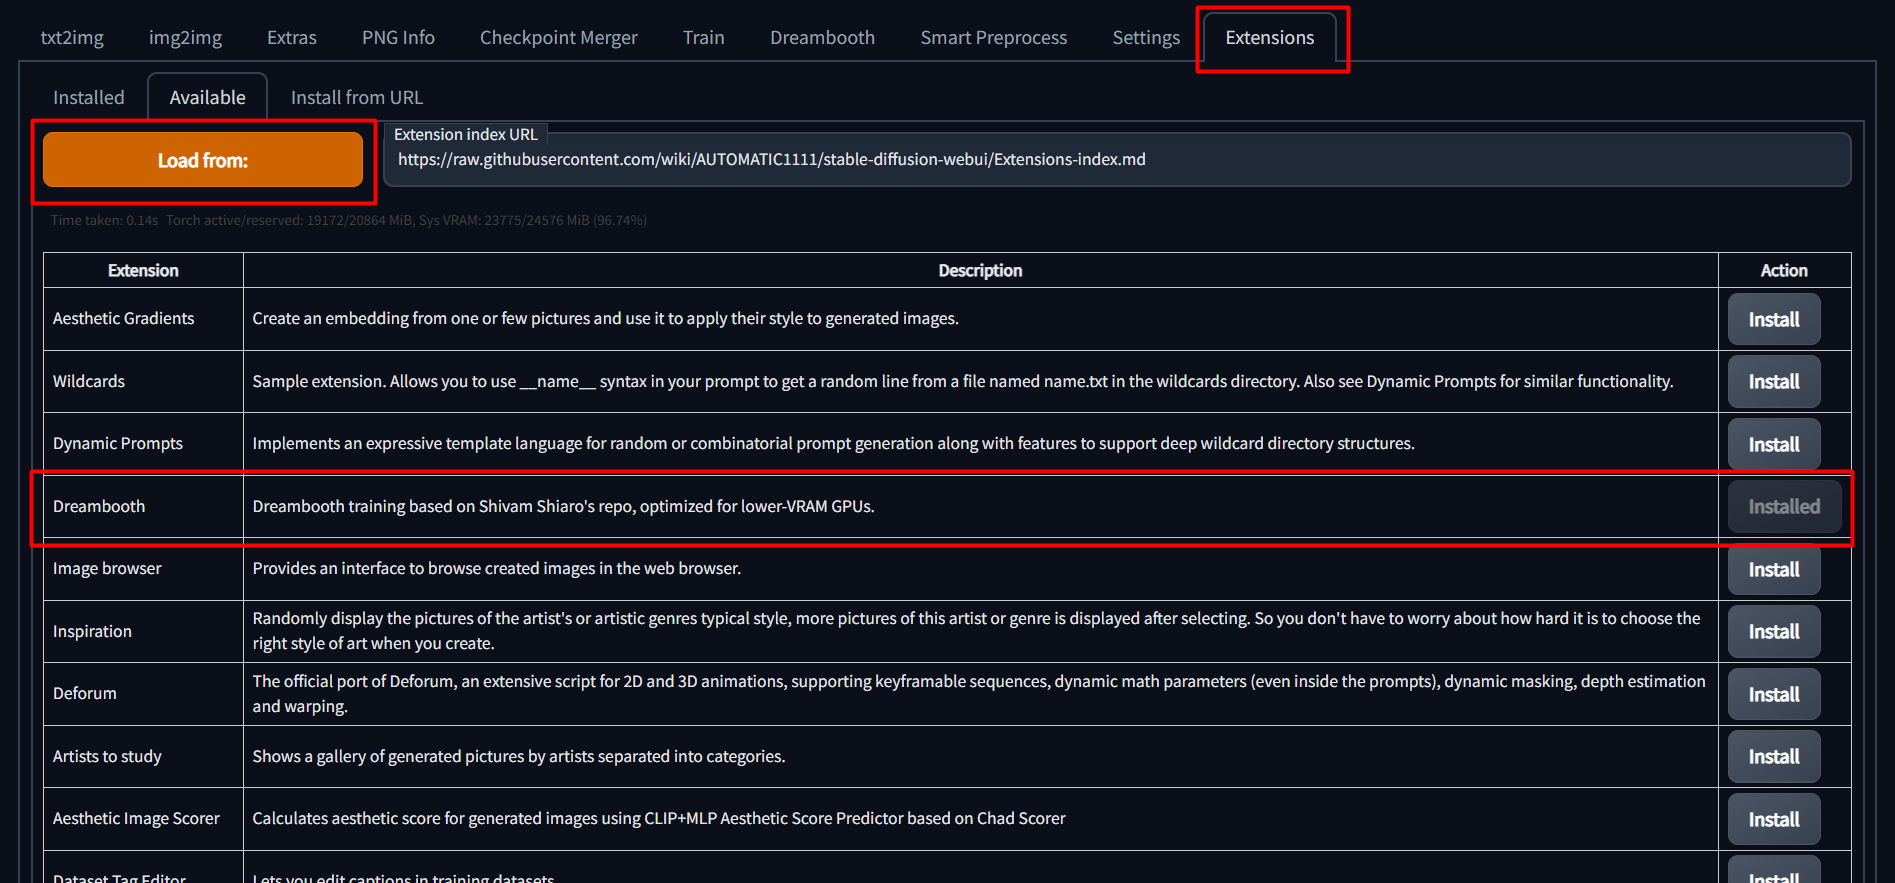
To install, simply go to the "Extensions" tab in the SD Web UI, select the "Available" sub-tab, pick "Load from:" to load the list of extensions, and finally, click "install" next to the Dreambooth entry.
For 8bit adam to run properly, it may be necessary to install the CU116 version of torch and torchvision, which can be accomplished below:
Refer to the appropriate script below for extra flags to install requirements:
https://github.com/d8ahazard/sd_dreambooth_extension/blob/main/webui-user-dreambooth.bat https://github.com/d8ahazard/sd_dreambooth_extension/blob/main/webui-user-dreambooth.sh
Setting the torch command to:
TORCH_COMMAND=pip install torch==1.12.1+cu116 torchvision==0.13.1+cu116 --extra-index-url https://download.pytorch.org/whl/cu116
will ensure that the proper torch version is installed when webui-user is executed, and then left alone after that, versus trying to install conflicting versions.
We also need a newer version of diffusers, as SD-WebUI uses version 0.3.0, while DB training requires > 0.6.0, so we use 0.7.2. Not having the right diffusers version is the cause of the 'UNet2DConditionModel' object has no attribute 'enable_gradient_checkpointing' error message, as well as safety checker warnings.
To force sd-web-ui to only install one set of requirements, we can specify the command line argument:
set/export REQS_FILE=.\extensions\sd_dreambooth_extension\requirements.txt
And last, if you wish to completely skip the "native" install routine of Dreambooth, you can set the following environment flag: DREAMBOOTH_SKIP_INSTALL=True
This is ideal for "offline mode", where you don't want the script to constantly check things from pypi.
After installing via the WebUI, it is recommended to set the above flags and re-launch the entire Stable-diffusion-webui, not just reload it.
- Go to the Dreambooth tab.
- Under the "Create Model" sub-tab, enter a new model name and select the source checkpoint to train from. The source checkpoint will be extracted to models\dreambooth\MODELNAME\working - the original will not be touched. 2b. Optionally, you can also specify a huggingface model directory and token to create the Dreambooth dataset from huggingface.co. Model path format should be like so: 'runwayml/stable-diffusion-v1-5'
- Click "Create". This will take a minute or two, but when done, the UI should indicate that a new model directory has been set up.
For any instance prompt, class prompt, or sample prompt, you may optionally use the '[filewords]' flag to replace '[filewords]' in your prompt string with a prompt from an instance image (or accompanying .txt file.
To properly edit filewords prompts for the various image types, there are additional fields = "Existing Prompt Contents", "Instance Token to swap", and "Class token(s) to swap".
The instance token is the unique word used to identify the subject. The class token is one or more words or phrases used to identify the class of the subject "man","a man", etc.
By setting the value of "Existing Prompt Contents" to indicate whether our filewords prompts contain the instance token, class token, both, or none. We can then use this information to properly swap out or append words when generating preview or class images, without having to edit any existing caption structure.
- After creating a new model, select the new model name from the "Model" dropdown at the very top.
- Select the "Train Model" sub-tab.
- Fill in the paramters as described below:
Training steps - How many total training steps to complete. According to this guide, you should train for appx 100 steps per sample image. So, if you have 40 instance/sample images, you would train for 4k steps. This is, of course, a rough approximation, and other values will have an effect on final output fidelity.
Use Concepts - Whether to use a JSON file or string with multiple concepts, or the individual settings below.
Concepts List - The path to a JSON file or a JSON string containing multiple concepts. See here for an example.
Instance Prompt - A short descriptor of your subject using a UNIQUE keyword and a classifier word. If training a dog, your instance prompt could be "photo of zkz dog".
The key here is that "zkz" is not a word that might overlap with something in the real world "fluff", and "dog" is a generic word to describe your subject. This is only necessary if using prior preservation.
You can use [filewords] in the instance prompt.
Dataset Directory - The path to the directory where the images described in Instance Prompt are kept. REQUIRED
Class Prompt - A keyword indicating what type of "thing" your subject is. If your instance prompt is "photo of zkz dog", your class prompt would be "photo of a dog". Leave this blank to disable prior preservation training. You can use '[filewords]' in the class prompt.
Classification dataset directory - The path to the directory where the images described in Class Prompt are kept. If a class prompt is specified and this is left blank, images will be generated to /models/dreambooth/MODELNAME/classifiers/
Existing prompt contents - Whether existing file captions contain the class, subject, both, or none.
Instance token to swap - The unique word for your subject. 'sks', 'xyz', etc. NOT 'a photo of sks' or 'sks person', JUST 'sks'. Used with [filewords] to build prompts to generate sample and class images if [filewords] specified in their respective prompts.
Class token to swap - Similar to 'Instance token to swap', with the distinction of being able to accept either a single token, or a comma-separated list of tokens.
For example, if an image caption is 'a photo of a woman' or 'a photo of a man and a woman', you can use 'a woman, woman' here, and both captions will be updated to 'a photo of sks woman' and 'a photo of a man and sks woman' for training and sample generation, but left as-is when generating classification images.
Total number of classification/reg images to use - Leave at 0 to disable prior preservation. Set to anyting greater than 0 to reveal the relevant class image settings.
Classification Image Negative Prompt - A negative prompt to use when generating class images. This is "universal", and applies to all concepts.
Classification CFG Scale - The CFG scale to use when generating class images.
Classification Steps - How many steps to use when generating class images. Scheduler is Euler A.
Learning rate - You probably don't want to touch this.
Resolution - The resolution to train images at. You probably want to keep this number at 512 or lower unless your GPU is insane. Lowering this (and the resolution of training images) may help with lower-VRAM GPUs.
Save a checkpoint every N steps - How frequently to save a checkpoint from the trained data. I should probably change the default of this to 1000.
Generate a preview image every N steps - How frequently will an image be generated as an example of training progress.
Preview image prompt - The prompt to use to generate preview image. Leave blank to use the instance prompt.
Preview image negative prompt - Like above, but negative. Leave blank to do nothing. :P
Number of samples to generate - Self explainatory?
Sample guidance scale - Like CFG Scale in Txt2Image/Img2Img, used for generating preview.
Sample steps - Same as sample guidance scale, but the number of steps to run to generate preview.
Batch size - How many training steps to process simultaneously. You probably want to leave this at 1.
Class batch size - How many classification images to generate simultaneously. Set this to whatever you can safely process at once using Txt2Image, or just leave it alone.
Use CPU Only - As indicated, this is more of a last resort if you can't get it to train with any other settings. Also, as indicated, it will be abysmally slow. Also, you cannot use 8Bit-Adam with CPU Training, or you'll have a bad time.
Don't Cache Latents - Why is this not just called "cache" latents? Because that's what the original script uses, and I'm trying to maintain the ability to update this as easily as possible. Anyway...when this box is checked latents will not be cached. When latents are not cached, you will save a bit of VRAM, but train slightly slower.
Train Text Encoder - Not required, but recommended. Enabling this will probably cost a bit more VRAM, but also purportedly increase output image fidelity.
Use 8Bit Adam - Enable this to save VRAM. Should now work on both windows and Linux without needing WSL.
Center Crop - Crop images if they aren't the right dimensions? I don't use this, and I recommend you just crop your images "right".
Gradient Checkpointing - Enable this to save VRAM at the cost of a bit of speed.
Scale Learning Rate - I don't use this, not sure what impact it has on performance or output quality.
Mixed Precision - Set to 'fp16' to save VRAM at the cost of speed.
Everything after 'Mixed Precision' - Adjust at your own risk. Performance/quality benefits from changing these remain to be tested.
The next two were added after I wrote the above bit, so just ignore me being a big liar.
Pad Tokens - Pads the text tokens to a longer length for some reason.
Max Token Length - raise the tokenizer's default limit above 75. Requires Pad Tokens for > 75.
Apply Horizontal Flip - "Apply horizontal flip augmentation". Flips images horizontally at random, which can potentially offer better editability?
Use EMA for finetuning - Use exponential moving average weight to reduce overfitting during the last iterations.
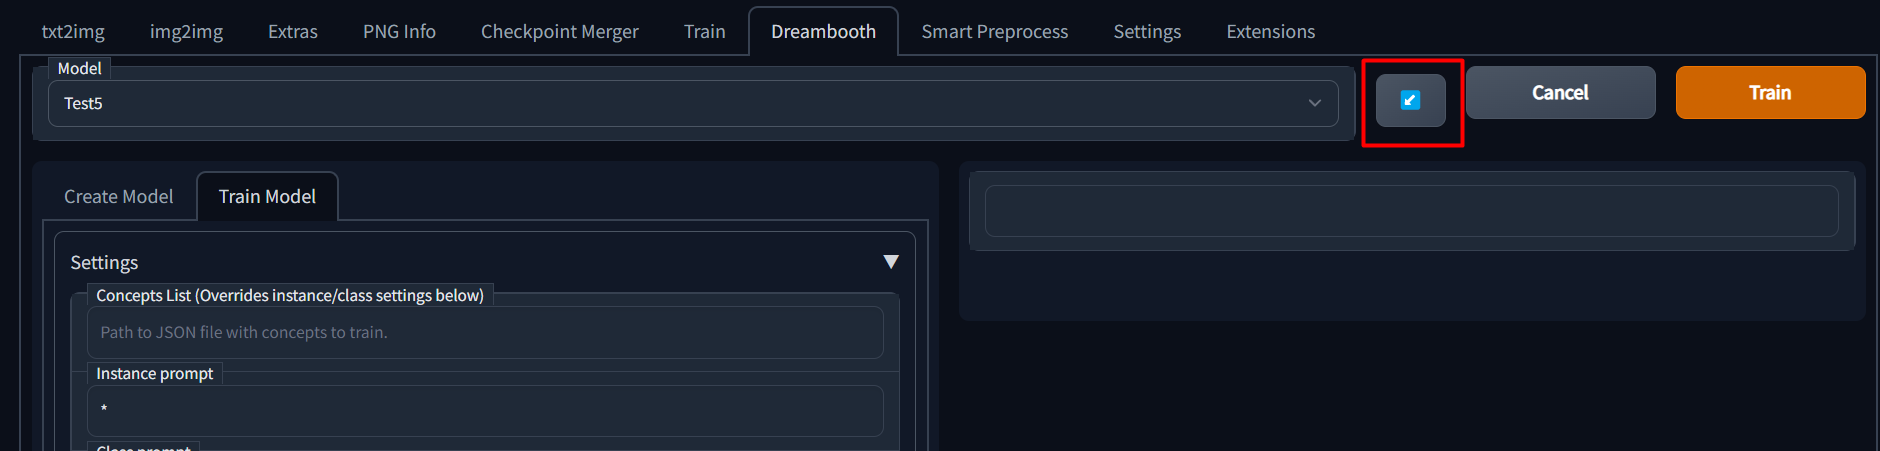
Once a model has been trained for any number of steps, a config file is saved which contains all of the parameters from the UI.
If you wish to continue training a model, you can simply select the model name from the dropdown and then click the blue button next to the model name dropdown to load previous parameters.
As this is based on ShivamShiaro's repo, it should be able to run under the same GPU constraints, but is not guaranteed.
Please check out the discussions page to find some possible tips and tricks to help you get this running on your setup - or share what you've done to get it working.
Please be sure to use an issue template when asking for help. Some of the questions may be tedious, but I promise, they'll help me help you faster.