If you want to experiment with the code examples from the book Atomic Kotlin, you're in the right place.
These examples are automatically extracted directly from the book. This repository includes tests to verify that the code in the book is correct.
NOTE If you are planning to solve the exercises after reading each atom (and you should), you can get the exercises AND all these examples together by installing the educational course. If you're going to solve the exercises, you can just install the course and you don't need to install the examples from this repository.
- Introduction
- Compiling and Running Programs in IntelliJ IDEA
- Building From the Command Line: Quick Version
- Building From the Command Line: Detailed Instructions
- Appendix A: Command-Line Basics
- Appendix B: Command-Line Hello World
- Appendix C: The Kotlin REPL
- Appendix D: Testing
The easiest way to access and experiment with the book examples is to clone/download this repository and open it with IntelliJ IDEA. This is all that most people need, and those people can ignore the rest of this README.
The remainder of this README shows you how to build and test the examples using both IntelliJ IDEA and the command line.
Exercises and solutions for the book can be found at AtomicKotlin.com/exercises.
Note: If any terminology or processes described here are still not clear to you, you can usually find explanations or answers through Google. For more specific issues or problems, try StackOverflow. Sometimes you can find installation instructions on YouTube.
The easiest and fastest way to start using the examples in this book is by compiling and running them using IntelliJ IDEA:
-
Follow the instructions here to install IntelliJ IDEA.
-
Download the zipped code repository and unzip it.
-
Start IntelliJ IDEA and select the
File | Openmenu item. Navigate to where you unzipped the repository and open thebuild.gradlefile. You should see a dialog box like this: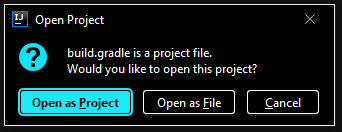
Select the
Open as Projectbutton. -
If you don't see a
Projectwindow on the left side, go to the menu and selectView | Tool Windows | Projectto turn it on. -
You'll see an
Examplesfolder. Click on it to open it, then navigate to theHelloWorldfolder and open that, then double-click onHelloWorld.kt. You'll see something like this: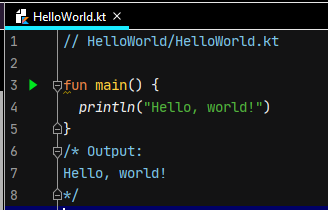
Click on the green triangle in the gutter area to the left of
fun main() {. It should look like this: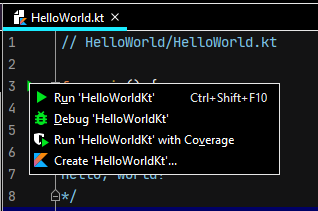
Select the top one, the
Runoption, and IntelliJ IDEA will run your program and display the resulting output.NOTE: The first program you run will take awhile, because IntelliJ IDEA is building the entire project. Subsequent programs will start much more quickly.
-
If you don't already have a JDK (Java Development Kit) on your machine, you will see error messages. A JDK is necessary to compile both Java and Kotlin. You can install one from within IntelliJ. Once the JDK is installed, IDEA will also be able to compile Kotlin.


Before you can run the examples from this repository, you must install the current version of Java, although some earlier versions should also work. (If you get any errors, try upgrading to a more recent version of Java).
If you just want to download and check the code, Download
Here
and unzip it into your destination directory. Open
a shell/command window and move into the
root of that directory. You'll know you are in the right directory if you see
the files gradlew and gradlew.bat.
You'll need an Internet connection the first time you compile the code, because Gradle needs to first install itself, then all the support libraries. Once these are installed you can perform additional compiling and running offline.
On Mac/Linux, enter:
./gradlew test
(If you get a Permission denied error, run chmod +x ./gradlew)
On Windows, enter
gradlew test
If all goes well, the tests will run. Everything should complete without errors.
All the book examples are in the subdirectory Examples in subdirectories
corresponding to the atom names.
To compile and run examples using the Kotlin command-line tools, see Command-Line Hello World.
If you are not familiar with the command line, first read Command-Line Basics.
Kotlin runs on top of Java, so you must first install the Java Development Kit (JDK).
-
Follow the instructions to install Chocolatey.
-
At a shell prompt, type:
choco install jdk8(you may also select a more recent version, likejdk11). The installation process takes some time, but when it's finished Java is installed and the necessary environment variables are set.
The Mac comes with a much older version of Java that won't work for the examples in this book, so you'll need to update it to (at least) Java 8.
-
Follow the instructions at this link to Install HomeBrew
-
At a shell prompt, first type
brew update. When that completes, enterbrew cask install java.
NOTE: Sometimes the default version of Java that you get with the above installation will be too recent and not validated by the Mac's security system. If this happens you'll either need to turn off the security by hand or install an earlier version of Java. For either choice, you'll need to Google for answers on how to solve the problem (often the easiest approach is to just search for the error message produced by the Mac).
Use the standard package installer with the following shell commands:
Ubuntu/Debian:
-
sudo apt-get update -
sudo apt-get install default-jdk
Fedora/Redhat:
su -c "yum install java-1.8.0-openjdk"
Open a new shell and type:
java -version
You should see something like the following (Version numbers and actual text will vary):
openjdk version "11" 2018-09-25
OpenJDK Runtime Environment 18.9 (build 11+28)
OpenJDK 64-Bit Server VM 18.9 (build 11+28, mixed mode)
If you see a message that the command is not found or not recognized, review the installation instructions. If you still can't get it to work, check StackOverflow.
Once you have Java installed, the process to install and run the book examples is the same for all platforms:
-
Download the book examples from the GitHub Repository.
-
Unzip the downloaded file into the directory of your choice.
-
Use the Windows Explorer, the Mac Finder, or Nautilus or equivalent on Linux to browse to the directory where you uzipped
AtomicKotlinExamples, and open a shell there. -
If you're in the right directory, you should see files named
gradlewandgradlew.batin that directory, along with numerous other files and directories. The directories correspond to the chapters in the book. -
At the shell prompt, type
gradlew test(Windows) or./gradlew test(Mac/Linux).
The first time you do this, Gradle will install itself and numerous other packages, so it will take some time. After everything is installed, subsequent builds and runs will be much faster.
Note that you must be connected to the Internet the first time you run gradlew
so that Gradle can download the necessary packages.
Because it is possible for a "dedicated beginner" to learn programming from this book, you may not have previously used your computer's command-line shell. If you have, you can go directly to the installation instructions.
To create and modify Kotlin program files—the code listings shown in this book—you need a program called an editor. You'll also need the editor to make changes to your system configuration files, which is sometimes required during installation.
Programming editors vary from heavyweight Integrated Development Environments (IDEs, like Eclipse, NetBeans and IntelliJ IDEA) to more basic text manipulation applications. If you already have an IDE and are comfortable with it, feel free to use that for this book.
Numerous explanations in this book are specific to IntelliJ IDEA so if you don't already have an IDE you might as well start with IDEA. There are many other editors; these are a subculture unto themselves and people sometimes get into heated arguments about their merits. If you find one you like better, it's not too hard to change. The important thing is to choose one and get comfortable with it.
If you haven't programmed before, you might be unfamiliar with your operating system shell (also called the command prompt in Windows). The shell harkens back to the early days of computing when everything happened by typing commands and the computer responded by displaying responses—everything was text-based.
Although it can seem primitive in the age of graphical user interfaces, a shell provides a surprising number of valuable features.
To learn more about your shell than we cover here, see Bash Shell for Mac/Linux or Windows Shell.
Mac: Click on the Spotlight (the magnifying-glass icon in the upper-right corner of the screen) and type "terminal." Click on the application that looks like a little TV screen (you might also be able to hit "Return"). This starts a shell in your home directory.
Windows: First, start the Windows Explorer to navigate through your directories:
-
Windows 7: click the "Start" button in the lower left corner of the screen. In the Start Menu search box area type "explorer" and then press the "Enter" key.
-
Windows 8: click Windows+Q, type "explorer" and then press the "Enter" key.
-
Windows 10: click Windows+E.
Once the Windows Explorer is running, move through the folders on your computer by double-clicking on them with the mouse. Navigate to the desired folder. Now click the file tab at the top left of the Explorer window and select "Open Windows Powershell." This opens a shell in the destination directory.
Linux: To open a shell in your home directory:
-
Debian: Press Alt+F2. In the dialog that pops up, type 'gnome-terminal'
-
Ubuntu: Either right-click on the desktop and select 'Open Terminal', or press Ctrl+Alt+T
-
Redhat: Right-click on the desktop and select 'Open Terminal'
-
Fedora: Press Alt+F2. In the dialog that pops up, type 'gnome-terminal'
Directories are one of the fundamental elements of a shell. Directories hold
files, as well as other directories. Think of a directory as a tree with
branches. If books is a directory on your system and it has two other
directories as branches, for example math and art, we say that you have a
directory books with two subdirectories math and art. We refer to them
as books/math and books/art since books is their parent directory.
Note that Windows uses backslashes rather than forward slashes to separate the
parts of a directory.
The shell operations shown here are approximately identical across operating systems. For the purposes of this book, here are the essential operations in a shell:
-
Change directory: Use
cdfollowed by the name of the directory where you want to move, orcd ..if you want to move up a directory. If you want to move to a different directory while remembering where you came from, usepushdfollowed by the different directory name. Then, to return to the previous directory, just saypopd. -
Directory listing:
ls(dirin Windows) displays all the files and subdirectory names in the current directory. Use the wildcard*(asterisk) to narrow your search. For example, if you want to list all the files ending in ".kt," you sayls *.kt(Windows:dir *.kt). If you want to list the files starting with "F" and ending in ".kt," you sayls F*.kt(Windows:dir F*.kt). -
Create a directory: use the
mkdir("make directory") command (Windows:md), followed by the name of the directory you want to create. For example,mkdir books(Windows:md books). -
Remove a file: Use
rm("remove") followed by the name of the file you wish to remove (Windows:del). For example,rm somefile.kt(Windows:del somefile.kt). -
Remove a directory: use the
rm -rcommand to remove the files in the directory and the directory itself (Windows:deltree). For example,rm -r books(Windows:deltree books). -
Repeat a command: The "up arrow" on all three operating systems moves through previous commands so you can edit and repeat them. On Mac/Linux,
!!repeats the last command and!nrepeats the nth command. -
Command history: Use
historyin Mac/Linux or press the F7 key in Windows. This gives you a list of all the commands you've entered. Mac/Linux provides numbers to refer to when you want to repeat a command.
A file name ending with .zip is an archive containing other files in a
compressed format. Both Linux and Mac have command-line unzip utilities, and
it's possible to install a command-line unzip for Windows via the Internet.
However, in all three systems the graphical file browser (Windows Explorer, the Mac Finder, or Nautilus or equivalent on Linux) will browse to the directory containing your zip file. Then right-mouse-click on the file and select "Open" on the Mac, "Extract Here" on Linux, or "Extract all ..." on Windows.
This appendix explains how to compile and run the program shown in the "Hello World" atom in the book, using the latest version (1.5 or higher) of the Kotlin command-line compiler.
Open up a console window in the HelloWorld directory, where you'll see
HelloWorld.kt, and type:
kotlinc HelloWorld.kt
kotlinc means "Kotlin compiler." The compiler is the program that takes
your program and turns it into something that will run; this process is
called compiling.
Assuming you've typed the code correctly, you should get back the console prompt, with no other messages. If you get error messages, try to discover where you've mis-typed the code, correct it and try again. Once you are successful, you're ready to run the program.
There's one more thing: When you run kotlinc, the resulting program doesn't
have the same name as the source program. Instead, the compiler appends a Kt
to the name. To see it, run ls or dir on the helloworld subdirectory.
You'll see that the directory contains HelloWorldKt.class. What's important
is the part before the .class. This is the actual name of the program:
HelloWorldKt.
Now we can run the program:
kotlin HelloWorldKt
And you'll see the output on the console:
Hello, world!
If the program is in a package, the package name is also required to run the
program. That is, if Foo.kt contains a package statement:
package bar
then you cannot simply say:
kotlin Foo
You'll get a message starting with error: could not find or load...
If you were to compile this program, you'd see there's a new subdirectory
called bar. The name of the subdirectory that appears when you run kotlinc
corresponds to the package name in the program that was compiled.
If the program is packaged under bar, we give the package name followed by a
"dot," then the program's name:
kotlin bar.FooKt
The Kotlin interpreter is also called the REPL (for Read-Evaluate-Print- Loop). To use this you must first install the latest version (1.5 or higher) of the Kotlin command-line compiler.
NOTE: You do not need to install command-line Kotlin for the operations described previously in this README.
In this book, we use Kotlin version 1.5, the latest available at the time. The detailed installation instructions for the command-line compiler are available at The Kotlin Site.
To check your installation, open a new shell and type:
kotlin -version
at the shell prompt. You'll see the version information for your Kotlin installation.
To start the REPL, type kotlinc by itself on the command line. You should see
something like the following:
Welcome to Kotlin version 1.5 (JRE 1.8.0_144-b01)
Type :help for help, :quit for quit
>>>
The exact version numbers will vary depending on the versions of Kotlin and Java you've installed, but make sure that you're running Kotlin 1.5 or greater.
The REPL gives you immediate interactive feedback, which is helpful for experimentation. For example, you can do arithmetic:
>>> 42 * 11.3
474.6
Find out more by typing :help at the Kotlin prompt. To exit the REPL, type:
>>> :quit
To compile and run examples using the Kotlin command-line tools, see Command-Line Hello World.
The test system is built in so that we (the authors) can verify the correctness of what goes into the book.
You don't need to run the tests, but if you want to, you can just run gradlew test (on Windows) or ./gradlew test (Mac/Linux).
There are two steps in creating and running the tests, which you can run
separately if you want (again, just running the Gradle test command will
validate the code, so you don't need to do the following steps):
-
gradlew GenerateTestsgenerates tests from the sources in this repository. It creates (or recreates) the fileTestExamples.java. You normally don't need to run this; theTestExamples.javain the repository should be up to date. -
gradlew TestExamplesruns the tests inTestExamples.java.
Alternatively, TestExamples.java can be called as a regular JUnit test class.