ROS / ROS2 VIM Auto-Completion With YouCompleteMe
Table of Contents
Install YouCompleteMe
I recommend installing YCM using Vundle.
However, the installation cannot be completed through a simple :PluginInstall in vim.
If you already have Vundle installed, please skip ahead to the Compile YCM section for Ubuntu or Windows
Ubuntu
Install Vundle
Requirement
Make sure you have
vimandgitinstalled.Setup Vundle
Simply clone the Vuhdle repository into the
~/.vim/bundledirectory.git clone https://github.com/VundleVim/Vundle.vim.git \ ~/.vim/bundle/Vundle.vimEnable Vundle
Add the following lines on the top of your
~/.vimrcfile. If this file does not exist yet, create a new empty file under the same name with the following content.set nocompatible " be iMproved, required filetype off " required " set the runtime path to include Vundle and initialize set rtp+=~/.vim/bundle/Vundle.vim call vundle#begin() " alternatively, pass a path where Vundle should install plugins "call vundle#begin('~/some/path/here') " let Vundle manage Vundle, required Plugin 'VundleVim/Vundle.vim' " All of your Plugins must be added before the following line call vundle#end() " required filetype plugin indent on " required " To ignore plugin indent changes, instead use: "filetype plugin on " " Brief help " :PluginList - lists configured plugins " :PluginInstall - installs plugins; append `!` to update or just :PluginUpdate " :PluginSearch foo - searches for foo; append `!` to refresh local cache " :PluginClean - confirms removal of unused plugins; append `!` to auto-approve removal " " see :h vundle for more details or wiki for FAQ " Put your non-Plugin stuff after this line
Install YCM
Requirement
The following setup is tested in Ubuntu 20.04, which contains
vim-noxatv8.1.2269. For more information on the system requirement on Ubuntu, please reference the official documentation.Basic Installation
Add the following line into the Vundle plugin part within
~/.vimrc.Plugin 'ycm-core/YouCompleteMe'
The complete Vundle plugin part in the
~/.vimrcshould looks like the following after the modification.... call vundle#begin() Plugin 'VundleVim/Vundle.vim' Plugin 'ycm-core/YouCompleteMe' call vundle#end() ...
After adding in the above code, run
vimand type in:PluginInstallcommand. This will download the YCM, as well as its submodules into the~/.vim/bundle/folder. Alternatively, you can use,git clone --recursive https://github.com/ycm-core/YouCompleteMe
However, additional compilation is still needed first before using YCM. Otherwise you will get the following error:
The ycmd server SHUT DOWN (restart with ':YcmRestartServer'). YCM core library not detected; you need to compile YCM before using it. Follow the instructions in the documentation.
To compile YCM, run the following commands,
cd ~/.vim/bundle/YouCompleteMe/
python3 install.py --clang-completer
For autocompletion with ROS, the
--clang-completeroption needs to be enable.Check out the official instructions for how to configure more completer options, such as Java, Go etc.
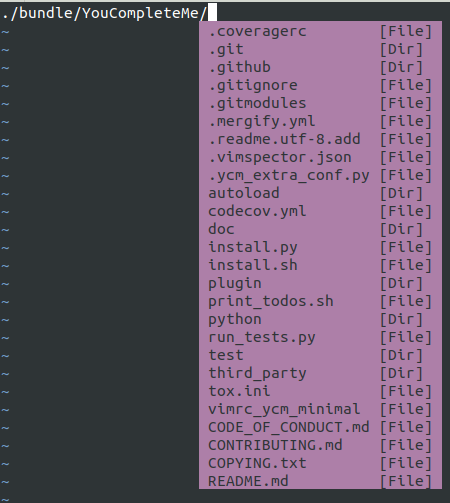
Installation Validation
After the compilation is completed, you should be able to test the installation with an empty
.pyfile.The easiest way to test it is to try typing in a relative file directory path. Upon successful installation, you should get a similar result as the image below.
Skip to customization and ROS Configuration section if you primarily using the Ubuntu YCM installation.

Windows
Install Vundle
Follow the official guide to install Vundle.
If the latest version of vim is installed on Windows,
by default it looks for _vimrc instead of .vimrc and vimfiles instead of .vim.
For the git commands, use the following instead in the Command Prompt.
git clone https://github.com/VundleVim/Vundle.vim.git %USERPROFILE%/vimfiles/bundle/Vundle.vimAfter completing the cloning, copy the following lines inside the _vimrc file, similarly to the setup in Ubuntu.
Please note the change in directory name for the vim configuration files.
filetype off
set shellslash
set rtp+=$HOME/vimfiles/bundle/Vundle.vim
call vundle#begin('$HOME/vimfiles/bundle')
" let Vundle manage Vundle, required
Plugin 'VundleVim/Vundle.vim'

" All of your Plugins must be added before the following line
call vundle#end()            " required
filetype plugin indent on    " required
" To ignore plugin indent changes, instead use:
"filetype plugin on
"
" Brief help
" :PluginList       - lists configured plugins
" :PluginInstall    - installs plugins; append `!` to update or just :PluginUpdate
" :PluginSearch foo - searches for foo; append `!` to refresh local cache
" :PluginClean      - confirms removal of unused plugins; append `!` to auto-approve removal
"
" see :h vundle for more details or wiki for FAQ
" Put your non-Plugin stuff after this line
Install YCM
Basic Installation
Add the following line into the Vundle plugin part of the
_vimrc.Plugin 'ycm-core/YouCompleteMe'
The complete Vundle plugin part in the
_vimrcshould looks like the following.... call vundle#begin() Plugin 'VundleVim/Vundle.vim' Plugin 'ycm-core/YouCompleteMe' call vundle#end() ...
After adding in the above code, run
vimand type in:PluginInstallcommand. This will download the YCM, as well as its submodules into thevimfiles/bundle/folder. Alternatively, you can use,git clone --recursive https://github.com/ycm-core/YouCompleteMe
However, additional compilation is still needed first before using YCM. Otherwise you will get the following error:
The ycmd server SHUT DOWN (restart with ':YcmRestartServer'). YCM core library not detected; you need to compile YCM before using it. Follow the instructions in the documentation.
To compile YCM, run the following commands
cd %USERPROFILE%/vimfiles/bundle/YouCompleteMe
python3 install.py --clang-completer
For autocompletion with ROS (WIP), the
--clang-completeroption needs to be enable.Check out the official instructions for how to configure more completer options, such as Java, go etc.
Installation Validation
After the compilation is completed, you should be able to test it with an empty
.pyfile.The easiest way to test it is to try type in a relative file directory path. Upon successful installation, you should get a similar result as the image below.

ROS Configuration
The following configuration does not work in Windows. For more information, checkout the discussion here.
No additional configuration is needed for Python,
as long as the library is included in the library PATH.
However, for C++, additional compilation flags need to be passed to the YCM.
This can be done through the compile_commands.json file,
which can be generated at compilation time.
CATKIN/COLCON generate this file in the <path-to-workspace>/build directory which YCM cannot find automatically,
and an additional Python script is needed to instruct YCM to look for the file in the correct directories.
First, navigate to the ROS workspace,
which should contain the build, src and install folders,
and download the extra configuration.
Do remember to source the necessary dependencies or other workspaces if needed.
cd <path-to-workspace>/
curl -O https://raw.githubusercontent.com/Briancbn/ros_vim_autocomplete/master/.ycm_extra_conf.py
Next, based on the ROS builder tool that is used, use the following instructions to generate the compile_commands.json file.
CATKIN
If you are using catkin_make, use the following command to generate and update the compile_commands.json file.
catkin_make \
  -DCMAKE_EXPORT_COMPILE_COMMANDS=ON
If you are using catkin-tools, you can configure the additional CMake arguments using the catkin config command.
catkin config --cmake-args \
  -DCMAKE_EXPORT_COMPILE_COMMANDS=ON
and run catkin build again to generate the compile_commands.json file.
COLCON
Use the following command to generate and update the compile_commands.json file.
colcon build --cmake-args \
  -DCMAKE_EXPORT_COMPILE_COMMANDS=ON
Validation
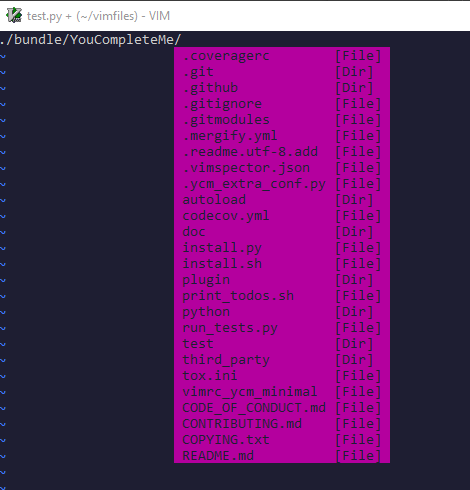
Use vim to open a ROS / ROS2 .cpp or .hpp file,
you should be able to see something similar to the following image.

If you are not satisfied with the default style for the warning or the completion, check out the customization section.
Also checkout the other tools, for guide on further speeding up your development with VIM.
Customization
Add in the following line to the end of the .vimrc file.
Below is my personal configuration
" YCM settings
let g:ycm_max_num_candidates = 5
let g:ycm_warning_symbol = '>'
let g:ycm_confirm_extra_conf = 0
let g:ycm_add_preview_to_completeopt = 1
let g:ycm_autoclose_preview_window_after_completion = 1
let g:ycm_max_diagnostics_to_display = 0  " Reference: https://github.com/ycm-core/YouCompleteMe/issues/2392

" YCM Error & Warning Color Scheme
" https://jonasjacek.github.io/colors/
hi YcmErrorSection ctermbg=0 cterm=underline
hi YcmWarningSection ctermbg=0 cterm=underline

" YCM Shortcut
map g :YcmCompleter GoTo<CR>  " Go to definition
If you configure it the same way as I did, you should have a similar looking style as below.

Let's go through the customization setting line-by-line.
let g:ycm_max_num_candidates = 5The number of options display in the drop down list.
let g:ycm_warning_symbol = '>'The symbol used on in the left column when there is a compilation warning for the line.
let g:ycm_confirm_extra_conf = 0This tells YCM to automatically load in the .ycm_extra_config.py file.
By default, there is a prompt to ask for confirmation.
It is rather inconvenient if you are using the .ycm_extra_config.py constantly.
let g:ycm_add_preview_to_completeopt = 1
let g:ycm_autoclose_preview_window_after_completion = 1
TODO(anyone): add explanation
let g:ycm_max_diagnostics_to_display = 0This will solve the max diagnostics exceeded warning if encountered.
hi YcmErrorSection ctermbg=0 cterm=underline
hi YcmWarningSection ctermbg=0 cterm=underline
Change the warning and error style to transparent background -- ctermbg=0,
and underline cterm=underline.
map g :YcmCompleter GoTo<CR>Change the hotkey for checking definition to g.
Note that you can use Ctrl+o to go back to the original file.
Other Tools
tabnine
Tabnine uses AI to help with code autocompletion. It can greatly speed up your development.
Tabnine maintains a fork of YCM,
you can simply replace the repository ycm-core/YouCompleteMe
in the installation instructions
with tabnine/YouCompleteMe.
Don't forget to change the Vundle portion in the .vimrc too.
After the successful installation the tabnine fork of YCM,
run :YcmTabnineHub to enter the configuration server - Tabnine Hub like the following image.

After successful configuration, you should see the tabnine suggestion in the YCM. Below is an example.

colcon cd & edit
The colcon_cd and colcon edit commands help quickly navigate ROS workspaces
and trigger vim to edit the correct file.
Not all of the below functionalities work in Windows
With the help of TAB completion, you will never need to use endless amount of cd and ls command to find the file that you want to edit.
Installation
Prerequesite
For Ubuntu, the best way is to install through debian from the APT repository. If you already have ROS / ROS2 installed, you can skip this step. Checkout the official documentation on how to do that.
Install
Run the following command to install
colcon-edandcolcon-cd.sudo apt install python3-colcon-ed python3-colcon-cd
Note:
If you want to enable the tab completion for
colcon-cd, please install the debian release from my fork instead.
Usage
The colcon_cd and colcon edit commands work very similar to
the roscd and rosed commands in ROS1.
To enable tab completion, please remember to source the following files,
or simply put the following commands in your ~/.bashrc.
if [ -f /usr/share/colcon_argcomplete/hook/colcon-argcomplete.bash ]; then
    . /usr/share/colcon_argcomplete/hook/colcon-argcomplete.bash
fi

if [ -f /usr/share/colcon_cd/function/colcon_cd.sh ]; then
    source /usr/share/colcon_cd/function/colcon_cd.sh
fi

# The following needs to install colcon-cd from Briancbn's fork
if [ -f /usr/share/colcon_cd/function/colcon_cd-argcomplete.bash ]; then
    source /usr/share/colcon_cd/function/colcon_cd-argcomplete.bash
fi
Checkout the official documentation for more usage information about colcon edit
ros_src_tool
A Bash tool for easily and dynamically sourcing ROS and ROS2 environment.
Usage