#include <std/disclaimer.h>
/*
*    Your Telegram account may get banned.
*    I am not responsible for any improper use of this bot
*    This bot is intended for the purpose of having fun with memes,
*    as well as efficiently managing groups.
*    You ended up spamming groups, getting reported left and right,
*    and you ended up in a Finale Battle with Telegram and at the end
*    Telegram Team deleted your account?
*    And after that, then you pointed your fingers at us
*    for getting your acoount deleted?
*    I will be rolling on the floor laughing at you.
*/
A modular Telegram Userbot running on Python3 with sqlalchemy database.
based on ProjectBish Userbot
Click for more details
1. Required Variable name and value
API_KEY# Get this value from Telegram.org.API_HASH# Get this value from Telegram.org.BOTLOG# Set toFalseto disable group logging. (DefaultTrue)BOTLOG_CHATID# Log chat id. Set it to0if BOTLOG =Falseand/or LOGSPAMMER =False.HEROKU_API_KEY# Get your Heroku API from Heroku Account Settings.HEROKU_APP_NAME# Your Heroku app name which are deployed as userbot.LOGSPAMMER# Set this toTruein case you want the error logs to be stored in the userbot log group. (requires a validBOTLOG_CHATIDto be set).STRING_SESSION# Get this value by running [python3 string_session.py] in Termux or local system.TMP_DOWNLOAD_DIRECTORY# This variable for Download directory for many modules (GDrive, .download etc..).
2. Non Mandatory Variable Name. [Recommended to fill this]
ALIVE_NAME# Name to show in .alive message.ALIVE_LOGO# Show Image/Logo in .alive message. Use telegra.ph or any direct link image.ANTI_SPAMBOT# Kick spambots from groups after they join. (Requires admin permissions in group) fill this withTrueorFalseANTI_SPAMBOT_SHOUT# Fill this value as false. if you're want Report spambots to @admins in groups after they join, just in case when you don't have admin powers to kick that shit by yourself.BIO_PREFIX# Prefix for Last.FM Module Bio.COUNTRY# Your Country to be used in the .time and .date commands.CLEAN_WELCOME# When a new person joins, the old welcome message is deleted, Set this toTrueorFalse.CONSOLE_LOGGER_VERBOSE# If you need verbosity on the console logging, set thisTrueorFalse.DEEZER_ARL_TOKEN# Your DEEZER ARL TOKEN. If you don't know this, leave it blank.DEFAULT_BIO# Default you profile bio.G_DRIVE_DATA# Your client_secret.json.G_DRIVE_INDEX_URL# Your Cloudflare Google Drive Index URL.GENIUS_ACCESS_TOKEN# Client Access Token from Genius site.LASTFM_API# API Key for Last.FM module. Get one from Last.FM site, Leave this blank if you won't use last.fm module.LASTFM_SECRET# SECRET Key for Last.FM module. Get one from Last.FM site, Leave this blank if you won't use last.fm module.LASTFM_PASSWORD# Your last.fm password. Leave this blank if you won't use last.fm module.OPEN_WEATHER_MAP_APPID# Get your own API key from Open Weather Map site. Leave it blank if you won't use this.OCR_SPACE_API_KEY# OCR API Key for .ocr command. Get one from OCR Space site.PM_AUTO_BAN# PM shield if you won't any user spam your PM. Set thisTrueorFalse.REM_BG_API_KEY# API Key for .rbg command. Get one from remove.bg.TZ_NUMBER# Fill1as a default value, Or in your country has multiple time zones. Just change the value to any time zones.TERM_ALIAS# Display user for .term command.UPSTREAM_REPO_URL# In case you're maintaining a fork repo, fill this with your fork repo url. if not, just leave this blank.USR_TOKEN_UPTOBOX# Uptobox API for uptobox direct link. Read this (Required premium uptobox account).WEATHER_DEFCITY# Set the default city for the userbot's weather module.
Heroku (GitHub Actions)
- Create github account and heroku account
- Fork this repository [RECOMMEND TO ENABLE DEKSTOP MODE IN YOUR BROWSER]
- Go to Your GitHub Forked repository settings. [example pict], Scroll down then Click Secret > actions
- Fill All credentials required in Github secrets
HEROKU_API. Fill your Heroku api keyHEROKU_APP. Fill your Heroku app name. This name should only contain lowercase letters, numbers, and dashes.HEROKU_REGION. FillusorenHEROKU_EMAIL. Your heroku email
- Now Go To Action tab in your repository [example pict], Click Select Workflow [example pict] Choose
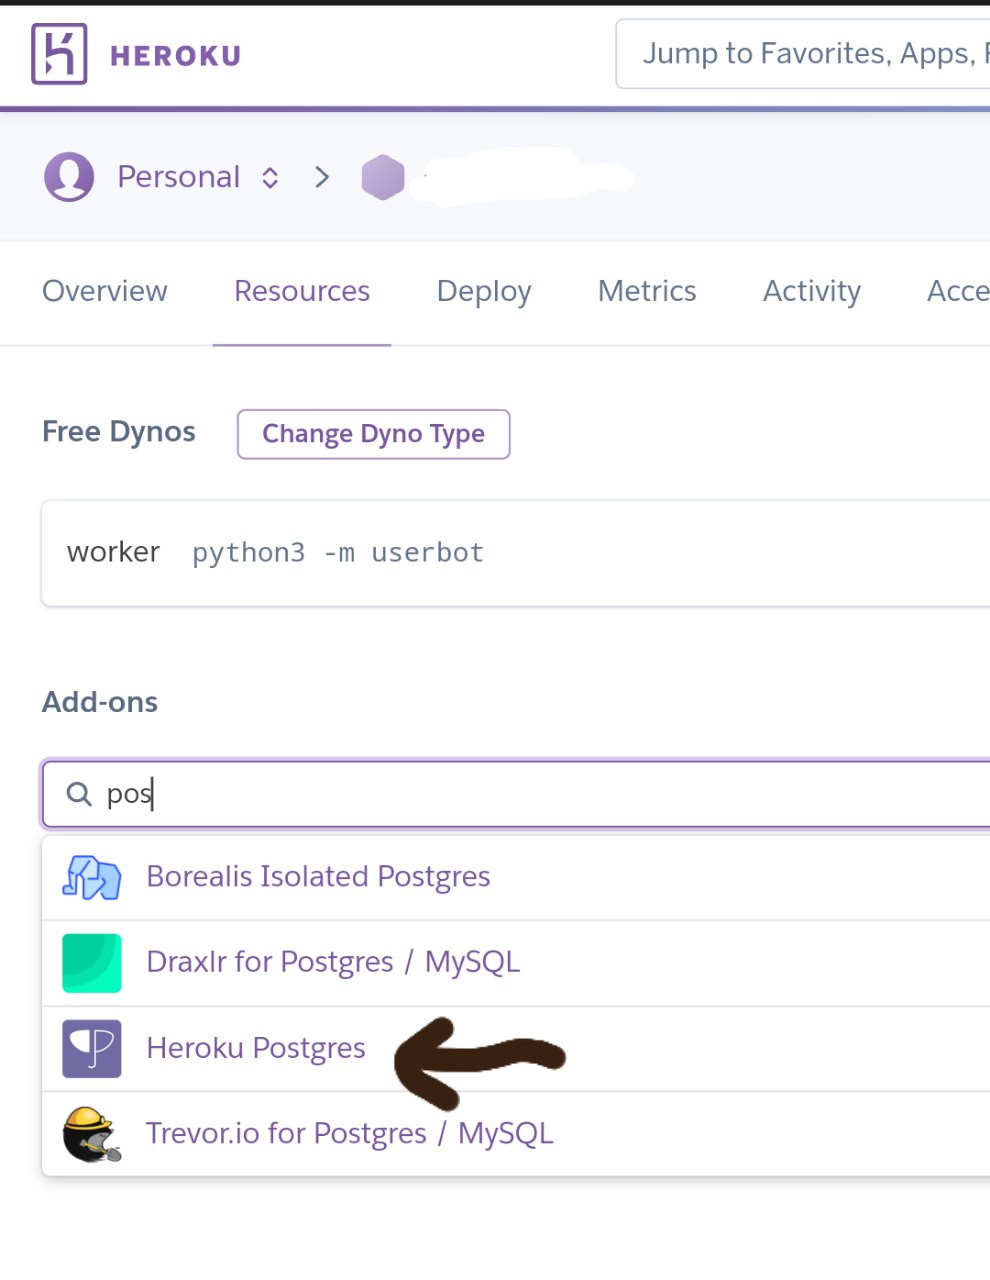
Heroku Container build and pushThen Click Run Workflow from master branch [example pict]. Wait process finish, if you got some errors while run workflow You can ask in SUPPORT GROUP - After deploy is finished, go to your heroku resource app add heroku posgress, check pict below
Using "Bare hands", using Git and Python3 -- on (Linux, macOS, and Android [via Termux])
- Clone this repository on your local machine and
cd(orchdir, anti bloat guy) to it - Set up Python virtual environment named "venv" inside it (Requires
virtualenvinstalled on the system)
virtualenv venv- Don't forget to activate the virtualenv:
. venv/bin/activate
- Set up database for the userbot, search Google on how to set up a local database (PostgreSQL is recommended)
- Install the requirements:
pip3 install -r ./requirements.txt - Edit
sample_config.envand save it asconfig.env
- Do not forget to fill in the
REQUIRED %%values, or else the bot will not run
- Run the bot:
bash ./exec.sh
- Protip: See what
bash ./exec.sh --helptells you
Docker
- Clone this repository on your local machine and
cd(orchdir, anti bloat guy) to it - Edit
sample_config.envand save it asconfig.env
- Set
DATABASE_URLtopostgresql://USERNAME:PASSWORD@db:5432/weebproject - You should set
USERNAMEandPASSWORDtoo indocker-compose.yml - Do not forget to fill in the
REQUIRED %%values, or else the bot will not run
- Run docker:
docker-compose up
※ Those steps are probably possible to pull off on Windows but it's pretty much unknown (different file tree paradigm, directory conventions, PowerShell instead of BASH or ZSH) -- If you're on Windows, you'd be better off running this on WSL (or WSL2)
- Adek Maulana - ProjectBish
- Mr. Miss - UserButt
- Move Angel - One4uBot
- Aidil Aryanto - ProjectDils
- Alfianandaa - ProjectAlf
- GengKapak - DCLXVI
and everyone that makes this userbot awesome :D
Licensed under Raphielscape Public License - Version 1.d, February 2020


