引子
想要了解webpack plugin如何编写,首先要了解其应用场景和作用。
可以先浏览这三篇文章
除此之外,在这里我和webpack loader进行了简单的对比。
plugin & loader
plugin
顾名思义,webpack plugin是作为webpack的一个插件机制存在,将webpack提供的处理方法暴露给第三方(开发者)来开发。在整个项目架构中,往往起宏观上的作用。例如HtmlWebpackPlugin,修改一些文件,inject一些用户的资源,这些资源往往是经过loader处理过的资源,比如jsx文件,css文件。
loader
而loader用于对开发者源代码的转换,功能而言,跟webpack本身并没有强耦合的关系。例如,强大的babel-loader可以使用浏览器暂不支持的JavaScript语法(糖),css-loader和styles-loader用来处理你的css。
总之,Loader的这些工作不需要开发者去干涉,只需相应配置全权交个loader去处理。而plugin往往需要用户先预备好已经有的资源,再去对资源进行宏观上的操作,并不会在内容细节上处理。
场景的明确
我们需要明确一些plugin场景来进行实际开发的模拟。比如,抽离公共模块(CommonsChunkPlugin),控制模块的输出方式,或者输出内容(这里可能体现比较直观的是UglifyJsPlugin),复制一些为经过webpack处理的静态文件(copyWebpackPlugin)。
Compiler and Compilation
在了解生命周期之前,必须要了解Compiler and Compilation两个概念,我通常会翻译成编译器和编译集合。
Compiler(编译器)
翻译为编译器,是因为往往编译器在开发者的眼中是整个源代码所处的编译环境(预设环境),是一个静态场景。webpack通过Compiler提供了webpack配置内容的所有配置项和插件相关的调用函数,在这里,你可以随意获得你想要的某个配置,并且根据相应的配置书写相应的plugin代码逻辑。下面展示了compiler中用到的一些生命周期和有关webpack配置的代码。
_plugins: { 'before-run': [ [Function] ], done: [ [Function] ] },
options:
   { entry: './index.js',
     output:
      { path: '/Users/beace/Documents/beace/github/webpack/custom-plugins/first-plugin',
        filename: 'bundle.js',
        chunkFilename: '[id].bundle.js',
        library: '',
        hotUpdateFunction: 'webpackHotUpdate',
        jsonpFunction: 'webpackJsonp',
        libraryTarget: 'var',
        sourceMapFilename: '[file].map[query]',
        hotUpdateChunkFilename: '[id].[hash].hot-update.js',
        hotUpdateMainFilename: '[hash].hot-update.json',
        crossOriginLoading: false,
        chunkLoadTimeout: 120000,
        hashFunction: 'md5',
        hashDigest: 'hex',
        hashDigestLength: 20,
        devtoolLineToLine: false,
        strictModuleExceptionHandling: false },
     plugins: [ HelloWorldPlugin {}, MyPlugin {} ],
     context: '/Users/beace/Documents/beace/github/webpack/custom-plugins/first-plugin',
     devtool: false,
     cache: true,
     target: 'web',
     module:
      { unknownContextRequest: '.',
        unknownContextRegExp: false,
        unknownContextRecursive: true,
        unknownContextCritical: true,
        exprContextRequest: '.',
        exprContextRegExp: false,
        exprContextRecursive: true,
        exprContextCritical: true,
        wrappedContextRegExp: /.*/,
        wrappedContextRecursive: true,
        wrappedContextCritical: false,
        strictExportPresence: false,
        strictThisContextOnImports: false,
        unsafeCache: true },
     node:
      { console: false,
        process: true,
        global: true,
        Buffer: true,
        setImmediate: true,
        __filename: 'mock',
        __dirname: 'mock' },
     performance: { maxAssetSize: 250000, maxEntrypointSize: 250000, hints: false },
     resolve:
      { unsafeCache: true,
        modules: [Array],
        extensions: [Array],
        mainFiles: [Array],
        aliasFields: [Array],
        mainFields: [Array],
        cacheWithContext: false },
     resolveLoader:
      { unsafeCache: true,
        mainFields: [Array],
        extensions: [Array],
        mainFiles: [Array],
        cacheWithContext: false } },
  context: '/Users/beace/Documents/beace/github/webpack/custom-plugins/first-plugin',
}
Compilation(编译集合)
Compilation虽然继承自Compiler,但是对于本身作用来讲,因为他包含了chunks,modules,cache,assets,是动态的资源集合。动态的原因是,在某个编译阶段,产生的编译资源是不相同的。
编译会显示有关模块资源,编译资源,更改的文件以及监视的依赖项当前状态的信息。编译还提供了许多插件可以选择执行自定义操作的回调点。
每一个版本执行的编辑逻辑(开发者),决定了上述特点。下面选取了部分关于chunks和assets中的内容
chunks:
   [ Chunk {
       id: 0,
       ids: [Array],
       debugId: 1000,
       name: 'main',
       _modules: [SortableSet],
       entrypoints: [Array],
       chunks: [],
       parents: [],
       blocks: [],
       origins: [Array],
       files: [Array],
       rendered: true,
       entryModule: [NormalModule],
       hash: 'bfe5f97a4642c50a5286f6a28486186a',
       renderedHash: 'bfe5f97a4642c50a5286' } ],

{ 'bundle.js':
   CachedSource {
     _source: ConcatSource { children: [Array] },
     _cachedSource: undefined,
     _cachedSize: undefined,
     _cachedMaps: {},
     node: [Function],
     listMap: [Function] } }
生命周期
简历一个简单的项目
通过以下简单的配置,我将一个index.js简单的进行webpack打包,输出bundle.js。并在根目录下创建my-plugin.js文件,作为即将开发的插件。代码如下。
const path = require('path');
const webpack = require('webpack');
const MyPlugin = require('./my-plugin');

module.exports = {
  entry: './index.js',
  output: {
    path: path.resolve(__dirname),
    filename: 'bundle.js',
  },
  plugins: [
    new MyPlugin({ options: true }),
  ]
}
根据webpack的要求,插件必须要在其原型上创建apply对象。
因为当webpack命令执行时,插件将被创建,而webpack将通过调用apply来安装插件,并将引用传递给webpack编译对象。
反观表现,通过创建apply对象以及apply的参数,可以调用webpack底层的方法。在my-plugin.js中写入
function MyPlugin(options) {}

MyPlugin.prototype.apply = function(compiler) {}
从执行顺序看生命周期
如果非常粗暴的将plugin的几个关键的生命周期输出出来,执行顺序是将会是这样的
// 1
compiler.plugin("compile", function(params) {
console.log("The compile is starting to compile...", params);
});
// 2
compiler.plugin("compilation", function(compilation, params) {
console.log("The compile is starting a new compilation...");
// 4
compilation.plugin("optimize", function() {
console.log("The compilation is starting to optimize file...");
});
});
// 3
compiler.plugin("make", function(compiler, callback){
console.log("the compile is making file...");
callback();
});
// 5
compiler.plugin("after-compile", function(compilation) {
console.log("The compile has aleardy compiled");
});
// 6
compiler.plugin("emit", function(compilation, callback) {
console.log("The compilation is going to emit files...");
callback();
});
// 7
compiler.plugin('after-emit', function(compilation) {
console.log('The compliation has aleardy emitted');
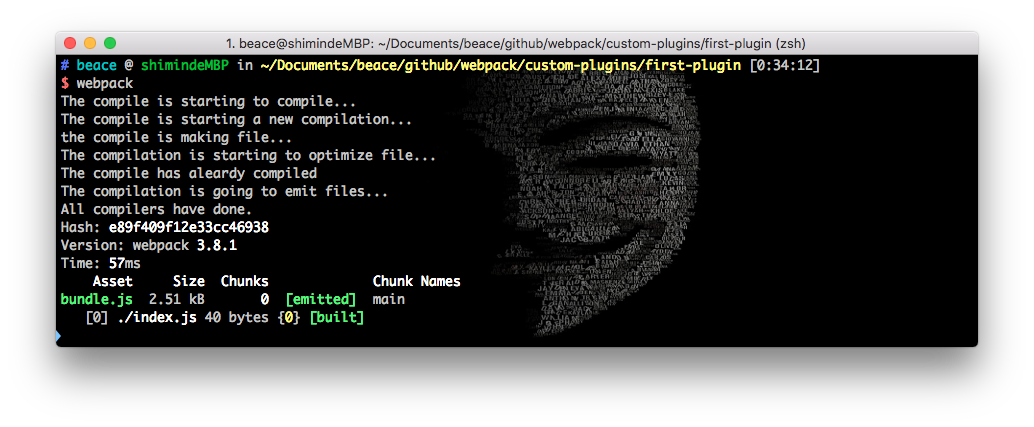
})代码的注释,代表了执行的顺序,可以看下命令行中的输出

从上述代码的执行顺序来看,plugin的生命周期如下:
Compile开始进入编译环境,开始编译Compilation即将产生第一个版本make任务开始optimize作为Compilation的回调方法,优化编译,在Compilation回调函数中可以为每一个新的编译绑定回调。after-compile编译完成emit准备生成文件,开始释放生成的资源,最后一次添加资源到资源集合的机会after-emit文件生成之后,编译器释放资源
从源码中看生命周期
咦,好像漏了两条,当编译完成时,可以看到命令行里面并没有文件的输出,回去查看项目中的代码,也并没有bundle.js文件。6、7步到底执行了么?
答案当然是没有执行。因为没有看到资源释放的结果。
让我们在源码中一探究竟。找到Compile所在的源码。
compile(callback) {
		const params = this.newCompilationParams();
		this.applyPluginsAsync("before-compile", params, err => {
			if(err) return callback(err);
			// 1
			this.applyPlugins("compile", params);
			// 2
			const compilation = this.newCompilation(params);
			// 3
			this.applyPluginsParallel("make", compilation, err => {
				if(err) return callback(err);

				compilation.finish();
				// 4
				compilation.seal(err => {
					if(err) return callback(err);
					// 5
					this.applyPluginsAsync("after-compile", compilation, err => {
						if(err) return callback(err);

						return callback(null, compilation);
					});
				});
			});
		});
	}
很明显,当编译完成时,webpack Seal 资源完毕后直接将callback return,所以当我们在调用after-compile 没有进行任何处理,阻止了接下来的return。将my-plugin.js中的代码注释掉after-compile这一步骤或者添加新的参数callback并执行。
// my-plugin.js
compiler.plugin("after-compile", function(compilation, callback) {
    console.log("The compile has aleardy compiled");
    callback();
});这时再运行webpack,命令行中可以看到输出了The compilation is going to emit files,并且输出了bundle.js。
编写自己的插件
上面截图可以看到,Hash上面的一行输出All compilers have done.,其实这也是在webpack plugin的生命周期的范围,done是所有工作结束后,会执行的最后一个步骤。并且,当webpack plugin watch到某个过程出错的时候,也会执行done。如以下源代码,可以看到每次执行错误之后,都会走done 流程。
this.compiler.applyPluginsAsync("watch-run", this, err => {
			if(err) return this._done(err);
			const onCompiled = (err, compilation) => {
				if(err) return this._done(err);
				if(this.invalid) return this._done();

				if(this.compiler.applyPluginsBailResult("should-emit", compilation) === false) {
					return this._done(null, compilation);
				}

				this.compiler.emitAssets(compilation, err => {
					if(err) return this._done(err);
					if(this.invalid) return this._done();

					this.compiler.emitRecords(err => {
						if(err) return this._done(err);

						if(compilation.applyPluginsBailResult("need-additional-pass")) {
							compilation.needAdditionalPass = true;

							const stats = new Stats(compilation);
							stats.startTime = this.startTime;
							stats.endTime = Date.now();
							this.compiler.applyPlugins("done", stats);

							this.compiler.applyPluginsAsync("additional-pass", err => {
								if(err) return this._done(err);
								this.compiler.compile(onCompiled);
							});
							return;
						}
						return this._done(null, compilation);
					});
				});
			};
			this.compiler.compile(onCompiled);
});因此,为了简单而言,我们此次编写的插件也是基于done来进行。
编写plugin
接下来将要编写一个在生成bundle.js文件之后,在第一行添加时间注释,在最后一行添加自己姓名注释,并重新输出bundle.js。
compiler.plugin("done", function(stats) {
    console.log('All compilers have done.');
    const fileData = fs.readFileSync(path.join(path.resolve(__dirname), 'bundle.js'), {encoding: 'utf-8'});
    console.log(fileData);
    const prefix = '/*2018*/';
    const author = '/* ——By Beace Lee */';
    const finalFileData = `${prefix}\n${fileData}\n${author}`;
    fs.writeFileSync(
      path.join(path.resolve(__dirname), 'bundle.js'),
      finalFileData
    );
})通过以上代码可以看出,在done这个步骤中,通过读取emit的bundle.js文件(因为这个时候资源已经释放,可以直接使用资源),以utf-8的格式读取,读取完毕后在整个字符串的前后添加两行注释并换行,再写到最终文件里。
// bundle.js
/*2018*/
...
/* 0 */
/***/ (function(module, exports) {
...
console.log('this is a entry js file');
...
/***/ })
/* ——By Beace Lee */
总结
此种方式,其实是调用了node的fs的API去实现,看起来除了生命周期之外,并没有和webpack plugin有什么太大关系,我们其实是操作了文件,当有大量文件存在的时候,该插件显得捉襟见肘。
除此之外,前面说过可以操作compiler的assets集合, 暂时写到这里,下回再聊。