This repository allows you to get started with training a State-of-the-art Deep Learning model with little to no configuration needed! You provide your labeled dataset and you can start the training right away. You can even test your model with our built-in Inference REST API. Training classification models with GluonCV has never been so easy.
- This repo is based on the Gluoncv Framework.
- The app supports all the networks in the GluonCV model zoo
- All networks can be trained from scratch or using pretrained weights.
- The solution contains both training and inference APIs.
- The training API supports both CPU and GPU architectures.
- The built-in inference API supports CPU architectures.
- It is recommended to use google Chrome when using the training app.

- Linux or windows
- NVIDIA Drivers (410.x or higher) (optional : for gpu training )
- Docker CE latest stable release
- NVIDIA Docker 2 (optional: for gpu training)
To check if you have docker-ce installed:
docker --version
To check if you have docker-compose installed:
docker-compose --version
To check if you have nvidia-docker installed:
nvidia-docker --version
To check your nvidia drivers version, open your terminal and type the command nvidia-smi

- If you don't have neither docker nor docker-compose use the following command
chmod +x install_full.sh && source install_full.sh
- If you have docker ce installed and wish only to install docker-compose and perform necessary operations, use the following command
chmod +x install_compose.sh && source install_compose.sh
- If both docker ce and docker-compose are installed then use the following command:
chmod +x install_minimal.sh && source install_minimal.sh
- Install NVIDIA Drivers (410.x or higher) and NVIDIA Docker for GPU training by following the official docs
Make sure that the base_dir field in docker_sdk_api/api/data/paths.json is correct (it must match the path of the root of the repo on your machine).

-
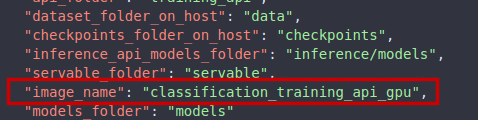
Go to
docker_sdk_api/api/data/paths.jsonand change the following:-
if you wish to deploy the training solution on GPUs (default mode), please set the field
image_nameto:
classification_training_api_gpu
-
if you wish to deploy the training solution on CPU, please set the field
image_nameto: classification_training_api_cpu
-


-
Go to
gui/src/environments/environment.tsandgui/src/environments/environment.prod.tsand change the following:-
field
url:
must match the IP address of your machine -
the IP field of the
inferenceAPIUrl: must match the IP address of your machine (Use theifconfigcommand to check your IP address . Please use your private IP which starts by either 10. or 172.16. or 192.168.)
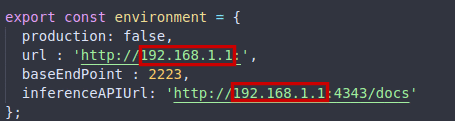
environment.ts
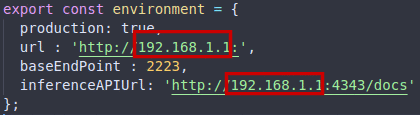
environment.prod.ts
-


If you are behind a proxy:
-
Enter you proxy settings in the
docker_sdk_api/api/data/proxy.jsonfile
-
From the repo's root directory, issue the following command:

python3 set_proxy_args.pyDocker SDK api uses the port 2223 to run.
In case this port is used by another application. The api can be configured to run on a different port by doing the following steps:
- Go to docker_sdk_api/dockerfile and change the value after the --port flag in the CMD command.

- Go to gui/src/environments/environment.ts and gui/src/environments/environment.prod.ts and change the
baseEndPointfield value to match the newly selected port:

gui/src/environments/environment.ts

gui/src/environments/environment.prod.ts
To classify your own images for training, you can install the labelme labeling tool. Check the specific classification documentation to know more about labeling using labelme.
We offer a sample dataset to use for training. It's called "dummy_dataset".
The following is an example of how a dataset should be structured. Please put all your datasets in the data folder.
├──data/
    ├──dummy_dataset/
        ├── class
        │   ├── img_1.jpg
        │   └── img_2.jpg
        ├── class2
            |__img_0.jpg
            │── img_1.jpg
            │── img_2.jpg
Lightweight (default mode): Building the docker image without pre-downloading any online pre-trained weights, the online weights will be downloaded when needed after running the image.
Midweight: Downloading specific online pre-trained weights during the docker image build.
To do that, open the json file training_api/midweight_heavyweight_solution/networks.json and change the values of the networks you wish to download to "true".
Heavyweight : Downloading all the online pre-trained weights during the docker image build.
To do that, open the json file training_api/midweight_heavyweight_solution/networks.json and change the value of "select_all" to "true".
If you wish want to deploy the training workflow in GPU mode, please write the following command
docker-compose -f build_gpu.yml buildIf you wish want to deploy the training workflow in CPU mode, please write the following command
docker-compose -f build_cpu.yml build If you wish want to deploy the training workflow in GPU mode, please write the following command
docker-compose -f run_gpu.yml upIf you wish to deploy the training workflow in CPU mode, please write the following command
docker-compose -f run_cpu.yml up
-
If the app is deployed on your machine: open your web browser and type the following:
localhost:4200or127.0.0.1:4200 -
If the app is deployed on a different machine: open your web browser and type the following:
<machine_ip>:4200
After running the docker container, run this command if you labeled your dataset with the labelme labeling-tool:
python3 preparedataset.py --datasetpath <your_resulting_folder>A new folder called customdataset will be created, just copy it into data in order to train.
This is how the customdataset folder should look like :
├──customdataset/
        ├── class
        │   ├── img_1.jpg
        │   └── img_2.jpg
        ├── class2
            |__img_0.jpg
            │── img_1.jpg
            │── img_2.jpg
Prepare your dataset for training

Specify the general parameters for you docker container

- From scratch : (i) Building the network and (ii) training without loading any pre-trained weights
- Transfer learning based on the ImageNet pretrained weights: (i) building the network, (ii) downloading online ImageNet pretrained weights from gluoncv's modelzoo, (iii) loading them onto the network, (iv) resetting the last layer (transfer learning) and (v) launching the training.
- Transfer learning based on the custom weights: (i) building the network, (ii) loading local weights into the network, (iii) resetting the last layer (transfer learning) and (iv) launching the training.
- From checkpoint: (i) building the network, (ii) loading local weights and (iii) training without resetting the last layer.
Specify the hyperparameters for the training job

For more information about our hyperparameters, feel free to read our hyperparameters documentation
Check your training logs to get better insights on the progress of the training

Download your model to use it in your applications.

After downloading your model, if you would like to load it in a GPU-based inference API , please make sure to specify the GPU architecture in the model's configuration json file. (please refer to the inference API's documentation , section Model "Model Structure")
Delete the container's job to stop an ongoing job or to remove the container of a finished job. (Finished jobs are always available to download)

The training might fail when a network isn't available anymore on the Gluoncv model_zoo server (pretrained online weights). If you encounter this error (image below), kindly create an issue.
