This is an Agent-based model (ABM) created explicitly for exemplifying several aspects of the development of ABM models. The target public is students and researchers of Archaeology and History. The development process is broken down into several steps that are progressively complex, each introducing a new concepts and NetLogo functionalities. Each step corresponds to a ".nlogo" file included in this repository. Although ".nlogo" files should be opened in NetLogo in order to run its code, it can also be opened and edited in any text editor.
NOTE: In the explanation below I'm using
<UPPERCASE_TEXT>to express the positions in the code to be filled by the name of entities, variables, and other elements, depending on the context. For instance,<COLOR> <FRUIT>would represent many possible phrases, such as "red apple", "brown kiwi", etc.
In NetLogo, any action we want to perform must be enclosed within a structure of the type:
to <PROCEDURE NAME>
  <PROCEDURE_ACTION_1>
  <PROCEDURE_ACTION_2>
  <PROCEDURE_ACTION_3>
  ...
end
Any procedure can be executed by typing <PROCEDURE_NAME> + Enter in the NetLogo's console at the bottom of the 'Interface' tab. The "Hello World" program, a typical minimum exercise when learning a programming language, correspond to the following procedure hello-world:
to hello-world
  print "Hello World!"
end
which generates the following "prints" in the console:
observer> hello-world
Hello World!
NetLogo's interface editor allows us to create buttons that can execute one or multiple procedures (or even a snippet of ad hoc code). The interface system is quite straightforward. First, at the top of the interface tab, click "Add" and select a type of element in the drop-down list. Click anywhere in the window below to place it. Select it with click-dragging or using the "Select" option in the right-click pop-up menu. You can edit the element by selecting "Edit", also in the right-click pop-up menu. For any doubts on how to edit the interface tab, please refer to NetLogo's documentation (https://ccl.northwestern.edu/netlogo/docs/interfacetab.html).
The first thing one should learn about NetLogo (and most agent-based modeling system) is that it handles mainly two types of entities/agents: patches, cells of a square grid, and turtles, which are proper "agents" (i.e., mobile, autonomous entities). Both entities have primitives (built-in, default properties), some of which can be modified by processes in your model. For example, you can't modify the position of a patch, but you can change its filling color. See NetLogo's documentation on agents for further details (https://ccl.northwestern.edu/netlogo/docs/programming.html#agents).
One should spend some time understanding the grid structure and associated syntaxis. It is recommendable to consult the "settings" pop-up window in the "interface tab":
The default configuration is a 33x33 grid with the position (0,0) at the center. Both dimensions and center can be easily edited for each particular model. Moreover, we can specify agents behavior at the borders by ticking the "wrap" options. Wrapping the world limits means that, for instance, under the default setting mentioned above, the position (-16,0) is adjacent to (16,0). In the console, we can "ask" the patch at (-16,0) to print its distance to the patch at (16,0), using the primitive function distance (https://ccl.northwestern.edu/netlogo/docs/dictionary.html#distance):
observador> ask patch -16 0 [ print distance patch 16 0 ]
1
Wrapping one dimension represents a cylindrical surface while wrapping two depicts a strange toroidal object (Donut!). Although this aspect is relatively hidden among the options, it can have great importance if spatial relations play any part in a model. So if you want your grid to represent a geographical map, make sure to untick the wrapping features.
One of the most useful resources of NetLogo's documentation is the dictionary that can be accessed in the "Help" menu. This is true at any moment throughout your learning curve; even when you know all primitives and built-in functions by heart. Moreover, all documentation is present with any copy of NetLogo, so it is fully available offline.
The dictionary is particularly useful whenever you are learning by example, as in our case. For instance, regarding the earlier mention of distance, you could have searched it in the dictionary directly. Whenever you find yourself reading NetLogo code with violet or blue words that you do not understand, take the habit of searching them in NetLogo's dictionary.
This is the actual initial step in building the Pond Trade model. It introduces the student to several fundamental concepts of NetLogo's programming language.
Inside a single procedure, called create-map, the code illustrates how all entities of a type (patches) can be ordered (ask) to do something using the structure:
ask <ENTITIES>
[
  <DO_SOMETHING>
]The code also introduces the syntaxis to set the values of variables, i.e. set <VARIABLE> <VALUE> (in this case, to change color):
set pcolor blueand to declare and set local variables (i.e., accessable only from its own context) by using let <VARIABLE> <VALUE>. In this case, for instance, we use a local variable to identify the patch at the postion (0,0) as the one at the center:
let centralPatch patch 0 0The fact that the centralPatch variable is local and placed inside ask patches [ <ACTIONS> ] structure means that we are creating and destroying a different variable for every patch. We cannot use these variables (plural intended) outside their enclosing brackets and patches hold no memory of their values before or after this particular action.
Furthermore, we show how to "comment" (i.e., write text that should be ignored when executing the code) using the structure:
; <FREE_TEXT>or
<CODE> ; <FREE_TEXT>The code exemplifies how to create conditional rules according to predefined general conditions using if/else statements, which in NetLogo can be written as if or ifelse:
if (<CONDITION_1_IS_TRUE>)
[
  <DO_ACTION_A>
]

ifelse (<CONDITION_2_IS_TRUE>)
[
  <DO_ACTION_B>
]
[
  <DO_ACTION_C>
]
In this step, we are ordering patches to paint themselves green or blue depending on if their distance to the center is less than a given value).
ifelse (distance centralPatch < minDistOfLandToCentre)
[
  set pcolor blue ; water
]
[
  set pcolor green ; land
]To calculate the if/else condition for every patch, we must set up the arbitrary value of minDistOfLandToCentre, i.e., the minimum distance of a land patch to the center patch. We want our pond to be completely inside the grid, but also occupying a significant part of the space. This can be accomplished by setting minDistOfLandToCentre to be equal to the rounded half of half of the grid width or a quarter of the grid width.
The whole code is kept short so these aspects can be better observed, investigated, and assimilated:
to create-map

  ask patches [

    ; set central patch
    let centralPatch patch 0 0

    ; set minimum distance to centre depending on world width
    let minDistOfLandToCentre round (0.5 * (world-width / 2))

    ifelse (distance centralPatch < minDistOfLandToCentre)
    [
      set pcolor blue ; water
    ]
    [
      set pcolor green ; land
    ]

  ]

end
This step exemplifies a very typical situation when designing a model and programming in general. Once you defined a procedure in raw terms and tested that it does what you expect, you probably want to generalize it. As the aim of modeling is to represent a type of phenomenon, its good practice to have all non-dynamic conditions to be isolated as "parameters", variables that can be set through user input in the interface tab (e.g., slides, selectors, numeric fields).
In Step 0, the code has several fixed arbitrary values (e.g., the coordinates of the centralPatch, the calculation of minDistOfLandToCentre assuming half of the world width). It is good enough for us to draw a particular blue circle, but it is insufficient to draw other types of blue circle. Of course, the code will never be able to draw anything, if we are not programming it to do it. For instance, the colors "blue" and "green" are also "magic numbers", but we are hardly interest in having them as parameters. We must generalize but also compromise, accepting that there will be possibilities that are not covered by our model.
One of the fixed values we may want to generalize is the central patch being described as patch 0 0 and the pond (blue circle) being a circle with a radius of a quarter of the grid width.
First, is there any case where this patch is not the one at the center of the grid? Imagine that you don't like to have negative coordinates in your model. Back in the Step 0, go to "Settings" and modify the "location of origin" to be at the corner. Now, test the create-map procedure:

A true mess! Not at all what we are looking for! To correct this behavior, we must calculate the center coordinates, depending on the ranges or sizes of the grid width and height, whatever its configuration. Therefore, we must replace "0" with the calculation "minimum + range / 2" for both x and y coordinates:
let centralPatch patch (min-pxcor + floor (world-width / 2)) (min-pycor + floor (world-height / 2))We use the floor function to obtain the round lower grid position when the range is an odd number. Because this calculation uses only NetLogo primitives, you can test this by printing it in the console in any NetLogo model. It will return the central patch given your grid settings:
observer> show patch (min-pxcor + floor (world-width / 2)) (min-pycor + floor (world-height / 2))
observer: (patch 16 16)
Now, back to Step 0, imagine that you are interested in changing the dimensions of the grid instead. Maybe you want the grid to be not square (e.g., 33x33) but rectangular (e.g., 100x20):

Again, not what we are looking for. We want our pond to be always fully within the grid. To do this, we must modify our calculation of minDistOfLandToCentre to account for both width and height. One way of doing it is to calculate the radius for both dimensions and then choose the lowest value.
let minXDistOfLandToCenter round 0.5 * (world-width / 2) ; minimum distance in X
let minYDistOfLandToCenter round 0.5 * (world-height / 2) ; minimum distance in Y
let minDistOfLandToCenter min (list minXDistOfLandToCenter minYDistOfLandToCenter)| 100x20 | 20x100 |
|---|---|
 |
 |
After the later changes, we still have two different kinds of "magic numbers". "2" represents the fact that we are drawing a circle whose radius is a proportion of half of the smaller grid dimension. Although it is possible, we will not replace this value with a parameter. As an exercise, you can imagine the outcome of having different numbers instead of "2".
On the contrary, "0.5" represents the relative size of the pond radius, i.e., the half of the half of the smaller dimension. Here we have a good candidate for a parameter. It is reasonable to believe that the size of the pond will be relevant to our model's results. Mainly, we expect that larger ponds will make trade slower, assuming a fixed number of settlements, evenly distributed around the pond. In NetLogo, we create a parameter by adding an input element to the interface tab (e.g., slider) and naming it. In this case, we create a parameter called "pondSize" that represents the pond radius as the percentage of the smallest dimension, i.e. varing between 0 and 100. then, we can use it in the code to replace "0.5":
let minXDistOfLandToCenter round ((pondSize / 100) * (world-width / 2)) ; minimum distance in X
let minYDistOfLandToCenter round ((pondSize / 100) * (world-height / 2)) ; minimum distance in Y
let minDistOfLandToCenter min (list minXDistOfLandToCenter minYDistOfLandToCenter)
Note that this parameter could be expressed directly as a proportion varying between 0 and 1. However, I recommend using percentages to format this kind of parameters because they are more intuitive for humans and will be more easily understood by colleagues and the general public with no background in computer science or mathematics.
We increased significantly the create-map procedure, but we now have a process that is both flexible and controllable by user input. Note that we extract the declaration of the local variables, centralPatch and minDistOfLandToCenter, from the patches commands. They are now calculated only once at the start of the procedure and then used by every patch. Once you close a version of any piece of code, it is good practice to increase the spacing between the lines or even break down single lines that are particularly complicated. NetLogo language allows much flexibility in this sense: you can add spaces, tabs, line breaks, and commentary between most elements of your code. Also, enclosing parenthesis are not required but may improve readability.
to create-map

  ; find central patch, depending on the size of dimensions
  let centralPatch
    patch
    ; position in X
    (
      min-pxcor +
      floor (world-width / 2)
    )
    ; position in Y
    (
      min-pycor +
      floor (world-height / 2)
    )
  print(centralPatch) ; print central patch

  ; find minimun distance of land pathes to the central patch, depending on the size of dimensions
  let minXDistOfLandToCenter round ((pondSize / 100) * (world-width / 2)) ; minimum distance in X
  let minYDistOfLandToCenter round ((pondSize / 100) * (world-height / 2)) ; minimum distance in Y
  let minDistOfLandToCenter min (list minXDistOfLandToCenter minYDistOfLandToCenter)

  ask patches [

    ifelse (distance centralPatch < minDistOfLandToCenter)
    [
      set pcolor blue ; water
    ]
    [
      set pcolor green ; land
    ]

  ]

end
Replacing "magic numbers" is part of what is often called "refactoring" in programming. By definition, refactoring means that your code change appearance but still produce the same result. Refactoring encompases all tasks aiming to generalize the code, make it extendable, but also make it cleaner (more readable) and faster. However, there are a trade-off between these three goals. For example, replacing default values with calculations or indirect values will probably increase the time of processing. In practice, this trade-off is not relevant until your model is very complex, very populated (many entities), or must be simulated for many different conditions. I recommend to be always especially attentative with the readability, commentary and documentation of your code. Assuming you are interested in creating models for academic discussion (i.e., science rather than enginering purposes), the priority is to communicate your models to other people.
We downgrade the extensive commentary on the calculation of centralPatch. Commenting your code is great but do not get carried away! You must assume that your reader has to know something about the programming language. At every step, I will be downgrading most commentaries added in the previous step.
We also simplify the calculation of minDistOfLandToCenter. This new version initializes a local variable halfSmallerDimension assuming the smaller dimension is the width. Then, it checks that this is the case, and re-write this value if height is actually smaller. Finally, we calculate minDistOfLandToCenter as a proportion of halfSmallerDimension. This version is less redundant, uses two instead of three local variables, and expresses more clearly that the condition is the comparison between the grid width and height.
let halfSmallerDimension (world-width / 2)
if (world-width > world-height) [ set halfSmallerDimension (world-height / 2) ]
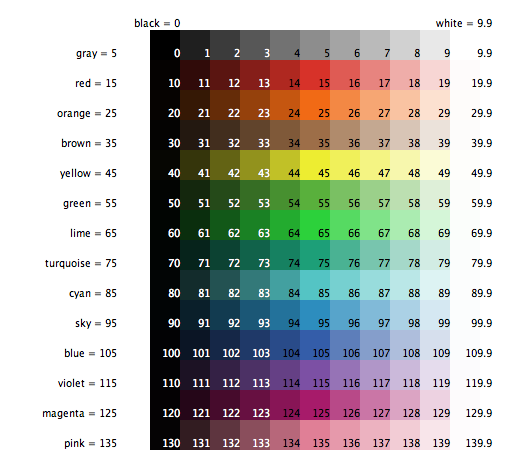
let minDistOfLandToCenter round ((pondSize / 100) * halfSmallerDimension)Last, we replace the text reference for colors with NetLogo's numerical codes. Using this numeric system allow us to use many shades of any given color. In this case, we are selecting slightly different shades of blue (106) and green (54). You can consult the color codes in "Tools" > "Color Swatches" or in http://ccl.northwestern.edu/netlogo/docs/programming.html#colors:
to create-map

  let centralPatch patch (min-pxcor + floor (world-width / 2)) (min-pycor + floor (world-height / 2))

  ; refactor previous code for finding minimun distance to centre
  let halfSmallerDimension (world-width / 2)
  if (world-width > world-height) [ set halfSmallerDimension (world-height / 2) ]

  let minDistOfLandToCenter round ((pondSize / 100) * halfSmallerDimension)

  ask patches
  [
    ifelse (distance centralPatch < minDistOfLandToCenter)
    [
      set pcolor 106 ; blue for water
    ]
    [
      set pcolor 54 ; green for land
    ]
    ;;; see "Tools > Color sample" to get the numerical values for different colors and shades
  ]

end
One of the most important characteristics of an agent-based model is stochasticity. This means that at least some of the processes are feed by random sequences. Methodologically, introducing randomness is a way of accounting for the entire spectrum of possibilities whenever a certain aspect of the model is undertheorized or cannot be controled in real scenarios. More importantly, it is justified whenever the modeler believes that the intended behavior is independent of a specific value or order. For those with no previous experience with computer science: note that "random" for a computer is not realy like "rolling dices". We are in fact getting values of a preordered sequence that is presumbly unrelated to the process at hand. The programs creating these sequences are called "random number generators" (RNG). Sequences will be different every time we run our program (i.e. simulation), unless we preset the RNG using a specific 'seed' (see http://ccl.northwestern.edu/netlogo/docs/dict/random-seed.html).
Stochasticity is intrinsic in NetLogo. We were already dealing with random processes since step 0, when asking patches to paint themselves. You probably did not realize, but the command ask patches demands that patches are ordered somehow. Think as if you were told to ask all your friends to have a look at your new model. Well, but who exactly are you going to ask first? NetLogo solves this dilemma automaticaly by randomizing the order of "asking". As an exercise, you can open the step 0 model, reduce the velocity of simulation (top of the interface tab), and execute the create-map procedure. You will observe each patch changing color, one at a time. This is also a nice example of using stochasticity to to assure that an aggregated outcome (i.e. blue circle) is not a mere artefact of any particular schedulle of processes (i.e. the order in which patches change colors).
But is it so important to have a random order? In the cases of step 0 through step 2, it is completely irrelevant. Our goal was to draw a blue circle; it does not matter which patch assumes the role of land or water first. However, this will became increasingly relevant as we advance in creating a proper agent-based model, because agents' states DO normally depend on other agents' states. Following the scenario where you want to show your model to your friends, imagine that your friends would talk to each other after one of them have seen your model and that some of them are more talkative and some more respected. Can you assume that the order in which you present your model would have no effect on the level of publicity and prestige of your model? 'Don't think so', 'Who knows?!', 'Don't really care about it'? If these thoughts cross your mind while addressing a process in your model, you are probably better off using stochasticity.
A perfect blue circle is great but it is a poor representation of a real water body. Once we implement the dynamics of the model, it will be quite difficult to explore the effect of geography solely by varying the size of the pond. The first step to creating more interesting set ups is to add noise to the condition used to determine whether a patch is land or water. NetLogo has a family of primitive functions, random and alike, that can be used to generate random discrete (integer) and continuos (float) values, following different probability distributions (e.g., uniform, normal, exponential).
For each patch, we sample a random continuous number, add it to the minDistOfLandToCenter, and use as the threshold distance from the center:
let coastThreshold minDistOfLandToCenter + random-float (halfSmallerDimension * coastalNoiseLevel / 100)

ifelse (distance centralPatch < coastThreshold)
[
  set pcolor 106 ; blue for water
]
[
  set pcolor 54 ; green for land
]
The function random-float <number> returns a random "float" number greater or equal to 0.0 and lower than <number>. To strech your learning skills, we are jumping a few minor steps in refactoring by defining a noise that is a portion of halfSmallerDimension and controlable through the parameter coastalNoiseLevel.
We now can generate strange "spray ponds". More importantly, we made the generation process controllable through two parameters that are easily understandable. Play with the parameters and meditate on their effects on the shape of the pond.
to create-map

  let centralPatch patch (min-pxcor + floor (world-width / 2)) (min-pycor + floor (world-height / 2))

  let halfSmallerDimension (world-width / 2)
  if (world-width > world-height) [ set halfSmallerDimension (world-height / 2) ]

  let minDistOfLandToCenter round ((pondSize / 100) * halfSmallerDimension)

  ask patches
  [

    ; add noise to coast line
    let coastThreshold minDistOfLandToCenter + random-float (halfSmallerDimension * coastalNoiseLevel / 100)

    ifelse (distance centralPatch < coastThreshold)
    [
      set pcolor 106 ; blue for water
    ]
    [
      set pcolor 54 ; green for land
    ]

  ]

end
to create-map

  print "Creating map..."

  ; erase previous data
  clear-all

  let centralPatch patch (min-pxcor + (floor world-width / 2)) (min-pycor + (floor world-height / 2))

  let halfSmallerDimension (world-width / 2)
  if (world-width > world-height) [ set halfSmallerDimension (world-height / 2) ]

  let minDistOfLandToCenter round ((pondSize / 100) * halfSmallerDimension)

  print "Assigning initial patch types..."

  ask patches
  [

    let coastThreshold minDistOfLandToCenter ; defaults to the basic value

    ;; add noise to coast line
    ; set general noise range depending on UI's coastalNoiseLevel and the size of world
    let noiseRange (halfSmallerDimension * coastalNoiseLevel / 100)

    ; noiseType is specified with the chooser in the UI
    if (noiseType = "uniform")
    [
      ; adds a random amount from a uniform distribution with mean minDistOfLandToCenter
      set noiseRange (random-float noiseRange) - (noiseRange / 2)
      set coastThreshold minDistOfLandToCenter + noiseRange
    ]
    if (noiseType = "normal")
    [
      ; adds a random amount from a normal distribution with mean minDistOfLandToCenter
      set coastThreshold random-normal minDistOfLandToCenter noiseRange
    ]

    ifelse (distance centralPatch < coastThreshold)
    [
      set pcolor 106 ; blue for water
    ]
    [
      set pcolor 54 ; green for land
    ]

  ]

  print "done."

end

to smooth-coast-line

  print "Smoothing..."

  ; smooth coast line
  repeat smoothIterations
  [
    ask patches
    [
      ifelse (pcolor = 106)
      [
        ; water patch
        if (count neighbors with [pcolor = 54] >= coastLineSmoothThreshold)
        [
          ; water patch has a certain number of land neighbors
          set pcolor 54 ; converted to land
        ]
      ]
      [
        ; land patch
        if (count neighbors with [pcolor = 106] >= coastLineSmoothThreshold)
        [
          ; land patch has a certain number of water neighbors
          set pcolor 106 ; converted to water
        ]
      ]
    ]
  ]
  print "done."

end