Copyright 2020 Google LLC

Licensed under the Apache License, Version 2.0 (the "License");
you may not use this file except in compliance with the License.
You may obtain a copy of the License at

 https://www.apache.org/licenses/LICENSE-2.0

Unless required by applicable law or agreed to in writing, software
distributed under the License is distributed on an "AS IS" BASIS,
WITHOUT WARRANTIES OR CONDITIONS OF ANY KIND, either express or implied.
See the License for the specific language governing permissions and
limitations under the License.
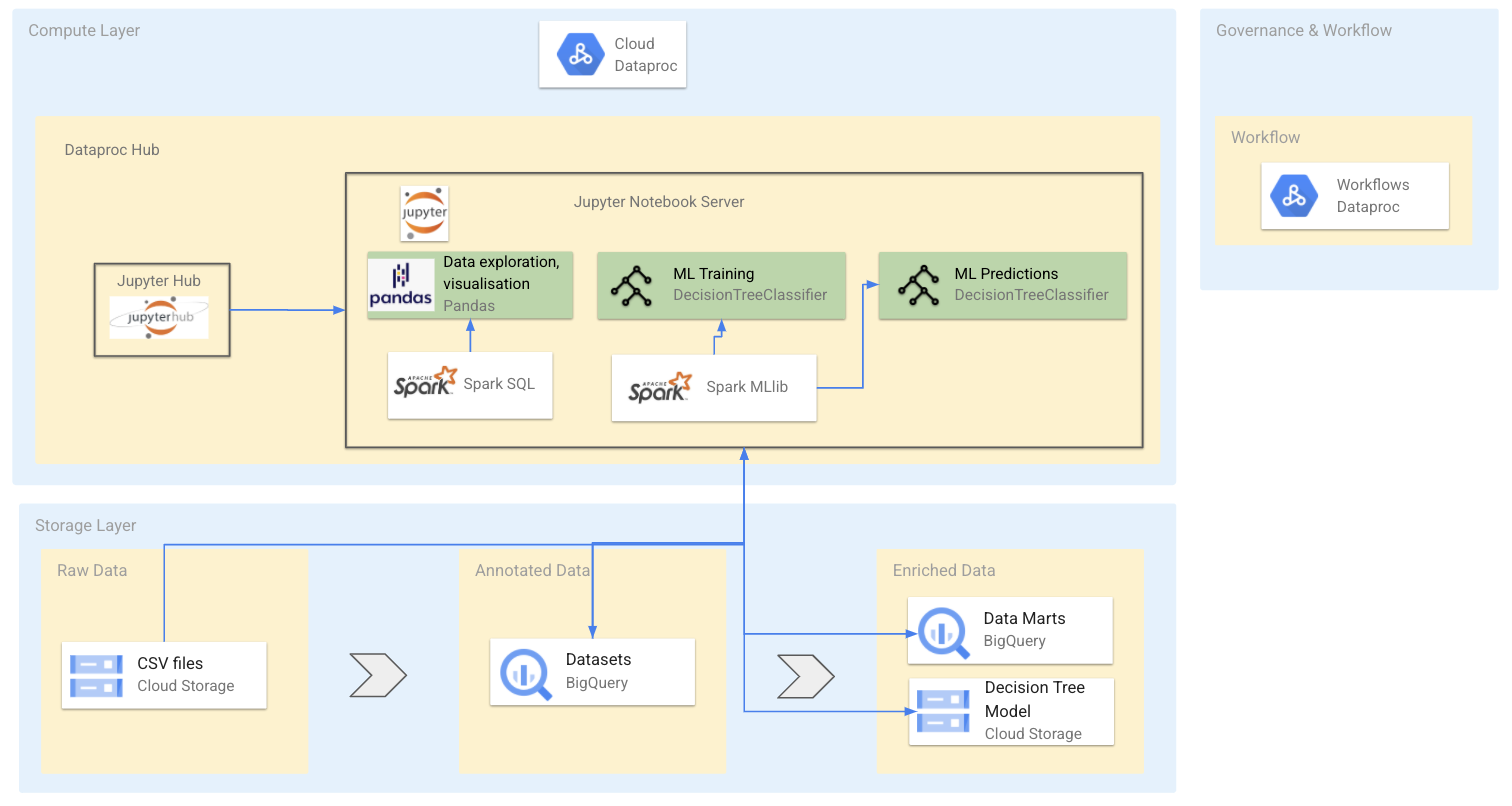
The collection of notebooks illustrates a financial services company build a data lake on Google Cloud using Spark, Dataproc and BigQuery. The team consists of data enginers, data analysts and data scientists who work together to process raw data and enrich it by predicting fradulent transactions.
This demo is designed to be run on Google Cloud Dataproc. Follow these steps to create create a Dataproc Cluster and then copy the notebook to your notebooks folder.
These steps should be run in the Google Cloud Shell
export REGION=<your-preferred-region>
export PROJECT_ID=<project-id>
gcloud services enable notebooks.googleapis.com
gcloud services enable dataproc.googleapis.com

gcloud projects add-iam-policy-binding $DEVSHELL_PROJECT_ID --member=serviceAccount:$(gcloud projects list --filter=$DEVSHELL_PROJECT_ID --format='value(PROJECT_NUMBER)')-compute@developer.gserviceaccount.com --role=roles/dataproc.admin
gcloud projects add-iam-policy-binding $DEVSHELL_PROJECT_ID --member=serviceAccount:$(gcloud projects list --filter=$DEVSHELL_PROJECT_ID --format='value(PROJECT_NUMBER)')-compute@developer.gserviceaccount.com --role=roles/dataproc.worker
gcloud projects add-iam-policy-binding $DEVSHELL_PROJECT_ID --member=serviceAccount:$(gcloud projects list --filter=$DEVSHELL_PROJECT_ID --format='value(PROJECT_NUMBER)')-compute@developer.gserviceaccount.com --role=roles/bigquery.admin
gcloud projects add-iam-policy-binding $DEVSHELL_PROJECT_ID --member=serviceAccount:$(gcloud projects list --filter=$DEVSHELL_PROJECT_ID --format='value(PROJECT_NUMBER)')-compute@developer.gserviceaccount.com --role=roles/iam.serviceAccountAdmin
gcloud projects add-iam-policy-binding $DEVSHELL_PROJECT_ID --member=serviceAccount:$(gcloud projects list --filter=$DEVSHELL_PROJECT_ID --format='value(PROJECT_NUMBER)')-compute@developer.gserviceaccount.com --role=roles/iam.serviceAccountUser
GCS bucket for Dataproc Clusters and temp storage.
export BUCKET_NAME=${PROJECT_ID}-data
gsutil mb -l ${REGION} gs://${BUCKET_NAME}
gsutil cp gs://2ca8b8fa-652a-11eb-8084-88e9fe60c70e/*.csv gs://${BUCKET_NAME}
gsutil cp gs://2ca8b8fa-652a-11eb-8084-88e9fe60c70e/cluster-config.yaml gs://${BUCKET_NAME}
-
Create a Dataproc Hub instance Go to the Dataproc→Notebooks instances page in the Cloud Console.
-
Click NEW INSTANCE → Dataproc Hub
-
On the New notebook instance page, provide the following information:
- Instance name: dataproc-hub instance name.
- Region - Select a region for the Dataproc Hub instance. Select europe-west3 if possible. Note: Dataproc clusters spawned by this Dataproc Hub instance will also be created in this region. For best performance, select a geographically close region.
- Zone: Select a zone within the selected region.
- Environment: Dataproc Hub
- Environment variables: Name=dataproc-configs Value=gs://[your BUCKET_NAME]/cluster-config.yaml
- Machine configuration: Machine Type - Select the machine type for the Compute Engine. Set other Machine configuration options.
- Click CREATE to launch the instance.
- When the instance is running, click the "OPEN JUPYTERLAB" link on the Notebooks instances page to access the instance.
- In the cluster's configuration select cluster-config and the appropriate zone. Click Start.
Once your cluster is ready go follow these steps to copy this notebook:
Go the Local Disk folder in JupyterLab Click on the plus (+) button to open the launcher Open terminal and run the cmd below to copy the notebook to your cluster
wget https://raw.githubusercontent.com/grubwieser/Datalake-training/main/1_Data_Engineer.ipynb
wget https://raw.githubusercontent.com/grubwieser/Datalake-training/main/2_Data_Analyst.ipynb
wget https://raw.githubusercontent.com/grubwieser/Datalake-training/main/3_Data_Scientist.ipynb
wget https://raw.githubusercontent.com/grubwieser/Datalake-training/main/4_Data_Ops.ipynb
wget https://raw.githubusercontent.com/grubwieser/Datalake-training/main/5_Data_Scientist_continued.ipynb
1_Data_Engineer.ipynb - Convert CSV and store in BigQuery
2_Data_Analyst.ipynb - Run SQL on tables and plot data
3_Data_Scientist.ipynb - Create ML models with Spark
4_Data_Ops.ipynb - Automate workflows
5_Data_Scientist_continued.ipynb - optimize
step - maps a unit of time in the real world. In this case 1 step is 1 hour of time. Total steps 744 (30 days simulation).

type - CASH-IN, CASH-OUT, DEBIT, PAYMENT and TRANSFER.

amount - amount of the transaction in local currency.

nameOrig - customer who started the transaction

oldbalanceOrg - initial balance before the transaction

newbalanceOrig - new balance after the transaction

nameDest - customer who is the recipient of the transaction

oldbalanceDest - initial balance recipient before the transaction. Note that there is not information for customers that start with M (Merchants).

newbalanceDest - new balance recipient after the transaction. Note that there is not information for customers that start with M (Merchants).

isFraud - This is the transactions made by the fraudulent agents inside the simulation. In this specific dataset the fraudulent behavior of the agents aims to profit by taking control or customers accounts and try to empty the funds by transferring to another account and then cashing out of the system.
