Deploying a Flask Machine Learning Application on Azure App Services.
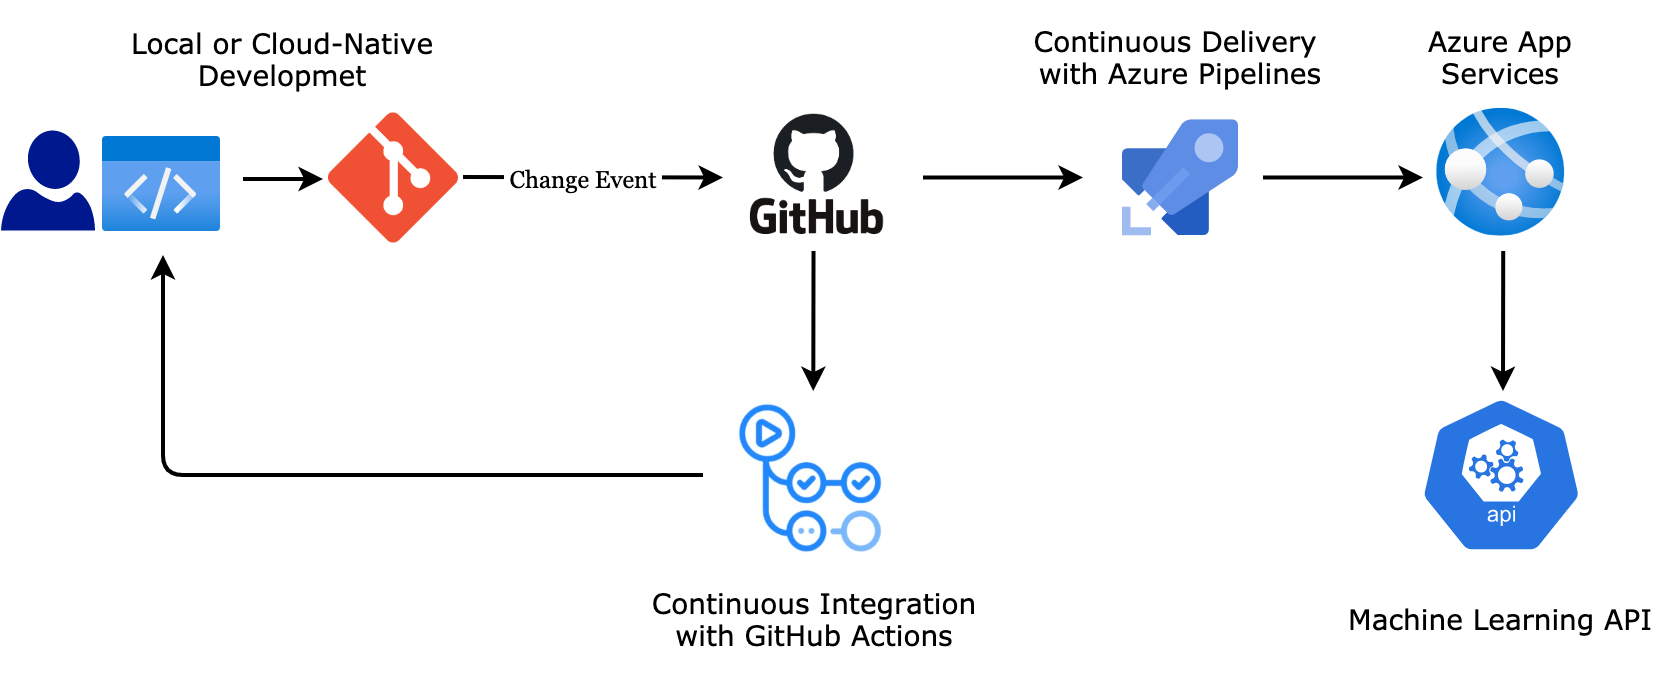
This project builds a Continuous Integration pipeline using GitHub Actions, and a Continuous Delivery pipeline using Azure Pipelines for a Machine Learning Application. The app is implemented in python using scikit-learn and the flask module. Azure App Services is used to host the application. In this repo you will find all the code and configurations necessary to implement CI/CD. The ML application is simple, however, it can be easily extended.
- Azure Account
- Azure command line interface (Only if running locally)
- Azure DevOps Account
To follow DevOps best practices, in the links bellow you will find a Kanban Trello board, and a spreadsheet showing the project plan, project deliverables and project goals.
- Fork this repository
- Log into the Azure Portal
- Launch Azure Cloud Shell
To run this project in the Azure Cloud Shell, follow the steps bellow. The same steps apply when running locally, however, you would need to log into your Azure Account from the terminal first.
- 1. Clone the forked repo in Azure Cloud Shell
- 2. Create virtual environment and source
- 3. Deploy your app in Azure Cloud
- 4. Verify Machine Learning predictions works
- 5. Verify Continuous Integration by changing app.py
- 6. Create a Webapp in Azure App Services
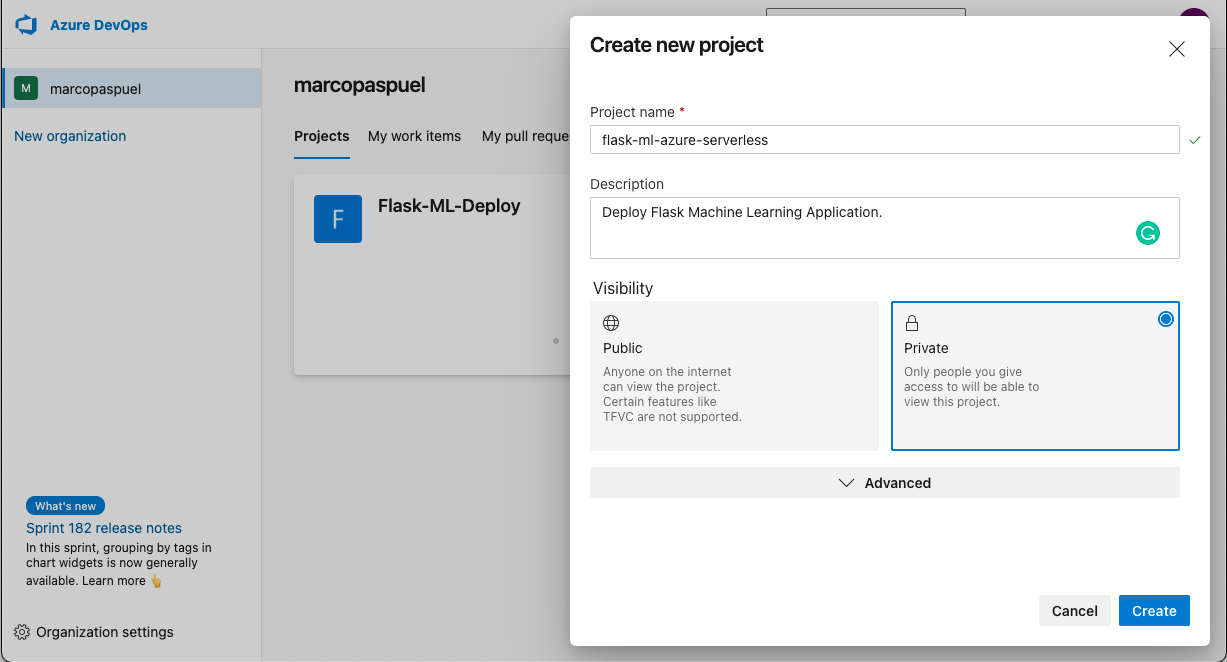
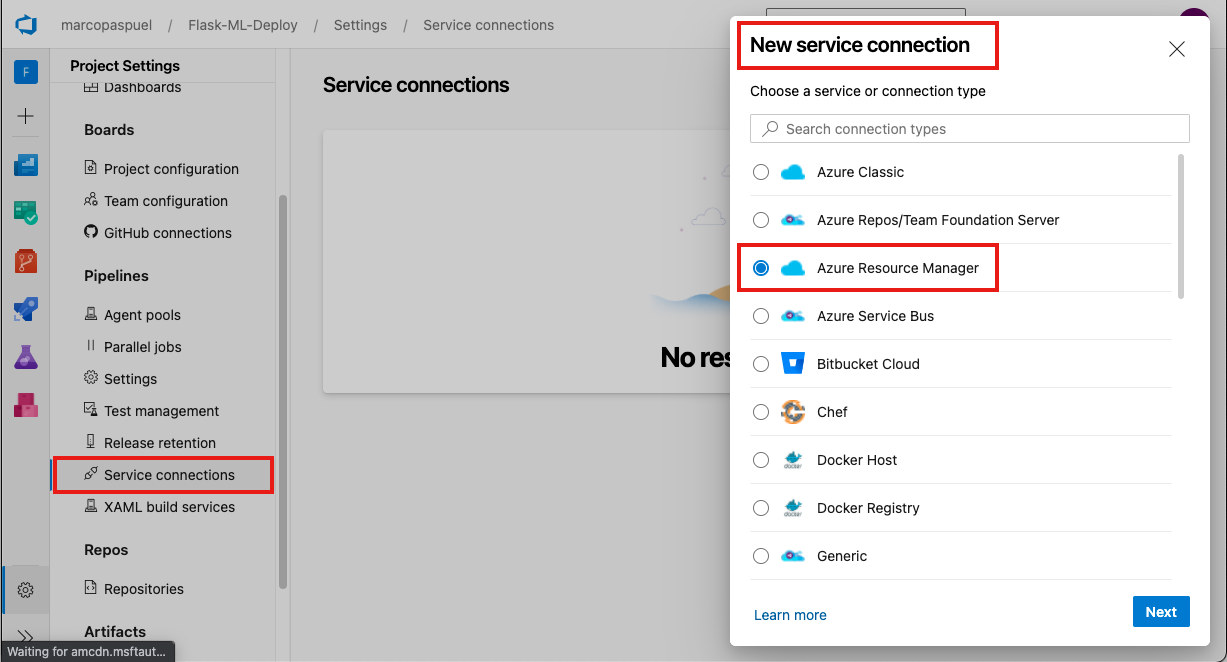
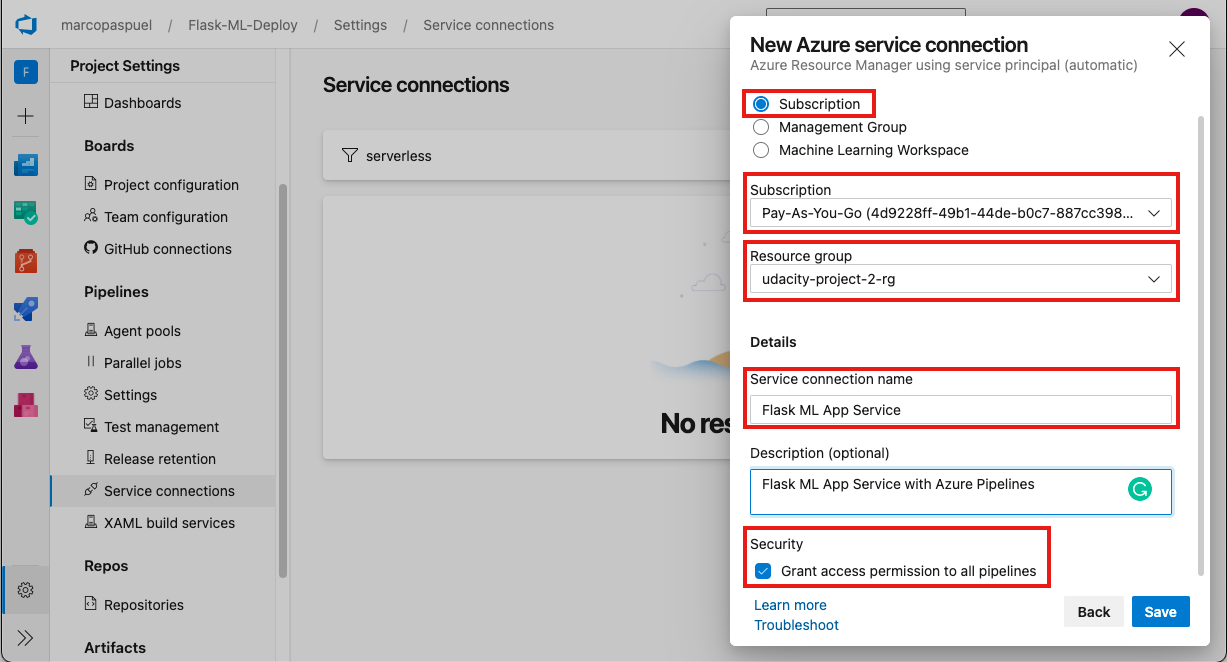
- 7. Create an Azure DevOps Project and connect to Azure
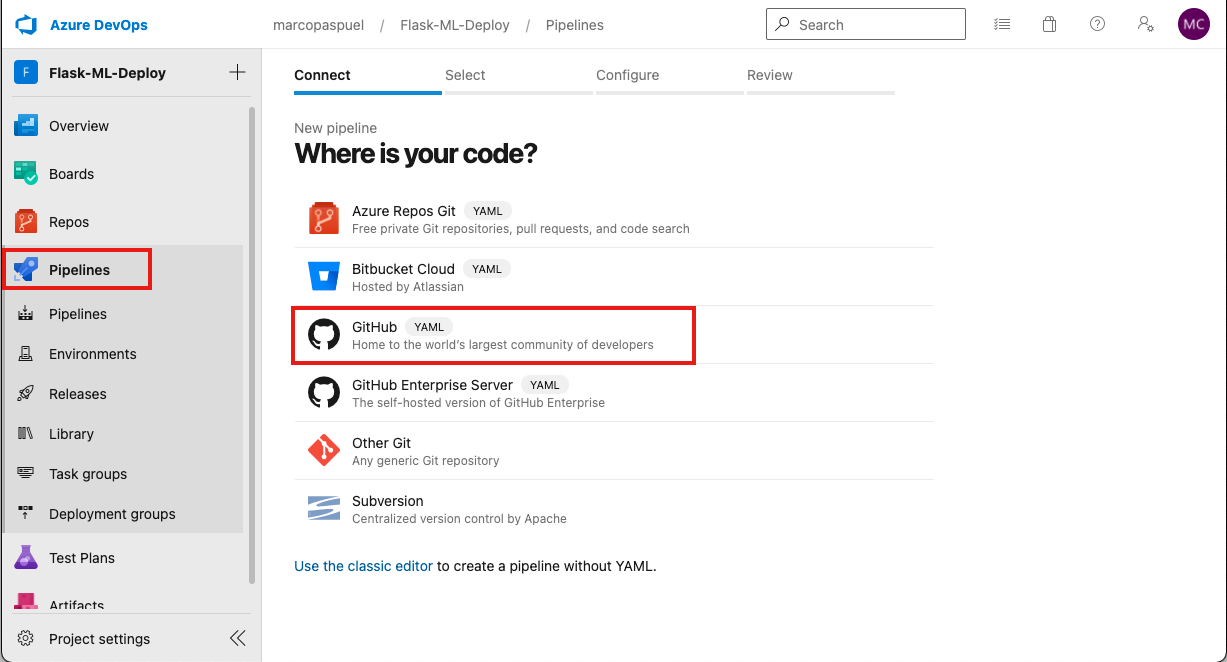
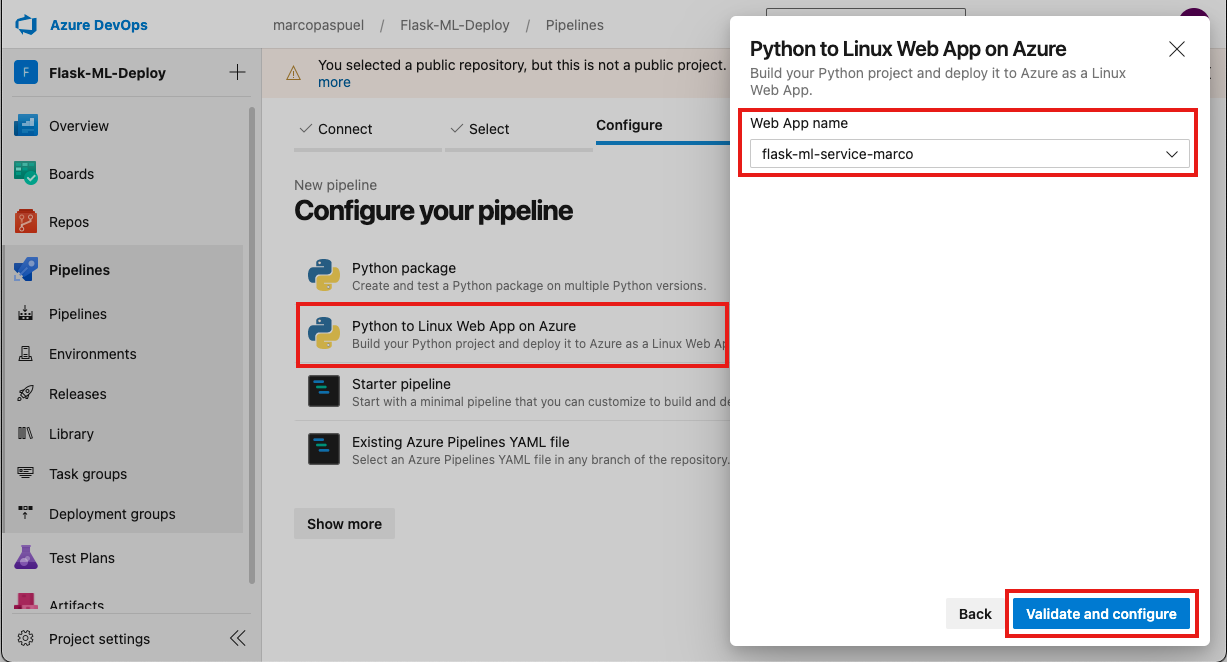
- 8. Create a Python Pipeline with GitHub Integration
- 9. Verify Continuous Delivery by changing app.py
- 10. Verify Machine Learning Prediction in Azure Apps
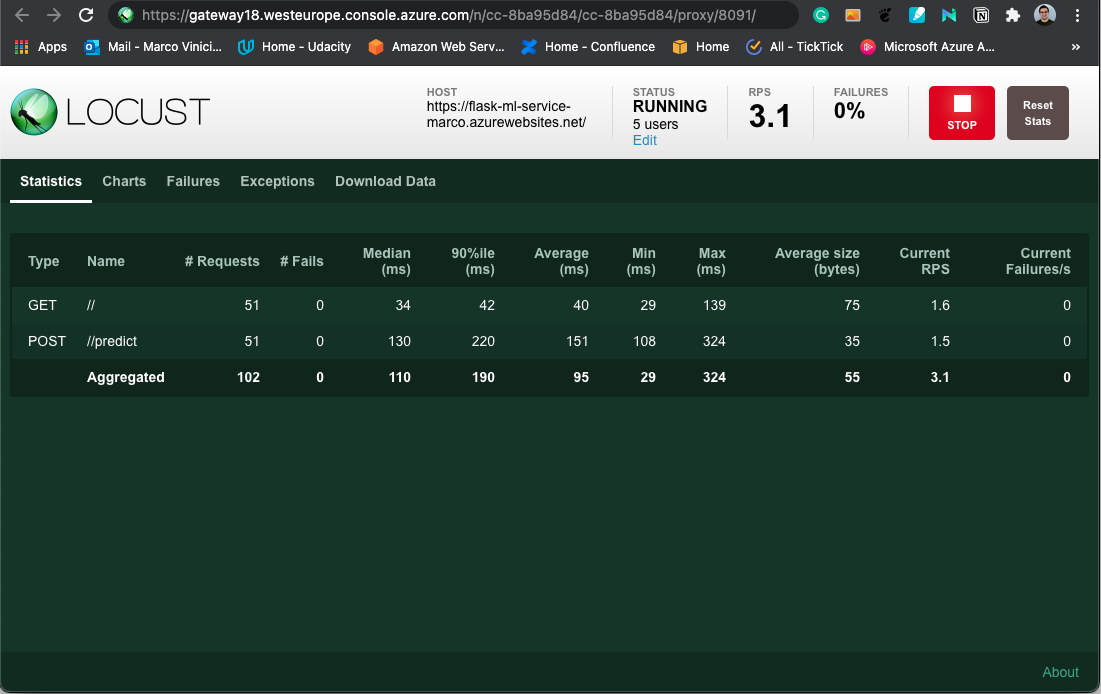
- 11. Load test the application using Locust
    git clone git@github.com:marcoBrighterAI/flask-ml-azure-serverless.git
    cd flask-ml-azure-serverless/
    ls
Note: You may need to follow this YouTube video guide on how to setup SSH keys and configure Azure Cloud Shell with Github.
    make setup
source ~/.flask-ml-azure-serverless/bin/activateTo start the app run the following commands:
    make all
    python app.py
After running both commands you should see an output like the screenshot bellow.
Now you can open the Web preview by clicking in the icon depicted with the red dot in the image above and set the port to 5000.
A new window will open, and you should see you web app running. See image bellow.

First open a new Azure Cloud Shell then run the commands bellow.
    cd flask-ml-azure-serverless/
    ./make_predict.sh
The model should predict the output depicted bellow.
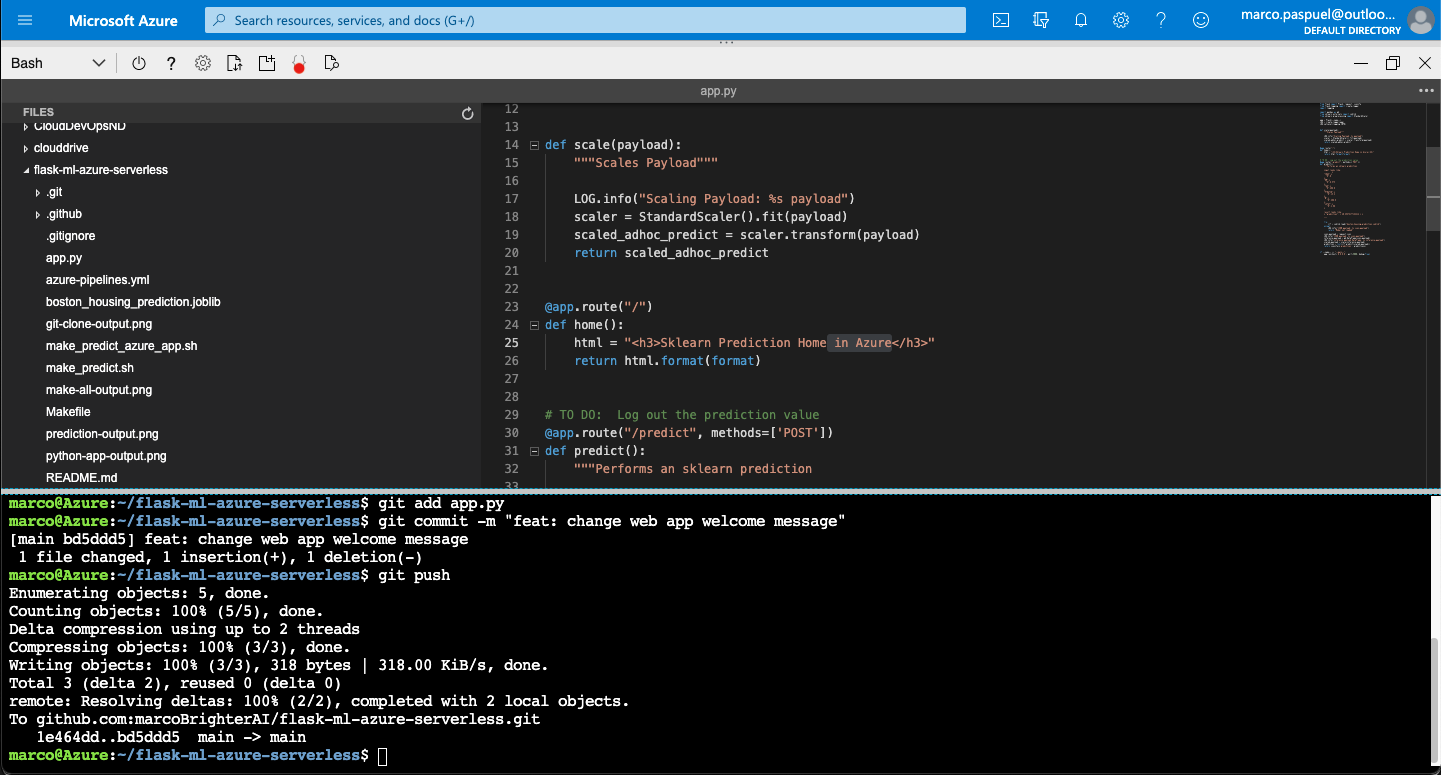
To verify that the Continuous Integration is working you can open the editor in Azure Cloud Shell and change the welcome message in the app.py script (line 25). Then commit and push your changes.
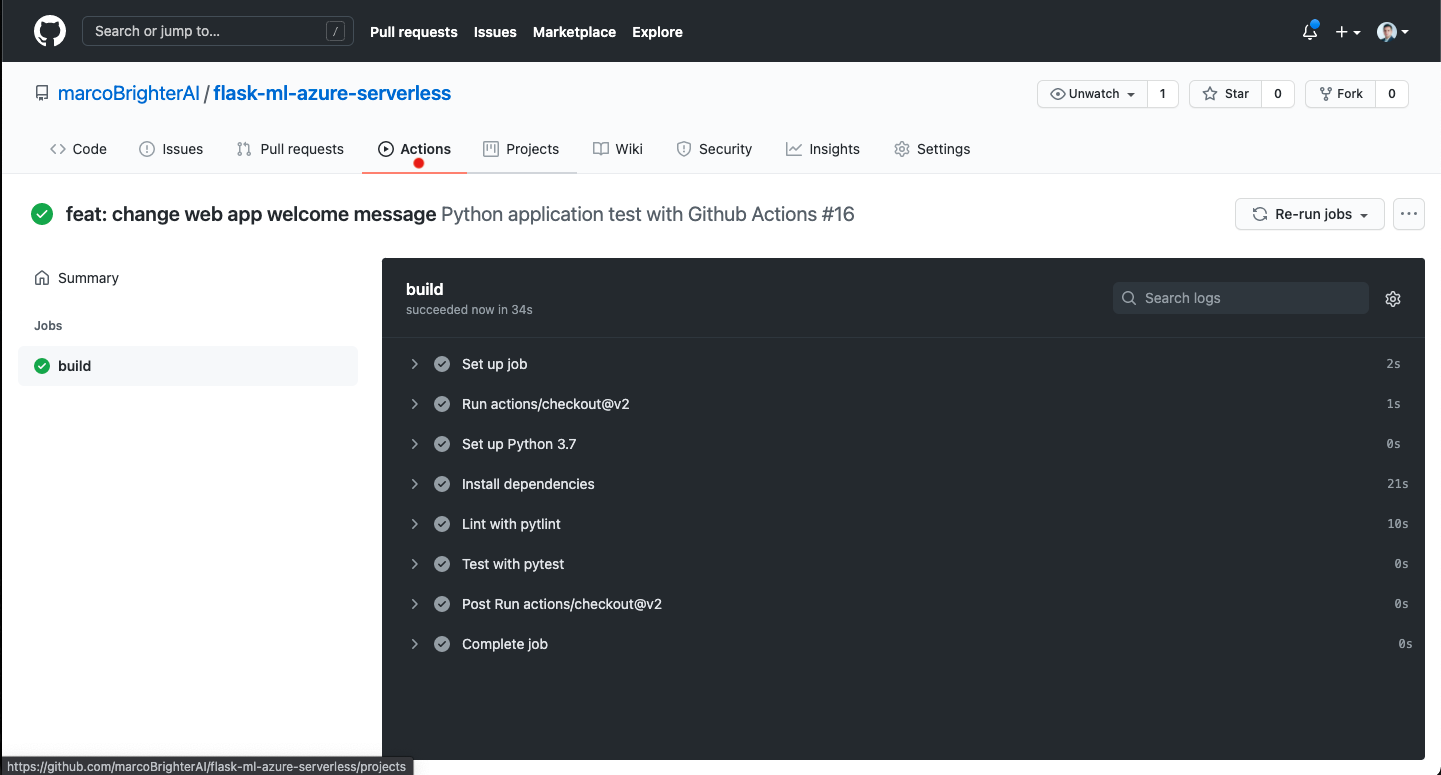
Now you can you open your GitHub repo and go to the Actions section. You will see that a new pipeline has been triggered. The pipeline will test your changes and make sure that the code is in a deployable state. See image bellow.
az group create --name "RESOURCE_GROUP_NAME" --location "LOCATION" --tags udacity=udacity-project2 az configure --defaults group="RESOURCE_GROUP_NAME" location="LOCATION"with a unique name that becomes the URL, http://<your_app_name>.azurewebsites.net.
az webapp up --name <your_app_name> --logs --launch-browserAlternately, you can run the commands.sh script, it will a resource group and then create and deploy the App service. Make sure to change the names accordingly!
For additional information of how to create an App service click on the links bellow:
The screenshots below show the steps, but if you need to, you can also refer to the official documentation for more detail.
7.1. In a browser, go to dev.azure.com.
Once you sign in, the browser will display your Azure DevOps dashboard.
Important: This project contains an azure-pipelines.yml already configure, therefore, we will rename it and use it as reference to configure the new pipeline.
mv azure-pipelines.yml azure-pipelines-old.ymlThis process will create a new YAML file that looks roughly like the azure-pipelines.yml provided with this project.
If you need to, you can also refer to the official documentation, and to the official Azure Pipeline YAML documentation for more information about it.
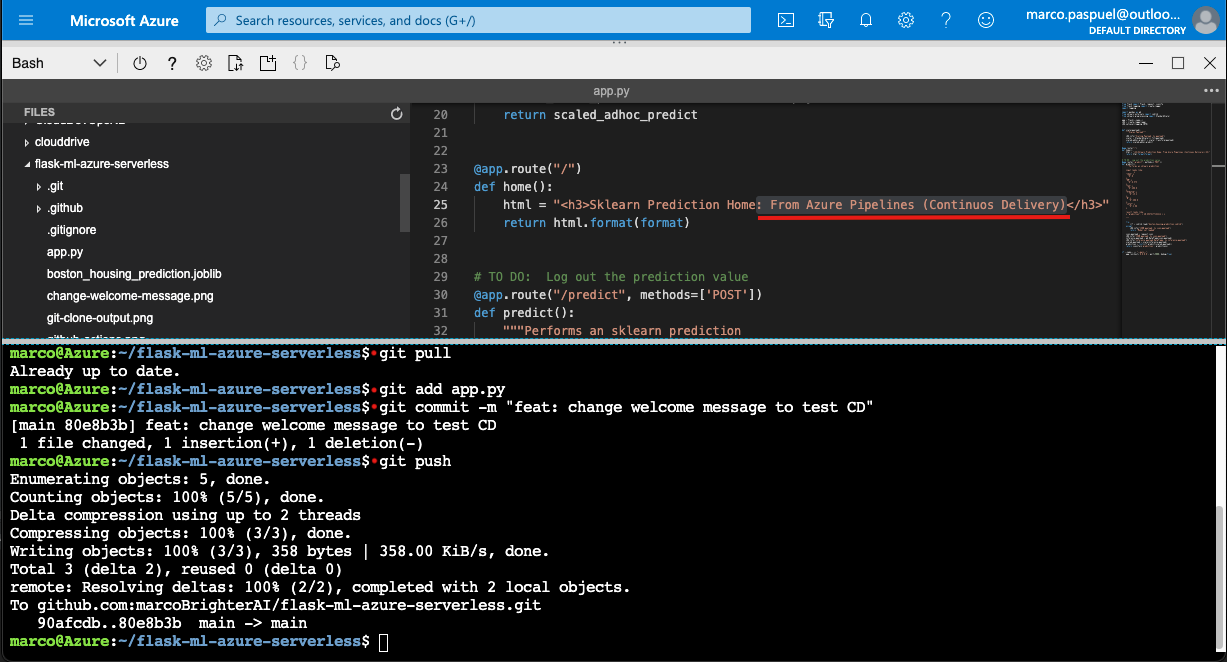
To verify that the Continuous Delivery is working you can open the editor in Azure Cloud Shell and change the welcome message again in the app.py script (line 25).
Note: You will need to pull the changes first before committing and pushing. See image bellow.
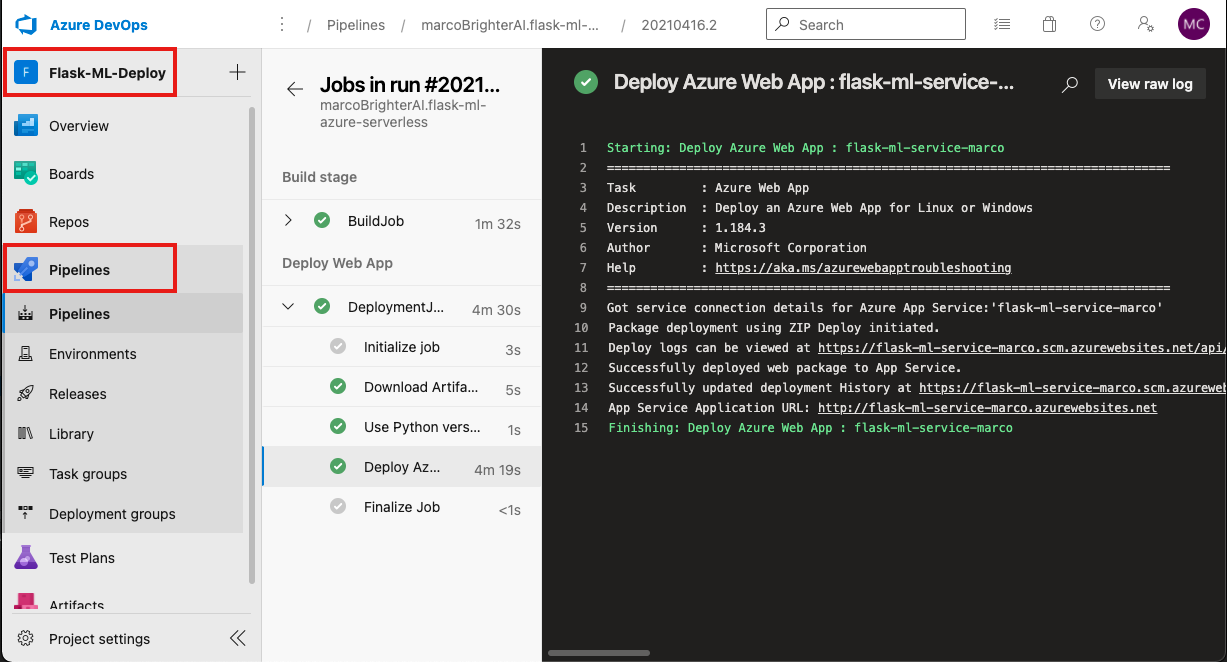
After pushing the changes you can go back to dev.azure.com. Select your project, and then select Pipelines. You will see that a new deployment has been triggered.
Once the deployment is done you can open the URL http://<your_app_name>.azurewebsites.net to see the changes.
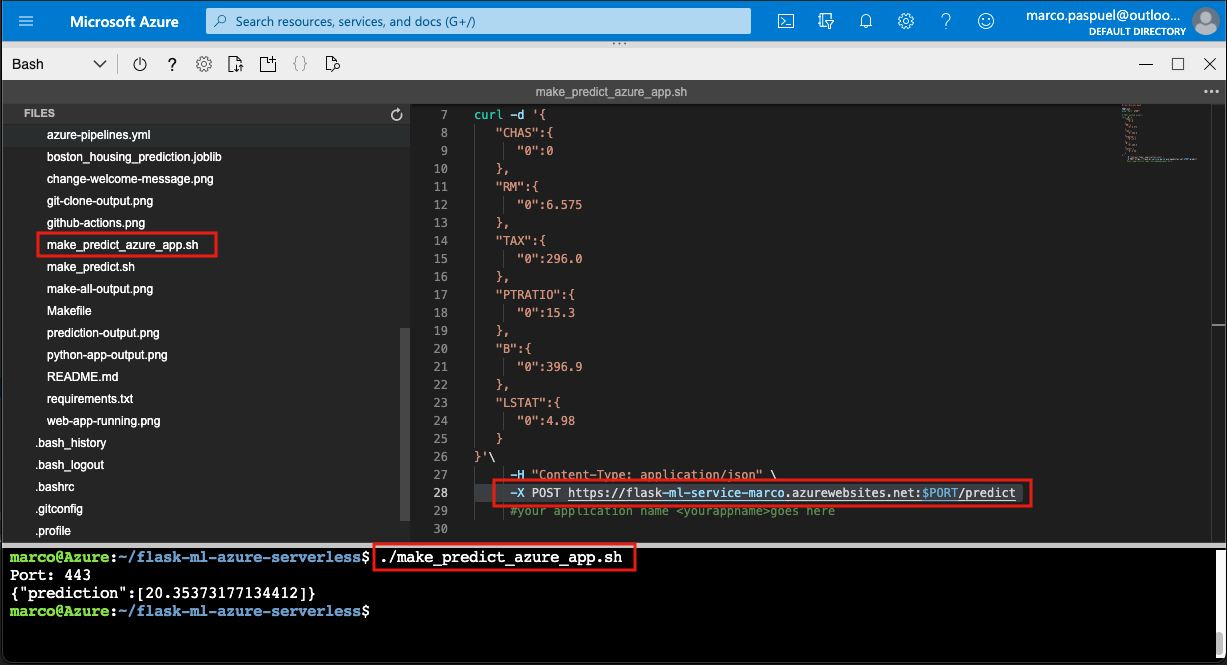
Now we can use this URL to run predictions. To do so, you can open the make_predict_azure_app.sh bash script and replace line 28 to match your app URL. Then run the following command.
./make_predict_azure_app.shSee image bellow and verity you get the same output.
You can stream the logs from your running application with the following command.
az webapp log tail --name <your_app_name> -g "RESOURCE_GROUP_NAME"Open a new terminal and navigate to the project's root directory. Then run the following commands to activate the environment and start locus.
    source ~/.flask-ml-azure-serverless/bin/activate
    locust --web-port 8091
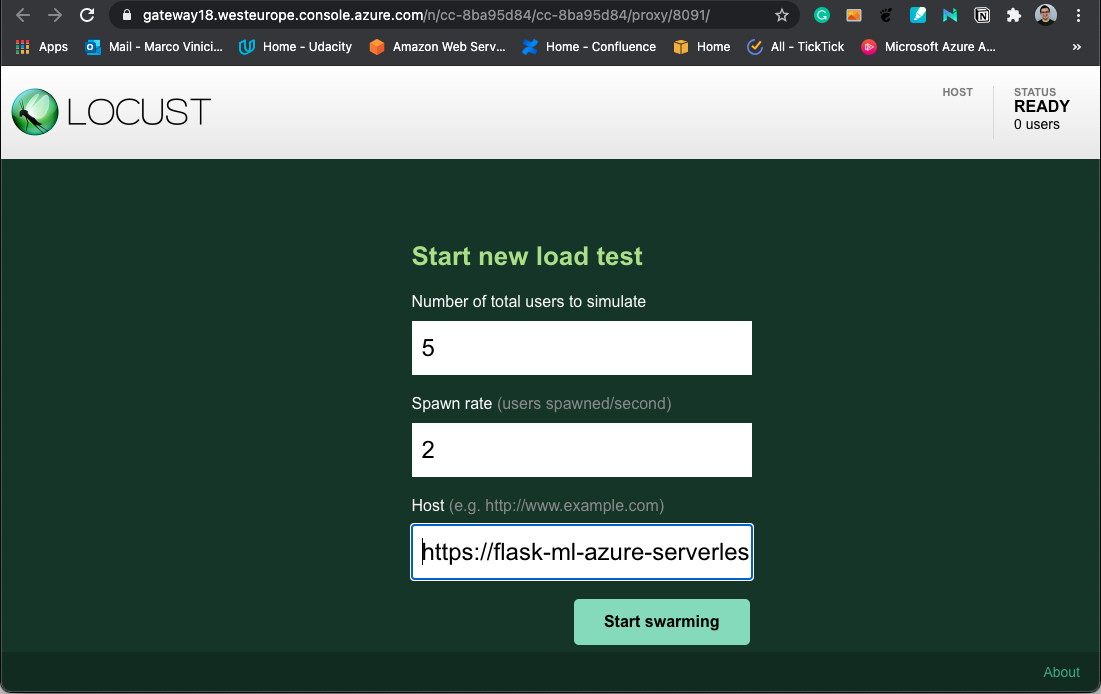
Then open a Web preview and set the port to 8091. Fill in the parameters and click start swarming. See images bellow.
- Containerize the webapp in a docker image and publish the docker image to the Azure Container Registry.
- Deploy a Kubernetes version of the project on Azure Kubernetes Service (AKS) for high scalability and cost efficiency.
- Deploy a more complex Machine Learning Application. E.g. Image Recognition.
These are all excellent official documentation examples from Microsoft that explain key components of Python-based Continuous Delivery on Azure:
