
토글 접기 / 펼치기
- Convention 맞추어서 폴더링, 주석, 변수 네이밍 붙이는 방법 숙달 완료! + GitHub 다루는 방법 확실히!
- Appearance 를 활용한 탭바 색 전환
//
//  TabBarController.swift
//  Assignment Week1
//
//  Created by 이의진 on 2022/05/22.
//

import UIKit

class TabBarController: UITabBarController {


    //**MARK: - Life Cycle**
    override func viewDidLoad() {
        super.viewDidLoad()
        self.delegate = self
        configurationUI()
    }
    //**MARK: - UI**
    private func configurationUI(){
        let tabBarAppearance = UITabBarAppearance()
            tabBarAppearance.backgroundColor = .white
            tabBarAppearance.stackedLayoutAppearance.normal.iconColor = UIColor.black
            tabBarAppearance.stackedLayoutAppearance.selected.iconColor = UIColor.black
            tabBar.standardAppearance = tabBarAppearance
            tabBar.scrollEdgeAppearance = tabBarAppearance
            tabBar.isTranslucent = false
    }
}

extension TabBarController: UITabBarControllerDelegate {
    override func tabBar(_ tabBar: UITabBar, didSelect item: UITabBarItem) {
        if item == (tabBar.items!)[2]{
            let tabBarAppearance = UITabBarAppearance()
                tabBarAppearance.backgroundColor = .black
                tabBarAppearance.stackedLayoutAppearance.normal.iconColor = UIColor.white
                tabBarAppearance.stackedLayoutAppearance.selected.iconColor = UIColor.white
                tabBar.standardAppearance = tabBarAppearance
                tabBar.scrollEdgeAppearance = tabBarAppearance

        }else {
            let tabBarAppearance = UITabBarAppearance()
                tabBarAppearance.backgroundColor = .white
                tabBarAppearance.stackedLayoutAppearance.normal.iconColor = UIColor.black
                tabBarAppearance.stackedLayoutAppearance.selected.iconColor = UIColor.black
                tabBar.standardAppearance = tabBarAppearance
                tabBar.scrollEdgeAppearance = tabBarAppearance
        }
    }

}- .을 이용한 문법 -> Struct를 enum 처럼 사용한 것!
struct Thing : RawRepresentable {
	let rawValue : Int
	static let one : Thing = Thing(rawValue : 1)
	static let two : Thing = Thing(rawValue : 2)
}- Transition 넣으면서 Root View 바꾸는 코드
let storyboard = UIStoryboard(name: “TabBar”, bundle: Bundle.main)
            guard let nextVC = storyboard.instantiateViewController(withIdentifier: “TabBarController”) as? UITabBarController else {return}
            guard let windowScene = UIApplication.shared.connectedScenes.first as? UIWindowScene, let window = windowScene.windows.first else {return}
            window.rootViewController = nextVC
            UIView.transition(with: window, duration: 0.3, options: .transitionCrossDissolve, animations: {}, completion: nil)
windowScene.windows.first?.makeKeyAndVisible()- Right View를 이용해 UI 구성하기
// **MARK: LifeCycle**
    override func viewDidLoad() {
        super.viewDidLoad()
        configureUI()
        self.loginEmail.addTarget(self, action: #selector(self.textFieldDidChange(_:)), for: .editingChanged)
        self.loginPassword.addTarget(self, action: #selector(self.textFieldDidChange(_:)), for: .editingChanged)
        self.passwordBtn.addTarget(self, action: #selector(self.tabPasswordBtn(_:)), for: .touchUpInside)
    }

    //**MARK: - UI**
    private func configureUI(){
        loginEmail.clearButtonMode = .unlessEditing
        loginBtn.isEnabled = false
        passwordBtn.setImage(UIImage(named:”password_hidden”), for: .normal)
        passwordBtn.frame = CGRect(x: 0, y: 0, width: 40, height: 40)
        passwordBtn.contentMode = .scaleAspectFit
        loginPassword.rightView = passwordBtn
        loginPassword.rightViewMode = .always
        passwordBtn.tintColor = .gray
        loginBtn.backgroundColor = UIColor(displayP3Red: 100/255, green: 150/255, blue: 250/255, alpha: 1)
    }

//**MARK: Custom Methods**
@objc func tabPasswordBtn(_ sender: Any) {
        if passwordBtn.currentImage == UIImage(named: “password_hidden”){
            passwordBtn.setImage(UIImage(named:”password_shown”), for: .normal)
            loginPassword.isSecureTextEntry = false
        } else {
            passwordBtn.setImage(UIImage(named:”password_hidden”), for: .normal)
            loginPassword.isSecureTextEntry = true
        }

}- URL로 이미지 불러오는 코드 예시 (아직 정확한 원리를 이해하지는 못함)
extension UIImageView {
    func loadImage(url: URL) {
        DispatchQueue.global().async { [weak self] in
            if let data = try? Data(contentsOf: url) {
                if let image = UIImage(data: data) {
                    DispatchQueue.main.async {
                        self?.image = image
                    }
                }
            }
        }
    }
}- 좋아요 버튼 누르기 예제를 통해 Delegate Pattern 익히기
토글 접기 / 펼치기
- 테이블 뷰 내에 Case 문을 이용해 셀을 구분한 문법
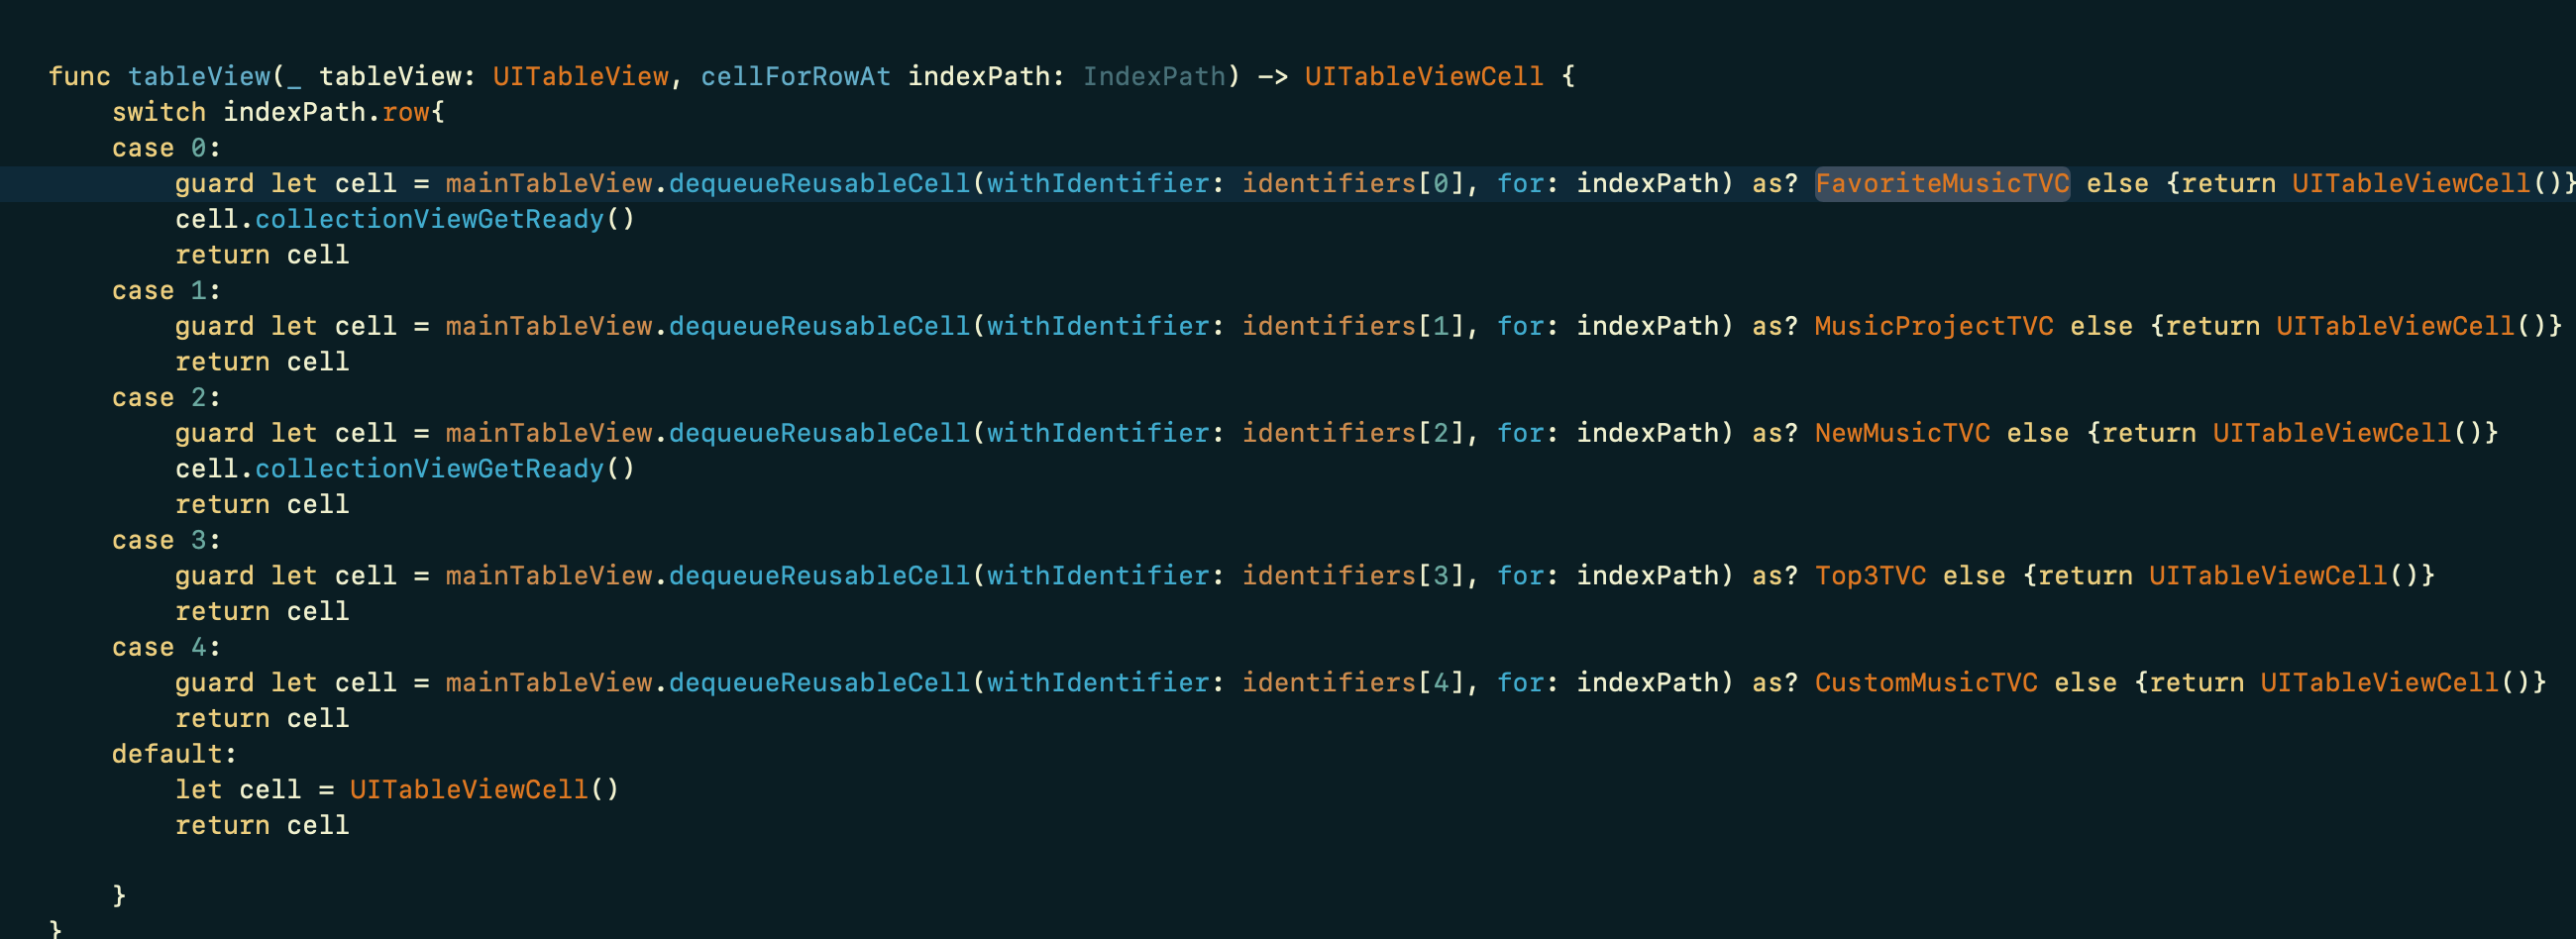
(cell을 리턴할 때 콜렉션 뷰가 있는 셀에 대해서는 nib 등록과 delegate를 등록해야함 이를 collectionViewGetReady 함수를 이용해 구현함)
-
컨트롤 키를 누르고 당겨서 비율로 오토레이아웃을 설정할 수 있는데
가급적 비율을 이용해서 동적 길이에 대응할 수 있도록 오토레이아웃을 설정할 수 있어야 한다.
- 오토레이아웃이 잘못 잡혔더라도 빌드가 성공하는 경우가 있는데, 이 경우 커멘드 창에 해당 해러가 출력이 된다.
이 사이트를 이용하면 아래 사진과 같이 프린트 문에 적힌 Constraint 들이 그림으로 뜨게 되고 이를 통해 어떤 뷰에서 문제가 발생했는지 탐색한다.
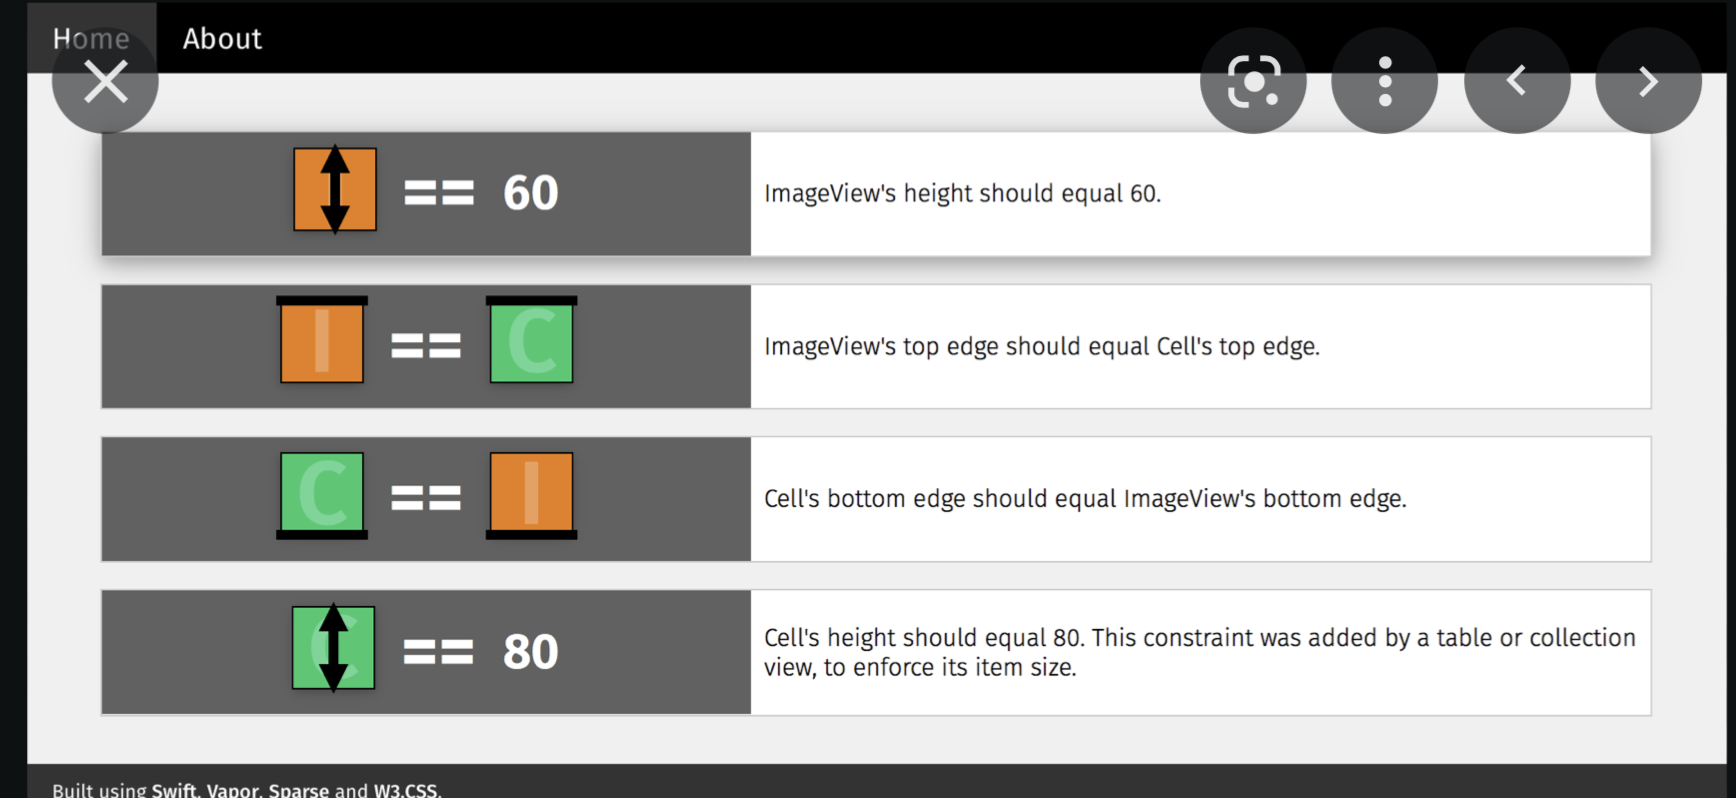
탐색이 완료되면 그 중 커멘트 창에 Breaking Constraint 라고 써져있는 부분의 Constraint를 지우게 되면 에러가 줄어든다.
이렇게 중복 Constraint가 걸리면 문제가 생길 수 있으니, 노하우를 길러서 필요한 Constraint"만" 걸어주는 태도가 중요하다.
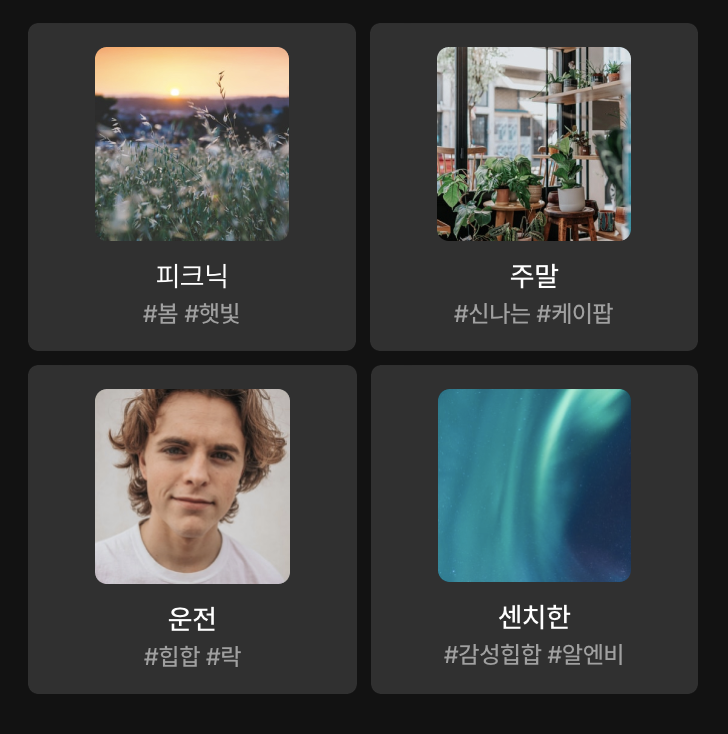
- 스택 뷰를 두 번 쌓아 아래 사진과 같은 그리드 UI를 구현할 수 있다.
- 동적으로 정해지는 컬렉션 뷰 셀 높이를 이용해 컬렉션 뷰 영역의 높이를 동적으로 조절하는 것은 스보에서 불가능하고 코드에서만 가능하다.

위의 질문 응답 결과가 1번 질문은 inset을 주는 방법으로 해결할 수 있고 2번 질문은 코드로만 가능하다
가 답변 내용이었다.
- 테이블 뷰를 이용해 구성하는 것 말고 스택뷰 + 스크롤 뷰 조합으로도 구성할 수 있는데 이 방법에 대한 영상 링크는
https://www.youtube.com/watch?v=_w_KeTBOiuE&t=194s
-
테이블뷰 방식은 ReusableCell을 이용할 수 있는 장점이 있으나, 구현이 어렵고 Reusable Cell을 이용하면서 발생하는 오류를 탐지하는 로직을 넣어야 하는 등 고장 위험이 크다는 단점이 있다.
-
스택뷰 방식은 구현이 쉽고 고장 위험이 적다는 장점이 있으나, Reusable Cell을 이용할 수 없다는 단점이 있다.
-
따라서 Reusable Cell을 적극적으로 이용하는 경우는 스택을 이용한 구현 방식이 좀 더 효과적이다.
-
나는 그 사실을 클디 과제를 시작할 때 인지하지 못했기도 했고 테이블 뷰로 구현하기로 합의도 봐서 테이블 뷰로 구현을 했다
13 섹션에 헤더를 넣는 코드는 사진 5처럼 구현하면 되는데, 헤더가 있는 섹션의 경우 헤더에 들어갈 xib를 등록해주고 없으면 nil Height는 헤더가 있는 섹션은 높이 (또는 autodimension) 없는 섹션은 0
-
탭노트 라이브러리 -> 최상단에 뷰를 위치시킬 수 있는 라이브러리
-
타이틀 부분 -> 스택 뷰를 이용해서 hidden 속성 이용해 구현 가능할 수 있다!
-
테이블 뷰 상황에서 네트워크 통신하는 방법 Ref Code
- 지금까지 공부한 내용 총 정리 -> 개인 정리 블로그 링크 📚
- Personal 솝커톤 (날씨 앱 클론 코딩 - 제한 시간 내에 구현하기)
- Personal 솝커톤 (시계 앱 클론 코딩 - 제한 시간 내에 구현하기)
- Code Base로 짜는 방법 익혀두기
- Git 다루기 연습
- Swift 헷갈리던 문법 요약 정리