A rapid and lightweight engine for small websites
Hanya runs best with PHP 5.3, but should run with PHP 5.2 (roughly tested)
- Download the repository as archive and extract it in your working directory.
- Edit the
RewriteBaseparameter in the .htaccess file to fit your remote or local configuration. - Set the rights of the system, uploads and user directory to 0777 recursively.
- Alter the default configuration in the index.php.
If you encountering problems check the Configuration section to run hanya in debuge mode.
The main feature of hanya is the simple request router. Each request will be mapped to an physical html file in the tree directory which holds the content of the page.
http://www.domain.com/directory/page => tree/directory/page.html
In these html files you can place your code for the page. At default each page will be wrapped with the elements/templates/default.html template. To alter this behavior you can add a template variable to the meta informations on top of the page file:
//--
title = "My Page Title"
template = "another"
--//
<p>content of my page</p>
...
The template variable will tell hanya to load the elements/templates/another.html to wrap the page. You hear more about meta informations later.
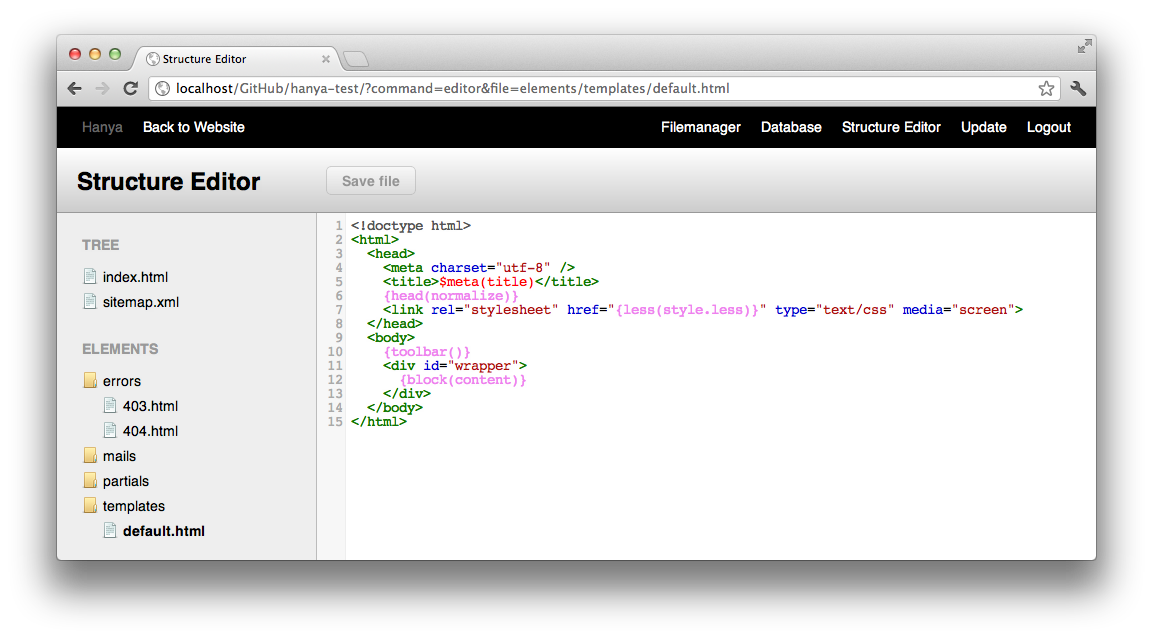
The default html5 template will look like this:
<!doctype html>
<html>
  <head>
    <meta charset="utf-8" />
    <title>$meta(title)</title>
    {head()}
    <link rel="stylesheet" href="{asset(style.css)}" type="text/css" media="screen">
  </head>
  <body>
    {toolbar()}
    {block(content)}
  </body>
</html>
In the example above you will find many unusual markup. This Markup is hanya related an will processed at each request.
- The
$meta(title)variable will replace it self with the value set in the meta information of the page. - The
{head()}tag renders system css and js includes to make the system working properly. jQuery is included as default. - With
{asset(style.css)}you have a shortcut to files in the assets directory. - One of the most important tags is the
{toolbar()}tag. It will render the login button and after login the hanya admin toolbar. - At the position of
{block(content)}your page will be injected.
As you will see the hanya system gives you handy variables and tag markup to enhance your boring html sites.
The working directory of your hanya installation consists of the following directories:
- assets (all image, stylsheet and javascript files goes in this directory, don't touch the system directory!)
- elements (place your mail templates, error pages, partials and layouts in their subdirectories)
- system (don't touch this!)
- tree (your sites page tree)
- uploads (all upload over the system goes here)
- user (the DB, your definitions, translations, plugins and tags)
Hanya is a system that will run out of the box. But some features needs some configuration.
All configuration is set in the index.php file by the Hanya::run(...) statement.
At default hanya creates an SQLite database in user/db.sq3 to store all db related data. For the small sites you are building with hanya a SQLite DB is enough. Furthermore you have on special advantage to an SQL Database: If you upload or download your project, you never again have to dump or load your mySQL Database. If you still want to connect to an mySQL Server use this configuration:
"db.driver" => "mysql"
"db.location" => "mysql:dbname=hanya;unix_socket=/tmp/mysql.sock"
"db.user" => "root"
"db.password" => "toor"
Check the PHP Manual for PDO connections to see available configuration for db.location.
Hanya has a builtin I18n translation system, but at the moment you can run the system only in one language. I don't knowh if there will be multiple language feature soon. However define your languages (one at the moment) and set it as default.
"i18n.languages" => array("de"=>array("timezone"=>"Europe/Berlin","locale"=>"de_CH")),
"i18n.default" => "de",
An english and german translation is built in for all system messages. Check the translation section to read about creating your own translations.
To give your customers access to the admin toolbar, add their credentials and set custom privileges:
"auth.users" => array(
	"admin" => array("pass"=>"admin","privileges"=>array("god"))
),
There are several privileges distributable:
* god - you can do what you want
* filemanager_access
* database_access
* editor_access
* updater_access
Currently there are no roles for users, so it will be enough to create one user.
If you want to run the system in debug mode issue this configuration:
"system.debug" => true
Hanya will create not existing tables automatically if they are needed. You can disable this behavior:
"system.automatic_db_setup" => false
The configuration options for the mailing system are covered in their section.
Hanya has a builtin sitemap generator which creates a sitemap.xml depending on your tree directory structure. To turn it off issue:
"system.sitemap_generation" => false
If you have turned automatic generation off check the Sitemap section for manual generation instructions.
If you maybe want to disable the inline update feature:
"system.updateable" => false
Sometimes you need a information about your page in the layout to render as example the <title>..</title> tag. With meta informations you can describe these variables in your page and use them later in your layout:
//---
title = "My page title"
subtitle = "Another important title"
//--
Now use them in your layout or partial:
...
<title>$meta(title)</title>
...
<h2>$meta(subtitle)</h2>
...
The hanya system markup in curly braces like {toolbar()} is a hanya tag which gets proccessed on each request.
There is a bunch of other system tags:
-
{head()}will render the system css and javascript includes. A reset CSS is automatically incluced. If you are more in love with the normalize.css, issue{head(normalize)}. -
{toolbar()}will output the hanya login button or if logged in the hanya admin toolbar. -
{anchor(title|url)is turning into<a href="url">title</a>. Additionally it will add a link-current css class if the url matches the current request url or it will add a link-active class if the url matches a part of the url (from the beginning).
The {head()} tag also renders <base path=""> with the url to the working directory. So all other paths can be relative to this directory.
-
{link(path)}will return the relative path to a page. -
{asset(path)}will return the relative path to an asset. -
{upload(path)}will return the relative path to an upload. -
{less(path)}will return the command querry to preprocess a less stylsheet. (Use like{asset(...)})
-
{attach(block|mode|(path/html))}lets you add html markup or load a file into an block, which can be render later with the block tag. To append html markup to an block use:{attach(block(my-block|html|<p>some html markup</p>))}. If you want to append the content of a partial use:{attach(my-block|file|my-partial)}. This will append the content of elements/partials/my-partial.html. -
{block(name)}renders the given block at this position. The content of your page ist se to the content block. -
{include(partial)}loads and renders a partial like elements/partials/partial.html -
{if(a|b|true|false)}compares the first two arguments. If the comparison is true the third argument will be rendered otherwise the fourth argument or nothing. -
{system(command)}will execute pre defined system commands. -
{redirect(a/path/to/a/page)}will redirect to the following page.
-
{html(id)}loads editable html markup from the database. -
{text(id)}loads editable text from the database. -
{string(id)}loads an editable string from the database. -
{image(id)}loads and editable image from the database. -
{new(definition|arguments...)}renders a link to create a new definition object. This will be covered later.
With Conditions you can check variables of existence and truness. The following meta variable is set in a page file:
...
subnavigation = false
...
Check it in your layout:
...
[?($meta(subnavigation))]
	<div id="subnavigation">
		...
	</div>
[?:]
	... (else part)
[/?]
...
Important is when you nest conditions add an minus for each level of nesting before the question mark:
...
[?($meta(condition1)))]
	[-?($meta(condition2)))]
		[--?($meta(condition3)))]
			...
		[/--?]
	[/-?]
[/?]
...
To this point hanya has a static routing where request will be mapped to its physical files. To get more dynamicness dynamic points will break that pattern and give you a handy function to create dynamic urls. You will need this functionalty only with the definitions but i will explain it first. Issue the following url pattern:
http://www.domain.com/news/a-nice-looking-slug-for-my-news => http://www.domain.com/news(/:slug)
The simplest way is to create a tree/news/a-nice-looking-slug-for-my-news.html file with the content for your news. But i will be more cool to have the news stored in a DB to push them into a template an render it. The best way is to tell hanya your dynamic url patterns as dynamic points. Add the following statements to the index.php above the hanya::run(... statement:
Hanya::dynamic_point("news","(/<slug>)");
This statement tells hanya to search for news (first argument) at the beginning of your url and use the remainig url after the / as a variable (second argument). The request will be automatically mapped to the tree/news.html (first argument). In this file you get a new magical variable for the slug:
<p>You requested the news: $request(slug)</p>
Use this variable in combination with definitions.
You can also add more difficult patterns:
Hanya::dynamic_point("company/news","(/<category>(/<slug>(/<part>)))");
hanya renders the page of the first argument even if there is no remaining url. The default vaule of all variables will be NULL.
The definition system is the greatest part of the whole hanya story it let you create models (definitions) of objects which can loaded and rendered in your pages. The best thing is that all content can be edited by your customer in the page itself. The only thing you have to carry about is your definition class, the rest will be handled by hanya.
In the example above we created a dynamic point for our news, now we want to create a definition for that:
Create user/definitions/news.php with the following content:
class News_Definition extends Definition {

	public $blueprint = array(
		"title" => array("as"=>"string"),
		"slug" => array("as"=>"string"),
		"intro" => array("as"=>"text"),
		"full" => array("as"=>"html"),
	);

}
This class explains your definitions blueprint to hanya. On the next request hanya will automatically create a table with fields to store the data. Now we want to render a list of news in our tree/news.html:
<h1>Actual News</h1>
[news()]
	<h2>$news(title)</h2>
	<p>$news(intro)</h2>
	<p><a href="{link(news/$news(slug))}">Read more</a></p>
[/news]
{new(news)}
The defined partial will be render for each item in your news table and creates a list of your news with a link to its item. The {new(news)} tag will render a button which will appear in "page editing" mode to let the user create a new news object. The admin functionalities will be covered later in this documentation.
To render our news item in the page we need to overload the load method of the definition to load only one item by a slug:
public function load($definition,$arguments) {
	if(count($arguments) == 2 && $arguments[0] == "item-by-slug") {
		// Return Item
		$table = ORM::for_table($definition)->where("slug",$arguments[1]);
		return Helper::each_as_array($table->find_many());
	} else {
		// Return List
		$table = ORM::for_table($definition)->order_by_asc("ordering");
		return Helper::each_as_array($table->find_many());
	}
}
If we pass the argument item-by-slug and the slug we get our item, else all items from the table are returned.
The rendering of a news item is also set in the tree/news.html page file. So we need to check if there is an slug added to the url to view the item or when not view the news list. To cover this issue we use a condition to check for the $news(slug) variable availability. We extend the example from above by that code:
[?($request(slug))]
	[news(item-by-slug|$request(slug))]
		<h1>$news(title)</h1>
		$news(full)
	[/news]
[?:]
	<h1>Actual News</h1>
	[news()]
		<h2>$news(title)</h2>
		<p>$news(intro)</h2>
		<p><a href="{link(news/$news(slug))}">Read more</a></p>
	[/news]
	{new(news)}
[/?]
The condition will check our slug variable and if it exists it will render the first part of the condition. If the variable is null the other part gets rendered.
Now you see how easy it is to create simple definitions of content, and give your html sites little bit dynamicness.
You can nest definition blocks to follow references. Consider a category definition which has many news. Don't forget to add a reference field to the news definition:
...
<h1>Actual news by category</h1>
[category()]
	<h2>$category(name)</h2>
	<ul>
		[news(in-category-by-slug|$category(slug))]
			<li><a href="{link(news/$category(slug)/$news(slug))}">$news(title)</a></li>
		[/news]
	</ul>
[/category]
{new(news)}
...
To setup this situation you have to create category definition with a name and slug field. Add to the news definition a reference field and overload the load function to load news by a category slug. Use conditions to check the url for a category slug an then again for news slug. If not provided view a list of category, news in a category or the news item.
Use this field types to make your definitions more exclusive:
"string" => array("as"=>"string")
"text" => array("as"=>"text")
"html" => array("as"=>"html")
"textile" => array("as"=>"textile")
"markdown" => array("as"=>"markdown")
"boolean" => array("as"=>"boolean")
"number" => array("as"=>"number")
"time" => array("as"=>"time")
"date" => array("as"=>"date")
"selection" => array("as"=>"selection","options"=>array(""=>"None","opt1"=>"Option 1","opt2"=>"Option 2"))
"reference" => array("as"=>"reference","definition"=>"my-definition","field"=>"value")
"file" => array("as"=>"file","folder"=>".","blank"=>true,"upload"=>true) // will add a name_path magic variable too
If you add, remove or alter fields in the blueprint, hanya will not push the changes to the table at this time. You have to delete the table or edit it with your favorite SQLite or mySQL Utility.
All definitions have a ordering field as default to let the user order them with up and down arrows. You can disable ordering with:
public $orderable = false;
As default the ordering will treat all items if a table in a group. If you have as example news in categories and you want a ordering structure for each category. So you need to set the groups variable:
public $groups = array("category"); // multiple groups are possible
You can also overload the create function of your definition. Check this sample definition:
class Image_Definition extends Definition {

	public $groups = array("owner");

	public $blueprint = array(
		"title" => array("as"=>"string"),
		"file" => array("as"=>"file","blank"=>false,"folder"=>"images","upload"=>true),
		"owner" => array("as"=>"string","hidden"=>true)
	);

	public function create($entry,$argument) {
		$entry->owner = $argument;
		return $entry;
	}

	public function load($definition,$arguments) {
		$table = ORM::for_table($definition)->order_by_asc("ordering")->where("owner",$arguments[0]);
		return Helper::each_as_array($table->find_many());
	}

}
You can pass arguments to the create function by adding them to the new tag:
{new(image|my-owner-a)}
To make your definitions more complex you can overload the events methods to add more logic to your definitions:
public function before_create($entry) {
	$entry->field = "override value";
	return $entry;
}

public function before_update($entry) {
	$entry->field = "override value";
	return $entry;
}

public function before_destroy() {
	return true;
}
There are some more options you can set in your definition class:
// is definition managed by hanya? (renders edit functionality)
public $managed = true;

// is object destroyable?
public $destroyable = true;

// the default config for each field (if you have a hundred of string fields)
public $default_config = array(
	"hidden" => false,
	"label" => true,
	"validation" => array(), // validation is not supported at the moment
);
If you want to prohibit edition of a definition for a block only, add a exclamation mark before the definition name:
...
[!news()]
...
By creating your first definition you will see that you have to create your own translation files for field labels and buttons in the admin interface. Check the Translation section for more information.
Hanya has an integrated mailing system. You can easiy create contact or ordering forms in html and create a template for the email.
First you have to specify your forms in the index.php:
"mail.sender" => "hanya@example.com",
"mail.forms" => array(
	"contact" => array("reciever"=>"mail@example.com","subject"=>"The Subject","protection"=>"javascript")
)
Protection variants are currently:
* none (default) - does nothing
* token - checks for a given token - include `<input type="hidden" name="token" value="{token()}" />`
* javascript - advanced token check with javascript  `<input type="hidden" class="hanya-javascript-token" name="token" value="{token()}" />`
* captcha - check provided catpcha with recaptcha service
Then create a form on a page:
<form action="?command=mailer" method="post">
  <input type="hidden" name="form" value="contact" />
  <input type="hidden" name="token" value="{token()}" />
  <label for="mail[name]">Name</label>
  <input name="mail[name]" />
  <label for="mail[subject]">Subject</label>
  <input name="mail[subject]" />
  <label for="mail[message]">Message</label>
  <textarea name="mail[message]"></textarea>
  <input type="submit" value="Send" />
</form>
Create your mail template elements/mails/contact.html:
<h1>Contact Request from <strong>$mail(name)</strong></h1>
<h2>Subject: $mail(subject)</h2>
<p>$mail(message)</p>
To inform the user if the mail has been submitted use:
[?($system(mail-sent))]
	<p class="info">You'r mail has been sent to our helpdesk!</p>
	{system(reset-mail-sent)}
[/?]
Remove the {system(reset-mail-sent)} if you want to print the information more than once.
Recaptcha integration is easily done by:
{captcha()}
and setting the following configuration settings:
"mail.forms" => array(
	"contact" => array("reciever"=>"mail@example.com","subject"=>"The Subject","protection"=>"captcha")
),
"recaptcha.publickey" => "PUBLIC_KEY",
"recaptcha.privatekey" => "PRIVATE_KEY"
I think if you read the previous sections, you will understand the exmaples. ;)
At default the sitemap will be generated automatically. If you have disabled this feature as described in the Configuration section you have to create the sitemap manually.
Create the file tree/sitemap.xml:
//--
template = false
--//
<urlset xmlns="http://www.sitemaps.org/schemas/sitemap/0.9" xmlns:xsi="http://www.w3.org/2001/XMLSchema-instance" xsi:schemaLocation="http://www.sitemaps.org/schemas/sitemap/0.9 http://www.sitemaps.org/schemas/sitemap/0.9/sitemap.xsd">
	{sitemap()}
</urlset>
This file will output the same as the automatic sitemap generation. But now you can add dynamic links depending on your defintions:
//--
template = false
--//
<urlset xmlns="http://www.sitemaps.org/schemas/sitemap/0.9" xmlns:xsi="http://www.w3.org/2001/XMLSchema-instance" xsi:schemaLocation="http://www.sitemaps.org/schemas/sitemap/0.9 http://www.sitemaps.org/schemas/sitemap/0.9/sitemap.xsd">
	{sitemap()}
	[news()]
		<url>
			<loc>{link(news/$news(slug))}</loc>
		</url>
	[/news]
</urlset>
Like the custome Sitemap feature you can create various .xml and .json files to create a simple machine readable API.
//--
template = false
--//
[
	[news()]
		{
			link: {link(news/$news(slug))},
			slug: $news(slug),
			text: $new(text)
		}
	[/news]
]
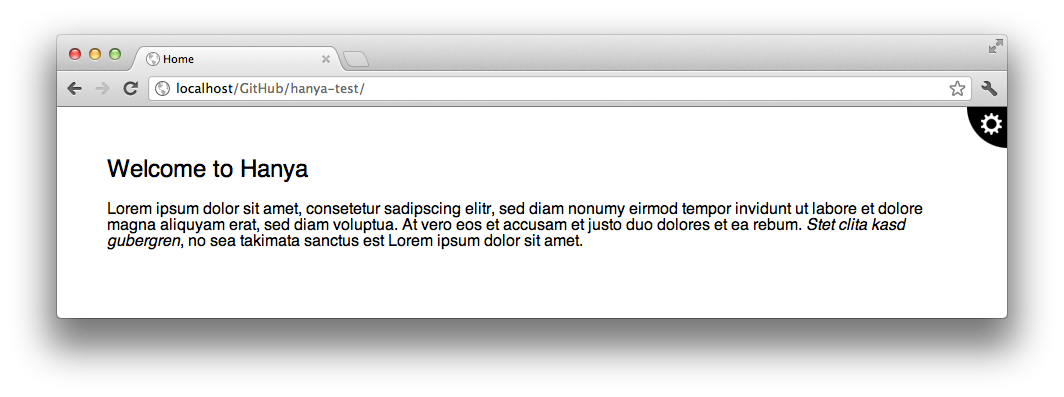
Hanya has no standard backend like the big CMS systems. Hanya tries to integrate all the administratives tasks into your site with an admin toolbar.
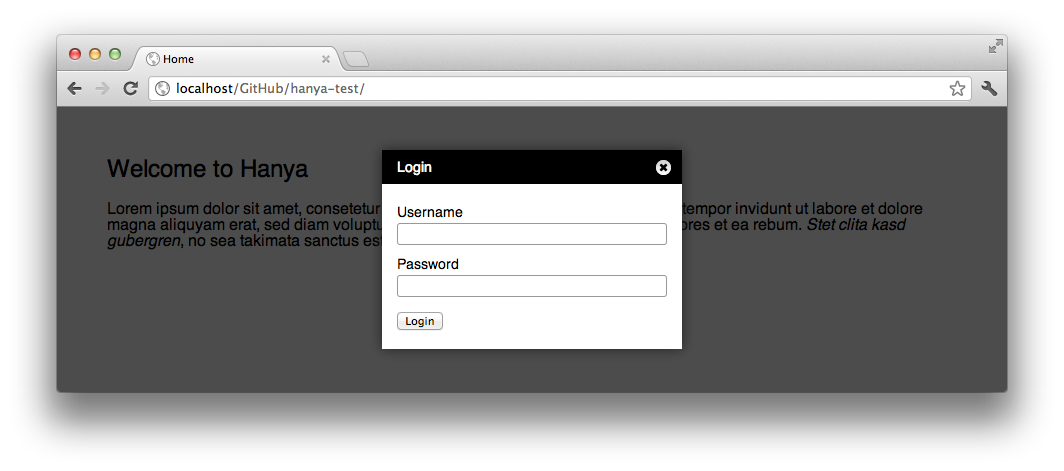
Hover over the left top edge to get the hidden link to the login form:
To get the toolbar you have to login into the system. Enter your credentials defined in the index.php:
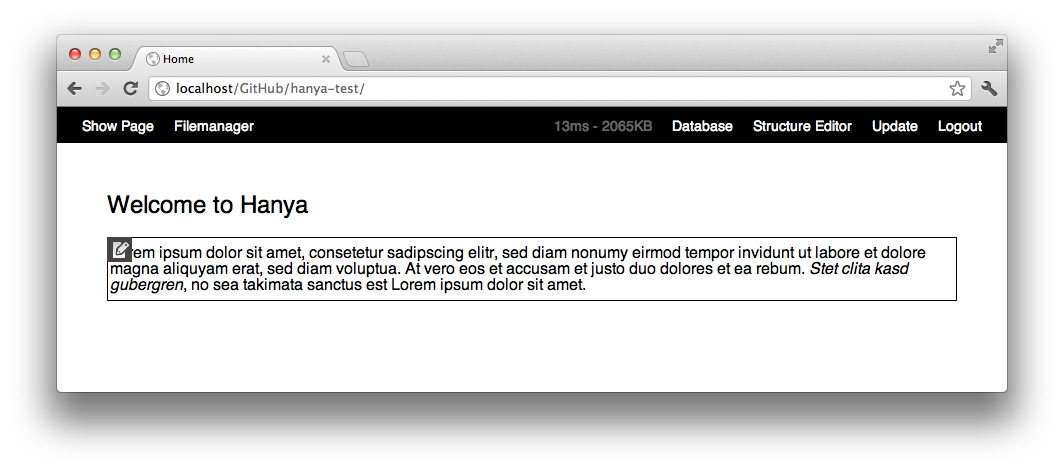
After the login is accepted you will get this admin toolbar if you included the {toolbar()} tag in your layout or page:

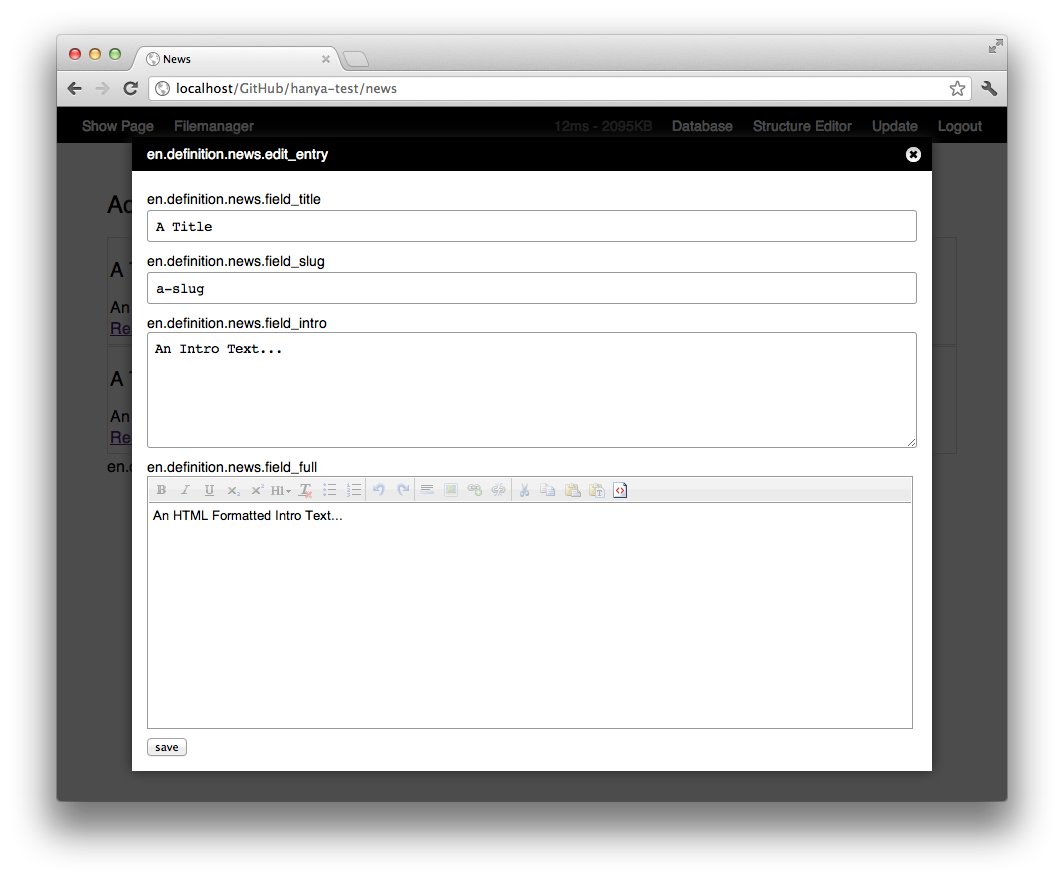
With the first button in the toolbar you can switch between edit and show mode. In edit mode every editable definition gets surrounded by a grey line. If you hover over this container you get controls to edit, order up, order down or remove the definition (if destroyable). Here you will see the {html(id)} tag in action which is also a definition:
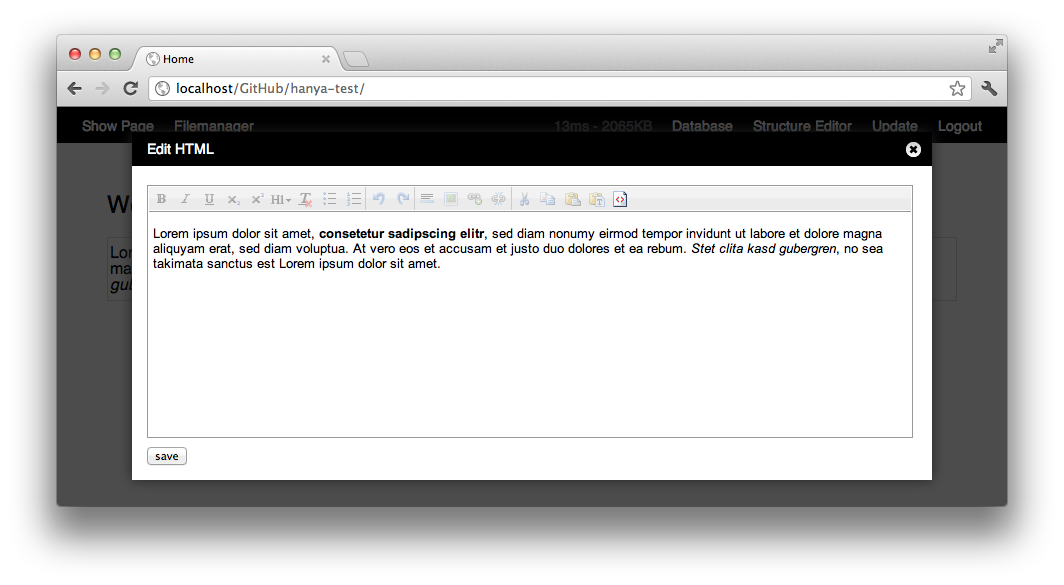
When you click the edit button you get a form with all your fields: (only one for the html definition)
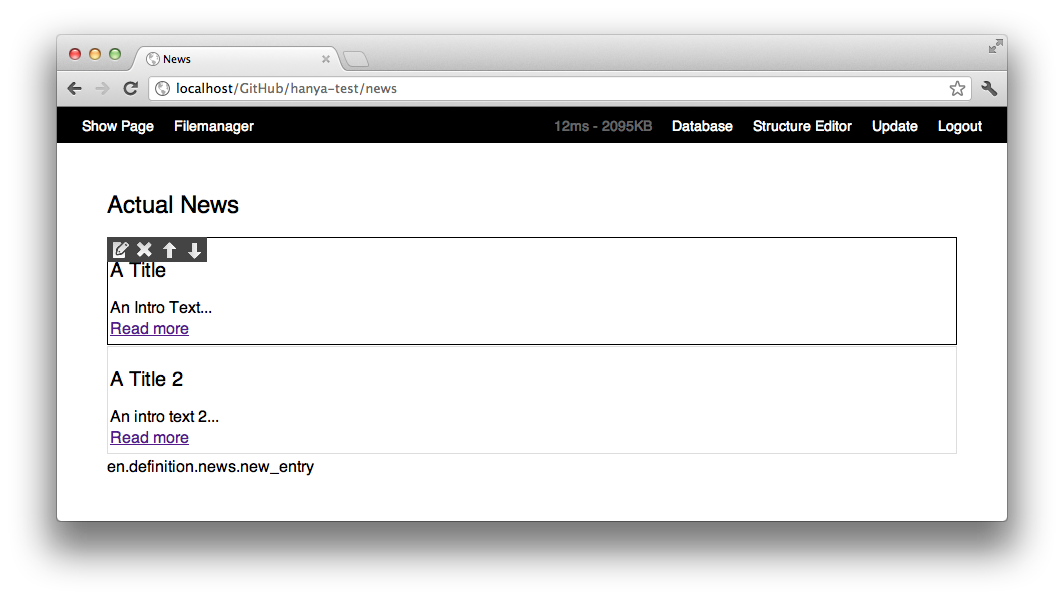
The news definition from the example above will look like this:
The Form will look like this: (i removed the translation to show you the translation-less output with keys)
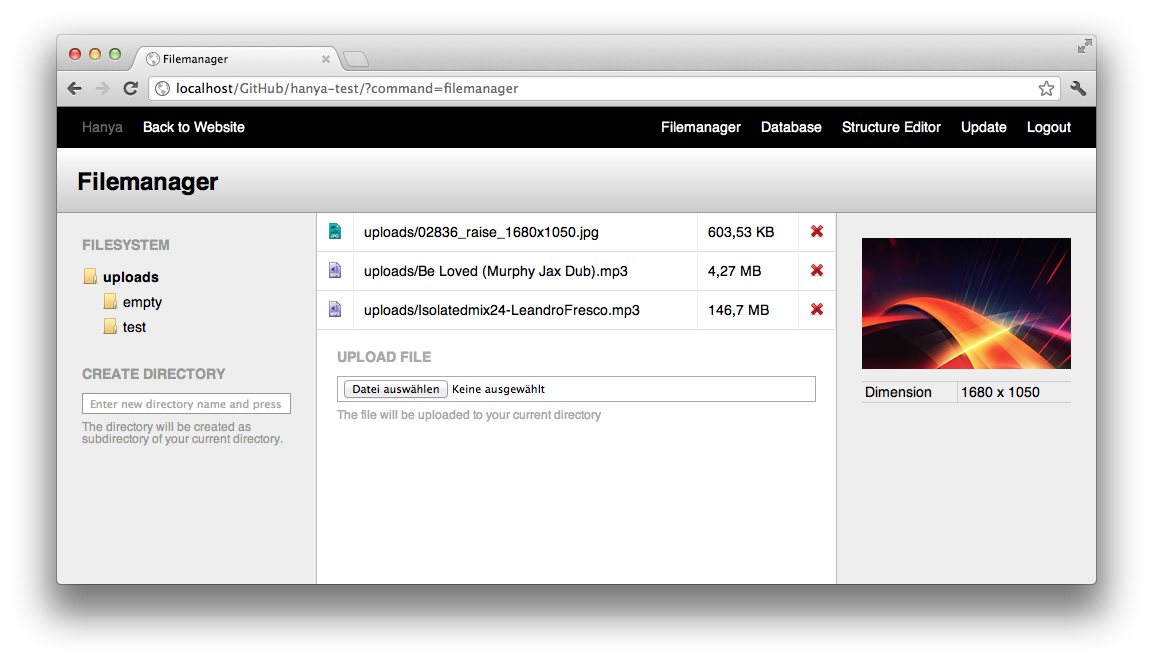
The Filemanager allow you to manage the files uploaded to the uploads directory. You can remove files, create folders and upload new files:
To edit your tree and elements online use the builtin sourceeditor. You have to set the permitions to 0777 for the tree and elements direcotry and its existing contents.
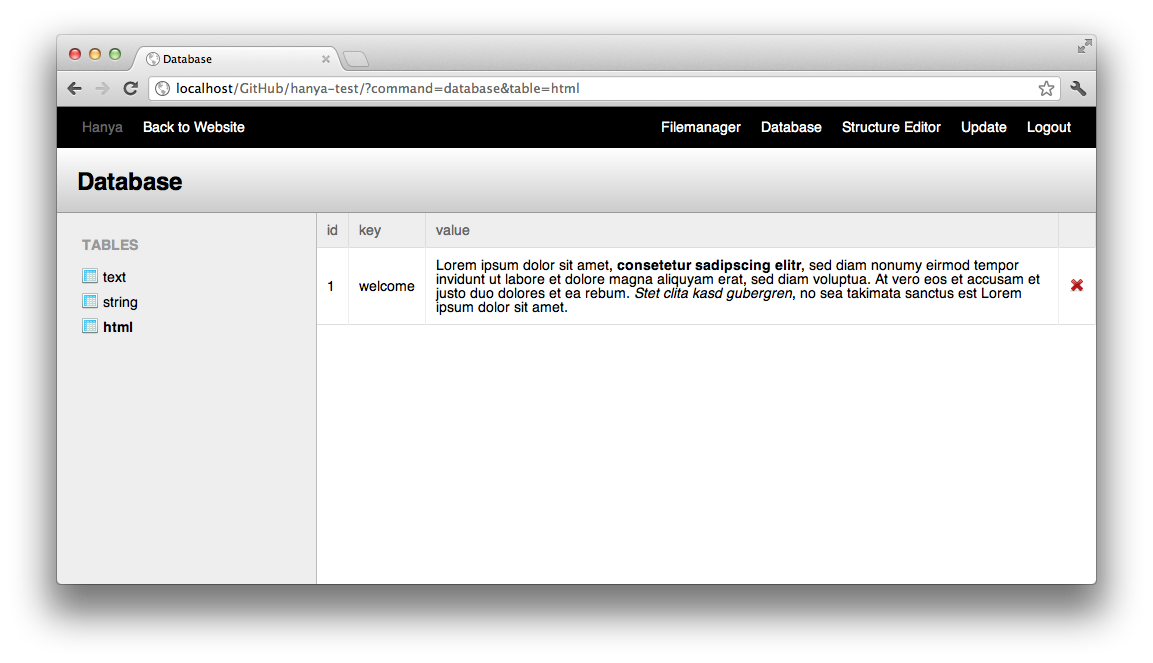
Check your tables and empty them with the Database Manager:
Hanya has a simple integrated update system. The update system is linked to the github repository. The different Hanya versions are managed as git tags. Click on the Update tab to check for updates:
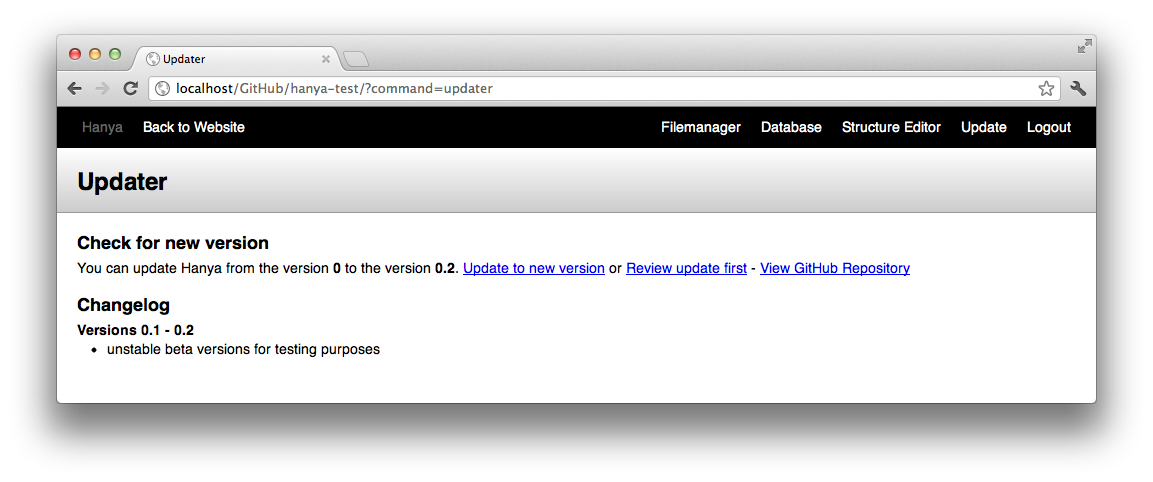
Review the updates first to get notices about big changes.
Translation files reside in two directories. The shipped system translations resides in system/i18n while you can add your own translations to user/i18n.
If you want to translate the system messages into another language copy system/i18n/system.en.ini as example to user/i18n/system.es.ini for spanish. Then you can translate the messages to your language:
; Hanya User Language File (ES)

[admin]
login = "Login"
username = "Nombre de usario"
password = "El password"
logout = "Logout"
edit = "Editar página"
...
When you create definitions you have to provide messages for the active language. Create a new translation file user/i18n/definition.en.ini:
; User Definition File [EN]

[example]
new_entry = "New Example"
edit_entry = "Edit Example"
field_string = "String"
field_text = "Text"
field_html = "HTML"
field_textile = "Textile"
field_boolean = "Boolean"
field_boolean_true = "True"
field_boolean_false = "False"
field_number = "Number"
field_time = "Time"
field_date = "Date"
field_selection = "Selection"
field_reference = "Reference"
field_file = "File"
If hanya don't find a translation for a message i will print a key like de.definition.example.field_text.
Notice that hanya will first load all system translation files and then merge it with your user files. So you can override system messages in your user files.
Adding your own tags to the system is verry simple. Create a file user/tags/mytag.php and programm your logic:
class Mytag_Tag {

	public static function call($arguments) {
		return "My own Tag with an argument: ".$arguments[0];
	}

}
Now you can use it wherever you like:
{mytag(An argument)}
Check the system tags in system/tags for inspiration for your own tags.
Writing your own plugin is also simple as writing your own tag. Create a file user/plugins/example.php with:
class Example_Plugin extends Plugin {

	// this event will be fired after hanya has started up
	public static function after_initialize() {
		...
	}

	// this event will be fired before the request gets handled
	public static function before_execution() {
		...
	}

	// this function is called on a "?command=example_do_stuff" request
	public static function on_example_to_stuff() {
		echo "Yeah my plugin will handle the whole request";
		exit;
	}

}
Check the system/lib directory to get familiar with the hanya API and check system/plugins for examples of the system plugins. You can also create views like the most of the system plugins use it.
For benchmarking there are two constants which you can use:
<p>#{HANYA_GENERATION_TIME} - #{HANYA_MEMORY_PEAK}</p>
These Constants are used in the Hanya Admin Toolbar.
- ORM Class idiorm by j4mie (http://github.com/j4mie/idiorm)
- Dynamic Point Function inspired by Kohana Routes (https://github.com/kohana/kohana)
- Filetype Icons by teambox (https://github.com/teambox/Free-file-icons)
- Icons from yusukekamiyaman (https://github.com/yusukekamiyamane/fugue-icons)
- jQuery JavaScript Library (http://jquery.com)
- jQuery wysiwyg editor (http://premiumsoftware.net/cleditor)
- CodeMirror Editor (http://codemirror.net)
- Less Compiler (https://github.com/leafo/lessphp)
- Recaptcha (http://code.google.com/p/recaptcha)
Hanya is released under the MIT License
Copyright Joël Gähwiler
Permission is hereby granted, free of charge, to any person obtaining a copy of this software and associated documentation files (the "Software"), to deal in the Software without restriction, including without limitation the rights to use, copy, modify, merge, publish, distribute, sublicense, and/or sell copies of the Software, and to permit persons to whom the Software is furnished to do so, subject to the following conditions:
The above copyright notice and this permission notice shall be included in all copies or substantial portions of the Software. THE SOFTWARE IS PROVIDED "AS IS", WITHOUT WARRANTY OF ANY KIND, EXPRESS OR IMPLIED, INCLUDING BUT NOT LIMITED TO THE WARRANTIES OF MERCHANTABILITY, FITNESS FOR A PARTICULAR PURPOSE AND NONINFRINGEMENT. IN NO EVENT SHALL THE AUTHORS OR COPYRIGHT HOLDERS BE LIABLE FOR ANY CLAIM, DAMAGES OR OTHER LIABILITY, WHETHER IN AN ACTION OF CONTRACT, TORT OR OTHERWISE, ARISING FROM, OUT OF OR IN CONNECTION WITH THE SOFTWARE OR THE USE OR OTHER DEALINGS IN THE SOFTWARE.