.png?raw=true)
In this lesson, we will learn how to create a proof of concept application that utilizes Azure SQL Database's Always Encrypted functionality. We will store the encryption keys and secrets in Azure Key Vault and register the application in Azure Active Directory to enhance security.
By storing encryption keys and secrets in Azure Key Vault and registering the application in Azure Active Directory, you will enhance the security of your application. The lesson includes exercises on deploying the base infrastructure from an ARM template, configuring the Key Vault resource with a key and a secret, setting up an Azure SQL database and a data-driven application, and demonstrating the use of Azure Key Vault in encrypting the Azure SQL database. Through these exercises, you will gain hands-on experience in implementing secure data encryption and key management techniques using Azure services.The lesson will cover the following exercises:
- Exercise 1: Deploy the base infrastructure from an ARM template
- Exercise 2: Configure the Key Vault resource with a key and a secret
- Exercise 3: Configure an Azure SQL database and a data-driven application
- Exercise 4: Demonstrate the use of Azure Key Vault in encrypting the Azure SQL database
In this exercise, we will deploy an Azure virtual machine (VM) and an Azure SQL database using an ARM template. The VM will be pre-configured with Visual Studio 2019 and SQL Server Management Studio 2018.
-
Sign in to the Azure portal
https://portal.azure.comusing an account with Owner or Contributor role in the target subscription. -
Search for "Deploy a custom template" in the Azure portal and select the option to build your own template in the editor.

-
Load the ARM template file provided in the lab resources.

-
Save the template and configure the deployment settings, such as the subscription, resource group, location, and admin credentials.

-
Review the settings and click Create to start the deployment.
Note: The deployment may take around 20-25 minutes to complete.


In the Azure portal, in the Search resources, services, and docs text box at the top of the Azure portal page, type Resource groups and press the Enter key.
-
On the Resource groups blade, in the list of resource group, click the AZ500LAB10 (or other name you chose earlier for the resource group) entry.
-
On the Resource Group blade, click the entry representing the newly created Key Vault.
-
On the Key Vault blade, in the Overview section, click Access Policies and then click + Create.

- On the Create an access policy blade, specify the following settings (leave all others with their default values):
| Setting | Value |
|---|---|
| Configure from template (optional) | Key, Secret, & Certificate Management |
| Key permissions | click Select all resulting in total of 9 selected permissions |
| Key permissions/Cryptographic Operations | click Sign resulting in total of 1 selected permissions |
| Secret permissions | click Select all resulting in total of 7 selected permissions |
| Certification permissions | click Select all resulting in total of 15 selected permissions |
| Select principal | click None selected, on the Principal blade, select your user account, and click Next |
| Application (optional) | click Next |
| Review + create | click Create |

Final Create and Review page before finalizing the creation of the policy

Note: The previous Review + create operation returns to the Access policies page that lists Application, Email, Key Permissions, Secret Permissions, and Certificate Permissions.
In this exercise, we will create and configure an Azure Key Vault resource. We will also add a key and a secret to the Key Vault.
- Open the Azure Cloud Shell and select PowerShell.
- Run the provided PowerShell commands to create an Azure Key Vault in the specified resource group.
$kvName = 'az500kv' + $(Get-Random)

$location = (Get-AzResourceGroup -ResourceGroupName 'AZ500LAB10').Location

New-AzKeyVault -VaultName $kvName -ResourceGroupName 'AZ500LAB10' -Location $location-
Take note of the Key Vault name and URI.
Note: The output of the last command will display the vault name and the vault URI. The vault URI is in the format
https://<vault_name>.vault.azure.net/ -
Add a key to the Key Vault using the PowerShell command provided and verify its creation.
 $kv = Get-AzKeyVault -ResourceGroupName 'AZ500LAB10'

$key = Add-AZKeyVaultKey -VaultName $kv.VaultName -Name 'MyLabKey' -Destination 'Software'- Add a secret to the Key Vault using the PowerShell command provided and verify its creation.
Get-AZKeyVaultKey -VaultName $kv.VaultName$key.key.kid 
Note: You can reference any key by using the key identifier. To get the most current version, reference
https://<key_vault_name>.vault.azure.net/keys/MyLabKeyor get the specific version with:https://<key_vault_name>.vault.azure.net/keys/MyLabKey/<key_version>
- Adding a Secret to the Key
$secretvalue = ConvertTo-SecureString 'Pa55w.rd1234' -AsPlainText -Force $secret = Set-AZKeyVaultSecret -VaultName $kv.VaultName -Name 'SQLPassword' -SecretValue $secretvalueNote: The name of the secret is SQLPassword.
- Verify Secret was Created
Get-AZKeyVaultSecret -VaultName $kv.VaultName
In this exercise, we will enable a client application to access the Azure SQL Database service and configure the necessary permissions.
- Register an application in Azure Active Directory (AD) to enable it to access the Azure SQL Database service. Note down the Application ID and create a client secret for the application.
Note: Once the registration is completed, the browser will automatically redirect you to sqlApp blade.
Create client Secret
.png?raw=true)
Client Secret Value

Note: Record this value. You will need it in the next task.
Note: Make sure to copy the value before you navigate away from the blade. Once you do, it is no longer possible to retrieve its clear text value.
- Grant the application permissions to access the Key Vault by running the provided PowerShell command.
Replace the <Azure_AD_Application_ID> placeholder with the value of the Application (client) ID):
$applicationId = '<Azure_AD_Application_ID>'- To create a variable storing the Key Vault name.
$kvName = (Get-AzKeyVault -ResourceGroupName 'AZ500LAB10').VaultName

$kvName- Grant permissions on the Key Vault to the application you registered in the previous task:
Set-AZKeyVaultAccessPolicy -VaultName $kvName -ResourceGroupName AZ500LAB10 -ServicePrincipalName $applicationId -PermissionsToKeys get,wrapKey,unwrapKey,sign,verify,list- Retrieve the ADO.NET connection string for the Azure SQL Database.
Note: When you use the connection string, make sure to replace the {your_password} placeholder with the password that you configured with the deployment in Exercise 1.
- Log on to the Azure VM that was deployed in Exercise 1, which has Visual Studio 2019 and SQL Server Management Studio 2018 installed.
In the Object Explorer pane, right-click the medical database and click New Query.
Paste the following code into the query window and click Execute. This will create a Patients table.
   CREATE TABLE [dbo].[Patients](
    [PatientId] [int] IDENTITY(1,1),
    [SSN] [char](11) NOT NULL,
    [FirstName] [nvarchar](50) NULL,
    [LastName] [nvarchar](50) NULL,
    [MiddleName] [nvarchar](50) NULL,
    [StreetAddress] [nvarchar](50) NULL,
    [City] [nvarchar](50) NULL,
    [ZipCode] [char](5) NULL,
    [State] [char](2) NULL,
    [BirthDate] [date] NOT NULL
PRIMARY KEY CLUSTERED ([PatientId] ASC) ON [PRIMARY] ); 
After the table is created successfully, in the Object Explorer pane, expand the medical database node, the tables node, right-click the dbo.Patients node, and click Encrypt Columns.
.png?raw=true)
Note: This will initiate the Always Encrypted wizard.
On the Introduction page, click Next.
On the Column Selection page, select the SSN and Birthdate columns, set the Encryption Type of the SSN column to Deterministic and of the Birthdate column to Randomized, and click Next.
.png?raw=true)
Note: While performing the encryption if any error thrown like Exception has been thrown by the target of an innvocation related to Rotary(Microsoft.SQLServer.Management.ServiceManagement) then make sure the Key Permission’s values of Rotation Policy Operations are unchecked, if not in the Azure portal navigate to the Key Vault » Access Policies » Key Permissions » Uncheck all the values under the Rotation Policy Operations » Under Privileged Key Operations » Uncheck Release.
On the Master Key Configuration page, select Azure Key Vault, click Sign in, when prompted, authenticate by using the same user account you used to provision the Azure Key Vault instance earlier in this lab, ensure that that Key Vault appears in the Select an Azure Key Vault drop down list, and click Next.

On the Run Settings page, click Next.
On the Summary page, click Finish to proceed with the encryption. When prompted, sign in again by using the same user account you used to provision the Azure Key Vault instance earlier in this lab.

Once the encryption process is complete, on the Results page, click Close.
In the SQL Server Management Studio console, in the Object Explorer pane, under the medical node, expand the Security and Always Encrypted Keys subnodes.
Note: The Always Encrypted Keys subnode contains the Column Master Keys and Column Encryption Keys subfolders.
In this exercise, we will demonstrate the use of Azure Key Vault in encrypting the Azure SQL database.
- Using Visual Studio 2019 on the Azure VM, open the provided program.cs file.
-
From the RDP session to the az500-10-vm1, launch Visual Studio 2019 from the Start menu.
-
Switch to the window displaying Visual Studio 2019 welcome message, click the Sign in button and, when prompted, provide the credntials you used to authenticate to the Azure subscription you are using in this lab.
-
On the Get started page, click Create a new project.
-
In the list of project templates, search for Console App (.NET Framework), in the list of results, click Console App (.NET Framework) for C#, and click Next.
-
.png?raw=true)
- On the Configure your new project page, specify the following settings (leave other settings with their default values), then click Create:
| Setting | Value |
|---|---|
| Project name | OpsEncrypt |
| Solution name | OpsEncrypt |
| Framework | .NET Framework 4.7.2 |
-
In the Visual Studio console, click the Tools menu, in the drop down menu, click NuGet Package Manager, and, in the cascading menu, click Package Manager Console.
-
In the Package Manager Console pane, run the following to install the first required NuGet package:
Install-Package Microsoft.SqlServer.Management.AlwaysEncrypted.AzureKeyVaultProvider- In the Package Manager Console pane, run the following to install the second required NuGet package:
Install-Package Microsoft.IdentityModel.Clients.ActiveDirectory- Replace the connection string with the ADO.NET connection string retrieved in Exercise 3.
- Follow the code comments to implement the necessary code for encrypting and decrypting sensitive data using Always Encrypted.
SELECT FirstName, LastName, SSN, BirthDate FROM Patients;- Build and run the application to see how Azure Key Vault is used to encrypt and decrypt data in the Azure SQL database.
-
Minimize the RDP session to your Azure virtual machine, then navigate to program file, open it in Notepad, and copy its content into Clipboard.
-
Return to the RDP session, and in the Visual Studio console, in the Solution Explorer window, click Program.cs and replace its content with the code you copied into Clipboard.
-
In the Visual Studio window, in the Program.cs pane, in line 15, replace the placeholder with the Azure SQL database ADO.NET connection string you recorded earlier in the lab. In the connection string, replace the {your_password} placehodler, with the password that you specified in the deployment in Exercise 1. If you saved the string on the lab computer, you may need to leave the RDP session to copy the ADO string, then return to the Azure virtual machine to paste it in.
-
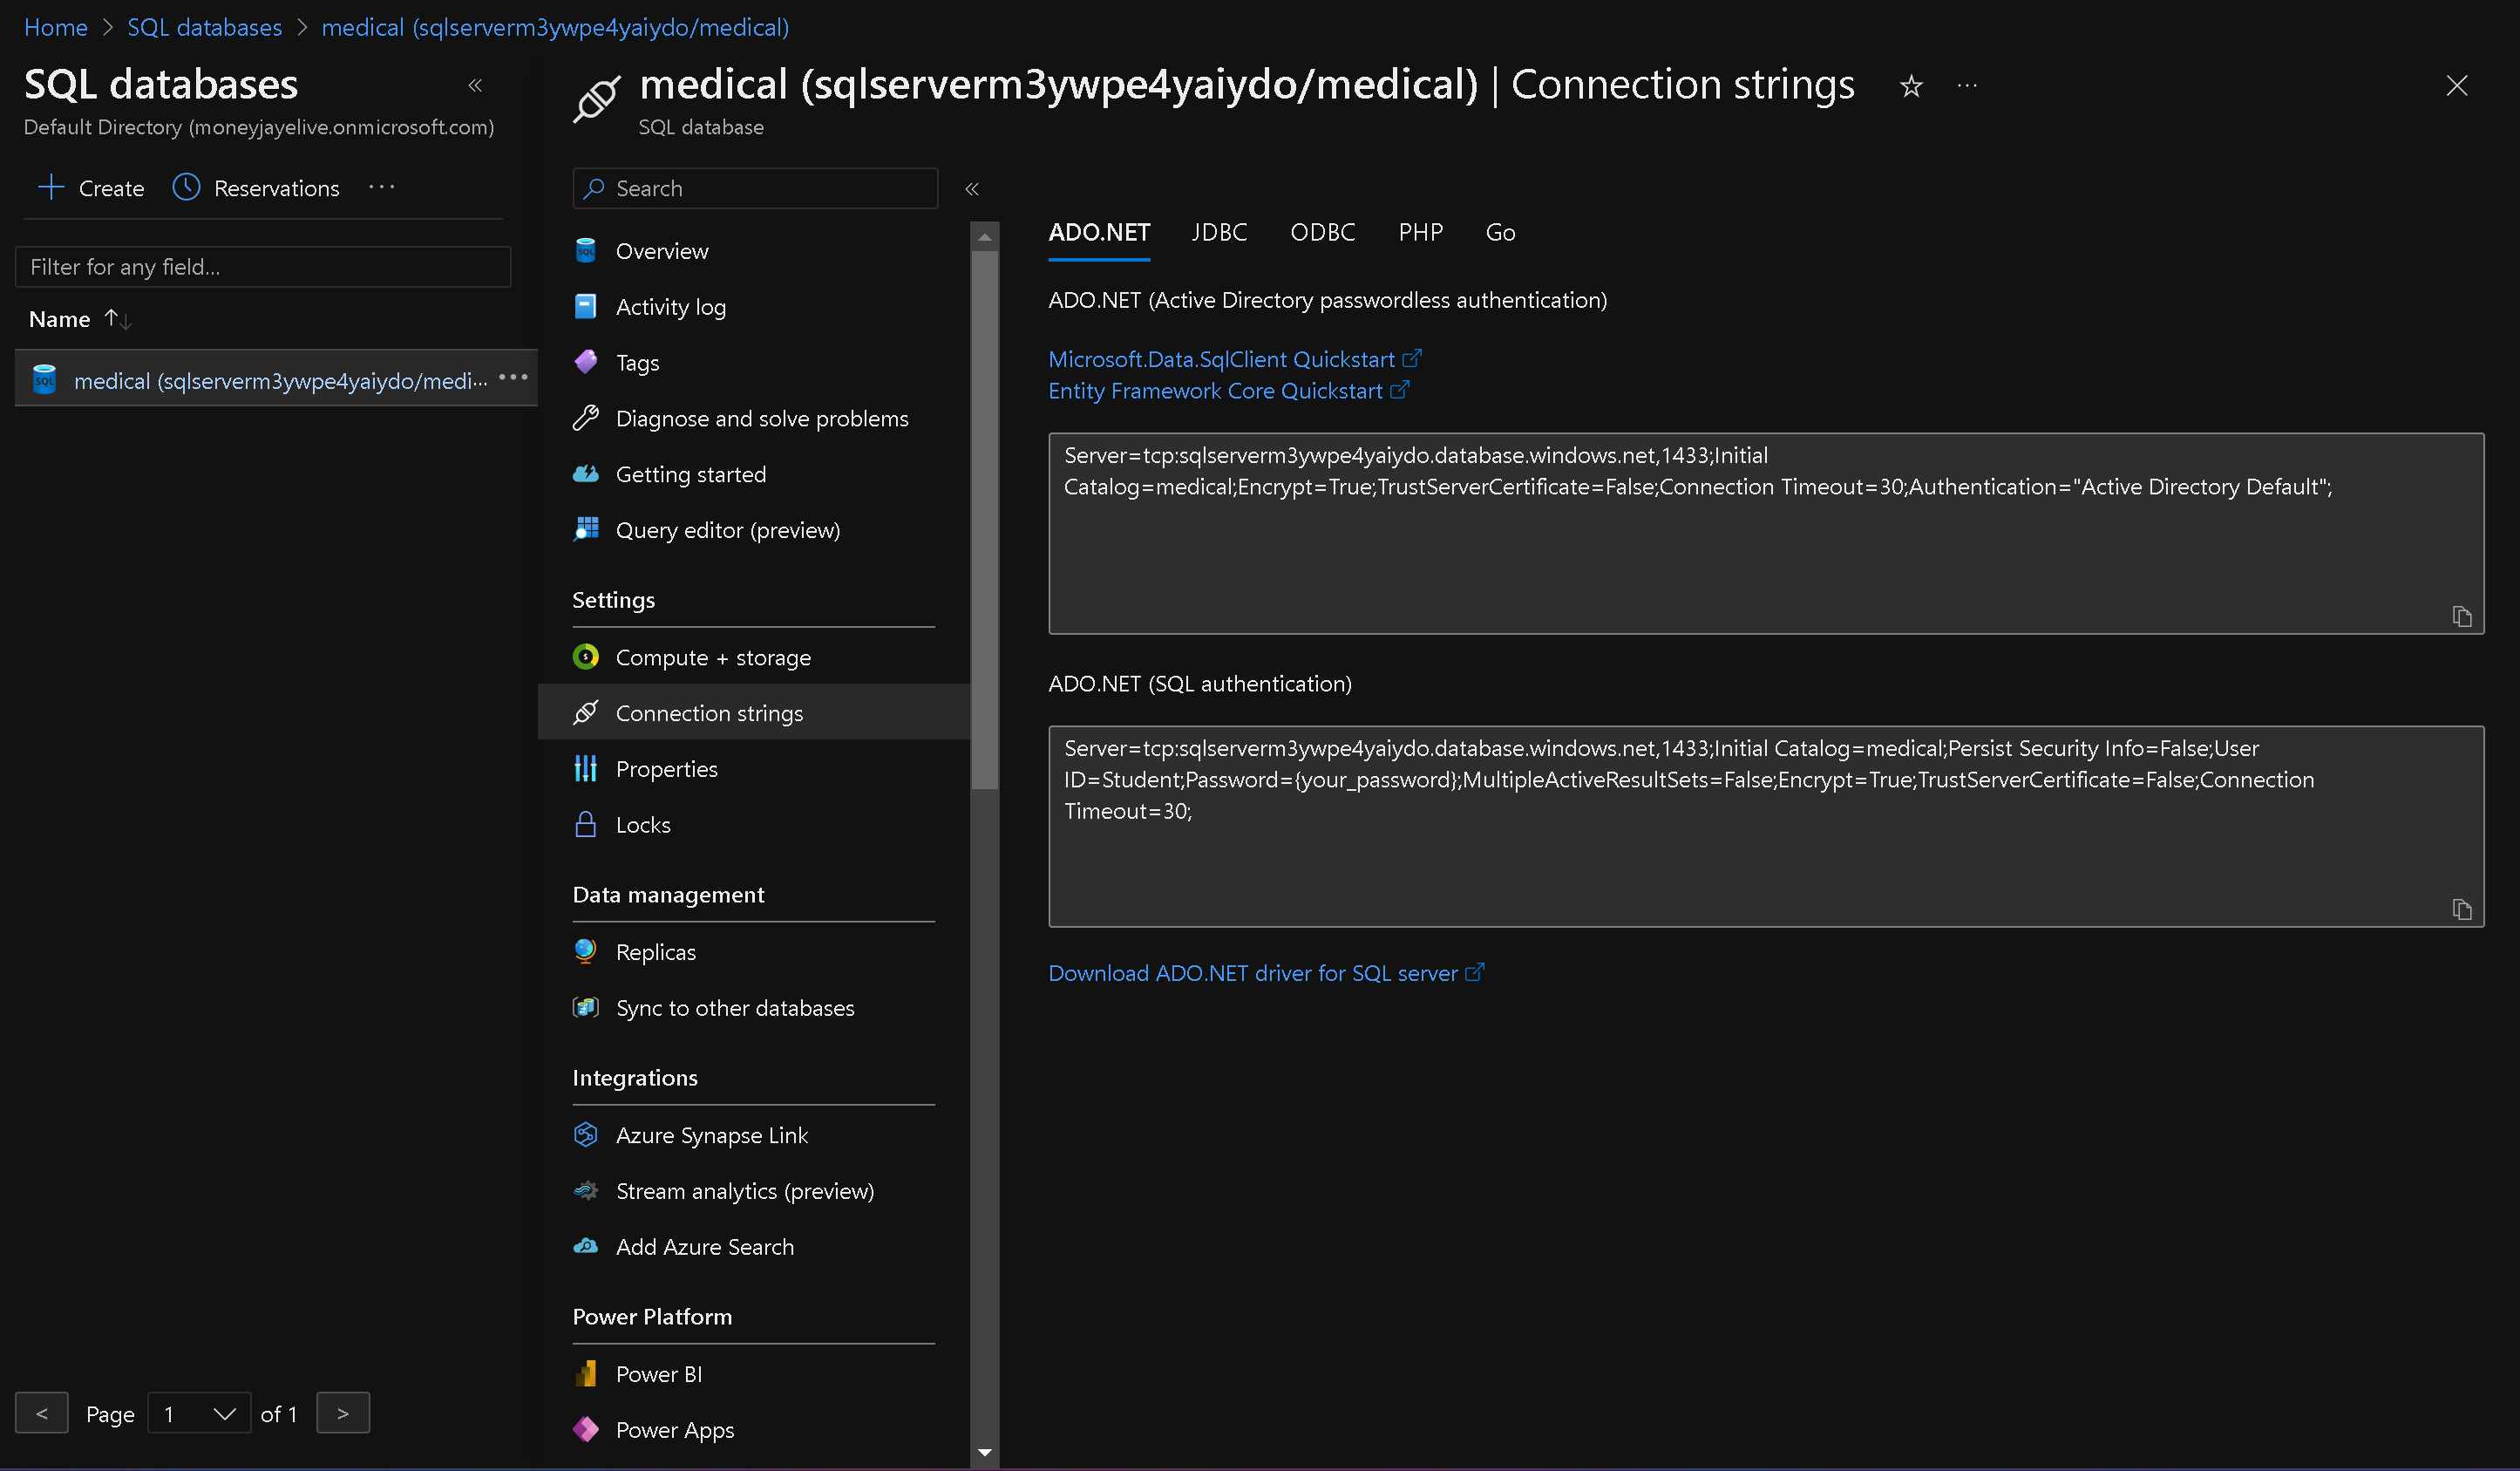
ADO.NET (SQL authentication)
Server=tcp:sqlserverm3ywpe4yaiydo.database.windows.net,1433;Initial Catalog=medical;Persist Security Info=False;User ID=Student;Password={your_password};MultipleActiveResultSets=False;Encrypt=True;TrustServerCertificate=False;Connection Timeout=30;
-
In the Visual Studio window, in the Program.cs pane, in line 16, replace the placeholder with the value of Application (client) ID of the registered app you recorded earlier in the lab.
-
In the Visual Studio window, in the Program.cs pane, in line 17, replace the placeholder with the the value of Key1 of the registered app you recorded earlier in the lab.

-
In the Visual Studio console, click the Start button to initiate the build of the console application and start it.
-
The application will start a Command Prompt window. When prompted for password, type the password that you specified in the deployment in Exercise 1 to connect to Azure SQL Database.
-
Leave the console app running and switch to the SQL Management Studio console.
-
In the Object Explorer pane, right-click the medical database and, in the right-click menu, click New Query.
-
From the query window, run the following query to verify that the data that loaded into the database from the console app is encrypted.
SELECT FirstName, LastName, SSN, BirthDate FROM Patients;Switch back to the console application where you are prompted to enter a valid SSN. This will query the encrypted column for the data. At the Command Prompt, type the following and press the Enter key:
999-99-0003
Note: Verify that the data returned by the query is not encrypted.
You've just unlocked the secrets of secure application development in the magical realm of Azure. With Azure SQL Database's Always Encrypted functionality, you now possess the power to protect your precious data from prying eyes. By entrusting your encryption keys and secrets to Azure Key Vault, you've built an impregnable fortress for your application's security. And let's not forget the grand ceremony of registering your application in Azure Active Directory, where it joins the league of mighty guardians. Throughout the mystical exercises, you've mastered the ancient art of deploying infrastructure with ARM templates, configuring Key Vaults with keys and secrets, and conjuring Azure SQL databases with data-driven enchantments. But the pinnacle of your journey lies in the thrilling demonstration of Azure Key Vault's prowess, encrypting and decrypting data with grace and finesse. With your newfound skills, you're now armed to venture forth and defend your kingdom against the lurking threats of the digital realm. So go forth, my brave Azure apprentice, and may the codes be forever in your favor!