


2024-04-18T13:40:12Z
5. Incompatability Between Old Firebase Library and This Firebase Library
📖 Async Firebase Client library for Arduino Documentation.
This library is the REST APIs Firebase Client that supports the following Firebase Products and Google Cloud Product.
Firebase Realtime DatabaseCloud Firestore DatabaseCloud MessagingFirebase StorageGoogle Cloud FunctionsGoogle Cloud Storage
This FirebaseClient library was cteated to eleminate the following issues in the old Firebase library.
- The confusion of different library names from the same developer and other developers in Library Manager.
- The different main header file name and class name issue.
- The long path issue due to long library name with spaces leads to
VisualMicro IDEcompilation error. - The cental settings using only single config class can cause the usage confusion.
- The system time changes causes the auth token expiry period calculation error.
- The internal SSL Client and WiFiClient issue causes the session need to be closed at some interval.
- The
Realtime Databasestream event data can be missing due to the sync read operation. - The async operation is not truely impremented.
Important
If you are new to Firebase products, please read the Project Preparation Setup section first.
Important
For ESP8266 device usage, you should read the Memory Options for ESP8266 section first.
Caution
This library included the SSL Client library called ESP_SSLClient to use in JWT token signing and the alternative use of the core SSL Client library e.g. WiFIClientSecure and WiFiSSLClient in some Arduino Client use cases which makes this library portable with no third-party library needed.
When this library was used together with my other library e.g. ESP-Mail-Client which comes with built-in ESP_SSLClient library, the Arduino IDE compilation error will be occurred.
You have to remove the folder src/client/SSLClient in the subsequent included library.
For example if ESP_Mail_Client.h was included after FirebaseClient.h, the folder src/client/SSLClient in the ESP-Mail-Client library installation folder should be removed.
-
Simple APIs.
-
Supports synchronous and asynchronous operations.
-
Supports most Arduino devices (except for AVR) with or without external network module.
-
Supports most Firebase Services included Google Cloud Storage.
-
Supports Firmware OTA updates.
-
Supports user management.
-
Faster and more reliable.
- ESP8266 MCUs based boards
- ESP32 MCUs based boards
- Arduino MKR WiFi 1010
- Arduino MKR 1000 WIFI
- Arduino Nano 33 IoT
- Arduino MKR Vidor 4000
- Raspberry Pi Pico (RP2040)
- LAN8720 Ethernet PHY
- TLK110 Ethernet PHY
- IP101 Ethernet PHY
- ENC28J60 SPI Ethernet module
- W5100 SPI Ethernet module
- W5500 SPI Ethernet module
- SIMCom Modules with TinyGSMClient
Note
This library does not support Arduino® UNO R4 WiFi due to the stack memory issue (related to the String class).
And this is not a library memory issue as the Arduino MKR (SAMD MCU) with the same amount of memory as Arduino UNO R4 WiFi can still be used without problem.
This library required the latest device's platform Core SDK to be installed.
Important
Please make sure that the Arduino IDE's Board Manager URL is up to date before you update your device's platform Core SDK. Any issue due to using out dated platform Core SDK is your own risk and does not support by library.
In case the library compile status showed here is passing and your code compilation is error, you should check your libary installation, platform Core SDK installation and the library usage. You cannot install library in the cloud storage virtual folder or sandbox e.g. Microsoft's OneDrive.
For Arduino IDE, the ESP8266 Core SDK can be installed through Boards Manager.
For PlatfoemIO IDE, the ESP8266 Core SDK can be installed through PIO Home > Platforms > Espressif 8266 or Espressif 32.
The RP2040 boards required Arduino-Pico SDK from Earle F. Philhower to be installed.
This library APIs are not compattible with the Firebase-ESP8266, Firebase-ESP32 and Firebase-ESP-Client libraries.
If you are using those libraries, the code should be rewritten.
In addition, some features are changed which included the following.
There is no JSON library included in this FirebaseClient library. If you still prefer to use FirebaseJson functions as in the old library, you have to include it manually in your code.
The FirebaseJson library can be installed via the Arduino's Library Manager and PlatformIO's Library Manager or can be download and install from the FirebaseJson Repository.
The blob and file upload via set, push and update, the byte data will be converted to base64 encoded string and store to the database without the signature string (file, and blob,) prepended to the base64 string as in the old library.
The data on the database that read using the async get function which the blob and file config data assign to the function, will treat as base64 encoded string and will be decoded to byte array using base64 decoder.
Then get the data that contains signature string (file, and blob,) created by old library will lead to the error after base64 decoding.
Due to some pitfalls in the old library's Multipath Stream usage. User is only looking for the JSON parsing data without checking the actual received stream event data, and this library does not include the JSON parser, then this feature will not be implemented in this FirebaseClient library.
The legaycy Firebase Cloud Messaging API was deprecated, only HTTPv1 is supported.
Deploying the Cloud Function from local flash or filesystem source in a single function is not available unless using several fnctions that are available to generate upload url, upload the source (zip file), deploy the function and set the permission.
The lwIP's TCP KeepAlive is not implemented in this FirebaseClient library because it can only be done by the network client (if it was supportd) e.g. WiFiClient in ESP32.
The TCP KeepAlive is currently not available in ESP8266 v3.1.2 at the time of this document writing and it will be available in the newer version after the pull request #8940 was merged.
If you use the core SSL client e.g. WiFiClientSecure or WiFiSSLClient, sush feature is not available.
In the old Firebase library, this feature was done internally by the internal SSL client and WiFiClient integration.
If you want to use this feature and if you use ESP32, you can use ESP_SSLClient library that included in this library and set the WiFiClient as the client.
The following example code is for using TCP KeepAlive with WiFiClient and built-in ESP_SSLClient in ESP32.
#include <lwip/sockets.h> // For lwIP TCP/IP sockets

bool tcp_keep_alive_set = false;
int keepAlive = 1000; // Milliseconds
int keepIdle = 5; // Seconds
int keepInterval = 5; // Seconds
int keepCount = 1;

WiFiClient basic_client;

ESP_SSLClient ssl_client;

void setup()
{
    ssl_client.setClient(&basic_client);
    ssl_client.setInsecure();
}


void loop()
{
    // TCP KeepAlive should be set once after server was connected
    if (basic_client.connected())
    {
        if(!tcp_keep_alive_set)
        {
            tcp_keep_alive_set = true;
            basic_client.setSocketOption(IPPROTO_TCP, TCP_KEEPALIVE, (void *)&keepAlive, sizeof(keepAlive));
            basic_client.setSocketOption(IPPROTO_TCP, TCP_KEEPIDLE, (void *)&keepIdle, sizeof(keepIdle));
            basic_client.setSocketOption(IPPROTO_TCP, TCP_KEEPINTVL, (void *)&keepInterval, sizeof(keepInterval));
            basic_client.setSocketOption(IPPROTO_TCP, TCP_KEEPCNT, (void *)&keepCount, sizeof(keepCount));

            // Or simpler functions in new ESP32 core
            // basic_client.setOption(TCP_KEEPALIVE, &keepAlive);
            // basic_client.setOption(TCP_KEEPIDLE, &keepIdle);
            // basic_client.setOption(TCP_KEEPINTVL, &keepInterval);
            // basic_client.setOption(TCP_KEEPCNT, &keepCount);
        }
    }
    else
    {
        tcp_keep_alive_set = false;
    }
}
The PSRAM in this library was enabled by default but it was only used partly in tempolary buffer memory allocation.
The server certificate verification can be done with the SSL Client on user side.
The filesystem features e.g. types (SD/Flash), initialization and operations should be done on user side.
At Arduino IDE, go to menu Sketch -> Include Library -> Manage Libraries...
In Library Manager Window, search "firebase" in the search form then select "FirebaseClient".
Click "Install" button.
For PlatformIO IDE, using the following command.
pio lib install "FirebaseClient""
Or at PIO Home -> Library -> Registry then search FirebaseClient.
For Arduino IDE, download zip file from the repository (Github page) by select Code dropdown at the top of repository, select Download ZIP
From Arduino IDE, select menu Sketch -> Include Library -> Add .ZIP Library....
Choose FirebaseClient-main.zip that previously downloaded.
Rename folder from FirebaseClient-main to FirebaseClient.
Go to menu Files -> Examples -> FirebaseClient and choose one from examples.
For Arduino IDE, the Arduino-Pico SDK can be installed from Boards Manager by searching pico and choose Raspberry Pi Pico/RP2040 to install.
For PlatformIO, the Arduino-Pico SDK can be installed via platformio.ini
[env:rpipicow]
platform = https://github.com/maxgerhardt/platform-raspberrypi.git
board = rpipicow
framework = arduino
board_build.core = earlephilhower
monitor_speed = 115200
board_build.filesystem_size = 1m
See this Arduino-Pico SDK documentation for more information.
Based on the async library design , there are no main generic Firebase class, central configuration class (FirebaseConfig) and all-in-one data containter class (FirebaseData) as in the old Firebase library.
This library provides the managed classes that are used in different purposes i.e. the classes that used to hadle the sync and async tasks and to use as a container (data provider) for authentication credentials, networking and filesystems configurations, and async task result.
For the concept and basic usage understanding, you should read this documentation thoroughly.
Important
For new Firebase users, please read the Project Preparation Setup section first.
The authentication classes provide the authentication data for authentication and authorization using service account, sign-in credentials and auth tokens.
The REST API client (this library) will use the short-lived token for authorization or no token used in some case.
This token will be expired in 60 minutes.
The token types that can be used are ID token and access token which both types will be refered to as auth token in this library.
The following authentication classes generate and hold the auth token to be used in authorization requests.
-
The
UserAuthclass is forUser Sign-in authenticationwhich is the only authentication method that allows user to sign in and provides the ID token. -
The
IDTokenclass is forID token authorizationusing the ID token that is generated from other applications. -
The
CustomAuthclass is forID token authorization using service accountthat allows user defined UID. -
The
CustomTokenclass is forID token authorization using custom tokenusing the custom claims signed JWT token that is generated from other applications.
The following classes provide privilege access (admin) to the Firebase and Google services.
-
The
ServiceAuthclass is forOAuth2.0 access token authorization using service account. -
The
AcessTokenclass is forOAuth2.0 access token authorizationusing the access token that is generated from other applications. -
The
LegacyTokenclass is fordatabase secretforRealtime Databaseprivilege access.
The following class provides non-authentication.
- The
NoAuthclass is for non-authentication.
The User Sign-in authentication requires the Email/Password Sign-in provider to be enabled in your project
The Users tab in the Authentication page in the Firebase console shows the list of users that are signed up or added.

The user management using this library are also available.
The sucurity rules can be used for user accessing control.
Visit Understand Firebase Realtime Database Security Rules, Get started with Cloud Firestore Security Rules and Get started with Firebase Security Rules to learn more about security rules.
This library used the internal millis timer to handle the token time to live. Then device time setting is not requierd in most authentication types.
In OAuth2.0 access token authentication using service account and ID token authorization using service account involve the JWT token generation and RSA private key signing.
The valid time is needed in the JWT token generation process, the time status callback that takes the user defined timestamp will be use in both ServiceAuthand CustomToken classes.
The details for these authentication classes will be discussed later in the App Initialization section.
The Firebase and Google Services classes that are available in this library are the following.
-
RealtimeDatabase is for
Realtime Databaseoperation. -
Firestore::Databases is for
Cloud Firestore Databaseoperation. -
Firestore::Documents is for
Cloud Firestore Documentoperation. -
Firestore::CollectionGroups::Indexes is for Cloud Firestore CollectionGroups's Indexes operation.
-
Messaging is for
Cloud Messagingoperation. -
Storage is for
Firebase Storageoperation. -
CloudStorage is for
Google Cloud Storageoperation. -
CloudFunctions is for
Google Cloud Functionsoperation.
All requests for sync and async operations are managed using FIFO queue.
Each sync and async requests data can be consumed the memory up to 1k. When many async tasks are added to the queue, the memory usage will be increased.
Each async client handles this queue separately. Then in order to limit the memory used for each async client, this library allows 10 async tasks (called slots) can be stored in the queue at a time.
The maximum queue size can be set via the build flag FIREBASE_ASYNC_QUEUE_LIMIT or macro in src/Config.h or created your own config in src/UserConfig.h.
The image below shows the order of tasks that inserted or add to the queue. The only one task in the first slot will be executed.
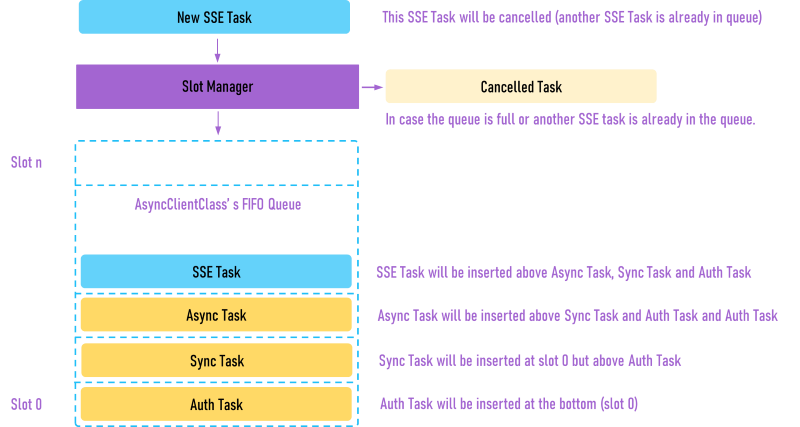
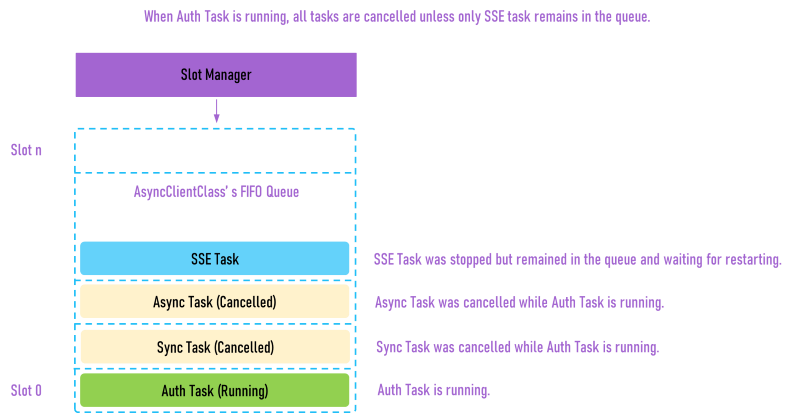
When the authentication task was required, it will insert to the first slot of the queue and all tasks are cancelled and removed from queue to reduce the menory usage unless the SSE mode (HTTP Streaming)task that stopped and waiting for restarting.
If the sync operation was called, it will insert to the first slot in the queue too but after the authentication task slot.
When async Get operation in SSE mode (HTTP Streaming) was currently stored in queue, the new sync and async tasks will be inserted before the async SSE mode (HTTP Streaming) slot.
When the queue is full or the another SSE mode (HTTP Streaming) function was called, the new sync and async tasks will be cancelled. The error code -118 (FIREBASE_ERROR_OPERATION_CANCELLED) or "operation was cancelled" will show in the debug message.
The finished or timed out task will be removed from the queue unless the async SSE mode (HTTP Streaming) and allow the vacant slot for the new async task.
The async SSE mode (HTTP Streaming) operation will run continuously and repeatedly as long as the FirebaseApp and the services app
(Database, Firestore, Messaging, Functions, Storage and CloudStorage) objects was run in the loop via FirebaseApp::loop() or <FirebaseServices>::loop().
Important
The user blocking code and delay used in the same loop of FirebaseApp::loop() and <FirebaseServices>::loop() that are running will block the async tasks in a FirebaseClientClass's async queue. Please avoid to use delay in the loop.
The authentication and Firebase service apps taks require the async client for server connection.
The async client holds the SSL client pointer that provided in its class constructor and used for server connection.
The async client also create the instances of async data and stored as a slot data in a FIFO queue.
The async data instance created in the async client, holds the header and payload of the http request and response.
The authentication task has the highest priority in the queue. Its async data when created will be inserted at the first slot of async queue.
The lower priority tasks are sync task, async task and SSE mode (HTTP Streaming) task respectively.
When user uses a async client for multiple tasks which included Realtime Database get in SSE mode (HTTP Streaming), sync and async tasks, the SSE mode (HTTP Streaming) will be interrupted (breaking the connection) because of the async client is only able to connect to the server via one TCP socket at a time.
Tip
In ESP32, if you want to run many async tasks concurrency with different async clients. It may not be possible because the ESP32's WiFiClientSecure required memory up to 50k per connection. Alternatively, this can be done by using the ESP_SSLClient that included in this library which it works in the same way as ESP8266's WiFiClientSecure which the lower memeory consumption can be achieve by setting the smaller buffer size. This is the example for how to use ESP_SSLClient with this library.
Warning
The async client and its SSL Client that used for async tasks included authentication task, need to be defined globally otherwise the dangling pointer problem will be occured.
The SSL Client is a kind of sync or blocking Client that takes time for SSL handshake during starting a new server connection.
The async SSL client can be used with the async client but currently experimental.
The async task can be cancelled and removed from the async client's queue by calling AsyncClientClass::stopAsync() for stopping currently processed async task or AsyncClientClass::stopAsync(true) for stopping all tasks.
Warning
The numbers of async client that can be used, the numbers of the sync/async tasks stored in the async client's queue will be limited which depends on the device free memory.
The async client (AsyncClientClass) takes two arguments i.e. SSL Client and network config data (network_config_data) that obtained from networking classes via the static function called getNetwork.
This example shows how the async client defined with its constructor parameters.
WiFiClientSecure ssl_client;

DefaultNetwork network;

AsyncClientClass aClient(ssl_client, getNetwork(network));
The network_config_data will be copied to use internally while the reference of SSL Client object was used internally. Then SSL Client should be existed while using the AsyncClientClass.
Warning
To prevent dangling pointer issue, the SSL Client should be defined at the same usage scope as AsyncClientClass.
For the detail of networking class, see Working with Networks section.
The default send and read timeouts for async task are 30 seconds and cannot be changed.
For sync task, the timeout in seconds can be set via the AsyncClientClass::setSyncSendTimeout and AsyncClientClass::setSyncReadTimeout.
Library provides the class object called AsyncResult that keeps the server response data, debug and error information.
There are two sources of async result in this library:
For example:
Database.get(<AsyncClientClass>, <path>, <options>, <AsyncResult>);For example:
Database.get(<AsyncClientClass>, <path>, <options>, <AsyncResultCallback>);From source 1, the async result (<AsyncResult>) shall be defined globally to use in async application because of the static data buffer is needed for use while running the async task.
From source 2, the async client (AsyncClientClass) shall be defined globally to use in async application too to make sure the instance of async result was existed or valid while running the async task.
The async result from source 2 can be accessed from the async result callback.
For the AsyncResult instance from source 2 that obtains from AsyncResultCallback, this library allows you to set the UID (unique identifier) for each async task to identify the task. The UID is any string that user defined and it is useful to identify the tasks when the same AsyncResultCallback was set for various async tasks.
The async task's UID can be set via the Firebase services functions which provided the both parameters in the function i.e. AsyncResultCallback and UID.
You can get the UID from AsyncResult via the function AsyncResult::uid().
Note
You cannot set UID to the AsyncResult directly as it will be overwritten, then the UID from the AsyncResult that defined by user from source 1 will always be empty.
Note
The async client object used in authentication task shoul be defined globally as it runs asynchronously and requires the static data buffer to store the result.
The aync result provides two types of information, app events and result data.
Caution
Please avoid calling code or function that uses large memory inside the asyn callback because it can lead to stack overflow problem especially in ESP8266 and causes the wdt rest crash.
For ESP8266, global definedAsyncResult is recommended for async task.
The authentication task event information can be obtained from AsyncResult::appEvent().code() and AsyncResult::appEvent().message().
The following event code (firebase_auth_event_type), auth_event_uninitialized, auth_event_initializing, auth_event_signup, auth_event_send_verify_email, auth_event_delete_user, auth_event_reset_password, auth_event_token_signing, auth_event_authenticating, auth_event_auth_request_sent, auth_event_auth_response_received, auth_event_ready and auth_event_error are available.
The following event strings "undefined", "initializing", "sign up", "send verification email", "delete user", "reset password", "token signing", "authenticating", "auth request sent", "auth response received", "ready" and "error" are available.
The result data can be obtained from AsyncResult object via AsyncResult::payload(), AsyncResult::available(), AsyncResult::path(), AsyncResult::etag(), AsyncResult::to<RealtimeDatabaseResult>().isStream(), AsyncResult::to<RealtimeDatabaseResult>().event(), AsyncResult::to<RealtimeDatabaseResult>().dataPath(), AsyncResult::to<RealtimeDatabaseResult>().type() and AsyncResult::to<RealtimeDatabaseResult>().name().
The function AsyncResult::payload() returns server serponse payload.
The function AsyncResult::available() returns the size of data that is ready to read.
The function AsyncResult::path() returns the resource path that the request was sent.
The function AsyncResult::etag() returns the ETag from server response header.
The function AsyncResult::to<RealtimeDatabaseResult>().name() returns the name (random UID) of node that will be creaated after calling push.
The function AsyncResult::to<RealtimeDatabaseResult>().type() returns the following realtime data type enum.
realtime_database_data_type_undefined (-1), realtime_database_data_type_null (0), realtime_database_data_type_integer (1), realtime_database_data_type_float (2), realtime_database_data_type_double (3), realtime_database_data_type_boolean (4), realtime_database_data_type_string (5), realtime_database_data_type_json (6), and realtime_database_data_type_array (7).
The AsyncResult::to<RealtimeDatabaseResult>().dataPath() and AsyncResult::to<RealtimeDatabaseResult>().event() are the Realtime Database node path that data has changed and the event type of SSE mode (HTTP Streaming).
The server response payload in AsyncResult can be converted to the the values of any type T e.g. boolean, integer, float, double and string via AsyncResult::to<RealtimeDatabaseResult>().to<T>().
The Firebase app (FirebaseApp) is the main authentication and access token handler class in this library. All Firebase services Apps will take the authentication data called app token (app_token_t) that maintains by Firebase app, and was used as the access key or bearer token while processing the request.
The FirebaseApp class constructor accepts the user auth data (user_auth_data) which is the struct that holds the user input sign-in credentials and token.
The user auth data that passes to the FirebaseApp class constructor can be obtained from the following sign-in credentials, access key, auth token providers classs via getAuth function.
Thses classes also mentioned in the earlier section.
The following authentication classes generate and hold the auth token to be used in further authorization requests.
The following classes provide privilege access (admin) to the Firebase and Google services.
The following class provides non-authentication.
The getAuth function is the function to get user auth data (user_auth_data) from these authentication provider classes.
Note
The user auth data will be coppied and use internally, then changing these authentication provider classes's data cannot affect the authentication process unless FirebaseApp was re-initializing.
The UID for user can be obtained from FirebaseApp::getUid().
The auth token (ID token, access token or legacy token) can be obtained from FirebaseApp::getToken().
The refresh token (if available) can be obtained from FirebaseApp::getRefreshToken().
The cusom signed JWT token was not exposed to the user unless it was used create internally and use tempolary.
This is the approach that allows you to access the service as a user with the custom UID without sign in.
You can define any UID to represent the user identifier for the access control.
The parameters for the CustomAuth class constructor are the following which most of the parameters can be taken from the service account credentials.
CustomAuth::CustomAuth(<TimeStatusCallback>, <api_key>, <client_email>, <project_id>, <private_key>, <user_id>, <scope>, <claims>, <expire>)<TimeStatusCallback> The time status callback that provides the UNIX timestamp value used for JWT token signing.
<api_key> The web API key of project.
<client_email> The service account client Email.
<project_id> The service account project ID.
<private_key> The service account private key.
<user_id> The user ID.
<scope> The OAuth scopes.
<claims> The OAuth claims.
<expire>The expiry period in seconds (less than 3600), 3300 is the default value.
This type of authentication is used when privilege (admin) access is needed.
The parameters for ServiceAuth provider class are the following which most of the parameters can be taken from service account credentials.
ServiceAuth::ServiceAuth(<TimeStatusCallback>, <api_key>, <client_email>, <project_id>, <private_key>, <expire>)<TimeStatusCallback> The time status callback that provide the UNIX timestamp value used for JWT token signing.
<client_email> The service account client Email.
<project_id> The service account project ID.
<private_key> The service account private key.
<expire> The expiry period in seconds (less than 3600), 3300 is the default value.
Note
The refresh token is not available for this authentication type.
The auth token need to be re-created instead of refreshing.
With UserAuth provider class, you are now signin as a user with Email and password.
The folowing are available parameters.
UserAuth::UserAuth(<api_key>, <user_email>, <user_password>, <expire>)<api_key> API key can be obtained from Firebase console > Project Overview > Project settings.
<user_email> The user Email that in the project.
<user_password>The user password in the project.
<expire>The expiry period in seconds (less than 3600), 3300 is the default value.
The NoAuth provider class, allows you to skip all auth data in the request that sent to the Firebase services.
The security rules should allow read and write access without conditiona.
This is suitable for testing and should not use in production.
With CustomToken provider class, you are able to set the custom token (custom claims signed JWT token) that generated from other Firebase client apps.
The available parameters in the class constructor are the following.
CustomToken::CustomToken(<api_key>, <custom_token>, <expire_in_seconds>)<api_key> API key can be obtained from Firebase console > Project Overview > Project settings.
<custom_token> Auth custom token (jwt signed token).
<expire_in_seconds> Expiry period in seconds (less than 3600), 3300 is the default value.
You should defined the expire period that less than the remaining time to live of your signed JWT token.
Note
Only valid RS256 signed JWT token can be used with Firebase and Google services that provided in the library.
Most Arduino boards that come with crypto chip e.g. ATECC608A do not support RSA-256 algorithm and can not use its crypto library to generate the signed JWT token used with this library.
You can assign the refresh token that obtains from Google API server when generating the ID token, as the <custom_token> parameter to refresh the token and use it last long.
The ID token itself is short-lived token which as expired in 1 Hour or less.
The AccessToken provider class allows you to authorize the Firebase and Google services with the access token.
The access token itself is short-lived token which will be expired in 1 Hour or less.
The access token can be obtained from Firebase client apps.
The available parameters in the class constructor are the following.
AccessToken::AccessToken(<auth_token>, <expire_in_seconds>, <refresh_token>, <client_id>, <client_secret>)<auth_token> Auth token from OAuthe2.0 auth.
<expire_in_seconds> Expire period in seconds
<refresh_token> Refresh token.
<client_id> Client ID.
<client_secret> Client secret.
Normally <refresh_token> is not needed, if it is provided, the token will be refresh immediately when calling FirebaseApp's initializeApp.
The <refresh_token>, <client_id> and <client_secret> are required for OAuth2.0 token refreshing.
The Client ID and Client Secret can be taken from https://console.developers.google.com/apis/credentials
By providing <refresh_token> without <client_id> and <client_secret>, the token refrehing process will fail with unexpected error.
The IDToken provider class, allows you to set the ID token form other Firebase clent apps.
The ID token itself is short-lived token which will be expired in 1 Hour or less.
The available parameters in the class constructor are the following.
IDToken::IDToken(<api_key>, <auth_token>, <expire_in_seconds>, <refresh_token>)<api_key> API key can be obtained from Firebase console > Project Overview > Project settings.
<auth_token> Auth token from user auth.
<expire_in_seconds> Expire period in seconds.
<refresh_token> Refresh token.
The LegacyToken provider class allows you to set the database secret used in Firebase Realtime Database service.
The database secret is now deprecated and should not use in production.
The available parameter in the class constructor is the following.
LegacyToken::LegacyToken(<database_secret>)<database_secret> The Realtime Database secret key.
The file config class (FileConfig) will be used to hold the SD/Flash file information and the file operation callback when file upload or download is required.
The function that require file/BLOB for download and upload will accept the file config data (file_config_data) in its parameters.
The file_config_data can be obtained from static functions called getFile and getBlob.
The FileConfig class constructor parameters that are available are following.
FileConfig::FileConfig(<filename>, <file_callback>)<filename> The full file name included its path.
The file name can be a name of source (input) and target (output) file that used in upload and download.
<file_callback> The file callback that required for file open to read, write, append and remove.
The <file_callback> function parameters included the File reference returned from file operation, filename for file operation and file_operating_mode.
The file_operating_mode included file_mode_open_read, file_mode_open_write, file_mode_open_append and file_mode_open_remove are available.
This example code works with SPIFFS filesystem.
#define MY_FS SPIFFS

void fileCallback(File &file, const char *filename, file_operating_mode mode)
{
    // FILE_OPEN_MODE_READ, FILE_OPEN_MODE_WRITE and FILE_OPEN_MODE_APPEND are defined in this library
    switch (mode)
    {
    case file_mode_open_read:
        file = MY_FS.open(filename, FILE_OPEN_MODE_READ);
        break;
    case file_mode_open_write:
        file = MY_FS.open(filename, FILE_OPEN_MODE_WRITE);
        break;
    case file_mode_open_append:
        file = MY_FS.open(filename, FILE_OPEN_MODE_APPEND);
        break;
    case file_mode_remove:
        MY_FS.remove(filename);
        break;
    default:
        break;
    }
}

FileConfig media_file("/media.mp4", fileCallback);

void download()
{
     storage.download(aClient, FirebaseStorage::Parent(STORAGE_BUCKET_ID, "media.mp4"), getFile(media_file), asyncCB);
}
The blob config class (BlobConfig) will provide the in/out data payload for the function that required upload and download operations.
The BlobConfig class constructor parameters that are available are following.
BlobConfig::BlobConfig(<blob>, <blob_size>)<blob> The BLOB data (byte array).
<blob_size> The size of data.
The data can be a source (input) and target (output) data that used in upload and download.
This example code works with BLOB data.
uint8_t source[2048];
uint8_t dest[2048];

BlobConfig upload_data(source, 2048);
BlobConfig download_data(dest, 2048);

void upload()
{
    Database.set(aClient, "/test/blob", getBlob(upload_data), asyncCB);
}

void download()
{
    Database.get(aClient, "/test/blob", getBlob(download_data), asyncCB);
}
When filesystems are not used, remove ENABLE_FS macro in src/Config.h or user defined src/UserConfig.h or adding DISABLE_FS in compiler build flags.
The AsyncClientClass object requires network config data (network_config_data) that obtained from one of the following networking classes via the static function called getNetwork.
-
DefaultNetwork is for core WiFi enabled networking.
-
DefaultWiFiNetwork is for core WiFi Multi enabled networking or non-core WiFi netwowking.
-
DefaultEthernetNetwork is for core Ethernet enabled networking.
-
EthernetNetwork is for non-core Ethernet networking.
-
GSMNetwork is for non-core GSM networking.
-
GenericNetwork is for non-core or user defined networking.
Warning
In ESP32, ADC2 (GPIO 0, GPIO 2, GPIO 4, GPIO 12, GPIO 13, GPIO 14, GPIO 15, GPIO 25, GPIO 26 and GPIO 27) cannot be used while using WiFi.
The default network class can be used for WiFi capable MCUs e.g. ESP8266, ESP32 and Raspberry Pi Pico W.
The network (WiFI) reconnection or resume can be done automatically or manually by user can be configurable via the boolean parameter assigned with default network class constructor.
The default WiFi network class provided mean for multiple WiFi's ssid and passworrd connections (WiFi Multi),
This default WiFi network class is suitable for device that provided the built-in WiFi module for non-WiFI capable MCU that the WiFi reconnection requires the ssid and password and device that support WiFi Multi in its core.
The default ethernet network class can be used for Ethernet capable MCUs using core Ethernet drivers e.g. ESP8266 and ESP32.
The other known networks (Ethernet and GSM) class are also available.
The user defined or generic networks are supported by assigning the ntwork connection and status callacks in its class constructor.
DefaultNetwork
The DefaultNetwork class constructors are the following.
DefaultNetwork::DefaultNetwork()

DefaultNetwork::DefaultNetwork(<re_connect_option>)
<re_connect_option> The Boolean value set for enabling the WiFi reconnection when the WiFi is disconnected. It should be set with false when the WiFi reconnection was controlled by your code or third-party library e.g. WiFiManager.
By define DefaultNetwork with no parameter, the WiFi reconnection will be enabled.
Note
When the WiFi was manage for connection and reconnection by user code or third party library, the <re_connect_option> parameter should be assign with false to avoid the WiFi connection/reconnection interferences.
Caution
If you are using third-party library to control your WiFi connection/reconnection e.g. WiFiManager or your code to do so,
You have to set the parameter, <re_connect_option> to false in the DefaultNetwork class constructor otherwise you cannot re-connect to the WiFi.
DefaultWiFiNetwork
This DefaultWiFiNetwork class required some parameter for reconnection using WiFi credentials.
The parameters for its class constructor are following.
DefaultWiFiNetwork::DefaultWiFiNetwork(<FirebaseWiFi>, <re_connect_option>)<FirebaseWiFi> The FirebaseWiFi class object that used for keeping the network credentials (WiFi APs and WiFi passwords).
<re_connect_option> The bool option for network reconnection. It should be set with false when the WiFi reconnection was controlled by your code or third-party library e.g. WiFiManager.
The FirebaseWiFi class holds the WiFi credentials list. The AP and password can be added to list with addAP.
The FirebaseWiFi object should be defined at the same level of DefaultWiFiNetwork and AsyncClientClass as it will be used internally by reference.
The example for working with multiple WiFi APs.
FirebaseWiFi wifimulti;

DefaultWiFiNetwork default_network(wifimulti, true /* reconnect network */);

void setup()
{
    wifimulti.addAP("wifi_ssid1", "password1");
    wifimulti.addAP("wifi_ssid2", "password2");
    wifimulti.addAP("wifi_ssid3", "password3");
}
DefaultEthernetNetwork
The DefaultEthernetNetwork class constructors are the following.
DefaultEthernetNetwork::DefaultEthernetNetwork()

DefaultEthernetNetwork::DefaultEthernetNetwork(<Firebase_SPI_ETH_Module>)
<Firebase_SPI_ETH_Module> The ESP8266 core SPI ethernet driver class that work with external SPI Ethernet modules that currently supported e.g. ENC28J60, Wiznet W5100 and Wiznet 5500. This <Firebase_SPI_ETH_Module> should be defined at the same level as AsyncClientCalss as it will be used internally by reference.
To use ESP8266 native Ethernet, the one of following macros, #defined ENABLE_ESP8266_ENC28J60_ETH, #definedENABLE_ESP8266_W5500_ETH and #defined ENABLE_ESP8266_W5100_ETH should be defined in src/Config.h or user defined src/UserConfig.h or adding
ENABLE_ESP8266_ENC28J60_ETH, ENABLE_ESP8266_W5500_ETH and ENABLE_ESP8266_W5100_ETH in compiler build flags.
The example for using ENC28J60lwIP with ESP8266
#include <ENC28J60lwIP.h>
#define ETH_CS_PIN 16 // D0
ENC28J60lwIP eth(ETH_CS_PIN);
Firebase_SPI_ETH_Module spi_eth;
DefaultEthernetNetwork default_network(spi_eth);
using AsyncClient = AsyncClientClass;
AsyncClient aClient(ssl_client, getNetwork(default_network));
void setup()
{
spi_eth.enc28j60 = ð
}See this example for using ESP8266 with its native ethernet library.
For ESP32, to use the native ETH class, define the DefaultEthernetNetwork object with no parameter.
See this example for using ESP32 with its native ethernet library.
EthernetNetwork
By default the external Ethernet module can be use with the library as the macro ENABLE_ETHERNET_NETWORK was assigned and Ethernet library was included in the sketch.
The Ethernet library and class other than Ethernet.h and Ethernet can be assigned (optional), see the Library Build Options section.
The calss constructor parameters are following.
EthernetNetwork::EthernetNetwork(<mac>, <cs_pin>, <reset_pin>, <Firebase_StaticIP>)<mac> The six bytes mac address.
<cs_pin> The Ethernet module chip select/enable pin.
<reset_pin> The Ethernet module reset pin. Assign -1 if not used.
<Firebase_StaticIP> (Optional) The pointer to Firebase_StaticIP object that holds the static ip configuration.
The Firebase_StaticIP class constructor parameters for static IP are following.
Firebase_StaticIP::Firebase_StaticIP(<local_ip>, <subnet>, <gateway>, <dns_server>, <optional>)<local_ip> The static IP.
<subnet> The subnet IP.
<gateway> The default gateway IP.
<dns_server> The dns server IP.
<optional> The boolean option to force use static IP only (not use DHCP).
See this example for external Ethernet module usage.
GSMNetwork
This GSMNetwork class is used for TinyGSMClient library.
As required by the TinyGSMClient library, one of GSM module macro should be defined in the sketch.
For example for SIM7600 module, the macro TINY_GSM_MODEM_SIM7600 should be defined.
Important
The GSM module macros e.g. TINY_GSM_MODEM_SIM7600 should be defined in src/Config.h or user defined src/UserConfig.h or adding TINY_GSM_MODEM_SIM7600 in compiler build flags.
The class constructor parameter are following.
GSMNetwork::GSMNetwork(<modem>, <gsm_pin>, <apn>, <user>, <password>)<modem> The pointer to TinyGsm modem object. Modem should be initialized and/or set mode before transfering data.
<gsm_pin> The SIM pin.
<apn> The GPRS APN (Access Point Name).
<user> The GPRS user.
<password> The GPRS password.
The TinyGsm modem should be defined at the same level of GSMNetwork and AsyncClientClass as it will be used internally by reference.
See this example for using TinyGSMClient with the library.
GenericNetwork
This type of network class is for all networking interfaces with some specific channels or ports e.g. Ethernet Module, WiFI Module, Bluetooth Module, NB-IoT module, and LoRa Module that have the internet access ability.
Since the interface class APIs are variety, the class constructor parameters are the basic callbacks required for network control and network status as following.
GenericNetwork::GenericNetwork(<net_connect_callback>, <network_status_callback>)<net_connect_callback> The network connection callback function.
<network_status_callback>The network status callback function.
Inside the <net_connect_callback>, the complete operation for the carier (network) and internet connection should be perform and waits until the internet connection was established.
In side the <network_status_callback> function, the status (Boolean variable) that passed by reference in the function, should be set based on the network status.
See this example for using WiFi with GenericNetwork for demonstation.
When using this library, user have to follow the following operation flows otherwise unknown errors can be occurred.
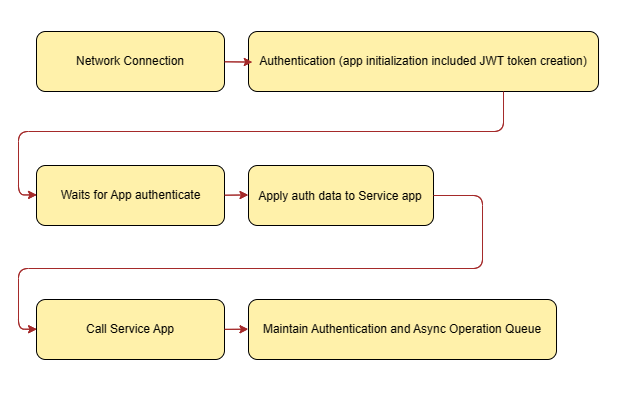
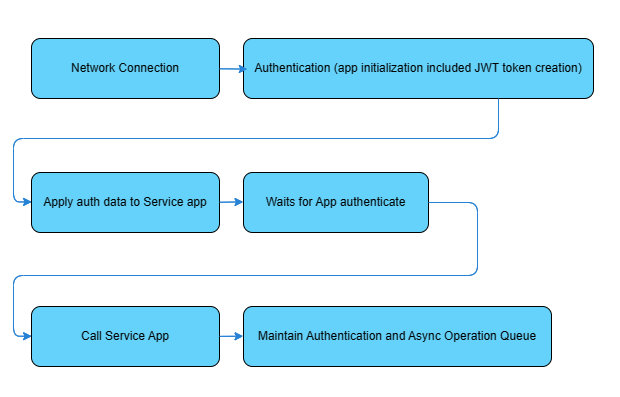
This library does not run any background process in FreeRTOS task or schedule task and timer ISR.
To maintaining the async tasks, you have to place the code for Maintain Authentication and Async Operation Queue in the infinite loop e.g. main loop() function, timer or scheduler cyclically event's callback function or infinite loop in FreeRTOS task (as in ESP32).
Warning
Don't use delay in the loop when async task is running because it will block the process in the queue to run.
For ESP32's FreeRTOS task, the CPU Core 1 is recommend for safely operation. Although the async task is designed to run without blocking, the SSL/TLS handshake in SSL client is the blocking process and running the task in Core 0 may cause the wdt reset.
Example for Maintain Authentication and Async Operation Queue in ESP32's FreeRTOS task in lambda function usage style.
void setup()
{
    /////////////////////////////////////
    // Network connection code here
    /////////////////////////////////////

    /////////////////////////////////////
    // Authentication code here
    /////////////////////////////////////

    auto loopTask = [](void *pvParameters)
    {
        for (;;)
        {
            /////////////////////////////////////
            // Maintain Authentication Queue
            /////////////////////////////////////
            app.loop();

            /////////////////////////////////////
            // Maintain App Async Queue
            /////////////////////////////////////
            Database.loop();

            if (app.ready())
            {
                // your other code here
                // For non-callback stream, you can check the information that provided from AsyncResult that assigned with the asyn get function with SSE mode (HTTP Streaming)
            }
            vTaskDelay(10 / portTICK_PERIOD_MS);
        }
    };

    xTaskCreatePinnedToCore(loopTask, "loopTask", 8000, NULL, 3, NULL, 1 /* must be core 1 for network task */);
}#include <Arduino.h>
#if defined(ESP32) || defined(ARDUINO_RASPBERRY_PI_PICO_W)
#include <WiFi.h>
#elif defined(ESP8266)
#include <ESP8266WiFi.h>
#elif __has_include(<WiFiNINA.h>)
#include <WiFiNINA.h>
#elif __has_include(<WiFi101.h>)
#include <WiFi101.h>
#elif __has_include(<WiFiS3.h>)
#include <WiFiS3.h>
#endif
#include <FirebaseClient.h>
#define WIFI_SSID "WIFI_AP"
#define WIFI_PASSWORD "WIFI_PASSWORD"
// The API key can be obtained from Firebase console > Project Overview > Project settings.
#define API_KEY "Web_API_KEY"
// User Email and password that already registerd or added in your project.
#define USER_EMAIL "USER_EMAIL"
#define USER_PASSWORD "USER_PASSWORD"
void asyncCB(AsyncResult &aResult);
DefaultNetwork network; // initilize with boolean parameter to enable/disable network reconnection
UserAuth user_auth(API_KEY, USER_EMAIL, USER_PASSWORD, 3000 /* expire period in seconds (< 3600) */);
FirebaseApp app;
#if defined(ESP32) || defined(ESP8266) || defined(PICO_RP2040)
#include <WiFiClientSecure.h>
WiFiClientSecure ssl_client;
#elif defined(ARDUINO_ARCH_SAMD)
#include <WiFiSSLClient.h>
WiFiSSLClient ssl_client;
#endif
using AsyncClient = AsyncClientClass;
AsyncClient aClient(ssl_client, getNetwork(network));
RealtimeDatabase Database;
unsigned long tmo = 0;
void setup()
{
Serial.begin(115200);
/////////////////////////////////////
// Network connection
/////////////////////////////////////
WiFi.begin(WIFI_SSID, WIFI_PASSWORD);
Serial.print("Connecting to Wi-Fi");
unsigned long ms = millis();
while (WiFi.status() != WL_CONNECTED)
{
Serial.print(".");
delay(300);
}
Serial.println();
Serial.print("Connected with IP: ");
Serial.println(WiFi.localIP());
Serial.println();
Firebase.printf("Firebase Client v%s\n", FIREBASE_CLIENT_VERSION);
Serial.println("Initializing app...");
#if defined(ESP32) || defined(ESP8266) || defined(PICO_RP2040)
ssl_client.setInsecure();
#if defined(ESP8266)
ssl_client.setBufferSizes(4096, 1024);
#endif
#endif
/////////////////////////////////////
// Authentication
/////////////////////////////////////
app.setCallback(asyncCB);
initializeApp(aClient, app, getAuth(user_auth));
/////////////////////////////////////
// Waits for App authenticate
/////////////////////////////////////
ms = millis();
while (app.isInitialized() && !app.ready() && millis() - ms < 120 * 1000)
;
/////////////////////////////////////
// Apply auth data to Service app
/////////////////////////////////////
app.getApp<RealtimeDatabase>(Database);
Database.url(DATABASE_URL);
/////////////////////////////////////
// Call Service App
/////////////////////////////////////
if (app.ready())
{
// Set int
Database.set<int>(aClient, "/test/int", 12345, asyncCB);
}
}
void loop()
{
/////////////////////////////////////
// Maintain Authentication Queue
/////////////////////////////////////
app.loop();
/////////////////////////////////////
// Maintain App Async Queue
/////////////////////////////////////
Database.loop();
/////////////////////////////////////
// Call Service App
/////////////////////////////////////
if (app.ready() && millis() - tmo > 3000)
{
tmo = millis();
// Get int
Database.get(aClient, "/test/int", asyncCB);
}
}
void asyncCB(AsyncResult &aResult)
{
if (aResult.appEvent().code() > 0)
{
Firebase.printf("Event msg: %s, code: %d\n", aResult.appEvent().message().c_str(), aResult.appEvent().code());
}
if (aResult.isDebug())
{
Firebase.printf("Debug msg: %s\n", aResult.debug().c_str());
}
if (aResult.isError())
{
Firebase.printf("Error msg: %s, code: %d\n", aResult.error().message().c_str(), aResult.error().code());
}
}
As the library is the Firebase (REST API) Client, but it also provides the extended functions to use in OTA update, filesystem download and upload as in the old library with cleaner and easy to read API and functions.
The request payload and URL query parameters are supported as class object with the same names and types that represent the inputs and qury parameters that are available from Google API documentation.
The function name or method is the same or identical to the Google API documentation unlesss some function names cannot be used due to prohibit keyword in C/C++, e.g. delete, visibility.
The library provides the placeholder struct for boolean, integer, float with custom precision, double with custom precision and object represents JSON or map and Array for input.
The response payload returning result (output) is straightforward as String.
Note
The async result in the async callback can be lived only inside the callback and it decontructed when async operation is complete. To take the data out from the async result callback, the static or glocal variable should be used to copy the data.
If the size of payload string in async reseut is large, to copy the char array buffer directly, use AsyncResult::payload().c_str() instead.
There is no JSON serialization/deserialization utilized or provided in this library.
See all examples for complete usages.
See function description for all available functions.
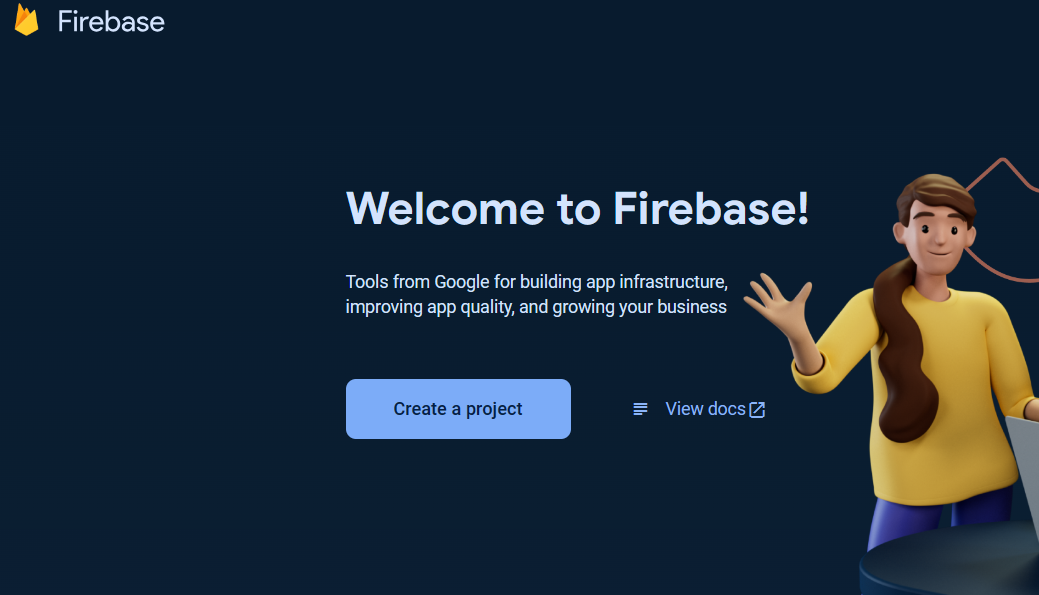
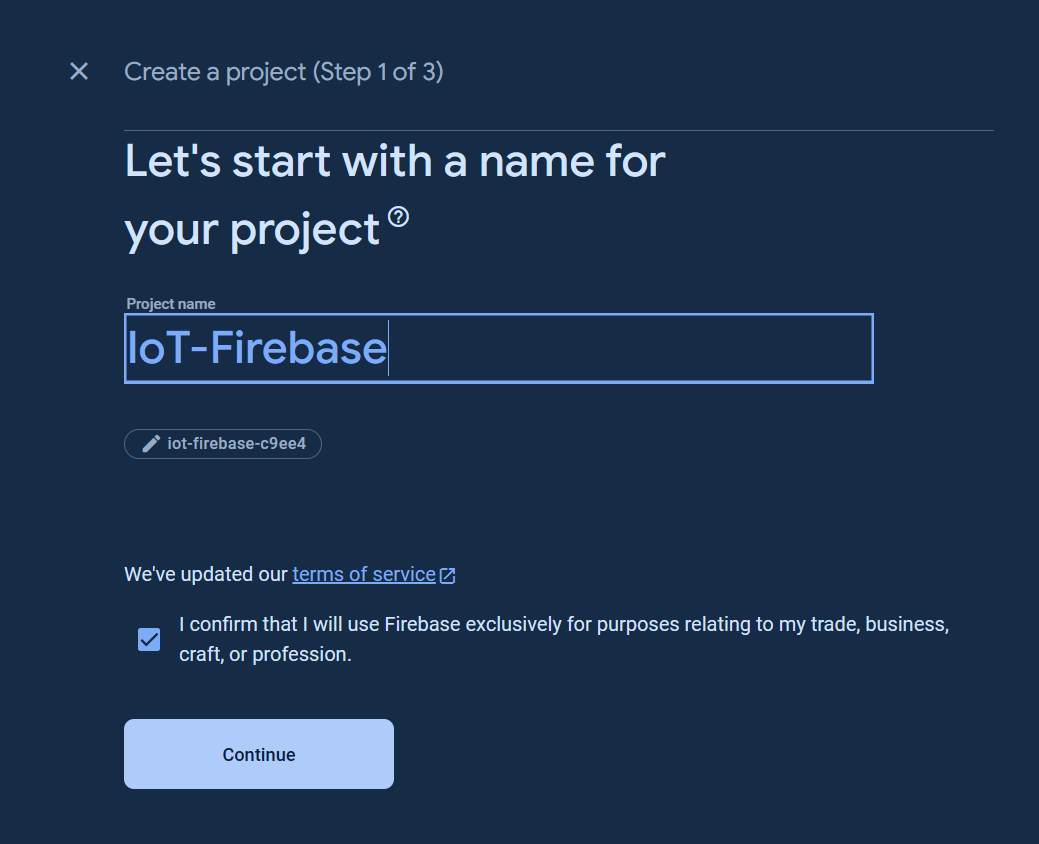
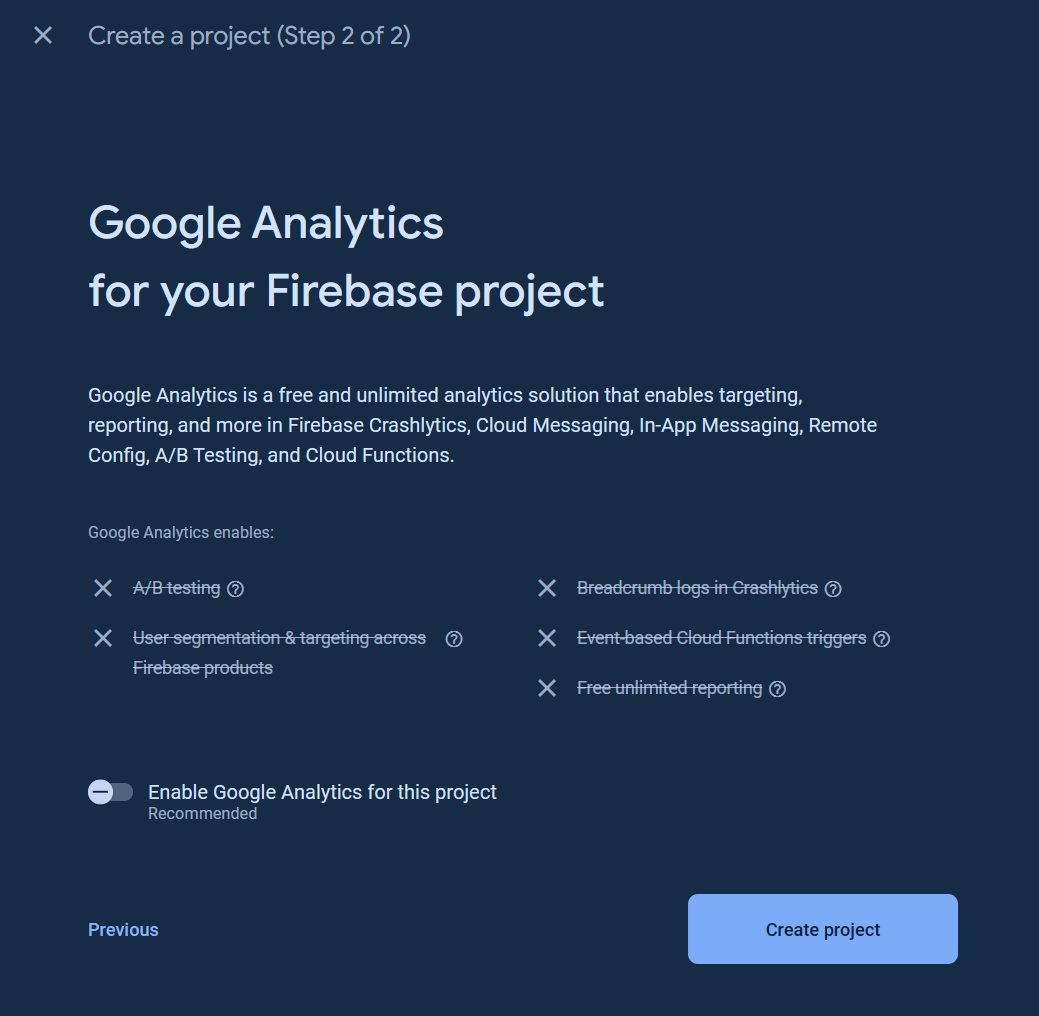
You have to setup the Firebase project to use Firebase products. Visit Understand Firebase Projects to learn more about Firebase projects.
For new Firebase user, go to the Google Firebase Console, sign in to your Google account, and create a new project as the following images.
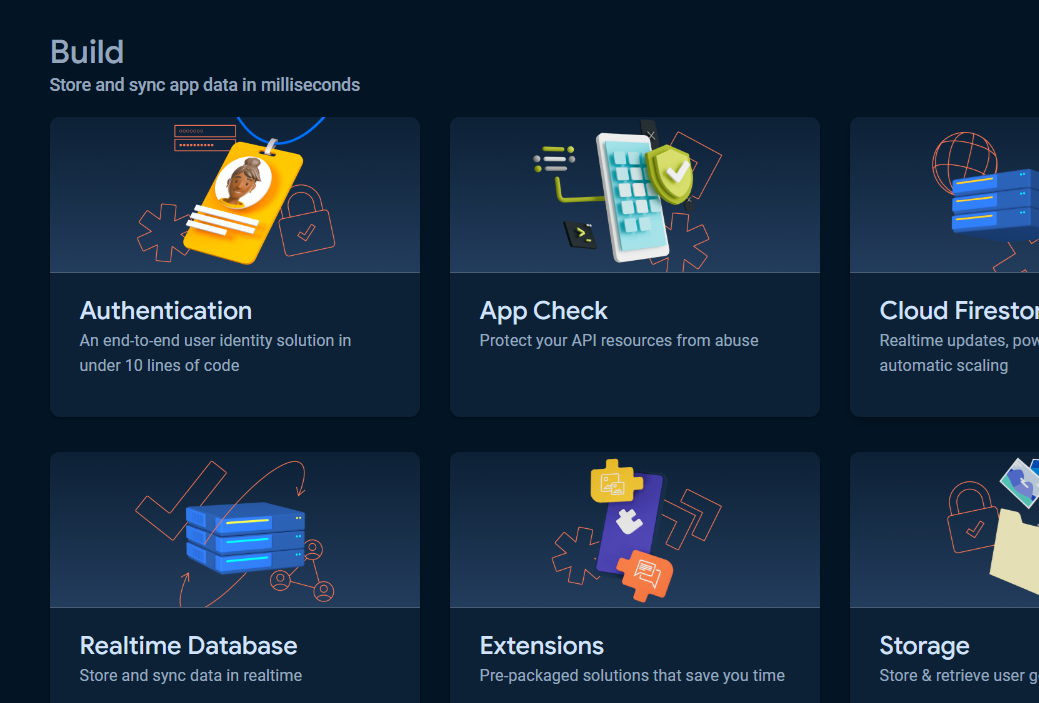
Click the button All products.
When custom token, ID token authentications are used via CustomAuth, UserAuth, CustomToken and IDToken, the Authentication service is needed and must be set up otherwise the HTTP status code 400 error will return from the authentication task.
Note
The Authentication service is not required for OAuth2.0 access token authentication and legacy token (database secret) authorization.
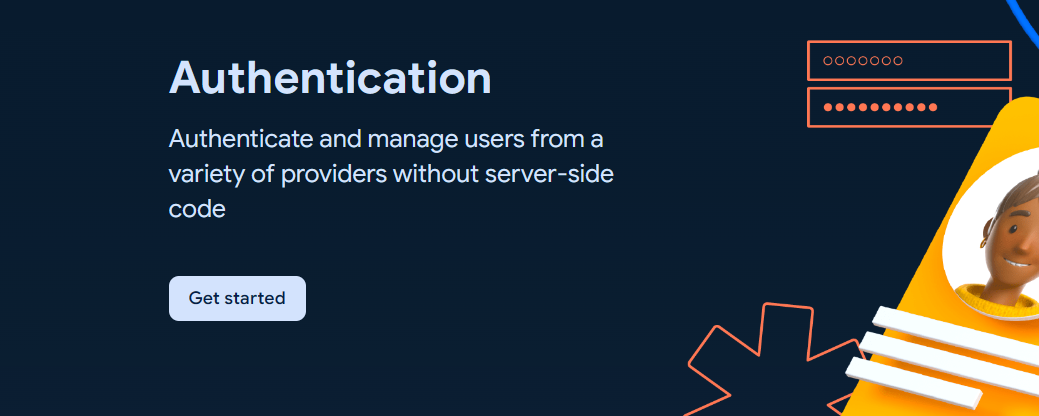
To get started with Authentication, choose Authentication and click Get started button.
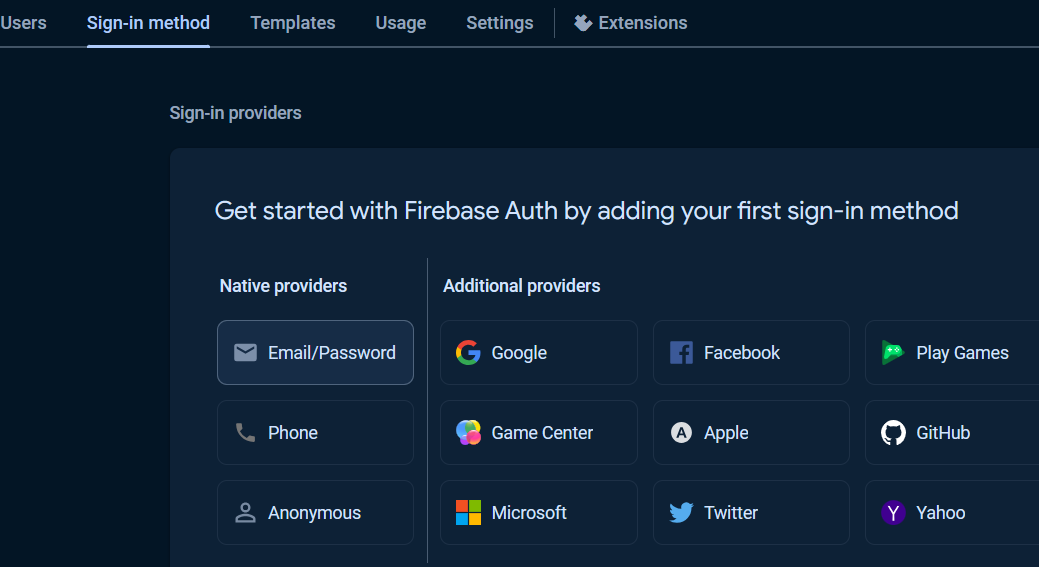
Under Sign-in providers, choose Email/Password.
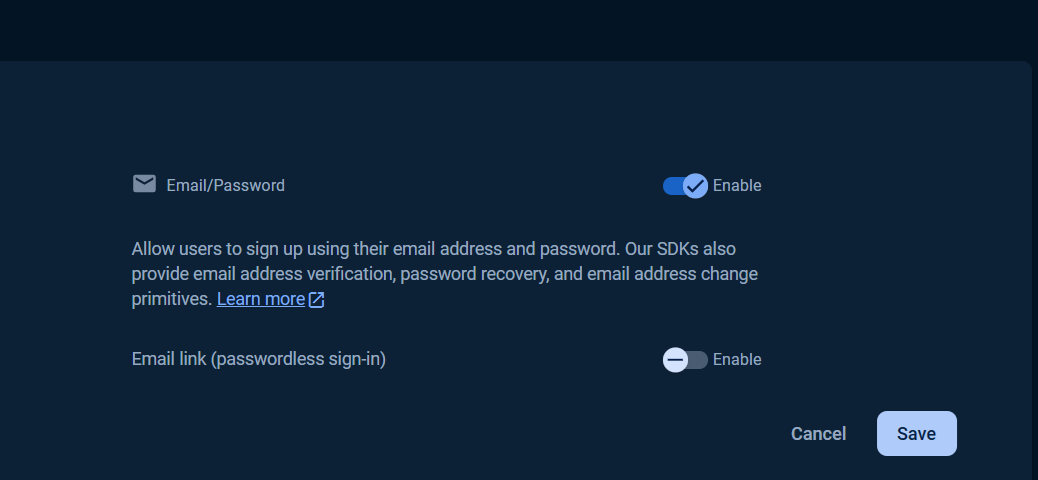
Select enable check option in Email/Password section, and click Save button.
Then click at Users tab, click Add user button.
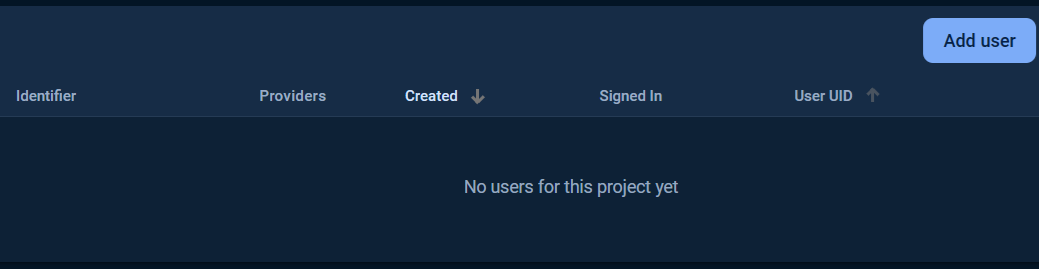
Fill in the Email and Password and click Add user button.
Once the Authentication was setup, the Web API Key will be generated. See the Project Settings page for Web API Key.
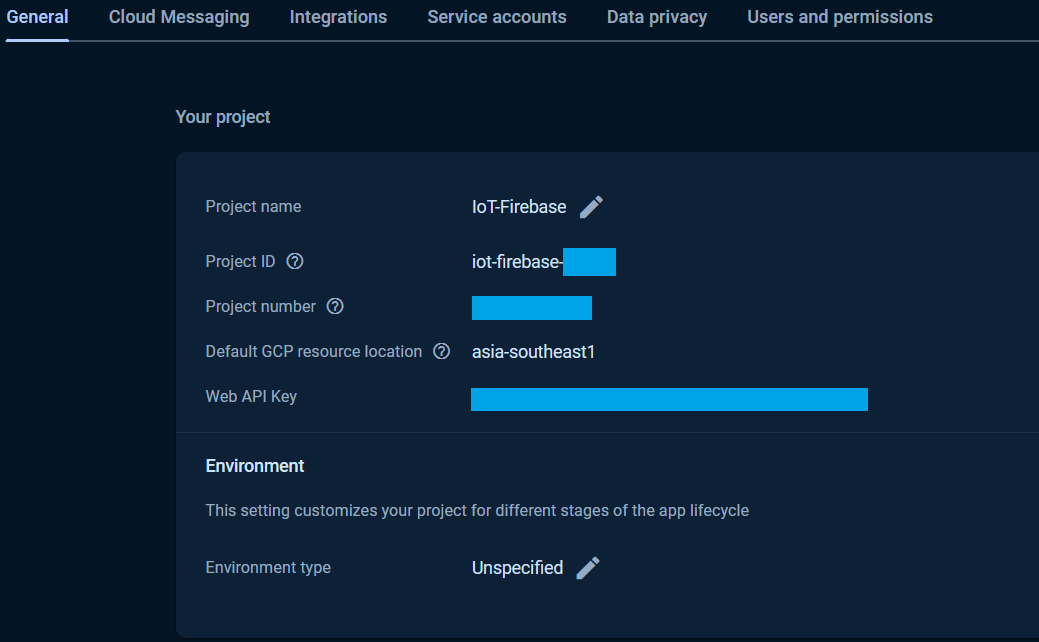
The Web API Key is used in all custom token, ID token authentications that used via the CustomAuth, UserAuth, CustomToken and IDToken provider classes and it was assign to the API_KEY in the exampless.
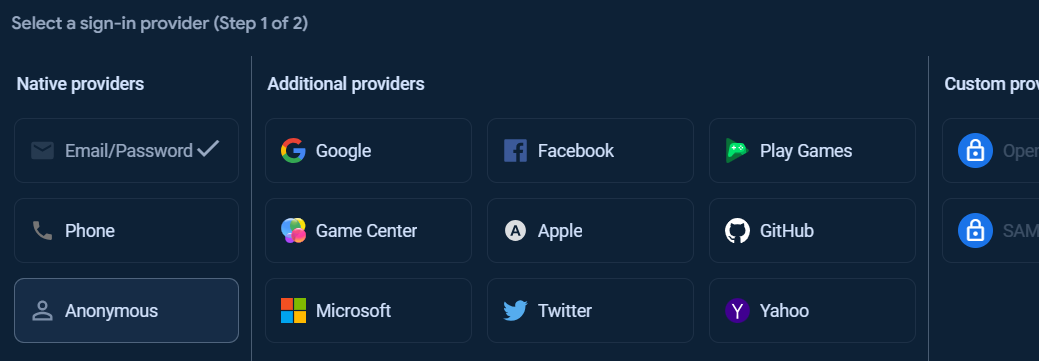
At the Authentication page, under Sigm-in method tab, other Sign-in providers can be added.
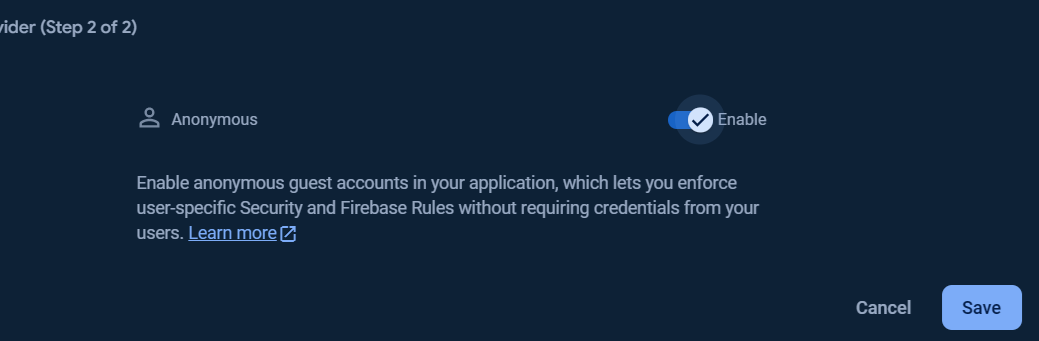
To add Anonymous sign-in provider, click at Add new provider button.
Select enable check option in Email/Password section, and click Save button.
To get started with Firebase Realtime Database, choose Realtime Database and click Create Database.
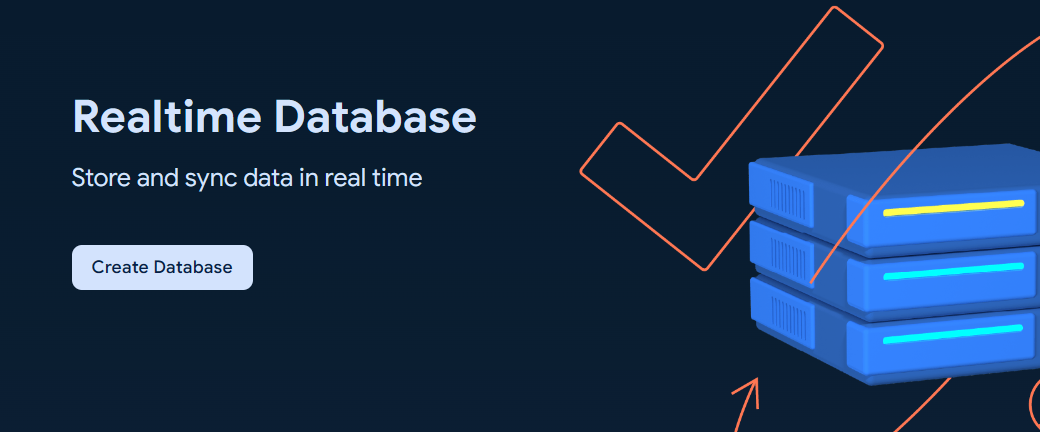
Set up your Database options and Security rules.
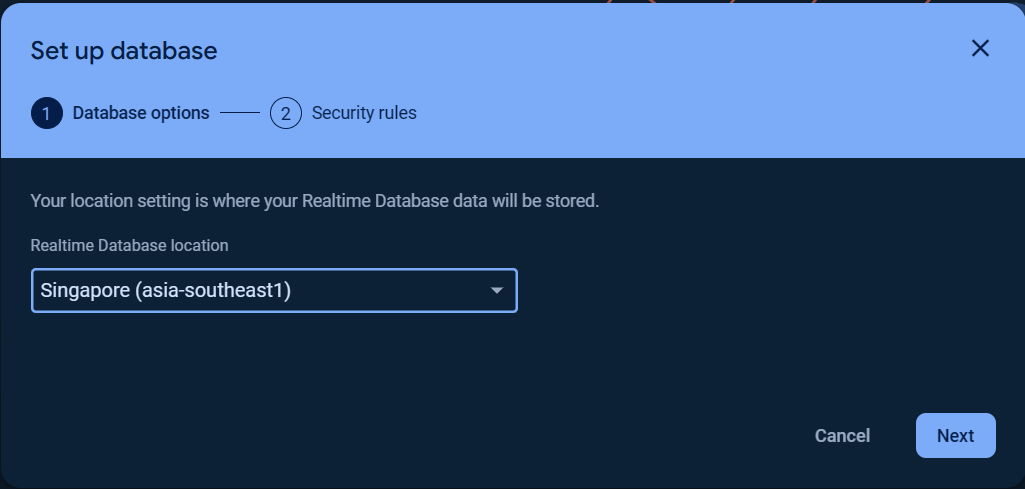

You can choose Start in locked mode or Start in test mode for Security rules.
Once the database was created, click on the Rules tab and change the Security rules as following to allow the basic authentication, click Publish button to apply the changes.
{
  "rules": {
    ".read": "auth != null",
    ".write": "auth != null"
  }
}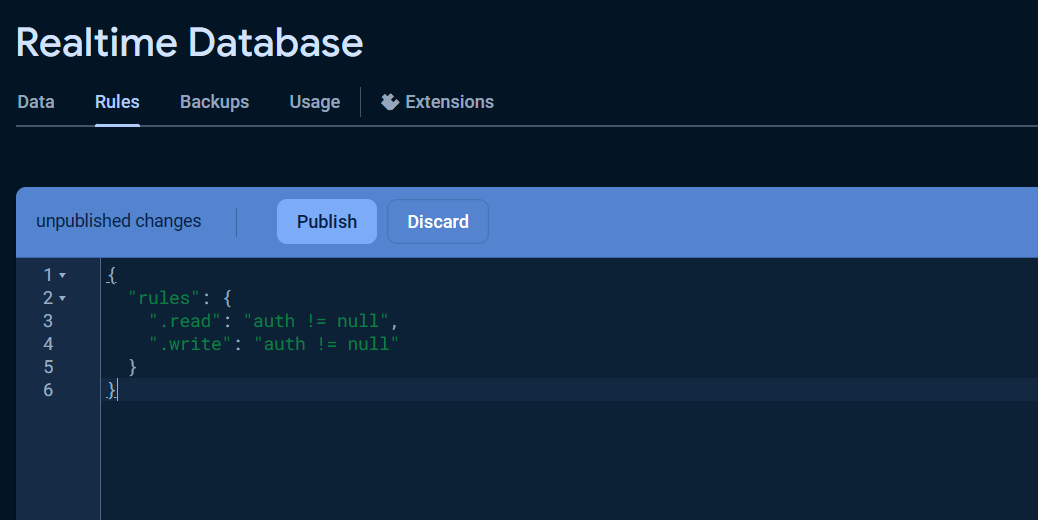
The warning Your security rules are not secure. Any authenticated user can steal, modify, or delete data in your database. will be displayed due to insecure rules which you can change it for more secure later.
Visit Understand Firebase Realtime Database Security Rules to learn more about security rules.
The reference url is the DATABASE_URL that defined and used in the Realtime Database examples can be obtained from the Data tab as the following.

The reference url or database url also can be taken from the Service Account key file, see Service Account section.
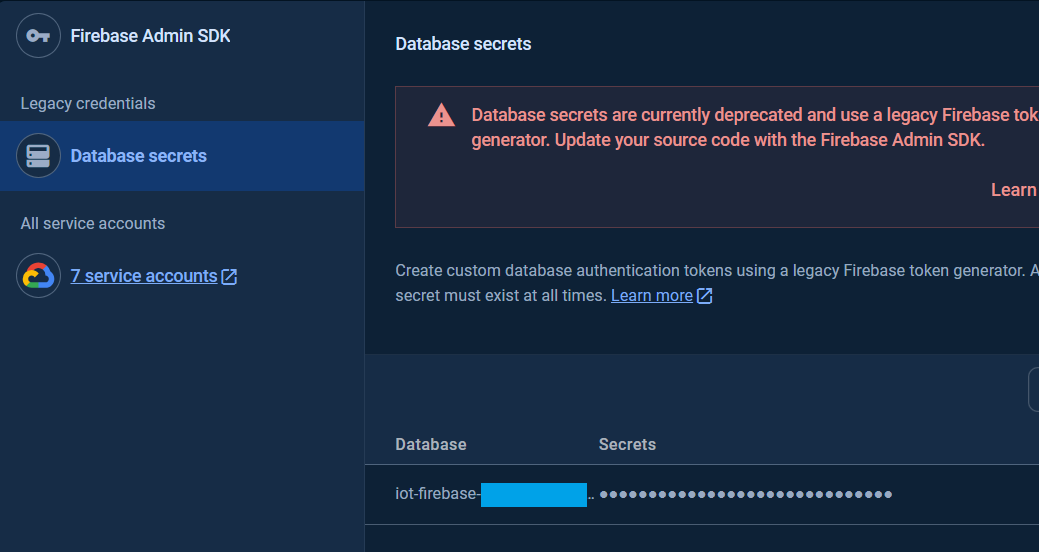
The database secret is the secret key for privileged accessing the Realtime Database.
The database secret is now currently deprecated. Alternatively, to use the Realtime Database with the same privileged access as database secret but secure, the OAuth2.0 access token athentication via ServiceAuth provider class is recommended.
To get the database secret, in the Project Settings page in the Google Firebase Console, under the Service accounts Tab click Database secret.
The database secret for the databases are available in the Secrets column.
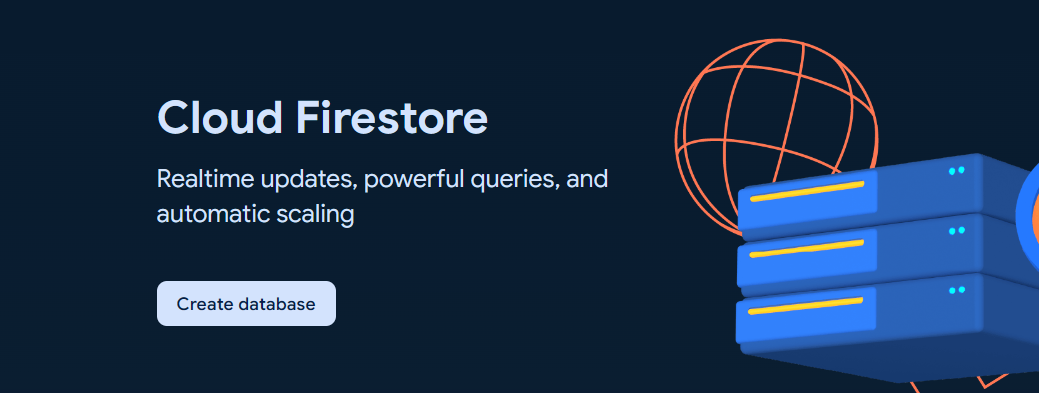
To get started with Cloud Firestore Database, choose Cloud Firestore and click Create database.
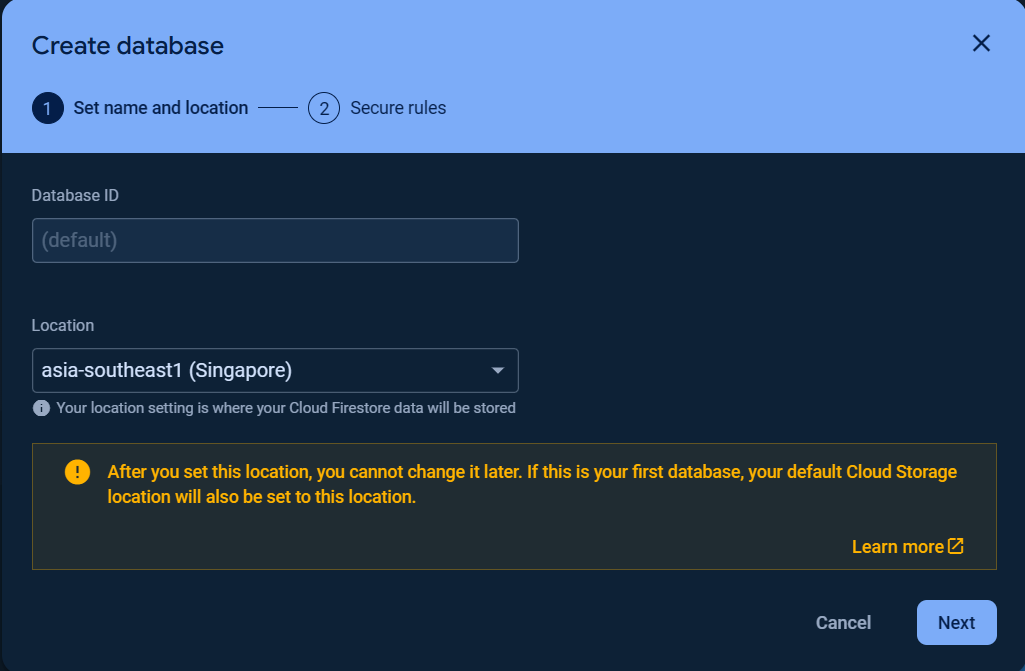
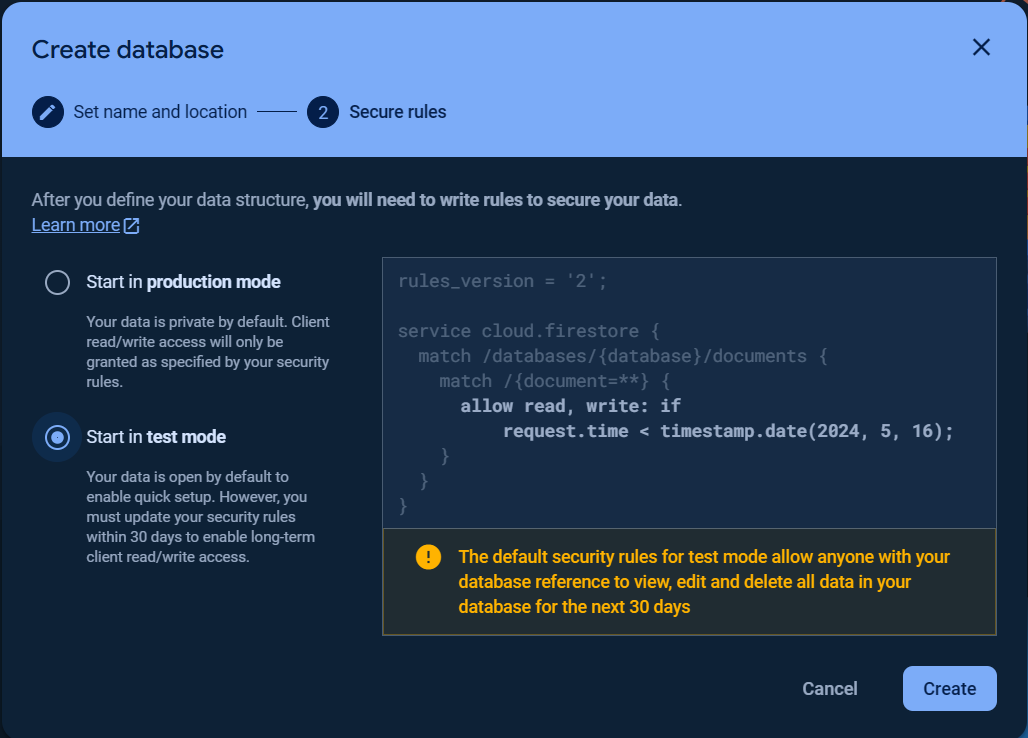
Set up your database Name and Location and Security rules.
Note
The first database name (ID) is (default) which cannot be changed.
Once the database was created, click on the Rules tab and change the Security rules as following to allow the basic authentication, click Publish button to apply the changes.
rules_version = '2';
service cloud.firestore {
  match /databases/{database}/documents {
    match /{document=**} {
      allow read, write: if request.auth.uid != null;
    }
  }
}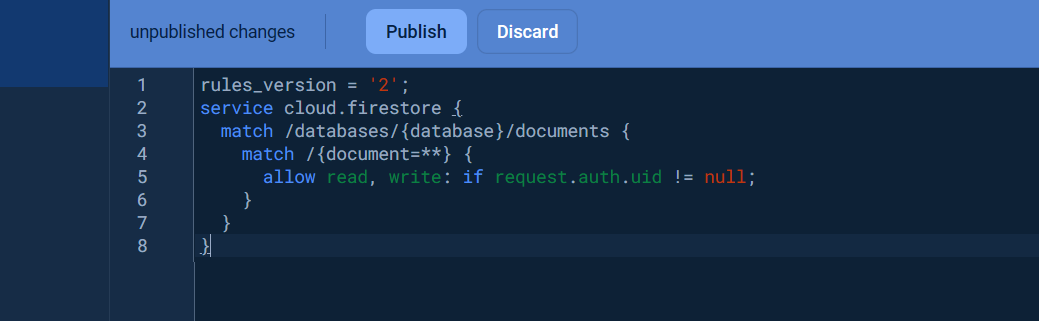
Visit Get started with Cloud Firestore Security Rules to learn more about security rules.
To get started with Storage, choose Storage and click Get started.
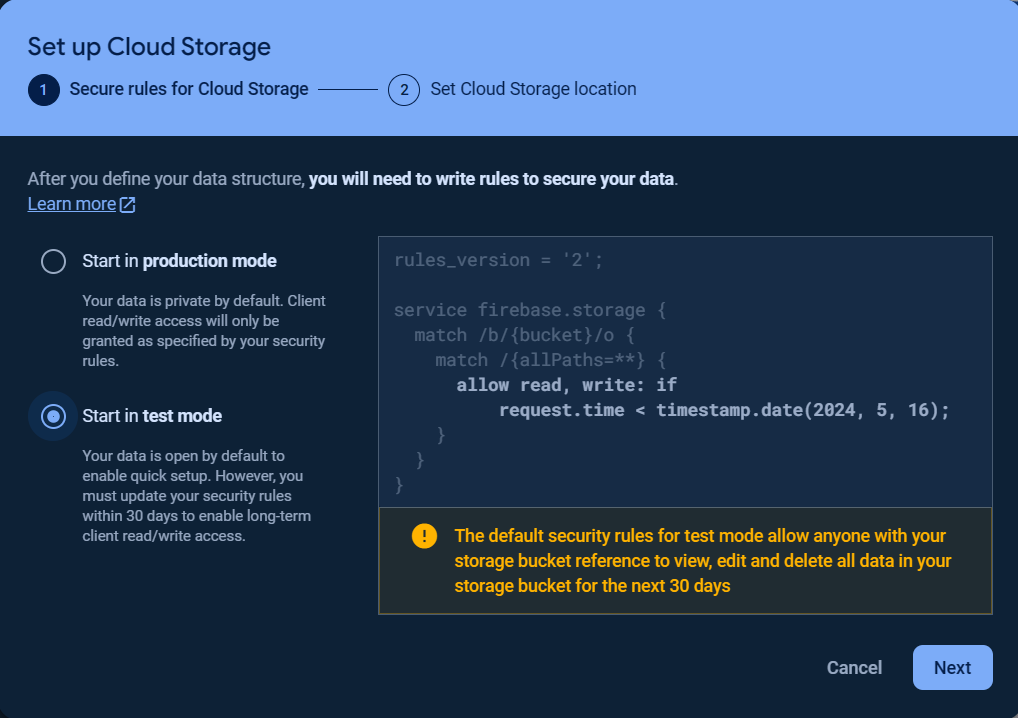
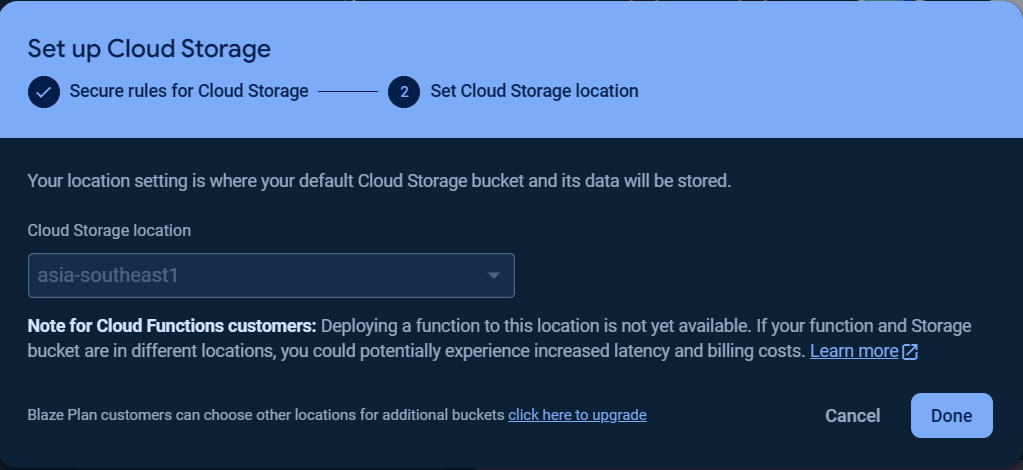
Then set the Secure Rules for Cloud Storage and Cloud Storage location.
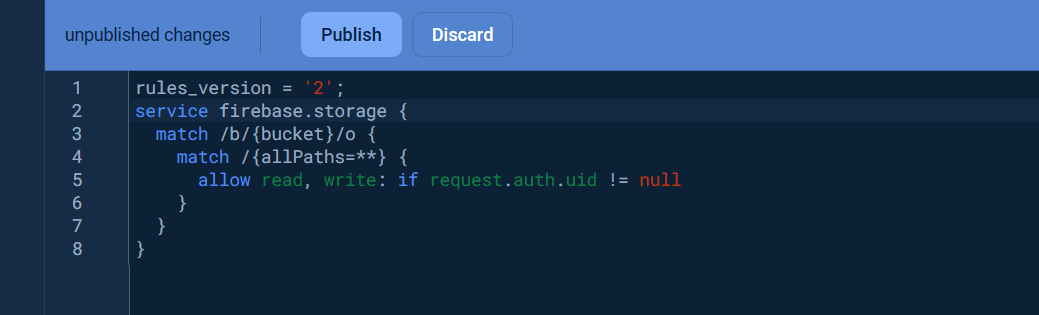
Once the storage bucket was created, click on the Rules tab and change the Security rules as following to allow the basic authentication, click Publish button to apply the changes.
rules_version = '2';
service firebase.storage {
  match /b/{bucket}/o {
    match /{allPaths=**} {
      allow read, write: if request.auth.uid != null
    }
  }
}
Visit Get started with Firebase Security Rules to learn more about security rules.
The folder path is the STORAGE_BUCKET_ID that defined and used in the Storage examples can be obtained from the Files tab as the following.

The folder path or the STORAGE_BUCKET_ID also can be taken from the Service Account key file, see Service Account section.
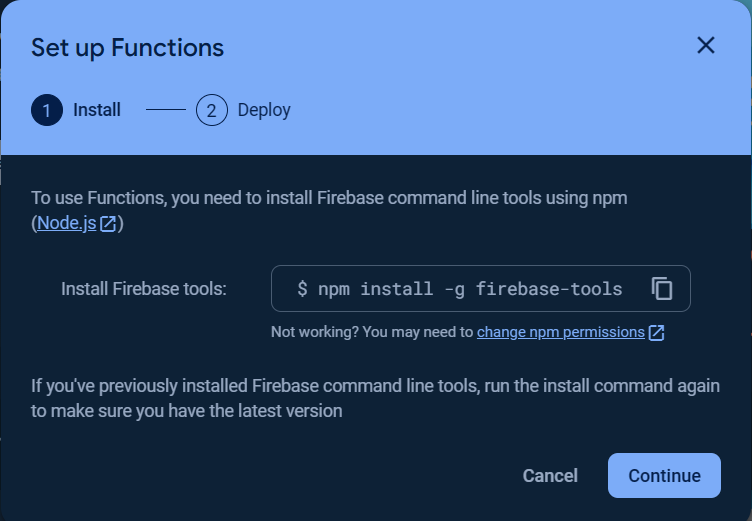
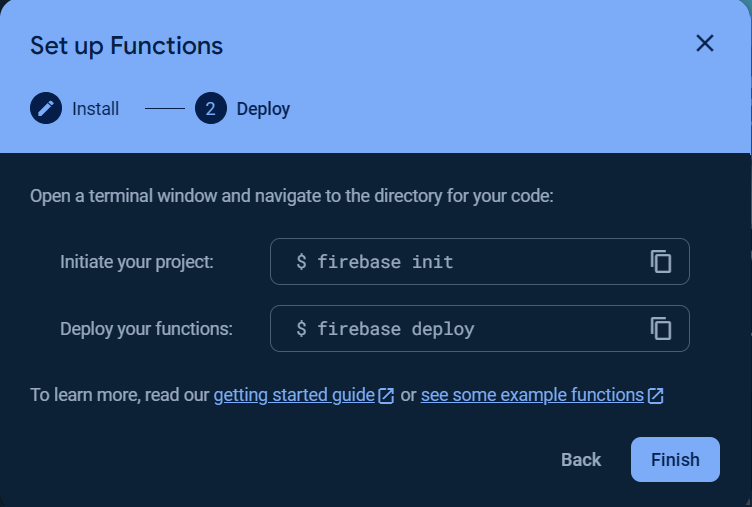
To use the Cloud Functions for running your backend automate code, the billing plan for the project is needed to be upgraded to at least Blaze plan.
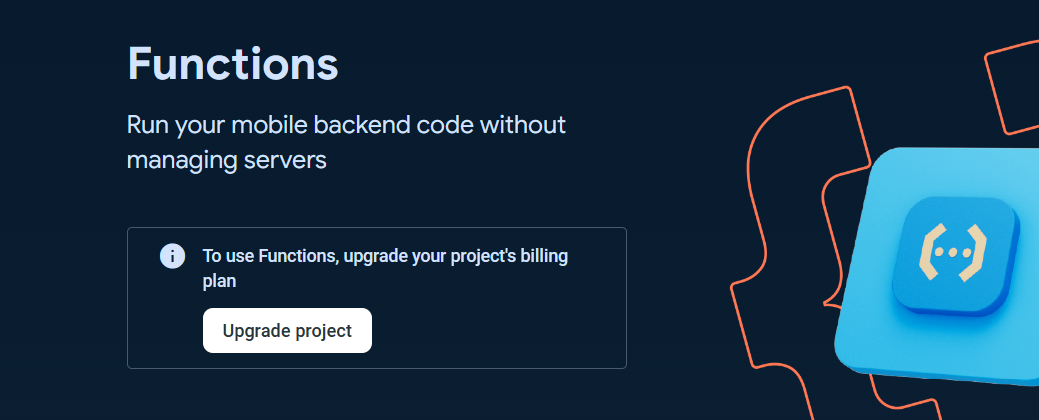
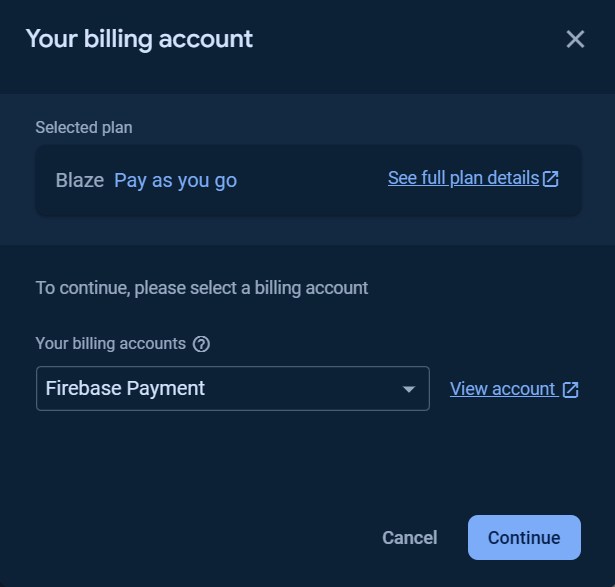
You can Set a billing budget at this step or skip it.
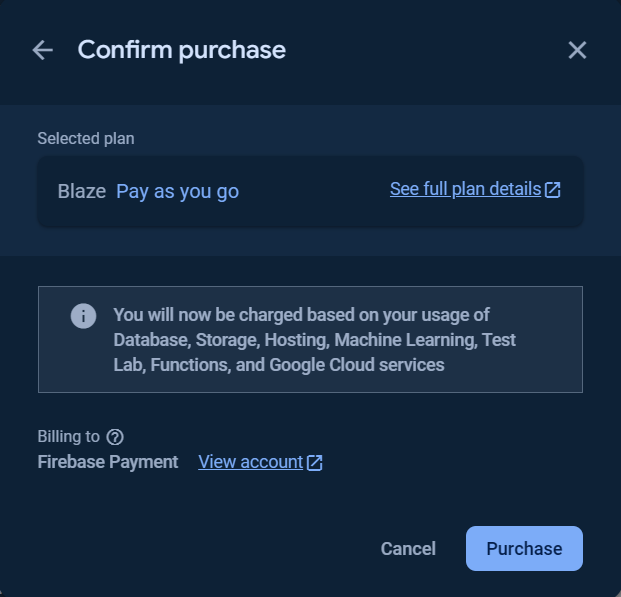
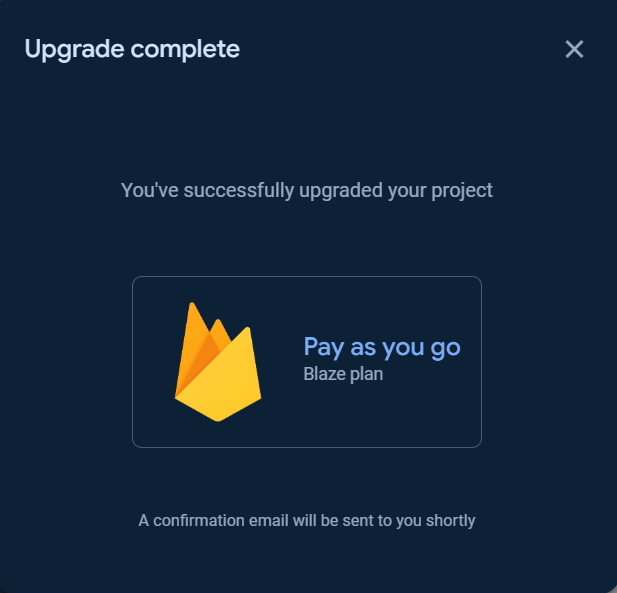
Click the Get started button and follow the steps as show in the following images.
Important
The Cloud Build API and Cloud Run Admin API must be enabled, click here to enable Cloud Build APIand here to enable Cloud Run Admin API.

Create an app (iOS, Android, Web, or Unity app) for getting started.
The following steps showed the web app (Javascript) is created.
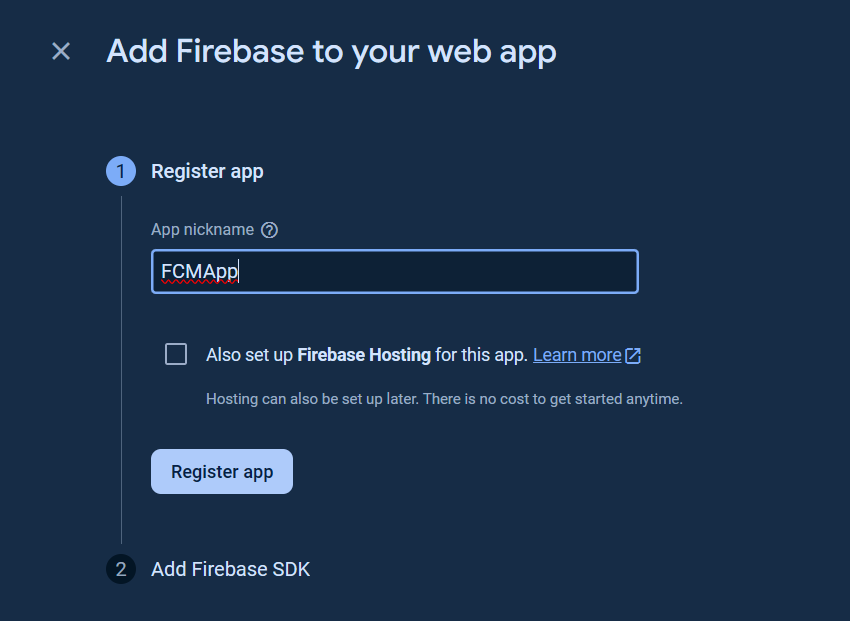
Add the Firebase SDK and click Continue to console button.
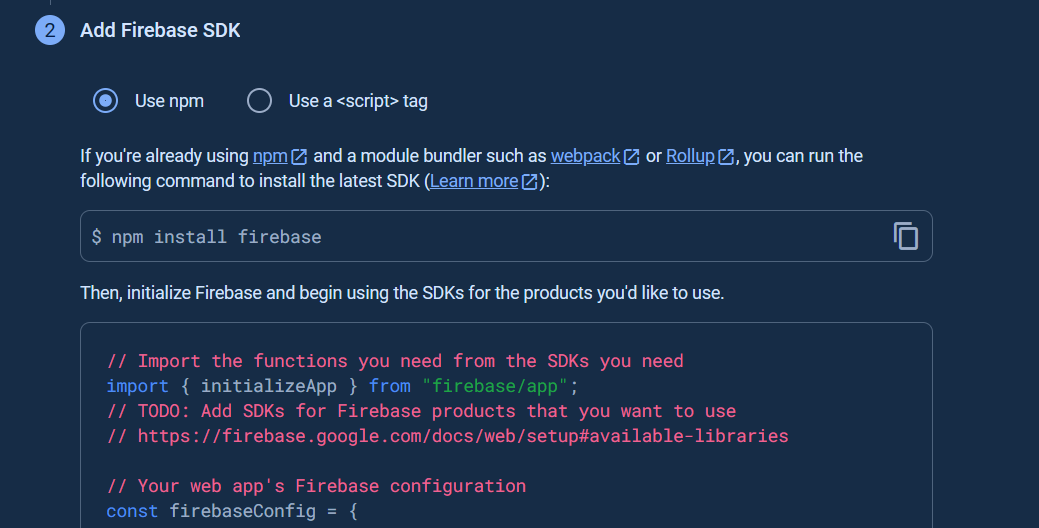
Follow the Firebase Cloud Messaging Quickstart for Javascript for the rest of steps.
Note
The script that provided in Firebase Cloud Messaging Quickstart for Javascript does not work at the present with the error Failed to register a Service Worker.
To workaround, change the script in firebase-messaging-sw.js as the following.
From
importScripts('/__/firebase/init.js');To
firebase.initializeApp({
  apiKey: 'API_KEY', // Change this with your API Key
  authDomain: 'PROJECT_ID.firebaseapp.com', // Change this with your API Key
  databaseURL: 'https://PROJECT_ID.firebaseio.com', // Change this with your database url
  projectId: 'PROJECT_ID', // Change this with your Project ID
  storageBucket: 'PROJECT_ID.appspot.com', // Change this with your storage bucket
  messagingSenderId: 'SENDER_ID', // Change this with your messaging sender ID
  appId: 'APP_ID' // Change this with your app ID
});
The app (iOS, Android, Web and Unity) registration token or DEVICE_TOKEN is a unique token string that identifies each client app instance. The registration token is required for single device and device group messaging. Note that registration tokens must be kept secret (ref)
A Firebase Admin SDK Service Account is created automatically when you create a Firebase project or add Firebase to a Google Cloud project and it is used to communicate with Firebase.
The Service Account credentials are required for OAuth2.0 access token and custom token authentications via the ServiceAuth and CustomAuth provider classes.
The Service Account private key contains the Service Account credentials which used for initialize the Firebase mobile app.
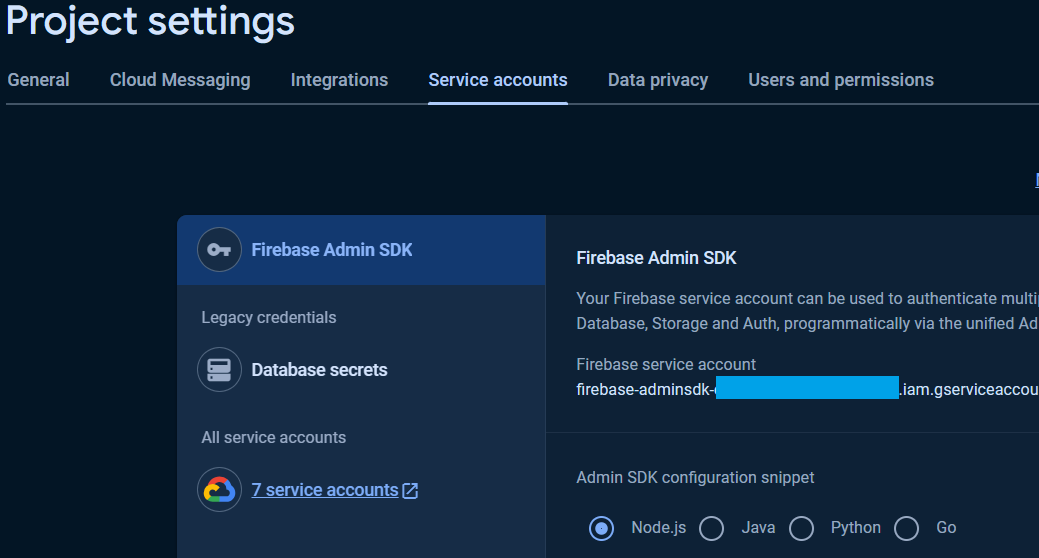
To generate and download Service Account private key file, in the Project Settings page in the Google Firebase Console, click at Service accounts tab and Generate new private key.
Open the .json file that is already downloaded with text editor.
{
  "type": "service_account",
  "project_id": "...",
  "private_key_id": "...",
  "private_key": "-----BEGIN PRIVATE KEY-----\n...\n-----END PRIVATE KEY-----\n",
  "client_email": "...",
  "client_id": "...",
  "auth_uri": "https://accounts.google.com/o/oauth2/auth",
  "token_uri": "https://oauth2.googleapis.com/token",
  "auth_provider_x509_cert_url": "https://www.googleapis.com/oauth2/v1/certs",
  "client_x509_cert_url": "...",
  "universe_domain": "googleapis.com"
}
Copy the project_id, client_email, private_key_id and private_key from .json file and paste to these defines in the example.
#define FIREBASE_PROJECT_ID "..." // Taken from "project_id" key in JSON file.
#define FIREBASE_CLIENT_EMAIL "..." // Taken from "client_email" key in JSON file.
const char PRIVATE_KEY[] PROGMEM = "-----BEGIN PRIVATE KEY-----\n...\n-----END PRIVATE KEY-----\n"; // Taken from "private_key" key in JSON file.When you want to use the Firebase Admin SDK Service Account to access the Google Cloud services e.g. Google Cloud Storage, Google Cloud Functions and some features of Google Cloud Firestore that perform some sensitive tasks, you have to add some permissive roles.
The Basic roles are highly permissive roles that used to grant principals broad access to Google Cloud resources.
The Basic roles e.g. Owner and Editor will be added for this reason. The Owner role is already covered the Editor role, then you can add only Owner role.
To add the Basic's Owner and Editor roles, go to the Identity and Access Management console.
Then choose the project, and select the VIEW BY PRINCIPALS tab.
From the table displayed, look at the firebase-adminsdk in the Name column, then click on the pencil icon on the right side in this table row to Edit principal.
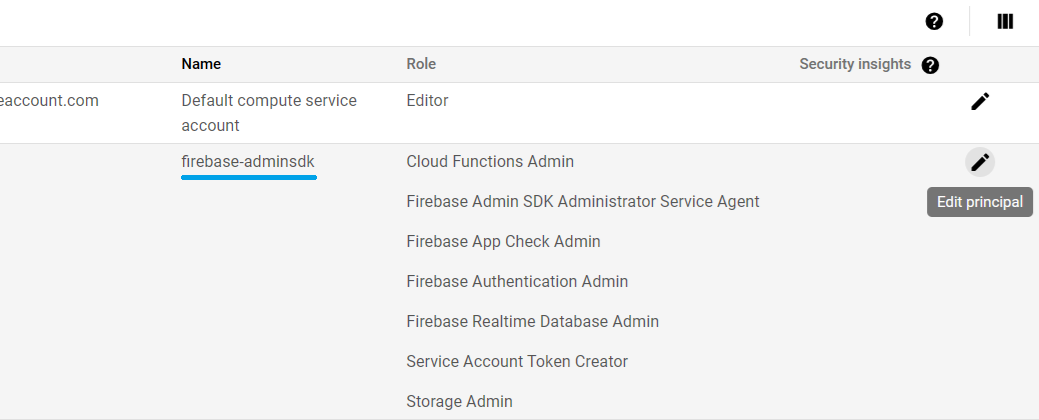
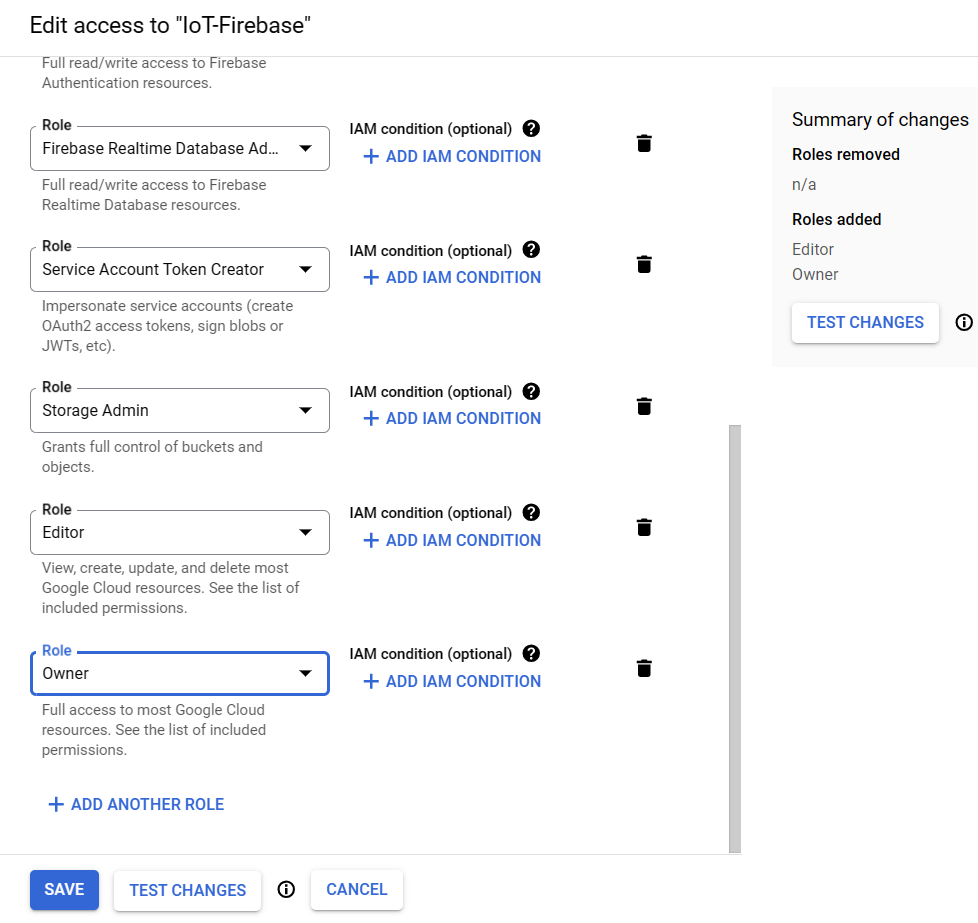
Add the role Owner and Editor under the Basic roles and click Save button.
Wait a few minutes for the action to propagate after adding roles.
When you update the ESP8266 Arduino Core SDK to v3.x.x, the memory for Heap and stack can be configurable from IDE.
You can choose the Heap memory between internal and external memory chip from IDE e.g. Arduino IDE and PlatformIO on VSCode or Atom IDE.
For ESP8266 devices that don't have external SRAM/PSRAM chip installed, choose the MMU option 3, 16KB cache + 48KB IRAM and 2nd Heap (shared).
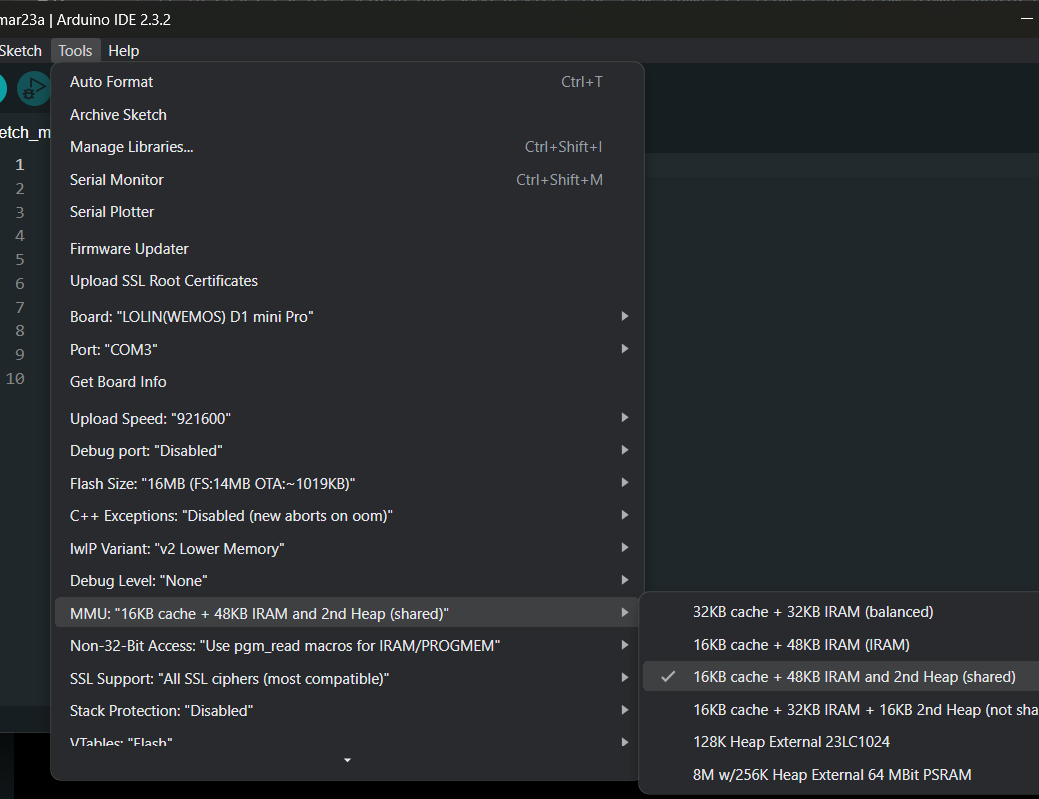
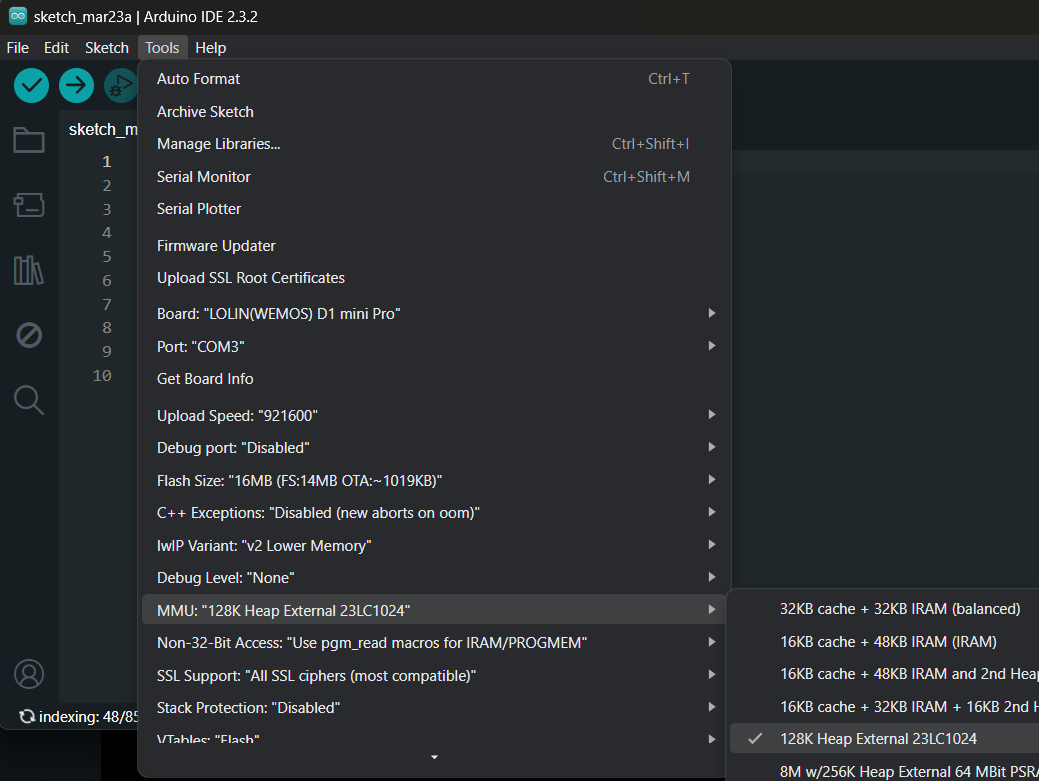
For ESP8266 devices that have external 23LC1024 SRAM chip installed, choose the MMU option 5, 128K External 23LC1024.
For ESP8266 devices that have external ESP-PSRAM64 chip installed, choose the MMU option 6, 1M External 64 MBit PSRAM.
The MMU options can be selected from build_flags in your project's platformio.ini file
For ESP8266 devices that don't not have external SRAM/PSRAM chip installed, add build flag as below.
[env:d1_mini]
platform = espressif8266
build_flags = -D PIO_FRAMEWORK_ARDUINO_MMU_CACHE16_IRAM48_SECHEAP_SHARED
board = d1_mini
framework = arduino
monitor_speed = 115200
For ESP8266 devices that have external 23LC1024 SRAM chip installed, add build flag as below.
[env:d1_mini]
platform = espressif8266
;128K External 23LC1024
build_flags = -D PIO_FRAMEWORK_ARDUINO_MMU_EXTERNAL_128K
board = d1_mini
framework = arduino
monitor_speed = 115200
For ESP8266 devices that have external ESP-PSRAM64 chip installed, add build flag as below.
[env:d1_mini]
platform = espressif8266
;1M External 64 MBit PSRAM
build_flags = -D PIO_FRAMEWORK_ARDUINO_MMU_EXTERNAL_1024K
board = d1_mini
framework = arduino
monitor_speed = 115200Most ESP8266 modules don't have the built-in SRAM/PSRAM on board. External memory chip connection can be done via SPI port as below.
23LC1024/ESP-PSRAM64                ESP8266

CS (Pin 1)                          GPIO15
SCK (Pin 6)                         GPIO14
MOSI (Pin 5)                        GPIO13
MISO (Pin 2)                        GPIO12
/HOLD (Pin 7 on 23LC1024 only)      3V3
Vcc (Pin 8)                         3V3
Vcc (Pin 4)                         GND
Once the external Heap memory was selected in IDE, to allow the library to use the external memory, you can set it in Config.h by define this macro.
#define ENABLE_PSRAMThis macro was defined by default when you installed or update the library.
In ESP32 module that has PSRAM installed, you can enable it and set the library to use this external memory instead.
To enable PSRAM in ESP32 module.
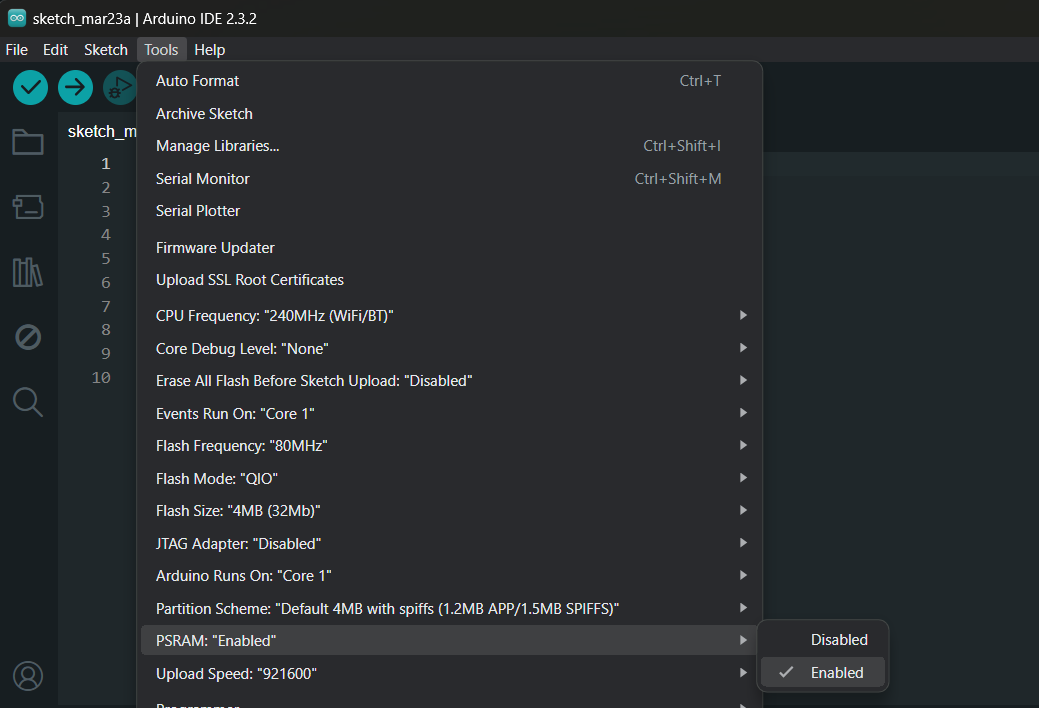
In PlatformIO on VSCode or Atom IDE, add the following build_flags in your project's platformio.ini file.
build_flags = -DBOARD_HAS_PSRAM -mfix-esp32-psram-cache-issueAs in ESP8266, once the external Heap memory was enabled in IDE, to allow the library to use the external memory, you can set it in Config.h by define this macro.
#define ENABLE_PSRAMThe library build options are defined as preprocessor macros (#define name).
Some options can be disabled.
The predefined options that are already set in Config.h are following.
ENABLE_DATABASE // For RTDB compilation
ENABLE_FIRESTORE // For Firestore compilation
ENABLE_FIRESTORE_QUERY // For Firestore Query feature compilation
ENABLE_MESSAGING // For Firebase Cloud Messaging compilation
ENABLE_STORAGE // For Firebase Storage compilation
ENABLE_CLOUD_STORAGE // For Google Cloud Storage compilation
ENABLE_FUNCTIONS // For Google Cloud Functions compilation
ENABLE_PSRAM // For enabling PSRAM support
ENABLE_OTA // For enabling OTA updates support via RTDB, Firebase Storage and Google Cloud Storage buckets
ENABLE_FS // For enabling Flash filesystem support
// For enabling authentication and token
ENABLE_SERVICE_AUTH
ENABLE_CUSTOM_AUTH
ENABLE_USER_AUTH
ENABLE_ACCESS_TOKEN
ENABLE_CUSTOM_TOKEN
ENABLE_ID_TOKEN
ENABLE_LEGACY_TOKEN
// For enabling non-sdk networking
ENABLE_ETHERNET_NETWORK
ENABLE_GSM_NETWORKThe following options are not yet defined in Config.h and can be assigned by user.
FIREBASE_ETHERNET_MODULE_LIB `"EthernetLibrary.h"` // For the Ethernet library to work with external Ethernet module
FIREBASE_ETHERNET_MODULE_CLASS EthernetClass // For the Ethernet class object of Ethernet library to work with external Ethernet module
FIREBASE_ETHERNET_MODULE_TIMEOUT 2000 // For the time out in milliseconds to wait external Ethernet module to connect to network
ENABLE_ESP8266_ENC28J60_ETH //  For native core library ENC28J60 Ethernet module support in ESP8266
ENABLE_ESP8266_W5500_ETH // For native core library W5500 Ethernet module support in ESP8266
ENABLE_ESP8266_W5100_ETH // For native core library W5100 Ethernet module support in ESP8266
FIREBASE_DISABLE_ONBOARD_WIFI // For disabling on-board WiFI functionality in case external Client usage
FIREBASE_DISABLE_NATIVE_ETHERNET // For disabling native (sdk) Ethernet functionality in case external Client usage
ENABLE_ASYNC_TCP_CLIENT // For Async TCP Client usage
FIREBASE_ASYNC_QUEUE_LIMIT // For maximum async queue limit setting for an async client
FIREBASE_DEFAULT_DEBUG_PORT // For Firebase.printf debug port
You can assign the optional build options using one of the following methods.
-
By creating user config file
UserConfig.hin library installed folder and define these optional options. -
By adding compiler build flags with
-D name.
In PlatformIO IDE, using build_flags in PlatformIO IDE's platformio.ini is more convenient
build_flags = -D DISABLE_STORAGE
              -D FIREBASE_DISABLE_ONBOARD_WIFI
For external Ethernet module integation used with function setEthernetClient, both FIREBASE_ETHERNET_MODULE_LIB and FIREBASE_ETHERNET_MODULE_CLASS should be defined.
FIREBASE_ETHERNET_MODULE_LIB is the Ethernet library name with extension (.h) and should be inside "" or <> e.g. "Ethernet.h".
FIREBASE_ETHERNET_MODULE_CLASS is the name of static object defined from class e.g. Ethernet.
FIREBASE_ETHERNET_MODULE_TIMEOUT is the time out in milliseconds to wait network connection.
For disabling predefined options instead of editing the Config.h or using #undef in UserConfig.h, you can define these build flags with these names or macros in UserConfig.h.
DISABLE_DATABASE // For disabling RTDB support
DISABLE_FIRESTORE // For disabling Firestore support
DISABLE_FIRESTORE_QUERY // For Firestore Query feature compilation
DISABLE_MESSAGING // For disabling Firebase Cloud Messaging support
DISABLE_STORAGE // For disabling Firebase Storage support
ENABLE_CLOUD_STORAGE // For disabling Google Cloud Storage support
DISABLE_FUNCTIONS // For disabling Google Cloud Functions support
DISABLE_PSRAM // For disabling PSRAM support
DISABLE_OTA // For disabling OTA updates support
DISABLE_FS // For disabling filesystem support
// For disabling authentication and token
DISABLE_SERVICE_AUTH
DISABLE_CUSTOM_AUTH
DISABLE_USER_AUTH
DISABLE_ACCESS_TOKEN
DISABLE_CUSTOM_TOKEN
DISABLE_ID_TOKEN
DISABLE_LEGACY_TOKEN

FIREBASE_DISABLE_ALL_OPTIONS // For disabling all predefined build options above
Note
UserConfig.h for user config should be placed in the library installed folder inside the src folder.
This UserConfig.h will not change or overwrite when update the library.
The MIT License (MIT)
Copyright (c) 2024 K. Suwatchai (Mobizt)
Permission is hereby granted, free of charge, to any person returning a copy of this software and associated documentation files (the "Software"), to deal in the Software without restriction, including without limitation the rights to use, copy, modify, merge, publish, distribute, sublicense, and/or sell copies of the Software, and to permit persons to whom the Software is furnished to do so, subject to the following conditions:
The above copyright notice and this permission notice shall be included in all copies or substantial portions of the Software.
THE SOFTWARE IS PROVIDED "AS IS", WITHOUT WARRANTY OF ANY KIND, EXPRESS OR IMPLIED, INCLUDING BUT NOT LIMITED TO THE WARRANTIES OF MERCHANTABILITY, FITNESS FOR A PARTICULAR PURPOSE AND NONINFRINGEMENT. IN NO EVENT SHALL THE AUTHORS OR COPYRIGHT HOLDERS BE LIABLE FOR ANY CLAIM, DAMAGES OR OTHER LIABILITY, WHETHER IN AN ACTION OF CONTRACT, TORT OR OTHERWISE, ARISING FROM, OUT OF OR IN CONNECTION WITH THE SOFTWARE OR THE USE OR OTHER DEALINGS IN THE SOFTWARE.