- GitOps Demonstration with Red Hat Advanced Cluster Management (RHACM) and Assisted Installer
- Objective
- 000 - Overview
- 001 - Bridge Network Setup -
br0- Optional - 002 - Hub Cluster Setup - hubztp
- 003 - Setting Up Sushy Tool
- 004 - Local Storage Setup for OpenShift Data Foundation
- 005 - OpenShift Data Foundation (ODF) Setup
- 006 - OpenShift GitOps Operator Setup
- 007 - Installing Red Hat Advanced Cluster Management (RHACM) with ArgoCD
- 008 - Secret Management with Vault and External Secrets Operator
- 009 - Setting Up Virtual Machines (Simulation of Bare Metal Installation)
- 010 - Deploying OCP Clusters using RHACM
- 011 - Integrating RHACM with ArgoCD
- 012 - Deploying Workloads with ArgoCD ApplicationSet
- 013 - Governance and Compliance Management using RHACM and ArgoCD
The primary goal of this project is to showcase the GitOps functionality using a combination of Red Hat tools, emulated bare metal infrastructure, and Tekton pipelines.

This demonstration integrates several tools and technologies to showcase the power and flexibility of GitOps in a modern infrastructure:
- RHACM is a comprehensive cluster management solution from Red Hat, designed to simplify the life-cycle of OpenShift clusters, from creation to management and application deployment.
- Role in this project: RHACM will oversee and manage the OpenShift clusters, ensuring they're compliant with defined policies, and helping in scaling, upgrading, or recovering clusters as necessary.
- An innovative deployment tool crafted for OpenShift Container Platform (OCP) clusters. It streamlines the process of setting up a OpenShift cluster, especially on challenging environments like bare metal.
- Role in this project: We'll use Assisted Installer to deploy OCP onto our emulated bare metal environment. It'll interact with the emulated Redfish API, believing it's deploying to genuine bare metal servers.
- KVM stands for Kernel-based Virtual Machine, a virtualization technology built into the Linux kernel. Sushy-Tools, on the other hand, simulates a Redfish API for systems that lack genuine Redfish support, like our KVM virtual machines.
- Role in this project: KVM creates the foundational virtual infrastructure for our demonstration. Sushy-Tools will act as a translator, making these VMs appear as Redfish compliant bare metal machines. This illusion allows Assisted Installer to deploy OCP clusters as if it's a true bare metal environment.
- Red Hat GitOps is a solution that enforces infrastructure and application configurations to be defined and stored in a Git repository. Tekton Pipelines is a powerful Kubernetes-native CI/CD solution that can be used to deploy and manage applications and infrastructure.
- Role in this project: With the GitOps principle, any change to our infrastructure or application state will start as a change in our Git repository. Tekton Pipelines will continuously ensure that our live environment matches this desired state, making the infrastructure-as-code paradigm a reality.
The instructions in this section are specific to our project infrastructure, revolving around the use of the eno1np0 physical interface to create a bridge network. While multiple methods exist to set up bridge networks, the steps detailed here are based on our unique configuration.
If your environment or requirements differ, you may choose to adapt the steps provided or skip this section.
For this project, we are creating a bridge network, named br0, to link our KVM virtual machines to the external network. This ensures seamless communication and proper network functionality between our VMs and the broader environment.
- Navigate to the setup directory:
cd 001-hubcluster-setup
- Run the bridge network creation script:
bash 001-create-bridge-network.sh
Executing this script will automate the creation of the br0 bridge using the eno1np0 physical interface and assign it an IP address of 192.168.7.212/22.
- Physical Interface (eno1np0): Retains its IP address (
192.168.7.213/24) even after the bridge's creation. - Bridge Interface (br0): Acquires an IP address of
192.168.7.212/22. This address will be used by VMs or other devices connected to the bridge for external communications.
- The
br0bridge acts much like a switch, witheno1np0serving as its port. VMs connected to this bridge can interact with the physical network viaeno1np0. - It's crucial to ensure that firewall settings, if applicable, are adjusted to facilitate traffic through both the
br0interface andeno1np0. - Remember, this is a unique configuration where both the bridge and the physical interface retain individual IP addresses. Ensure proper routing and network configurations to avoid potential issues.
In this section, we'll focus on setting up a hub cluster consisting of three nodes. This cluster setup will leverage virtual machines (VMs) to simulate bare metal nodes. For ease of setup, we have a scripted approach.
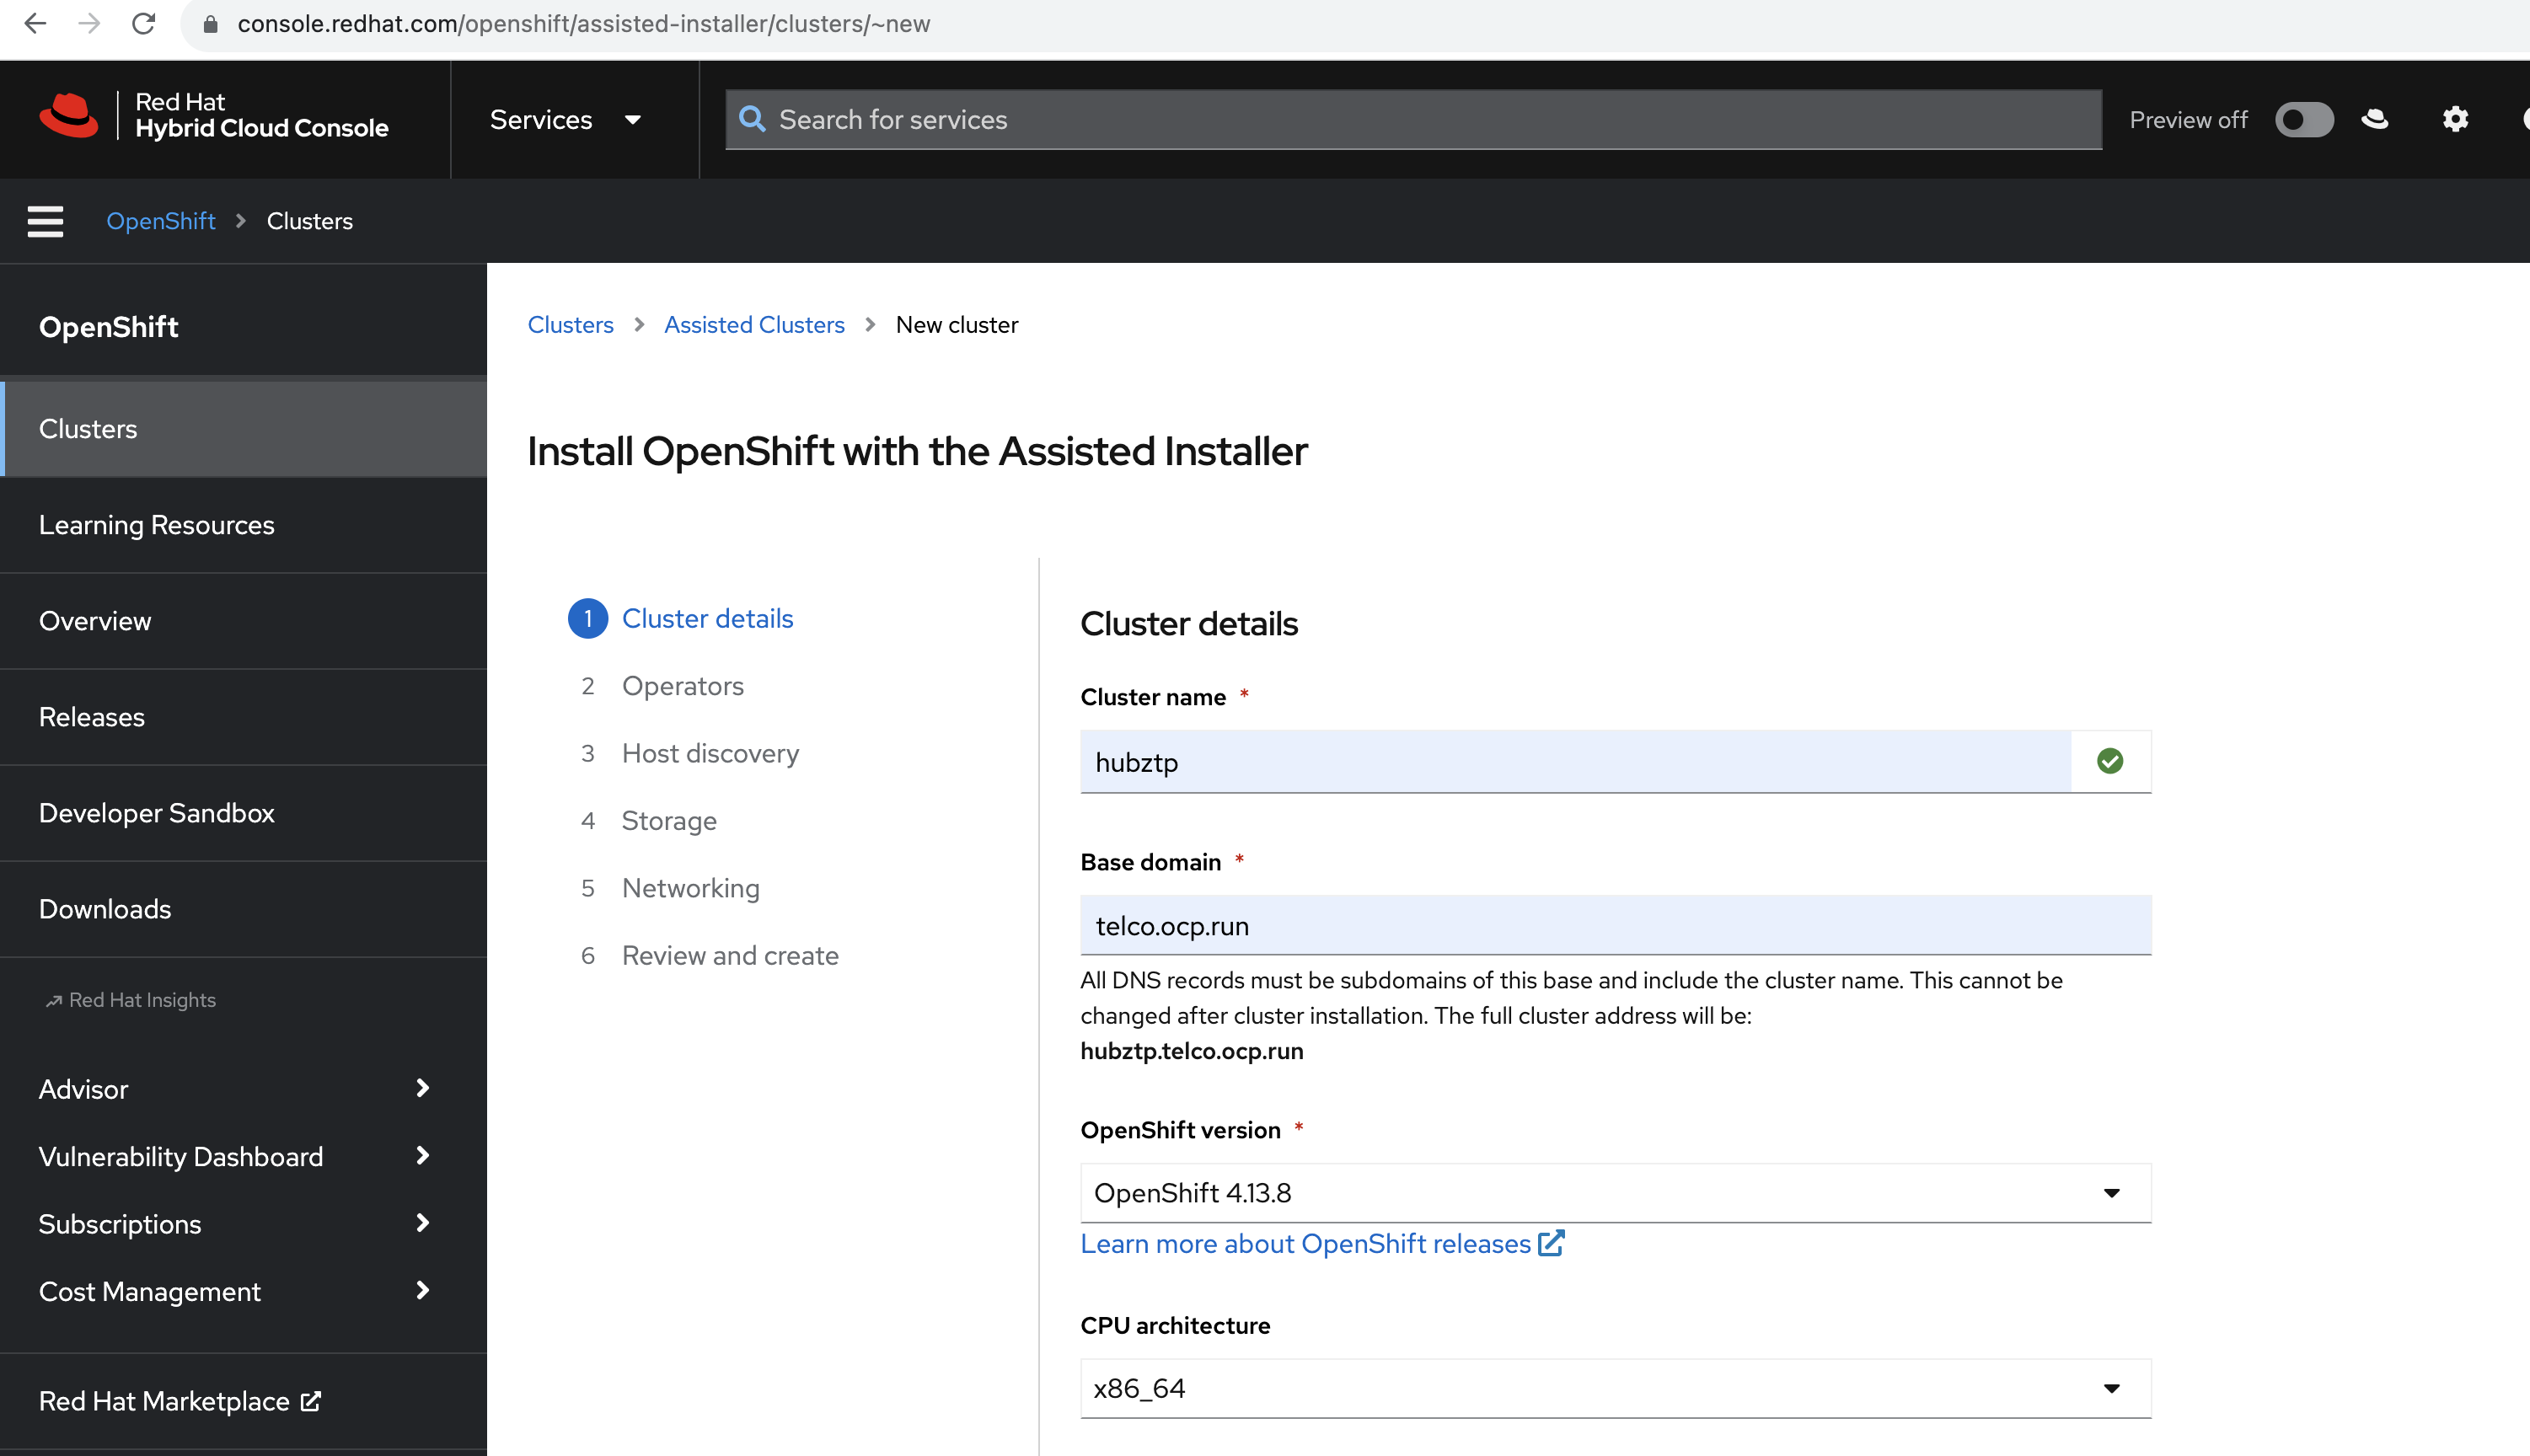
The first step is to generate the necessary ISO image to provision the hub cluster nodes:
- Visit Red Hat OpenShift Cluster Manager.
- Navigate to the Assisted Installer service.
- Follow the instructions to generate an ISO image tailored for your hub cluster setup. This image will be used to boot and provision the nodes.


- Ensure that all prerequisites, especially QEMU and
virt-install, are already installed and configured on the system. - As the VMs are simulating bare metal nodes, ensure the ISO generated from the Assisted Installer is compatible and has the necessary drivers and configurations.
- Monitoring the provisioning process from the Assisted Installer on the Red Hat OpenShift Cluster Manager portal will give you a real-time status of each node and the overall cluster setup.
After generating the ISO image using Assisted Installer, the next step is to download it. This image contains all the configurations and software needed to provision our simulated bare metal nodes, i.e., the virtual machines we are going to set up in the next section.
Once the ISO generation is complete, you'll find a download option for the ISO in the Assisted Installer section of the Red Hat OpenShift Cluster Manager portal.

To accommodate the storage needs of the OpenShift Data Foundation (ODF) component, an additional 50G of storage will be attached to each node in the hub cluster. Using the QEMU tool, a 50G virtual disk image in the qcow2 format is created for each node in the hub cluster.
Navigate to the 001-hubcluster-setup directory and run:
cd 001-hubcluster-setup
bash 003-attach-disk-for-odf.sh
After attaching the storage to the VMs, it's necessary to ensure that the new disk does not retain any old metadata.
To SSH into the VMs, you'll first need their IP addresses. These can be obtained in two primary ways:
- From the console.redhat.com cluster host list page. Navigate to the appropriate section and look for the IP addresses associated with the nodes of the hub cluster.
- From your router's configuration or management interface. Depending on your router's make and model, navigate to the connected devices or DHCP clients section to locate the IP addresses assigned to the VMs.
Once you have the IP addresses, SSH into each VM:
ssh core@[VM_IP_ADDRESS]
After accessing the VM, run the following command to clear any existing filesystem signatures:
sudo wipefs -a /dev/vdb
This step ensures the additional storage attached to each VM is ready and optimized for ODF usage.
Note: These steps are essential for the proper functioning of the ODF storage component in the hub cluster. They ensure sufficient storage capacity and a fresh, unformatted disk to be managed and used by ODF.
The script uses QEMU to create images and virt-install to set up the VMs. It sets up three nodes, each with 50GB of RAM and 16 vCPUs, using the qcow2 format for the virtual hard drives.
- Each VM image is created with a size of 200GB.
- The virtual machines are named with a pattern (
${CLUSTER_NAME}-master-x). - VMs are associated with the
br0network bridge created in the previous step. - A unique MAC address is assigned to each VM for identification.
Caution: The ISO location in the script is hardcoded. Ensure to download the ISO to the specified location:
/opt/ssd/boot/discovery_image_${CLUSTER_NAME}.isoor adjust the script accordingly.
Navigate to the 001-hubcluster-setup directory and run:
cd 001-hubcluster-setup
bash 002-create-hubvms-mno.sh
This script initializes the VMs and starts them.
After initializing and starting the VMs as part of the hub cluster setup, the next step involves finalizing the cluster installation process through the Red Hat Console. Once the cluster is up and running you can download the kubeconfig file from Red Hat Console page.
The Sushy tool serves as an emulator for Redfish, which is a standard protocol for managing servers. This guide will walk you through the steps to set up the Sushy tool by following the steps outlined in the cloudcult.dev blog post. All scripts is placed in the 002-sushy-tool-setup/001-sushy-setup.sh file.
cd 002-sushy-tool-setup
bash 001-sushy-setup.sh
Notes: Ensure Podman and other dependencies are installed and up-to-date before starting this process.
To validate that the Sushy tool is up and running and to check if VMs are exposed using this tool, you can follow these steps:
- Check if the sushy-emulator service is running:
sudo systemctl status sushy-emulator.service
You should see an active (running) status if it's operational.
- Curl the Redfish endpoints: The Sushy emulator imitates a Redfish interface. You can use curl to query the base Redfish endpoint to see if it responds:
curl http://localhost:8000/redfish/v1/
This should return a JSON response with various Redfish details if the emulator is running and functioning correctly.
- Check for VMs Redfish organizes servers into Systems. You can list the systems (VMs in this context) that the emulator is exposing:
curl http://localhost:8000/redfish/v1/Systems/
This should provide you with a list of systems (VMs) that are being managed by the Sushy emulator.
- Specific VM Details:
If you want details on a specific VM, use the
Idfrom the above command and query:
curl http://localhost:8000/redfish/v1/Systems/<VM_Id>
Replace <VM_Id> with the ID of the VM you're interested in. This should give you detailed information about that particular VM.
Setting up local storage is a foundational step before deploying OpenShift Data Foundation (ODF) on Red Hat OpenShift Container Platform (OCP).
- Namespace Creation: Initialize the openshift-local-storage namespace.
oc apply -f 003-setup-local-storage/001-namespace-local-storage.yaml
- Operator Group Setup: Configure the operator group for the Local Storage Operator in this namespace.
oc apply -f 003-setup-local-storage/002-operatorgroup-local-storage.yaml
- Subscription: Subscribe to the local-storage-operator. Make sure the channel matches your OCP version.
oc apply -f 003-setup-local-storage/003-subscription-local-storage.yaml
Note: Ensure the Local Storage Operator's channel aligns with your OCP version.
- Node Labeling: Add the ocs label to each OCP node equipped with storage devices. ODF uses this label to ascertain which nodes to target for its components.
Command (replace
<NodeName>with your node's name):
oc label node <NodeName> cluster.ocs.openshift.io/openshift-storage=''
- Node Requirements: At least three similarly equipped nodes are necessary. These nodes should be fitted with SSDs or NVMe devices.
From versions OCS v4.6 onwards:
- Auto-Discovery: The Local Storage Operator can now automatically discover devices on labeled OCP nodes.
oc apply -f 003-setup-local-storage/004-local-volume-discovery.yaml
- LocalVolumeDiscovery Resource: After labeling, instantiate this resource. It will generate localvolumediscoveryresults detailing each disk for every labeled OCP node. To inspect discovery results:
oc get localvolumediscoveries -n openshift-local-storage
oc get localvolumediscoveryresults -n openshift-local-storage
For ODF:
- Disk Requirements: Use only raw block SSDs or NVMe devices. The operator partitions these raw blocks for different requirements.
- LocalVolumeSet Creation: Utilize the YAML configuration to initiate the LocalVolumeSet.
oc apply -f 003-setup-local-storage/005-local-volume-set.yaml
- Post-Creation Checks: Confirm that PVs are created for each disk on the labeled nodes after creating the resource.
To validate the setup:
oc get pods -n openshift-local-storage | grep "diskmaker-manager"
oc get pv -n openshift-local-storage
- Namespace Creation: Create the openshift-storage namespace which also sets up the namespace for cluster monitoring.
oc apply -f 004-odf-setup/001-namespace.yaml
- Operator Group Setup: Establish the openshift-storage-operatorgroup for the ODF Operator within the openshift-storage namespace.
oc apply -f 004-odf-setup/002-operator-group.yaml
- Subscription to the OCS Operator: Depending on your version of OCS, subscribe to the appropriate operator. For OCS version 4.9 and above:
oc apply -f 004-odf-setup/003-subscription.yaml
Note: Ensure the channel aligns with your desired OCS version and is compatible with your OCP version.
- Storage Cluster CR Creation: Use the provided configuration for setting up the storage cluster. You might need to adjust parameters such as count for the number of OSDs and storage size based on your infrastructure.
oc apply -f 004-odf-setup/004-storage-cluster.yaml
- Check ODF Pods: Ensure all pods within the openshift-storage namespace are either in a Running or Completed state.
oc get pods -n openshift-storage
- Check CSV Phase: Confirm that the
odf-operatorare in the "Succeeded" phase.
oc get csv -n openshift-storage
- CephRBD PVC Creation:
oc apply -f - <<EOF
apiVersion: v1
kind: PersistentVolumeClaim
metadata:
  name: rbd-pvc
spec:
  accessModes:
  - ReadWriteOnce
  resources:
    requests:
      storage: 1Gi
  storageClassName: ocs-storagecluster-ceph-rbd
EOF
- CephFS PVC Creation:
oc apply -f - <<EOF
apiVersion: v1
kind: PersistentVolumeClaim
metadata:
  name: cephfs-pvc
spec:
  accessModes:
  - ReadWriteMany
  resources:
    requests:
      storage: 1Gi
  storageClassName: ocs-storagecluster-cephfs
EOF
- Validation of PVC Creation:
oc get pvc | grep rbd-pvc
oc get pvc | grep cephfs-pvc
- Namespace Creation: The OpenShift GitOps Operator will reside in the openshift-gitops namespace. This namespace is also set up to allow for cluster monitoring.
oc apply -f 005-openshift-gitops/00-namespace.yaml
- Subscription: Subscribing to the OpenShift GitOps Operator allows your cluster to receive updates and function in conjunction with GitOps practices. Make sure you've chosen the right version (gitops-1.9 in this case).
oc apply -f 005-openshift-gitops/01-subscription.yaml
-
RBAC Configuration: The OpenShift GitOps Operator's application controller requires certain permissions to manage resources related to the MultiClusterHub. To facilitate this, you should set up a ClusterRole and ClusterRoleBinding.
- ClusterRole: Defines the permissions required by the ArgoCD application controller to manage MultiClusterHub resources.
- ClusterRoleBinding: Binds the above ClusterRole to the ArgoCD application controller's service account.
Apply the RBAC configurations:
oc apply -f 005-openshift-gitops/02-rbac-multiclusterhub.yaml
- Deploy Everything Using Kustomization: Instead of applying each resource individually, you can utilize kustomize to deploy all manifests at once. This is beneficial for managing and organizing resources.
oc apply -k 005-openshift-gitops/
- Check Pod Status: Before proceeding, it's crucial to ensure all related pods are up and running in the openshift-gitops namespace.
oc get pods -n openshift-gitops
Expected Output:
NAME                                                         READY   STATUS    RESTARTS   AGE
cluster-6b8c7b49f-vx2vr                                      1/1     Running   0          80m
kam-59fd558fcb-s6ncn                                         1/1     Running   0          80m
openshift-gitops-application-controller-0                    1/1     Running   0          80m
openshift-gitops-applicationset-controller-7d5bf7f69-vncj4   1/1     Running   0          80m
openshift-gitops-dex-server-f69dd7684-bnh95                  1/1     Running   0          80m
openshift-gitops-redis-bb656787d-jk7j5                       1/1     Running   0          80m
openshift-gitops-repo-server-6bf856897c-zm2rw                1/1     Running   0          80m
openshift-gitops-server-7ffc6ff594-hqfh7                     1/1     Running   0          80m
- Access Argo CD Console: To confirm that Argo CD has been properly set up, fetch the route to its console and access it in your web browser.
oc get route openshift-gitops-server -n openshift-gitops --template='https://{{.spec.host}}'
Output:
https://openshift-gitops-server-openshift-gitops.apps.sno01.telco.ocp.run
Access the ArgoCD UI. Once logged in, you should be greeted with the ArgoCD dashboard displaying various applications, clusters, and repositories (empty by default).

- OpenShift Console Verification: Open your OpenShift Console and navigate to the installed operators list. You should be able to see the "OpenShift GitOps Operator" listed as one of the installed operators. Additionally, check for the ArgoCD navigation menu from the top right menu bar to confirm the successful installation.

Ensure that ArgoCD and OpenShift GitOps operator are installed and correctly configured. If not, refer to the previous section on setting them up.
Before we begin, it's essential to understand the components:
-
AppProject: In ArgoCD, an AppProject is a custom resource that provides a logical grouping of applications. It defines a set of rules which can restrict source repositories, destination clusters & namespaces, and can be used to control what cluster-wide resources can be defined within the project.
-
ApplicationSet: An ApplicationSet is a custom resource introduced to ArgoCD that provides automation in generating ArgoCD Applications. It lets you deploy applications across multiple clusters and namespaces, source multiple repositories, and more.
If you look at the content of ApplicationSet which refer to the repository https://github.com/pandeybk/rhacm-gitops-workshop.git and will deploy the RHACM operator based on the manifests available in the resources/rhacm-operator directory.
- Use Kustomize to Apply AppProject and ApplicationSet:
oc apply -k 006-advance-cluster-management/
This command will create both the AppProject and ApplicationSet in the openshift-gitops namespace.
Once the AppProject and ApplicationSet are deployed:
Navigate to the ArgoCD dashboard. Under the "Applications" tab, you will observe the deployment progress of the "advance-cluster-management" application.

Click on the "advance-cluster-management" application for a detailed view. This will give you an idea of the resources being deployed, their health, and sync status. As ArgoCD pulls the manifests from the GitHub repository and begins the deployment, you can watch the progress in real-time. The resources, including the RHACM namespace, operator group, subscription, and multicluster hub, will get deployed in sequence.

Upon successful deployment:
- Check the RHACM Resources in OpenShift: Verify that the RHACM resources are correctly deployed in the open-cluster-management namespace.
oc get all -n open-cluster-management
You should see the RHACM resources, including the multicluster hub, running smoothly.
- Inspect the OpenShift Console: Navigate to the OpenShift console. In the installed operators list, you should see the RHACM operator listed as "Installed" and "Succeeded".
Moreover, a new menu item to access the multicluster hub should be visible, indicating that RHACM is fully integrated with your OpenShift cluster.

- Access the RHACM Dashboard: Click on the "All Clusters" menu item from the drop list. This action should redirect you to the RHACM dashboard. The dashboard provides a comprehensive view of all your managed clusters, their health, and other associated details (empty by dafault).

Efficiently and securely managing secrets is crucial. Secrets, such as database credentials, API tokens, and encryption keys, are sensitive pieces of information that applications require to function correctly. Exposing such secrets can lead to serious security breaches. In this project we are using following two tools,
-
HashiCorp Vault is a powerful tool for secrets management, encryption as a service, and privileged access management. It allows you to centralize and control access to secrets, while providing a detailed audit log to keep track of who is accessing them and why.
-
External Secrets Operator for Kubernetes is another essential tool in our arsenal. It helps to securely add secrets in Kubernetes from external sources like AWS Secrets Manager, HashiCorp Vault, and more. It ensures that secrets used in your Kubernetes environment are not stored inside git repositories and remain securely in the tool of choice.
Together, these tools provide a robust mechanism to handle secrets in your OpenShift cluster. Let's walk through their deployment and configuration.
Start by creating an AppProject, a logical grouping of Applications that serves as a boundary for network and security policies. Then, use the ArgoCD ApplicationSet, a new CRD in ArgoCD that automates deployments in multi-cluster environments. The ApplicationSet works by defining a set of parameters, templates, and generators, subsequently creating an ArgoCD Application for each parameter set.
oc apply -k 007-secret-management/
Monitor the deployment of Vault and the External Secrets Operator using ArgoCD or the OpenShift console.
The process to initialize Vault will generate a root token and five unseal keys. To fully unseal Vault, at least three of these unseal keys will be needed. Let's walk through the initialization and unsealing process:
- Initialize Vault: Initializing Vault will generate a root token and five unseal keys. You'll need to save these credentials securely as they will be used in the following steps.
oc exec -ti vault-server-0 -- vault operator init
The output will provide the unseal keys and the root token. For example:
Unseal Key 1: <key_1>
Unseal Key 2: <key_2>
Unseal Key 3: <key_3>
Unseal Key 4: <key_4>
Unseal Key 5: <key_5>
Initial Root Token: <root_token>
- Unseal Vault: Use at least three of the five generated unseal keys to unseal Vault. Each unseal command requires one key. Here we use the first three keys as an example:
oc exec -ti vault-server-0 -- vault operator unseal <key_1>
oc exec -ti vault-server-0 -- vault operator unseal <key_2>
oc exec -ti vault-server-0 -- vault operator unseal <key_3>
- Join Other Vault Nodes to the Cluster and Unseal: Here, other Vault instances are joined to the main instance for high availability, and then they are unsealed.
oc exec -ti vault-server-1 -- vault operator raft join http://vault-server-0.vault-server-internal:8200
oc exec -ti vault-server-1 -- vault operator unseal <key_1>
oc exec -ti vault-server-1 -- vault operator unseal <key_2>
oc exec -ti vault-server-1 -- vault operator unseal <key_3>
oc exec -ti vault-server-2 -- vault operator raft join http://vault-server-0.vault-server-internal:8200
oc exec -ti vault-server-2 -- vault operator unseal <key_1>
oc exec -ti vault-server-2 -- vault operator unseal <key_2>
oc exec -ti vault-server-2 -- vault operator unseal <key_3>
- Login to Vault Using the Root Token: Now, login to Vault using the root token that was generated during initialization.
oc exec -ti vault-server-0 -- vault login <root_token>
- Verify Vault Peers: After setting up and unsealing Vault, you can verify the connected peers in the cluster.
oc exec -ti vault-server-0 -- vault operator raft list-peers
- Setup Key-Value Secrets Store in Vault and Add a Sample Secret: Enable the KV secrets store and add a image pull secret. You can obtain the image pull secret from the Red Hat OpenShift Cluster Manager.
oc exec -ti vault-server-0 -- vault secrets enable -path=secret/ kv
oc exec -ti vault-server-0 -- vault kv put secret/openshiftpullsecret dockerconfigjson='{"auths":{...}}'
- Creating a Custom Vault Token: Instead of using the root token, which has full and unrestricted access to Vault, it's recommended to create a custom token with limited permissions tailored to the specific needs of the application or component. This follows the principle of least privilege.
- Create a Policy: Before creating a token, we typically want to define a policy that outlines the exact permissions the token will have. For instance, to create a policy that allows read access to the secret we've stored:
oc exec -ti vault-server-0 -- vault policy write read-openshiftpullsecret - <<EOF
path "secret/openshiftpullsecret" {
    capabilities = ["read"]
}
EOF
- Generate a Custom Token with the Defined Policy: With the policy in place, we can create a custom token attached to it:
oc exec -ti vault-server-0 -- vault token create -policy=read-openshiftpullsecret
This command will generate a token. You'll see an output similar to:
Key                  Value
---                  -----
token                <custom_token>
token_accessor       <accessor_value>
token_duration       768h
token_renewable      true
token_policies       ["default" "read-openshiftpullsecret"]
identity_policies    []
policies             ["default" "read-openshiftpullsecret"]
- Create Kubernetes Secret with the Custom Token: Instead of using the root token, we'll use the custom token to create a Kubernetes secret. This token will have only the permissions we've defined in our policy.
oc create secret generic vault-token --from-literal=token="<custom_token>" -n vault
Remember to replace placeholders like <custom_token> with the actual values from your environment.
This token and kubernetes is referenced from ClusterSecretStore, which is a custom resource provided by the External Secrets Operator. It allows Kubernetes to understand where external secrets (in this case, in Vault) are located and how to authenticate to access them. Take a look on file resources/secret-management/external-secrets-config/cluster-secret-store.yaml, here's how our custom token is utilized:
apiVersion: external-secrets.io/v1alpha1
kind: ClusterSecretStore
metadata:
  name: vault-backend
  annotations:
    argocd.argoproj.io/sync-wave: "3"
spec:
  provider:
    vault:
      server: "http://vault-server-internal.vault:8200"
      path: "secret"
      version: "v1"
      auth:
        tokenSecretRef:
          name: "vault-token"
          key: "token"
          namespace: vault
Notice the tokenSecretRef section, which references the Kubernetes secret (vault-token) we created earlier. This ensures that the External Secrets Operator uses our custom token for authentication against the Vault.
In this section, we'll be setting up Virtual Machines (VMs) which act as a simulation of a bare metal installation for our OpenShift clusters. These VMs will later be used as targets for our OpenShift cluster installations through Red Hat Advanced Cluster Management (RHACM).
We've provided scripts for the creation of each VM located under resources/ocp-clusters. Let's break down one of these scripts (create-sno01.telco.ocp.run-vm.sh) to understand its functionality:
export HUB_CLUSTER_NAME="hubztp"
export CLUSTER_NAME="sno01"
export NAME_BRIDGE="br0"
export UUID="deed1e55-fe11-f0e5-0dd5-babb1ed1a010"
export MAC="00:00:00:00:00:10"

sudo qemu-img create -f qcow2 /opt/ssd/${HUB_CLUSTER_NAME}/${CLUSTER_NAME}.qcow2 200G

sudo virt-install \
  --name=${HUB_CLUSTER_NAME}-${CLUSTER_NAME} \
  --uuid=${UUID} \
  --ram=65536 \
  --vcpus=16 \
  --cpu host-passthrough \
  --os-type linux \
  --os-variant rhel8.0 \
  --noreboot \
  --events on_reboot=restart \
  --noautoconsole \
  --boot hd,cdrom \
  --import \
  --disk path=/opt/ssd/${HUB_CLUSTER_NAME}/${CLUSTER_NAME}.qcow2,size=20 \
  --network type=direct,source=${NAME_BRIDGE},mac=${MAC},source_mode=bridge,model=virtio
HUB_CLUSTER_NAME: The name of the central hub cluster.CLUSTER_NAME: The specific name for the cluster VM we're creating.NAME_BRIDGE: The name of the bridge interface to which the VM's network will be connected.UUID: A unique identifier for the VM.MAC: A unique MAC address for the VM's network interface.
Using qemu-img, we're creating a qcow2 format image. This image acts as the VM's hard drive:
sudo qemu-img create -f qcow2 /opt/ssd/${HUB_CLUSTER_NAME}/${CLUSTER_NAME}.qcow2 200G
Here, we're allocating 200GB of space for this VM on our host's SSD.
We're using virt-install to create and start our VM:
name: Specifies the name of the VM.uuid: Sets a unique identifier for the VM.ram: Allocates 64GB of RAM to our VM.vcpus: Sets the number of virtual CPUs.os-type & os-variant: Define the type and variant of the operating system.disk: Defines the path to the VM's hard drive and its size.network: Configures the VM's network.
After executing this script, a new VM will be initialized, which simulates a bare metal machine ready to have OpenShift installed on it.
For our setup, we need to create multiple VMs. Execute the following commands to initialize them:
bash resources/ocp-clusters/create-sno01.telco.ocp.run-vm.sh
bash resources/ocp-clusters/create-sno02.telco.ocp.run-vm.sh
bash resources/ocp-clusters/create-sno03.telco.ocp.run-vm.sh
Once these VMs are set up, we'll leverage RHACM and GitOps practices to provision and manage our OpenShift clusters on these VMs in the upcoming sections.
Red Hat Advanced Cluster Management (RHACM) provides capabilities to manage multiple Kubernetes clusters with a governance-driven approach. In our setup, we are using RHACM to deploy OCP (OpenShift Container Platform) clusters onto the Virtual Machines (VMs) we prepared in the previous step.
Within the 008-ocp-clusters directory, we have multiple manifests that help configure and set up the OCP clusters:
- 00-namespace.yaml: This file defines a namespace ztp-clusters where all resources related to our Zero Touch Provisioning (ZTP) clusters will reside.
- 01-channel.yaml: Represents a Channel resource. A channel in RHACM points to the source of truth (like a Git repository) for your desired state. This channel points to a specific GitHub repository which will store the configurations.
- 02-git-secrets.yaml: This secret contains authentication information to access the GitHub repository. Specifically, it has your GitHub username and a developer API key, enabling RHACM to pull configurations from private repositories.
- 03-placementrule.yaml: Defines a PlacementRule resource that specifies the conditions for cluster selection. Here, it is configured to match the local hub cluster.
  clusterSelector:
    matchLabels:
      local-cluster: 'true'
- 04-clusterrolebinding.yaml: Grants necessary permissions to users for RHACM operations. This binding grants the subscription-admin role to both kube:admin and system:admin.
- Application & Subscription: The manifests for each individual OCP cluster to be created are stored in their respective directories, for example
resources/ocp-clusters/sno01.telco.ocp.run.- Files like
sno01-telco-ocp-run.yamlorsno02-telco-ocp-run.yamldefine Application resources. These resources represent logical applications in RHACM and are associated with Subscriptions, which represent the deployment of resources from the repository. - Associated Subscription manifests, like
cluster-sno01-tor-subscription-1, define the relationship between the application, its source repository, and the target clusters where it should be deployed. - For example if you look at the file you will notice following annotations
apps.open-cluster-management.io/git-branch: main: This annotation specifies the branch in the Git repository that RHACM should reference. It is directing the system to use the main branch, ensuring that configurations from this specific branch are applied to the managed clusters. - and annotations
apps.open-cluster-management.io/git-path: resources/ocp-clusters/sno01.telco.ocp.run: Directs RHACM to a specific directory or path within the Git repository. By pointing toresources/ocp-clusters/sno01.telco.ocp.run, it specifies where to locate the desired resources or configurations for the particular cluster setup.
- Files like
In the directory resources/ocp-clusters/sno01.telco.ocp.run, you'll find several important configuration files and resources that further detail the cluster setup and related configurations:
- 00-namespace.yaml: This YAML file defines a Kubernetes Namespace named
sno01. Namespaces are used to partition or isolate different parts of the cluster. - 01-external-pull-secret.yaml: This YAML sets up an ExternalSecret which integrate with an external secret manager (e.g., Vault) to provide OpenShift with the necessary pull secret for accessing private container images. Eventually it will create kubernetes secrets, this mean you can also create kubernetes secrets directly instead of creating
ExternalSecretobject. - 01-unsealed-bmc-secret.yaml: This YAML defines a Kubernetes Secret that hold credentials for Baseboard Management Controller (BMC). BMC allows for out-of-band management of a server.
- 03-agentclusterinstall.yaml: The AgentClusterInstall custom resource is used to specify requirements and settings for installing OpenShift. This resource has information on networking, the desired version of OpenShift to install, SSH keys, and more.
- 04-clusterdeployment.yaml: The ClusterDeployment custom resource describes the desired state of an OpenShift cluster, such as the domain, cluster name, platform specifics, and how it should be installed. It references the AgentClusterInstall resource for detailed installation instructions.
- 05-klusterlet.yaml: KlusterletAddonConfig custom resource is related to Open Cluster Management. This provides specifications for different add-ons available when integrating with the Open Cluster Management framework.
- 06-managedcluster.yaml: The ManagedCluster custom resource is a representation of a cluster in the Open Cluster Management framework. It provides specifications on how the hub cluster should manage or interact with this managed cluster.
- 07-nmstate.yaml: The NMStateConfig custom resource defines the desired network configuration for a node using the NMState project. This can include configurations such as static IP addresses, DNS settings, and more.
- 08-infraenv.yaml: The InfraEnv custom resource is a part of the agent-based installation process for OpenShift. It defines environment specifics like SSH keys, agent selectors, and other configurations necessary to set up the infrastructure for the cluster deployment.
- 09-baremetalhost.yaml: This BareMetalHost custom resource is related to Metal3, a project focused on Kubernetes-native bare metal management. It provides the specifics of the physical host, like MAC address, BMC address, and more.
The integration of Red Hat Advanced Cluster Management (RHACM) with ArgoCD allows you to leverage the strengths of both RHACM's multi-cluster management and ArgoCD's GitOps capabilities. In this section, we will look at the process to set up this integration.
The directory 009-argocd-acm-integration contains the ArgoCD ApplicationSet manifest which will determine which clusters the following resources should be applied to. The resources are then provided in the resources/rhacm-argocd-integration directory.
Let's break down each of the manifests in resources/rhacm-argocd-integration:
- 01-managedclusterset.yaml: This manifest defines a
ManagedClusterSetnamedgitops-clusters. This is essentially a grouping mechanism in RHACM to categorize clusters. - 02-managedclustersetbinding.yaml: The
ManagedClusterSetBindingbinds the aforementioned cluster set to theopenshift-gitopsnamespace. This implies that ArgoCD in theopenshift-gitopsnamespace can manage clusters part of the gitops-clusters set. - 03-placement.yaml: This manifest defines a
Placementnamedgitops-clustersthat specifies the criteria for cluster selection. In this case, the cluster with a label key app that has a value webapp will be matched.
  - requiredClusterSelector:
      labelSelector:
        matchExpressions:
        - key: app
          operator: "In"
          values:
          - webapp
- 04-gitopscluster.yaml: The
GitOpsClusterkind is a way of defining the integration point between RHACM and ArgoCD. Here, we specify that ArgoCD from theopenshift-gitopsnamespace should manage clusters matching the aforementionedPlacement.
The argocd.argoproj.io/sync-wave annotations ensure a sequence for the application of resources, defining the order in which resources are synchronized by ArgoCD.
Use following command to enable this RHACM and ArgoCD Integration.
oc apply -f 009-argocd-acm-integration/01-applicationset.yaml
Once the ApplicationSet resource is applied, ArgoCD will dynamically generate Application resources based on the defined template and generator within the ApplicationSet definition.
In this section, we will be deploying two workloads - bookinfo and podinfo. The former uses Kustomization, and the latter uses Helm charts for deployment. Both of these workloads will be managed and deployed using the ArgoCD ApplicationSet resource. This allows for dynamic application creation based on target clusters and reduces manual Application creation overhead.
Given the directory structure:
010-workloads
├── bookinfo-dev.yaml
├── kustomization.yaml
├── podinfo-dev.yaml
Let's dive deeper into each of the components.
- This ApplicationSet resource targets clusters with the label
app=webappusing the ACM Placement rule namedbookinfo-placement. - It defines an application template that points to a Git repository containing the
bookinfoworkload manifest structured for Kustomization. - The applications generated from this set will create or identify the namespace
bookinfo-devon the target clusters and deploy the workload within it.
- Defines a selection criteria to target clusters having a label
app=webapp.
- This ApplicationSet also targets clusters with the label
app=webapp, but uses the ACM Placement rule namedpodinfo-placement. - The application template for podinfo points to its respective Helm chart in the provided Git repository.
- The applications generated will create or identify the namespace podinfo-dev on the target clusters and deploy the workload within it.
Similar to the bookinfo placement, it targets clusters with the label app=webapp.
Deploy the manifests for both bookinfo and podinfo workloads.
kubectl apply -k 010-workloads/
Once the ApplicationSet resources are applied, ArgoCD will dynamically create applications based on the clusters matching the ACM placement rules.
You can monitor the applications via the ArgoCD UI.
Governance and compliance management are integral components of modern cloud-native infrastructure. They aim to ensure that clusters and workloads conform to organizational and regulatory standards, thus mitigating risks and maintaining security and reliability.
Red Hat Advanced Cluster Management (RHACM) introduces governance and risk management capabilities, utilizing policies to enforce configurations or validate cluster state against a predefined set of conditions.
What is a Governance Policy in RHACM? A governance policy in RHACM is a declarative description that specifies a desired state or condition of one or more clusters. Once defined, the policy can be checked across managed clusters to determine compliance.
To apply this run following command,
oc apply -k 011-rhacm-governance
Once the ApplicationSet resource is applied, ArgoCD will dynamically generate an application based on the list generator's elements and apply the governance policy to the managed cluster.
You can monitor the application via the ArgoCD UI.

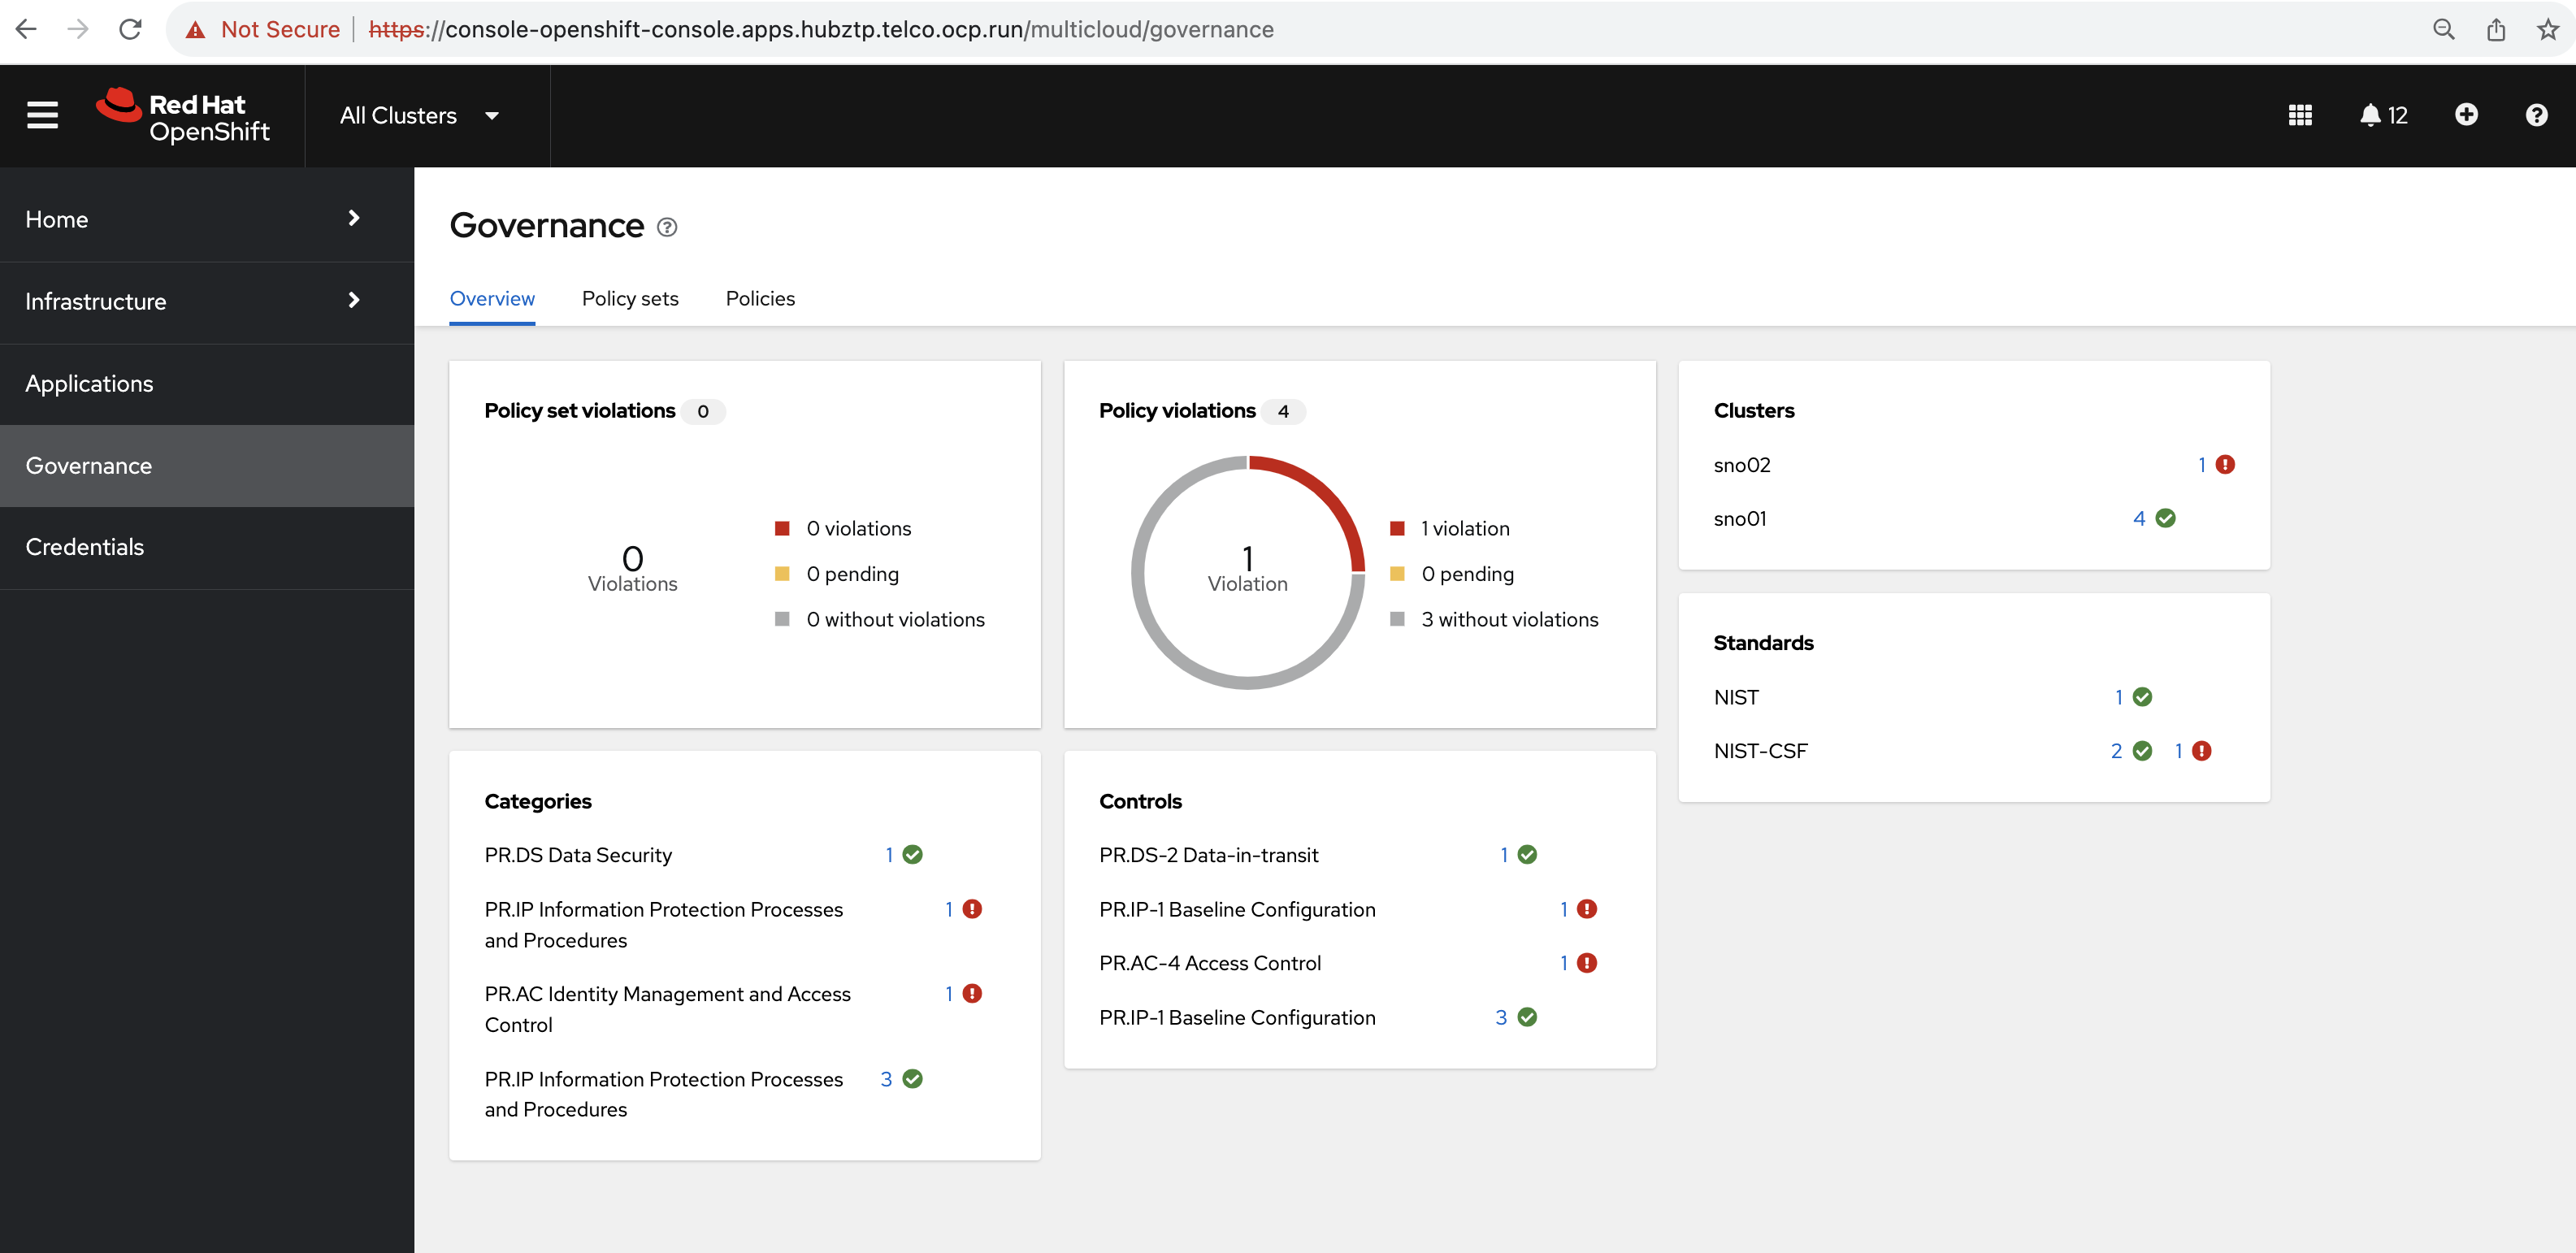
To verify that the governance policy is applied and evaluated:
- Navigate to the MultiClusterHUB UI.
- Head over to the Governance dashboard.
- The newly applied policies should be listed, and their compliance state can be viewed. Any non-compliance will be flagged.