0x53525354
- TOC:
- Notes taken through my journey of learning to write an OS in Rust
-
2023 A
- rCore 2023(Autumn) overview
- rCore-Tutorial-Guide 2023(Autumn)
- 线上课
- 第二阶段rCore Classroom链接
- 我的作业
- 在做Lab之前:
- update rustsbi-qemu.bin (If using qemu8.0)
- os/src/sbi.rs SBI_SHUTDOWN const SBI_SHUTDOWN: usize = 0x53525354; (If using qemu8.0)
- git clone https://github.com/LearningOS/rCore-Tutorial-Test-2023A.git user
- git clone https://github.com/LearningOS/rCore-Tutorial-Checker-2023A.git ci-user
- Comment out "env:"(rustup something something) in makefile, both in os/ and ci-user/, otherwise it'll reinstall your Rust env
- git clone https://github.com/LearningOS/rCore-Tutorial-Test-2023A.git ci-user/user
- Add reports at root dir
- cd ci-user && make test CHAPTER=$ID
- os/src/sbi.rs SBI_SHUTDOWN const SBI_SHUTDOWN: usize = 8;
- 我的作业
- 第二阶段基于Rust语言的rCore Tutorial排行榜
- 晋级第三阶段需要填写的Blog
-
2023 S
- Computer Organization and Design RISC-V Edition: The Hardware Software Interface - David A. Patterson
- The RISC-V Reader: An Open Architecture Atlas
- riscv-asm-manual on Github
- 【计算机架构的伟大想法】UC Berkeley 公开课-CS61C (Fall 2021)
Successfully setup the developing environment following the guidelines here
- rCore locked the Rust toolchain version inside the repo in .cargo, didn't know that trick
- Be Ware: Whoever is on a arm64 machine, after downloading the RISC-V tools, use riscv64-unknown-elf-gdb-py instead of riscv64-unknown-elf-gdb, due to the need of python support needed by gdb-dashboard. Otherwise we'll get an error: "Scripting in the "Python" language is not supported in this copy of GDB". But there is a build in TUI inside GDB anyway, so, not really that of a big deal maybe? Just call 'tui enable' when debugging in GDB
  ```
      应用程序
        ||
        || 函数调用
        ||
        \/
      标准库
        ||
        || 系统调用
        ||
        \/
    内核/操作系统
        ||
        ||  指令集
        ||
        \/
      硬件平台
  ```
- #![no_std]
- #[panic_handler]
use core::panic::PanicInfo;
fn panic(_info: &PanicInfo) -> ! {
    loop{}
}- #![no_main]
- cargo-binutils
- rust-readobj 文件头信息
- rust-objdump 反汇编
-
QEMU 模拟加电启动
- Stage 1
- QEMU PC(Program Counter) => 初始化0x1000 => 0x80000000
- Stage 2
- 0x80000000 bootloader(rustsbi-qemu.bin) => 0x80200000
- Stage 3
- 0x80200000 os.bin
- Stage 1
-
程序内存布局
-
典型布局
- High Address
- stack
- heap
- .bss(保存未初始化的全局数据)
- .data
- .rodata
- .text
- Low Address
- High Address
-
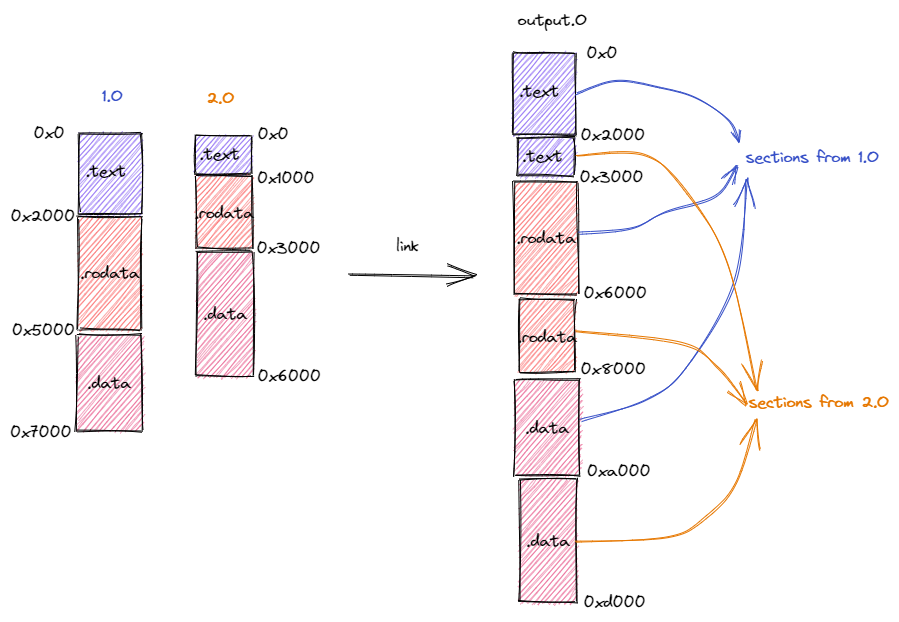
Linker
-
不同目标文件的段的重新排布
-
将符号替换为具体地址
- 内部符号
- Symbol table => 获取外部符号
- 合并,地址发生变化 => Relocation
-
-

qemu-system-riscv64 \
    -machine virt \
    -nographic \
    -bios ../bootloader/rustsbi-qemu.bin \ # bootloader
-device loader,file=target/riscv64gc-unknown-none-elf/release/os.bin,addr=0x80200000# RISC-V
.section .text.entry # .section => Code Section, .text.entry => Name of the Code Section
.global _start # Global variable _start
_start: # Pointing to the line after it
li x1, 100 # li => Load Immediate,
# x1 => x1 reg,
# 100 => value// Rust
use core::arch::global_asm
global_asm!(include_str!("entry.asm"));-
Linker Script To manually set the first line of the OS's instruction at 0x80200000, fitting QEMU's expectation
- OUTPUT_ARCH() => Target Architecture
- ENTRY() => Entry Point of the OS
- SECTIONS => Sections
- . => Current Address
-
Strip Metadata -- otherwise QEMU will not find kernel's first instruction at BASE_ADDR

rust-objcopy
    --strip-all os(The os executable)
    -O binary os.bin(The binary after stripped)
strip 之后的os.bin仅 4 字节,这是因为它里面仅包含我们在 entry.asm 中编写的一条指令。一般情况下 RISC-V 架构的一条指令位宽即为 4 字节。
QEMU > 7.0.0 不必进行任何元数据的裁剪工作-device loader,file=path/to/os,即教程中使用的
qemu-system-riscv64 \
... \
-s -S # -s => Start server, -S => Start running when a request is received
(gdb) x/10i $pc => 从PC开始,展示10条反汇编
0x1000: auipc t0,0x0
0x1004: addi a1,t0,32
0x1008: csrr a0,mhartid
0x100c: ld t0,24(t0) => The value of t0 is 0x80000000
0x1010: jr t0
0x1014: unimp
0x1016: unimp
0x1018: unimp
0x101a: 0x8000
0x101c: unimp- 单步调试
(gdb) si
0x0000000000001004 in ?? ()
(gdb) si
0x0000000000001008 in ?? ()
(gdb) si
0x000000000000100c in ?? ()
(gdb) si
0x0000000000001010 in ?? ()
(gdb) p/x $t0               => 以 16 进制打印寄存器 t0 的值
1 = 0x80000000              => 可以看到是0x80000000
(gdb) si
0x0000000080000000 in ?? () => 程序进入了0x80000000,即将进入RustSBI- 进入RustSBI
(gdb) x/10i $pc     => 10 lines of assemblly code
0x80000000:         auipc   sp,0x28
0x80000004: mv      sp,sp
0x80000008: lui     t0,0x4
0x8000000a: addi    t1,a0,1
0x8000000e: add     sp,sp,t0
0x80000010: addi    t1,t1,-1
0x80000012: bnez    t1,0x8000000e
0x80000016: j       0x8001125a
0x8000001a: unimp
0x8000001c: addi    sp,sp,-48
(gdb) si
0x0000000080000004 in ?? ()
(gdb) si
0x0000000080000008 in ?? ()
(gdb) si
0x000000008000000a in ?? ()
(gdb) si
0x000000008000000e in ?? ()- 在内核入口设置断点
(gdb) b *0x80200000         => 如果在特定地址设置断点需加*
Breakpoint 1 at 0x80200000
(gdb) c
Continuing.

Breakpoint 1, 0x0000000080200000 in ?? ()- 进入内核
(gdb) x/5i $pc
0x80200000: li ra,100    => 即entry.asm中的第一条指令(ra即x1寄存器)
0x80200004: unimp
0x80200006: unimp
0x80200008: unimp
0x8020000a: unimp
(gdb) si
0x0000000080200004 in ?? ()
(gdb) p/d $x1           => Print/Decimal $x1
2 = 100
(gdb) p/x $sp           => 栈指针(Stack Pointer)
3 = 0x0                 => 为0
Since I can't understand the RISC-V asm above. I think maybe it's about time to Read the RISC-V manuel(There's a ton of RISC-V books holy...).
Found this article on the Internet, which described RISC-V Instruction Set so well
- https://fraserinnovations.com/risc-v/risc-v-instruction-set-explanation/
-
The immediate is the number that exists as an integer in the instructions.
-
So basically every instruction does this kind of thing
- Specify the instruction type
- Set the rd(Destination Register) (except for type S/B)
- Read rs1 & rs2(Source Register) (except for type U/I/J)
- Perform operations
- Write the result to rd or some register
-
And there are many instructions for each instruction type RV32I can be divided into six basic instruction formats:
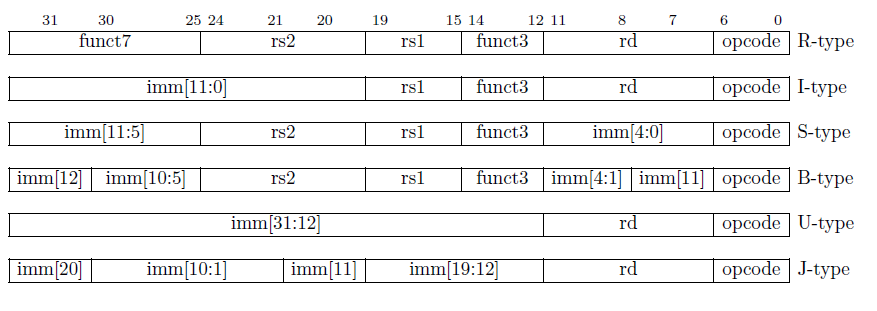
- R-type instructions for register-register operations
- I-type instructions for immediate and load operations
- S-type instructions for store operations
- B-type instructions for conditional branch operations
- U-type instructions for long immediate
- J-type instructions for unconditional jumps.
-

- Function Call Context

So basically they are J-Type instructions:
- JAL rd, imm[20:1] => Jump to imm[20:1]
- JALR rd, rs1, imm[11:0] => Jump back to rs1
For example: jal x1, 80000040:
- rd == x1 is where the PC is pointing
- x1 = rd + 4, stores the adress for jumping back
- rs1 = x1, expand imm to x1 is exists
- Then the program jumps back to rs1
rs => Source Register (可在x0-x31通用寄存器选取), imm => Immediate, rd => Destination Register (可在x0-x31通用寄存器选取)
-
调用规范(Calling Convention)
-
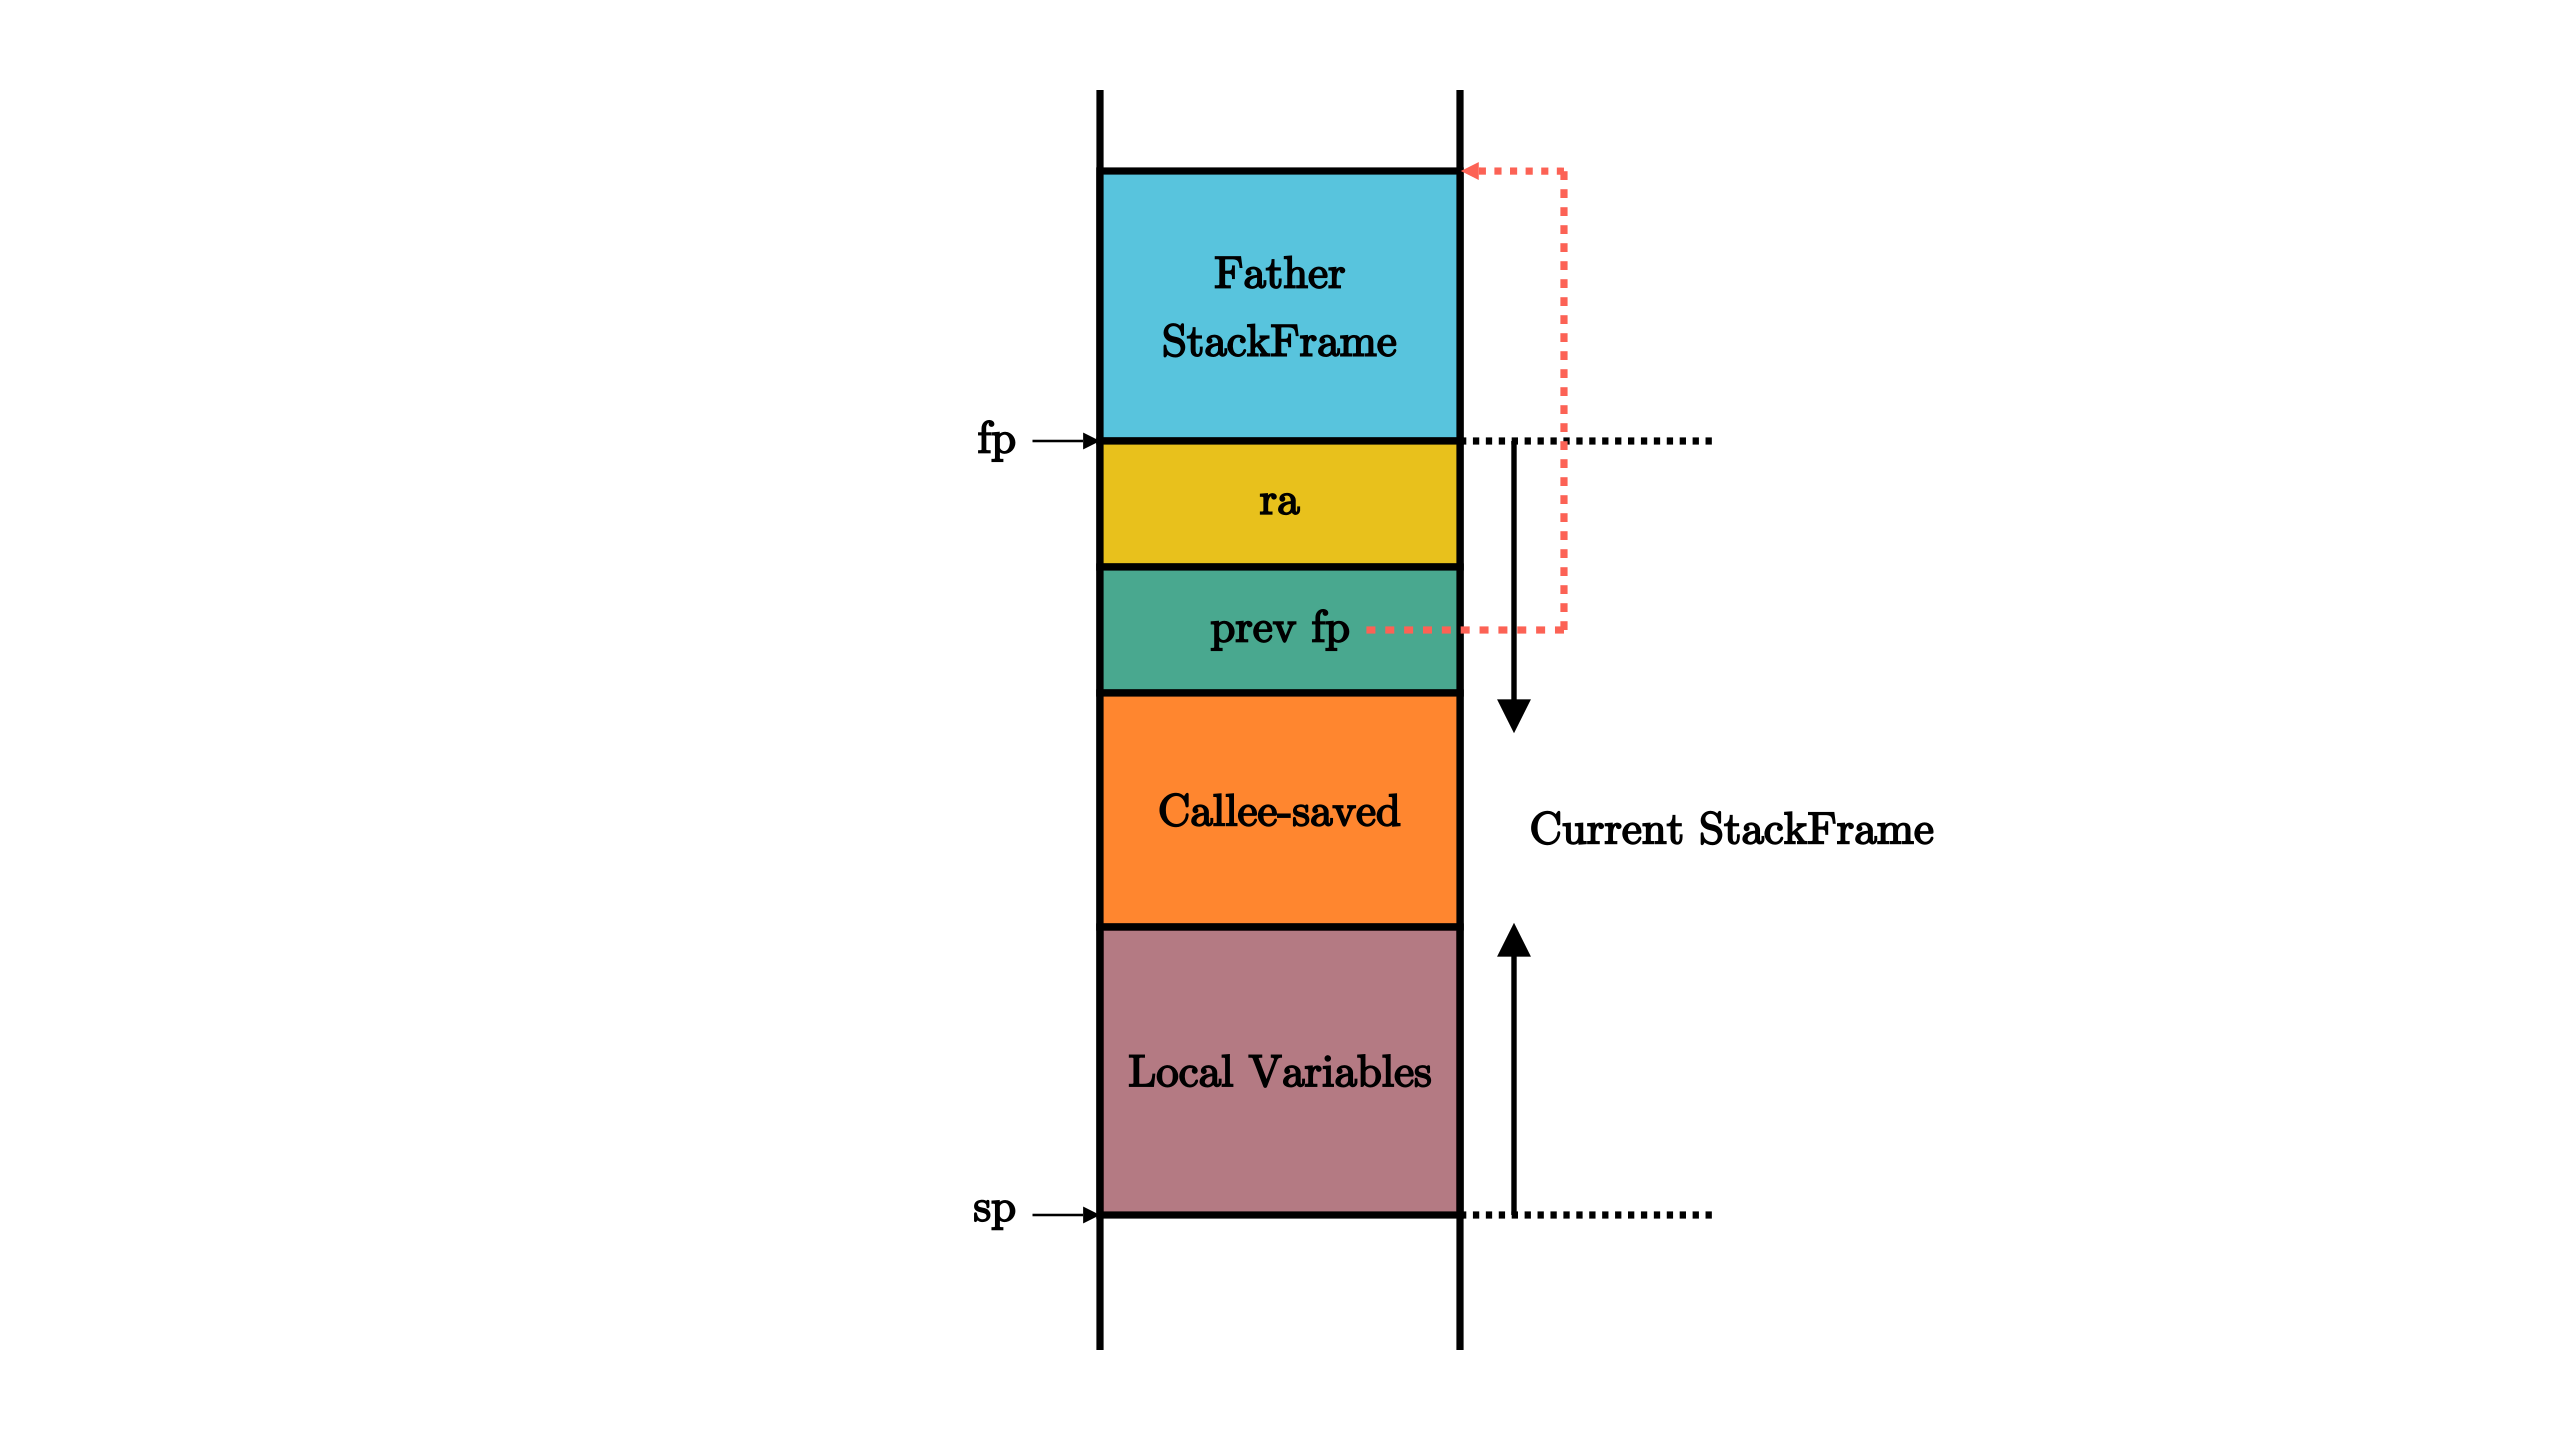
Stack Frame
- ra => Return address callee saved
- 父栈帧的结束地址 fp callee saved
- s1 ~ s11 callee saved
- 函数所使用到的局部变量。
-
分配并使用启动栈
- Allocate stack frame
- Initialize .bss
-

- 使用 RustSBI 提供的服务
- fn sbi_call
- 封装一些RustSBI服务:
- SBI_CONSOLE_PUTCHAR
- SBI_SHUTDOWN
- 实现格式化输出
- impl Write for Stdout
- declare print & println macro
- 处理致命错误
- panic => shutdown()
BatchOS => Load one app to APP_BASE_ADDR
- ecall(Excution Environment Call) 切换至比当前高一级的特权级
- eret(Excution Environment Return) 切换至不高于当前的特权级
- User 用户模式
- Supervisor 监督模式 => OS
- Hypervisor 虚拟监督模式
- Machine 机器模式 => SEE, Supervisor Execution Environment
In the perspective of privileged architecture

- Exception
RISC-V Exceptions - https://rcore-os.cn/rCore-Tutorial-Book-v3/chapter2/1rv-privilege.html#id6
-
Trap/trap instructions, caused by specific calls
- Breakpoint
- Environment call
结果:陷入异常控制流
- 程序的起始物理地址调整为 0x80400000 ,三个应用程序都会被加载到这个物理地址上运行;
- 将 _start 所在的 .text.entry 放在整个程序的开头,作为用户库的入口点,并会在初始化之后跳转到应用程序主逻辑;
- 提供最终可执行文件 .bss 段起始、终止地址,供 clear_bss 函数使用
/// 功能:将内存中缓冲区中的数据写入文件。
/// 参数:`fd` 表示待写入文件的文件描述符;
///      `buf` 表示内存中缓冲区的起始地址;
///      `len` 表示内存中缓冲区的长度。
/// 返回值:返回成功写入的长度。
/// syscall ID:64
fn sys_write(fd: usize, buf: *const u8, len: usize) -> isize;

/// 功能:退出应用程序并将返回值告知批处理系统。
/// 参数:`exit_code` 表示应用程序的返回值。
/// 返回值:该系统调用不应该返回。
/// syscall ID:93
fn sys_exit(exit_code: usize) -> !;- RISC-V Register-ABI Names-Descriptions

Bind args to regs
// NOTE: syscall
// user/src/syscall.rs
use core::arch::asm;
// user/src/syscall.rs
// - Rust Inline ASM: https://rust-lang.github.io/rfcs/2873-inline-asm.html
fn syscall(id: usize, args: [usize; 3]) -> isize {
    let mut ret: isize;
    unsafe {
        asm!(
            "ecall",
            // x10 => 保存系统调用的返回值(同时也作为输入)
            inlateout("x10") args[0] => ret,    => a0
            // 输入参数args、变量id
            in("x11") args[1],                  => a1
            in("x12") args[2],                  => a2
            in("x17") id                        => a7
        );
    }
    ret
}应用放置静态绑定 操作系统加载应用动态加载
内核中的应用程序的数量和相应位置,供运行时加载和管理
这个文件是在 cargo build 的时候,由脚本 os/build.rs 控制生成的
- 全局AppManager & UpSafeCell保证“单线程”安全
Rust 对于并发安全的检查较为粗糙,当声明一个全局变量的时候,编译器会默认程序员会在多线程上使用它
// os/src/sync/up.rs
pub struct UPSafeCell<T> {
    /// inner data
    inner: RefCell<T>,
}
unsafe impl<T> Sync for UPSafeCell<T> {}
impl<T> UPSafeCell<T> {
    /// User is responsible to guarantee that inner struct is only used in
    /// uniprocessor.
    pub unsafe fn new(value: T) -> Self {
        Self { inner: RefCell::new(value) }
    }
    /// Panic if the data has been borrowed.
    pub fn exclusive_access(&self) -> RefMut<'_, T> {
        self.inner.borrow_mut()
    }
}- 初始化AppManager
// lazy_static => Initialize AppManager at runtime(依赖于运行期间才能得到的数据)
lazy_static! {
    ...
}- load_app
将参数app_id对应的应用程序的二进制镜像加载到物理内存以0x80400000起始的位置 即将app的内容复制到APP_BASE_ADDRESS
unsafe fn load_app(&self, app_id: usize) {
    ...
}Trap 前的特权级不会高于 Trap 后的特权级
当启动应用程序的时候,需要初始化应用程序的用户态上下文,并能切换到用户态执行应用程序; 当应用程序发起系统调用(即发出 Trap)之后,需要到批处理操作系统中进行处理; 执行出错,OS kill app & run_next_app 执行结束,run_next_app
-
控制状态寄存器 (CSR, Control and Status Register) => 辅助 Trap 处理
-
RISC-V-Reader-Chinese P106 ⚫ 发生例外的指令的PC被存入sepc,且PC被设置为stvec。 ⚫ scause按图10.3根据异常类型设置,stval被设置成出错的地址或者其它特定异常的信息字。 ⚫ 把sstatusCSR中的SIE置零,屏蔽中断,且SIE之前的值被保存在SPIE中。 ⚫ 发生例外时的权限模式被保存在sstatus的SPP域,然后设置当前模式为S模式。

-
用户栈与内核栈
- 专门为OS准备的内核栈来保存原控制流的寄存器状态
- Trap 触发 CPU 会切换到 S 特权级并跳转至 stvec 所指的位置,
impl UserStack {
    fn get_sp(&self) -> usize {
        self.data.as_ptr() as usize + USER_STACK_SIZE
    }
}
换栈:sp 寄存器的值修改为 get_sp 的返回值
- Trap Context
包含所有通用寄存器x0-x31,另有sstatus和sepc
#[repr(C)]
pub struct TrapContext {
    pub x: [usize; 32],
    pub sstatus: Sstatus,
    pub sepc: usize,
}- 修改 stvec 寄存器来指向正确的 Trap 出现地址
- stvec设置为Direct模式
- 保存&恢复Trap上下文-trap.S csrrw => CSR Read and Write
- csrrw sp sscratch sp => Switch between UserStack and KernelStack
// os/src/trap/mod.rs

global_asm!(include_str!("trap.S"));

pub fn init() {
    extern "C" { fn __alltraps(); }
    unsafe {
        stvec::write(__alltraps as usize, TrapMode::Direct);
    }
}
####### Trap 分发与处理
// os/src/trap/mod.rs

#[no_mangle]
pub fn trap_handler(cx: &mut TrapContext) -> &mut TrapContext {
    let scause = scause::read();
    let stval = stval::read();
    match scause.cause() {
        Trap::Exception(Exception::UserEnvCall) => {
            cx.sepc += 4;
            cx.x[10] = syscall(cx.x[17], [cx.x[10], cx.x[11], cx.x[12]]) as usize;
        }
        Trap::Exception(Exception::StoreFault) |
        Trap::Exception(Exception::StorePageFault) => {
            println!("[kernel] PageFault in application, kernel killed it.");
            run_next_app();
        }
        Trap::Exception(Exception::IllegalInstruction) => {
            println!("[kernel] IllegalInstruction in application, kernel killed it.");
            run_next_app();
        }
        _ => {
            panic!("Unsupported trap {:?}, stval = {:#x}!", scause.cause(), stval);
        }
    }
    cx
}CoopOS => Load every app at once
loader Module => Process Control task Module => Process Execute & Switch
- build.py => Determine the address to load each app
- os/src/loader.rs => Load every app at once
- fn get_num_app => get total num of apps
- fn get_base_i => get base address of app i
- config Module => All the constants
- Task Context
// os/src/task/context.rs
pub struct TaskContext {
    ra: usize,
    sp: usize,
    s: [usize; 12],
}
__switch(current_task_cx_ptr, next_task_cx_ptr)
- .rept => repeat
- sd sp, 8(a0) => store Doubleword, sp at the address of a0+8
- sd ra. 0(a0) => store Doubleword, ra with a0(current_task_cx_ptr)
- ld ra, 0(a1) => load Doubleword, ra with a1(next_task_cx_ptr)

-
Task Status
- UnInit
- Ready
- Running
- Exited
-
Task Control Block
// os/src/task/task.rs
#[derive(Copy, Clone)]
pub struct TaskControlBlock {
    pub task_status: TaskStatus,
    pub task_cx: TaskContext,
}- TaskManager & TaskManagerInner
// os/src/task/mod.rs

pub struct TaskManager {
    num_app: usize,
    inner: UPSafeCell<TaskManagerInner>,
}

struct TaskManagerInner {
    tasks: [TaskControlBlock; MAX_APP_NUM],
    current_task: usize,
}- Task-related Syscalls (sys_yield, sys_exit)
yield apps that for example need IO, which can't be finished at once
-
os/src/syscall/process.rs
- sys_yield (syscall ID: 124) now has to suspend_current_and_run_next()
- sys_exit(exit_code) now has to exit_current_and_run_next()
-
TaskManager-related functions
-
Status-related(os/src/task/mod.rs)
- impl TaskManager { mark_current_suspended(&self) }
- impl TaskManager { mark_current_exited(&self) }
-
next_task_?()
- impl TaskManager { run_next_task() }
- drop(inner) before __switch
- impl TaskManager { find_next_task() -> Option }
- find first task after current_task that is at the status of Ready
- impl TaskManager { run_next_task() }
-
__restore apps that enter U mode for the first time do not have TaskContext with them, we need to init for them
- init_app_cx(app_id: usize) -> usize
- Init TrapContext for tasks[i], and push the TrapContext to KERNEL_STACK
- impl TaskContext { goto_restore(kstack_ptr: usize) -> Self }
- iterate through tasks, adjust their states to ready
- init_app_cx(app_id: usize) -> usize
-
impl TaskManager { run_first_task() }
- _unused TaskContext, to prevent coverting other data
-
-
Using RR(Round-Robin) algorithm to handle cooperaions between tasks
-
RISC-V Interrupt(It's Async compare to Trap)
| Interrupt | Exception | Description |
|---|---|---|
| 1 | 1 | Supervisor Software Interrupt |
| 1 | 3 | Machine Software Interrupt |
| 1 | 5 | Supervisor Timer Interrupt |
| 1 | 7 | Machine Timer Interrupt |
| 1 | 9 | Supervisor External Interrupt |
| 1 | 11 | Machine External Interrupt |
Software Interrupt => Triggered by Software Timer Interrupt => Triggered by Timer External Interrupt => Triggered by External
- Interruption handle
sstatus(CSR reg).sie { ssie stie seie }
if (sie == 1 && CPU Mode Not higher than S) && (ssie == 1 || stie ==1 || seie == 1)
    Handle the interruption {
        // To prevent nested Trap loops
        sstatus.spie = sstatus.sie;
        sstatus.sie = 0;
    }
    After interruption was handled {
        sret to where it's interrupted
        sstatus.sie = sstatus.spie;
}
else
Block the interruption-
Timer interrupt & RISC-V M Mode 64bit CSR mtime & mtimecmp
- os/src/timer.rs
- Once mtime > mtimecmp => Timer interrupt
- SBI_SET_TIMER = 0 (According to SBI specification)
- CLOCK_FREQ (How many clock cycles in 1 second, vary from platforms)
- TICKS_PER_SEC = 100 (100/1000s == 10ms)
- Clock increment value = get_time() + CLOCK_FREQ / TICKS_PER_SEC
- == Every 10ms
- Trigger timer interrupt at every Clock increment value
- struct TimeVal (syscall ID: 169)
- holding sec & usec
-
Preemptive multitasking
-
rust_main(os/src/main.rs) To prevent S Mode Timer interrupt from being blocked
- trap::enable_timer_interrupt()
- timer::set_next_trigger
-
user/src/bin/03sleep.rs
-
- Page <=> Frame
- App =>
- Virtual Page Number =>
- PageTable, find corresponding FrameNumber + offset =>
- Physical Page Number + offset =>
- Physical Memory

-
RISC-V-Reader-Chinese P108
-
SV39 分页硬件机制由RISC-V 64 架构提供
-
satp(Supervisor Address Translation and Protection,监管者地址转换和保护) Inactivated by default, a CSR called satp needs to be modified to activate SV39
- Mode 开启分页并选择页表级数
- 0 Physical adress
- 8 activate SV39
- ASID(Address Space Identifier, 地址空间标识符)域是可选的,它可以用来降低上下文切换的开销
- PPN 字段保存根页表的物理地址,它以 4 KiB 的页面大小为单位
- Mode 开启分页并选择页表级数
-
-
页表项的数据结构抽象与类型定义
-
PTE(Page Table Entry)Flags
- V(Valid):仅当位 V 为 1 时,页表项才是合法的;
- R(Read)/W(Write)/X(eXecute):分别控制索引到这个页表项的对应虚拟页面是否允许读/写/执行;
- U(User):控制索引到这个页表项的对应虚拟页面是否在 CPU 处于 U 特权级的情况下是否被允许访问;
- G:暂且不理会;
- A(Accessed):处理器记录自从页表项上的这一位被清零之后,页表项的对应虚拟页面是否被访问过;
- D(Dirty):处理器记录自从页表项上的这一位被清零之后,页表项的对应虚拟页面是否被修改过。
-
-
多级页表(Multi-Level Page-Table)
字典树
-
SV39 地址转换过程
-
三级页表 26-18 一级页索引 17-9 二级页索引 8-0 三级页索引 另12位 Offset
- each PageTable is 8 bytes, which is 512*8 = 4096 = 4KiB
-
-
快表(TLB, Translation Lookaside Buffer) sfence.vma会通知处理器,软件可能已经修改了页表,于是处理器可以相应地刷新转换缓存。 两个可选的参数,这样可以缩小缓存刷新的范围。一个位于rs1,它指示了页表哪个虚址对应的转换被修改了; 另一个位于 rs2,它给出了被修改页表的进程的地址空间标识符(ASID)。如果两者都是x0,便会刷新整个转换缓存。
-
物理页帧管理
-
Range of ppn => from
currenttoend -
recycled => 回收(alloc)过的物理页号
-
dealloc => not in recycled, must in range of ppn
-
RAII style:
- frame_alloc -> FrameTracker(tracks the ppn)
- impl Drop for FrameTracker: frame_dealloc
-
-
多级页表管理
- PageTable
- root_ppn: PhysPageNum,
- frames: Vec
- Accessed specific PPN
- get_pte_array -> PageTableEntry
- get_bytes_array -> [u8]
- get_mut -> T
...
(pa(Physical address).0 as *mut T).as_mut().unwrap();
...
- PageTable
-
建立和拆除虚实地址映射关系
- impl indexes() -> [usize; 3] for VirtPageNum
- impl for PageTable
- find_pte_create() -> PTE
- iterate through Multi-Level Page-Table
- if pte not valid => frame_alloc & PTEFlags::V
- iterate through Multi-Level Page-Table
- find_pte() -> PTE
- if pte not valid => return None
- map vpn => pte => ppn + flags
- unmap vpn => pte => make empty
- Locate specific page
- from_token(satp(Providing the physical address of the root)) -> PageTable
- translate(vpn) -> PTE
- find_pte_create() -> PTE
-
实现地址空间抽象
-
MapArea逻辑段
- vpn_range: VPNRange,
- data_frames: BTreeMap<VirtPageNum, FrameTracker>,
- map_type: MapType,
- Identical
- Framed
- map_perm: MapPermission,
- R/W/X/U
-
impl for MapArea
- new()
- map_one() => PageTable.map vpn to ppn
- unmap_one() => PageTable.map vpn
- map() => Call nm
- unmap() => Call map_one() for a range of vpns
- copy_data()
-
MemorySet地址空间
- page_table: PageTable
- areas: Vec
-
impl for MemorySet
- new_bare() -> Self
- push() { area.push(MapArea) }
- inert_frame_area(start_va, end_va, permission) push MapArea that inserted to a certain address
-
-
内核地址空间
- impl for MemorySet
- new_kernel() -> Self => Create kernel address space, and wrap it inside a Arc<UPSafeCell>
- from_elf() -> Self
- impl for MemorySet
-
KERNEL_SPACE
- PageTable::token -> satp CSR
- sfence.vma => Clear TLB
-
跳板 需要保存内核地址的token来写入satp 需要保存应用的内核栈栈顶的位置来保存Trap上下文 然而只有一个sscratch 所以只能把Trap上下文保存在应用地址空间次高页的一个虚拟页面
-
重要系统调用
- sys_fork() => ID: 220
- sys_exec(path: &str) => ID: 221
- sys_waitpid(pid: isize. exit_code: *mut i32) => ID: 260
- pid -1 => Wait for any subprocess
-
应用程序示例
- initproc
- user_shell