Yolact_minimal
Minimal PyTorch implementation of Yolact:《YOLACT: Real-time Instance Segmentation》.
The original project is here.
This implementation simplified the original code, preserved the main function and made the network easy to understand.
Following instruction is based on resnet-101.
The network structure.

Environments
PyTorch >= 1.1.
Python >= 3.6.
tensorboardX
Other common packages.
Prepare
- Download COCO 2017 datasets, modify the paths of training and evalution datasets in
data/config.py. - Download weights.
Yolact trained weights.
| Backbone | box mAP | mask mAP | Google Drive | Baidu Cloud |
|---|---|---|---|---|
| Resnet50 | 30.25 | 28.04 | res50_coco_800000.pth | password: mksf |
| Resnet101 | 32.54 | 29.83 | res101_coco_800000.pth | password: oubr |
ImageNet pre-trained weights.
| Backbone | Google Drive | Baidu Cloud |
|---|---|---|
| Resnet50 | resnet50-19c8e357.pth | password: a6ee |
| Resnet101 | resnet101_reducedfc.pth | password: kdht |
Train
Note: this project may not support multi-GPU training well. Due to the lack of device resource, I can't check this at present.
# Train with resnet101 backbone on coco2017 with a batch size of 8 (default).
python train.py --config=res101_coco_config
# Train with resnet50 backbone on coco2017 with a batch size of 8.
python train.py --config=res50_coco_config
# Train with different batch_size (remember to set freeze_bn=True in `config.py` when the batch_size is smaller than 4).
# You might also tune the learning rate and learning rate decay by yourself.
python train.py --config=res101_coco_config --batch_size=4
# Train with different image size (anchor settings related to image size will be adjusted automatically).
python train.py --config=res101_coco_config --img_size=400
# Resume training with the latest trained model.
python train.py --config=res101_coco_config --resume latest
# Resume training with a specified model.
python train.py --config=res101_coco_config --resume latest_res101_coco_35000.pth
# Set evalution interval during training, set -1 to disable it.
python train.py --config=res101_coco_config --val_interval 20000
Use tensorboard
tensorboard --logdir=tensorboard_logEvalution
# Evaluate on COCO val2017 (configs will be parsed according to the model name).
python eval.py --trained_model=res101_coco_800000.pth
The results should be:

# Evaluate with a specified number of images.
python eval.py --trained_model=res101_coco_800000.pth --max_num=1000
# Create a json file and then use the COCO API to evaluate the COCO detection result.
python eval.py --trained_model=res101_coco_800000.pth --cocoapi
Detect

# To detect images, put your images to the 'images' folder, then:
python detect.py --trained_model=res101_coco_800000.pth --image images
# To detect videos, put your videos to the 'videos' folder, then:
python detect.py --trained_model=res101_coco_800000.pth --video 1.mp4
# Use --real_time to detect real-timely.
python detect.py --trained_model=res101_coco_800000.pth --video 1.mp4 --real_time
# Use --hide_mask, --hide_score, --show_lincomb and so on to get different results.
python detect.py --trained_model=res101_coco_800000.pth --image images --hide_mask
Train on PASCAL_SBD datasets
- Download PASCAL_SBD datasets from here, modify the path of the
imgfolder indata/config.py. - Then, generate a coco-style json.
python utils/pascal2coco.py- Download the Yolact trained weights. Google dirve, Baidu Cloud: eg7b
# Training.
python train.py --config=res50_pascal_config
# Evalution.
python eval.py --trained_model=res50_pascal_120000.pth
Train custom datasets
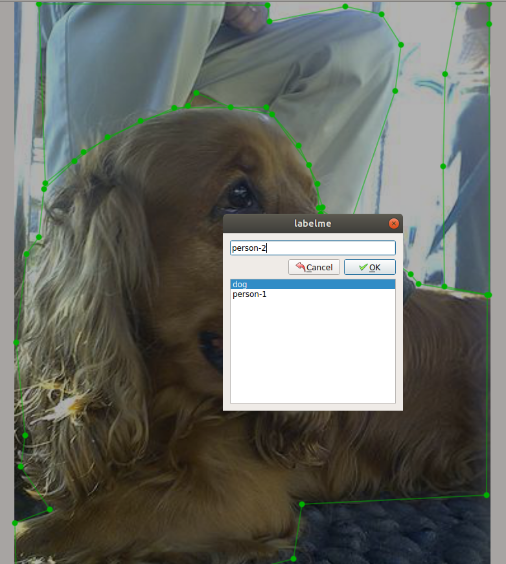
- Install labelme
pip install labelme- Use labelme to label your images, only ploygons are needed. Note that different objects belong to one class need to be distinguished by '-1', '-2', ... The created json files are in the same folder with the images, leave them alone.
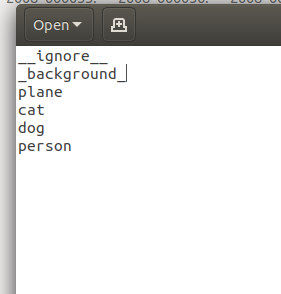
- Prepare a 'labels.txt' like this, note that row1 and row2 are also required.
- Prepare coco-style json.


python utils/labelme2coco.py your-image-and-labelme-json-path your-expected-output-folder --labels the-path-of-labels.txt- Edit
CUSTOM_CLASSESandCUSTOM_LABEL_MAPindata/config.py.


- Edit
custom_datasetindata/config.py, modify the path as your output folder. If you need to validate, prepare the validation dataset by the same way. - Then train, since that the custom dataset is different from coco2017, you might tune the learning rate and learning rate decay by yourself.


python train.py --config=res101_custom_config