Custom pages for HASwitchplate created by @aderusha
- Two themes to choose from
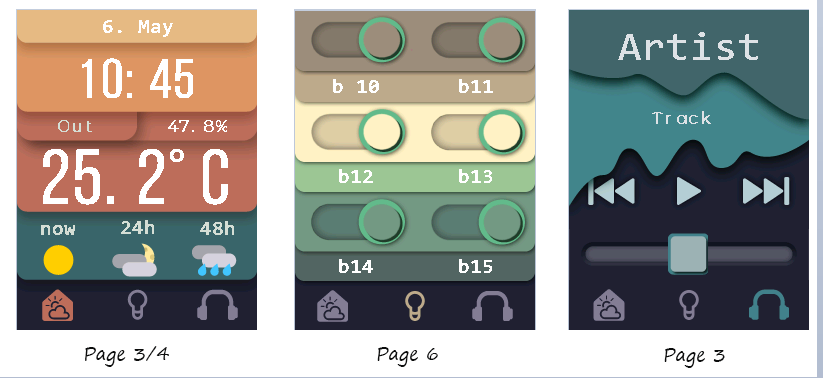
- Access Weather/Time, Toggles and Media Player via NavBar Buttons
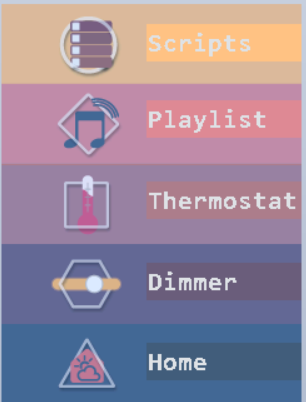
- Menu Page to access:
- Thermostat
- Sliders
- 3D Printer
- Scripts
- Playlists for Media Player:
- Access by pressing Media Player NavBar Button while on the Media Player page
- Two pages for toggles by pressing the toggles page button
- Add shell script for faster first time setup
- Add automation to switch back to the Clock/Weather Page, if there is no button press for 20 seconds.
- Fix automation trigger on page change for p5, p6, p7, p9
-
Major: Add Thermostat Page: To use the thermostat add
hasp_plate01_p5_thermostat.yamlto your HASP folder and replace the entities with your thermostat. -
Migrate all pages to standard theme
-
Pressing a button that changes pages now is coded in the Nextion Firmware. This change makes going through pages more responsive. If you're coming from an earlier release turn off every automation that switches pages or delete them in the YAML files. Or replace
hasp_plate01_p0_pages.yamlYou need to flash the new firmware for the Nextion panel. Addhasp_plate01_p5_thermostat.yamlto your config and replace everyclimate.DUMMYin the file with your thermostat component.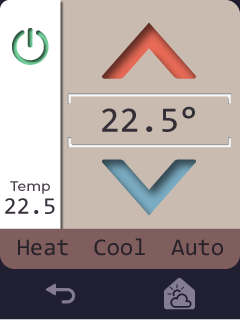
-
Alternative Theme available. Replace the firmware with the new one according to your panel. Nothing else has to be changed. The firmwares with the new theme end with
_alternate_theme_*.yaml. -
New Pages added There is a set of new Pages added to HASP. Pressing button 1 (Hamburger Icon) on the Date/Weather page will open up a menu where you can access further functions The extended funcionalty will only work with the alternate theme for now. Follow Instructions to get the new Pages working
- Your now able to switch between two pages on Page 6 (Toggles) by pressing the toggles button in the Navigation Bar again.
- Simplified setting up entities for Page6 (Toggles). See Step 4 in Quick start.
Standard Theme
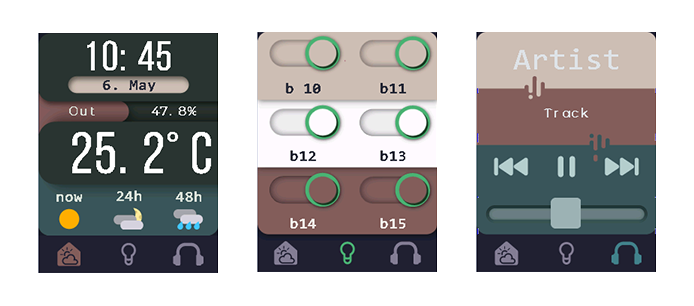
Alternative Theme
-
Flash the ESP8266 and the Nextion panel as usual but use one of these Nextion Firmwares according to your panel size, orientation and theme you want to use, provided by this repository instead.
-
(a)You can run a script for an easier/faster setup. You will need to SSH to run the script. Hass.IO users running the SSH Addon: Open the terminal and execute:
cd /config
apk add tar wget
bash <(wget -qO- -o /dev/null https://github.com/zonko16/Custom-Pages-for-HASwitchplate/raw/master/deploy_script/deploy.sh)
Standard Home Assistant users:
sudo su -s /bin/bash homeassistant
cd ~/.homeassistant
bash <(wget -qO- -o /dev/null https://github.com/zonko16/Custom-Pages-for-HASwitchplate/raw/master/deploy_script/deploy.sh)
You can skip the rest of the installation guide if you ran through the script.
2.(b) Replace the yaml files in config/packages/plate01 with the ones provided in this repository.
- For the 2.4" Panel use .yamls in packages_2.4in/
- For the 3.2" Panel use .yamls in packages_3.2in/
Update 0.3: Access a Menu with extra pages.
Coming from previous release add/replace hasp_plate01_p0_pages.yaml, hasp_plate01_p1_menu.yaml, hasp_palte01_p2_scripts.yaml, hasp_plate01_p4_sliders.yaml, hasp_plate01_p7_playlist.yaml
It's recommended to deactivate any colorconfig.yaml as colors are already set in the firmware.
-
Replace YOUR_API_KEY in
hasp_plate01_00_components.yamlyour own Darksky API -
Replace the entities and names to your liking for every page in the different YAML files. Entities that need to be changed are called like switch.YOUR_ENTITY, senor.YOUR_TEMPERATURE and so on. IMPORTANT UPDATE: This step hast been considerably simplified for page 6.
- Open
hasp_plate01_p6_entities.yaml - In there you'll find
hasp_plate01_p6_toggle1-12(16):
  name: Toggle 1-12(16)
  entities:
  - switch.DUMMY
- replace switch.DUMMY with the component you are using for ever single button and set the name for your toggle.
- (3.2" users skip this step) If you're using a second temperature/humidity and want to switch between In and Out by clicking on the displayed temperature uncomment lines 16 to 23 in
hasp_plate01_p3_weather.yaml(Coming from previous releases these lines were inhasp_plate01_p0_components.yamlif switching temperature doesn't work copy below lines intohasp_plate01_p3_weather.yaml):
####################################################################
# Toggles the Label and Temp/Humidity displayed on Page 3. Thanks @madrian
#  - alias: hasp_plate01_p0_ChangeToTempInOut
#    trigger:
#    - platform: mqtt
#      topic: 'hasp/plate01/state/p[3].b[6]'
#      payload: 'ON'
#    action:
#    - service: input_boolean.toggle
#      entity_id: input_boolean.hasp_plate01_p3_temperatureswitch
Page 3 Weather Setup
You'll need a Darksky API to use the weather component. Place your API key into hasp_plate01_p3_weather.yaml.
Special thanks to @aderusha for creating HASwitchPlate and @madrian for spending hours of beta testing with me.