- Lab 1
- Access cluster
- Lab 2 - Getting started with NiFi
- Consuming the Meetup RSVP stream
- Extracting JSON elements we are interested in
- Splitting JSON into smaller fragments
- Writing JSON to File System
- Lab 3 - MiNiFi
- Enable Site2Site in NiFi
- Designing the MiNiFi Flow
- Preparing the flow
- Running MiNiFi
- Lab 4 - Kafka Basics
- Creating a topic
- Producing data
- Consuming data
- Lab 5 - Integrating Kafka with NiFi
- Creating the Kafka topic
- Adding the Kafka producer processor
- Verifying the data is flowing
- Lab 6 - Integrating the Schema Registry
- Creating the Kafka topic
- Adding the Meetup Avro Schema
- Sending Avro data to Kafka
- Lab 7 - Tying it all together with SAM
- Creating the Streaming Application
- Watching the dashboard
Credentials will be provided for these services by the instructor:
- SSH
- Ambari
-
Right click to download this ppk key > Save link as > save to Downloads folder
-
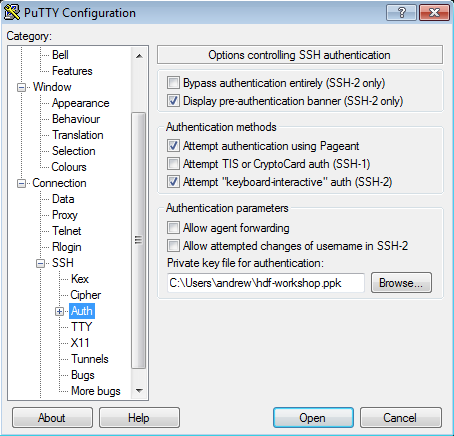
Use putty to connect to your node using the ppk key:
- Connection > SSH > Auth > Private key for authentication > Browse... > Select hdf-workshop.ppk
- Connection > SSH > Auth > Private key for authentication > Browse... > Select hdf-workshop.ppk
-
Create a new seession called
hdf-workshop- For the Host Name use: centos@IP_ADDRESS_OF_EC2_NODE
- Click "Save" on the session page before logging in

-
SSH into your EC2 node using below steps:
-
Right click to download this pem key > Save link as > save to Downloads folder
-
Copy pem key to ~/.ssh dir and correct permissions
cp ~/Downloads/hdf-workshop.pem ~/.ssh/ chmod 400 ~/.ssh/hdf-workshop.pem -
Login to the ec2 node of the you have been assigned by replacing IP_ADDRESS_OF_EC2_NODE below with EC2 node IP Address (your instructor will provide this)
ssh -i ~/.ssh/hdf-workshop.pem centos@IP_ADDRESS_OF_EC2_NODE -
To change user to root you can:
sudo su -
-
Login to Ambari web UI by opening http://{YOUR_IP}:8080 and log in with admin/admin
-
You will see a list of Hadoop components running on your node on the left side of the page
- They should all show green (ie started) status. If not, start them by Ambari via 'Service Actions' menu for that service
- NiFi is installed at: /usr/hdf/current/nifi
In this lab, we will learn how to:
- Consume the Meetup RSVP stream
- Extract the JSON elements we are interested in
- Split the JSON into smaller fragments
- Write the JSON to the file system
To get started we need to consume the data from the Meetup RSVP stream, extract what we need, splt the content and save it to a file:
- Consume Meetup RSVP stream
- Extract the JSON elements we are interested in
- Split the JSON into smaller fragments
- Write the JSON files to disk
Our final flow for this lab will look like the following:
 A template for this flow can be found here
-
Step 1: Add a ConnectWebSocket processor to the cavas
- Configure the WebSocket Client Controller Service. The WebSocket URI for the meetups is:
ws://stream.meetup.com/2/rsvps - Set WebSocket Client ID to your favorite number.
- Configure the WebSocket Client Controller Service. The WebSocket URI for the meetups is:
-
Step 2: Add an Update Attribute procesor
- Configure it to have a custom property called
mime.typewith the value ofapplication/json
- Configure it to have a custom property called
-
Step 3. Add an EvaluateJsonPath processor and configure it as shown below:

The properties to add are:
event.name $.event.event_name event.url $.event.event_url group.city $.group.group_city group.state $.group.group_state group.country $.group.group_country group.name $.group.group_name venue.lat $.venue.lat venue.lon $.venue.lon venue.name $.venue.venue_name -
Step 4: Add a SplitJson processor and configure the JsonPath Expression to be
$.group.group_topics -
Step 5: Add a ReplaceText processor and configure the Search Value to be
([{])([\S\s]+)([}])and the Replacement Value to be{ "event_name": "${event.name}", "event_url": "${event.url}", "venue" : { "lat": "${venue.lat}", "lon": "${venue.lon}", "name": "${venue.name}" }, "group" : { "group_city" : "${group.city}", "group_country" : "${group.country}", "group_name" : "${group.name}", "group_state" : "${group.state}", $2 } } -
Step 6: Add a PutFile processor to the canvas and configure it to write the data out to
/tmp/rsvp-data

- What does a full RSVP Json object look like?
- How many output files do you end up with?
- How can you change the file name that Json is saved as from PutFile?
- Why do you think we are splitting out the RSVP's by group?
- Why are we using the Update Attribute processor to add a mime.type?
- How can you cange the flow to get the member photo from the Json and download it.
In this lab, we will learn how to configure MiNiFi to send data to NiFi:
- Setting up the Flow for NiFi
- Setting up the Flow for MiNiFi
- Preparing the flow for MiNiFi
- Configuring and starting MiNiFi
- Enjoying the data flow!
NOTE: Before starting NiFi we need to enable Site-to-Site communication. To do that we will use Ambari to update the required configuration. In Ambari the below property values can be found at http://<EC2_NODE>:8080/#/main/services/NIFI/configs .
- Change:
To
nifi.remote.input.socket.port=nifi.remote.input.socket.port=10000 - Restart NiFi via Ambari
Now we should be ready to create our flow. To do this do the following:
-
The first thing we are going to do is setup an Input Port. This is the port that MiNiFi will be sending data to. To do this drag the Input Port icon to the canvas and call it "From MiNiFi".
-
Now that the Input Port is configured we need to have somewhere for the data to go once we receive it. In this case we will keep it very simple and just log the attributes. To do this drag the Processor icon to the canvas and choose the LogAttribute processor.
-
Now that we have the input port and the processor to handle our data, we need to connect them.
-
We are now ready to build the MiNiFi side of the flow. To do this do the following:
-
Add a GenerateFlowFile processor to the canvas (don't forget to configure the properties on it)
-
Add a Remote Processor Group to the canvas
For the URL copy and paste the URL for the NiFi UI from your browser
-
- Connect the GenerateFlowFile to the Remote Process Group
-
The next step is to generate the flow we need for MiNiFi. To do this do the following steps:
- Create a template for MiNiFi
- Select the GenerateFlowFile and the NiFi Flow Remote Processor Group (these are the only things needed for MiMiFi)
- Select the "Create Template" button from the toolbar
- Choose a name for your template
-
Now we need to download the template
-
Now SCP the template you downloaded to the
/tmpdirectory on your EC2 instance. If you are using Windows you will need to download WinSCP (https://winscp.net/eng/download.php) -
We are now ready to setup MiNiFi. However before doing that we need to convert the template to YAML format which MiNiFi uses. To do this we need to do the following:
-
Navigate to the minifi-toolkit directory (/usr/hdf/current/minifi-toolkit-0.4.0)
-
Transform the template that we downloaded using the following command:
sudo bin/config.sh transform <INPUT_TEMPLATE> <OUTPUT_FILE>For example:
sudo bin/config.sh transform /temp/MiNiFi_Flow.xml config.yml
-
-
Next copy the
config.ymlto theminifi-0.4.0/confdirectory. That is the file that MiNiFi uses to generate the nifi.properties file and the flow.xml.gz for MiNiFi. -
That is it, we are now ready to start MiNiFi. To start MiNiFi from a command prompt execute the following:
cd /usr/hdf/current/minifi-0.4.0
sudo bin/minifi.sh start
tail -f logs/minif-app.log
You should be able to now go to your NiFi flow and see data coming in from MiNiFi.
In this lab we are going to explore creating, writing to and consuming Kafka topics. This will come in handy when we later integrate Kafka with NiFi and Streaming Analytics Manager.
- Creating a topic
-
Step 1: Open an SSH connection to your EC2 Node.
-
Step 2: Naviagte to the Kafka directory (
/usr/hdf/current/kafka-broker), this is where Kafka is installed, we will use the utilities located in the bin directory.#cd /usr/hdf/current/kafka-broker/ -
Step 3: Create a topic using the kafka-topics.sh script
bin/kafka-topics.sh --zookeeper localhost:2181 --create --partitions 1 --replication-factor 1 --topic first-topicNOTE: Based on how Kafka reports metrics topics with a period ('.') or underscore ('_') may collide with metric names and should be avoided. If they cannot be avoided, then you should only use one of them.
-
Step 4: Ensure the topic was created
bin/kafka-topics.sh --list --zookeeper localhost:2181
- Testing Producers and Consumers
- Step 1: Open a second terminal to your EC2 node and navigate to the Kafka directory
- In one shell window connect a consumer:
bin/kafka-console-consumer.sh --zookeeper localhost:2181 --from-beginning --topic first-topic
Note: using –from-beginning will tell the broker we want to consume from the first message in the topic. Otherwise it will be from the latest offset.
- In the second shell window connect a producer:
bin/kafka-console-producer.sh --broker-list demo.hortonworks.com:6667 --topic first-topic
-
Sending messages. Now that the producer is connected we can type messages.
- Type a message in the producer window
-
Messages should appear in the consumer window.
-
Close the consumer (ctrl-c) and reconnect using the default offset, of latest. You will now see only new messages typed in the producer window.
-
As you type messages in the producer window they should appear in the consumer window.
- Creating the topic
-
Step 1: Open an SSH connection to your EC2 Node.
-
Step 2: Naviagte to the Kafka directory (
/usr/hdf/current/kafka-broker), this is where Kafka is installed, we will use the utilities located in the bin directory.#cd /usr/hdf/current/kafka-broker/ -
Step 3: Create a topic using the kafka-topics.sh script
bin/kafka-topics.sh --zookeeper localhost:2181 --create --partitions 1 --replication-factor 1 --topic meetup_rsvp_rawNOTE: Based on how Kafka reports metrics topics with a period ('.') or underscore ('_') may collide with metric names and should be avoided. If they cannot be avoided, then you should only use one of them.
-
Step 4: Ensure the topic was created
bin/kafka-topics.sh --list --zookeeper localhost:2181
- Integrating NiFi
-
Step 1: Add a PublishKafka_0_10 processor to the canvas.
-
Step 2: Add a routing for the success relationship of the ReplaceText processor to the PublishKafka processor added in Step 1 as shown below:

-
Step 3: Configure the topic for the PublishKafka processor

-
Start the NiFi flow
-
In a terminal window to your EC2 node and navigate to the Kafka directory and connect a consumer to the
meetup_rsvp_rawtopic:bin/kafka-console-consumer.sh --zookeeper localhost:2181 --from-beginning --topic meetup_rsvp_raw -
Messages should now appear in the consumer window.
- Creating the topic
-
Step 1: Open an SSH connection to your EC2 Node.
-
Step 2: Naviagte to the Kafka directory (
/usr/hdf/current/kafka-broker), this is where Kafka is installed, we will use the utilities located in the bin directory.#cd /usr/hdf/current/kafka-broker/ -
Step 3: Create a topic using the kafka-topics.sh script
bin/kafka-topics.sh --zookeeper localhost:2181 --create --partitions 1 --replication-factor 1 --topic meetup_rsvp_avroNOTE: Based on how Kafka reports metrics topics with a period ('.') or underscore ('_') may collide with metric names and should be avoided. If they cannot be avoided, then you should only use one of them.
-
Step 4: Ensure the topic was created
bin/kafka-topics.sh --list --zookeeper localhost:2181
- Adding the Schema to the Schema Registry
-
Step 1: Open a browser and navigate to the Schema Registry UI. You can get to this from the either the
Quick Linksdrop down in Ambari, as shown below:
or by going to
http://<EC2_NODE>:17788 -
Step 2: Create Meetup RSVP Schema in the Schema Registry
-
Click on “+” button to add new schemas. A window called “Add New Schema” will appear.
-
Fill in the fields of the
Add Schema Dialogas follows:
For the Schema Text you can download it here and either copy and paste it or upload the file.
Once the schema information fields have been filled and schema uploaded, click Save.
-


- We are now ready to integrate the schema with NiFi
-
Step 0: Remove the PutFile and PublishKafka_0_10 processors from the canvas, we will not need them for this section.
-
Step 1: Add a UpdateAttribute processor to the canvas.
-
Step 2: Add a routing for the success relationship of the ReplaceText processor to the UpdateAttrbute processor added in Step 1.
-
Step 3: Configure the UpdateAttribute processor as shown below:

-
Step 4: Add a JoltTransformJSON processor to the canvas.
-
Step 5: Add a routing for the success relationship of the UpdateAttribute processor to the JoltTransformJSON processor added in Step 5.
-
Step 6: Configure the JoltTransformJSON processor as shown below:

The JSON used in the 'Jolt Specification' property is as follows:
{ "venue": { "lat": ["=toDouble", 0.0], "lon": ["=toDouble", 0.0] } } -
Step 7: Add a LogAttribute processor to the canvas.
-
Step 8: Add a routing for the failure relationship of the JoltTransformJSON processor to the LogAttribute processor added in Step 7.
-
Step 9: Add a PublishKafkaRecord_0_10 to the canvas.
-
Step 10: Add a routing for the success relationship of the JoltTransformJSON processor to the PublishKafka processor added in Step 9.
-
Step 11: Configure the PublishKafkaRecord processor to look like the following:

-
Step 12: When you configure the JsonTreeReader and AvroRecordSetWriter, you will first need to configure a schema registry controller service. The schema registry controller service we are going to use is the 'HWX Schema Registry', it should be configured as shown below:

-
Step 13: Configure the JsonTreeReader as shown below:

-
Step 14: Configure the AvroRecordSetWriter as shown below:

After following the above steps this section of your flow should look like the following:


-
Start the NiFi flow
-
In a terminal window to your EC2 node and navigate to the Kafka directory and connect a consumer to the
meetup_rsvp_avrotopic:bin/kafka-console-consumer.sh --zookeeper localhost:2181 --from-beginning --topic meetup_rsvp_avro -
Messages should now appear in the consumer window.
For this lab we are going to break from the Meetup RSVP data and use a fictious IoT Trucking application.
-
Step 1: SSH to your EC2 instance
-
Step 2: We are now going to get a data loader running:
cd /root/Data-Loader nohup java -cp /root/Data-Loader/stream-simulator-jar-with-dependencies.jar hortonworks.hdp.refapp.trucking.simulator.SimulationRegistrySerializerRunnerApp 20000 hortonworks.hdp.refapp.trucking.simulator.impl.domain.transport.Truck hortonworks.hdp.refapp.trucking.simulator.impl.collectors.KafkaEventSerializedWithRegistryCollector 1 /root/Data-Loader/routes/midwest/ 10000 demo.hortonworks.com:6667 http://demo.hortonworks.com:7788/api/v1 ALL_STREAMS NONSECURE & -
Step 3: Now that the data is flowing, instantiate the 'IoT Trucking' NiFi template.
-
Step 4: Inspect the flow that is created and ensure there are no errors, if there are go ahead and correct those.
-
Step 5: Start this section of the NiFi flow.
-
Step 6: Go to your Ambari dashboard and navigate to the SAM UI, by selecting the following URL:

-
Step 7: You should now see the SAM UI that looks like the following:

-
Step 8: To inspect the application, click the icon in the top right hadn corner of the applicaiton and chose 'Edit', as shown below:

-
Step 9: You shoudl now see a UI that looks like the following:

Spend a moment to explore and dig into any of the components. Notice at the bottom right hand corner is states "Status Active", this indicates that the application is running.
-
Step 10: Verify that Storm the application is running using Storm Mon. To do this go back to your Ambari Dashboard and chose the "Storm Mon link" as shown below:

That should bring up a UI that looks like the following:

-
Step 11: We are now ready to explore Superset, to do this go back to the Ambari dashboard and from the Drui service chose the "Quick Link" to "Superset" as shown below:

-
Step 12: Exploring Superset -- following the link in Step 11 should take you to a UI that looks like the following:


NOTE: If you are prompted for a password use admin/admin
Spend some time exploring the dashboard and the datasources.