Prompts Browser Extension for the AUTOMATIC1111/stable-diffusion-webui.
- Installation
- Known Prompts Browser
- Active Prompts
- Adding new prompts to the collection
- Generating previews for prompts
- Prompt tools
- Styles
- Collection editor
- Prompt editor
- Setup window
- Autocomplite
- Normalize
- Collections database

As of version 1.1.0, the extension now works via FastAPI and no longer depends on an additional local server or extension installation location. This will cover more use cases and customizations of the application.
-
Make sure you have the latest AUTOMATIC1111/stable-diffusion-webui version instaled. Prompt Browser 1.1.0 was tested and adapted for WebUI versions 1.6.0.
-
Unzip/clone the plugin into the extensions directory. Or install it using WebUI Extensions -> Install from URL tab.
-
On first run in the Prompts Browser Extension directory will be created directory
prompts_cataloguewith subdirectorymyprompts- this will be the first collection of prompts. As well as the directorystyles_cataloguewhere new styles will be stored. -
With the extension installed, you can add the startup argument to Stable Diffusion WebUI
--prompts-browser-readonly. With this argument, the extension client and server will be read-only, which may be desirable when using the extension when hosting the application online.
This extension modifies the DOM directly, without working through any API for such purposes. As such, an update to AUTOMATIC1111/stable-diffusion-webui could potentially break some functionality of this extension until the extension is in turn updated to work with a newer version of WebUI. If something stops working after WebUI update - create a ticket.
-
The known prompts browser will display all known prompts from all the collections added to the
prompts_cataloguedirectory. -
Clickon a prompt to add it to the active prompts. -
Shift + click: opens prompt edition window. -
Ctrl/Meta + click: opens the dialog of removing the prompt from the collection (it will be lost). -
Prompts in the collection can be moved by drag and drop.
-
You can filter prompts using filter params like collection, category, tags (supports autocomplite of known tags) and name.
-
You can change sorting mode in the order drop down menu.
-
Prompts can be added either manually via the text box or via the Prompt Browser.
-
The order of the Prompts can be changed by dragging them with the mouse.
-
Shift + mouse wheel: will change the weight of the Prompt depending on the direction of the mouse wheel. -
Ctrl + click: deletes prompt from the active prompts. -
Double click: opens the Prompt Tools.
-
Enter text in the text box - the text will be divided by the presence of a comma in the prompts in the text box. If you click on the icon of a prompt, it will become the selected one. Now you can generate an image and if any of the currently active prompts is selected there will be a button
Save previewabove the generated image. By saving the preview, it will be added to the collection, and the preview image for that sample will be added to the collection'spreviewdirectory.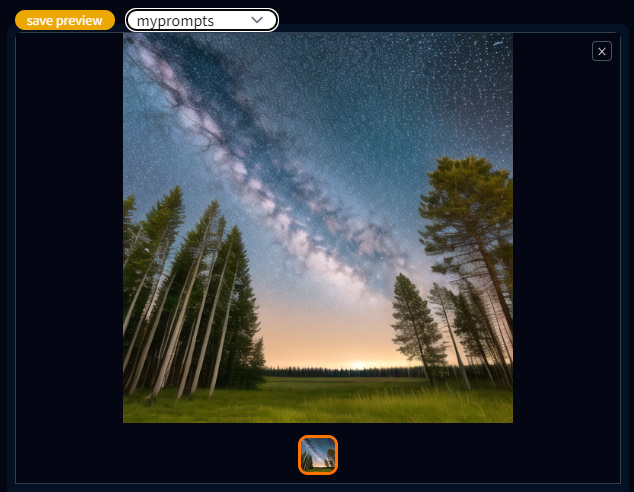
-
The
Add unknownbutton above the Prompts entry field opens a window for adding new prompts. In this window you can select new prompts and a collection of prompts, where you can add them with theAdd new promptsbutton. TheToggle allbutton selects or deselects all new proppts. TheAll collectionstoggle switches on or off the check for all possible collections (by default, it is on and only those prompts that are not in any of the possible collections will be displayed).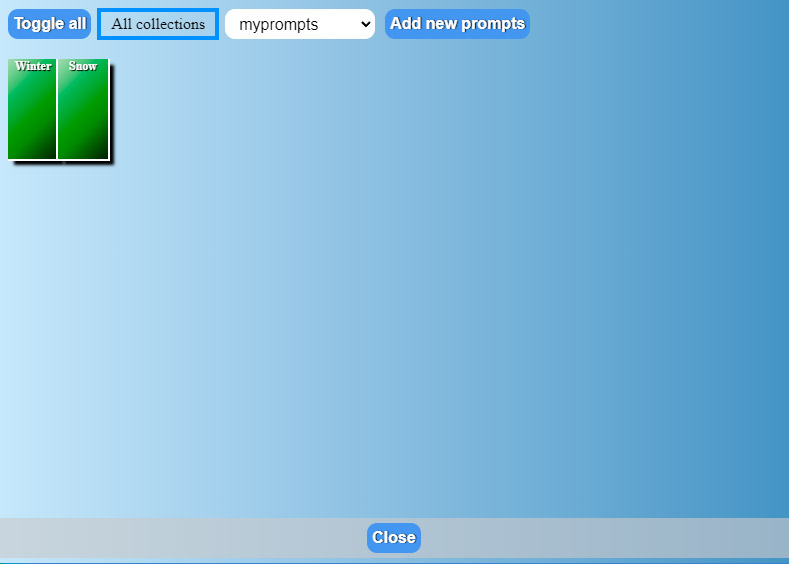


-
You can select a prompt, generate an image and click the
Save previewbutton above the generated image to create or replace the preview for that prompt. -
You can use the
Collection editorto generate previews for multiple prompts at once. You can open the Collection editor by clicking theEdit collectionbutton above the list of known prompts. In the Collection editor window, you can click on the preview square of the prompt to mark it. You can also click on theToggle allbutton to select all the prompts in the collection. You can also filter the prompts so that only prompts without previews are displayed. To do this, set the filter "exclude - meta - have preview". After that, you can click "Generate" and previews will be generated for all selected prompts one by one. -
You can select additional styles to be used during autogeneration.
Prompt only- only prompt itself will be used for generating preview.With current prompt- target prompt will be added to the current prompts in the positive prompts textbox..With prompt autogen style- If a prompt has a style assigned for autogeneration, it will use that prompt and the assigned style. If the prompt does not have an autogenerate-style, only the prompt itself will be used.With selected autogen style- the currently selected style in theAutogenerate stylefield will be used as the style for autogeneration.

-
If you
double-clickon the active prompt, the Prompt Tools window will open. -
A list of active prompts will be displayed at the top, where you can change the selected prompt.
-
Based on categories, tags and name of the prompt, similar prompts will be displayed.
-
Prompts will be sorted by their similarity to the selected prompt according to the selected parameters (tags, categories and name).
-
Clicking on a promt from the list of similar promts will replace the selected promt with the target one.
-
Shift + clickon a promt from the list will add the target promt to the active promts (keeping the selected promt).

-
Above the text box there is a
stylesbutton which opens the Styles window. -
A list of active prompts will be displayed at the top.
-
The current prompts can be saved as a style by typing in the text box above the name of the style and clicking the
Save as stylebutton next to it. -
In the list of style collections, you can select the collection where the style will be saved. You can also select the current generation parameters that will be saved along with the style's prompts (such as negative prompts, size, sampler, etc).
-
"Simple mode" switch changes styles view mode from the simple to the detailed mode.
-
In simple mode you need to select a prompt and then press a needed button at the bottom of the window.
-
Prompts from saved styles can be added to active prompts at the beginning of their list or at the end.
-
The
removebutton will delete the style from the database (it will be lost). -
The
updatebutton will replace the style's prompts with the current active prompts. -
The
Update previewbutton will add/replace preview for the style using the currently generated and selected image. -
In simple mode you can also click with
shiftkey to add style. You can click and holdctrl/metakey to delete style.

-
You can open the
Collection editorby clicking theEdit collectionbutton above the list of known prompts. -
The collection selected in the collections filter field of known prompts will be opened for editing. If no collection is selected, the first collection from the list of collections will be opened.
-
You can click on the preview square of the prompt to mark it.
-
You can also select/deselect all prompts by clicking on
Toggle all. -
You can filter prompts by using filter menu at the top of the window.
-
You can delete selected prompt by pressing
Delete selectedbutton (this will remove them permanently). -
If you have more than one collection installed, you will have the
Collectionblock available. Selecting another collection and pressingMoveorCopywill copy or move the selected props into the selected collection. -
In the
Categoryblock you can select a category and add or remove it from all selected prompts. -
In the
Tagsblock you can write tags and add or remove them from all selected prompts. -
In the
Autogenerate styleyou can assign style to be used with preview image autogeneration for this prompt. -
By pressing
Generatebutton you will start generating preview for all selected prompts. See autogeneration subsection of Generating previews for prompts.

-
By clicking on prompt in the
Known prompts listholdingshiftkey you will open target Prompt Editor window. -
If you have same prompt in different collections you can switch between them with collection selector near prompt name.
-
If you have more than one collection installed, you can select another collection and
copyormovetarget prompt there. -
TagsandCategorieslists shows prompt tags and collections. You can holdctrl/metaand click on them toremovethem. -
You can enter new tags and click
Add tagbutton to add them to the target prompt. -
You can select new category and click
Add categoryto add new category to the target prompt. -
Autogen- assigns style to be used with prompt preview autogeneration. See autogeneration subsection of Generating previews for prompts. -
Add at the beginning- if checked will always add prompt to the start of other prompts. By default will add new prompt at the end of active prompts list. -
Subsequent prompts- prompts to add right after target prompt. -
Add prompts at the start- prompts to add at the start of the active prompts. -
Add prompts at the end- prompts to add at the end of the active prompts. -
Add at the beginning,Subsequent prompts,Add prompts at the startandAdd prompts at the endare useful when working with LORAs. For example, if a LORA requires specific prompts for activation, you can assign them to be automatically appended along with the LORA. You can also assign LORA prompt for some prompts if you always want to use them together. -
You can add comment for the prompt in the comment text area.
-
Press
Saveto save your changes and close window orcancelto close window without saving.

-
Click on
Setupbutton at the top menu to open Setup window. -
New prompts collections- will open creation of the new prompts collection. -
New styles collections- will open creation of the new styles collection. -
Collection name- name of the collection. A directory with the same name will be created. -
Store format- the way prompts/styles are stored. In theshortformat all prompts/styles data will be saved in the filedata.json. In theexpandedformat a directoryprompts/styleswill be added to the collection directory and every prompt/style will be stored as a separate file. The expanded format makes it easier to work with the collection when using version control systems like Git. -
Below 1 scroll weight- how much weight one mouse wheel movement will change when below weight 1. -
Above 1 scroll weight- how much weight one mouse wheel movement will change when above weight 1. -
Transform prompts to lower case- will change prompts in the prompts textarea to be lower case. -
Spaces in prompts transform- changes the handling of spaces in multiword prompts. Can beDo nothing,To spaceandTo underscore. -
Show prompt index in database- will display the ordinal id of the prompt in the collection if the collection is selected in the collection filter. Useful when manually sorting prompts within a collection.
- When you manually type prompts, a menu with similar prompts from the database of known prompts will be displayed. You can finish a prompt from the autocomplite menu by clicking on it or by selecting it with the up and down arrows and pressing Enter.
- The
normalizebutton is displayed above the positive prompt field. It activates the function of normalization of the entered prompts according to the settings of normalization of prompts set in the Setup window. Useful when inserting prompts from external sources.
This extension does not come with a pre-built prompts database. It is up to the user to choose a ready-made database or create their own. Remember that collections goes into the prompts_catalogue directory inside your Stable Diffusion Web UI directory. This directory is being crated after at least one start of SDWebUI with the installed Prompts Browser Extension.
Some existing collections:
- prompts_portrait - A proof of concept collection for generating character portraits. Comes with tags and categories tagged in.