Flex prompt is a flexible customizable prompt for Clink, and requires Clink v1.2.10 or higher.
There are several built-in prompt modules, and it's easy to add new custom prompt modules.
The style of the prompt can be customized in many ways as well.
Flex prompt for Clink was inspired by the zsh powerlevel10k theme by Roman Perepelitsa.
Some of the prompt modules are based on cmder-powerline-prompt.
- Go to the Releases page.
- Download the latest
clink-flex-prompt-*.zipfile. - Extract the files from it into your Clink scripts directory (use
clink infoto find it if you're not sure where it is).
- TBD: publish via scoop?
There is no "best" or "right" or "wrong" font. The most important thing is to pick a font whose shape you like.
Flex prompt's configuration wizard will ask few questions, and it's ok for some of the questions to look ugly -- choose the appropriate answer, and the wizard will adapt accordingly.
Flex prompt can use fancy characters, if you want, to personalize the prompt with shapes and icons. To use fancy characters, you'll need to find a font with Powerline characters and/or icon characters. The nerd fonts site has a large selection of special fonts. The configuration wizard lets you choose from the most common fancy characters, but you can also manually configure flex prompt (with Lua code) to use just about any special characters.
Benefits of fancy characters:
- Your prompt will look fancy on the screen.
Drawbacks of fancy characters:
- If you copy/paste from the screen to somewhere else, then fancy characters may not be readable by other people depending on what font they're using.
- The same font may look different in different terminal programs, because of features or limitations in the terminal programs.
- Some of the fancy characters require special fonts.
Here are some recommended fonts to consider:
- Meslo Nerd Font patched by romkatv: this is a patched version of Meslo Nerd Font.
- Cascadia Code: recent versions of this font include Powerline symbols, but the font doesn't include icon characters.
- Caskaydia Cove Nerd Font: this is a patched version of Cascadia Code that adds many icon characters.
- FiraCode Nerd Font: this is a patched version of Fira Code that adds Powerline symbols and many icon characters.
- RobotoMono Nerd Font: this is a patched version of Roboto Mono that adds Powerline symbols and many icon characters.
- And there are many other fonts to have fun with -- enjoy!
Flex prompt can be easily customized via its configuration wizard.
To start the wizard, run flexprompt configure and follow the instructions on the screen.
The wizard doesn't cover everything, and more advanced configuration is possible by assigning settings manually in a flexprompt_config.lua file.
The script will look something like this:
flexprompt_config.lua
flexprompt.settings.style = "classic"
flexprompt.settings.heads = "pointed"
flexprompt.settings.lines = "two"
flexprompt.settings.left_prompt = "{battery}{cwd}{git}"
flexprompt.settings.right_prompt = "{exit}{overtype}{vpn}{duration}{time}"
Tip: By making your manual customizations modify settings (rather than replacing them), your customizations can adapt according to the options you've chosen in the flexprompt configuration wizard.
For example:
flexprompt.settings.left_prompt = flexprompt.settings.left_prompt:gsub("{git}", "{git:showremote}")
-- or
flexprompt.settings.left_prompt = flexprompt.settings.left_prompt .. "{my_custom_module}{python}"
The flexprompt.settings.left_prompt and flexprompt.settings.right_prompt string variables list prompt modules to be displayed.
"{battery}"shows the battery level and whether the battery is charging."{cwd}"shows the current working directory."{duration}"shows the duration of the previous command."{exit}"shows the exit code of the previous command."{git}"shows git status."{hg}"shows Mercurial status."{histlabel}"shows the current %CLINK_HISTORY_LABEL%, if any."{keymap}"shows the current key bindings keymap (emacs mode, vi command mode, or vi insert mode)."{maven}"shows package info."{modmark}"shows a modified line indicator when the current line is a history entry and has been modified (only when themark-modified-linesReadline config setting ison)."{npm}"shows package name and version."{overtype}"shows indicator when overtype mode is on (i.e. when insert mode is off)."{python}"shows the virtual environment."{svn}"shows Subversion status."{time}"shows the current time and/or date."{user}"shows the current user name and/or computer name."{vpn}"shows the current VPN or dialup connection.
flexprompt.settings.left_prompt = "{battery}{user}{cwd}{git}"
flexprompt.settings.right_prompt = "{exit}{duration}{time}"- TBD: details about configuring the modules. In the meantime, you can search for "MODULE:" in
flexprompt.luato find the available options for each module (including colors).
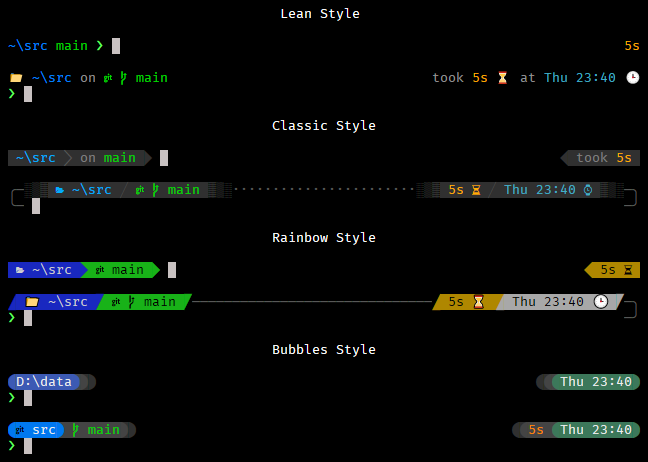
"lean"shows prompt modules using only colored text."classic"shows prompt modules using colored text on a gray background."rainbow"shows prompt modules using text on colored backgrounds.
flexprompt.settings.style = "classic""ascii"uses only ASCII characters, and is compatible with all fonts; text copy/pasted from the terminal display will look right everywhere."unicode"uses Unicode characters to add styling to the prompt, and requires fonts compatible with powerline symbols; text copy/pasted from the terminal display will look wrong when pasted somewhere that doesn't use a compatible font.
flexprompt.settings.charset = "unicode""lightest""light""dark""darkest"- Custom frame colors can be provided as
{ frame_color, background_color, fluent_text_color, separator_color }. The fields can be color name strings or ANSI escape code SGR arguments (e.g."31"is red text).
These choose the prompt background color for the "classic" style, and choose the frame and connection color for all styles.
-- Use a predefined set of coordinated dark colors:
flexprompt.settings.frame_color = "dark"

-- Or use custom colors:
flexprompt.settings.frame_color =
{
    "38;5;242",     -- frame color (gray 44%)
    "38;5;238",     -- background color (gray 28%)
    "38;5;246",     -- text color (gray 60%)
    "38;5;234",     -- separator color (gray 12%)
}For the "classic" style:
"none"is just a space between prompt modules."vertical"is a vertical bar."pointed"is a sideward-pointing triangle (requires Unicode)."slant"is slanted from bottom left to top right."backslant"is slanted from top left to bottom right."round"is a semi circle (requires Unicode)."dot"is a dot (requires Unicode)."updiagonal"is a small slash from bottom left to top right (requires Unicode)."downdiagonal"is a small slash from top left to bottom right (requires Unicode).- (See flexprompt.lua for the most up to date list.)
- Custom separators can be provided as a table with two values, for the left and right separators.
For the "rainbow" style:
- Any of the Heads or Tails options may be used as separators.
For all styles:
"connector"shows a frame connector (see the Connection section further below).
-- Use a predefined separator:
flexprompt.settings.separator = "pointed"

-- Or use a custom separator:
flexprompt.settings.separator = { "»", "«" }
Tails are at the outside ends of the prompts. Heads are at the inside ends.
"flat"is a flat vertical edge."pointed"is a sideward-pointing triangle (requires Unicode)."slant"is slanted from bottom left to top right (requires Unicode)."backslant"is slanted from top left to bottom right (requires Unicode)."round"is a semi circle (requires Unicode)."blurred"uses shaded block characters to fade the edge (requires Unicode).- Custom end types can be provided as
{ open_string, close_string }. However, that is advanced usage and you need to know how background and foreground colors work; that isn't covered in this documentation.
flexprompt.settings.tails = "flat"
flexprompt.settings.heads = "blurred""one"uses a single line. Any right-side prompt modules are shown if there is room, and if the input text hasn't reached them."two"uses two lines. The first line shows the prompt modules, and the second line is for input text.
flexprompt.settings.lines = "two"Only when using "both" sides:
"disconnected"shows blank space between the left and right side prompts."dotted"shows dots between the left and right side prompts."solid"draws a horizontal line connecting the left and right side prompts."dashed"draws a horizontal line using minus signs to connect the left and right side prompts.- A custom connection can be provided as a string.
-- Use a predefined connection:
flexprompt.settings.connection = "solid"

-- Or use a custom connection:
flexprompt.settings.connection = "═"When using "two" lines, left and right prompt frames can each be:
"none"shows no frame."square"shows a frame with square corners."round"shows a frame with rounded corners.- Custom frames can be provided as
{ top_frame, bottom_frame }.
-- Use predefined frame shapes:
flexprompt.settings.left_frame = "none"
flexprompt.settings.right_frame = "round"

-- Or use custom frame shapes:
flexprompt.settings.left_frame = { "╔═", "╚═" }
flexprompt.settings.right_frame = { "═╗", "◄───╜" }- "compact" removes blank lines before the prompt.
- "normal" neither removes nor adds blank lines before the prompt.
- "sparse" removes blank lines before the prompt, and then inserts one blank line.
flexprompt.settings.spacing = "sparse""concise"shows minimal text for each prompt module."fluent"shows additional text for some prompt modules, to make the prompt "read" nicely.
flexprompt.settings.flow = "fluent"-- Use all available icons:
flexprompt.settings.use_icons = true
-- Use icons only for the time and exit modules:
flexprompt.settings.use_icons = { "time_module", "exit_module" }
-- Enables battery level refresh in prompt:
flexprompt.settings.battery_idle_refresh = 30 -- every 30 seconds
-- Replaces %HOME% with ~ in the cwd module.
flexprompt.settings.use_home_tilde = true
-- Use additional symbol in cwd module in a git repo, when cwd type is 'smart' or 'rootsmart':
flexprompt.settings.symbols.cwd_git_symbol
-- Use custom prompt symbol (instead of >):
flexprompt.settings.symbols.prompt = "$"
-- Use custom prompt color (supersedes exit_zero_color and exit_nonzero_color):
flexprompt.settings.prompt_symbol_color = "magenta"
-- Use custom prompt symbol when overtype mode is on (i.e. insert mode is off):
flexprompt.settings.symbols.overtype_prompt = "#"
-- Use custom prompt symbol for the transient prompt:
flexprompt.settings.symbols.transient_prompt = ")"
-- Use custom prompt color when last exit code is zero:
flexprompt.settings.exit_zero_color = "brightgreen"
-- Use custom prompt color when last exit code is non-zero:
flexprompt.settings.exit_nonzero_color = "brightred"
-- Override a symbol that isn't in the font being used:
flexprompt.settings.symbol.charging = "++"
-- Override separators when style is 'lean':
flexprompt.settings.lean_separators = " "
-- Run `git fetch` in a repo up to once every 60 minutes:
flexprompt.settings.git_fetch_interval = 60
-- Don't show duration unless a command takes at least this many seconds:
flexprompt.settings.duration_threshold = 10You can write prompt modules in Lua.
A prompt module can return a text string and a color for the text -- this adds a "segment" to the prompt. It can optionally return multiple pairs of text and colors to add multiple segments to the prompt. Or it can return nil to add no segments.
Put your prompt module code in a Lua file whose name starts with flexprompt_
in the same directory as the flexprompt.lua file.
Advanced: Since scripts are loaded in alphabetical order, the easiest thing to do is name your script something that follows after
flexprompt_alphabetically. But another more advanced option is to defer making use offlexprompt.until the first onbeginedit event, and then the script name wouldn't have the alphabetical order limitation.
Here is a basic example of a prompt module, which we'll call "mfm" as an abbreviation for "my first module":
-- This is the prompt module function.
local function my_first_module(args)
    -- It returns some text to show in the prompt, and a color for the text.
    -- (The args will be explained in the next section.)
    return "Hello World", "magenta"
end

-- This registers the prompt module function with flexprompt.
-- Pass a string, and a function.
-- In your prompt, refer to the prompt module by putting its name inside
-- squiggly braces, such as "{mfm}" in this example.
flexprompt.add_module("mfm", my_first_module)
With the above code installed, if you set your flexprompt.left_prompt string
to include "{mfm}" then your prompt will include a magenta segment that says
"Hello World".
Prompt modules can accept arguments to customize them. There are two flexprompt API functions to help with that.
If a module name is followed by a colon : then everything between the colon
and the closing brace } is passed to the prompt module function as a string.
Let's suppose your prompt string includes "{mfm:excited:capitalize=upper}" and
look at how the my_first_module example could use the arguments.
The excited part does not have an equal = sign, so it is a keyword. Your
module function can use flexprompt.parse_arg_keyword() to check whether a
specific keyword is present.
The case=upper part includes an equal = sign, so it is a token. Your module
function can use flexprompt.parse_arg_token() to retrieve the part following
the equal = sign.
Here is the example prompt module function, updated to recognize the two example arguments described above.
-- The MFM module:
--
-- This module replaces "{mfm}" in your prompt string with "Hello World".
--
-- This module accepts two arguments.  To use an argument, append a colon and
-- the argument after the module name:
--      excited             Adds an exclamation mark to the prompt text.
--      case=type           Applies capitalization according to 'type':
--                          - 'upper' applies upper case.
--                          - 'lower' applies lower case.

-- This is the prompt module function.
local function my_first_module(args)
    -- The text to show normally.
    local text = "Hello World"

    -- Check for the 'excited' argument keyword.  If present, then let's add
    -- exclamation marks to the text to express excitement.
    local excited = flexprompt.parse_arg_keyword(args, "excited")
    if excited then
        text = text .. "!!!"
    end

    -- Check for the 'case' argument token.  If present, then apply upper or
    -- lower casing, depending on the value of the 'case' token.
    local case = flexprompt.parse_arg_token(args, "case")
    if case == "upper" then
        text = string.upper(text)
    elseif case == "lower" then
        text = string.lower(text)
    end

    -- Return the final version of the text, and the color for the prompt
    -- module's segment in the prompt string.
    return text, "magenta"
end

-- This registers the prompt module function with flexprompt.
flexprompt.add_module("mfm", my_first_module)Flexprompt can apply colors to prompt modules' segments. Each prompt module controls its own colors. But prompt modules may accepts arguments to allow customizing their colors.
If a module will only apply one color, then its token name may be color. But
if the module has more than one color, or if you think it ever might have more
than one color, then give each color a separate name (e.g. clean and dirty
and "{mfm:clean=green:dirty=yellow}").
Your module function can use flexprompt.parse_colors() to retrieve the
specified colors.
Here is where styling comes up for the first time: Each prompt segment actually
has three things: text string, main color, and alternate color. In the "lean"
and "classic" prompt styles, the main color says what text color to use (the
alternate color is not used). But in the "rainbow" style the main color says
what background color to use, and the alternate color says what text color to
use. If the alternate color is omitted, then "white" is assumed. Overriding
the alternate color may be desirable sometimes, for example to improve contrast.
Now we'll update the example prompt module to have a customizable color:
-- The MFM module:
--
-- This module replaces "{mfm}" in your prompt string with "Hello World".
--
-- This module accepts two arguments.  To use an argument, append a colon and
-- the argument after the module name:
--      excited             Adds an exclamation mark to the prompt text.
--      case=type           Applies capitalization according to 'type':
--                          - 'upper' applies upper case.
--                          - 'lower' applies lower case.
--      color=main,alt      Customize the default color.

-- This is the prompt module function.
local function my_first_module(args)
    -- The text to show normally.
    local text = "Hello World"

    -- Check for the 'excited' argument keyword.  If present, then let's add
    -- exclamation marks to the text to express excitement.
    local excited = flexprompt.parse_arg_keyword(args, "excited")
    if excited then
        text = text .. "!!!"
    end

    -- Check for the 'case' argument token.  If present, then apply upper or
    -- lower casing, depending on the value of the 'case' token.
    local case = flexprompt.parse_arg_token(args, "case")
    if case == "upper" then
        text = string.upper(text)
    elseif case == "lower" then
        text = string.lower(text)
    end

    -- Set up the default colors, and then parse a 'color' token to override the
    -- defaults with customized colors.
    local color = "magenta"
    local altcolor = "black"
    local color_arg = flexprompt.parse_arg_token(args, "color")
    color, altcolor = flexprompt.parse_colors(color_arg, color, altcolor)

    -- Return the final version of the text, and the color for the prompt
    -- module's segment in the prompt string.
    return text, color, altcolor
end

-- This registers the prompt module function with flexprompt.
flexprompt.add_module("mfm", my_first_module)TBD
TBD
TBD
clink-flex-prompt is distributed under the terms of The MIT License.