基于Docker实现nginx-keepalived双机热备机制
superleeyom opened this issue · comments

基本概念
LVS
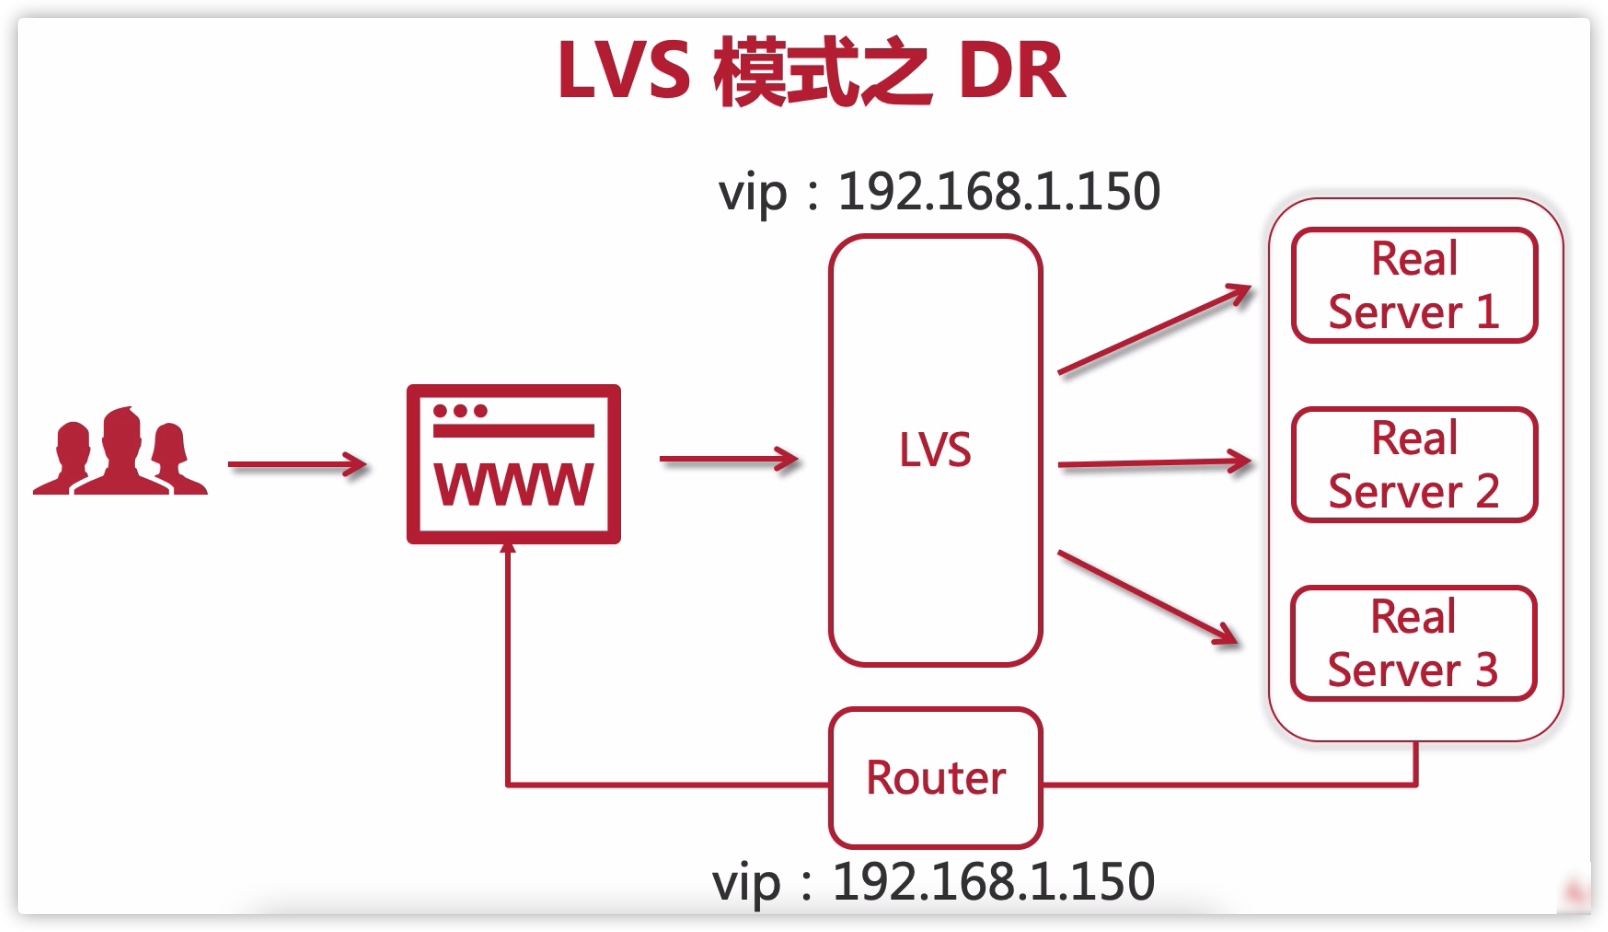
LVS 是一个开源的软件,可以实现传输层四层负载均衡。LVS 是 Linux Virtual Server 的缩写,意思是 Linux 虚拟服务器。目前有三种 IP 负载均衡技术(VS/NAT、VS/TUN和VS/DR);八种调度算法:轮询、加权轮询、源地址散列、目标地址散列、最小连接数、加权最少连接数、最短期望延迟、最少队列调度。
-
NAT:
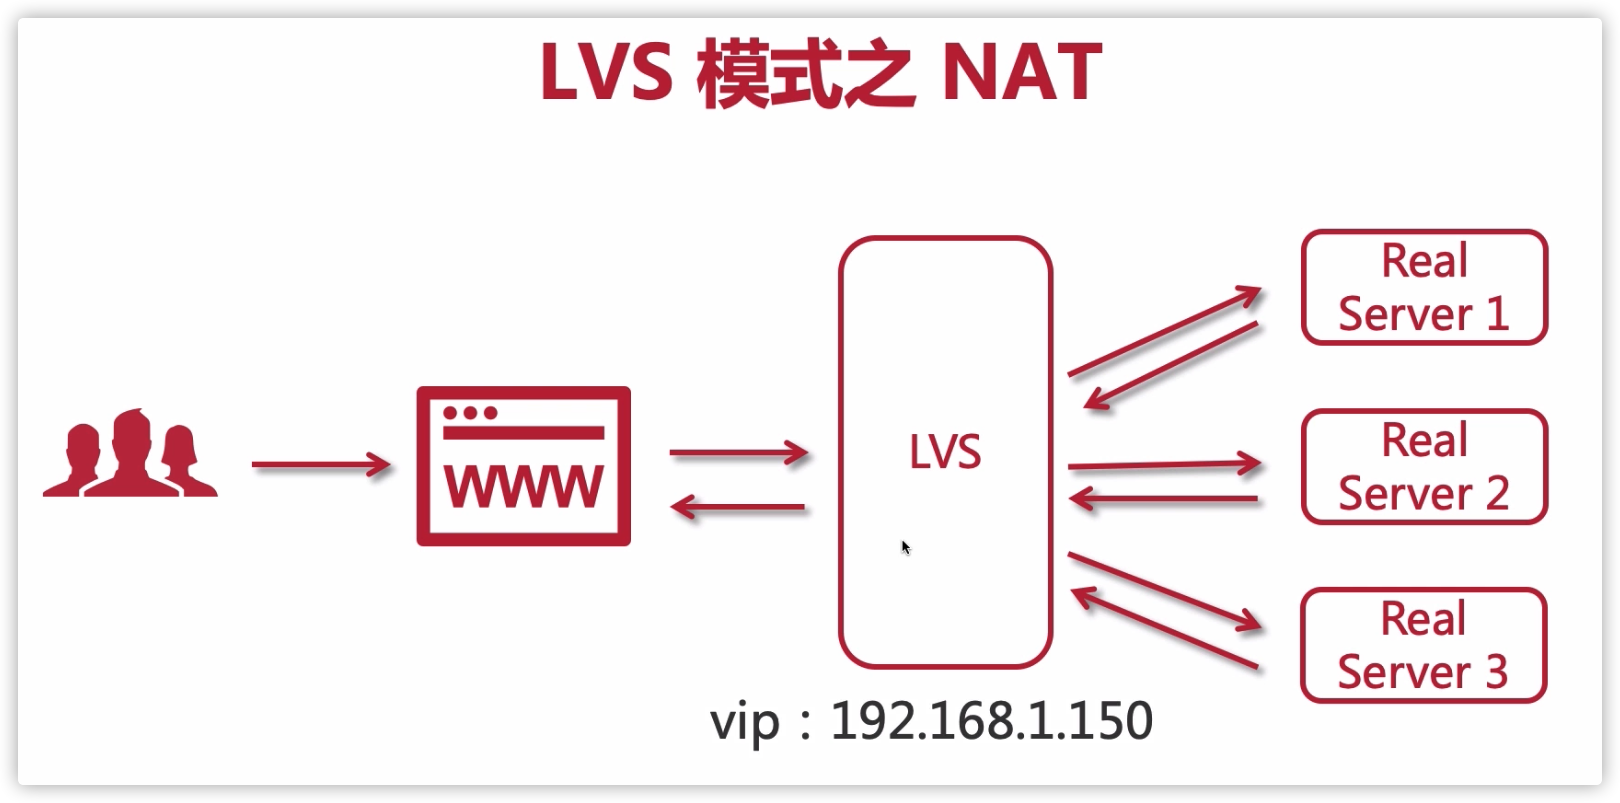
-
TUN:

-
DR:
Keepalived
Keepalived 是基于 vrrp 协议的一款高可用软件。Keepailived 有一台主服务器和多台备份服务器,在主服务器和备份服务器上面部署相同的服务配置,使用一个虚拟 IP 地址(Virtual IP,简称 VIP)对外提供服务,当主服务器出现故障时,虚拟 IP 地址会自动漂移到备份服务器,能够真正做到主服务器和备份服务器故障时 IP 瞬间无缝交接。
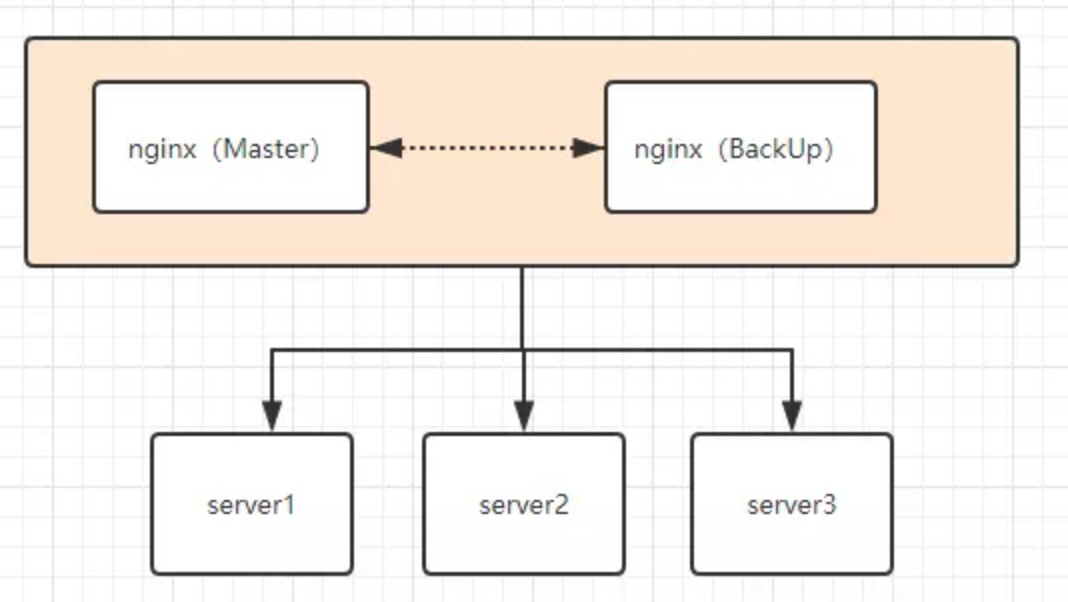
整体流程
-
创建基础镜像
centos_base,基础镜像里面安装了常用的工具,比如vim、wget、zlib等,打包镜像的时候,为了方便,使用docker的commit命令,但是实际推荐还是使用Dockerfile定制镜像,使用docker commit意味着所有对镜像的操作都是黑箱操作,生成的镜像也被称为黑箱镜像,官方并不推荐。# 拉取centos7镜像 docker pull centos:7 # 创建容器centos1 docker run -itd --name centos1 centos:7 # 进入容器centos1 docker exec -it centos1 bash # 进入容器centos1后,安装常用的工具 yum update yum install -y vim yum install -y wget yum install -y gcc-c++ yum install -y pcre pcre-devel yum install -y zlib zlib-devel yum install -y openssl-devel yum install -y popt-devel yum install -y initscripts yum install -y net-tools # 常用工具安装完成后,退出容器centos1,然后将该容器重新打包成新的镜像centos_base docker commit -a 'leeyom' -m 'centos with common tools' centos1 centos_base
-
删除之前创建的
centos1容器,重新以镜像centos_base为基础镜像创建容器centos_temp,并安装keepalived和nginx。# 终止centos1容器 docker container stop centos1 # 删除centos1容器 docker container rm centos1 # 创建基础镜像容器centos_temp,使用privileged参数,表示容器内的root用户拥有真正的root权限 # 容器内需要使用systemctl服务,需要加上/usr/sbin/init docker run -it --name centos_temp -d --privileged centos_base /usr/sbin/init # 进入centos_temp容器 docker exec -it centos_temp bash # 安装nginx的依赖库 rpm -Uvh http://nginx.org/packages/centos/7/noarch/RPMS/nginx-release-centos-7-0.el7.ngx.noarch.rpm # 安装nginx yum install -y nginx # 启动nginx systemctl start nginx.service # 测试nginx是否安装成功,若安装成功会显示nginx的欢迎界面的html代码 curl 172.17.0.2 # 下载keepalived wget http://www.keepalived.org/software/keepalived-1.2.18.tar.gz # 解压keepalived安装包 tar -zxvf keepalived-1.2.18.tar.gz -C /usr/local/ # 安装keepalived依赖的插件openssl yum install -y openssl openssl-devel # 编译keepalived cd /usr/local/keepalived-1.2.18/ && ./configure --prefix=/usr/local/keepalived make && make install # 将keepalived安装成系统服务 mkdir /etc/keepalived cp /usr/local/keepalived/etc/keepalived/keepalived.conf /etc/keepalived/ cp /usr/local/keepalived/etc/sysconfig/keepalived /etc/sysconfig/ cp /usr/local/keepalived/sbin/keepalived /usr/sbin/
修改
keepalived的配置文件keepalived.conf,同时设置keepalived开机自启。# 备份配置文件 cp /etc/keepalived/keepalived.conf /etc/keepalived/keepalived.conf.backup # 删除默认的配置文件,自己重新创建一个keepalived.conf文件 cd /etc/keepalived/ rm -f keepalived.conf vim keepalived.conf
keepalived.conf文件的配置内容如下:vrrp_script chk_nginx { # nginx心跳检测脚本 script "/etc/keepalived/nginx_check.sh" interval 2 weight -20 } vrrp_instance VI_1 { # 指定master state MASTER interface eth0 # 路由id,所有服务器指定一致 virtual_router_id 121 # 当前容器ip地址 mcast_src_ip 172.17.0.2 priority 100 nopreempt advert_int 1 authentication { auth_type PASS auth_pass 1111 } track_script { chk_nginx } # 虚拟ip virtual_ipaddress { 172.17.0.100 } }keepalived是通过检测keepalived进程是否存在判断服务器是否宕机,如果keepalived进程在但是nginx进程不在了那么keepalived是不会做主备切换,所以我们需要写个脚本来监控nginx进程是否存在,如果nginx不存在就将keepalived进程杀掉:# 在/etc/keepalived/目录下创建监控脚本 vim nginx_check.sh # 脚本内容 #!/bin/bash A=`ps -C nginx –no-header |wc -l` if [ $A -eq 0 ];then /usr/local/nginx/sbin/nginx sleep 2 if [ `ps -C nginx --no-header |wc -l` -eq 0 ];then killall keepalived fi fi # 给脚本赋予执行权限 chmod +x nginx_check.sh # keepalived开机自启 systemctl enable keepalived.service chkconfig keepalived on systemctl start keepalived.service
将
nginx设置为开机自启:systemctl enable nginx.service chkconfig nginx on检测虚拟 ip 是否成功,在宿主机内执行如下的命令:
curl 172.17.0.100
如果出现
nginx欢迎界面,则表示成功:<!DOCTYPE html> <html> <head> <title>Welcome to nginx!</title> <style> body { width: 35em; margin: 0 auto; font-family: Tahoma, Verdana, Arial, sans-serif; } </style> </head> <body> <h1>Welcome to nginx master !</h1> <p>If you see this page, the nginx web server is successfully installed and working. Further configuration is required.</p> <p>For online documentation and support please refer to <a href="http://nginx.org/">nginx.org</a>.<br/> Commercial support is available at <a href="http://nginx.com/">nginx.com</a>.</p> <p><em>Thank you for using nginx.</em></p> </body> </html>
-
将
centos_temp容器重新打包成镜像centos_kn,然后利用这个新镜像再创建两个容器centos_master和centos_slave,实现热备效果。# 创建新的镜像centos_kn docker commit -a 'leeyom' -m 'centos with keepalived nginx' centos_temp centos_kn # 删除容器centos_temp docker container stop centos_temp docker container rm centos_temp # 用centos_kn镜像创建主服务器容器centos_master docker run --privileged -tid --name centos_master --restart=always centos_kn /usr/sbin/init
进入
centos_master,修改centos_master容器里面nginx欢迎页的标题为:Welcome to nginx master,用于区分我们当前访问的是master容器的nginx。vim /usr/share/nginx/html/index.html
创建从服务器容器
centos_slave,并进入容器,修改keepalived.conf配置文件,主要是state和priority、mcast_src_ip三个参数的调整,其中master节点的priority值一定要比slave大才行。# 创建容器centos_slave docker run --privileged -tid --name centos_slave --restart=always centos_kn /usr/sbin/init # 进入容器 docker exec -it centos_slave bash # 编辑keepalived.conf文件 vim /etc/keepalived/keepalived.conf
vrrp_script chk_nginx {
    script "/etc/keepalived/nginx_check.sh"
    interval 2
    weight -20
}

vrrp_instance VI_1 {
    state SLAVE
    interface eth0
    virtual_router_id 121
    mcast_src_ip 172.17.0.3
    priority 80
    nopreempt
    advert_int 1
    authentication {
        auth_type PASS
        auth_pass 1111
    }

    track_script {
        chk_nginx
    }

    virtual_ipaddress {
        172.17.0.100
    }
}
修改
centos_slave容器里面nginx欢迎页的标题为:Welcome to nginx slave,用于区分我们当前访问的是slave容器的nginx。vim /usr/share/nginx/html/index.html
修改完后,重新加载
keepalived服务:systemctl daemon-reload systemctl restart keepalived.service
-
开始测试:
-
分别在宿主机,
centos_master、centos_slave中进行一下命令测试,如果nginx都显示为master的欢迎页面,说明配置是没啥问题的。curl 172.17.0.100
-
关闭
centos_master容器,模拟master机器故障,在centos_slave执行命令测试,如果nginx显示的欢迎页面由master切换到了slave,说明进行了故障转移,vip主机进行了漂移,主机挂掉后,备用机顶上。curl 172.17.0.100
-
重新启动
centos_master容器,再次执行命令测试,看nginx欢迎页面标题,slave切换到了master,如果切换成功,说明我们配置到此成功了。curl 172.17.0.100
-
-
以上便是模拟的
nginx-keepalived双机热备机制,到此,所有的验证和预期的一致,也达到我们借助docker为基础来实现了整套基于Nginx+Keepalived高可用的方案了。
keepalived 服务命令
systemctl daemon-reload:重新加载systemctl enable keepalived.service: 设置开机自动启动systemctl disable keepalived.service:取消开机自动启动systemctl start keepalived.service:启动systemctl stop keepalived.service:停止systemctl status keepalived.service:查看服务状态