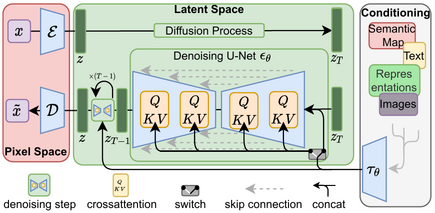
High-Resolution Image Synthesis with Latent Diffusion Models
Robin Rombach*,
Andreas Blattmann*,
Dominik Lorenz,
Patrick Esser,
Björn Ommer
* equal contribution
0.0. Adjustment: Training hyperparameters to make even better diffusion models? 0. Adjustment: Selective averaging of weights based on model key (better understanding of model weights and what they mean)
- New approach: combining the datasets together and understanding resultant weights
- New approach: CLIP/img2text parsing for each image in dataset, something about providing adversarial text->image examples to perception/object detection algorithm. Inspiration here: to isolate impact
In line 27 of main.py, change LOG_PATH to the location on your system where you want your logs to be stored. For Sherlock users, make sure this is outside your $HOME directory.
A suitable conda environment named ldm can be created
and activated with:
conda env create -f environment.yaml
conda activate ldm-shounakWe've included the following packages in the conda environment due to avoid well-known compatibility issues:
packaging==21.3
torchmetrics==0.6
This is to avoid an error involving PyTorch Lighting. This is the error (if you don't have packaging==21.3 on your system):
packaging.version.InvalidVersion: Invalid version: '0.10.1,<0.11'
and if you don't have torchmetrics==0.6 on your system:
ImportError: cannot import name 'get_num_classes' from 'torchmetrics.utilities.data'
If you ever feel the need to manually install them, first get in the conda environment, and prepend your pip install command as follows python3 -m pip install <package>==<version>].
If stuff doesn't run, make sure everything is properly synced with the conda environment:
conda env update --file environment.yaml --prune
For more information, refer to: CompVis#207 (comment) as required.
You also need to install the model checkpoint for the pre-trained autoencoder we're going to use. From the root directory of this repository:
wget -O models/first_stage_models/vq-f4/model.zip https://ommer-lab.com/files/latent-diffusion/vq-f4.zip
cd models/first_stage_models/vq-f4
unzip -o model.zipLastly, ensure that the driving data is in the right location. We will use the waymo perception dataset as an example. Specifically, the following two files should exist (with respect to the root directory):
data/autodrive/waymo/waymo_train.txt
data/autodrive/waymo/waymo_val.txt
Each text file is a list of all the image-paths that belong to the training and validation sets. For example, the first few lines of data/autodrive/waymo_train.txt looks like:
00153297.jpg
00075449.jpg
00120038.jpg
00062245.jpg
00055714.jpg
...
Notice that there aren't any other prefixes to each file path. Ensure that you don't add a prefix here. See the docstrings above AUTOWaymoTrain and AUTOWaymoValidation located inside ldm/data/autodrive.py for how these text files were created.
Furthermore, the driving dataset should exist as well in a particular location as defined in AUTOWaymoTrain and AUTOWaymoValidation located inside ldm/data/autodrive.py.
The current, hardcoded data_root is
/scratch/groups/mykel/shounak_files/DATASETS/waymo/all.
We've already downloaded a pretrained AE model (SEE ""Retrieve a Pretrained VAE (for now)"" above). Visit the original repository for more information
Configs for training a KL-regularized autoencoder on ImageNet are provided at configs/autoencoder.
Training can be started by running
CUDA_VISIBLE_DEVICES=<GPU_ID> python main.py --base configs/autoencoder/<config_spec>.yaml -t --gpus 0,
where config_spec is one of {autoencoder_kl_8x8x64(f=32, d=64), autoencoder_kl_16x16x16(f=16, d=16),
autoencoder_kl_32x32x4(f=8, d=4), autoencoder_kl_64x64x3(f=4, d=3)}.
For training VQ-regularized models, see the taming-transformers repository.
Stay tuned.
In configs/latent-diffusion/ we provide configs for training LDMs on the LSUN-, CelebA-HQ, FFHQ and ImageNet datasets.
Training can be started by running
CUDA_VISIBLE_DEVICES=<GPU_ID> python main.py --base configs/latent-diffusion/<config_spec>.yaml -t --gpus 0,Google Cloud Example Command for WAYMO:
CUDA_VISIBLE_DEVICES=0,1 python main.py --base configs/latent-diffusion/waymo-ldm-vq-4.yaml -t --gpus 0,1 -l "/home/shounak/LOGS/diffusion-for-auto/waymo" -s 42Stanford Sherlock Example Command for WAYMO:
CUDA_VISIBLE_DEVICES=0,1 python main.py --base configs/latent-diffusion/waymo-ldm-vq-4.yaml -t --gpus 0,1 -l $SCRATCH/LOGS/diffusion-for-auto/waymo -s 42Stanford Sherlock Example Command for NUIMAGES:
CUDA_VISIBLE_DEVICES=0,1 python main.py --base configs/latent-diffusion/nuimages-ldm-vq-4.yaml -t --gpus 0,1 -l $SCRATCH/LOGS/diffusion-for-auto/nuimages -s 42Stanford Sherlock Example Command for NUIMAGES+WAYMO:
CUDA_VISIBLE_DEVICES=0,1,2,3 python main.py --base configs/latent-diffusion/nuimages_waymo-ldm-vq-4.yaml -t --gpus 0,1,2,3 -l $SCRATCH/LOGS/diffusion-for-auto/nuimages_waymo -s 42Possible <config_spec> options also include
celebahq-ldm-vq-4(f=4, VQ-reg. autoencoder, spatial size 64x64x3)ffhq-ldm-vq-4(f=4, VQ-reg. autoencoder, spatial size 64x64x3),lsun_bedrooms-ldm-vq-4(f=4, VQ-reg. autoencoder, spatial size 64x64x3),lsun_churches-ldm-vq-4(f=8, KL-reg. autoencoder, spatial size 32x32x4),cin-ldm-vq-8(f=8, VQ-reg. autoencoder, spatial size 32x32x4).
Once you've downloaded or generated a model checkpoint(s), we also provide a script for sampling from unconditional LDMs. Start it via:
CUDA_VISIBLE_DEVICES=<GPU_ID> python scripts/sample_diffusion.py -r models/ldm/<model_spec>/model.ckpt -l <logdir> -n <\#samples> --batch_size <batch_size> -c <\#ddim steps> -e <\#eta> An example command to run inference on a nuimages model on Sherlock is:
CUDA_VISIBLE_DEVICES=0, python scripts/sample_diffusion.py -r $SCRATCH/LOGS/diffusion-for-auto/nuimages/2023-10-19T15-54-56_nuimages-ldm-vq-4/checkpoints/last.ckpt -l $SCRATCH/LOGS/diffusion-for-auto/nuimages_inference/ -d "nuimages" -n 16 --batch_size 4 -c 20 -e 0An example command to run inference on a merged model on Sherlock is:
CUDA_VISIBLE_DEVICES=0, python3 scripts/sample_diffusion.py -r $SCRATCH/LOGS/diffusion-for-auto/joint/0.1_nuimages-waymo_20231022-202113.ckpt -l $SCRATCH/LOGS/diffusion-for-auto/joint_inference/ -d "nuimages" -n 16 --batch_size 4 -c 20 -e 0@misc{rombach2021highresolution,
title={High-Resolution Image Synthesis with Latent Diffusion Models},
author={Robin Rombach and Andreas Blattmann and Dominik Lorenz and Patrick Esser and Björn Ommer},
year={2021},
eprint={2112.10752},
archivePrefix={arXiv},
primaryClass={cs.CV}
}
@misc{https://doi.org/10.48550/arxiv.2204.11824,
doi = {10.48550/ARXIV.2204.11824},
url = {https://arxiv.org/abs/2204.11824},
author = {Blattmann, Andreas and Rombach, Robin and Oktay, Kaan and Ommer, Björn},
keywords = {Computer Vision and Pattern Recognition (cs.CV), FOS: Computer and information sciences, FOS: Computer and information sciences},
title = {Retrieval-Augmented Diffusion Models},
publisher = {arXiv},
year = {2022},
copyright = {arXiv.org perpetual, non-exclusive license}
}
