Blog Article: https://spltech.co.uk/creating-a-vpn-with-2-factor-authentication-using-openvpn-and-docker/
This OpenVPN solution uses three separate open-source projects:
-
OpenVPN which provides the VPN functionality
-
OpenVPN-Admin which provides a UI for an administrator and users to set up VPN users.
-
The PHP gangsta — Google Authenticator project — a PHP implementation of the Google Authenticator reference app originally written for mobile.
The Community edition of OpenVPN does not provide 2 Factor authentication, therefore I had to add this feature.
So I forked the GitHub project https://github.com/Chocobozzz/OpenVPN-Admin and added extra functionality required for enabling the Google Authenticator functionality.
The new OpenVPN implementation runs as 4 docker containers:
-
googleauth docker container is needed for the 2 factor authentication. It is called internally by openvpn and the webadmin when doing the 2 factor authentication.
-
db docker container is used to store usernames/passwords.
-
OpenVPN container runs the OpenVPN server to which the OpenVPN will connect.
-
webadmin container contains the OpenVPN web administration interface where you can create VPN accounts and setup 2 Factor authentication.
Preparation:
- Install Docker
yum install -y yum-utils
yum-config-manager --add-repo https://download.docker.com/linux/centos/docker-ce.repo
yum install docker-ce docker-ce-cli containerd.io git
systemctl start docker
systemctl start containerd
systemctl enable docker
systemctl enable containerd
- Install docker-compose
curl -L "https://github.com/docker/compose/releases/download/v2.0.1/docker-compose-$(uname -s)-$(uname -m)" -o /usr/local/bin/docker-compose
chmod +x /usr/local/bin/docker-compose
Steps for setup:
git clone https://github.com/roxleopardo/OpenVPN-Docker-GoogleAuth.git
cd OpenVPN-Docker-GoogleAuth
mv .env_template .env
# Edit .env file with desired informations
docker-compose up -d
Now check that you have 4 docker containers running in your system:
docker ps -a

    CONTAINER ID        IMAGE                                  COMMAND                  CREATED             STATUS              PORTS                                        NAMES

    0917e2be15b4        openvpn-docker-googleauth_webadmin     "docker-php-entrypoi…"   2 minutes ago       Up 2 minutes        0.0.0.0:8080->80/tcp                         webadmin

    da8c0f04bdfe        openvpn-docker-googleauth_openvpn      "docker-entrypoint.s…"   2 minutes ago       Up 2 minutes        8080/tcp, 0.0.0.0:1099->1099/tcp, 8443/tcp   openvpn

    4985a54a5594        openvpn-docker-googleauth_googleauth   "docker-php-entrypoi…"   2 minutes ago       Up 2 minutes        80/tcp                                       googleauth

    970f978c37d1        mariadb                                "docker-entrypoint.s…"   2 minutes ago       Up 2 minutes        3306/tcp                                     db
To persist container running after server restart run:
docker update --restart unless-stopped <container>
To explore container run:
docker exec -t -i <container> /bin/bash
# Then you can edit OpenVPN iptables rules
vi /usr/local/bin/docker-entrypoint.sh
To access the OpenVPN web administration interface you can use:
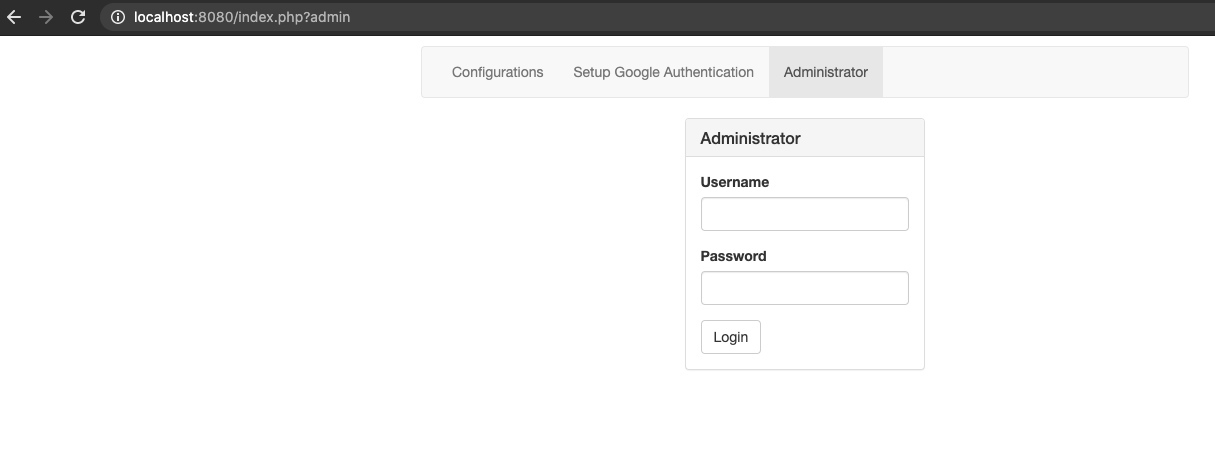
Before we can log in, we need to do the initial setup:
Go to the following URL:
http://localhost:8080/index.php?installation
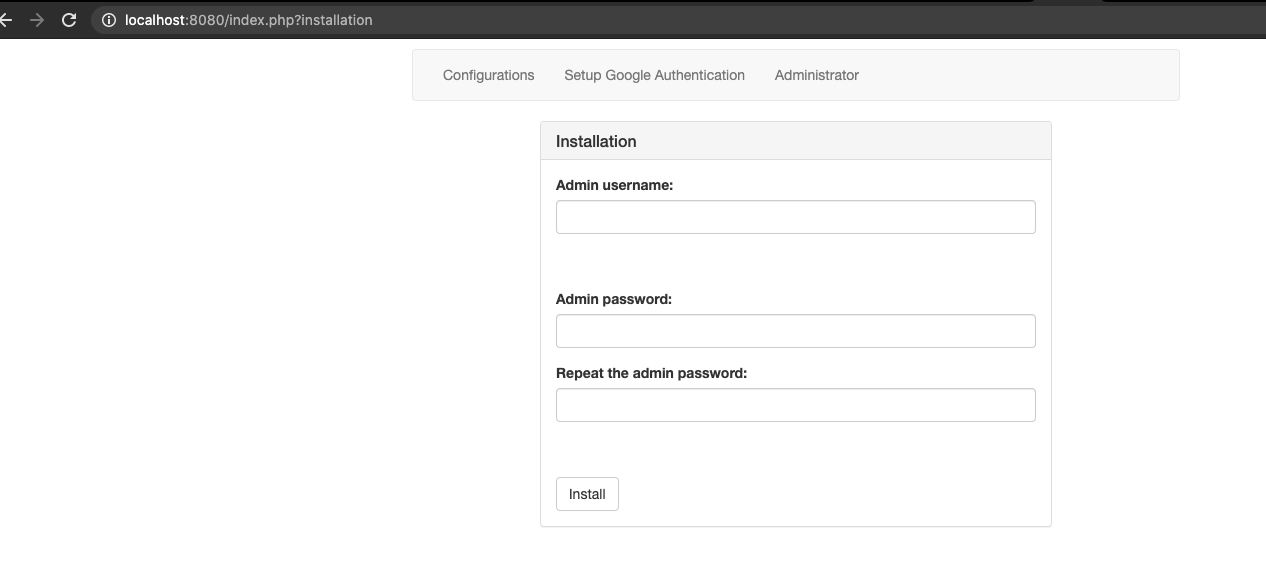
Pick an admin username and a secure password.

Now we should be able to login:

Let’s create a VPN user
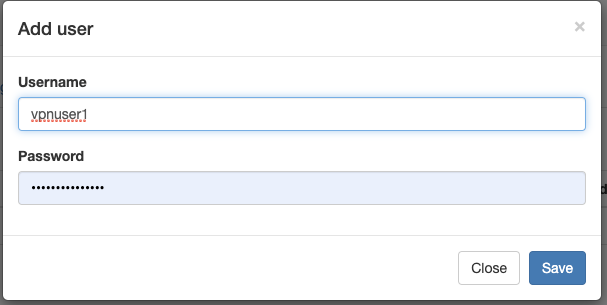
The new user should be visible in the list below:

Now that you have a VPN user, there are three steps required for setup of each VPN user.
-
Set up 2-Factor Authentication: Each VPN user needs to download the Google Authenticator app and pair the app with their VPN account. Note that it is possible to switch off 2 Factor authentication via the admin UI.
-
Download OpenVPN zip file: To be able to create a new profile, you need to download a ZIP file that contains the client certificate(.ovpn file) that you will need later when setting up the OpenVPN client.
-
Setting up the OpenVPN client
-
Navigate to the OpenVPN Web Administration Page, at http://localhost:8080
-
Click Setup Google Authentication on the navigation bar
-
Enter the credentials given by your administrator to log in.
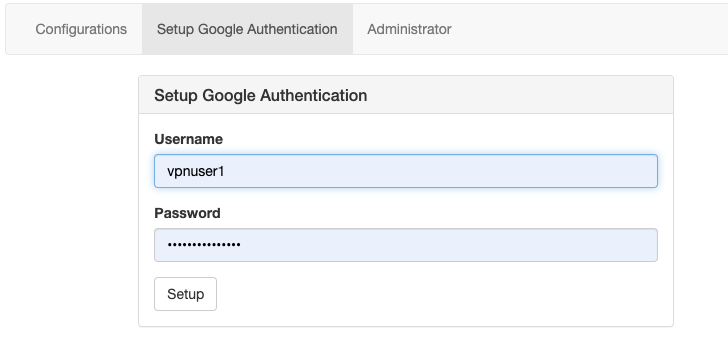
- After login you should see the following page:
At this stage, you should install the Google Authenticator app on your mobile phone.
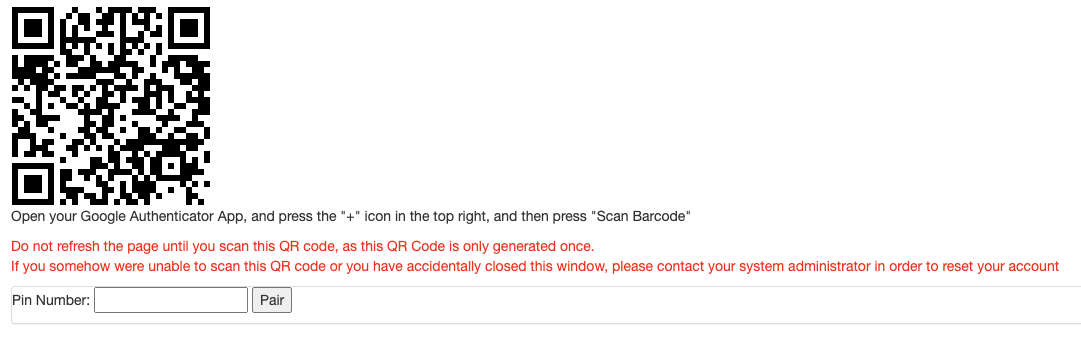
Open your Google Authenticator App, and press the ‘+’ icon in the top right and then press ‘Scan Barcode’
Point your camera at the QR code and you should see the profile appear with your details.
- Next you need to type the 6 digit PIN number you see in the Authenticator app. If it all goes well, the pairing will succeed and you will see a “Pairing succeeded” message. If you see an error instead, it is possible that you were too slow typing the PIN number. Try again.
Download OpenVPN zip file
-
Navigate to the OpenVPN Web Administration Page, at http://localhost:8080
-
Click Configurations on the navigation bar
-
Enter the VPN user credentials given by your administrator to log in.
-
Choose the correct OS from the dropdown: Linux, OS X(MacOS) or Windows
-
Click “Get Configuration Files”. You will be downloading a ZIP file with the required client configuration for OpenVPN. Keep it in a safe folder. You will need it soon.
I am assuming at this stage that you have already completed the steps above and your VPN is accessible via a public IP address on a given port. The VPN IP address will be stored in the client certificates that we downloaded earlier.
Download the OpenVPN client for your operating system. Ensure that you download version 3 or above. Version 2 will not work.
MacOS Download: https://openvpn.net/downloads/openvpn-connect-v3-macos.dmg
Windows Download: https://openvpn.net/downloads/openvpn-connect-v3-windows.msi
Install the OpenVPN client.
After installing the OpenVPN client, you should see the following screen:
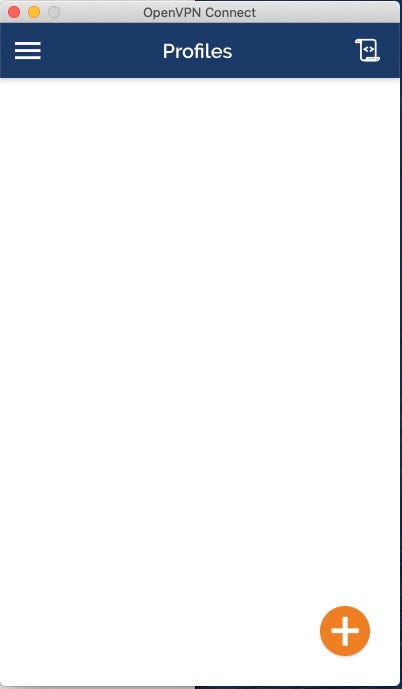
Click the + sign, and select file.
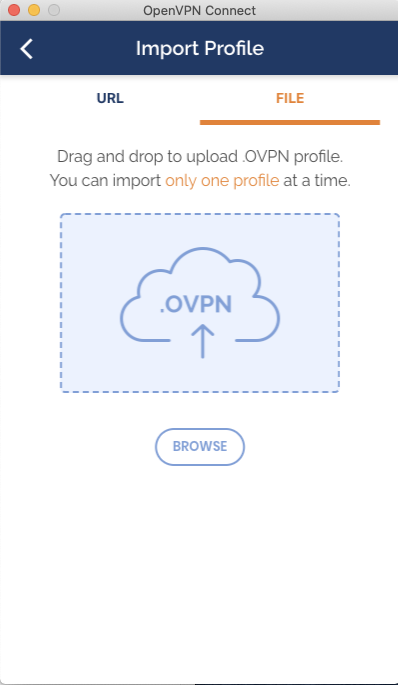
Select the client.ovpn file you downloaded in the earlier step(don’t forget to unzip).
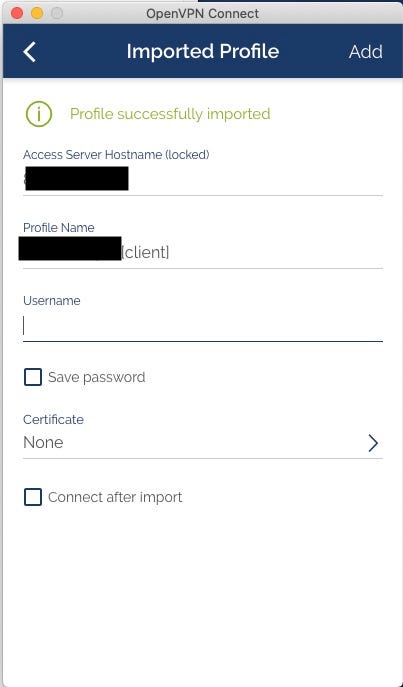
At this stage, you need to supply your VPN credentials. Click Save Password. But remember that every time you log in, if you don’t disable 2 Factor Authentication you will need to add your 6 digits PIN number to the end of your password. This is slightly annoying, but worth it because of the extra security.
Click Save when you are done.
And that’s it, you now have a VPN profile setup ready to connect.

Every time you try to connect to the VPN you will need to supply a six-digit PIN that is everchanging. This PIN is available from the google authenticator app.
-
Just before you login take note of the latest PIN number(you need to be quick)
-
Click the toggle button on the left-hand side to connect to the VPN
-
At this stage you will be prompted for your password.
Enter your password and add at the end of your password without any extra spaces the PIN number from step 1. Click OK
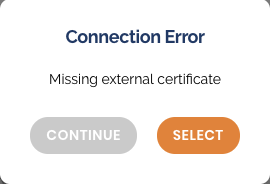
- You will see a Connection Error message. Click “Continue”
- If all goes well, you are connected to the VPN!
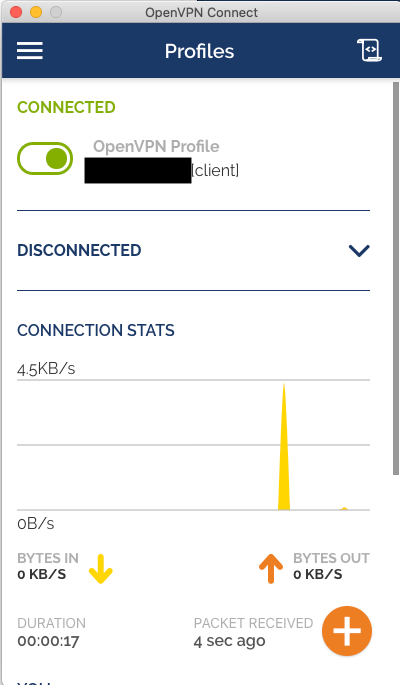
And a new world opens up! Hope you enjoy it.