pSCT optical alignment using defocused optical images of a star at the focal plane
Python scripts for the alignment of the pSCT Optical System (OS) using defocused images of a bright star are in this repo; they have grown over the years to adapt the evolving need of the alignment. There is a certain level of automation, but the scripts are not fully smart, users should be aware. The procedure for the alignment of the pSCT OS using defocused images of a bright star can be found in this reference Adams et al., 2020, Proc. SPIE 11488, Optical System Alignment, Tolerancing, and Verification XIII, 1148805 (20 August 2020); doi: 10.1117/12.2568134 link here: https://spie.org/Publications/Proceedings/Paper/10.1117/12.2568134
As of 2021, the pSCT Optics team is able to maintain a OS configuration with a 3-ring defocused image from a bright star to break the degeneracy of images at the focal plane from each individual mirror panel. The associated alignment procedure aims to maintain the optical PSF at different elevation, azimuth, and temperature. This procedure is in two steps: 1) maintaining an ideal defocused pattern of rings at different elevation, azimuth, and temperature; and 2) maintainig an ideal optical PSF from moving panels from defocused configuration to focused configuration (collapse the rings). The script focal_plane.py is automated to some degree to identify the ring patterns for P1-S1 panels (inner ring), P2-S1 panels (middle ring), and P2-S2 panels (outer ring), and characterize all centroids in these patterns (centroid coordinates and shape in the CCD camera and flux etc.).
For earlier work (done in 2019) to identify a panel motion in the focal plane image in order to form the defocused ring patterns, first run focal_plane.py to create catalog of centroids, and then identify by eye the number (as shown in the pdf for centroids that are not common in both imamges) of the first (green) centroid and the second (yellow) centroid, finally run find_motion_focal_plane.pyto produce a clean output of the information of these two centroid.
sextractor, sewpy, numpy, pandas, matplotlib, scikit-learn (for ring radii clustering)
Ideally, opencv2.4 (cv2)
** This code processes the raw images using Sextractor, create catalog of centroids, compare two images to identify centroids that moved, and identify ring patterns associated with panels in the defocused configuration. It can also just search for centroids within a rectangle, useful for optical PSF measurement. **
To identify and characterize all 3 ring patterns, run the script with the -r option, e.g.,
python focal_plane.py --show rawfile -r
One specific example is shown below:
python focal_plane.py --show ~/Pictures/Aravis/The\ Imaging\ Source\ Europe\ GmbH-37514083-2592-1944-Mono8-2021-04-30-20\:00\:16.raw -r --THRESH 3 -p 1875 1072 --DEBLEND_MINCONT 0.002
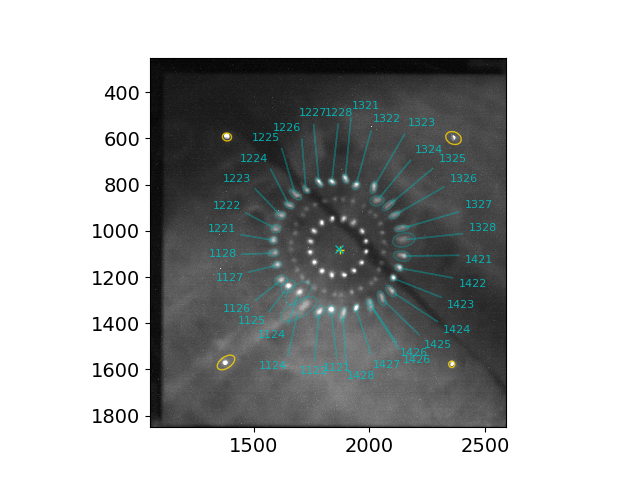
An example showing one (outer P2-S2) of the three ring patterns identified using the command above.

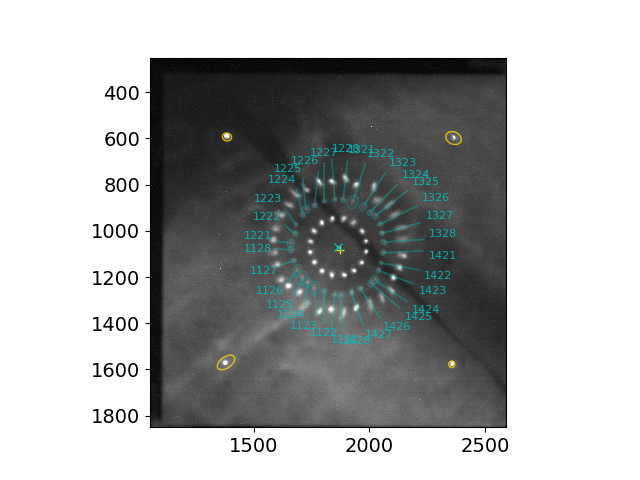
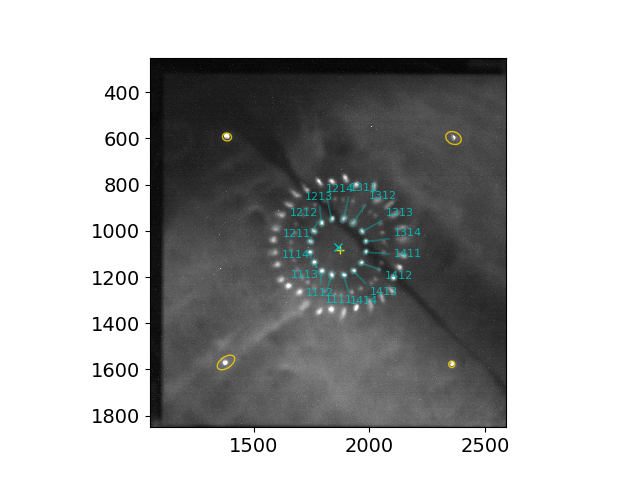
The same example showing the middle (P2-S1) and inner (P1-S1) ring patterns identified at the same time.


To identify and characterize only 2 ring patterns (inner and middle, e.g., when the secondary mirror is aligned, i.e., S2s aligned to S1s), run the script with the options -r and --skip_s2, e.g.,
python focal_plane.py --show rawfile -r --skip_s2
Similarly, to identify and characterize only 1 ring pattern (inner, e.g., when the middle P2 ring is collapsed to the center), run the script with the options -r and --skip_s2 and --skip_p2, e.g.,
python focal_plane.py --show rawfile -r --skip_p2 --skip_s2
In all of the above situations, important parameters for sextractor are often needed, and eyeballed coordinates for the ring center may be needed using the option -p [center_x] [center_y], e.g.,
python focal_plane.py --show ~/Pictures/Aravis/The\ Imaging\ Source\ Europe\ GmbH-37514083-2592-1944-Mono8-2021-04-30-22\:02\:40.raw -r --THRESH 3 -p 1840 1060 --skip_s2 --DEBLEND_MINCONT 0.0001
In this example, -p 1840 1060 is specified from hovering the mouse around the eyeballed center in a poped-up image from a previous attempt without this arguement, --THRESH 3 and -DEBLEND_MINCONT 0.0001 are used in combination to identify a very out-of-focus image from one S2 panel, which appears extended and dim and close to a neighboring image.
**A few important calibration values are hard coded: **
PIX2MM = 0.241
CM_REF
LED_REF
**The CM_REF and LED_REF values need to be updated when the CCD camera is touched; all values need to be updated if the objective lens is replaced; LED_REF needs to be updated if the LEDs (on the screen) are moved. **
====
For early work, to isolate unique centroids in image1 and image2 if the distance between them is larger than min_dist, make "diff_cat" plot with unique sources in the 1st image labelled in green, and those in the 2nd image labelled in yellow. Common images are shown as red (or not shown in the "diff_cat" plots).
The easiest example to run focal_plane.py is
python focal_plane.py rawfile1 rawfile2 --DETECT_MINAREA DETECT_MINAREA --THRESH THRESH --min_dist MIN_DIST
e.g.,
python focal_plane.py The\ Imaging\ Source\ Europe\ GmbH-37514083-2592-1944-Mono8-2019-09-16-01\:25\:51.raw The\ Imaging\ Source\ Europe\ GmbH-37514083-2592-1944-Mono8-2019-09-16-01\:26\:42.raw --min_dist 20 --THRESH 2 --DETECT_MINAREA 80
====
The most important parameters are listed:
-
min_dist: the minimum distance between two centroid to identify motion, this will depend on how large a motion the panel was moved. If panel motion is large, can use something like 10 to 20 (pixels) to reduce false alarms (which will happen anyways); if a panel motion is small, use small values as low as 2 pixels.
-
THRESH: Sextractor image centroid analysis threshold, if you see your suspect centroid but it's not identified, lower this number. Depending on the light condition and exposure of the image, something between 2 to 8 have been useful, in extreme cases may need values out of this range.
-
DETECT_MINAREA: Sextractor minimum number of pixels above threshold triggering detection.
Output:
Some useful information are printed on
Output files are dumped into the sub directory ./data, and the most important ones that enters the Excel file for motion calculation (plan to implement into the scripts here) are:
data/res_focal_plane_YYYY_MM_DD_HH_MM_SS_ring_search_vvv_P1.csv data/res_focal_plane_YYYY_MM_DD_HH_MM_SS_ring_search_vvv_P2.csv data/res_focal_plane_YYYY_MM_DD_HH_MM_SS_ring_search_vvv_S2.csv
PNG files are also saved to verify the panel ID labeling, e.g., data/res_focal_plane_YYYY_MM_DD_HH_MM_SS_ring_search_vvv_P1.png
As of 2021 May, 4 LEDs are attached to the screen to mark the position of the camera structure (the designated 8 LEDs on the flange of the camera are not yet plugged in). These LEDs are also characterized. The LED centroids info is saved in a file named data/res_focal_plane_YYYY_MM_DD_HH_MM_SS_LEDs.csv
==== For earlier work to compare frames and search for images that moved:
4 text files, 2 fits files, 4 pdf files, and 1 gif file will be generated. With the default names, all files start with the prefix "res_focal_plane", followed by some time stamps and keywords to differentiate them.
"res_focal_plane_YYYY_MM_DD_HH_MM_SS_cat1.txt" contains all centroids identified in image 1, the first row is the header: X_IMAGE Y_IMAGE FLUX_ISO FLUX_RADIUS FLAGS A_IMAGE B_IMAGE THETA_IMAGE
"res_focal_plane_YYYY_MM_DD_HH_MM_SS_cat1.pdf" is an image that shows all these centroids, red color indicates common centroid (within --min_dist) in image 1 and 2, and green ones indicate those only exist in image 1, and potentially one of those correspond to the image from the panel of interest.
"res_focal_plane_YYYY_MM_DD_HH_MM_SS_cat2.txt" and "res_focal_plane_YYYY_MM_DD_HH_MM_SS_cat2.pdf" are the same for image 2, note that the color for those centroids that only exist in image 2 will be marked in yellow (instead of green for image 1).
"res_focal_plane_YYYY_MM_DD_HH_MM_SS_diff_cat1.txt" (note the extra "diff" in the file name) contains all the centroids that only exist in image 1 (hence the "diff"), columns are the same ones: X_IMAGE Y_IMAGE FLUX_ISO FLUX_RADIUS FLAGS A_IMAGE B_IMAGE THETA_IMAGE
"res_focal_plane_YYYY_MM_DD_HH_MM_SS_diff_cat1.pdf" suppreses the common red centroids in the pdf without the "diff", and only shows the unique centroids, candidates of interest, in green and with numbers (these numbers corresponds to the row number, skipping header and start from 0, in the "res_focal_plane_YYYY_MM_DD_HH_MM_SS_diff_cat1.txt" text file).
Same goes for the files with strings "diff_cat2" for image 2.
"res_focal_plane_YYYY_MM_DD_HH_MM_SS_YYYY_MM_DD_HH_MM_SS_anime.gif" (now the two timestamps correspond to the timestamps in raw file name 1 and raw file name 2) shows an animated gif to assist with identification of centroid motion corresponding to a panel motion.
This is done in two steps: step 1 to analyze a single spot centered at coordinates in the CCD camera center_x center_y (in pixels; over a box with a default half width is 50 pixels):
python focal_plane.py --show rawfile --psf -p [center_x] [center_y]
step 2 to fit a 2D gaussian plus a constant background in a box (default half width is 50 pixels):
python optical_psf.py rawfile --catalog ./data/res_focal_plane_YYYY_MM_DD_HH_MM_SS_cat1.txt
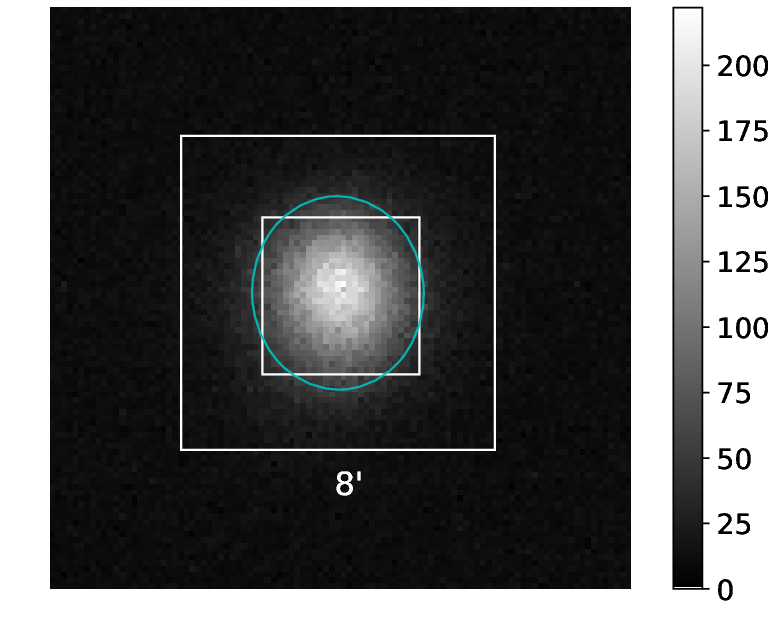
The above script will produce a plot that looks like the example below, and print the optical PSF to standard output.
                    x : 49.1
                    y : 48.6
                    $\sigma_x$ : 8.2 pix = 2.0 mm = 1.22 '
                    $\sigma_y$ : 9.3 pix = 2.2 mm = 1.38 '
                    ========
                    The optical PSF (2 x max{$\sigma_x$, $\sigma_y$}) is:
                    2.75 '
                    ========
focal_plane.py has been expanded to search for ring patters, which is frequently used for optical alignment. To search for a ring as of Nov 2019, run like:
python focal_plane.py [path_to/]rawfile -r --ring_rad 105 --ring_frac 0.25 -p 1913 1010 --ring_tol 0.2 --show
Note that it is not a very smart algorithm at figuring out where the center of the ring is; as early work involves many centroid that forms a far-from-ideal ring.
To only search for centroids near the center, can use --search_xs and --search_ys
** This code is run after focal_plane.py, if you believe you found two centroids that correspond to the same panel, use the green number in diff_cat1 image for this centroid and the yellow number in diff_cat2 image, and run this with -1 and -2 options.
The easiest way to run find_motion_focal_plane.py is
python find_motion_focal_plane.py rawfile1 rawfile2 -1 centroid_number1 -2 centroid_number2
e.g.,
python find_motion_focal_plane.py The\ Imaging\ Source\ Europe\ GmbH-37514083-2592-1944-Mono8-2019-09-16-01\:25\:51.raw The\ Imaging\ Source\ Europe\ GmbH-37514083-2592-1944-Mono8-2019-09-16-01\:26\:42.raw -1 11 -2 20
Full use of focal_plane.py can be found using:
python focal_plane.py -h
usage: focal_plane.py [-h] [--DETECT_MINAREA DETECT_MINAREA]
                      [--DETECT_MINAREA_S2 DETECT_MINAREA_S2]
                      [--THRESH THRESH] [--DEBLEND_MINCONT DEBLEND_MINCONT]
                      [--kernel_w KERNEL_W] [--min_dist MIN_DIST]
                      [--save_filename_prefix1 SAVE_FILENAME_PREFIX1]
                      [--save_filename_prefix2 SAVE_FILENAME_PREFIX2]
                      [--savefits_name1 SAVEFITS_NAME1]
                      [--saveplot_name1 SAVEPLOT_NAME1]
                      [--savefits_name2 SAVEFITS_NAME2]
                      [--saveplot_name2 SAVEPLOT_NAME2]
                      [--savecatalog_name1 SAVECATALOG_NAME1]
                      [--savecatalog_name2 SAVECATALOG_NAME2]
                      [--diffcatalog_name1 DIFFCATALOG_NAME1]
                      [--diffcatalog_name2 DIFFCATALOG_NAME2]
                      [--diffplot_name1 DIFFPLOT_NAME1]
                      [--diffplot_name2 DIFFPLOT_NAME2] [--datadir DATADIR]
                      [--gifname GIFNAME] [--cropx1 CROPX1] [--cropx2 CROPX2]
                      [--cropy1 CROPY1] [--cropy2 CROPY2]
                      [-o MOTION_OUTFILE_PREFIX] [--nozoom] [-v] [-c] [-s]
                      [-r] [--p1rx P1RX] [--clustering] [-C CENTER CENTER]
                      [-p PATTERN_CENTER PATTERN_CENTER] [--vvv_tag VVV_TAG]
                      [--ring_rad RING_RAD] [--ring_tol RING_TOL]
                      [--phase_offset_rad PHASE_OFFSET_RAD]
                      [--ring_frac RING_FRAC] [--ring_file RING_FILE]
                      [--labelcolor LABELCOLOR]
                      [--search_xs SEARCH_XS SEARCH_XS]
                      [--search_ys SEARCH_YS SEARCH_YS]
                      [--quick_ring_check QUICK_RING_CHECK] [--show]
                      [--get_center] [--skip_p2] [--skip_s2] [--psf]
                      [--psf_search_width PSF_SEARCH_WIDTH]
                      [--LED_search_xs LED_SEARCH_XS LED_SEARCH_XS]
                      [--LED_search_ys LED_SEARCH_YS LED_SEARCH_YS]
                      rawfile1 [rawfile2]

Compare two raw images of stars at the focal plane

positional arguments:
  rawfile1
  rawfile2

optional arguments:
  -h, --help            show this help message and exit
  --DETECT_MINAREA DETECT_MINAREA
                        +++ Important parameter +++: Config param for
                        sextractor, our default is 30.
  --DETECT_MINAREA_S2 DETECT_MINAREA_S2
                        +++ Important parameter +++: Config param for
                        sextractor for P2S2 (outer ring) images, our default
                        is 500.
  --THRESH THRESH       +++ Important parameter +++: Config param for
                        sextractor, our default is 6.
  --DEBLEND_MINCONT DEBLEND_MINCONT
                        +++ Important parameter +++: Config param for
                        sextractor, our default is 0.01 The smaller this
                        number is, the harder we try to deblend, i.e. to
                        separate overlaying objects.
  --kernel_w KERNEL_W   If you have cv2, this is the median blurring kernel
                        widthour default is 3 (for a 3x3 kernel).
  --min_dist MIN_DIST   +++ Important parameter +++: Minimum distance we use
                        to conclude a centroid is common in both imagesour
                        default is 20 pixels.
  --save_filename_prefix1 SAVE_FILENAME_PREFIX1
                        File name prefix of the output files, this will
                        automatically populate savefits_name1, saveplot_name1,
                        savecatalog_name1, and diffcatalog_name1default is
                        None.
  --save_filename_prefix2 SAVE_FILENAME_PREFIX2
                        File name prefix of the output files, this will
                        automatically populate savefits_name2, saveplot_name2,
                        savecatalog_name2, and diffcatalog_name2default is
                        None.
  --savefits_name1 SAVEFITS_NAME1
                        File name of the fits for the first image if you want
                        to choose, default has the same name as raw.
  --saveplot_name1 SAVEPLOT_NAME1
                        File name of the image (jpeg or pdf etc) for the first
                        image if you want to choose, default is not to save
                        it.
  --savefits_name2 SAVEFITS_NAME2
                        File name of the fits for the second image if you want
                        to choose, default has the same name as raw.
  --saveplot_name2 SAVEPLOT_NAME2
                        File name of the image (jpeg or pdf etc) for the
                        second image if you want to choose, default is not to
                        save it.
  --savecatalog_name1 SAVECATALOG_NAME1
                        File name of the ascii catalog derived from the first
                        image, default is not to save it.
  --savecatalog_name2 SAVECATALOG_NAME2
                        File name of the ascii catalog derived from the second
                        image, default is not to save it.
  --diffcatalog_name1 DIFFCATALOG_NAME1
                        File name of the ascii catalog for sources only in the
                        first image, default is diff_cat1.txt.
  --diffcatalog_name2 DIFFCATALOG_NAME2
                        File name of the ascii catalog for sources only in the
                        second image, default is diff_cat2.txt.
  --diffplot_name1 DIFFPLOT_NAME1
                        File name of the image catalog for sources only in the
                        first image, default is diff_cat1.pdf.
  --diffplot_name2 DIFFPLOT_NAME2
                        File name of the image catalog for sources only in the
                        second image, default is diff_cat2.pdf.
  --datadir DATADIR     Folder to save all output files. Default is ./data
                        (ignored by git)
  --gifname GIFNAME     File name to save gif animation.
  --cropx1 CROPX1       zooming into xlim that you want to plot, use None for
                        no zoom, default is (1650, 2100).
  --cropx2 CROPX2       zooming into xlim that you want to plot, use None for
                        no zoom, default is (1650, 2100).
  --cropy1 CROPY1       zooming into ylim that you want to plot, use None for
                        no zoom, default is (1250, 800).
  --cropy2 CROPY2       zooming into ylim that you want to plot, use None for
                        no zoom, default is (1250, 800).
  -o MOTION_OUTFILE_PREFIX, --motion_outfile_prefix MOTION_OUTFILE_PREFIX
                        File name prefix of the output catalog to calculate
                        motion.
  --nozoom              Do not zoom/crop the image.
  -v, --verbose
  -c, --clean           Whether or not to delete centroid with flag > 16.
  -s, --single          Only analyze a single image.
  -r, --ring            Try to find a ring.
  --p1rx P1RX           This is just for S1 alignment, P1 rx applied to check
                        for ghost images due to S1 misalignment. Only a few
                        values are valid.
  --clustering
  -C CENTER CENTER, --center CENTER CENTER
                        Center coordinate X_pix Y_pix.
  -p PATTERN_CENTER PATTERN_CENTER, --pattern_center PATTERN_CENTER PATTERN_CENTER
                        Center coordinate for ring pattern X_pix Y_pix.
  --vvv_tag VVV_TAG     A string to identify which ring.
  --ring_rad RING_RAD   Radius in pixels for ring pattern.
  --ring_tol RING_TOL
  --phase_offset_rad PHASE_OFFSET_RAD
  --ring_frac RING_FRAC
                        Fraction (1-frac, 1+frac)*radius that you accept a
                        centroid as part of a ring pattern.
  --ring_file RING_FILE
                        File name for ring pattern.
  --labelcolor LABELCOLOR
                        Label color.
  --search_xs SEARCH_XS SEARCH_XS
                        Xmin and Xmax to list all centroid in a box.
  --search_ys SEARCH_YS SEARCH_YS
                        Ymin and Ymax to list all centroid in a box.
  --quick_ring_check QUICK_RING_CHECK
                        Do ring check; dubs as file name for ring pattern.
  --show
  --get_center
  --skip_p2
  --skip_s2
  --psf
  --psf_search_width PSF_SEARCH_WIDTH
  --LED_search_xs LED_SEARCH_XS LED_SEARCH_XS
                        Xmin and Xmax to search for LED centroid in a box.
  --LED_search_ys LED_SEARCH_YS LED_SEARCH_YS
                        Ymin and Ymax to search for LED centroid in a box.
Full use of find_motion_focal_plane.py and be found using:
python find_motion_focal_plane.py -h
usage: find_motion_focal_plane.py [-h] [--diffcatalog_name1 DIFFCATALOG_NAME1]
                                  [--diffcatalog_name2 DIFFCATALOG_NAME2]
                                  [-1 IND1] [-2 IND2]
                                  [-o MOTION_OUTFILE_PREFIX]
                                  [--saveplot_name1 SAVEPLOT_NAME1]
                                  [--saveplot_name2 SAVEPLOT_NAME2]
                                  [--cropx1 CROPX1] [--cropx2 CROPX2]
                                  [--cropy1 CROPY1] [--cropy2 CROPY2]
                                  rawfile1 rawfile2

Compare two raw images of stars at the focal plane

positional arguments:
  rawfile1
  rawfile2

optional arguments:
  -h, --help            show this help message and exit
  --diffcatalog_name1 DIFFCATALOG_NAME1
                        File name of the ascii catalog for sources only in the
                        first image. If not provided, will use default that
                        focal_plane.py usesi.e.,
                        res_focal_plane_YYYY_MM_DD_HH_MM_SS_diff_cat1.txt
  --diffcatalog_name2 DIFFCATALOG_NAME2
                        File name of the ascii catalog for sources only in the
                        second image. If not provided, will use default that
                        focal_plane.py usesi.e.,
                        res_focal_plane_YYYY_MM_DD_HH_MM_SS_diff_cat2.txt
  -1 IND1, --ind1 IND1  Index of the centroid in the first catalog
  -2 IND2, --ind2 IND2  Index of the centroid in the second catalog
  -o MOTION_OUTFILE_PREFIX, --motion_outfile_prefix MOTION_OUTFILE_PREFIX
                        File name prefix of the output catalog to calculate
                        motion.
  --saveplot_name1 SAVEPLOT_NAME1
                        File name of the image (jpeg or pdf etc) for the first
                        image.
  --saveplot_name2 SAVEPLOT_NAME2
                        File name of the image (jpeg or pdf etc) for the
                        second image if you want to choose.
  --cropx1 CROPX1       zooming into xlim that you want to plot, use None for
                        no zoom, default is (1650, 2100).
  --cropx2 CROPX2       zooming into xlim that you want to plot, use None for
                        no zoom, default is (1650, 2100).
  --cropy1 CROPY1       zooming into ylim that you want to plot, use None for
                        no zoom, default is (1250, 800).
  --cropy2 CROPY2       zooming into ylim that you want to plot, use None for
                        no zoom, default is (1250, 800).
python optical_psf.py -h
usage: optical_psf.py [-h] [--catalog CATALOG]
                      [--psf_search_halfwidth PSF_SEARCH_HALFWIDTH]
                      rawfile

Compute optical PSF

positional arguments:
  rawfile

optional arguments:
  -h, --help            show this help message and exit
  --catalog CATALOG
  --psf_search_halfwidth PSF_SEARCH_HALFWIDTH
** Utilities to calculate rx ry resp matrix given (dx1, dy1, rx, dx2, dy2, ry), where dx1 and dy1 is the motion of centroid when panel rx is introduced, and dx2 and dy2 is the motion of centroid when panel ry is introduced. Or calculate motion needed to go to center and pattern position for a given panel, need to provide current coordinates in camera x and y. **
Currently (Nov 2019) the default M1 resp matrix is "M1_matirx_fast.yaml", it is calculated using the collective motions of P1 and P2 rings, respectively, on Nov 14, 2019, in Rx and Ry for every panel in the ring.
Ususally, a reference image is chosen with panels in a ring pattern, then all panels execute a delta rx (x rotation) motion and take an image (let's call this image Rx), similarly for image Ry. The "fast" way of calculating matrices for every panel in P1 or P2 ring using such images im_Ref, im_Rx, im_Ry is:
python calc_motion.py --files im_Ry im_Ref im_Rx --ry Ry --rx Rx --resp out_matrix.yaml
We recommend you to test first with dry_run, this is safe, will not overwrite any files, and will perform sanity check (that recovers the introduced rx ry motion).
python calc_motion.py --files im_Ry im_Ref im_Rx --ry Ry --rx Rx --dry_run
To calculate the rx ry motion needed to go from a pattern position to a center position (aka ring to focus), can run like below (resp mat has to be in the file).
python calc_motion.py --p2c --sector 'P1' --pattern_radius 280 --resp_file M1_matirx_fast.yaml
Should expect very small rx motion and almost entirely ry motion.
- To calculate rx ry response matrix, run it like:
python calc_motion.py 1424 --dx1 -12.4 --dy1 16.5 --rx 0.32 --dx2 19.4 --dy2 15.1 --ry 0.32
You'll be given a chance to save it to the default yaml file rx_ry_matrix.yaml.
- For those panels that already have matrices in the file "rx_ry_matrix.yaml", to calculate the motion needed to move the image to the center of the FoV, run it like:
python calc_motion.py 1328 -c -x 1444 -y 877
where x and y are the current centroid coordinates.
- Similarly, if a panel has resp matrix in the file, to calculate the rx ry motion needed to move the image to the "pattern position" where all panels are spread out (default file is pattern_position.txt), run like:
python calc_motion.py 1328 -p -x 1444 -y 877
