Enterprises today are exploring ways to upgrade existing applications to harvest value from machine learning. Business have lots of structured and unstructured data already. Machine learning is not a one time activity where you train a model and it can live forever. There are things such as concept drift that makes the model stale. The stale model has to be minimally periodically retrained with fresh batch of data. To continue to get value out of machine learning models we need an architecture and process in place to repeatedly and consistently train new models and retrain existing models with new data.
In the workshop, we will discuss how you can build an end to end pipeline for machine learning. Machine learning is more than building a cool model. It involves tasks that includes data sourcing, data ingestion, data transformation, pre-processing data for use in training, training a model and hosting the model.
AWS provides several services to address specific needs of different stages of machine learning pipeline. The workshop have multiple labs that focus on different stages of machine learning pipeline. We will be demonstrating the overall flow and design of machine learning pipeline
This is a self-paced workshop which will guide you through the complete Machine learning process for a Car evaluation use case .
In this workshop we’ll use the Car Evaluation Data Set from UCI’s Machine Learning Repository. Our goal is to predict the acceptability of a specific car, amongst the values of: unacc, acc, good, and vgood. At the core, it is a classification problem and we will train a machine learning model using Amazon SageMaker’s built-in XGBoost algorithm. However, the dataset only contains six categorical string features - buying, maint, doors, persons, lug_boot, and safety and XGBoost can only process data that is in numerical format. Therefore we will pre-process the input data using SparkML StringIndexer followed by OneHotEncoder to convert it to numerical format. We will also apply a post-processing step on the prediction result using SparkML IndexToString to convert our inference output back to their original labels that correspond to the predicted condition of the car.
We’ll write our SparkML pre-processing and post-processing scripts once, and apply them for processing training data using AWS Glue. Then, we will serialize and capture the SparkML artifacts produced by AWS Glue to Amazon S3 using MLeap. This is so that they can be reused during inference for real-time requests using the SparkML Serving container that Amazon SageMaker provides. Finally, we will deploy the pre-processing, inference, and post-processing steps in an inference pipeline and will execute these steps in order for each real-time inference request.
The workshop is using services including Amazon S3, AWS Glue , Amazon Sagemaker , AWS Amplify and AWS Cloud9
This workshop is split into three sections :
Section 1 : Data Engineering In Lab 1, we will source the dataset from external source on internet, bring it to S3 . In enterprises the equivalent data may be already present in some RDS, NoSQL or Data-warehouse system. The data can be ingested as a one time full-load as a batch or as a real-time stream of data. Depending on the usecase, there may be a need to do both batch and stream or just a batch or a stream. In the current workshop, we will do a one full-load of data into S3.In this Lab, you will use Glue Data Catalog to define schema on the data stored in S3 . You will perform ETL on the data to prepare it for the machine learning process.
Section 2 : Machine Learning At this point you should have all you files in an AWS S3 bucket ready for Data Science work. We will use Amazon Sagemaker for model training and inference.
Section 3 : Inference on a Single Page Application Once the machine learning process is complete ,you should be able to run the inference on a Single Page Application using AWS Amplify .
The labs are sequential and participants will have to complete them in the sequence. Each lab has references to resources and instruction to help you complete the lab successfully.
There are some prerequisites to kick-off the workshop as mentioned below :
The code and instructions in this workshop assume only one participant is using a given AWS account at a time. If you attempt sharing an account with another participant, you will encounter naming conflicts for certain resources. You can work around this by either using a suffix in your resource names or using distinct Regions, but the instructions do not provide details on the changes required to make this work. You need to have an IAM user with administrative rights to be able to run the workshop. You may want to consider setting up a separate AWS account for this workshop to ensure you have administrative rights and clean up the resources once you are finished
You can use US East (N. Virginia), US West (Oregon), or EU (Ireland) for this workshop. Each supports the complete set of services covered in the material. Consult the Region Table to determine which services are available in a Region.
The instructions of this lab are across the github Readme and the notebook itself . Make sure you read through the instructions carefully .
Jupyter is an open-source web application that allows you to create and share documents that contain live code, equations, visualizations and narrative text. Uses include: data cleaning and transformation, numerical simulation, statistical modeling, data visualization, machine learning, and much more. With respect to code, it can be thought of as a web-based IDE that executes code on the server it is running on instead of locally.
There are two main types of "cells" in a notebook: code cells, and "markdown" cells with explanatory text. You will be running the code cells. These are distinguished by having "In" next to them in the left margin next to the cell, and a greyish background. Markdown cells lack "In" and have a white background. In the screenshot below, the upper cell is a markdown cell, while the lower cell is a code cell:

To run a code cell, simply click in it, then either click the Run Cell button in the notebook's toolbar, or use Control+Enter from your computer's keyboard. It may take a few seconds to a few minutes for a code cell to run. You can determine whether a cell is running by examining the In[]: indicator in the left margin next to each cell: a cell will show In [*]: when running, and In [a number]: when complete.
Please run each code cell in order, and only once, to avoid repeated operations. For example, running the same training job cell twice might create two training jobs, possibly exceeding your service limits.
We'll start by creating a SageMaker notebook instance, which we will use for the other workshop modules.
- Make sure you are on the AWS Management Console home page. In the Find Services search box, type SageMaker. The search result list will populate with Amazon SageMaker, which you should now click. This will bring you to the Amazon SageMaker console homepage.

-
In the upper-right corner of the AWS Management Console, confirm you are in the desired AWS region. Select N. Virginia, Oregon, Ohio, or Ireland.
-
To create a new notebook instance, click the Notebook instances link on the left side, and click the Create notebook instance button in the upper right corner of the browser window.

- Type smworkshop-[First Name]-[Last Name] into the Notebook instance name text box, and select ml.m5.xlarge for the Notebook instance type.

- In the Permissions and encryption section, choose Create a new role in the IAM role drop down menu. In the resulting pop-up modal, select Any S3 bucket. Click Create role.

- You will be taken back to the Create Notebook instance page. Now you should see a message saying "Success! You created an IAM role."

- Click Create notebook instance at the bottom.
- Wait for the server status to change to InService. This will take several minutes, possibly up to ten but likely much less.

- Click Open Jupyter. You will now see the Jupyter homepage for your notebook instance. The notebook instance will be empty and will look like below

The operating system of Jupyter Notebook server of SageMaker is a customized Linux server specially
tuned for machine learning environment. You can directly access this Linux server using a web-based Terminal interface that Jupyter Notebook server provides. To run it, Go to Open Jupyter-> Click on “New” -> Terminal

In Terminal, run below Linux shell commands to download a sample Jupyter notebook

cd SageMaker/
git clone https://github.com/Aashmeet/ml-end-to-end-workshop
After cloning the git, click the top-left Jupyter icon to go back to the notebook. Clicking Refresh icon on
the top-right corner to see a newly created folder (ai-ml-workshop). Click the folder and verify that the notebook exists.

Open the notebook in the folder "Car Evaluation" and now you are ready to start working on the three parts of the workshop.
Data scientists and developers spend a large portion of their time cleaning and preparing data before training machine learning (ML) models. This is because the real-world data cannot be used directly. There may be missing values, duplicate information, or multiple variations of the same information that need to be standardized. Additionally, data often needs to be transformed from one format to another so it can be used by machine learning algorithms. For example, the XGBoost algorithm can only accept numerical data, so if input data in strings or categorical format, it needs to be converted to numerical format before it can be used. In other cases, combining multiple input features into a single feature can result in more accurate machine learning models. For example, using a combination of temperature and humidity to predict flight delays produces more accurate models.
In this section, we’ll use Apache Spark MLLib for data processing using AWS Glue and reuse the data processing code during inference. We’ll use the Car Evaluation Data Set from UCI’s Machine Learning Repository.
Our goal is to predict the acceptability of a specific car, amongst the values of unacc, acc, good, and vgood.
At the core, it is a classification problem, and we will train a machine learning model using Amazon SageMaker’s built-in XGBoost algorithm. However, the dataset only contains six categorical string features – buying, maint, doors, persons, lug_boot, and safety and XGBoost can only process data that is in numerical format. Therefore we will pre-process the input data using SparkML StringIndexer followed by OneHotEncoder to convert it to a numerical format. We will also apply a post-processing step on the prediction result using IndexToString to convert our inference output back to their original labels that correspond to the predicted condition of the car.
We’ll write our pre-processing and post-processing scripts once, and apply them for processing training data using AWS Glue. Then, we will serialize and capture these artifacts produced by AWS Glue to Amazon S3 using MLeap, a common serialization format and execution engine for machine learning pipelines. This is so the pre-processing steps can be reused during inference for real-time requests using the SparkML Serving container that Amazon SageMaker provides. Finally, we will deploy the pre-processing, inference, and post-processing steps in an inference pipeline and will execute these steps for each real-time inference request.
-
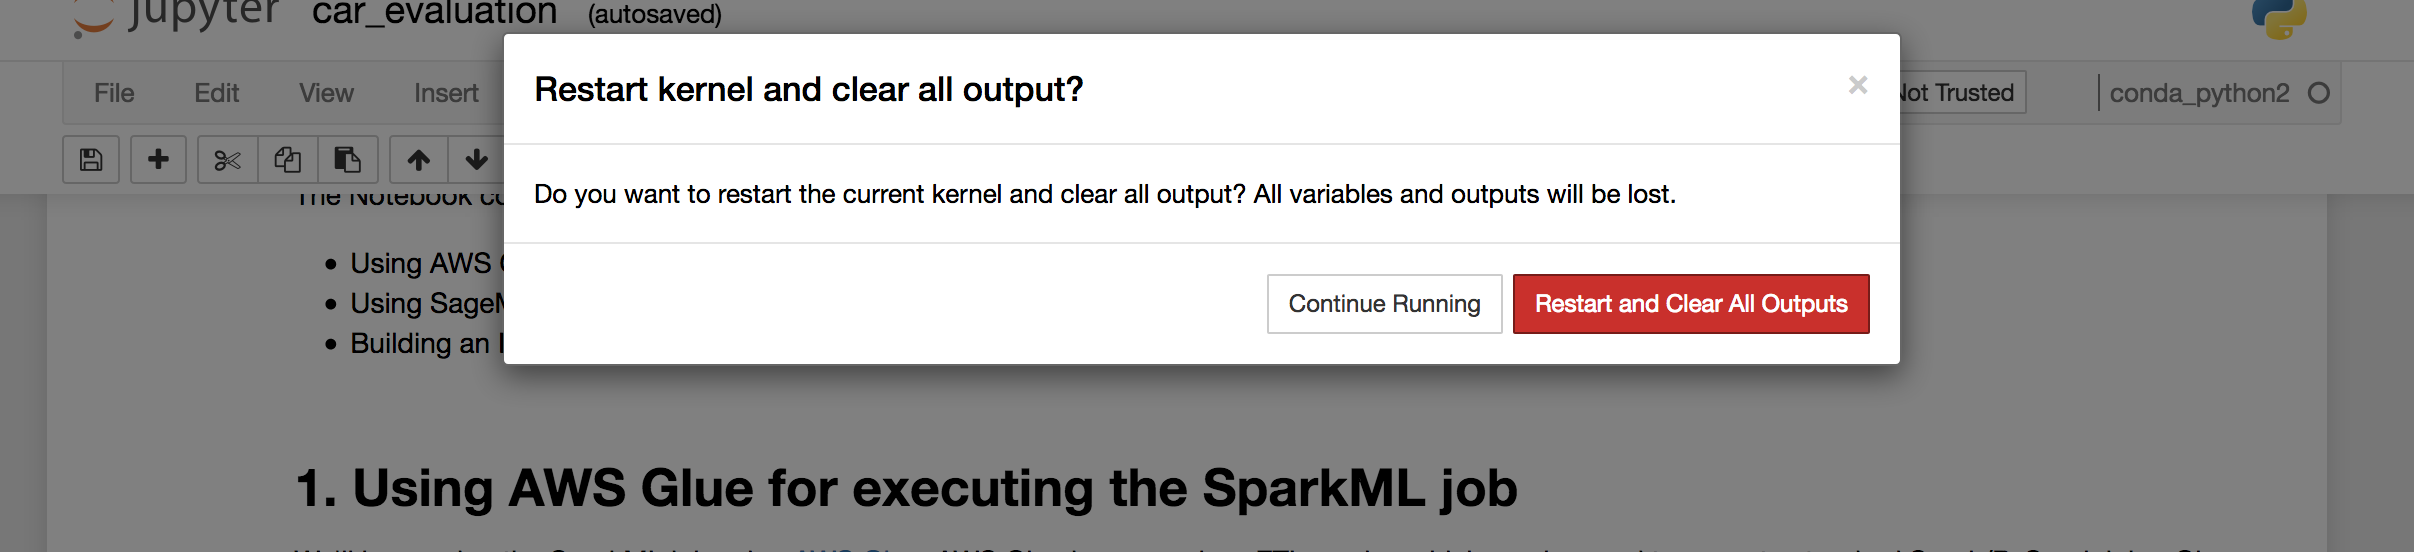
Open the Notebook and Select Kernel->Restart and clear all Outputs
-
Go to the part 1 of the Lab and execute the initial steps


Execute the steps in the notebook to set up the S3 bucket and download the required dataset as per the instructions .
- These are steps/cells 1.1 to 1.3 in the 'Car Evaluation' Jupyter notebook .
** After finsihing the steps 1.1 to 1.3 from the Jupyter notebook , follow the instruction set below .
- Once complete , look at the created S3 bucket and the contents . These would map to the screenshots below :
Folder 'data' and 'scripts' will be created .

Folder 'data' will have the sample car evaluation data .

Folder 'scripts' will have the scripts required to execute the ETL Transformation

Once complete , you will create a Glue job to execute the steps .
If you take a look at the data we downloaded, you’ll notice all of the fields are categorical data in string format, which XGBoost cannot natively handle. In order to utilize SageMaker’s XGBoost, we need to preprocess our data into a series of one hot encoded columns. Apache Spark provides preprocessing pipeline capabilities that we will utilize.
Furthermore, to make our endpoint particularly useful, we also generate a post-processor in this script, which can convert our label indexes back to their original labels. All of these processor artifacts will be saved to S3 for SageMaker’s use later. For the Glue Job to be created ,please follow the below steps :
- Check the permission of the Role created above in Sagemaker . Go to IAM->Role ->Enter the role and check the trusted entities as per below .

- Go to Services -> AWS Glue

- At the left ,under the "ETL" tab , click Jobs

-
Click on " Add Job"
-
Provide the Job details as per below
Name - preprocessing-cars-alias
IAM role -Use the IAM role created with Sagemaker
Type - Spark
This job runs : "An existing script that you can provide "
ETL Language - Python
Script File Name - s3:// 'Provide the s3 bucket name'/scripts/preprocessor.py
S3 path where the script is stored

-
Keep the Advanced Properties and Tags as default
-
Click on "Security Configuration ,script libraries and job parameters
Python Library path - s3://'Provide the s3 bucket name'/scripts/python.zipDependent jars path -s3://'Provide the s3 bucket name'/scripts/mleap_spark_assembly.jar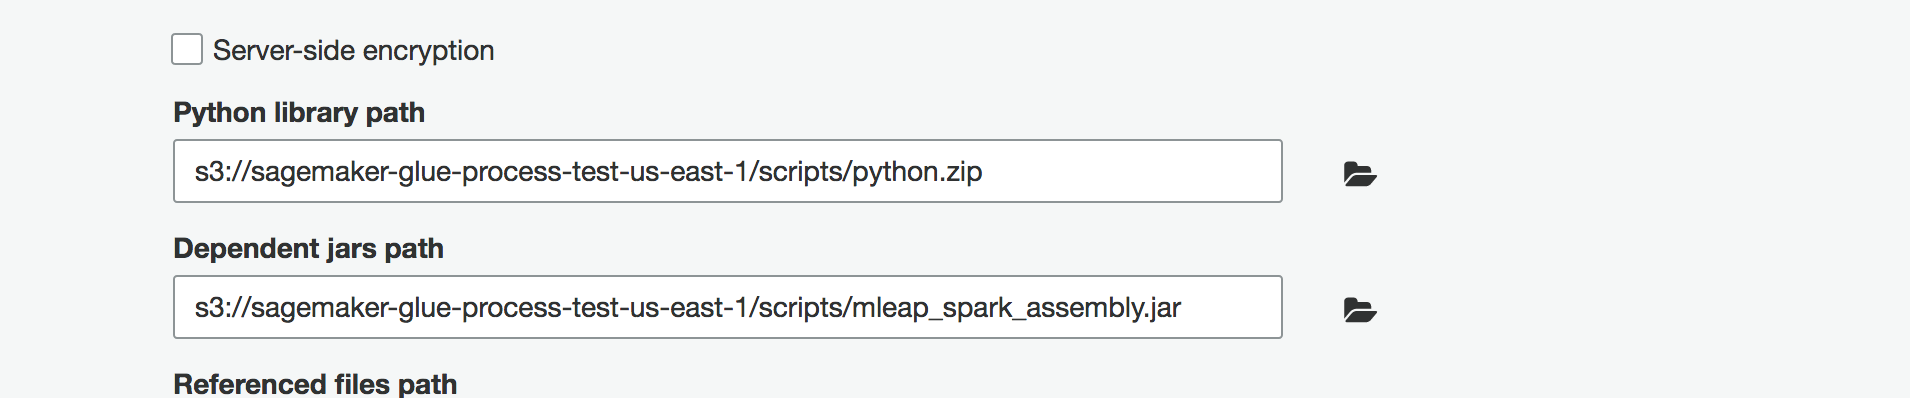
-
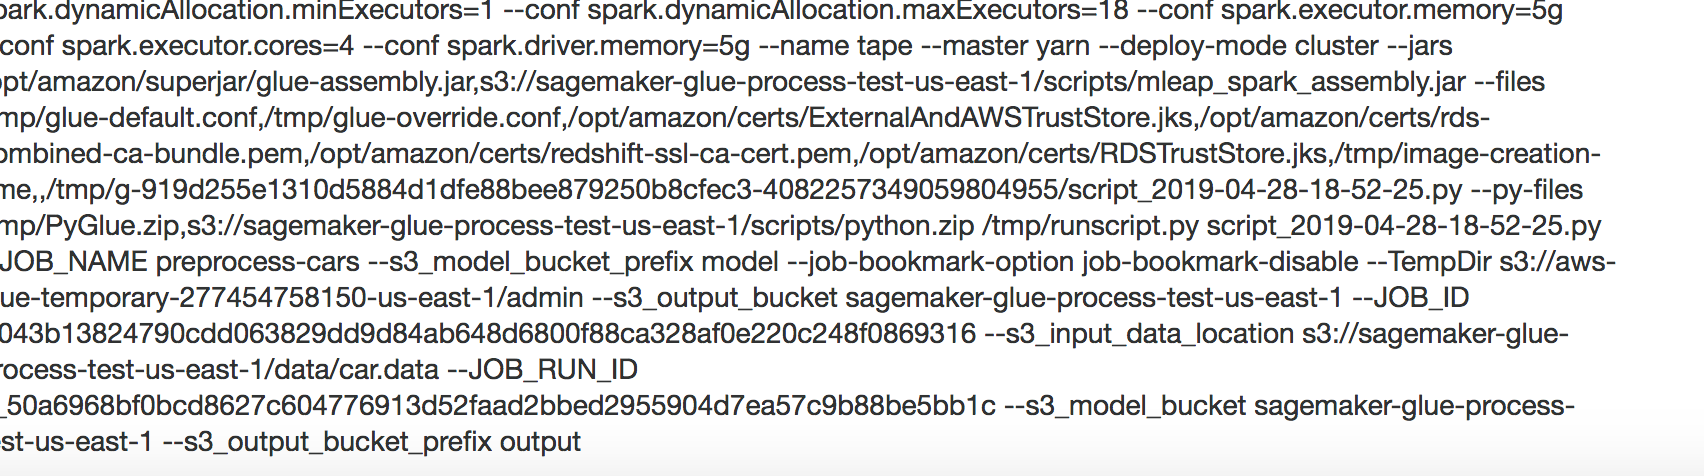
Add the following Job parameters
--s3_input_data_location -  s3://'Provide the s3 bucket name'/data/car.data

--s3_model_bucket_prefix -   model

--s3_model_bucket -   'Provide the s3 bucket name'

--s3_output_bucket - 'Provide the s3 bucket name'

--s3_output_bucket_prefix  -  output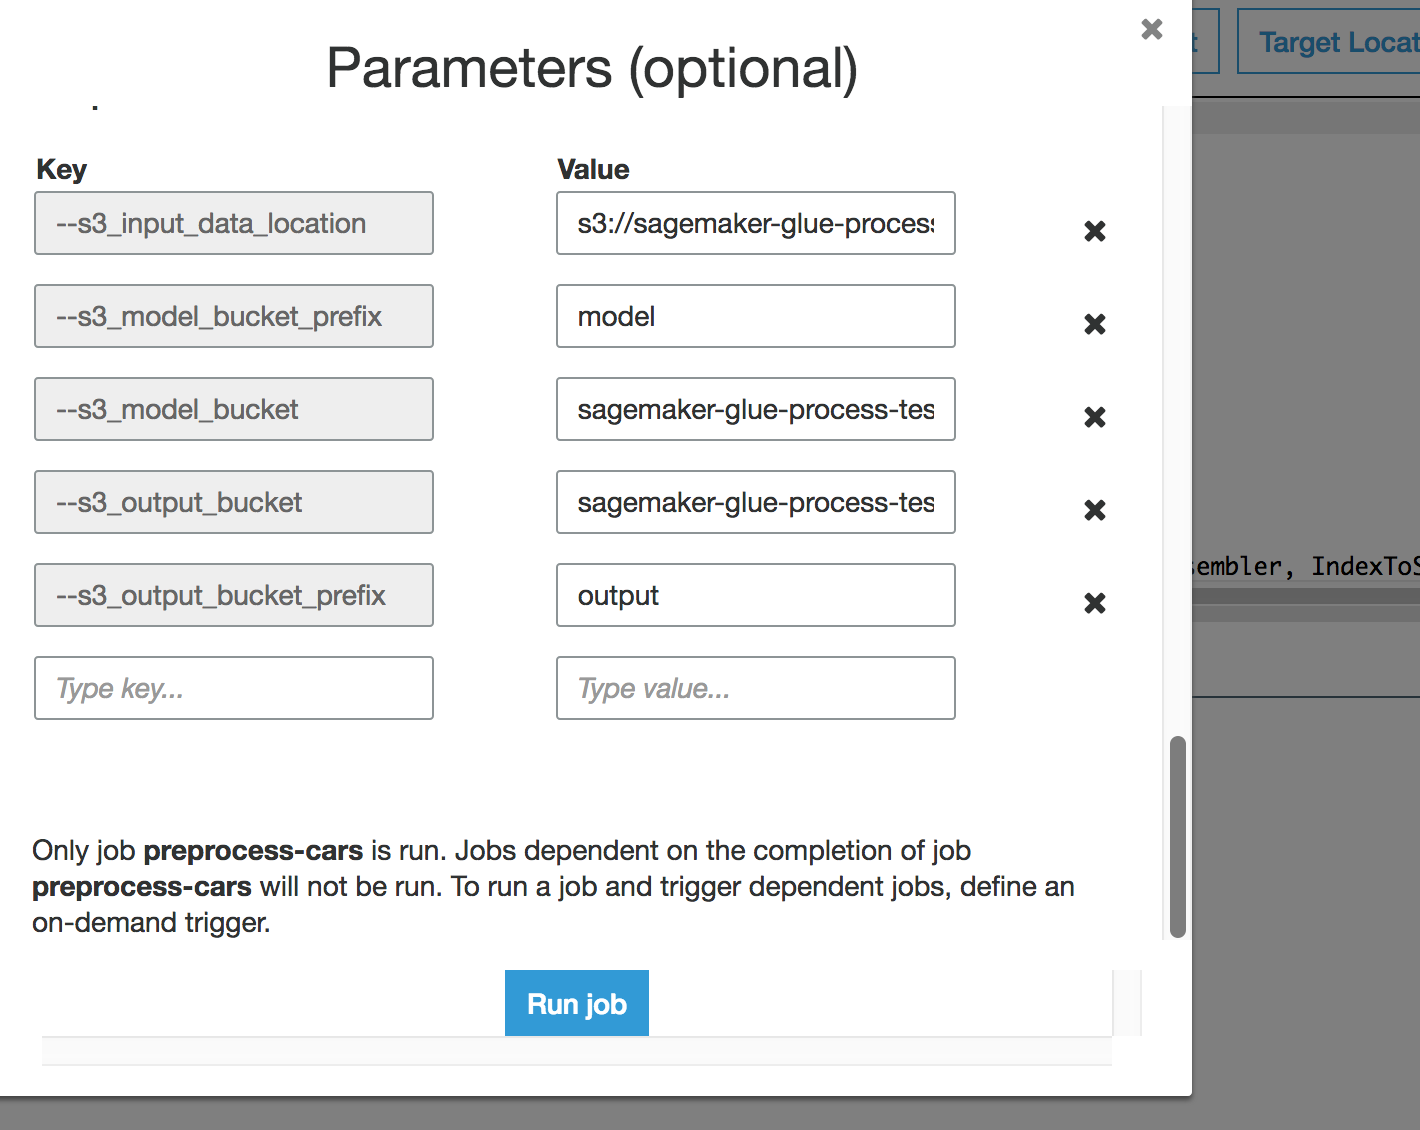
-
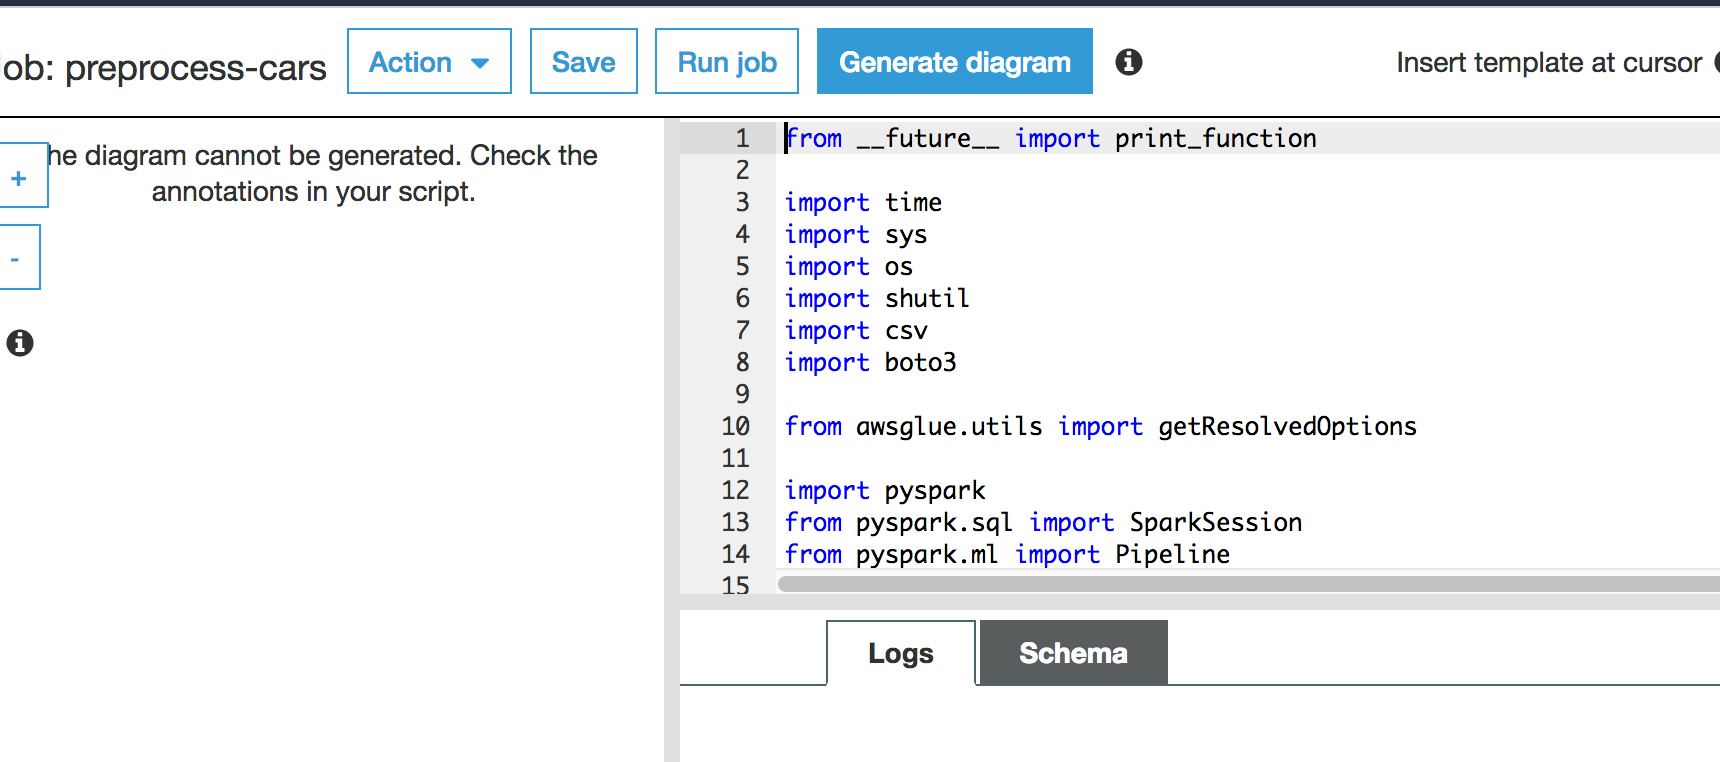
Click on Save Job and Edit Script
-
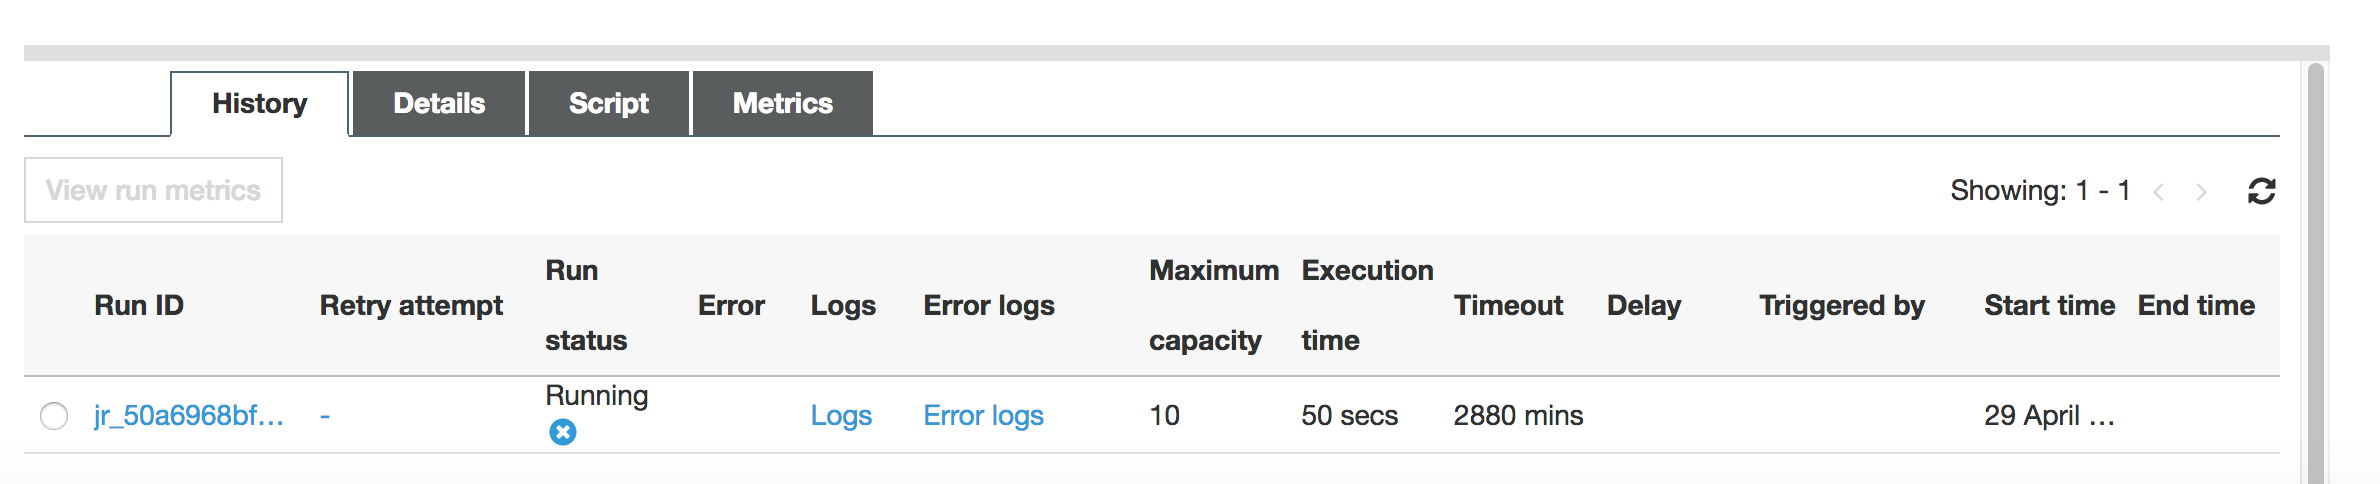
Click on "Run Job" . The job will take about 7-8 minutes to finish.
-
Check the logs for the Glue execution and make sure there are no errors.
-
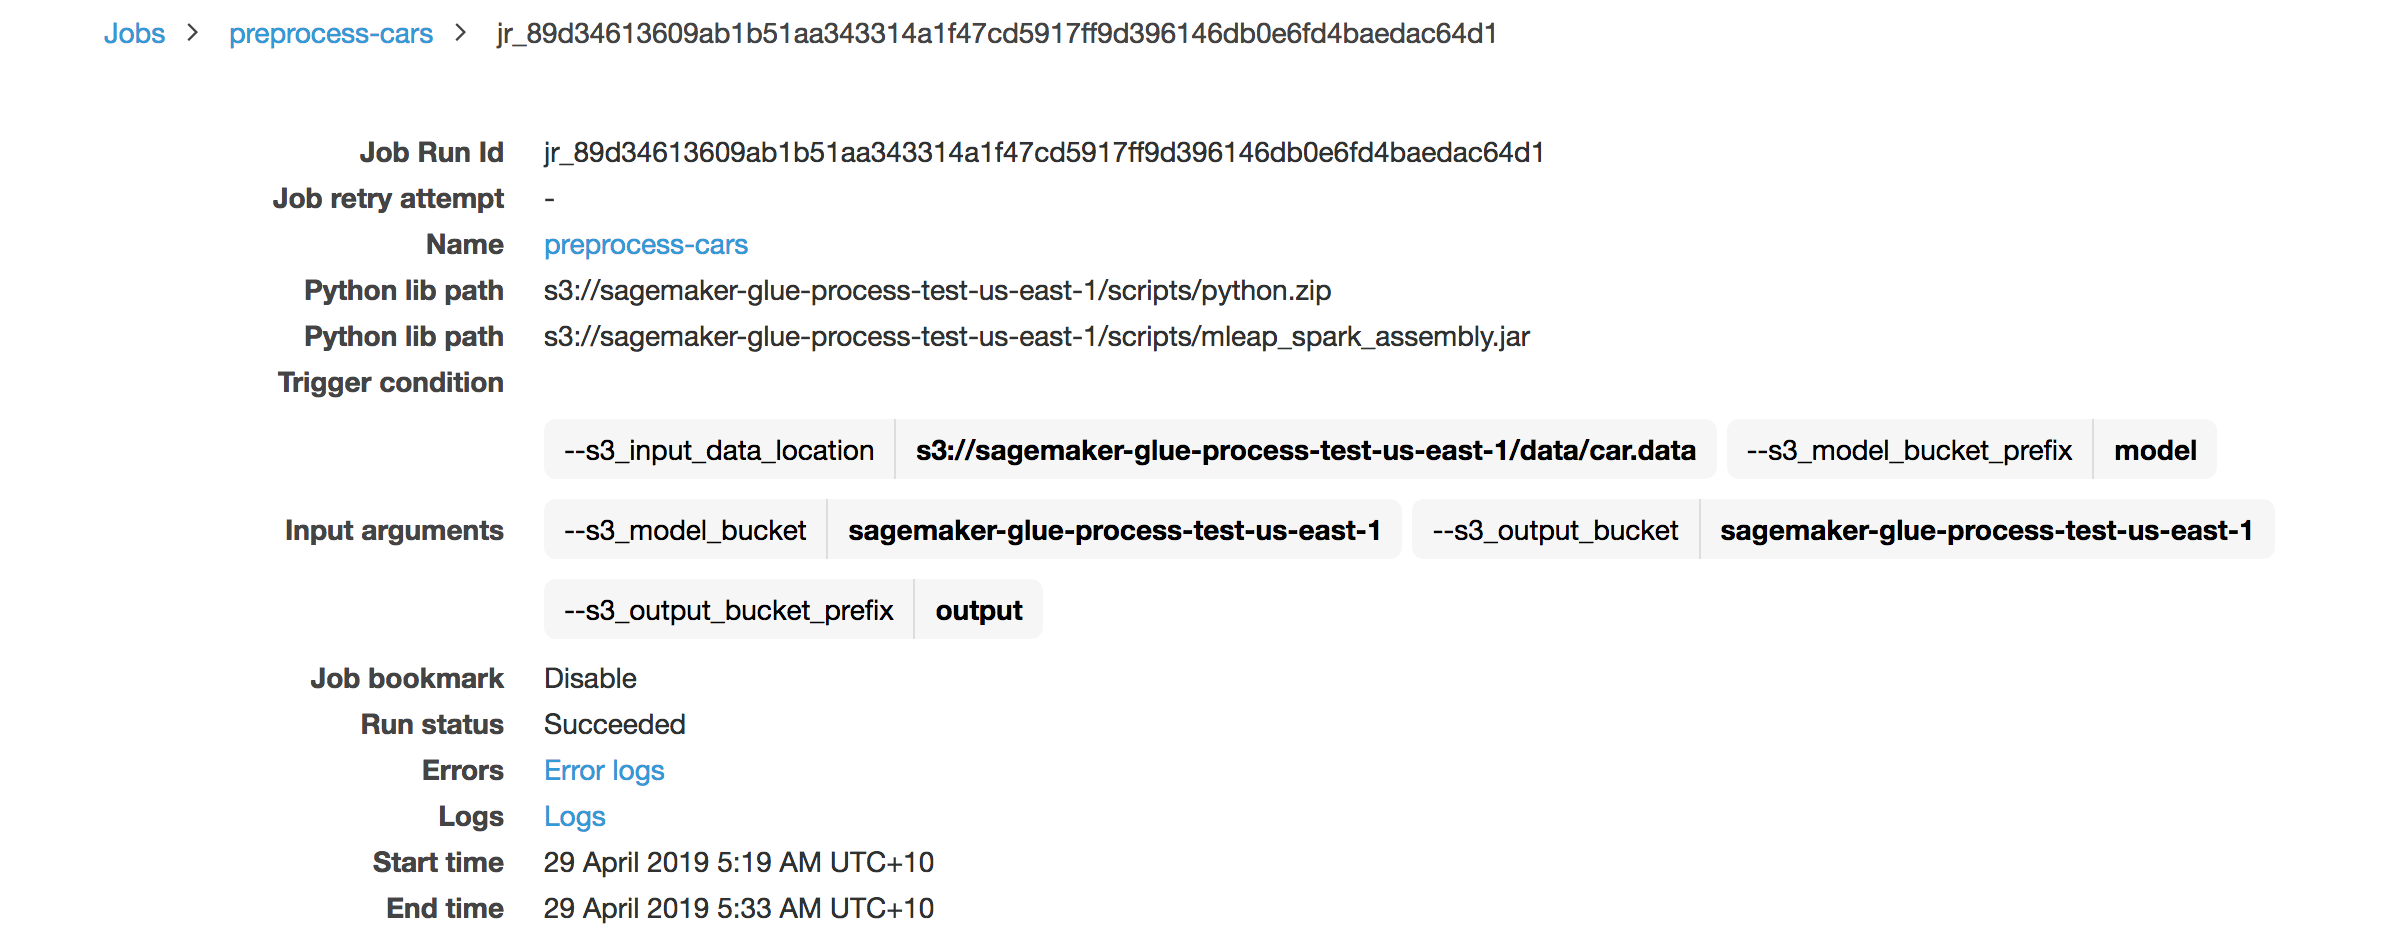
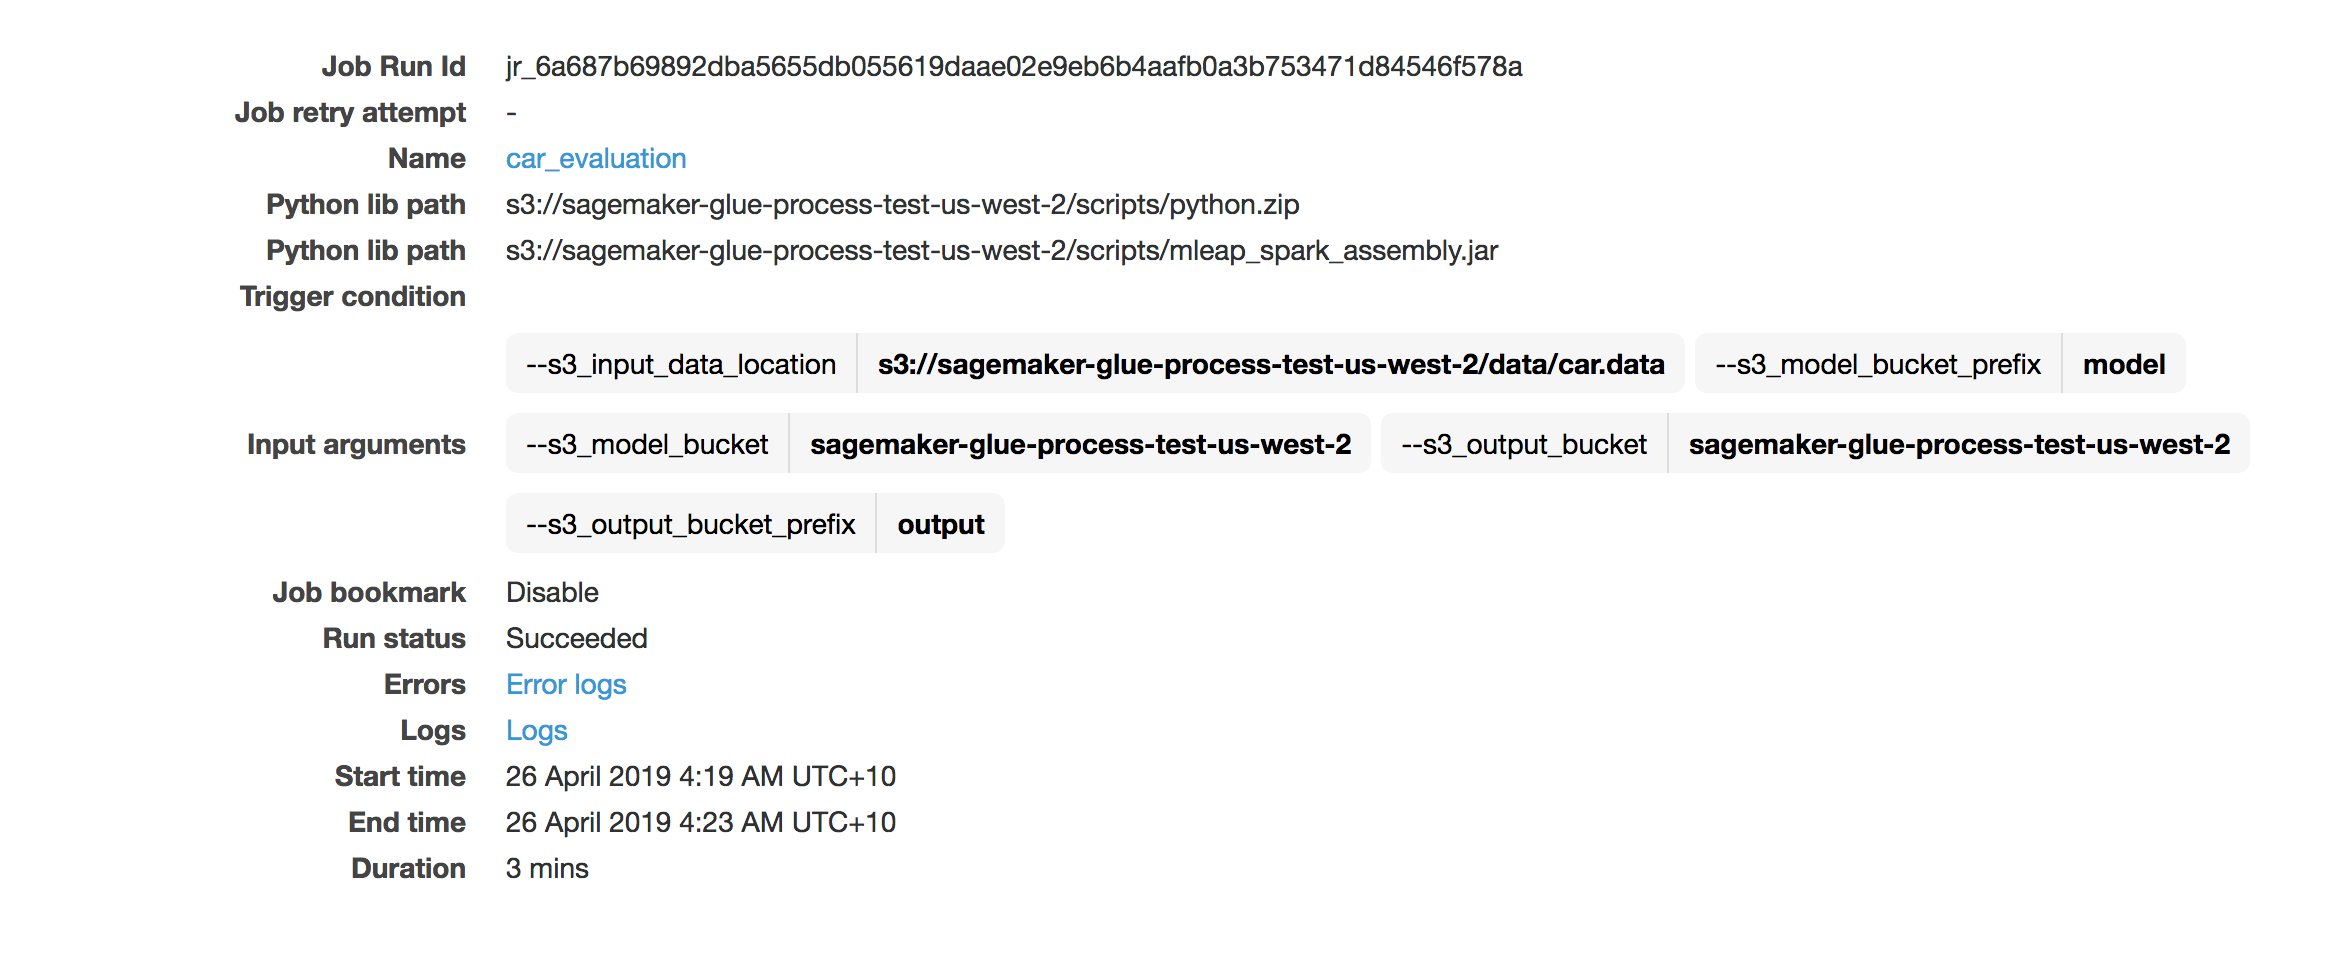
When the job is complete ,you should be able to see the "Success" status of the Glue Job.


Here is the explanation of what the job is actually doing :
While executing the notebook, you downloaded our preprocessor.py script, and we recommend you take the time to explore how Spark pipelines are handled. Let’s take a look at the relevant part of the code where we define and fit our Spark pipeline:
# Target label
catIndexer = StringIndexer(inputCol="cat", outputCol="label")

labelIndexModel = catIndexer.fit(train)
train = labelIndexModel.transform(train)

converter = IndexToString(inputCol="label", outputCol="cat")

# Index labels, adding metadata to the label column.
# Fit on whole dataset to include all labels in index.
buyingIndexer = StringIndexer(inputCol="buying", outputCol="indexedBuying")
maintIndexer = StringIndexer(inputCol="maint", outputCol="indexedMaint")
doorsIndexer = StringIndexer(inputCol="doors", outputCol="indexedDoors")
personsIndexer = StringIndexer(inputCol="persons", outputCol="indexedPersons")
lug_bootIndexer = StringIndexer(inputCol="lug_boot", outputCol="indexedLug_boot")
safetyIndexer = StringIndexer(inputCol="safety", outputCol="indexedSafety")


# One Hot Encoder on indexed features
buyingEncoder = OneHotEncoder(inputCol="indexedBuying", outputCol="buyingVec")
maintEncoder = OneHotEncoder(inputCol="indexedMaint", outputCol="maintVec")
doorsEncoder = OneHotEncoder(inputCol="indexedDoors", outputCol="doorsVec")
personsEncoder = OneHotEncoder(inputCol="indexedPersons", outputCol="personsVec")
lug_bootEncoder = OneHotEncoder(inputCol="indexedLug_boot", outputCol="lug_bootVec")
safetyEncoder = OneHotEncoder(inputCol="indexedSafety", outputCol="safetyVec")

# Create the vector structured data (label,features(vector))
assembler = VectorAssembler(inputCols=["buyingVec", "maintVec", "doorsVec", "personsVec", "lug_bootVec", "safetyVec"], outputCol="features")

# Chain featurizers in a Pipeline
pipeline = Pipeline(stages=[buyingIndexer, maintIndexer, doorsIndexer, personsIndexer, lug_bootIndexer, safetyIndexer, buyingEncoder, maintEncoder, doorsEncoder, personsEncoder, lug_bootEncoder, safetyEncoder, assembler])

# Train model.  This also runs the indexers.
model = pipeline.fit(train)
This snippet defines both our preprocessor and postprocessor. The preprocessor converts all the training columns from categorical labels into a vector of one-hot encoded columns, while the post-processor converts our label index back to a human readable string.
In addition, it may be helpful to examine the code which allows us to serialize and store our Spark pipeline artifacts in the MLeap format. Because the Spark framework was designed around batch use cases, we need to use MLeap here. MLeap serializes SparkML Pipelines and provides run time for deploying for real-time, low latency use cases. Amazon SageMaker has launched a SparkML Serving container that uses MLEAP to make it easy to use. Let’s look at the code below:
# Serialize and store via MLeap
SimpleSparkSerializer().serializeToBundle(model, "jar:file:/tmp/model.zip", predictions)

# Unzipping as SageMaker expects a .tar.gz file but MLeap produces a .zip file.
import zipfile
with zipfile.ZipFile("/tmp/model.zip") as zf:
    zf.extractall("/tmp/model")

# Writing back the content as a .tar.gz file
import tarfile
with tarfile.open("/tmp/model.tar.gz", "w:gz") as tar:
    tar.add("/tmp/model/bundle.json", arcname='bundle.json')
    tar.add("/tmp/model/root", arcname='root')

s3 = boto3.resource('s3')
file_name = args['s3_model_bucket_prefix'] + '/' + 'model.tar.gz'
s3.Bucket(args['s3_model_bucket']).upload_file('/tmp/model.tar.gz', file_name)

os.remove('/tmp/model.zip')
os.remove('/tmp/model.tar.gz')
shutil.rmtree('/tmp/model')

# Save postprocessor
SimpleSparkSerializer().serializeToBundle(converter, "jar:file:/tmp/postprocess.zip", predictions)

with zipfile.ZipFile("/tmp/postprocess.zip") as zf:
    zf.extractall("/tmp/postprocess")

# Writing back the content as a .tar.gz file
import tarfile
with tarfile.open("/tmp/postprocess.tar.gz", "w:gz") as tar:
    tar.add("/tmp/postprocess/bundle.json", arcname='bundle.json')
    tar.add("/tmp/postprocess/root", arcname='root')

file_name = args['s3_model_bucket_prefix'] + '/' + 'postprocess.tar.gz'
s3.Bucket(args['s3_model_bucket']).upload_file('/tmp/postprocess.tar.gz', file_name)

os.remove('/tmp/postprocess.zip')
os.remove('/tmp/postprocess.tar.gz')
shutil.rmtree('/tmp/postprocess')
You’ll notice we unzip this archive and re-archive it into a tar.gz file that SageMaker recognizes.
With the completion of these steps , the S3 bucket you created will have the structure as per the diagram below .

In this section ,we will define the machine learning process to create a model using XGBoost to do real time inference .
Now that we have our data preprocessed in a format that XGBoost recognizes, we can run a simple training job to train a classifier model on our data. We can run this entire process in our Jupyter notebook.This will train the model on the preprocessed data we created earlier. After a few minutes, usually less than 5, the job should complete successfully, and output our model artifacts to the S3 location we specified. Once this is done, we can deploy an inference pipeline that consists of pre-processing, inference and post-processing steps.
When you deploy machine learning models into production to make predictions on new data (a process called inference), you need to ensure that the same data processing steps that were used in training are also applied to each inference request. Otherwise, you can get incorrect prediction results. Until now, you had to maintain two copies of the same data processing steps for use in training and inference and ensure that they were always in sync. Also, the data processing steps had to be coupled either with the application code making requests to the machine learning models or baked into the inference logic. As a result, development overhead and complexity was higher than it needed to be, and your ability to iterate quickly was limited.
Now, you can reuse the same data processing steps from training during inference by creating an inference pipeline in Amazon SageMaker. You can use an inference pipeline to specify up to five data processing and inference steps. These steps are executed for every prediction request. You can reuse the data processing steps from training, so you only manage one copy of the data processing code, and you can independently update the data processing steps without the need to update your client application or inference logic. Follow the steps/cells in the Jupyter notebook to execute the Machine learning part (labelled as 2) -this will include setting up a training job to build a model and then create an endpoint to host the model .
When the training job completes ,the status will be updated to "Completed"

When the endpoint is created ,the status will be updated to "InService"

On testing the inference locally ,the output is as below :

At this point , the machine learning process for the workload is complete and you are ready to build a Single Page application to derive inference from the trained model .
When building your deployments, you may find you need to monitor or debug your endpoint, and the new inference pipelines change how the logs appear in Amazon CloudWatch. You can now see logs and metrics for each of your containers within a single endpoint. To see these logs, return to the AWS Management Console, and go to Services, Amazon SageMaker, Inference, and then Endpoints. Locate your pipeline-xgboost endpoint in the list, and select it by the name to see the endpoint details.
Locate the Monitor section, and you will find a View logs link. Select it, and you will be taken to a CloudWatch Logs interface. For our example endpoint, there are three sets of log streams, one for each container. It should look like this:
If an invocation gives an error, the relevant output will appear in the relevant log stream. Whatever is output to stdout for each container will end up at this location.
In the Jupyter notebook , you have tested the inference on the Machine learning model . Now we will build a SPA using AWS Amplify and React and will set up the process to test the inference via the web channel .
To set up the environment for the same , follow the below steps :
AWS Cloud9 is a cloud-based integrated development environment (IDE) that lets you write, run, and debug your code with just a browser. It includes a code editor, debugger, and terminal. Cloud9 comes prepackaged with essential tools for popular programming languages, including JavaScript, Python, PHP, and more, so you don’t need to install files or configure your development machine to start new projects. In the instructions that follow, we describe the steps required to set up your AWS Cloud9 environment and get ready to implement the workshop. Note: You must have a default VPC in the region you will run the workshop in. If you do not have a default VPC, please create one by following the instructions at https://docs.aws.amazon.com/vpc/latest/userguide/default-vpc.html#create-default-vpc
- Go to the Cloud9 web console

- Select Create environment .Name it SMworkshop, and go to the Next step

- Select Create a new instance for environment (EC2) and pick t2.medium

-
Leave all of the environment settings as they are, and go to the Next step and Click Create environment.
-
Your new AWS Cloud9 environment will be created automatically, and will take a moment to complete. When it is finished, you will see the IDE in your browser
-
Once your cloud9 environment is up and running, open a terminal and run the following commands.
git clone https://github.com/perima/amplify-sagemaker.git
pip install --user --upgrade awscli
nvm install v8.11.0
nvm alias default v8.11.0
npm install -g @aws-amplify/cli
cd amplify-sagemaker
The next steps will help you set up a project im an environment.The project contains the single page app, API GW/Lambda function. The flow is Amplify SPA -> API GW -> Lambda -> Sagemaker endpoint.
Set up your AWS resources the Amplify CLI:
Go to the project directory
cd amplify-sagemaker
Before we start building our UI, we’ll also include Semantic UI components for React to give us components that will help make our interface look a bit nicer. Go to thr actual project folder and run the below command .
npm install --save semantic-ui-react
npm install –save
Now the environment is ready with all the required installs
The next steps will help you set up a project im an environment.The project contains the single page app, API GW/Lambda function. The flow is Amplify SPA -> API GW -> Lambda -> Sagemaker endpoint.
Set up your AWS resources the Amplify CLI:
$ amplify init
Do you want to use an existing environment? No
Choose the environment you would like to use: 'Give a unique name to the environment'
Choose your default editor: None
Do you want to use an AWS profile? Yes (select default from the list)
This command creates new AWS backend resources (in this case a single S3 bucket to host your cloudformation templates) and pull the AWS service configurations into the app! Follow the prompts as shown in the below Image. Remember, even if you are implementing the ios or android version of the application, you MUST choose javascript here since the admin panel is a web app that makes calls to the backend and is seperate from the client.


Now the required cloudformation templates are set up and it is time to create the cloud resources by pushing the changes:
$ amplify push
This will push all the required changes of the API and the lambda function to AWS . Next steps is to publish and host your Single Page Application .
This can be done in 2 ways :
Option 1: Run locally in Cloud9 For this to be done , execute the below command
npm start.
Once this is done ,select Preview in the Cloud9 environment and run it .
Option 2: Hosting on S3
Execute amplify add hosting from the project's root folder and follow the prompts to create a S3 bucket (DEV) and/or a CloudFront distribution (PROD).
$ amplify hosting Add
While hosting ,choose the non-Prod option as per the below image

Build and publish the application
$ amplify publish


Now you should get a url for the application . Access the SPA and invoke the sagemaker endpoint with the values .

Once you get the inference from the Sagemaker endpoint ,you have successfully built an end-to-end use case to build a machine learning solution for a business problem .
When you are done with this lab, make sure to delete your Amazon SageMaker endpoint to avoid incurring unexpected costs. You can do this from the console by going to Services, Amazon SageMaker, Inference, and Endpoints. Choose the endpoint created under Endpoints. In the upper-right, choose Delete. This will remove the endpoint from your AWS account. You will also want to make sure to stop your Notebook instance.
A more extensive cleanup can be done from your Notebook instance by running the code cell labeled Environment cleanup.
This is an optional part for you to take back as an outcome from the lab and build from here . The instructions below provide you integration with Code Pipeline to introduce Continuous delivery in your business problem . This is important since we need to adhere to the best practices of implementing a solution with Software engineering principles .
Prerequisites: GitHub OAuth Token – Follow these instructions to create an OAuth Token: Create a GitHub OAuth Token
To integrate with GitHub, AWS CodePipeline uses OAuth tokens. Go to GitHub's Token Settings to generate your token and ensure you enable the following two scopes:
admin:repo_hook, which is used to detect when you have committed and pushed changes to the repository repo, which is used to read and pull artifacts from public and private repositories into a pipeline
1 Extract the details from the model and update the cloudformation stack .
2 Go to CloudFormation and Launch the stack
3 The stack should comprise of the following sample options :
- AWS CloudFormation – This solution uses the CloudFormation Template language, in either YAML or JSON, to create each resource.
- AWS CodeBuild – This solution uses CodeBuild to build the source code from GitHub
- AWS CodePipeline – CodePipeline has various stages defined in CloudFormation which step through which actions must be taken in which order to go from source code to creation of the production endpoint.
- AWS EC2 – EC2 Instances are created in order to train the model as well as host the model to be accessed via and endpoint.
- AWS SageMaker – This solution uses SageMaker to train the model to be used and host the model at an endpoint, where it can be accessed via HTTP/HTTPS requests
- AWS IAM – Separate Identity and Access Management (IAM) Roles are created for the pipeline, CodeBuild, and CloudFormation.
- AWS SNS – This solution uses a Simple Notification Service (SNS) Topic in order to approve movement into production after testing.
- AWS S3 – Artifacts created throughout the pipeline as well as the data for the model is stored in an Simple Storage Service (S3) Bucket.
This will create a framework for you to run and deploy the stack and you can use this framework to build continuous integration .