
This is a Python and Torch implementation of the CVPR 2015 paper FaceNet: A Unified Embedding for Face Recognition and Clustering by Florian Schroff, Dmitry Kalenichenko, and James Philbin at Google using publicly available libraries and datasets. Torch allows the network to be executed on a CPU or with CUDA.
Crafted by Brandon Amos in the Elijah research group at Carnegie Mellon University.
No! Accuracies from research papers have just begun to surpass human accuracies on some benchmarks. The accuracies of open source face recognition systems lag behind the state-of-the-art. See our accuracy comparisons on the famous LFW benchmark below.
We do not support the use of this project in applications that violate privacy and security. We are using this to help cognitively impaired users to sense and understand the world around them.
The following overview shows the workflow for a single input image of Sylvestor Stallone from the publicly available LFW dataset.
- Detect faces with a pre-trained models from dlib or OpenCV.
- Transform the face for the neural network. This repository uses dlib's real-time pose estimation with OpenCV's affine transformation to try to make the eyes and nose appear in the same location on each image.
- Use a deep neural network to represent (or embed) the face on a 128-dimensional unit hypersphere. The embedding is a generic representation for anybody's face. Unlike other face representations, this embedding has the nice property that a larger distance between two face embeddings means that the faces are likely not of the same person. This property makes clustering, similarity detection, and classification tasks easier than other face recognition techniques where the Euclidean distance between features is not meaningful.
- Apply your favorite clustering or classification techniques to the features to complete your recognition task. See below for our examples for classification and similarity detection, including an online web demo.

- batch-represent: Generate representations from a batch of images, stored in a directory by names.
- demos/web: Real-time web demo.
- demos/compare.py: Demo to compare two images.
- demos/vis-outputs.lua: Demo to visualize the network's outputs.
- demos/classifier.py: Demo to train and use classifiers.
- evaluation: LFW accuracy evaluation scripts.
- openface: Python library code.
- images: Images used in the README.
- models: Model directory for openface and 3rd party libraries.
- training: Scripts to train new OpenFace models.
- util: Utility scripts.
See our YouTube video of using this in a real-time web application for face recognition. The source is available in demos/web.
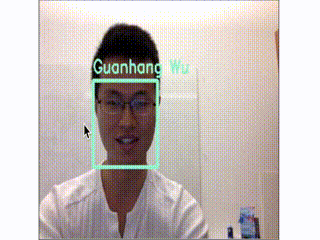
This demo does the full face recognition pipeline on every frame. In practice, object tracking like dlib's should be used once the face recognizer has predicted a face.
To run on your system, after following the setup directions
below, install the requirements for the web demo with
./install-deps.sh and sudo pip install -r requirements.txt
from the demos/web directory.
The application is split into a processing server and static
web pages that communicate via web sockets.
Start the server with ./demos/web/server.py and
serve the static website with python2 -m SimpleHTTPServer 8000.
You should now be able to access the demo from your browser
at http://localhost:8000.
The comparison demo outputs the predicted similarity
score of two faces by computing the squared L2 distance between
their representations.
A lower score indicates two faces are more likely of the same person.
Since the representations are on the unit hypersphere, the
scores range from 0 (the same picture) to 4.0.
The following distances between images of John Lennon and
Eric Clapton were generated with
./demos/compare.py images/examples/{lennon*,clapton*}.
| Lennon 1 | Lennon 2 | Clapton 1 | Clapton 2 |
|---|---|---|---|
 |
 |
 |
 |
The following table shows that a distance threshold of 0.5 would
distinguish these two people.
In practice, further experimentation should be done on the distance threshold.
On our LFW experiments, the mean threshold across multiple
experiments is 0.71 ± 0.027,
see accuracies.txt.
| Image 1 | Image 2 | Distance |
|---|---|---|
| Lennon 1 | Lennon 2 | 0.310 |
| Lennon 1 | Clapton 1 | 1.241 |
| Lennon 1 | Clapton 2 | 1.056 |
| Lennon 2 | Clapton 1 | 1.386 |
| Lennon 2 | Clapton 2 | 1.073 |
| Clapton 1 | Clapton 2 | 0.259 |
OpenFace's core provides a feature extraction method to obtain a low-dimensional representation of any face. demos/classifier.py shows a demo of how these representations can be used to create a face classifier.
This is trained on about 6000 total images of the following people, which are the people with the most images in our dataset. Classifiers can be created with far less images per person.
- America Ferrera
- Amy Adams
- Anne Hathaway
- Ben Stiller
- Bradley Cooper
- David Boreanaz
- Emily Deschanel
- Eva Longoria
- Jon Hamm
- Steve Carell
This demo uses scikit-learn to perform
a grid search over SVM parameters.
For 1000's of images, training the SVMs takes seconds.
Our trained model obtains 87% accuracy on this set of data.
models/get-models.sh
will automatically download this classifier and place
it in models/openface/celeb-classifier.nn4.v1.pkl.
For an example, consider the following small set of images the model has no knowledge of. For an unknown person, a prediction still needs to be made, but the confidence score is usually lower.
Run the classifier on your images with:
./demos/classifier.py infer ./models/openface/celeb-classifier.nn4.v1.pkl <image>
| Person | Image | Prediction | Confidence |
|---|---|---|---|
| Carell |  |
SteveCarell | 0.78 |
| Adams |  |
AmyAdams | 0.87 |
| Lennon 1 (Unknown) | |
DavidBoreanaz | 0.28 |
| Lennon 2 (Unknown) | |
DavidBoreanaz | 0.56 |
Even though the public datasets we trained on have orders of magnitude less data than private industry datasets, the accuracy is remarkably high and outperforms all other open-source face recognition implementations we are aware of on the standard LFW benchmark. We had to fallback to using the deep funneled versions for 152 of 13233 images because dlib failed to detect a face or landmarks. We obtain a mean accuracy of 0.8483 ± 0.0172 with an AUC of 0.923.

This can be generated with the following commands from the root openface
directory, assuming you have downloaded and placed the raw and
deep funneled LFW data from here
in ./data/lfw/raw and ./data/lfw/deepfunneled.
- Install prerequisites as below.
- Preprocess the raw
lfwimages, change8to however many separate processes you want to run:for N in {1..8}; do ./util/align-dlib.py data/lfw/raw align affine data/lfw/dlib-affine-sz:96 --size 96 &; done. Fallback to deep funneled versions for images that dlib failed to align:./util/align-dlib.py data/lfw/raw align affine data/lfw/dlib-affine-sz:96 --size 96 --fallbackLfw data/lfw/deepfunneled - Generate representations with
./batch-represent/main.lua -outDir evaluation/lfw.nn4.v1.reps -model models/openface/nn4.v1.t7 -data data/lfw/dlib-affine-sz:96 - Generate the ROC curve from the
evaluationdirectory with./lfw-roc.py --workDir lfw.nn4.v1.reps. This createsroc.pdfin thelfw.nn4.v1.repsdirectory.
As the following table shows, the forefront of deep learning research is driven by large private datasets. In face recognition, there are no open source implementations or models trained on these datasets. If you have access to a large dataset, we are very interested in training a new OpenFace model with it. Please contact Brandon Amos at bamos@cs.cmu.edu.
| Dataset | Public | #Photos | #People |
|---|---|---|---|
| DeepFace (Facebook) | No | 4.4 Million | 4k |
| Web-Scale Training... (Facebook) | No | 500 Million | 10 Million |
| FaceNet (Google) | No | 100-200 Million | 8 Million |
| FaceScrub | Yes | 100k | 500 |
| CASIA-WebFace | Yes | 500k | 10k |
t-SNE is a dimensionality reduction technique that can be used to visualize the 128-dimensional features OpenFace produces. The following shows the visualization of the three people in the training and testing dataset with the most images.
Training

Testing

These can be generated with the following commands from the root
openface directory.
- Install prerequisites as below.
- Preprocess the raw
lfwimages, change8to however many separate processes you want to run:for N in {1..8}; do ./util/align-dlib.py <path-to-raw-data> align affine <path-to-aligned-data> --size 96 &; done. - Generate representations with
./batch-represent/main.lua -outDir <feature-directory (to be created)> -model models/openface/nn4.v1.t7 -data <path-to-aligned-data> - Generate t-SNE visualization with
./util/tsne.py <feature-directory> --names <name 1> ... <name n>This createstsne.pdfin<feature-directory>.
Visualizing the output feature maps of each layer is sometimes helpful to understand what features the network has learned to extract. With faces, the locations of the eyes, nose, and mouth should play an important role.
demos/vis-outputs.lua outputs the feature maps from an aligned image. The following shows the first 39 filters of the first convolutional layer on two images of John Lennon.


Model definitions should be kept in models/openface, where we have provided definitions of the NN2 and nn4 as described in the paper, but with batch normalization and no normalization in the lower layers. The inception layers are introduced in Going Deeper with Convolutions by Christian Szegedy et al.
Pre-trained models are versioned and should be released with
a corresponding model definition.
We currently only provide a pre-trained model for nn4.v1
because we have limited access to large-scale face recognition
datasets.
This model has been trained by combining the two largest (of August 2015) publicly-available face recognition datasets based on names: FaceScrub and CASIA-WebFace. This model was trained for about 300 hours on a Tesla K40 GPU.
The following plot shows the triplet loss on the training
and test set.
Semi-hard triplets are used on the training set, and
random triplets are used on the testing set.
Our nn4.v1 model is from epoch 177.
The LFW section above shows that this model obtains a mean accuracy of 0.8483 ± 0.0172 with an AUC of 0.923.

The processing time depends on the size of your image for face detection and alignment. These only run on the CPU and take from 100-200ms to over a second. The neural network uses a fixed-size input and has a more consistent runtime. Averaging over 500 forward passes of random input, the latency is 77.47 ms ± 50.69 ms on our 3.70 GHz CPU and 21.13 ms ± 6.15 ms on our Tesla K40 GPU, obtained with util/profile-network.lua
See the image comparison demo for a complete example written in Python using a naive Torch subprocess to process the faces.
import openface
from openface.alignment import NaiveDlib # Depends on dlib.

# `args` are parsed command-line arguments.

align = NaiveDlib(args.dlibFaceMean, args.dlibFacePredictor)
net = openface.TorchWrap(args.networkModel, imgDim=args.imgDim, cuda=args.cuda)

# `img` is a numpy matrix containing the RGB pixels of the image.
bb = align.getLargestFaceBoundingBox(img)
alignedFace = align.alignImg("affine", args.imgDim, img, bb)
rep1 = net.forwardImage(alignedFace)

# `rep2` obtained similarly.
d = rep1 - rep2
distance = np.dot(d, d)This repository also contains our training infrastructure to promote an open ecosystem and enable quicker bootstrapping for new research and development. Warning: Training is computationally expensive and takes a few weeks on our Tesla K40 GPU.
A rough overview of training is:
- Preprocess the raw images, change
8to however many separate processes you want to run:for N in {1..8}; do ./util/align-dlib.py <path-to-raw-data> align affine <path-to-aligned-data> --size 96 &; done. Prune out directories with less than N (I use 10) images per class with./util/prune-dataset.py <path-to-aligned-data>and then split the dataset intotrainandvalsubdirectories with `./util/create-train-val-split.py '. - Run training/main.lua to start training the model.
Edit the dataset options in training/opts.lua or
pass them as command-line parameters.
This will output the loss and in-progress models to
training/work. - Visualize the loss with training/plot-loss.py.
The following instructions are for Linux and OSX only. Please contribute modifications and build instructions if you are interested in running this on other operating systems.
Clone with --recursive or run git submodule init && git submodule update
after checking out.
Run ./models/get-models.sh to download pre-trained OpenFace
models on the combined CASIA-WebFace and FaceScrub database.
This also downloads dlib's pre-trained model for face landmark detection.
Be sure you have checked out the submodules and downloaded the models as described above.
This repo can be deployed as a container with Docker for CPU mode:
sudo docker build -t openface .
sudo docker run -t -i -v $PWD:/openface openface /bin/bash
cd /openface
./demos/compare.py images/examples/{lennon*,clapton*}
To use, place your images in openface on your host and
access them from the shared Docker directory.
Be sure you have checked out the submodules and downloaded the models as described above. See the Dockerfile as a reference.
Install the packages the Dockerfile uses with your package manager.
With pip, install numpy, scipy, scikit-learn, and scikit-image.
Next, manually install the following.
Download OpenCV 2.4.11 and follow their build instructions.
Download dlib v18.16.
cd ~/src
tar xf dlib-18.16.tar.bz2
cd dlib-18.16/python_examples
mkdir build
cd build
cmake ../../tools/python
cmake --build . --config Release
cp dlib.so ..
Install Torch from the instructions on their website
and install the dpnn
and nn libraries with
luarocks install dpnn and luarocks install nn.
If you want CUDA support, also install cudnn.torch.
Please cite this repository if you use this in academic works.
@misc{amos2015openface,
    author       = {Amos, Brandon and Harkes, Jan and Pillai, Padmanabhan and Elgazzar, Khalid and Satyanarayanan, Mahadev},
    title        = {OpenFace: Face recognition with Google's FaceNet deep neural network.},
    month        = oct,
    year         = 2015,
    doi          = {10.5281/zenodo.32041},
    url          = {http://dx.doi.org/10.5281/zenodo.32041}
}
- The fantastic Torch ecosystem and community.
- Alfredo Canziani's implementation of FaceNet's loss function in torch-TripletEmbedding
- Nicholas Léonard for quickly merging my pull requests to nicholas-leonard/dpnn modifying the inception layer.
- Francisco Massa and Andrej Karpathy for quickly releasing nn.Normalize after I expressed interest in using it.
- Soumith Chintala for help with the fbcunn example code.
- NVIDIA's academic hardware grant program for providing the Tesla K40 used to train the model.
- Davis King's dlib library for face detection and alignment.
- Zhuo Chen, Kiryong Ha, Wenlu Hu, Rahul Sukthankar, and Junjue Wang for insightful discussions.
The source code and trained models nn4.v1.t7 and
celeb-classifier.nn4.v1.t7 are copyright
Carnegie Mellon University and licensed under the
Apache 2.0 License.
Portions from the following third party sources have
been modified and are included in this repository.
These portions are noted in the source files and are
copyright their respective authors with
the licenses listed.
| Project | Modified | License |
|---|---|---|
| Atcold/torch-TripletEmbedding | No | MIT |
| facebook/fbnn | Yes | BSD |