Dopefolio has been listed as the Hottest Frontend Tool of 2021 According to CSS Tricks 🥳. Thanks to all of you for supporting this project 🙌
Link to the CSS tricks article on Dopefolio
I do need support from amazing people like you as I started posting on My Youtube channel and want each one of you to checkout my latest Youtube Video which is regarding Dopefolio & subscribe to My Youtube channel. Here's the video ⬇️
Subscribing to My Youtube channel is the best way to support Dopefolio and the developer of Dopefolio and it will motivate me to bring more and more awesome content and projects for amazing people like you ❤️
Subscribing to My Youtube channel isn't going to change the world but it will change the world for me, so please do it 😇 and it will not cost you anything 😉

- HTML 🚀
- CSS 🚀
- JavaScript 🚀
- SASS 🚀
From your command line, first clone Dopefolio:
# Clone this repository
$ git clone https://github.com/rammcodes/dopefolio

# Go into the repository
$ cd dopefolio

# Remove current origin repository
$ git remote remove origin
Then you can install the dependencies
Using NPM:
# Install dependencies
$ npm install

# Listen to changes in CSS Preprocessor files ( SASS files )
$ npm run compile:scss
Once you run npm run compile:scss, then open the index.html inside your favorite browser or using the live server extension.
Make sure you have started the SASS to CSS compilation by running
$ npm run compile:scssChange the color theme of the website.
Go to sass/abstracts/_variables.scss and change the value of this sass variable called $themeClrPrimary to your preferred HEX color.
// Default value
$themeClrPrimary: #0062b9;NOTE: I highly recommend to checkout the Dopefolio Playground Link to test the template with different colors and see which color do you like the most.
Go to /index.html and fill your information, there are 6 sections:
- On
.header__logo-img, Add your own Image, Better if the background of the image is transparent so the background can match the theme color. To remove the background of your image, you can visit remove.bg where you can upload your image and it will remove the background of it. - On
.header__logo-sub, Add your own Name.
<!-- **** Header of Homepage **** -->
<header class="header">
  <div class="header__content">
    <div class="header__logo-container">
      <div class="header__logo-img-cont">
        <img
          src="./assets/png/john-doe.png"
          alt="Ram Maheshwari Logo Image"
          class="header__logo-img"
        />
      </div>
      <span class="header__logo-sub">John Doe</span>
    </div>
    <div class="header__main">
      <ul class="header__links">
        <li class="header__link-wrapper">
          <a href="./" class="header__link"> Home </a>
        </li>
        <li class="header__link-wrapper">
          <a href="./#about" class="header__link">About </a>
        </li>
        <li class="header__link-wrapper">
          <a href="./#projects" class="header__link"> Projects </a>
        </li>
        <li class="header__link-wrapper">
          <a href="./#contact" class="header__link"> Contact </a>
        </li>
      </ul>
      <div class="header__main-ham-menu-cont">
        <img
          src="./assets/svg/ham-menu.svg"
          alt="hamburger menu"
          class="header__main-ham-menu"
        />
      </div>
    </div>
  </div>
  <div class="header__sm-menu">
    <div class="header__sm-menu-content">
      <ul class="header__sm-menu-links">
        <li class="header__sm-menu-link">
          <a href="./"> Home </a>
        </li>

        <li class="header__sm-menu-link">
          <a href="./#about"> About </a>
        </li>

        <li class="header__sm-menu-link">
          <a href="./#projects"> Projects </a>
        </li>

        <li class="header__sm-menu-link">
          <a href="./#contact"> Contact </a>
        </li>
      </ul>
    </div>
  </div>
</header>
<!-- END Header -->- On
.heading-primary, put your custom title. - On
.text-primary, put a short description about yourself. - On
.home-hero__social-icon-link, fill the href attribute with a link related to your social media account.
<!-- **** Hero Section of Homepage **** -->
<section class="home-hero">
<div class="home-hero__content">
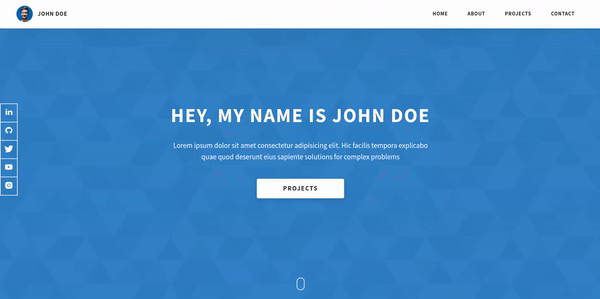
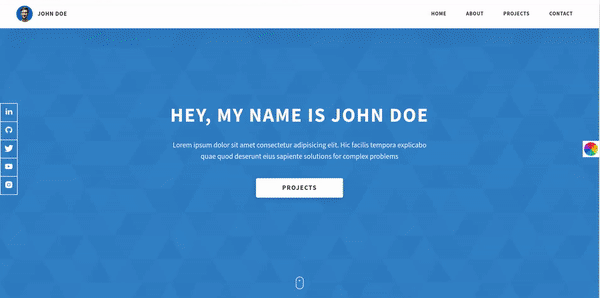
<h1 class="heading-primary">Hey, My name is John Doe</h1>
<div class="home-hero__info">
<p class="text-primary">
Lorem ipsum dolor sit amet consectetur adipisicing elit. Hic facilis
tempora explicabo quae quod deserunt eius sapiente solutions for complex
problems
</p>
</div>
<div class="home-hero__cta">
<a href="./#projects" class="btn btn--bg">Projects</a>
</div>
</div>
<div class="home-hero__socials">
<div class="home-hero__social">
<a href="#" class="home-hero__social-icon-link">
<img
src="./assets/png/linkedin-ico.png"
alt="icon"
class="home-hero__social-icon"
/>
</a>
</div>
<div class="home-hero__social">
<a href="#" class="home-hero__social-icon-link">
<img
src="./assets/png/github-ico.png"
alt="icon"
class="home-hero__social-icon"
/>
</a>
</div>
<div class="home-hero__social">
<a href="#" class="home-hero__social-icon-link">
<img
src="./assets/png/twitter-ico.png"
alt="icon"
class="home-hero__social-icon"
/>
</a>
</div>
<div class="home-hero__social">
<a href="#" class="home-hero__social-icon-link">
<img
src="./assets/png/yt-ico.png"
alt="icon"
class="home-hero__social-icon"
/>
</a>
</div>
<div class="home-hero__social">
<a
href="#"
class="home-hero__social-icon-link home-hero__social-icon-link--bd-none"
>
<img
src="./assets/png/insta-ico.png"
alt="icon"
class="home-hero__social-icon"
/>
</a>
</div>
</div>
<div class="home-hero__mouse-scroll-cont">
<div class="mouse"></div>
</div>
</section>
<!-- /END Hero Section -->- On
.heading-sec__sub, put a short description about the section. - On
.about__content-details-para, put your details here and use<strong></strong>tag to highlight specific keywords. - On
.skills__skill, mention your skill one by one.
<!-- **** About Section of Homepage **** -->
<section id="about" class="about sec-pad">
  <div class="main-container">
    <h2 class="heading heading-sec heading-sec__mb-med">
      <span class="heading-sec__main">About Me</span>
      <span class="heading-sec__sub">
        Lorem ipsum dolor sit amet consectetur adipisicing elit. Hic facilis
        tempora explicabo quae quod deserunt eius sapiente
      </span>
    </h2>
    <div class="about__content">
      <div class="about__content-main">
        <h3 class="about__content-title">Get to know me!</h3>
        <div class="about__content-details">
          <p class="about__content-details-para">
            Hey! It's
            <strong>John Doe</strong>
            and I'm a <strong> Frontend Web Developer </strong> located in Los
            Angeles. I've done
            <strong> remote </strong>
            projects for agencies, consulted for startups, and collaborated with
            talented people to create
            <strong>digital products </strong>
            for both business and consumer use.
          </p>
          <p class="about__content-details-para">
            I'm a bit of a digital product junky. Over the years, I've used
            hundreds of web and mobile apps in different industries and
            verticals. Feel free to
            <strong>contact</strong> me here.
          </p>
        </div>
        <a href="./#contact" class="btn btn--med btn--theme dynamicBgClr"
          >Contact</a
        >
      </div>
      <div class="about__content-skills">
        <h3 class="about__content-title">My Skills</h3>
        <div class="skills">
          <div class="skills__skill">HTML</div>
          <div class="skills__skill">CSS</div>
          <div class="skills__skill">JavaScript</div>
          <div class="skills__skill">React</div>
          <div class="skills__skill">SASS</div>
          <div class="skills__skill">GIT</div>
          <div class="skills__skill">Shopify</div>
          <div class="skills__skill">Wordpress</div>
          <div class="skills__skill">Google ADS</div>
          <div class="skills__skill">Facebook Ads</div>
          <div class="skills__skill">Android</div>
          <div class="skills__skill">IOS</div>
        </div>
      </div>
    </div>
  </div>
</section>
<!-- END About Section -->-
On
.heading-sec__sub, put a short description about the section. -
.projects__rowis the row for each project in your portfolio. -
One
.projects__rowfor each project in your portfolio ( so for example, if you have 3 projects then you need 3.projects__rowone by one). -
Inside each
projects__row, there are 4 main elements.-
Project Image is located at
.projects__row-imgwhere you can add the URL for your project mockup/image. You can use websites like Media Modifier and SmartMockups to generate mockups for free. Just make sure to crop the extra white space around your mockup so the mockups can look bigger and the size of the mockup file will be less. -
.projects__row-content-titleis where you need to add your Project title. -
.projects__row-content-descis where you need to add a short 2-3 lines description of your project. As there's going to be a separate page for each project so there you can add all the details for each project on the specific project page. -
The Anchor tag ( Case Study button) on press will take you to the details page for each project ( For example: If you click the Case Study button of Project 1 then it will take you to the
project-1.htmlfile where you will have all the details about that particular project).
-
Currently, I have already added a separate for each project ( considering there are 3 projects ) the file names are project-1.html, project-2.html, and project-3.html. They all contain the same code only the project title, description and image will change. If you like to add more projects then you can just create a new file for it and paste the same code that we have in project-1.html as the code is going to be the same and the only thing that you need to change is the data inside each project.
<!-- **** Projects Section of Homepage **** -->
<section id="projects" class="projects sec-pad">
  <div class="main-container">
    <h2 class="heading heading-sec heading-sec__mb-bg">
      <span class="heading-sec__main">Projects</span>
      <span class="heading-sec__sub">
        Lorem ipsum dolor sit amet consectetur adipisicing elit. Hic facilis
        tempora explicabo quae quod deserunt eius sapiente
      </span>
    </h2>

    <div class="projects__content">
      <div class="projects__row">
        <div class="projects__row-img-cont">
          <img
            src="./assets/jpeg/project-mockup-example.jpeg"
            alt="Software Screenshot"
            class="projects__row-img"
            loading="lazy"
          />
        </div>
        <div class="projects__row-content">
          <h3 class="projects__row-content-title">Project 1</h3>
          <p class="projects__row-content-desc">
            Lorem ipsum dolor sit amet consectetur adipisicing elit. Hic facilis
            tempora, explicabo quae quod deserunt eius sapiente praesentium.
          </p>
          <a
            href="./project-1.html"
            class="btn btn--med btn--theme dynamicBgClr"
            target="_blank"
            >Case Study</a
          >
        </div>
      </div>
      <div class="projects__row">
        <div class="projects__row-img-cont">
          <img
            src="./assets/jpeg/project-mockup-example.jpeg"
            alt="Software Screenshot"
            class="projects__row-img"
            loading="lazy"
          />
        </div>
        <div class="projects__row-content">
          <h3 class="projects__row-content-title">Project 2</h3>
          <p class="projects__row-content-desc">
            Lorem ipsum dolor sit amet consectetur adipisicing elit. Hic facilis
            tempora, explicabo quae quod deserunt eius sapiente praesentium.
          </p>
          <a
            href="./project-2.html"
            class="btn btn--med btn--theme dynamicBgClr"
            target="_blank"
            >Case Study</a
          >
        </div>
      </div>
      <div class="projects__row">
        <div class="projects__row-img-cont">
          <img
            src="./assets/jpeg/project-mockup-example.jpeg"
            alt="Software Screenshot"
            class="projects__row-img"
            loading="lazy"
          />
        </div>
        <div class="projects__row-content">
          <h3 class="projects__row-content-title">Project 3</h3>
          <p class="projects__row-content-desc">
            Lorem ipsum dolor sit amet consectetur adipisicing elit. Hic facilis
            tempora, explicabo quae quod deserunt eius sapiente praesentium.
          </p>
          <a
            href="./project-3.html"
            class="btn btn--med btn--theme dynamicBgClr"
            target="_blank"
            >Case Study</a
          >
        </div>
      </div>
    </div>
  </div>
</section>
<!-- END Projects Section -->- On
.heading-sec__sub, put a short description about the section. .contact__form-fieldis the field inside form. Currently, there are 3 fields but you can add more fields as per your need but just make sure to change the name of label and input/textarea inside it.
If you like to know how to submit forms so you can receive the form details in your email then highly recommend using formspree.io as it's easier to set up and free to use. If you are using Netlify to host the site then Netlify has an inbuilt form receiver which you can use instead of formspree.
<!-- **** Contact Section of Homepage **** -->
<section id="contact" class="contact sec-pad dynamicBg">
  <div class="main-container">
    <h2 class="heading heading-sec heading-sec__mb-med">
      <span class="heading-sec__main heading-sec__main--lt">Contact</span>
      <span class="heading-sec__sub heading-sec__sub--lt">
        Lorem ipsum dolor sit amet consectetur adipisicing elit. Hic facilis
        tempora explicabo quae quod deserunt eius sapiente
      </span>
    </h2>
    <div class="contact__form-container">
      <form action="#" class="contact__form">
        <div class="contact__form-field">
          <label class="contact__form-label" for="name">Name</label>
          <input
            required
            placeholder="Enter Your Name"
            type="text"
            class="contact__form-input"
            name="name"
            id="name"
          />
        </div>
        <div class="contact__form-field">
          <label class="contact__form-label" for="email">Email</label>
          <input
            required
            placeholder="Enter Your Email"
            type="text"
            class="contact__form-input"
            name="email"
            id="email"
          />
        </div>
        <div class="contact__form-field">
          <label class="contact__form-label" for="message">Message</label>
          <textarea
            required
            cols="30"
            rows="10"
            class="contact__form-input"
            placeholder="Enter Your Message"
            name="message"
            id="message"
          ></textarea>
        </div>
        <button type="submit" class="btn btn--theme contact__btn">
          Submit
        </button>
      </form>
    </div>
  </div>
</section>
<!-- END Contact Section -->- Inside h4 tag with the class
heading heading-sm text-ltadd your name. - On
.main-footer__short-descput a short description about yourself. - On Anchor tag inside
.main-footer__social-cont, fill the href attribute with a link related to your social media account.
<!-- **** Footer Section **** -->
<footer class="main-footer">
<div class="main-container">
<div class="main-footer__upper">
<div class="main-footer__row main-footer__row-1">
<h2 class="heading heading-sm main-footer__heading-sm">
<span>Social</span>
</h2>
<div class="main-footer__social-cont">
<a target="_blank" rel="noreferrer" href="#">
<img
class="main-footer__icon"
src="./assets/png/linkedin-ico.png"
alt="icon"
/>
</a>
<a target="_blank" rel="noreferrer" href="#">
<img
class="main-footer__icon"
src="./assets/png/github-ico.png"
alt="icon"
/>
</a>
<a target="_blank" rel="noreferrer" href="#">
<img
class="main-footer__icon"
src="./assets/png/twitter-ico.png"
alt="icon"
/>
</a>
<a target="_blank" rel="noreferrer" href="#">
<img
class="main-footer__icon"
src="./assets/png/yt-ico.png"
alt="icon"
/>
</a>
<a target="_blank" rel="noreferrer" href="#">
<img
class="main-footer__icon main-footer__icon--mr-none"
src="./assets/png/insta-ico.png"
alt="icon"
/>
</a>
</div>
</div>
<div class="main-footer__row main-footer__row-2">
<h4 class="heading heading-sm text-lt">John Doe</h4>
<p class="main-footer__short-desc">
Lorem ipsum dolor sit amet consectetur adipisicing elit facilis
tempora explicabo quae quod deserunt
</p>
</div>
</div>
<div class="main-footer__lower">
© Copyright 2021. Made by
<a rel="noreferrer" target="_blank" href="https://rammaheshwari.com"
>Ram Maheshwari</a
>
</div>
</div>
</footer>
<!-- END Footer Section -->Each project will have its own Page. The project page will have important details about the project like the Project Title, Description, Technologies, Project Links, etc.
- On
.heading-primaryadd the Project Title. - On
.text-primaryadd a short description about the Project. - On Anchor Tag that says Live Link with class
btn btn--bg, add the Project Live Link as the value for the href attribute.
<section class="project-cs-hero">
  <div class="project-cs-hero__content">
    <h1 class="heading-primary">Project 1</h1>
    <div class="project-cs-hero__info">
      <p class="text-primary">
        Lorem ipsum dolor sit amet consectetur adipisicing elit. Dignissimos in
        numquam incidunt earum quaerat cum fuga, atque similique natus nobis
        sit.
      </p>
    </div>
    <div class="project-cs-hero__cta">
      <a href="#" class="btn btn--bg" target="_blank">Live Link</a>
    </div>
  </div>
</section>- On
.project-details__showcase-img, change the value of src to the location/link of Project Mockup. - On
.project-details__desc-parato add a detailed paragraph describing your project. Use multiple.project-details__desc-paraelements for multiple paragraphs. - On
.skillsmention the skills that were used to build the project inside.skills__skillto mention each skill. - On Anchor Tag that says Live Link with class
btn btn--med btn--theme project-details__links-btn, add the Project Live Link as the value for the href attribute. - On Anchor Tag that says Code Link with class
btn btn--med btn--theme-inv project-details__links-btn, add the Project's Code Link ( Repository Link ) as the value for the href attribute.
<section class="project-details">
  <div class="main-container">
    <div class="project-details__content">
      <div class="project-details__showcase-img-cont">
        <img
          src="./assets/jpeg/project-mockup-example.jpeg"
          alt="Project Image"
          class="project-details__showcase-img"
        />
      </div>
      <div class="project-details__content-main">
        <div class="project-details__desc">
          <h3 class="project-details__content-title">Project Overview</h3>
          <p class="project-details__desc-para">
            Lorem ipsum dolor sit amet consectetur adipisicing elit. Neque alias
            tenetur minus quaerat aliquid, aut provident blanditiis, deleniti
            aspernatur ipsam eaque veniam voluptatem corporis vitae mollitia
            laborum corrupti ullam rem. Lorem ipsum dolor sit amet consectetur
            adipisicing elit. Neque alias tenetur minus quaerat aliquid, aut
            provident blanditiis, deleniti aspernatur ipsam eaque veniam
            voluptatem corporis vitae mollitia laborum corrupti ullam rem?
          </p>
          <p class="project-details__desc-para">
            Lorem ipsum dolor sit amet consectetur adipisicing elit. Neque alias
            tenetur minus quaerat aliquid, aut provident blanditiis, deleniti
            aspernatur ipsam eaque veniam voluptatem corporis vitae mollitia
            laborum corrupti ullam rem?
          </p>
        </div>
        <div class="project-details__tools-used">
          <h3 class="project-details__content-title">Tools Used</h3>
          <div class="skills">
            <div class="skills__skill">HTML</div>
            <div class="skills__skill">CSS</div>
            <div class="skills__skill">JavaScript</div>
            <div class="skills__skill">React</div>
            <div class="skills__skill">SASS</div>
            <div class="skills__skill">GIT</div>
            <div class="skills__skill">Shopify</div>
            <div class="skills__skill">Wordpress</div>
            <div class="skills__skill">Google ADS</div>
            <div class="skills__skill">Facebook Ads</div>
            <div class="skills__skill">Android</div>
            <div class="skills__skill">IOS</div>
          </div>
        </div>
        <div class="project-details__links">
          <h3 class="project-details__content-title">See Live</h3>
          <a
            href="#"
            class="btn btn--med btn--theme project-details__links-btn"
            target="_blank"
            >Live Link</a
          >
          <a
            href="#"
            class="btn btn--med btn--theme-inv project-details__links-btn"
            target="_blank"
            >Code Link</a
          >
        </div>
      </div>
    </div>
  </div>
</section>Once you have done with your setup. You need to put your website online!
I highly recommend to use Netlify to achieve this on the EASIEST WAY
Whenever you wanna host a new site on Netlify. You will need to press the Create New Site button from the Netlify's dashboard once you login into Netlify.
Once you press the Create Site Button then you will have to follow the 3 steps:
-
You will have to select your Github account.
-
Then select the Repository which you wanna host, in this case its your Portfolio website ( Clone of Dopefolio )
-
In the 3rd step, you will have to modify the Site settings and deploy, keep everything as it is but just make sure to modify the Build command and set its value to npm run build and then modify the Publish directory and set its value to / as shown in the image below

Then hit the Deploy site button and your Portfolio Site is live 🥳
If you like this project then give it a Github star by pressing the Star button ⭐
I'm currently looking for good Job Opportunities both Remote ( Worldwide ) and On-Site ( Anywhere in India ). So, if you have a good opportunity that matches my skills experience then you can contact me on my Linkedin or my email id rammcodes@gmail.com 🙌
Special thanks to Jacobo Martínez for inspiring me to create something useful for the Developer Community. Jacobo is the creator of Simplefolio which is another great Portfolio website Template for Developers. Check it out and show him some love ❤️
This project is licensed under the GPL-3.0 License - see the LICENSE file for details