Here is a how-to guide for setting up a Raspberry Pi as a home network router and a wireless Wi-Fi access point.
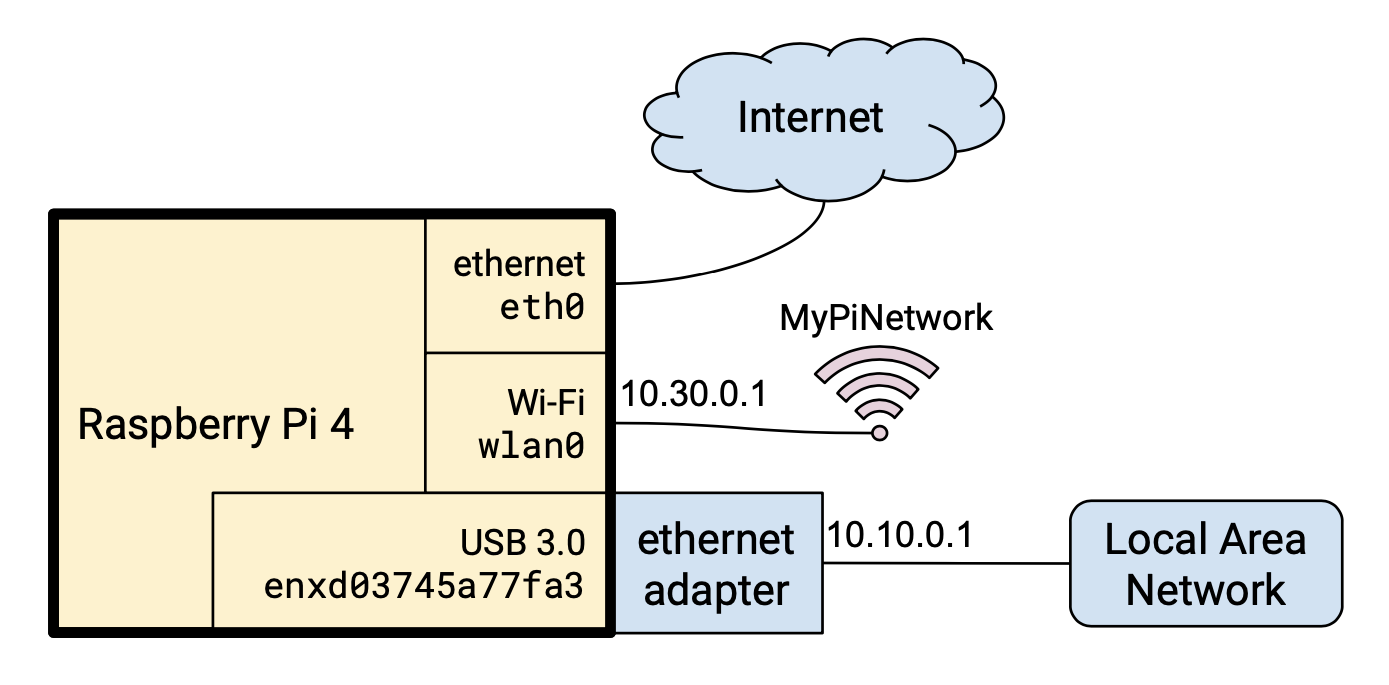
The Raspberry Pi uses the following configuration
- Built-in ethernet connector for connecting to the Internet
- A USB ethernet adapter for connection to the local area network
- Built-in Wi-Fi for creating the wireless access point.
Required:
- Raspberry Pi (version 4 model B used here)
- USB 3.0 Gigabit Ethernet adapter (TP-LINK UE300 used here)
- microSD card used as the boot disk (minimum capacity 8 GB)
- Power source
Useful when setting up or troubleshooting:
- Monitor
- Micro HDMI cable
- USB keyboard
-
Download
Raspberry Pi OS Litefrom the Raspberry Pi website. -
Install the image
raspbian_lite_latest.zipon a microSD memory card with balenaEtcher.
-
Plug in the memory card to the microSD card slot. It is located on the bottom side of the Raspberry Pi at the end opposite to the USB connectors.
-
Plug in the Ethernet adapter to a blue USB 3.0 connector,
-
Plug in a monitor with a micro HDMI cable to either micro HDMI port.
-
Plug in a USB keyboard to any available USB port.
-
Plug in a power source to the USB-C connector.
Start the Raspberry Pi Software Configuration Tool raspi-config:
$ sudo raspi-config
Select the following options:
5. Localisation Options
- L3 Keyboard
- select the proper keyboard layout
- L2 Timezone
- select the proper timezone
- L4 WLAN Country
- select the proper WLAN country
1. System Options
- S3 Password
- select a new password for the
piuser
- select a new password for the
- S4 Hostname
- select a new hostname for the computer
3. Interface Options
- P2 SSH
- enable remote command line access using SSH
6. Advanced Options
- A1 Expand Filesystem ** select this** to use all available storage space on your boot media
- A4 Network Interface Names
- enable predictable network interface names
- this will make a USB ethernet adapter with MAC address
d0:37:45:a7:7f:a3appear as interface ´enxd03745a77fa3`
Reboot the Raspberry Pi after changing all the settings.
Upgrade packages to latest versions.
$ sudo apt update && sudo apt upgrade
Install required packages:
$ sudo apt install dnsmasq netfilter-persistent iptables-persistent hostapd
dnsmasq runs a DNS and DHCP server on the local area network.
netfilter-persistent and iptables-persistent are used to save and restore firewall rules.
hostapd makes the Pi act as a Wi-Fi access point
Also optionally install the following packages:
$ sudo apt install screen dnsutils
screen is useful for running a terminal session.
dnsutils contains the command dig that is useful for checking that domain name service queries work both for local and Internet addresses.
Uncomment the following line on /etc/sysctl.conf or add file /etc/sysctl.d/ip-routing.conf with the following
content to enable IP forwarding:
net.ipv4.ip_forward=1
Apply the new setting without rebooting:
$ sudo sysctl --system
Add a postrouting rule to table nat of iptables to masquerade traffic from other interfaces as coming from eth0:
$ sudo iptables -t nat -A POSTROUTING -o eth0 -j MASQUERADE
$ sudo netfilter-persistent save
Note: if the iptables command above gives an error message, you may need to reboot your Raspberry Pi.
You can check the masquerading rule and its statistics with this command:
$ sudo iptables -t nat -vL POSTROUTING
Chain POSTROUTING (policy ACCEPT 4984 packets, 331K bytes)
 pkts bytes target     prot opt in     out     source               destination
 5169  441K MASQUERADE  all  --  any    eth0    anywhere             anywhere
Find out name of the external ethernet adapter. This command lists all network interfaces:
$ ip a
...
3: enxd03745a77fa3: <NO-CARRIER,BROADCAST,MULTICAST,UP> mtu 1500 qdisc pfifo_fast state DOWN group default qlen 1000
...
The name should have prefix enx. In the example above the interface name is enxd03745a77fa3
Append DHCP client configuration to file /etc/dhcpcd.conf:
interface eth0
  static domain_name=home

# TODO use name of your interface
interface enxd03745a77fa3
  static ip_address=10.10.0.1/24

interface wlan0
  static ip_address=10.20.0.1/24
  nohook wpa_supplicant
Append DNS and DHCP server configuration to file /etc/dnsmasq.conf:
# run DNS and DHCP server on these interfaces
interface=enxd03745a77fa3  # TODO use name of your interface
interface=wlan0

# use local domain .home
domain=home
expand-hosts

# assign fixed IP and hostname to certain devices based on MAC address
dhcp-host=ac:dc:de:ad:be:ef,10.10.0.2,mylaptop,24h

# give IP addresses from this range to devices at ethernet interface
dhcp-range=10.10.0.100,10.10.0.250,24h

# give IP addresses from this range to devices at Wi-Fi acces point
dhcp-range=10.20.0.100,10.20.0.250,24h

# name of this device
address=/pi.home/10.10.0.1
Unblock Wi-Fi radio with the following command:
$ sudo rfkill unblock wlan
Run this command to see which Wi-Fi channels are available for 2 GHz and 5 GHz modes:
$ iwlist wlan0 channel
Add configuration to file /etc/hostapd/hostapd.conf:
ssid=MyPiNetwork
country_code=FI
interface=wlan0

# 5GHz mode
hw_mode=a
channel=36
ieee80211n=1
ieee80211ac=1
macaddr_acl=0

# WPA authentication
wpa_passphrase=TODO-Wi-Fi-network-password
auth_algs=1
ignore_broadcast_ssid=0
wpa=2
wpa_key_mgmt=WPA-PSK
wpa_pairwise=TKIP
rsn_pairwise=CCMP
Choose the values you want to use:
ssid: Wi-Fi network namecountry_code: two-letter ISO 3166-1 country codehw_mode: protocol version:a= IEEE 802.11a (5 Ghz),b= IEEE 802.11b (2.4 Ghz)g= IEEE 802.11g (2.4 GHz)
channel- available channels depend on
hw_mode
- available channels depend on
wpa_passphrase: Wi-Fi password
When all configuration is done, do the following:
- Power off Raspberry Pi
- Plug in Internet ethernet cable to internal ethernet port
- Plug in local area network (LAN) ethernet cable to external ethernet adapter
- Power on Raspberry Pi
Devices connected to LAN should get local IP addresses in the range 10.10.0.1/24 from the DHCP server on the Raspberry Pi.
Devices connected to the Wi-Fi Access Point should get IP addresses in the range 10.20.0.1/24.
All devices should be able to connect to the Internet.
Here are some useful commands for troubleshooting:
| command | explanation |
|---|---|
lsusb -v |
show information on USB devices |
ip a |
show addresses assigned to all network interface |
iw dev wlan0 info |
show information on wireless device wlan0 |
tail -f /var/log/syslog |
show system log |
systemctl status hostapd |
show status of service hostapd |
journalctl -xe |
show log output of services started by systemd |
sudo iwlist wlan0 scan |
show list of access points and ad-hoc cells seen by wireless interface wlan0 |
route -n |
show routing table that tells which IP addresses are routed to which interfaces |
sudo tshark wlan0 |
show network traffic on interface wlan0 |
If you want to use the external TP-link AC600 Wi-Fi adapter, you need to download a driver from http://downloads.fars-robotics.net/. The site contains instructions for installing the driver.
Get the correct driver for your kernel version. Here is, for example, the driver for kernel version 5.10.11-v7l-1399:
http://downloads.fars-robotics.net/wifi-drivers/8812au-drivers/8812au-5.10.11-v7l-1399.tar.gz
The particular USB 3.0 Ethernet adapter I used boots in USB Mass Media mode and needs to be reset before it works as an ethernet adapter.
Reset the adapter by adding the following udev rule to file /etc/udev/rules.d/80-r8152.rules:
ACTION=="add", SUBSYSTEM=="usb", ENV{ID_VENDOR_ID}=="2357", ENV{ID_MODEL_ID}=="0600", RUN+="/usr/sbin/usb_modeswitch -v 2357 -p 0600 -R"
Source: [SOLVED] r8153 USB Network Device shows up as CD-ROM on boot