在GraphQL中实现用户认证和授权的5种方式
mrdulin opened this issue · comments

在GraphQL中实现用户认证和授权的5种方式
前言
用户的认证和授权是大多数web服务具备的功能,对于提供RESTful API的web服务,以Node.js社区的web框架express.js为例,基本流程是将用户认证和授权的功能实现放在中间件(middleware)中,比如express-jwt中间件,使用基于JWT的用户认证,该中间件会验证和解析客户端发送的请求的请求头上设置的Authorization: Bearer <jwt>字段,并将解析出来的用户信息设置在请求对象req上,在下一个中间件或者我们定义的路由controller中,可以拿到该用户信息,比如id和email,通过id或email查询数据库,从而获取用户角色role,进行权限验证。相关的文档已经很多,不再叙述。
这篇文章主要讲构建GraphQL Web服务时,由于其不同于传统RESTful API的路由和中间件定义方式,严格意义上没有路由的概念,所以技术实现上不同于使用RESTful架构风格构建的web服务。不过很多原理和**依旧是想通的,希望这篇文章能给开发者们一个启发。
阅读本文需要熟练掌握以下编程技术,**,模式:
- Node.js,Express.js,TypeScript,JavaScript, apollographql,graphql
- middleware, RESTful API架构风格, JWT
- Decorator模式, mokeypatch, FP, OOP, high-order function(高阶函数)
解决方案
首先使用可视化工具给示例代码的GraphQL Schema生成一份可视化图表,可以直观的看到定义的GraphQL Schema及其关系。
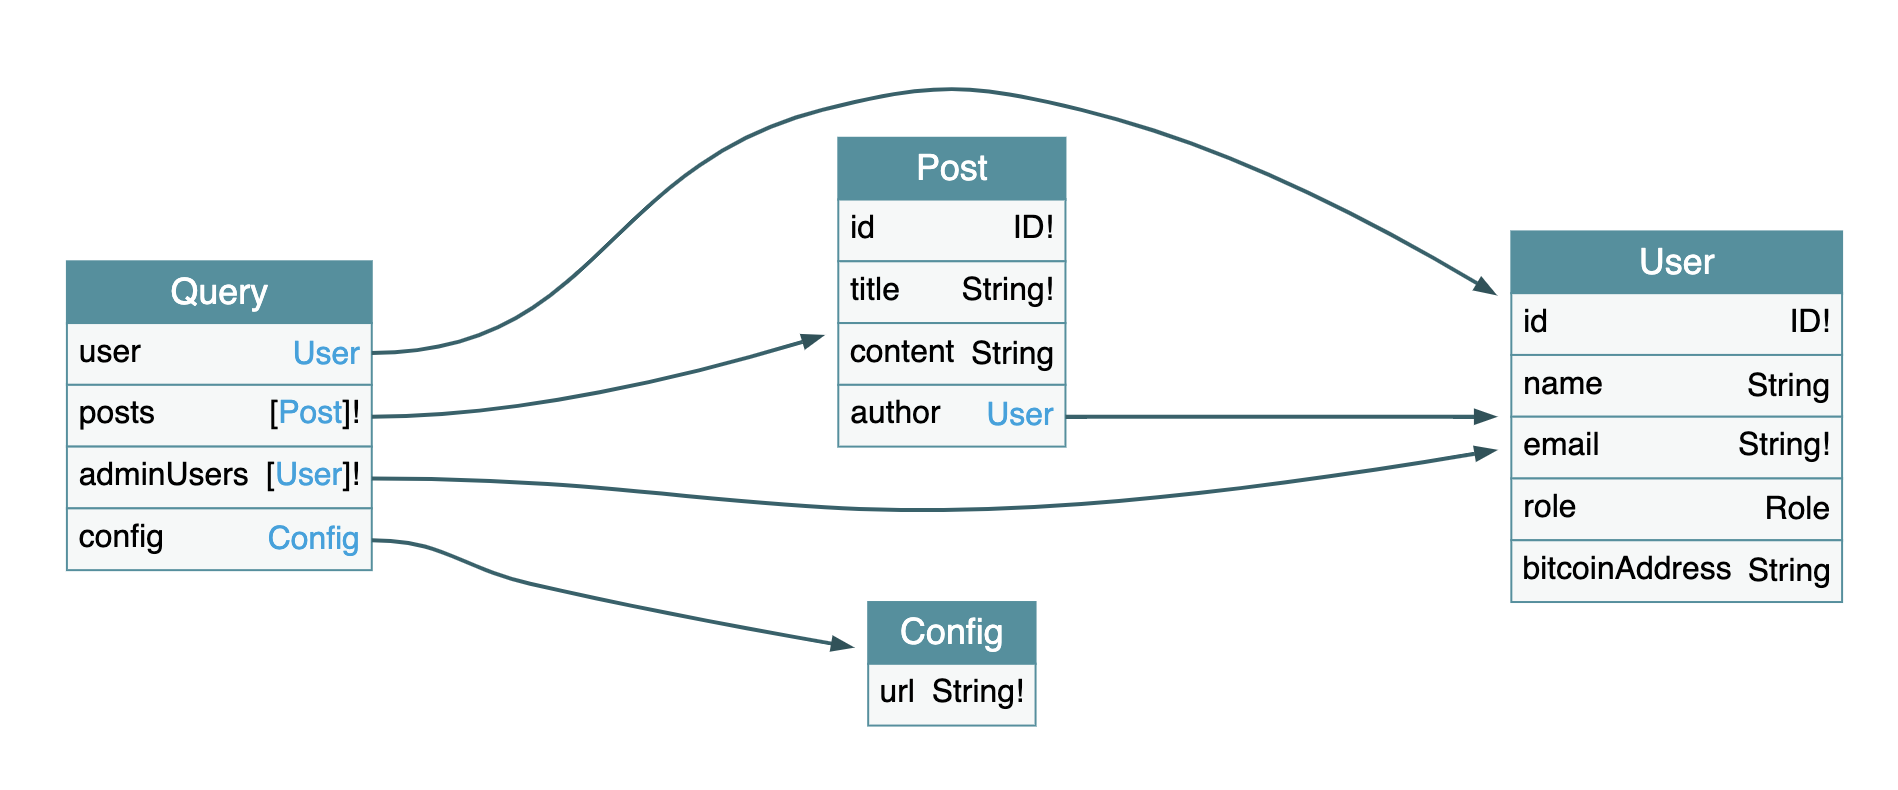
Query Type中定义了4个查询字段,分别是user, posts,adminUsers, config,可以理解为定义了4个查询API。再来看下数据库中user的角色role,为了简单起见,示例代码构造了一个简单的内存数据库。user的role:
enum Role {
  admin = 'admin',
  viewer = 'viewer',
  editor = 'editor',
}
现在需要对这4个接口进行认证和授权,规则如下:
user: 访问需要用户的角色为viewer或 editor或admin
posts: 公开的API,不需要用户认证和授权,任何互联网上的用户都能访问
adminUsers: 访问需要用户角色为admin
config: 访问需要用户的角色为viewer或 editor或admin
访问上述4个查询API的用户权限规则很容易理解,目前我们定义的用户权限规则都是在API级别上的,下面来看定义在GraphQL Schema中User这个Object Type上字段级别的用户权限规则:
User.bitcoinAddress: 客户端发送GraphQL查询,查询GraphQL Schema定义的User上的bitcoinAddress字段,需要admin的用户权限。
介绍完我们要实现的用户认证和授权规则,接下来设计数据库表和关系,并插入一些测试数据,内存数据库如下:
const db = {
  users: [
    {
      id: 1,
      name: faker.name.findName(),
      email: faker.internet.email(),
      role: Role.admin,
      bitcoinAddress: faker.finance.bitcoinAddress(),
    },
    {
      id: 2,
      name: faker.name.findName(),
      email: faker.internet.email(),
      role: Role.viewer,
      bitcoinAddress: faker.finance.bitcoinAddress(),
    },
  ],

  posts: [
    { id: 1, title: faker.lorem.sentence(), content: faker.lorem.paragraph(), authorId: 1 },
    { id: 2, title: faker.lorem.sentence(), content: faker.lorem.paragraph(), authorId: 1 },
    { id: 3, title: faker.lorem.sentence(), content: faker.lorem.paragraph(), authorId: 2 },
  ],
};
GraphQL Schema:
import { gql } from 'apollo-server';

const typeDefs = gql`
  enum Role {
    admin
    viewer
    editor
  }

  type User {
    id: ID!
    name: String
    email: String!
    role: Role
    bitcoinAddress: String
  }

  input CreateUserInput {
    name: String
    email: String!
    role: Role!
  }

  type Post {
    id: ID!
    title: String!
    content: String
    author: User
  }

  type Config {
    url: String!
  }

  input CreatePostInput {
    title: String!
    content: String!
  }

  type Query {
    user(id: ID!): User
    posts(ids: [ID!]!): [Post]!

    adminUsers: [User]!
    config: Config
  }

  type CommonResponse {
    code: Int!
    message: String!
  }

  type Mutation {
    createPost(input: CreatePostInput!): CommonResponse!
    createUser(input: CreateUserInput!): CommonResponse!
  }
`;

export { typeDefs };
GraphQL Resolvers:
import { IResolvers } from 'apollo-server';
import { Role } from './db';

const resolvers: IResolvers = {
  Query: {
    user: (_, { id }, { db }) => {
      return db.users.find((user) => user.id.toString() === id);
    },
    posts: (_, { ids }, { db }) => {
      return db.posts.filter((post) => ids.includes(post.id.toString()));
    },
    adminUsers: (_, __, { db }) => {
      return db.users.find((user) => user.role === Role.admin);
    },
    config: () => {
      return { url: 'https://github.com/mrdulin' };
    },
  },
  Mutation: {
    createPost: (_, { input }, { db }) => {
      const post = {
        id: db.posts.length,
        ...input,
      };
      db.posts.push(post);
      return { code: 0, message: 'ok' };
    },

    createUser: (_, { input }, { db }) => {
      const user = {
        id: db.users.length,
        ...input,
      };
      db.users.push(user);
      return { code: 0, message: 'ok' };
    },
  },

  Post: {
    author: (post, _, { db }) => {
      return db.users.find((user) => user.id === post.authorId);
    },
  },
};

export { resolvers };server.ts:
import express from 'express';
import { ApolloServer } from 'apollo-server-express';
import { db } from './db';
import { schema } from './schema';
import http from 'http';

async function createApolloServer(): Promise<http.Server> {
  const PORT = process.env.PORT || 3000;
  const app = express();

  function contextFunction({ req }) {
    const token = req.get('authorization');
    // mock jwt auth user
    const user = db.users.find((u) => u.id.toString() === token);
    req.user = user;
    return { db, req };
  }

  const server = new ApolloServer({ schema, context: contextFunction });
  server.applyMiddleware({ app, path: '/graphql' });

  return new Promise((resolve) => {
    const httpServer = app.listen(PORT, () => {
      console.log(`🚀 Server ready at http://localhost:${PORT}${server.graphqlPath}`);
      resolve(httpServer);
    });
  });
}

export { createApolloServer };示例代码在contextFunction中模拟JWT的认证过程,const token = req.get('authorization');语句表示校验并解析出用户信息,我在GraphQL客户端中设置内存数据库中用户的id,用来模拟JSON web token。
const user = db.users.find((u) => u.id.toString() === token);语句表示根据用户id查询数据库,获取user。req.user = user;语句表示将查询出的user添加到req请求对象上,由于apollo-server默认做了和express.js框架的集成,所以该req请求对象就是express.js提供的req。return { db, req };语句表示将内存数据库db和req对象注入到context中并返回。
const server = new ApolloServer({ schema, context: contextFunction }); 语句表示实例化apollo server,传入GraphQL Schema和contextFunction,contextFunction会在每次客户端有请求访问GraphQL web服务时执行一次,因此每次请求的req对象都是新的,代表不同的客户端请求。context对象会被传入GraphQL的所有resolver函数。我们就可以通过context获取内存数据库db和req请求对象。
1. 使用GraphQL Middleware
prisma社区开源了一个叫做graphql-middleware的工具,该工具的工作原理是,我们可以将定义好的中间件在GraphQL resolver函数被调用之前或之后运行,使用中间件这种方式可以改善代码结构,提高代码的可读性,可维护性,可扩展性,提升代码复用能力(我们将公共代码逻辑放入中间件中,而不是在每个GraphQL resolver中都写一遍),以及清晰的职责分离。
Authentication和Authorization这两种场景是非常适合使用中间件的,定义好的auth middleware代码如下:
import { IMiddleware } from 'graphql-middleware';
import { GraphQLResolveInfo } from 'graphql';
import { AuthenticationError } from 'apollo-server';

const resolverAuthMap = {
  Query: {
    user: 'viewer:editor:admin',
    adminUser: 'admin',
    config: 'viewer:editor:admin',
  },
  Mutation: {
    createPost: 'admin',
    createUser: 'admin',
  },
  User: {
    bitcoinAddress: 'admin',
  },
};

const authMiddleware: IMiddleware = async (
  // tslint:disable-next-line: ban-types
  resolve: Function,
  parent: any,
  args: any,
  context: any,
  info: GraphQLResolveInfo,
) => {
  if (resolverAuthMap[info.parentType.name]) {
    const role = resolverAuthMap[info.parentType.name][info.fieldName];
    if (role) {
      const roles = role.split(':');
      const { user } = context.req;
      console.log(
        `parentType.name: ${info.parentType.name}, fieldName: ${
          info.fieldName
        }, role = ${role}, user = ${JSON.stringify(user)}`,
      );
      if (!user || !roles.includes(user.role)) {
        throw new AuthenticationError('no permission');
      }
    }
  }
  return resolve(parent, args, context, info);
};

export { authMiddleware };首先定义了resolverAuthMap变量,其结构和前面定义的GraphQL resolver结构保持一致。定义了每个resolver需要的用户权限规则,不同角色role之间通过:符号分割,当然也可以定义为数组形式,如['viewer', 'editor', 'admin']。
紧接着定义authMiddleware,函数签名中的resolve表示GraphQL resolver函数,比如开发者定义的resolver函数Query.user, Query.posts, Post.author, 以及GraphQL Scalar Type默认的resolver。因此,就可以在每个GraphQL resolver函数被调用之前或之后加入我们自己的代码逻辑,这里就是用户认证和授权的代码。
接着看,authMiddleware函数签名中的parent, args, context和info和resolver函数签名一致。具体解释请看apollographql社区提供的解释说明。
通过info.parentType.name,可以获取到当前执行的resolver函数父级类型的名称,info.fieldName表示当前resolver函数解析的字段名称,这就是为什么resolverAuthMap变量的数据结构要和resolver的结构匹配,可以获取到API级别resolver或者字段级别resolver需要的相应的用户权限规则,即 view:editor:admin, admin等。稍后将通过例子来更直观的说明。
通过context.req可以获取到数据库中查询出来的user, 上述代码38-40行,判断用户是否存在(没有经过JWT认证的用户不存在),以及是否有足够的权限访问该resolver。
接下来创建GraphQL Schema,并应用创建好的authMiddleware:
import { applyMiddleware } from 'graphql-middleware';
import { typeDefs } from './typeDefs';
import { resolvers } from './resolvers';
import { makeExecutableSchema } from 'graphql-tools';
import { authMiddleware } from './middleware';
const schema = makeExecutableSchema({
typeDefs,
resolvers,
});
const schemaWithMiddleware = applyMiddleware(schema, authMiddleware);
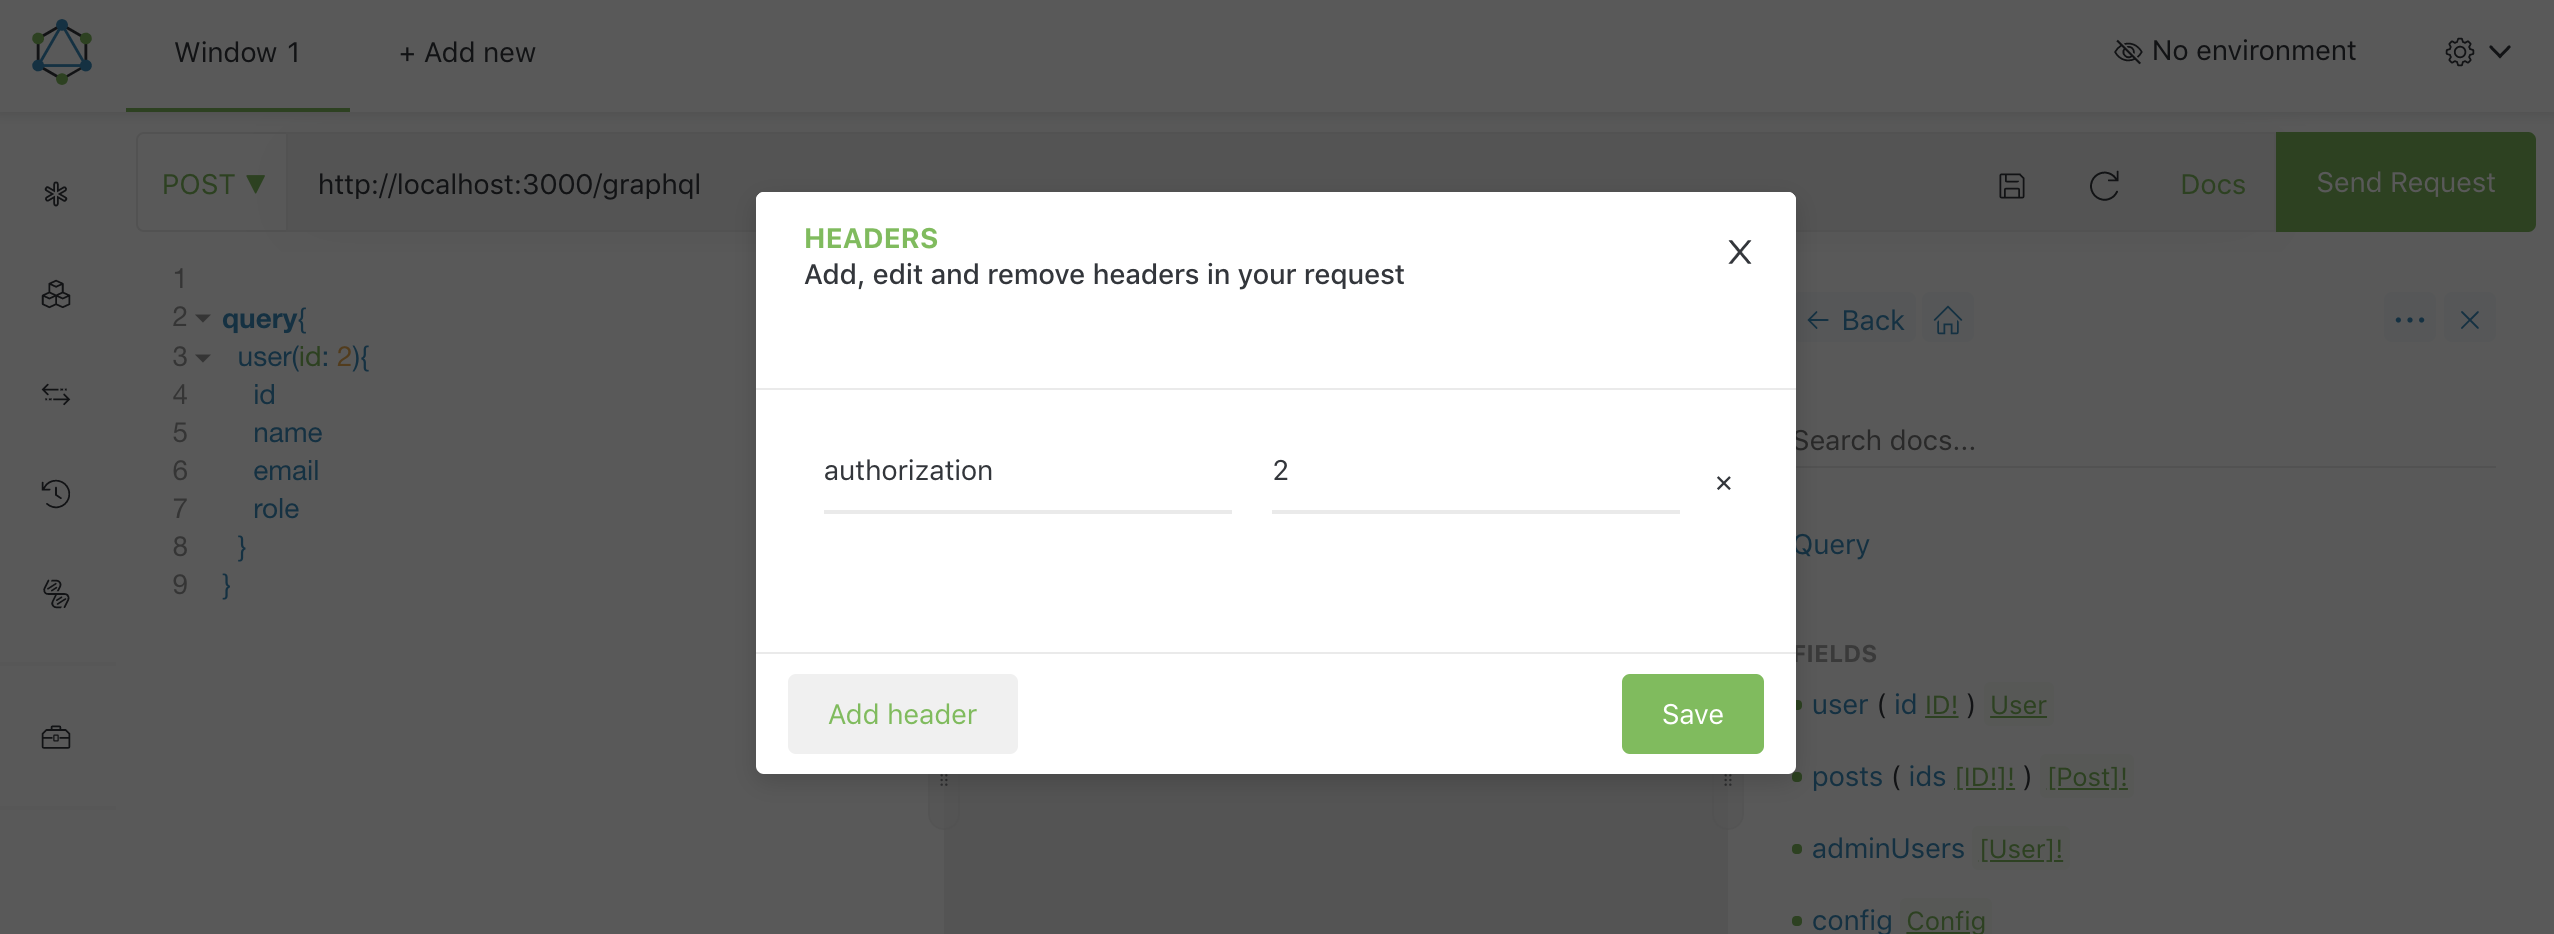
export { schemaWithMiddleware as schema };至此,GraphQL Server端的关键代码说明完毕。开始在客户端发起GraphQL查询,进行验证(手动e2e测试)。测试1: 不设置请求头,用来模拟没有进行JWT认证的用户:
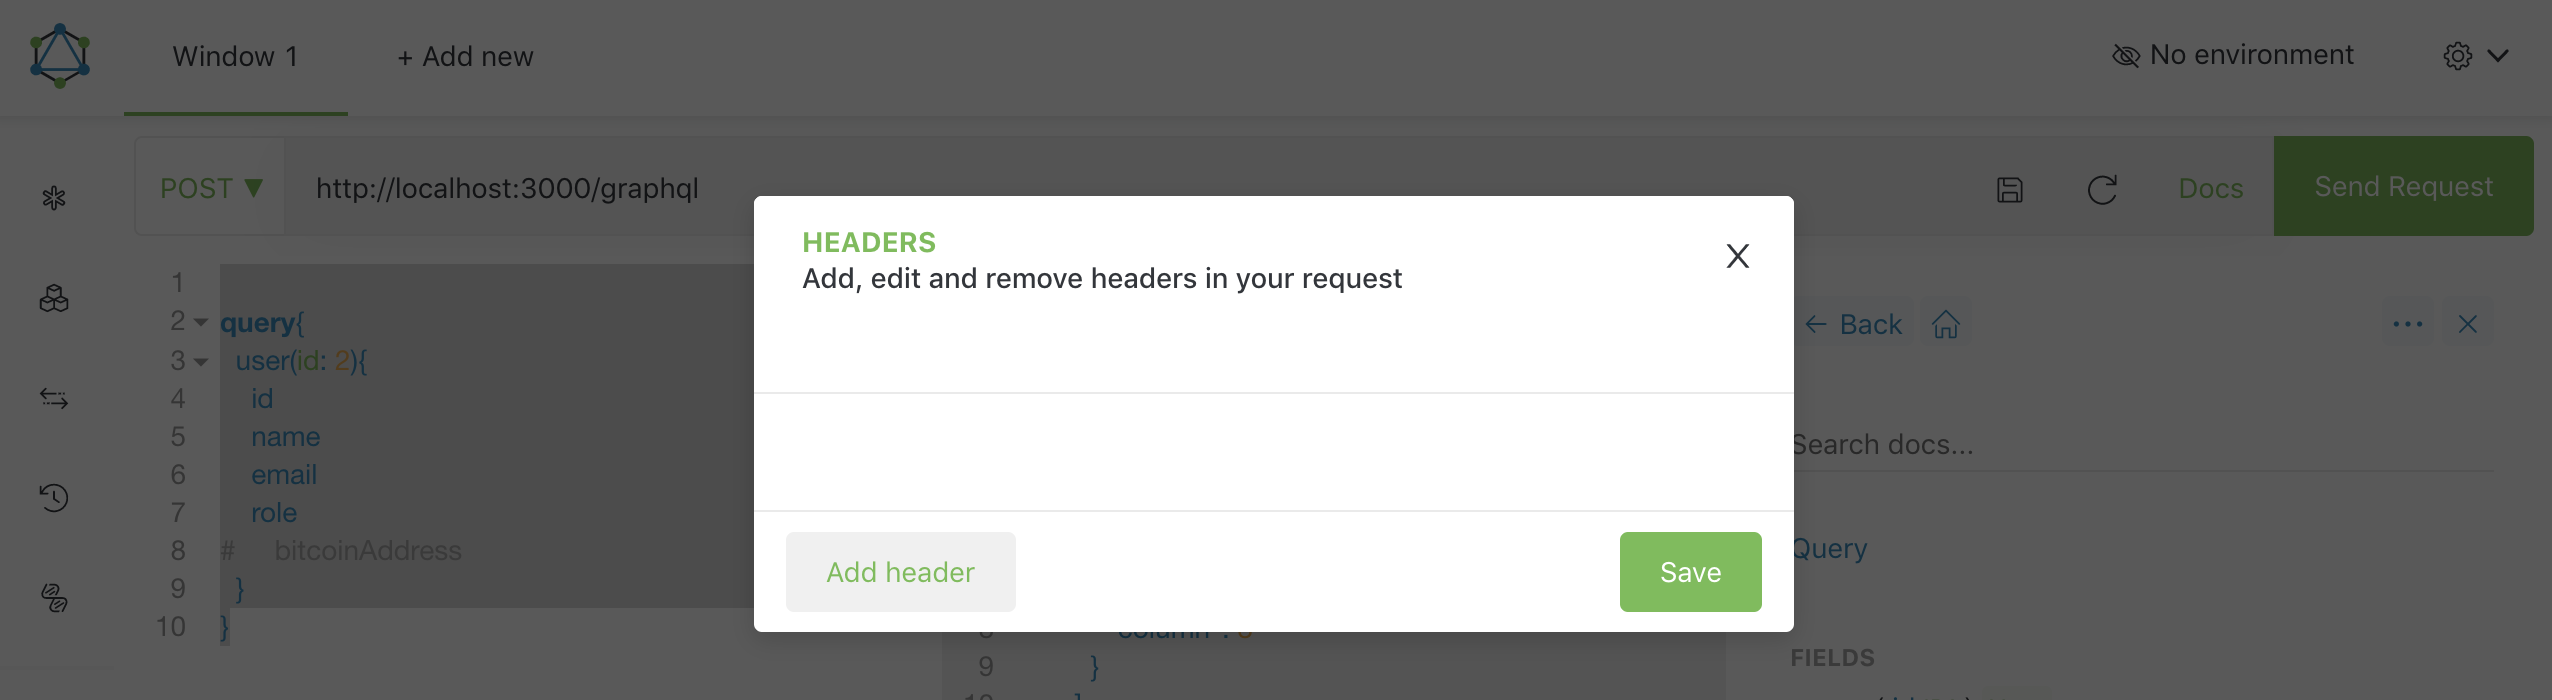
查询user,查询和返回结果如下:
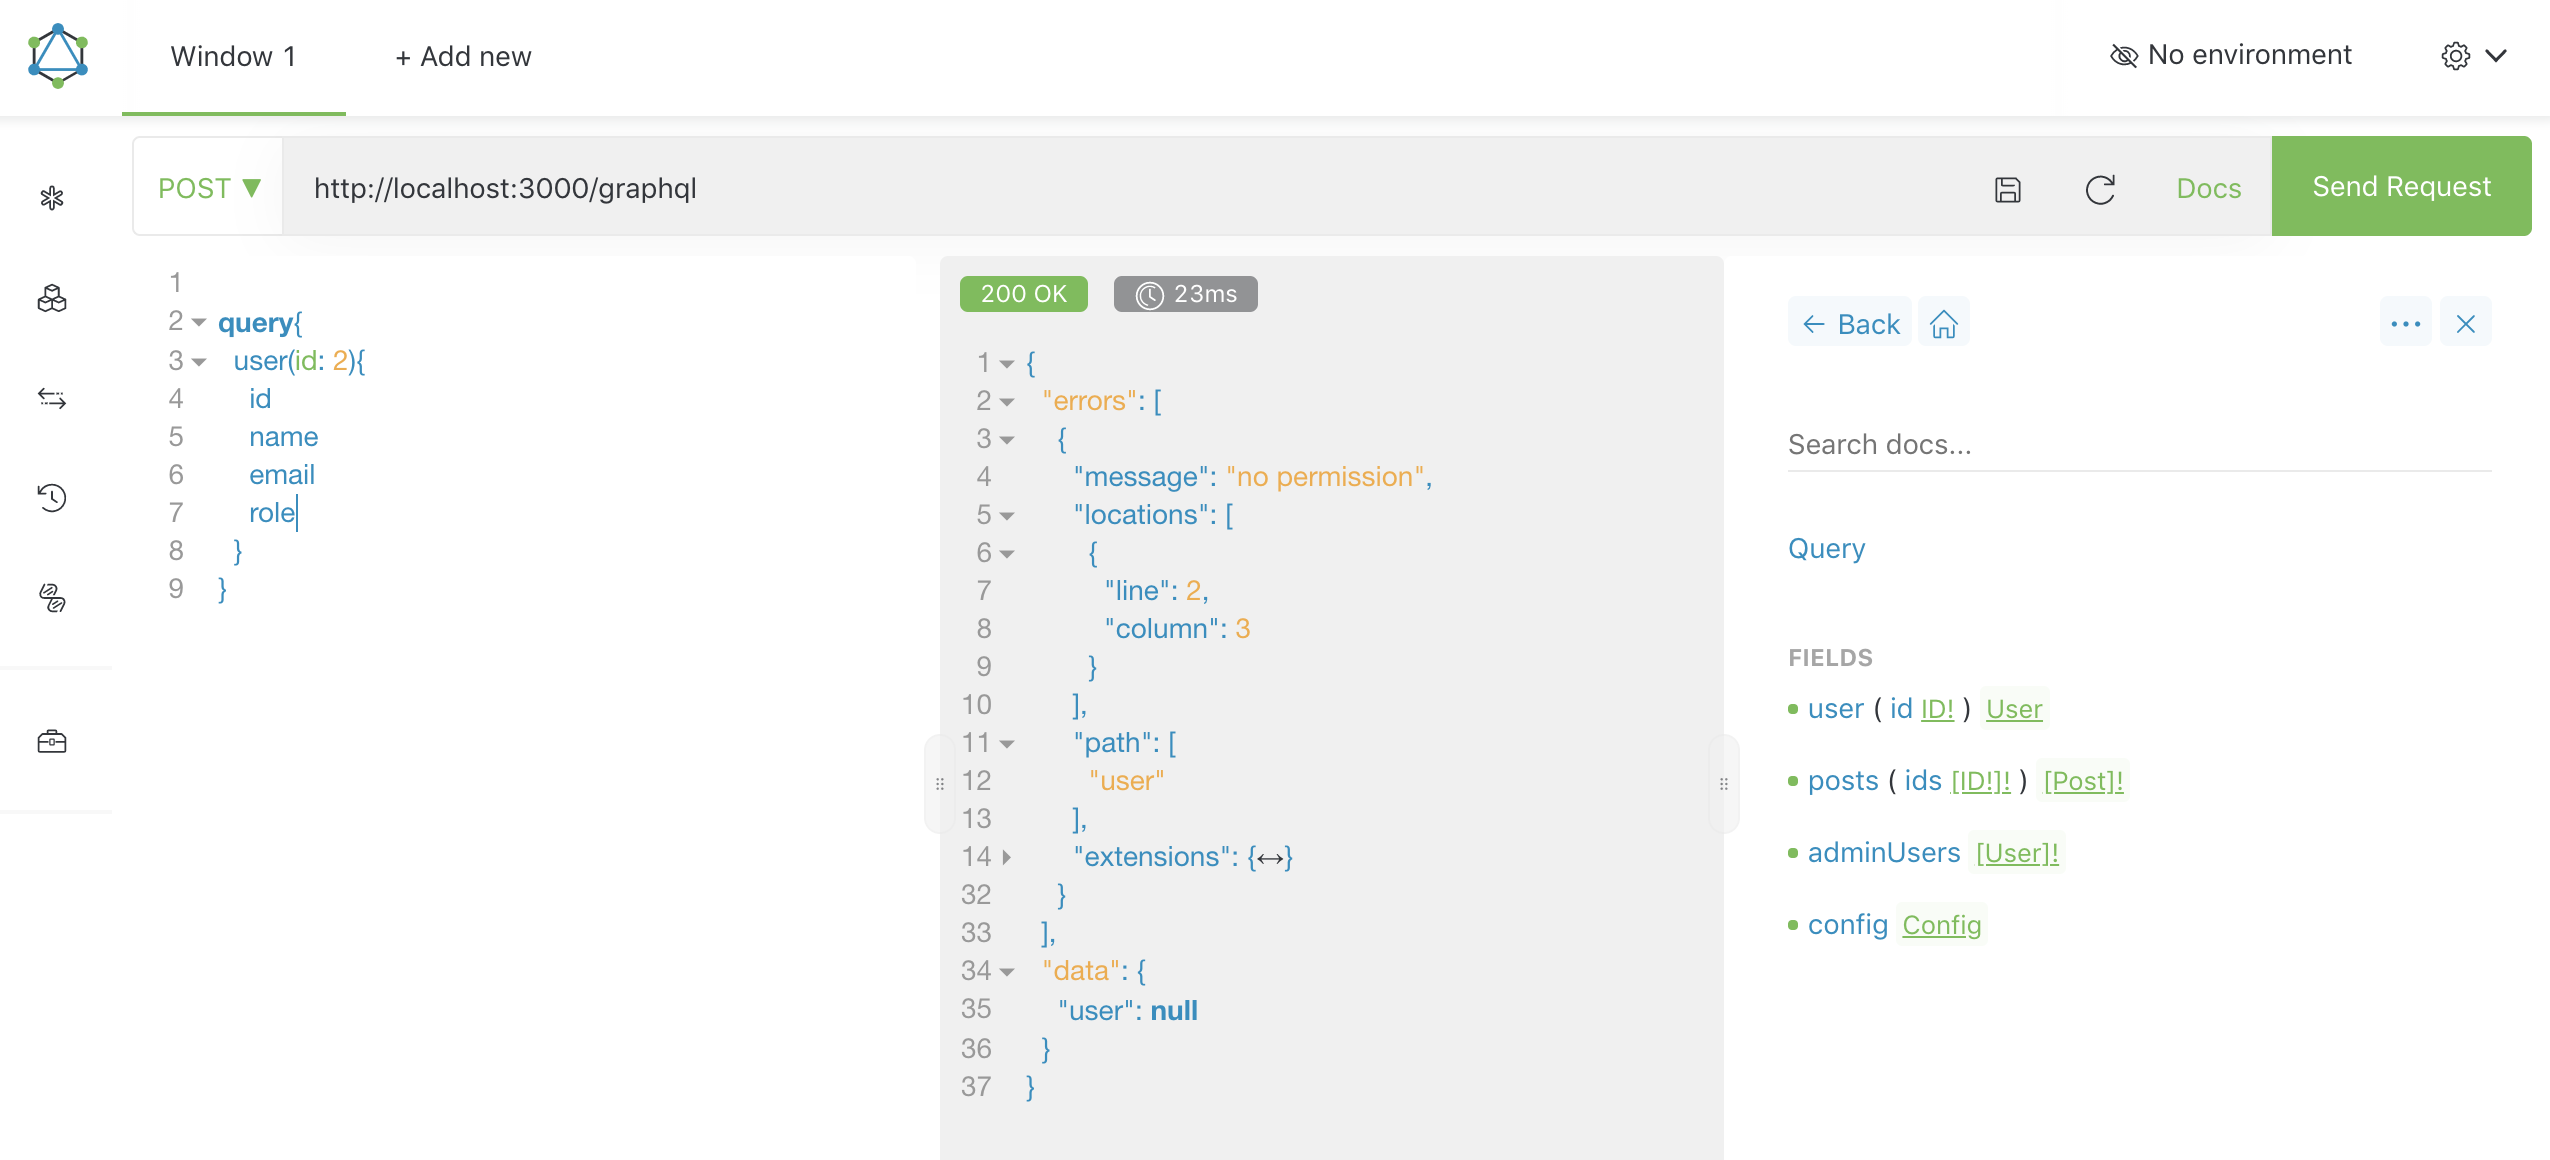
访问user接口需要view,editor,admin权限,用户没有经过JWT认证,因此返回no permission错误。GraphQL Server端authMiddleware中打印的日志如下:
parentType.name: Query, fieldName: user, role = viewer:editor:admin, user = undefined测试通过。
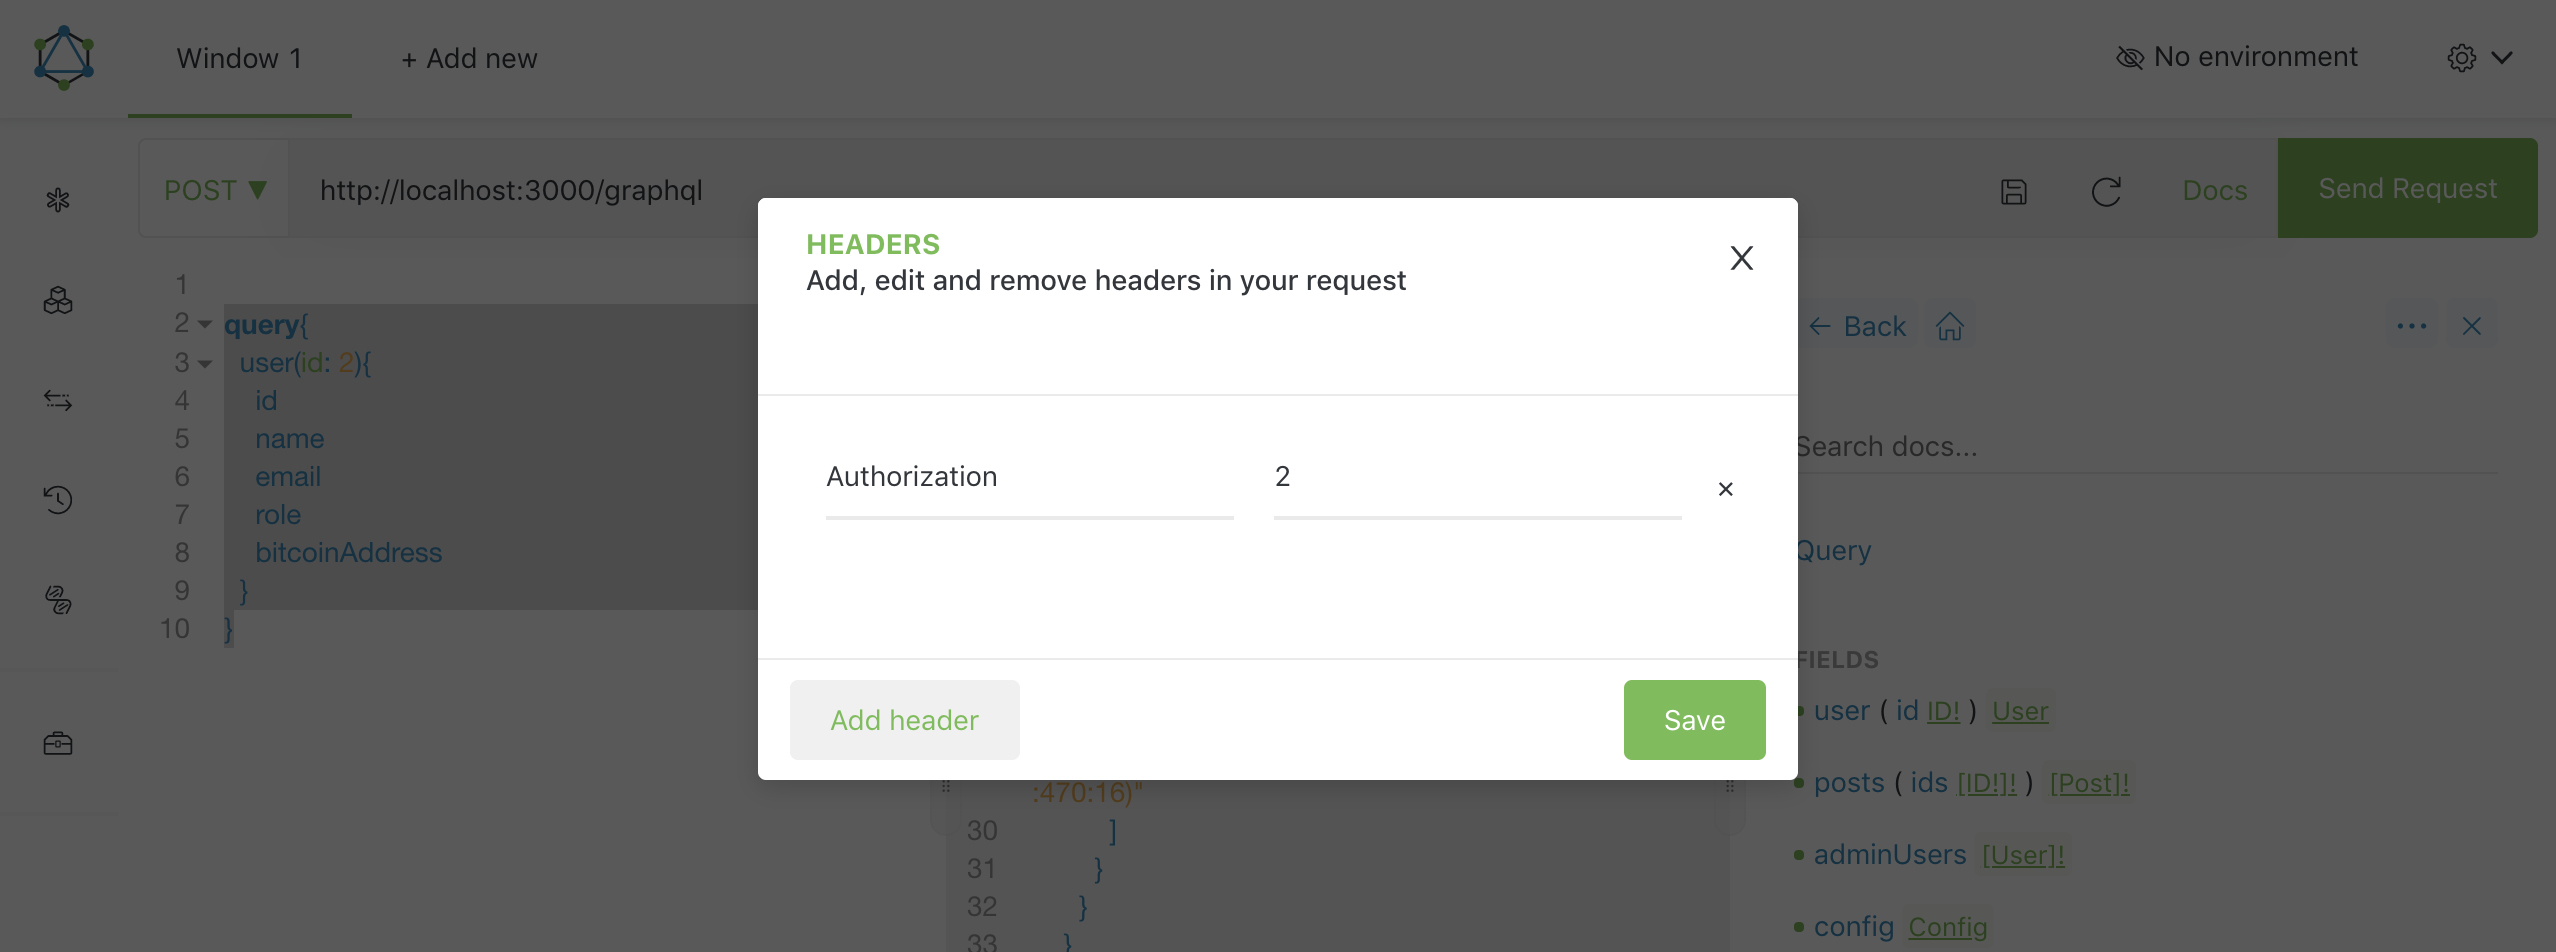
测试2: 设置请求头,模拟经过JWT认证的用户,并且用户的role是viewer
用户id为2的用户有viewer权限,查询user,查询和返回结果如下:

server端日志如下:
parentType.name: Query, fieldName: user, role = viewer:editor:admin, user = {"id":2,"name":"Lacy Hills","email":"Chaya53@gmail.com","role":"viewer","bitcoinAddress":"1XK325B63F25Q6AF2Z57VQIJ84W9JJF"}测试通过。
测试3: 拥有viewer权限的用户访问GraphQL Schema定义的User上的bitcoinAddress字段,访问该字段需要用户拥有admin权限。
查询user,查询和返回结果如下:
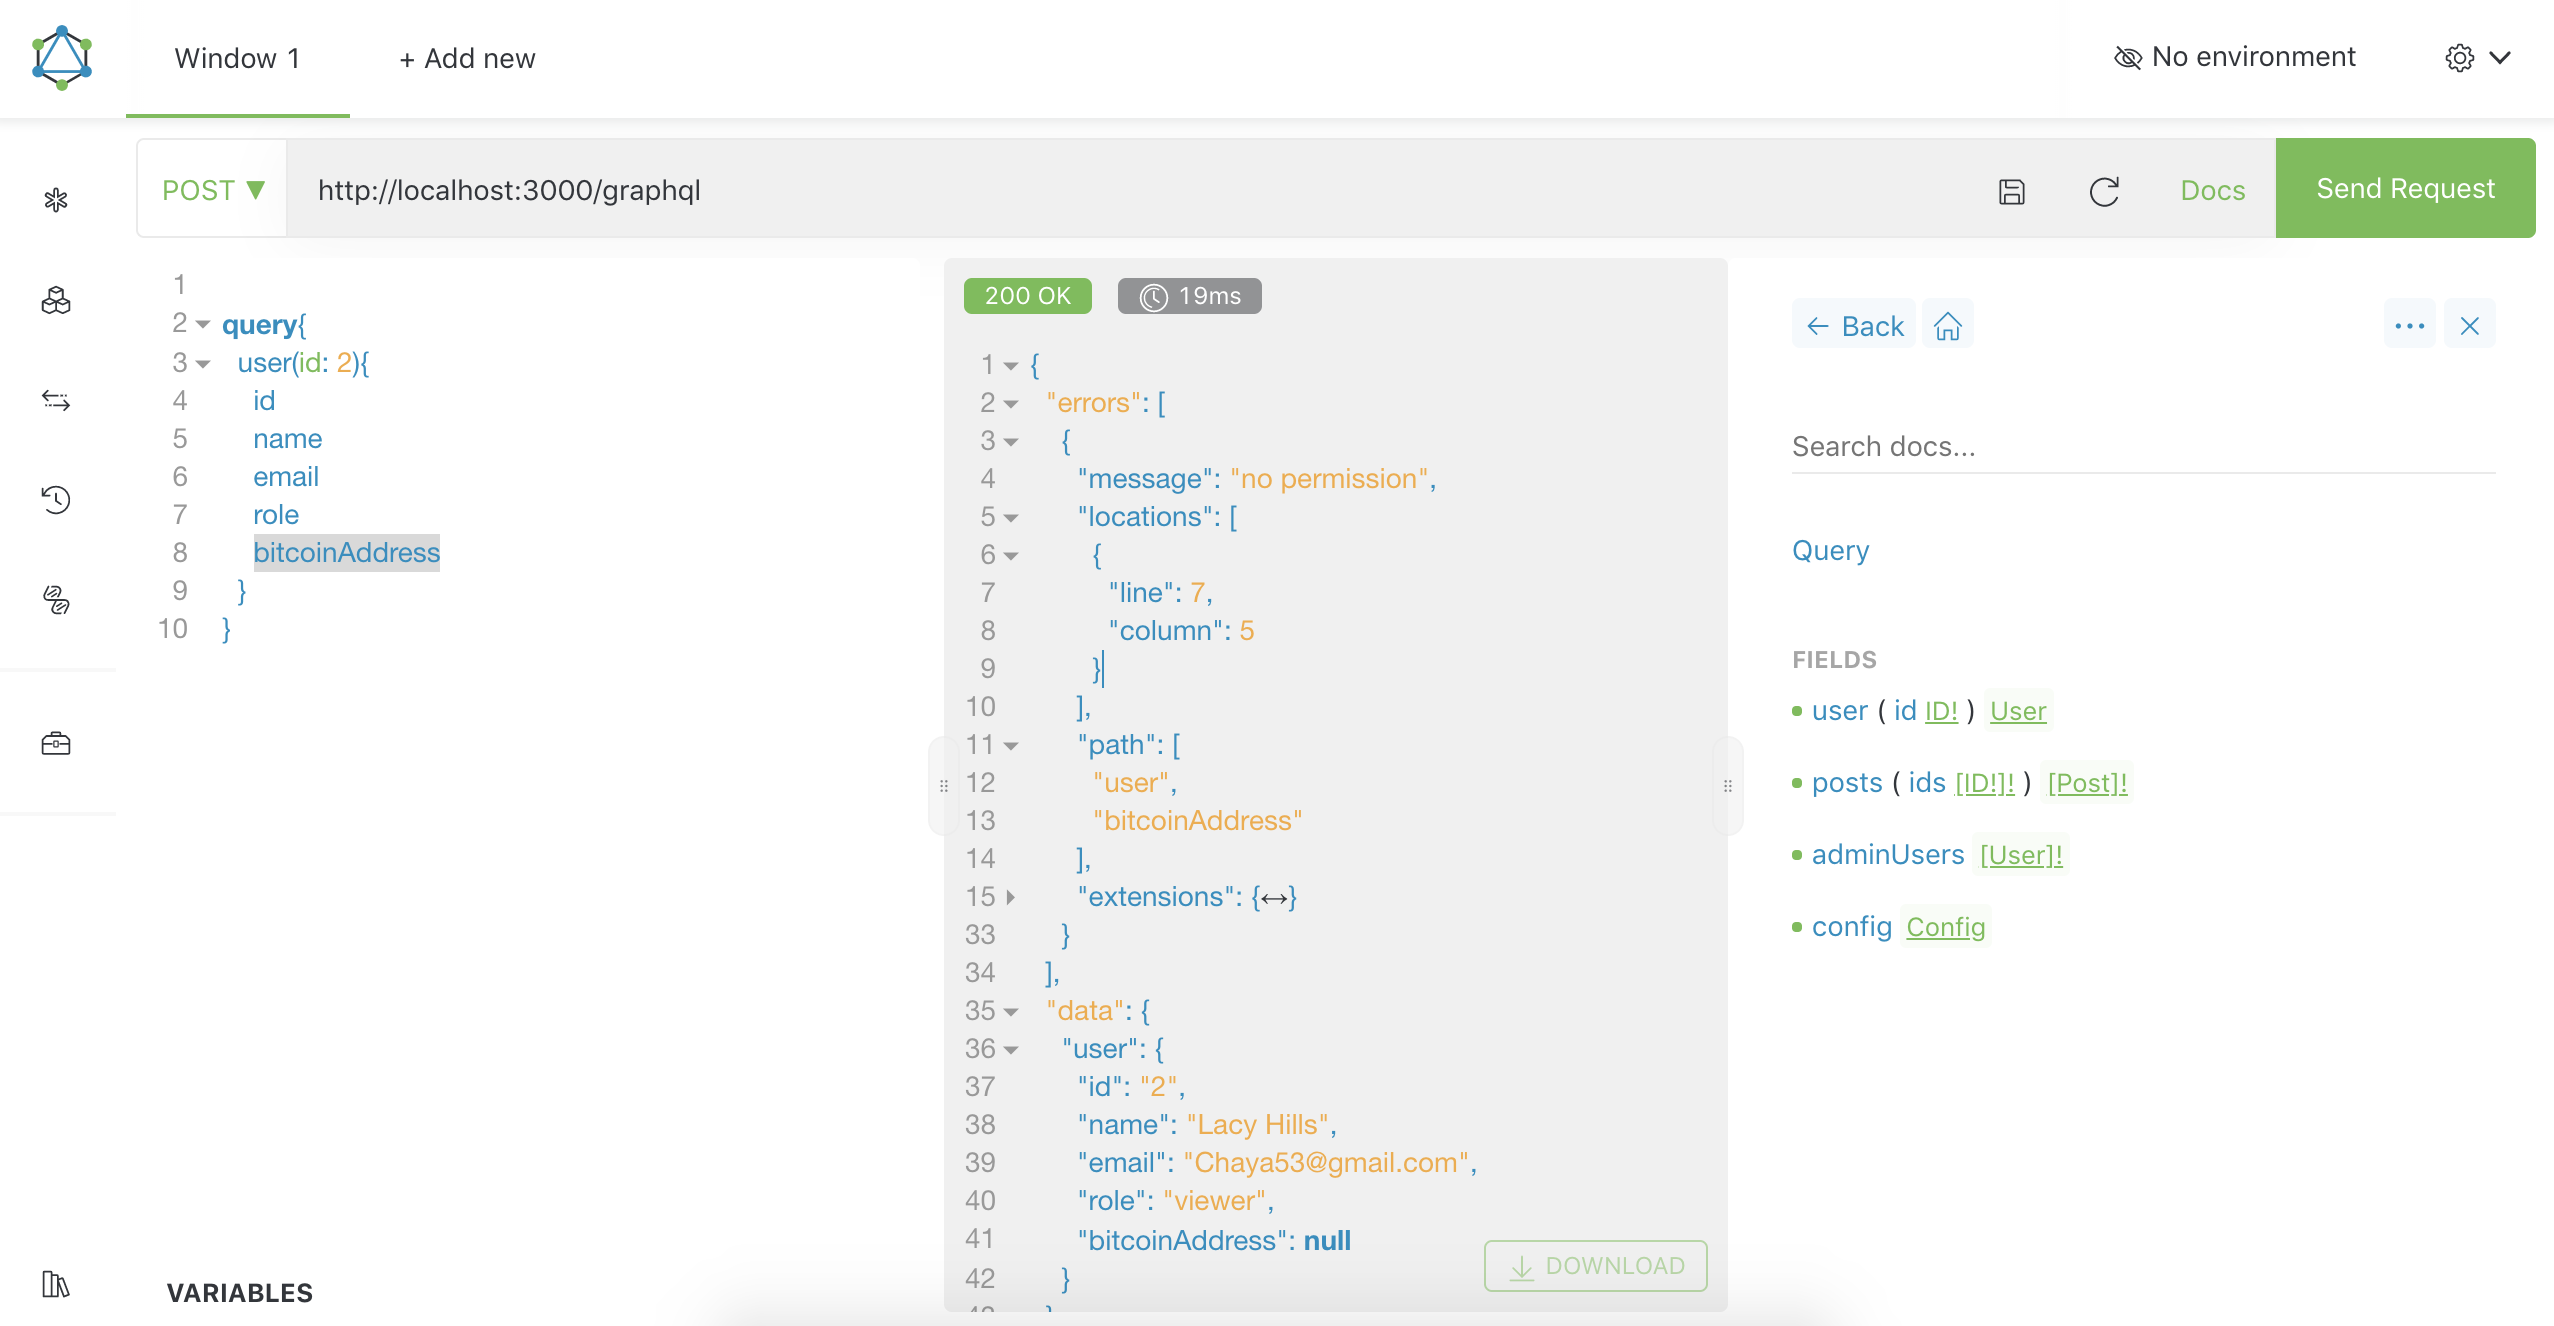
这里GraphQL给出了部分失败(partial failures)的返回结果,即有访问权限的接口user和字段id, name, email, role正常返回,没有访问权限的字段bitcoinAddress返回null,并通过errors和path字段给出错误字段解析路径。
测试通过。
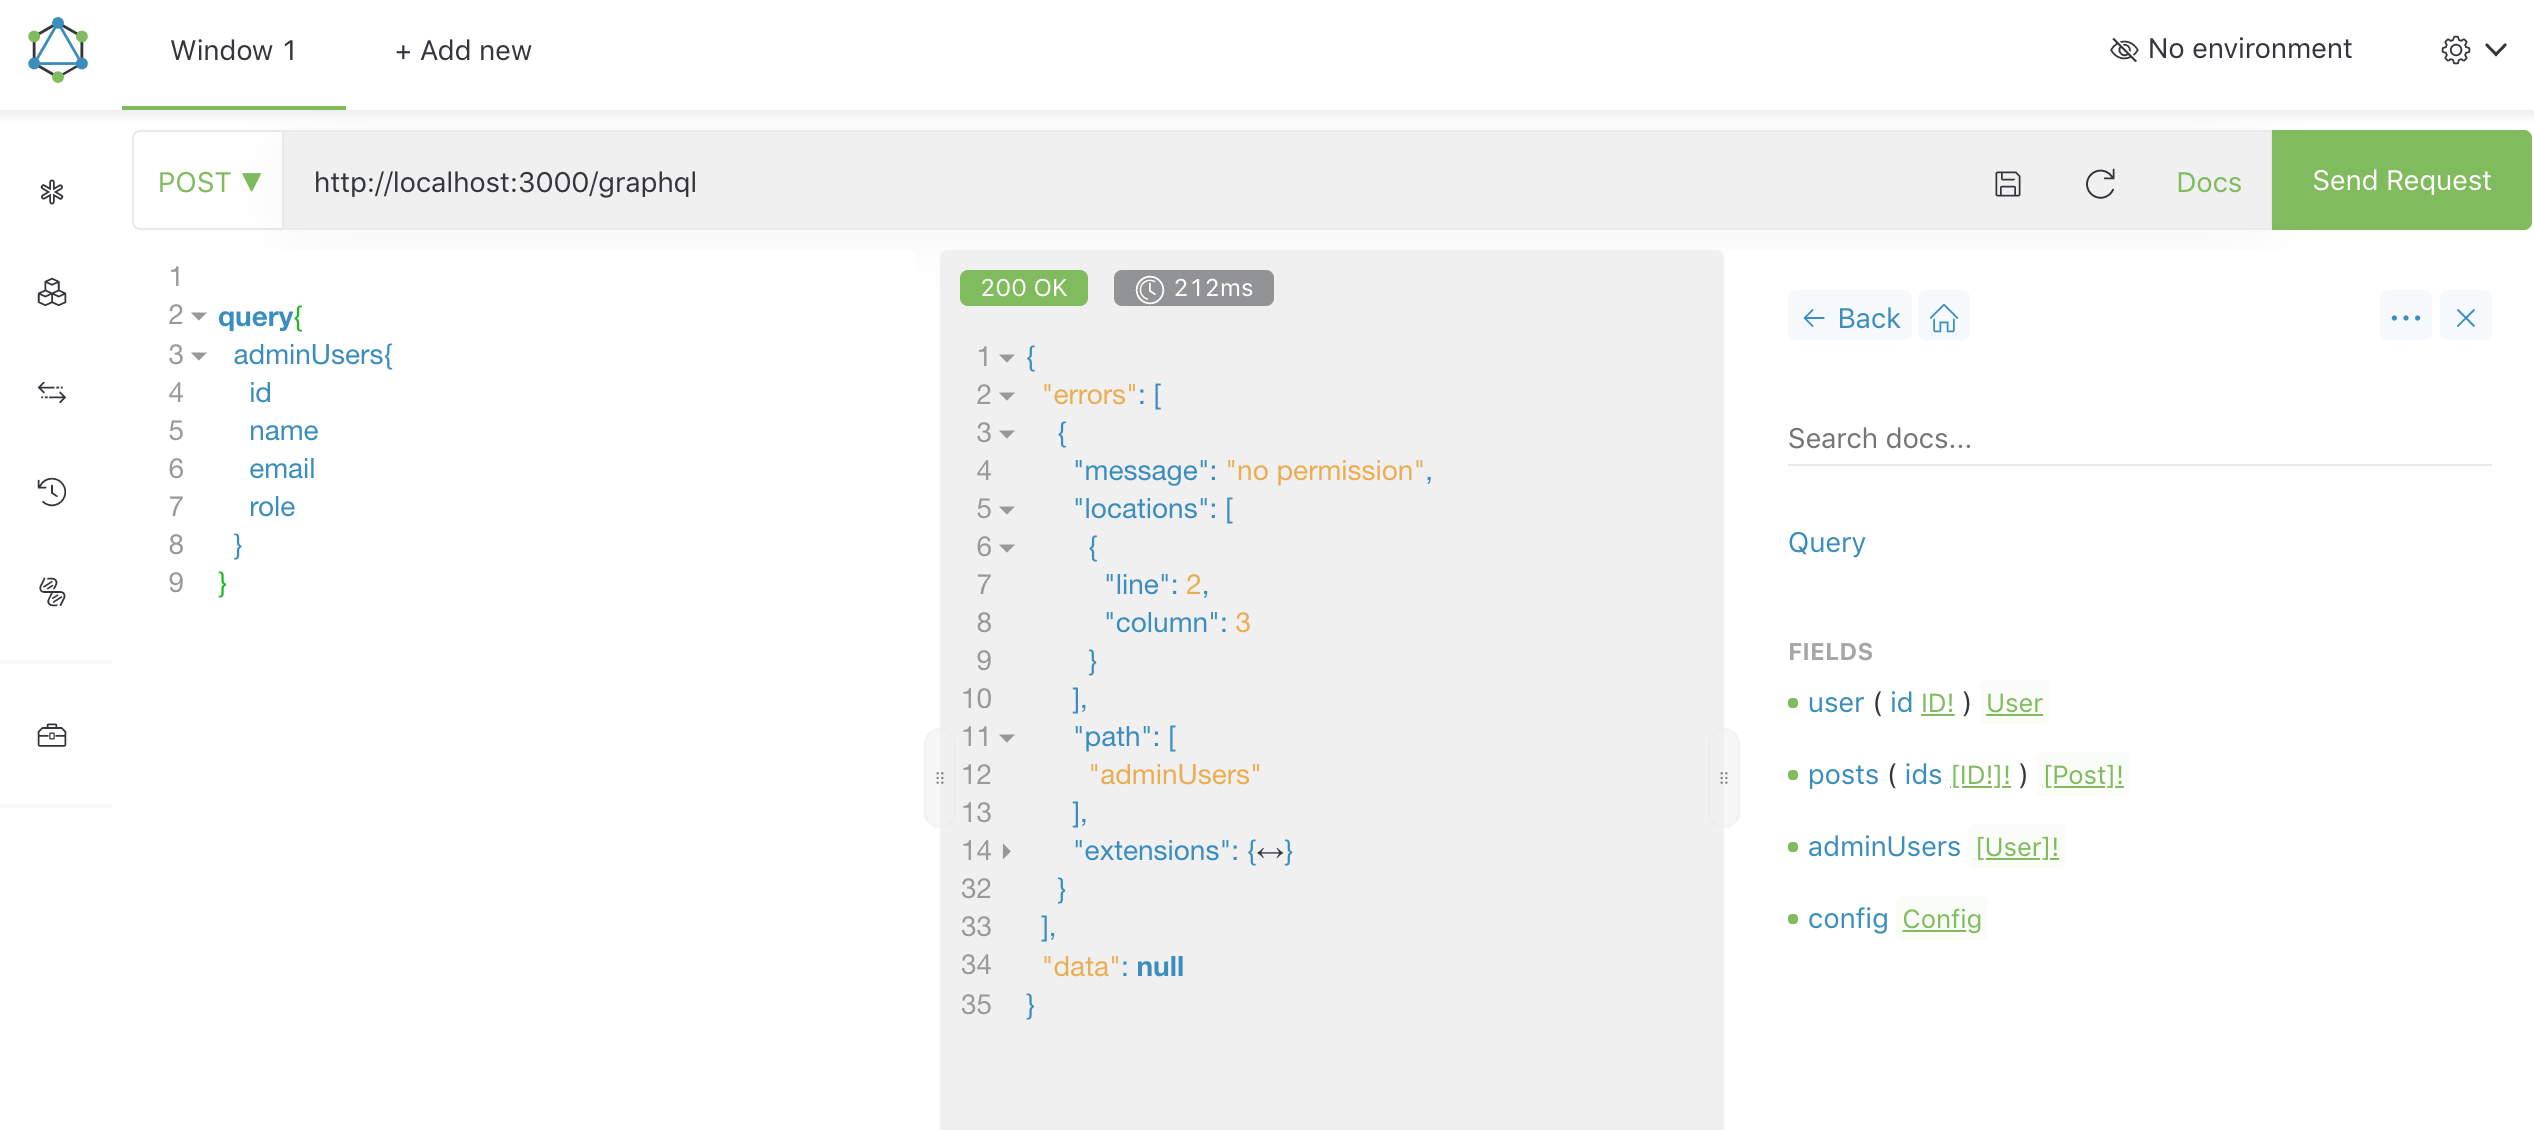
测试4: 拥有viewer权限的用户访问需要admin权限的adminUser接口
查询和返回结果如下:
server端日志:
parentType.name: Query, fieldName: adminUsers, role = admin, user = {"id":2,"name":"Brian Weimann III","email":"Rickie83@gmail.com","role":"viewer","bitcoinAddress":"1KQNBJ9JKHXS4LL3ZU6B0NNLVG7Q"}
得到no permission错误,测试通过。
其他接口测试类似,这里不再测试。基于graphql-middleware的认证与授权,可以使用已有的轮子graphql-shield package.
2. 使用GraphQL Schema Directive
关于GraphQL Schema Directive的概念这里不再介绍,直接来看示例代码,相比于第一种方式,这种方式需要修改GraphQL Schema,添加了用户认证和授权directive的GraphQL Schema定义如下:
import { gql } from 'apollo-server';

const typeDefs = gql`
  directive @auth(requires: [Role]) on OBJECT | FIELD_DEFINITION

  enum Role {
    admin
    viewer
    editor
  }

  type User {
    id: ID!
    name: String
    email: String!
    role: Role
    bitcoinAddress: String @auth(requires: [admin])
  }

  input CreateUserInput {
    name: String
    email: String!
    role: Role!
  }

  type Post {
    id: ID!
    title: String!
    content: String
    author: User
  }

  type Config {
    url: String!
  }

  input CreatePostInput {
    title: String!
    content: String!
  }

  type Query {
    user(id: ID!): User @auth(requires: [admin, editor, viewer])
    posts(ids: [ID!]!): [Post]!

    adminUsers: [User]! @auth(requires: [admin])
    config: Config @auth(requires: [admin, editor, viewer])
  }

  type CommonResponse {
    code: Int!
    message: String!
  }

  type Mutation {
    createPost(input: CreatePostInput!): CommonResponse! @auth(requires: [admin])
    createUser(input: CreateUserInput!): CommonResponse! @auth(requires: [admin])
  }
`;

export { typeDefs };代码第4行定义一个auth directive,该directive接收一个requires参数,类型是GraphQL枚举类型Role的数组。OBJECT表示该指令可以标记在GraphQL Object Type上,如type User, type Post,也可以标记在字段级别上,对字段级别进行权限校验,如Query.user, Query.adminUsers, User.bitcoinAddress。示例代码将auth指令都标记在了字段级别。
auth指令实现如下:
import { SchemaDirectiveVisitor, AuthenticationError } from 'apollo-server';
import { defaultFieldResolver } from 'graphql';

class AuthDirective extends SchemaDirectiveVisitor {
  public visitObject(type) {
    this.ensureFieldsWrapped(type);
    type._requiredAuthRole = this.args.requires;
  }

  public visitFieldDefinition(field, details) {
    this.ensureFieldsWrapped(details.objectType);
    field._requiredAuthRole = this.args.requires;
  }

  public ensureFieldsWrapped(objectType) {
    if (objectType._authFieldsWrapped) {
      return;
    }
    objectType._authFieldsWrapped = true;

    const fields = objectType.getFields();
    Object.keys(fields).forEach((fieldName) => {
      const field = fields[fieldName];
      const { resolve = defaultFieldResolver } = field;
      field.resolve = async function(...args) {
        const roles = field._requiredAuthRole || objectType._requiredAuthRole;
        if (!roles) {
          return resolve.apply(this, args);
        }
        const context = args[2];
        const { user } = context.req;
        console.log(
          `[AuthDirective] fieldName: ${fieldName}, roles = ${roles.join(':')}, user = ${JSON.stringify(user)}`,
        );
        if (!user || !roles.includes(user.role)) {
          throw new AuthenticationError('no permission');
        }
        return resolve.apply(this, args);
      };
    });
  }
}

export { AuthDirective };代码24行,我们可以获取到标记了auth指令的字段及其原始的resolver。代码25-40行,重写该字段的resolver,加入用户权限校验代码逻辑。生成GraphQL Schema:
const schema = makeExecutableSchema({
  typeDefs,
  resolvers,
  schemaDirectives: {
    auth: AuthDirective,
    authorized: AuthDirective,
    authenticated: AuthDirective,
  },
});
测试结果和和方式1一样,这里不再给出。
3. 使用组合Resolver
通过编写组合函数combineResolvers,可以组合多个resolver,最后返回一个resolver,这些resolver会使用相同的参数依次被调用,直到某个resolver函数的返回值不是undefined,该返回值会被立即返回,排在该resolver后面的resolver函数将被忽略。combineResolvers实现如下:
import { IFieldResolver } from 'graphql-tools';

export const skip = undefined;

export const combineResolvers = (...funcs: Array<IFieldResolver<any, any>>): IFieldResolver<any, any> => (...args) =>
  funcs.reduce(
    (prevPromise, resolver) => prevPromise.then((prev) => (prev === skip ? resolver(...args) : prev)),
    Promise.resolve(),
  );
改造后的resolver如下:
import { IResolvers } from 'apollo-server';
import { Role } from './db';
import { combineResolvers, isAuthenticated, isAuthorized } from './fp';
import { defaultFieldResolver } from 'graphql';

const resolversWIthCombineResolvers: IResolvers = {
  Query: {
    user: combineResolvers(
      isAuthenticated,
      isAuthorized([Role.admin, Role.editor, Role.viewer]),
      (_, { id }, { db }) => {
        return db.users.find((user) => user.id.toString() === id);
      },
    ),
    posts: (_, { ids }, { db }) => {
      return db.posts.filter((post) => ids.includes(post.id.toString()));
    },
    adminUsers: combineResolvers(isAuthenticated, isAuthorized([Role.admin]), (_, __, { db }) => {
      return db.users.find((user) => user.role === Role.admin);
    }),
    config: combineResolvers(isAuthenticated, isAuthorized([Role.admin, Role.editor, Role.viewer]), () => {
      return { url: 'https://github.com/mrdulin' };
    }),
  },
  Mutation: {
    createPost: combineResolvers(isAuthenticated, isAuthorized([Role.admin]), (_, { input }, { db }) => {
      const post = {
        id: db.posts.length,
        ...input,
      };
      db.posts.push(post);
      return { code: 0, message: 'ok' };
    }),

    createUser: combineResolvers(isAuthenticated, isAuthorized([Role.admin]), (_, { input }, { db }) => {
      const user = {
        id: db.users.length,
        ...input,
      };
      db.users.push(user);
      return { code: 0, message: 'ok' };
    }),
  },

  User: {
    bitcoinAddress: combineResolvers(isAuthenticated, isAuthorized([Role.admin]), defaultFieldResolver),
  },

  Post: {
    author: (post, _, { db }) => {
      return db.users.find((user) => user.id === post.authorId);
    },
  },
};

export { resolversWIthCombineResolvers };
isAuthenticated resolver函数用来判断进行用户认证,isAuthorized resolver函数用来进行用户权限校验。
import { AuthenticationError } from 'apollo-server';
import { Role } from '../db';
import { skip } from './';

const isAuthenticated = (_, __, { req }) => (req.user ? skip : new AuthenticationError('Not authenticated'));

const isAuthorized = (roles: Role[]) => (_, __, { req }) =>
  roles.includes(req.user.role) ? skip : new AuthenticationError('Not authorized');

export { isAuthenticated, isAuthorized };这种方式很像express.js框架中间件的使用方式,这里的skip变量就类似于next()函数,用来调用下一个中间件。开源社区已经有人写了一些帮助函数,graphql-resolvers,源码很容易理解。
4. 使用Decorator(monkey patch)
我们可以利用类和装饰器(decorator)的方式,实现用户认证和授权,装饰器模式可以使我们在不侵入原有代码逻辑的情况下,给代码增加额外的功能,拥有良好的可读性,可维护性和可扩展性,代码重用及职责分离。
实现思路:为GraphQL Schema中定义的Object Type,比如User, Post, Config,创建一个单例Controller,比如UserController,PostController,当然叫Controller还是其他名称都可以,示例代码主要是参考使用Express.js做开发时,我们给路由定义的路由controller。那么我将resolver作为"路由"层,并为每个"路由"定义controller。
UserController.ts
import { Role } from '../db';
import { auth } from './decorator';
import { defaultFieldResolver } from 'graphql';

class UserController {
  @auth({ roles: [Role.admin, Role.editor, Role.viewer] })
  public static user(_, { id }, { db }) {
    return db.users.find((user) => user.id.toString() === id);
  }
  @auth({ roles: [Role.admin] })
  public static adminUsers(_, __, { db }) {
    return db.users.find((user) => user.role === Role.admin);
  }
  @auth({ roles: [Role.admin] })
  public static createUser(_, { input }, { db }) {
    const user = {
      id: db.users.length,
      ...input,
    };
    db.users.push(user);
    return { code: 0, message: 'ok' };
  }
  @auth({ roles: [Role.admin] })
  public static bitcoinAddress(_, __, ___) {
    return defaultFieldResolver;
  }

  private constructor() {}
}

export { UserController };在UserController类中定义的静态方法命名规则保持和resolver函数要解析的字段名称一致,这里为了简单起见,只定义了controller层,如果项目变大,逻辑变复杂,要使用分层架构,我们可以引入service layer,data access layer等,通过context注入到controller的各个方法(实际上就是resolver)中。
改造后的resolver如下:
import { IResolvers } from 'apollo-server';
import { UserController, PostController, ConfigController } from './oop';

const resolversWithClass: IResolvers = {
  Query: {
    user: UserController.user,
    posts: PostController.posts,
    adminUsers: UserController.adminUsers,
    config: ConfigController.config,
  },
  Mutation: {
    createPost: PostController.createPost,
    createUser: UserController.createUser,
  },
  Post: {
    author: PostController.author,
  },
  User: {
    bitcoinAddress: UserController.bitcoinAddress,
  },
};

export { resolversWithClass };
装饰器实现如下:
import { Role } from '../../db';
import { AuthenticationError } from 'apollo-server';

function AuthDecoratorFactory(options?: { roles: Role[] }) {
  return function authDecorator(target: any, propertyKey: string, descriptor: TypedPropertyDescriptor<any>) {
    const orignalFunction = descriptor.value;
    descriptor.value = function(...args: any[]) {
      const context = args[2];
      const { user } = context.req;

      if (!user) {
        throw new AuthenticationError('no permission');
      }

      if (options && options.roles) {
        console.log(`[authDecorator] roles = ${options.roles}, user = ${JSON.stringify(user)}`);
        if (!options.roles.includes(user.role)) {
          throw new AuthenticationError('no permission');
        }
      }

      return orignalFunction.apply(this, args);
    };
  };
}

export { AuthDecoratorFactory as auth };
测试结果一样,这里不再给出。
5. 直接在resolver中加入认证和授权逻辑
这种方式具有侵入性,不符合开闭原则,如下:
user: (_, { id }, { db, req, authService }) => {
      authService.auth(req.user);
      return db.users.find((user) => user.id.toString() === id);
},authService.auth(req.user);语句可能会在每个resolver中都出现,导致代码重复,尽管我们将用户认证和授权逻辑放在authService.auth方法中,但调用authService.auth(req.user);语句是重复出现在resolver中的,这种方式简单直观,容易理解,没有引入任何技术概念。
总结
使用GraphQL middleware的方式,引入middleware的概念,实质上就是使用中间件函数对GraphQL resolver函数进行包装,遵循洋葱模型,每一个middleware都像是一层洋葱皮包裹着最内层的resolver函数,示意图如下:
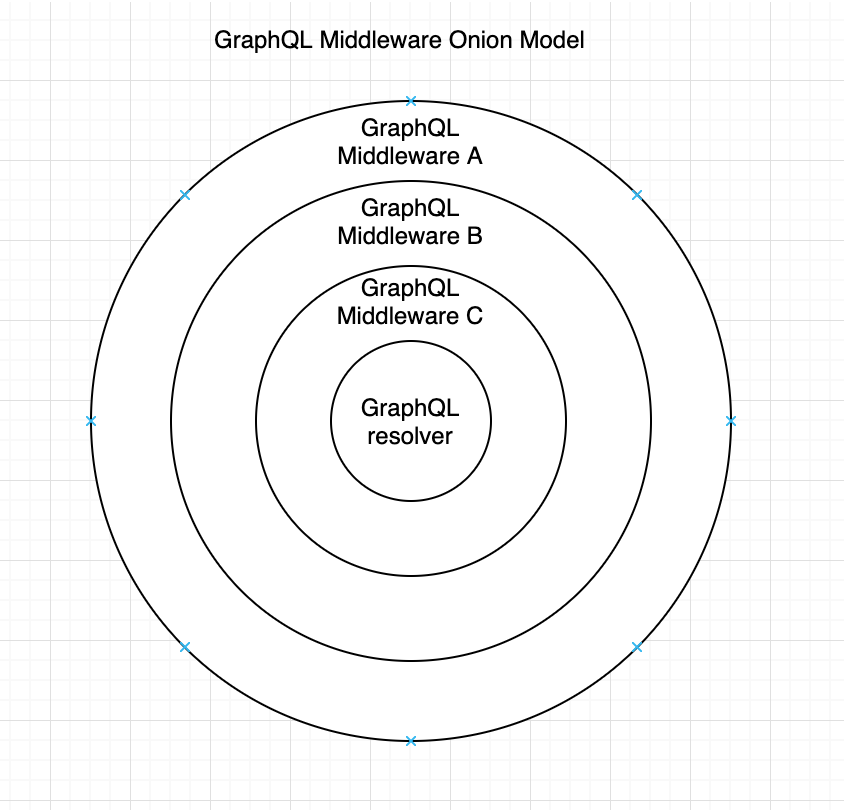
这种方式的重点在于要设计好中间件,比如方式1代码中的定义的resolverAuthMap变量,就是将resolver和访问该resolver需要的用户权限做一个映射,又通过resolver的info参数获取到解析的字段名称,这样才建立了映射关系。但是info参数,正如apollographql官方文档所描述:
This argument should only be used in advanced cases
进阶使用,对于一般的日常开发,使用prisma或者apollographql来构建一个GraphQL Web服务,几乎用不到该参数,目前关于如何使用该参数的文档并不多,因此如果要写中间件,特别是复杂的中间件,可能需要对info对象进行深入学习了解,并对中间件充分测试,这提升了开发成本。本示例中间件方式的另一个缺点是,在schema,resolver这两层上看不到任何用户权限,需要在authMiddleware这个文件才能看到resolver相对应的用户权限,可能不够直观,降低了代码的可读性。
使用GraphQL Schema Directive方式,相比于方式1在GraphQL resolver这一层上做用户认证和授权,directive将这一功能移动到了GraphQL Schema这一层,通过@auth指令直接在schema上标记字段需要的用户权限,很直观。但和使用middleware方式一样,该方案的实现成本可能过高,尽管是GraphQL规格中的一个概念,但目前对于GraphQL Schema Directive的文档也不多,很多技术细节没有交代清楚,对于复杂指令,可能会踩坑。
使用类+装饰器的方式,优点是没有引入graphql middleware和graphql schema directive的概念,装饰器模式及其技术实现都很成熟,概念也相对容易理解。不过需要将编程范式改为OOP,装饰器只能配合类来使用,如果用FP,实现装饰器的功能需要用高阶函数(high-order function)。
使用组合式resolver的方式,利用了FP的概念,代码实现也很简单,缺点是会导致resolver代码略显凌乱,可读性变差。