This is a tutorial aimed at Android application developers who want to build their own backends for their front end apps. By the end of this tutorial you will be able to build mobile applications with the following backend features:
- Authentication (Auth)
- Storing and retrieving data from a Database in the cloud (Data)
- Upload and download files to and from the cloud (Filestore)
- Create a server in nodejs (Custom Microservice):
- To implement custom business logic
- To handle Push notifications
- To handle realtime data using websockets
- Basic knowledge of Android application development.
- A basic knowledge of Javascript or atleast the readiness to pick it up.
- A basic understanding of relational databases(RDMS).
gitinstalled on your local machine and also a basic knowledge of usinggit
Before you begin, ensure that you have the Hasura CLI installed on your local machine. If not, you can find the instructions to install it here. Once you have the CLI tool installed, login or signup into Hasura by running the following command on your terminal:
$ hasura loginThere are two steps required to get started with Hasura.
Step 1: Get a Hasura project and a Hasura cluster
A hasura project is a folder on your filesystem that contains all the source code and configuration for your application. A hasura project has a particular structure and the best way to create a hasura project is by cloning one from hasura.io/hub. Every project you see on hasura.io/hub is a
Hasura Projectwith particular services or data added to it based on the type of project it is. To know more about a Hasura Project, check out the docs.
We are going to clone the hello-android project which consists of:
- Boilerplate code for a nodejs server to handle push notifications and a websocket connection
- A basic Android application with working code implementing the various backend features covered in this tutorial
To get the project,
$ hasura quickstart hasura/hello-androidThe above command does the following:
- Creates a new directory in your current directory called
hello-androidand clones the content of thehello-androidproject from Hasura Hub into it. - Makes this new directory a
gitrepository and adds a remote calledhasurato it. - It also creates a free
Hasura Clusterfor you andaddsthis cluster to the cloned hasura project.
A Hasura cluster is a cluster of nodes (VMs) on the cloud that can host any Hasura project. It has all the Hasura microservices running and the necessary tooling for you to deploy your Hasura project. Every Hasura cluster comes with a name and a domain attached to it as well. Eg:
awesome45.hasura-app.io. Know more here.
Step 2: Deploy the project to your cluster
$ # cd into the project directory
$ cd hello-android
$ # Make your initial commit
$ git add . && git commit -m "Initial Commit"
$ # Push to the hasura remote
$ git push hasura master- Open the Android app present in the root directory of the project.
- Navigate to a file named
Hasura - Replace the value for the variable
CLUSTER_NAMEwith the name of your cluster.
public class Config {
      //Replace the following with your cluster name
      private static final String CLUSTER_NAME = "disorder10";
      ......
}Every Hasura cluster comes with an API Console that you can use to explore the various backend features provided by Hasura. To access the API console,
$ # Run the following inside the project directory
$ hasura api-console
This will open up the console on your browser. You can access it at http://localhost:9695. We will be using the API Console extensively during this tutorial.
Every modern app almost always requires some form of authentication. This is useful to identify a user and provide some sort of personalized experience to the user. Hasura provides various types of authentication methods (username/password, mobile/otp, email/password, Google, Facebook etc).
In this tutorial, we are going to take a look at a simple username/password based authentication. Start by opening up the API Console. Ensure that you are on the API Explorer tab.
Let's first take a look at the signup endpoint. From the panel on the left, click on SignUp under Username/Password. Next, fill up your required username and password.
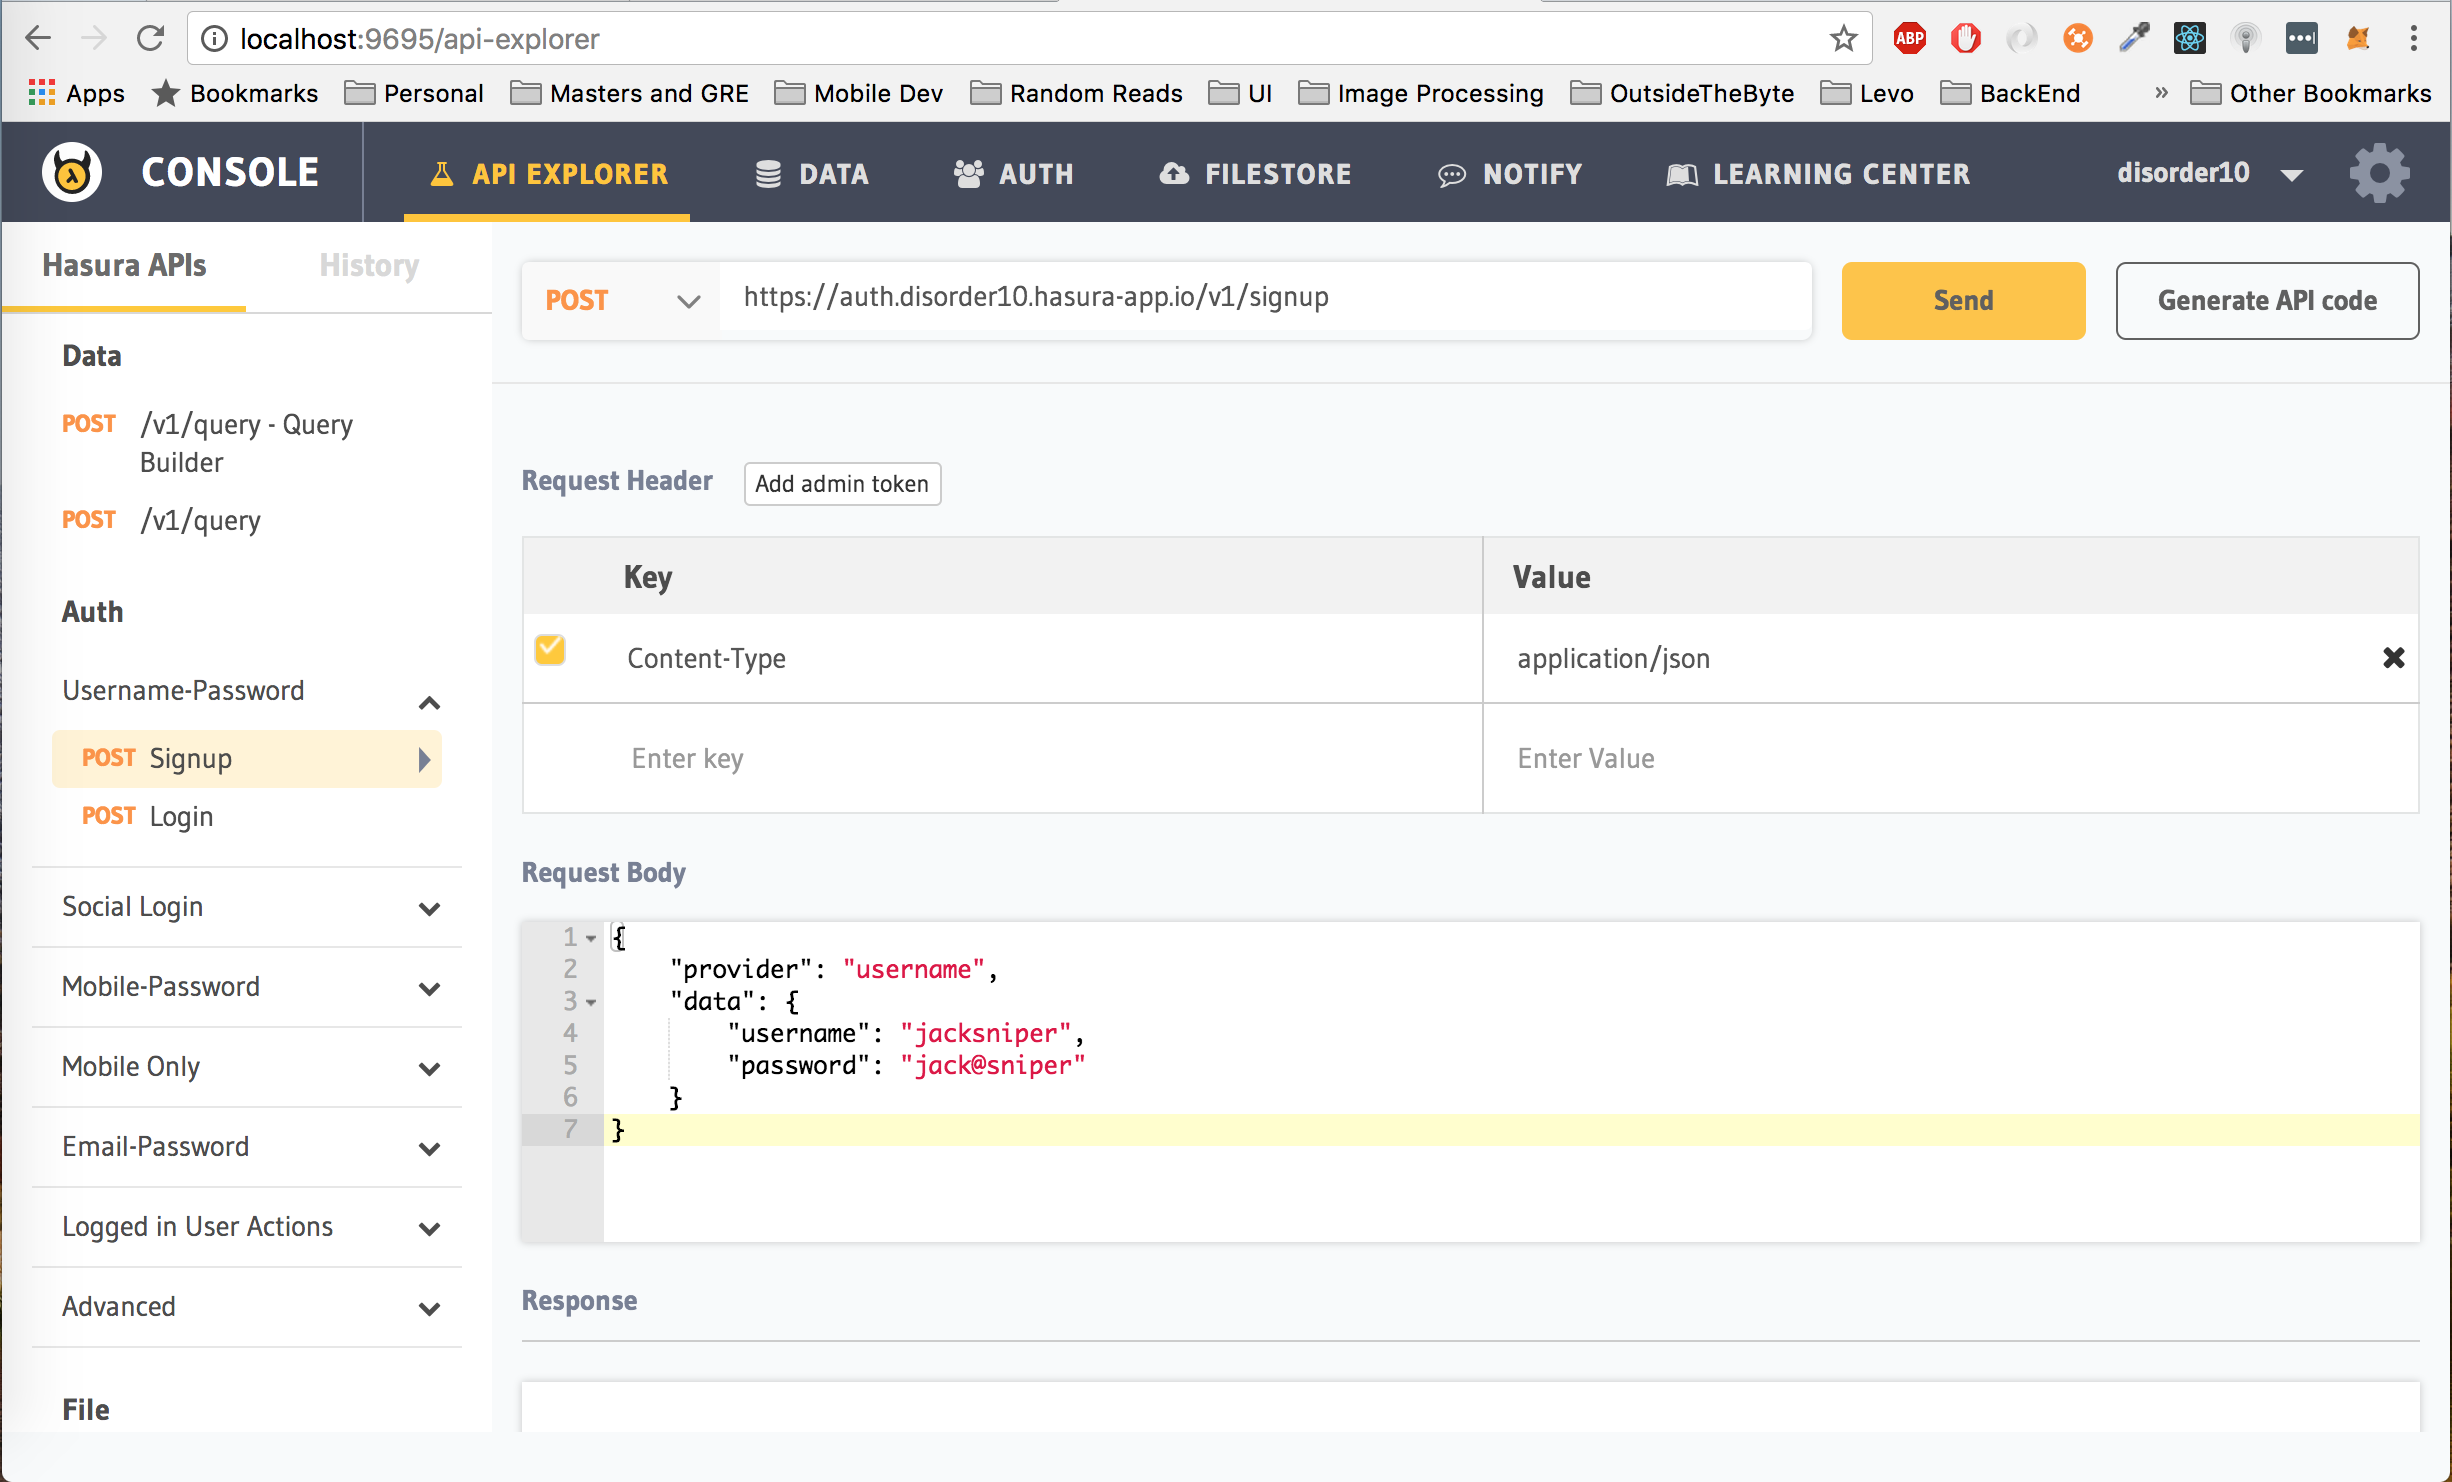
We are going with the username "jacksniper" and password "jack@sniper". You can choose any username and password combination. Once you have decided on your username and password, hit on the Send button to Sign Up. Your response would look like:
{
    "auth_token": "9cea876c07de13d8336c4a6d80fa9f64648506bc20974fd2",
    "username": "jacksniper",
    "hasura_id": 2,
    "hasura_roles": [
        "user"
    ]
}- auth_token is the authorization token for this particular user, which we will use later to access authorized information. You should save this offline in your app to avoid making your user login each time.
- hasura_id is the id of the user that is automatically assigned by Hasura on signing up. You should save this offline as well.
- hasura_roles are the roles associated with this user. Keep in mind that the role associated with this user is
user. This is default behaviour. We will get to where this comes into play in a bit.
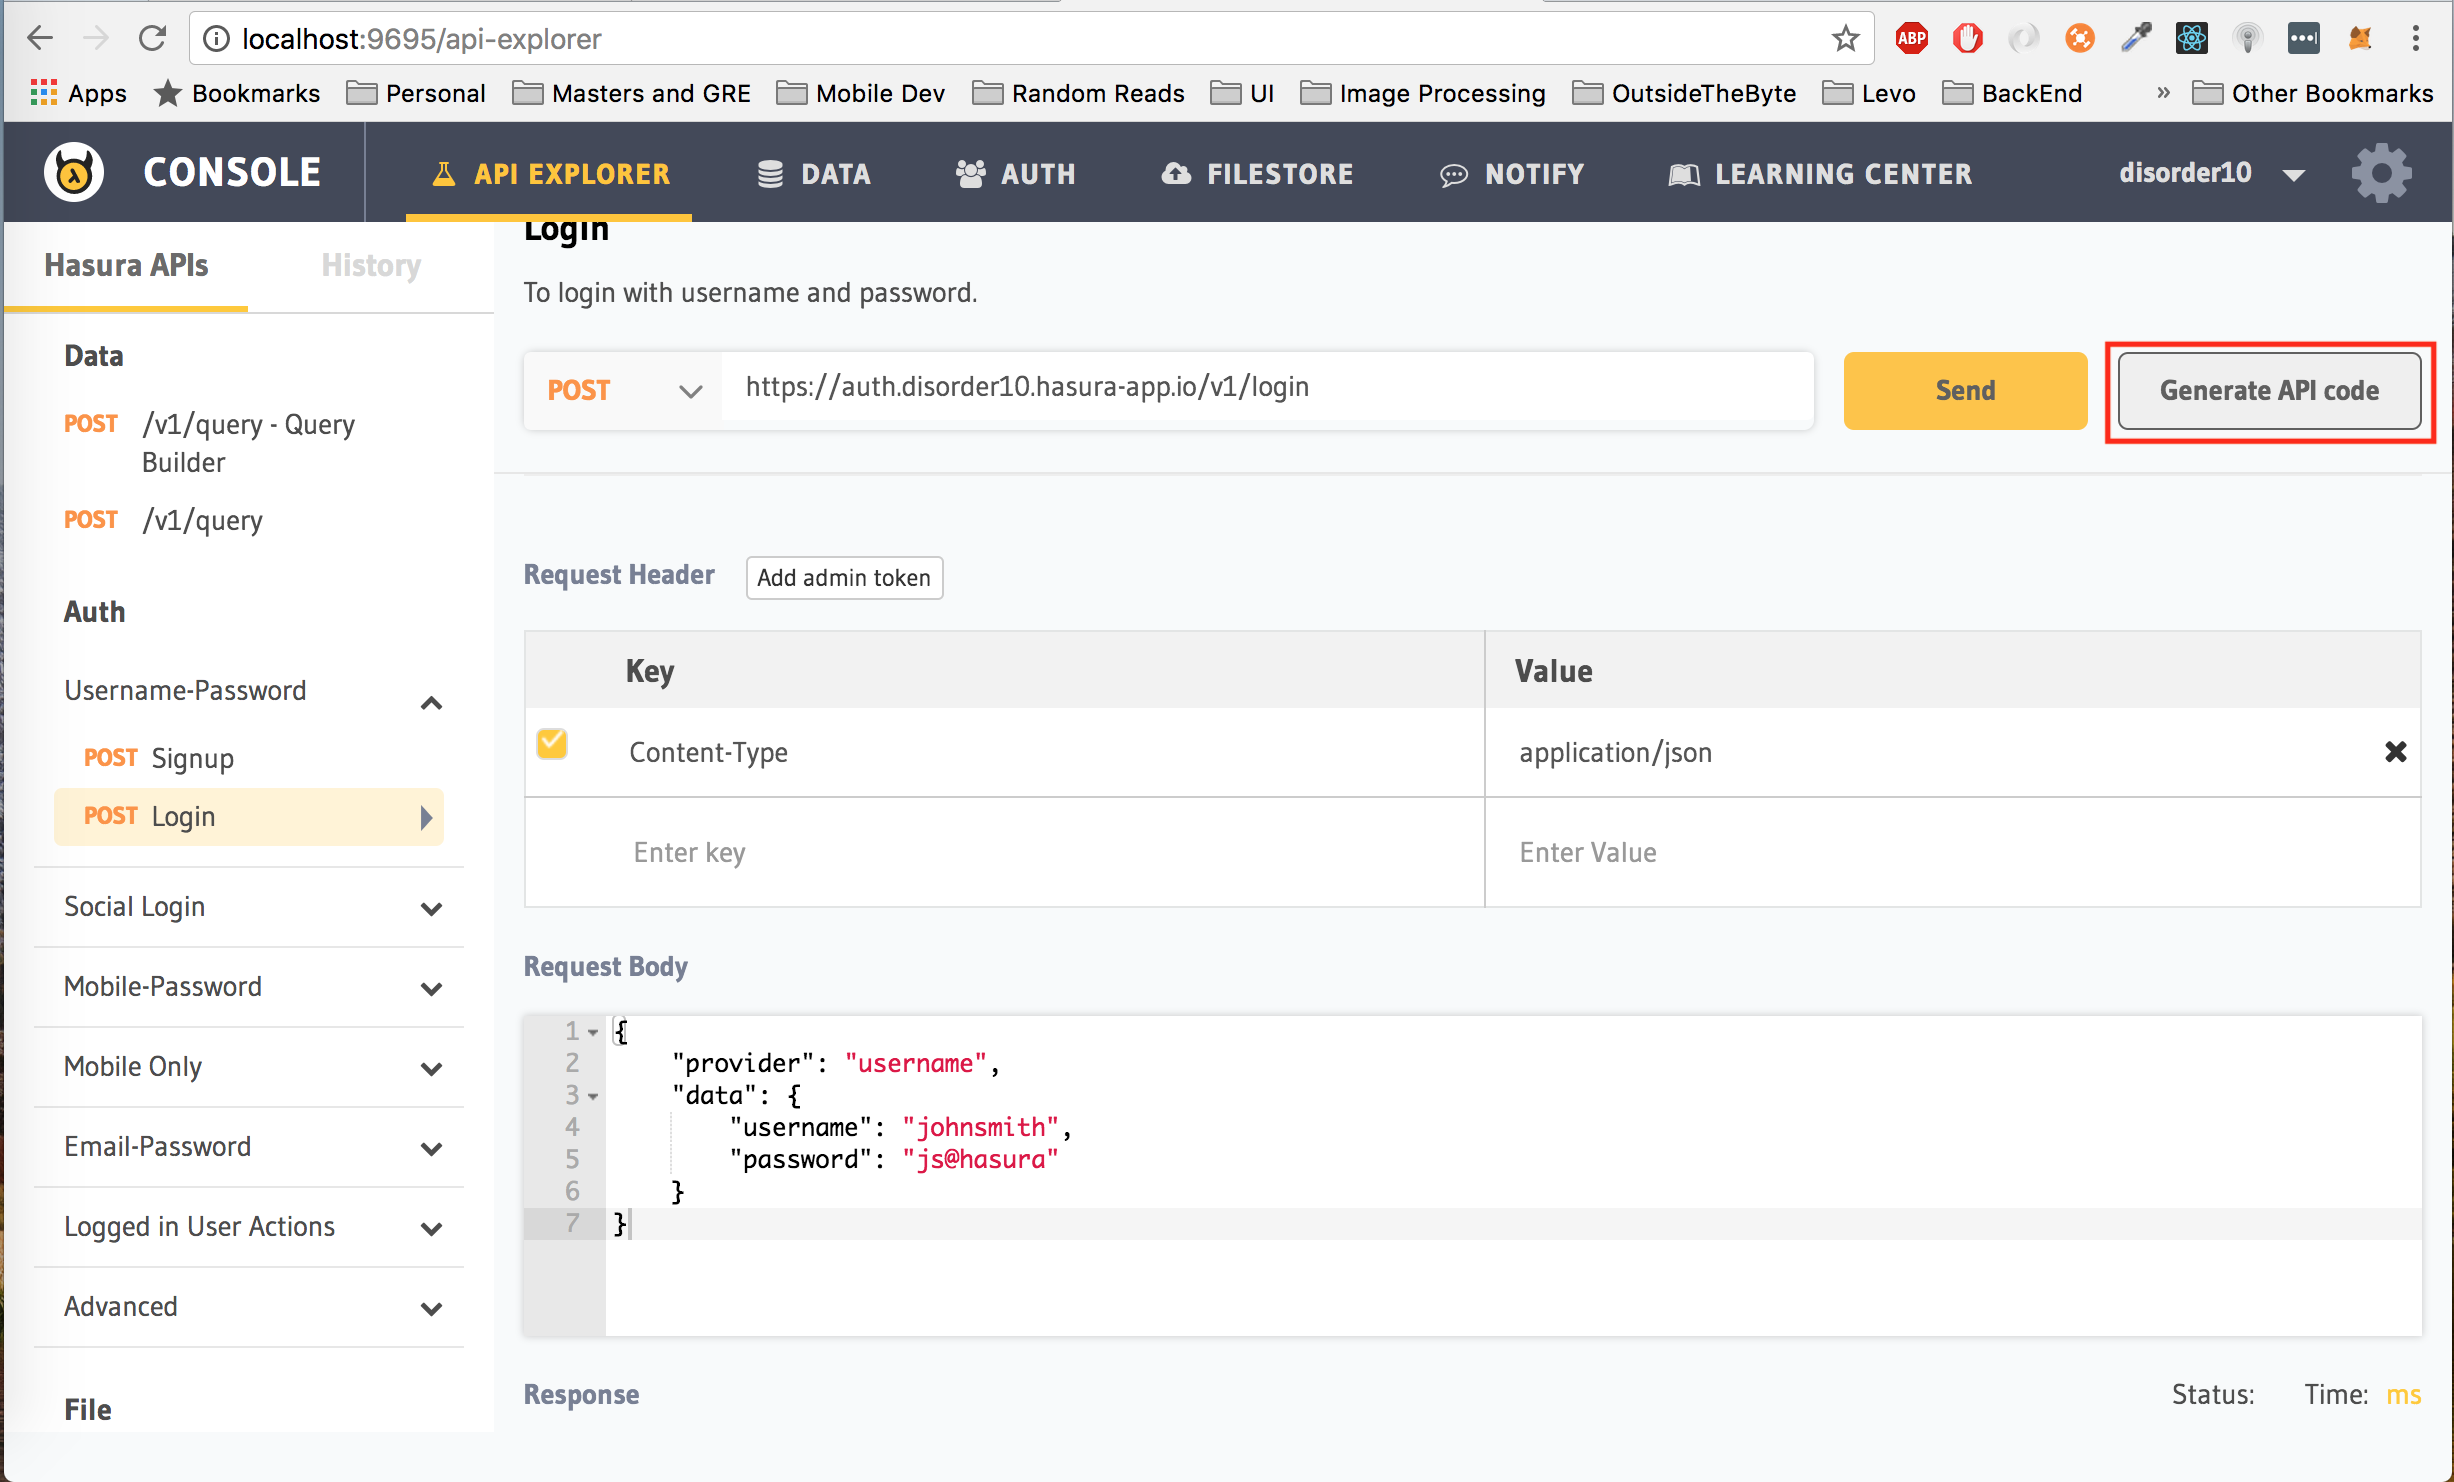
Now that we have created a user using the signup endpoint, we can login with the same credentials. Click on Login under Username/Password. Enter in the same username and password that you used to sign up above and click on Send.
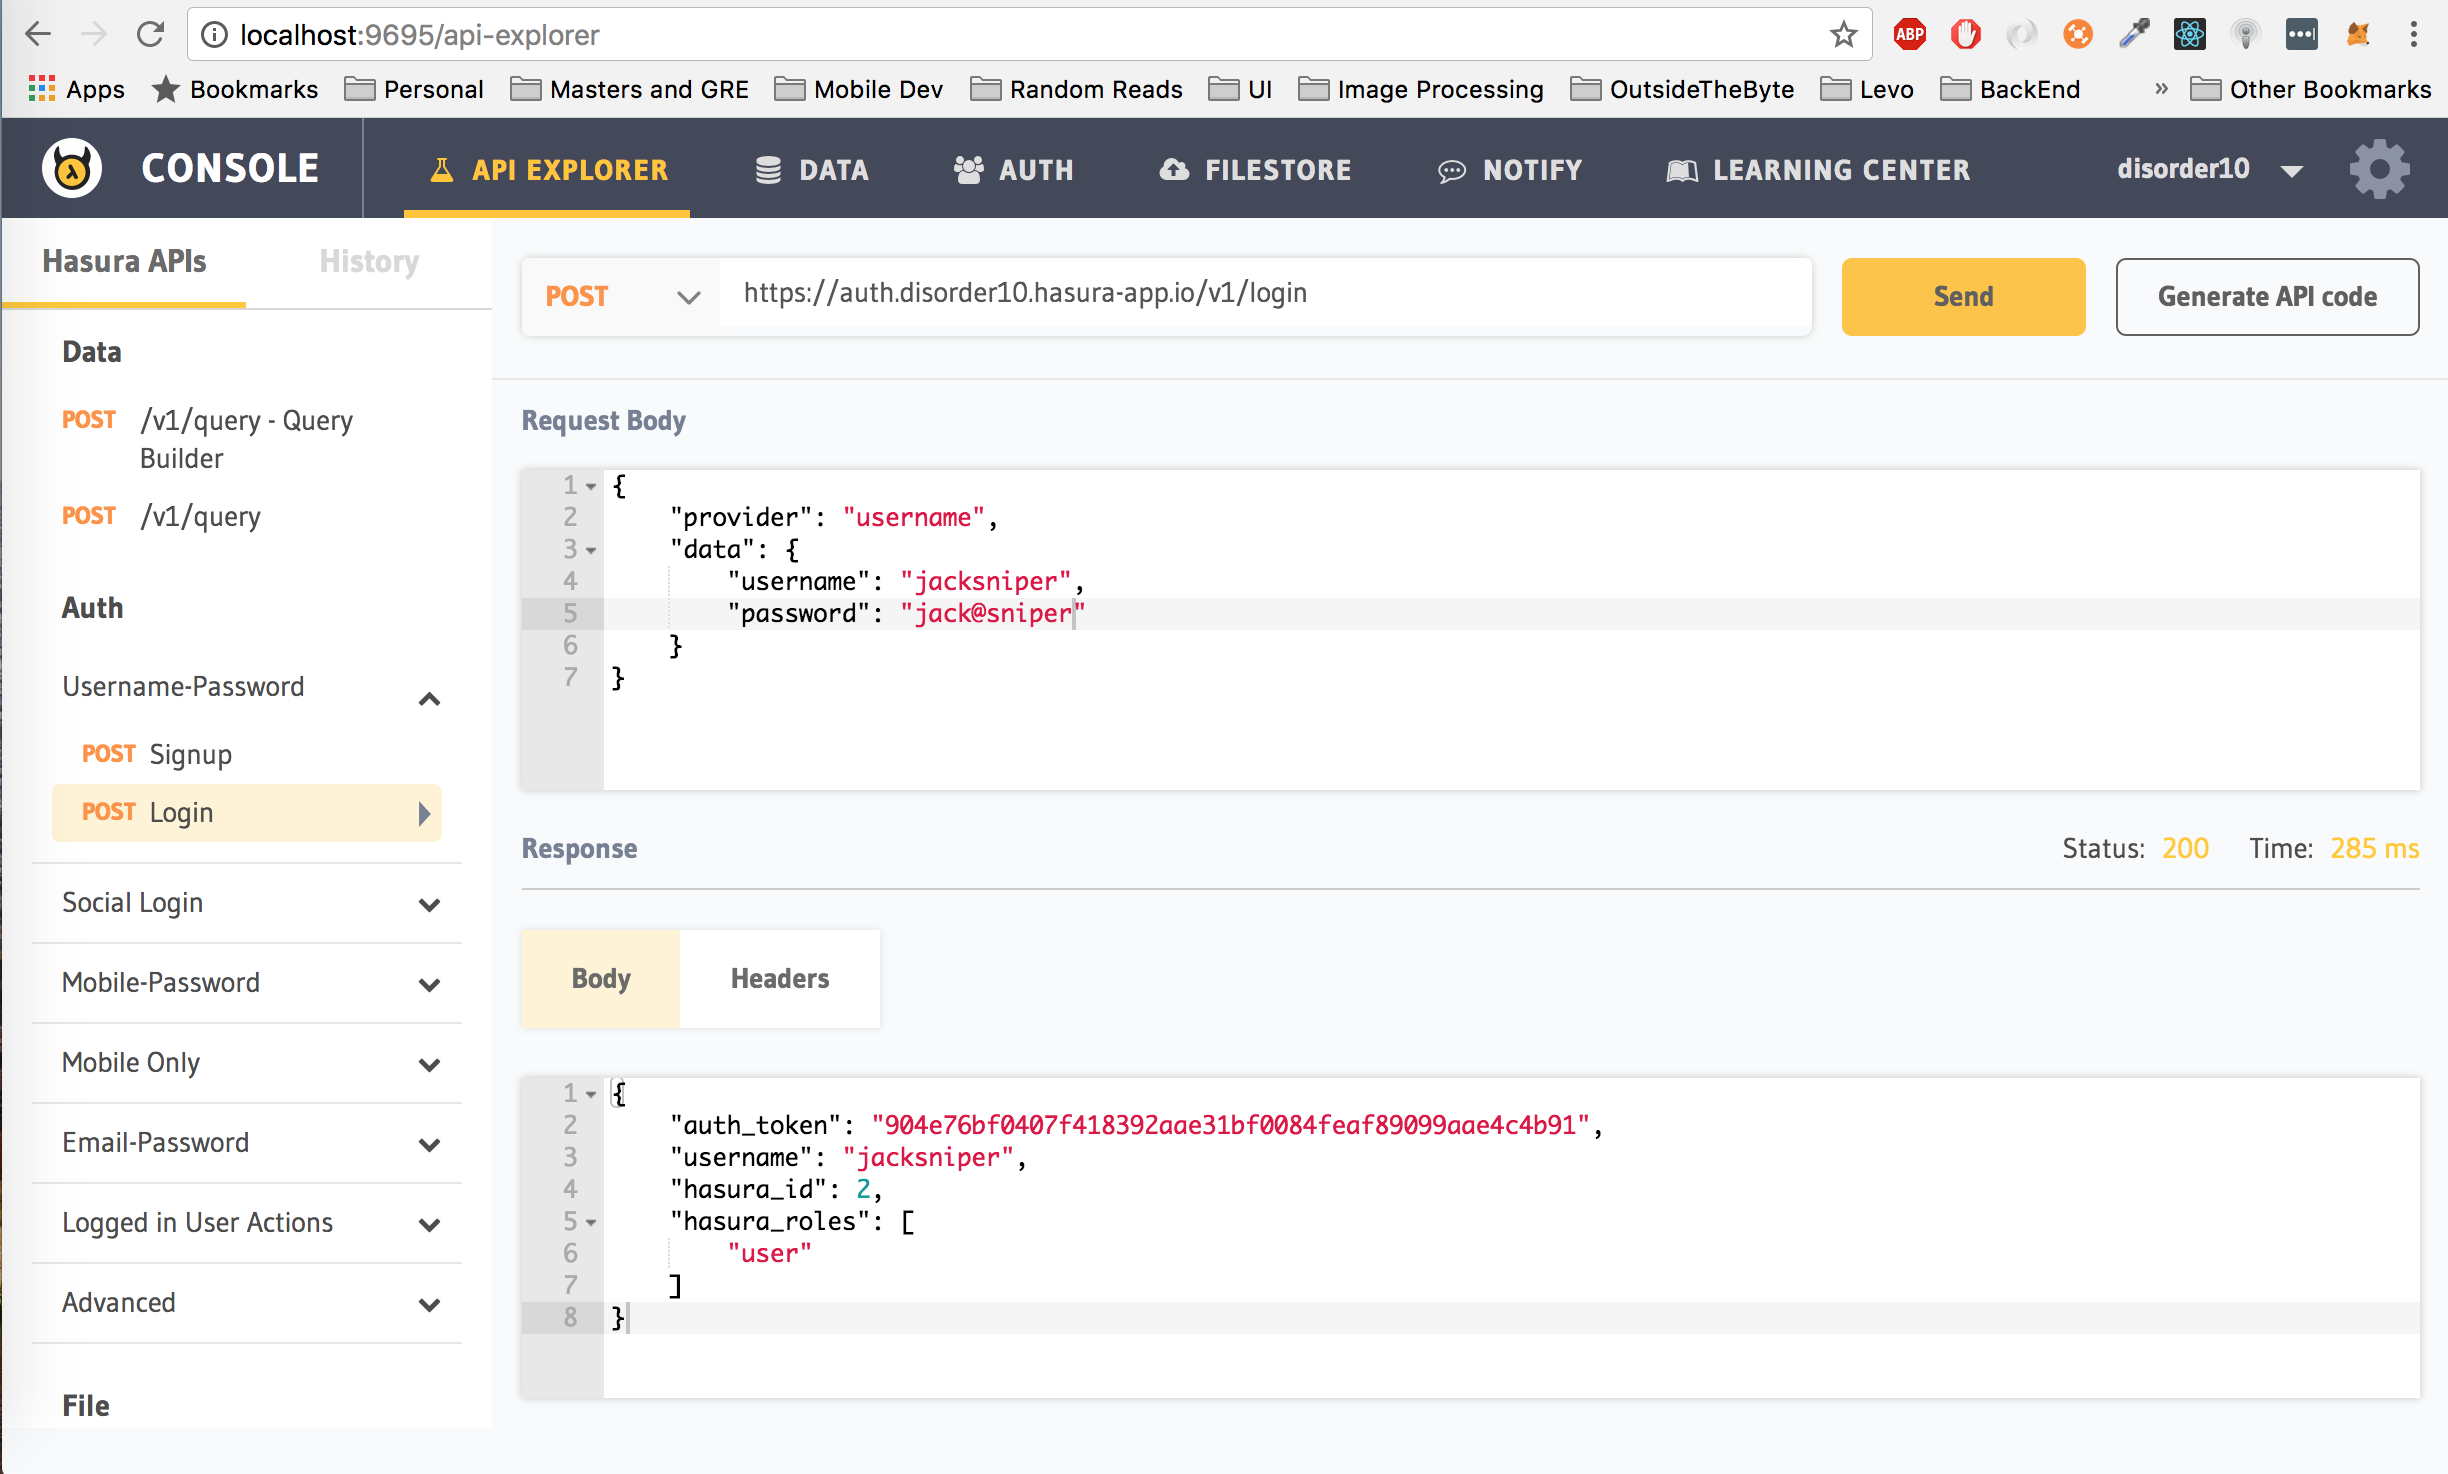
In the response that you get, you will see that the hasura_id key has the same value as the one you got after you signed up. In this case, that value is 2.
To perform any authenticated request, you need the user's authentication token (auth_token from the login/signup endpoint) and pass that as a header.
You can find a list of these APIs under the Logged in User Actions title on the left panel.
Let's check out one such API. In the API Explorer of the API Console, click on User Information under Logged in User Actions and hit the Send button.
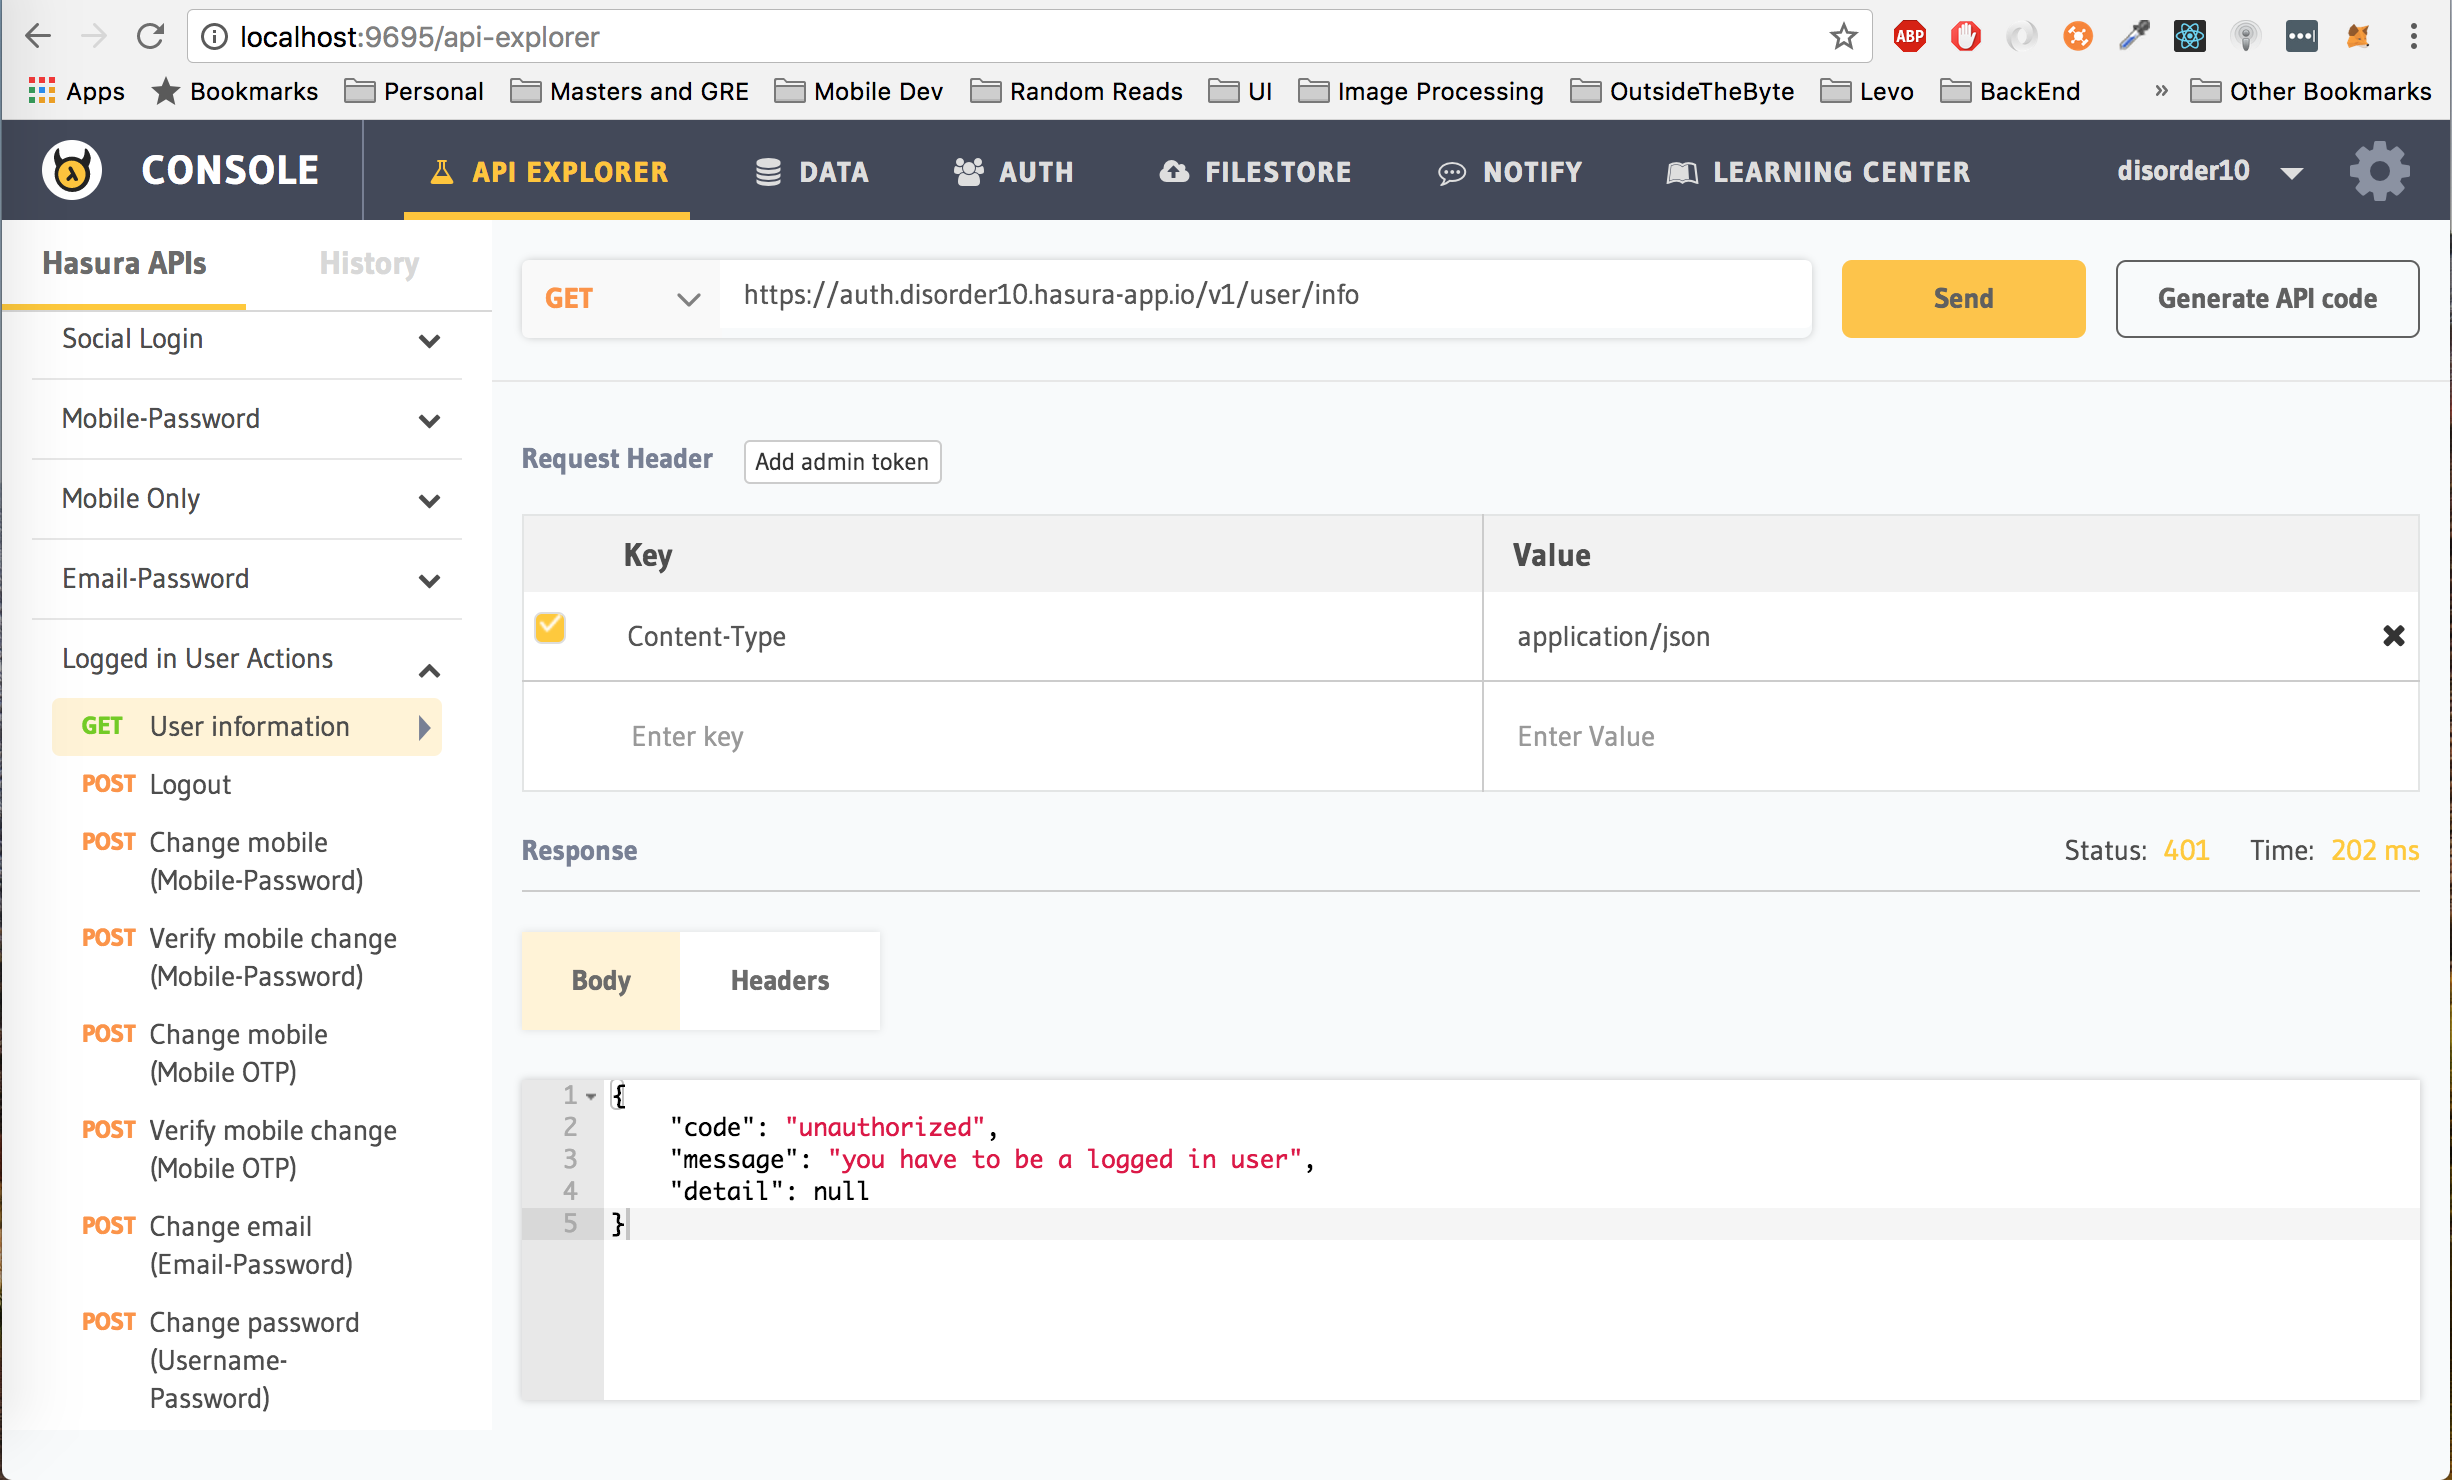
We get the following response:
{
"code": "unauthorized",
"message": "you have to be a logged in user",
"detail": null
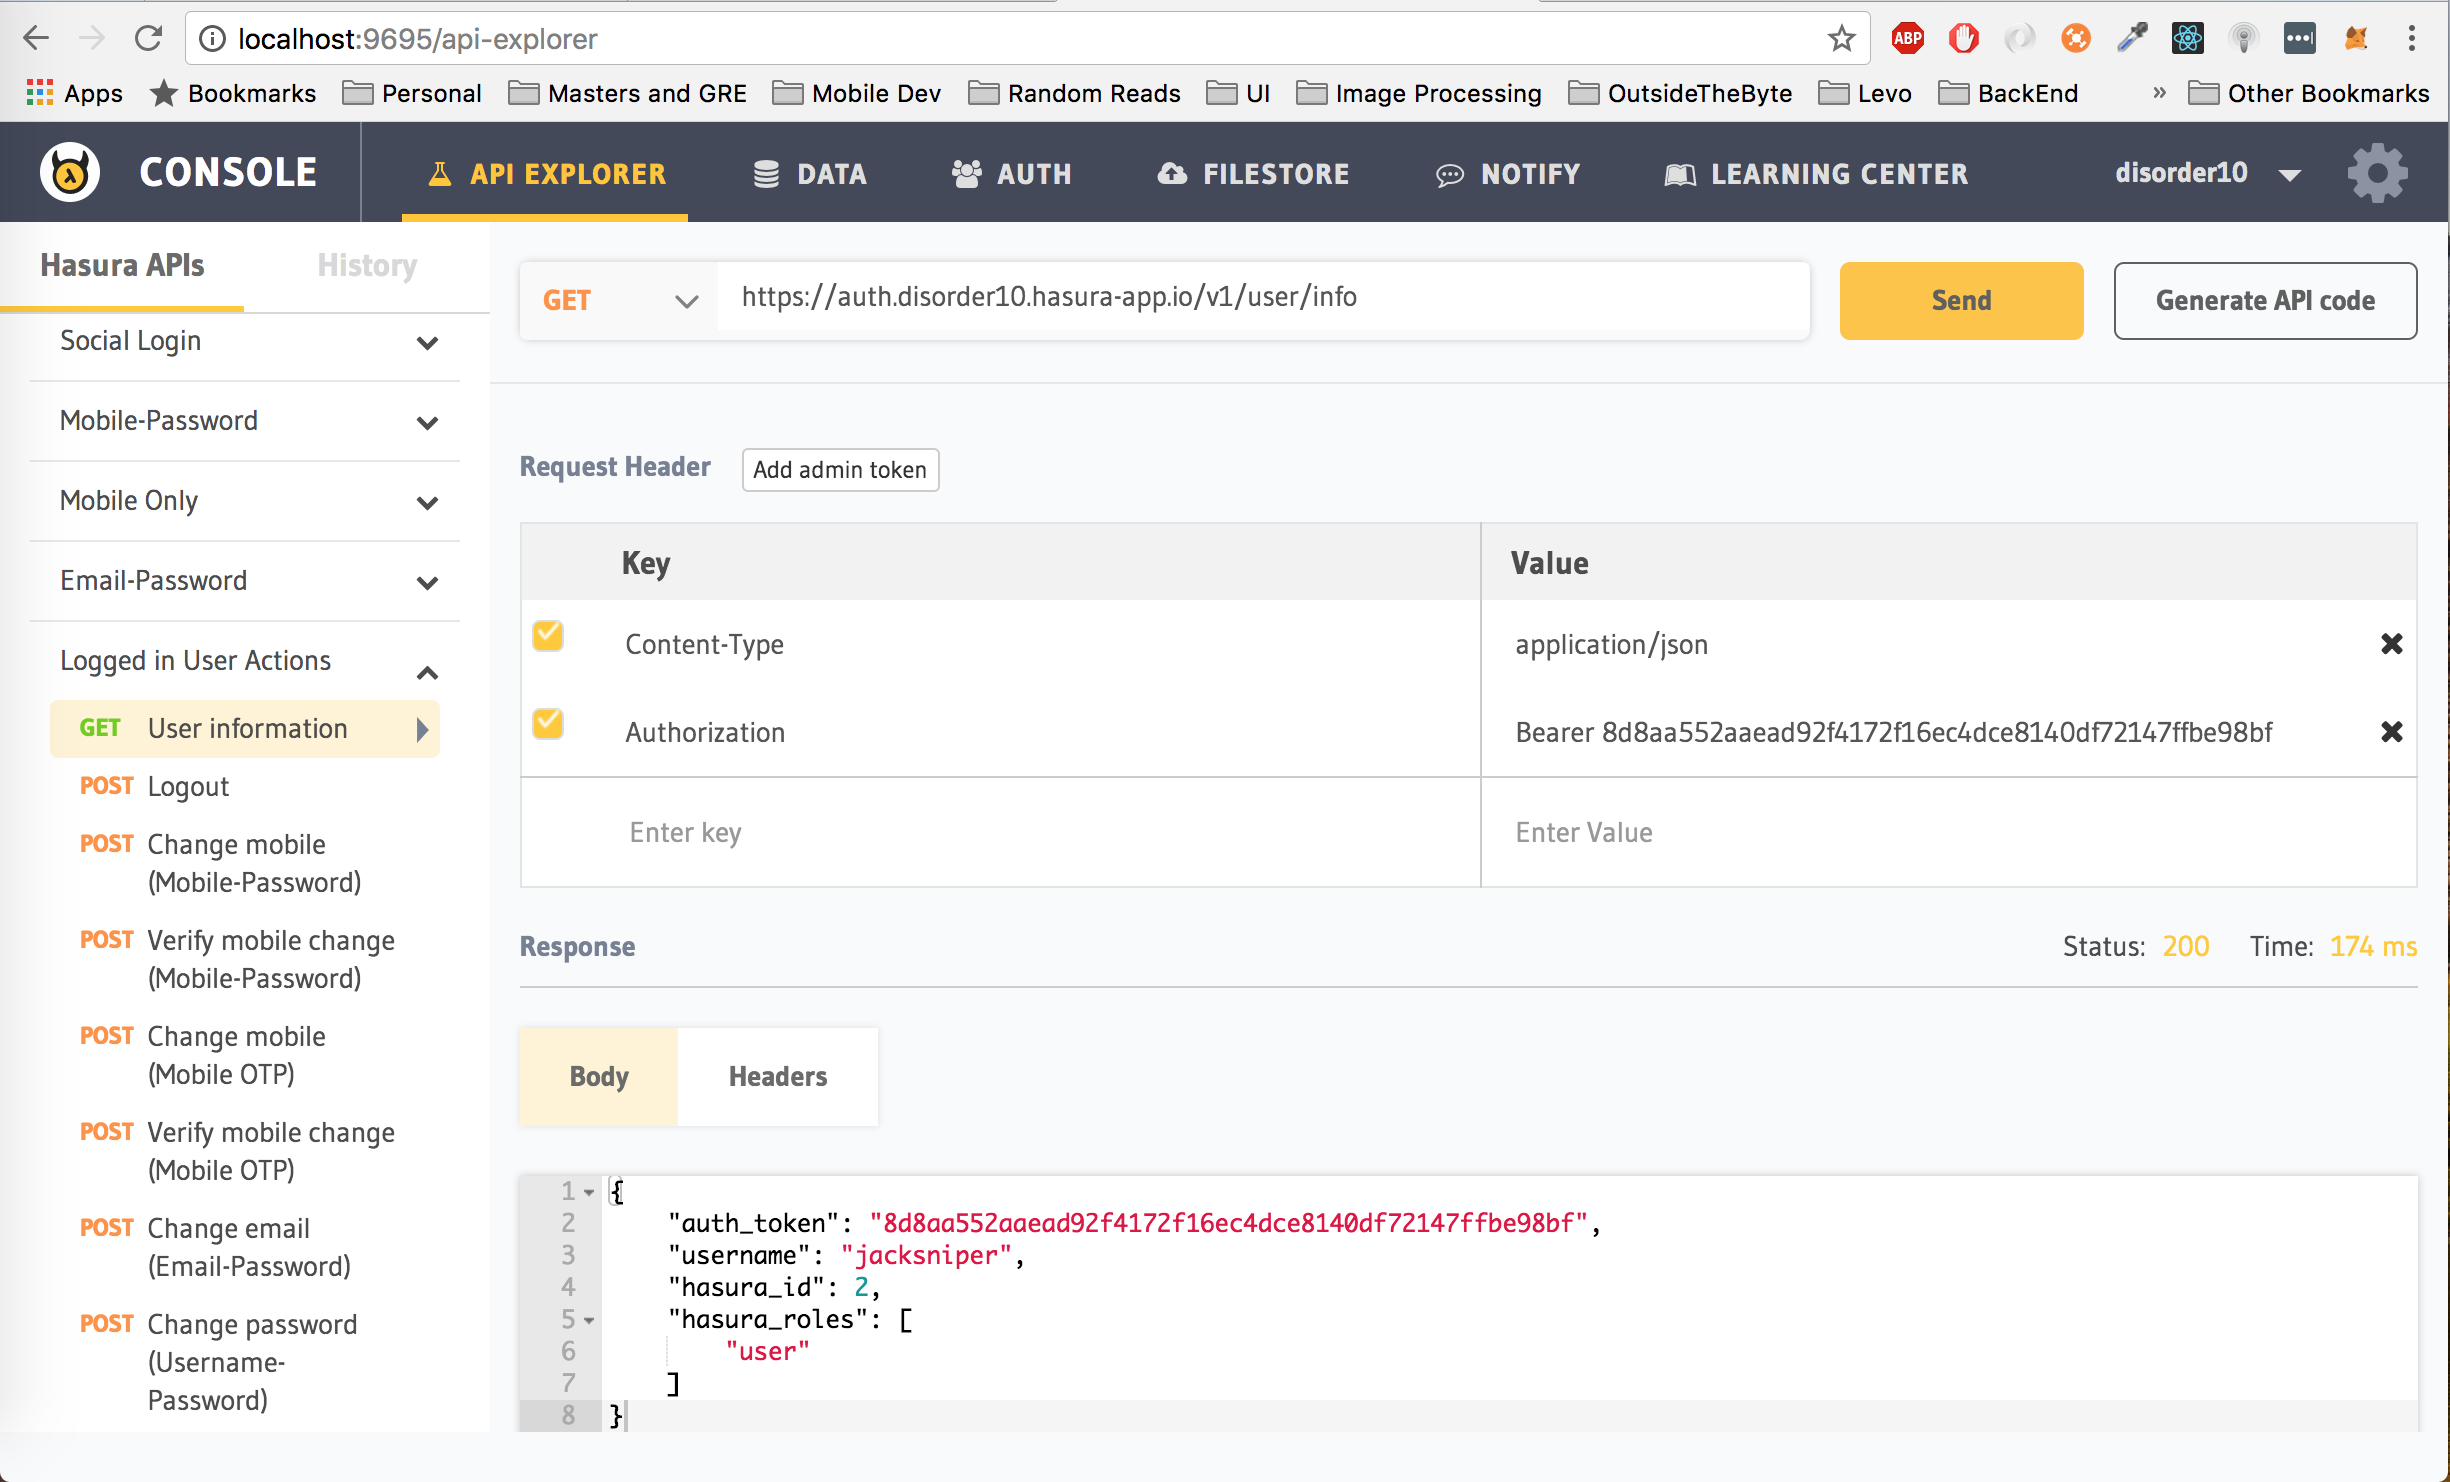
}This is because we have not passed the auth_token in the header. Add a new header to the request with key Authorization and value Bearer <auth_token> (replace <auth_token> with the auth_token that you received from your login/signup request. If you did not save it, perform a login request with the same username and password to get an auth_token again)
Hit the Send button after adding the Authorization header. You will receive a response similar to the one you received after login/signup.
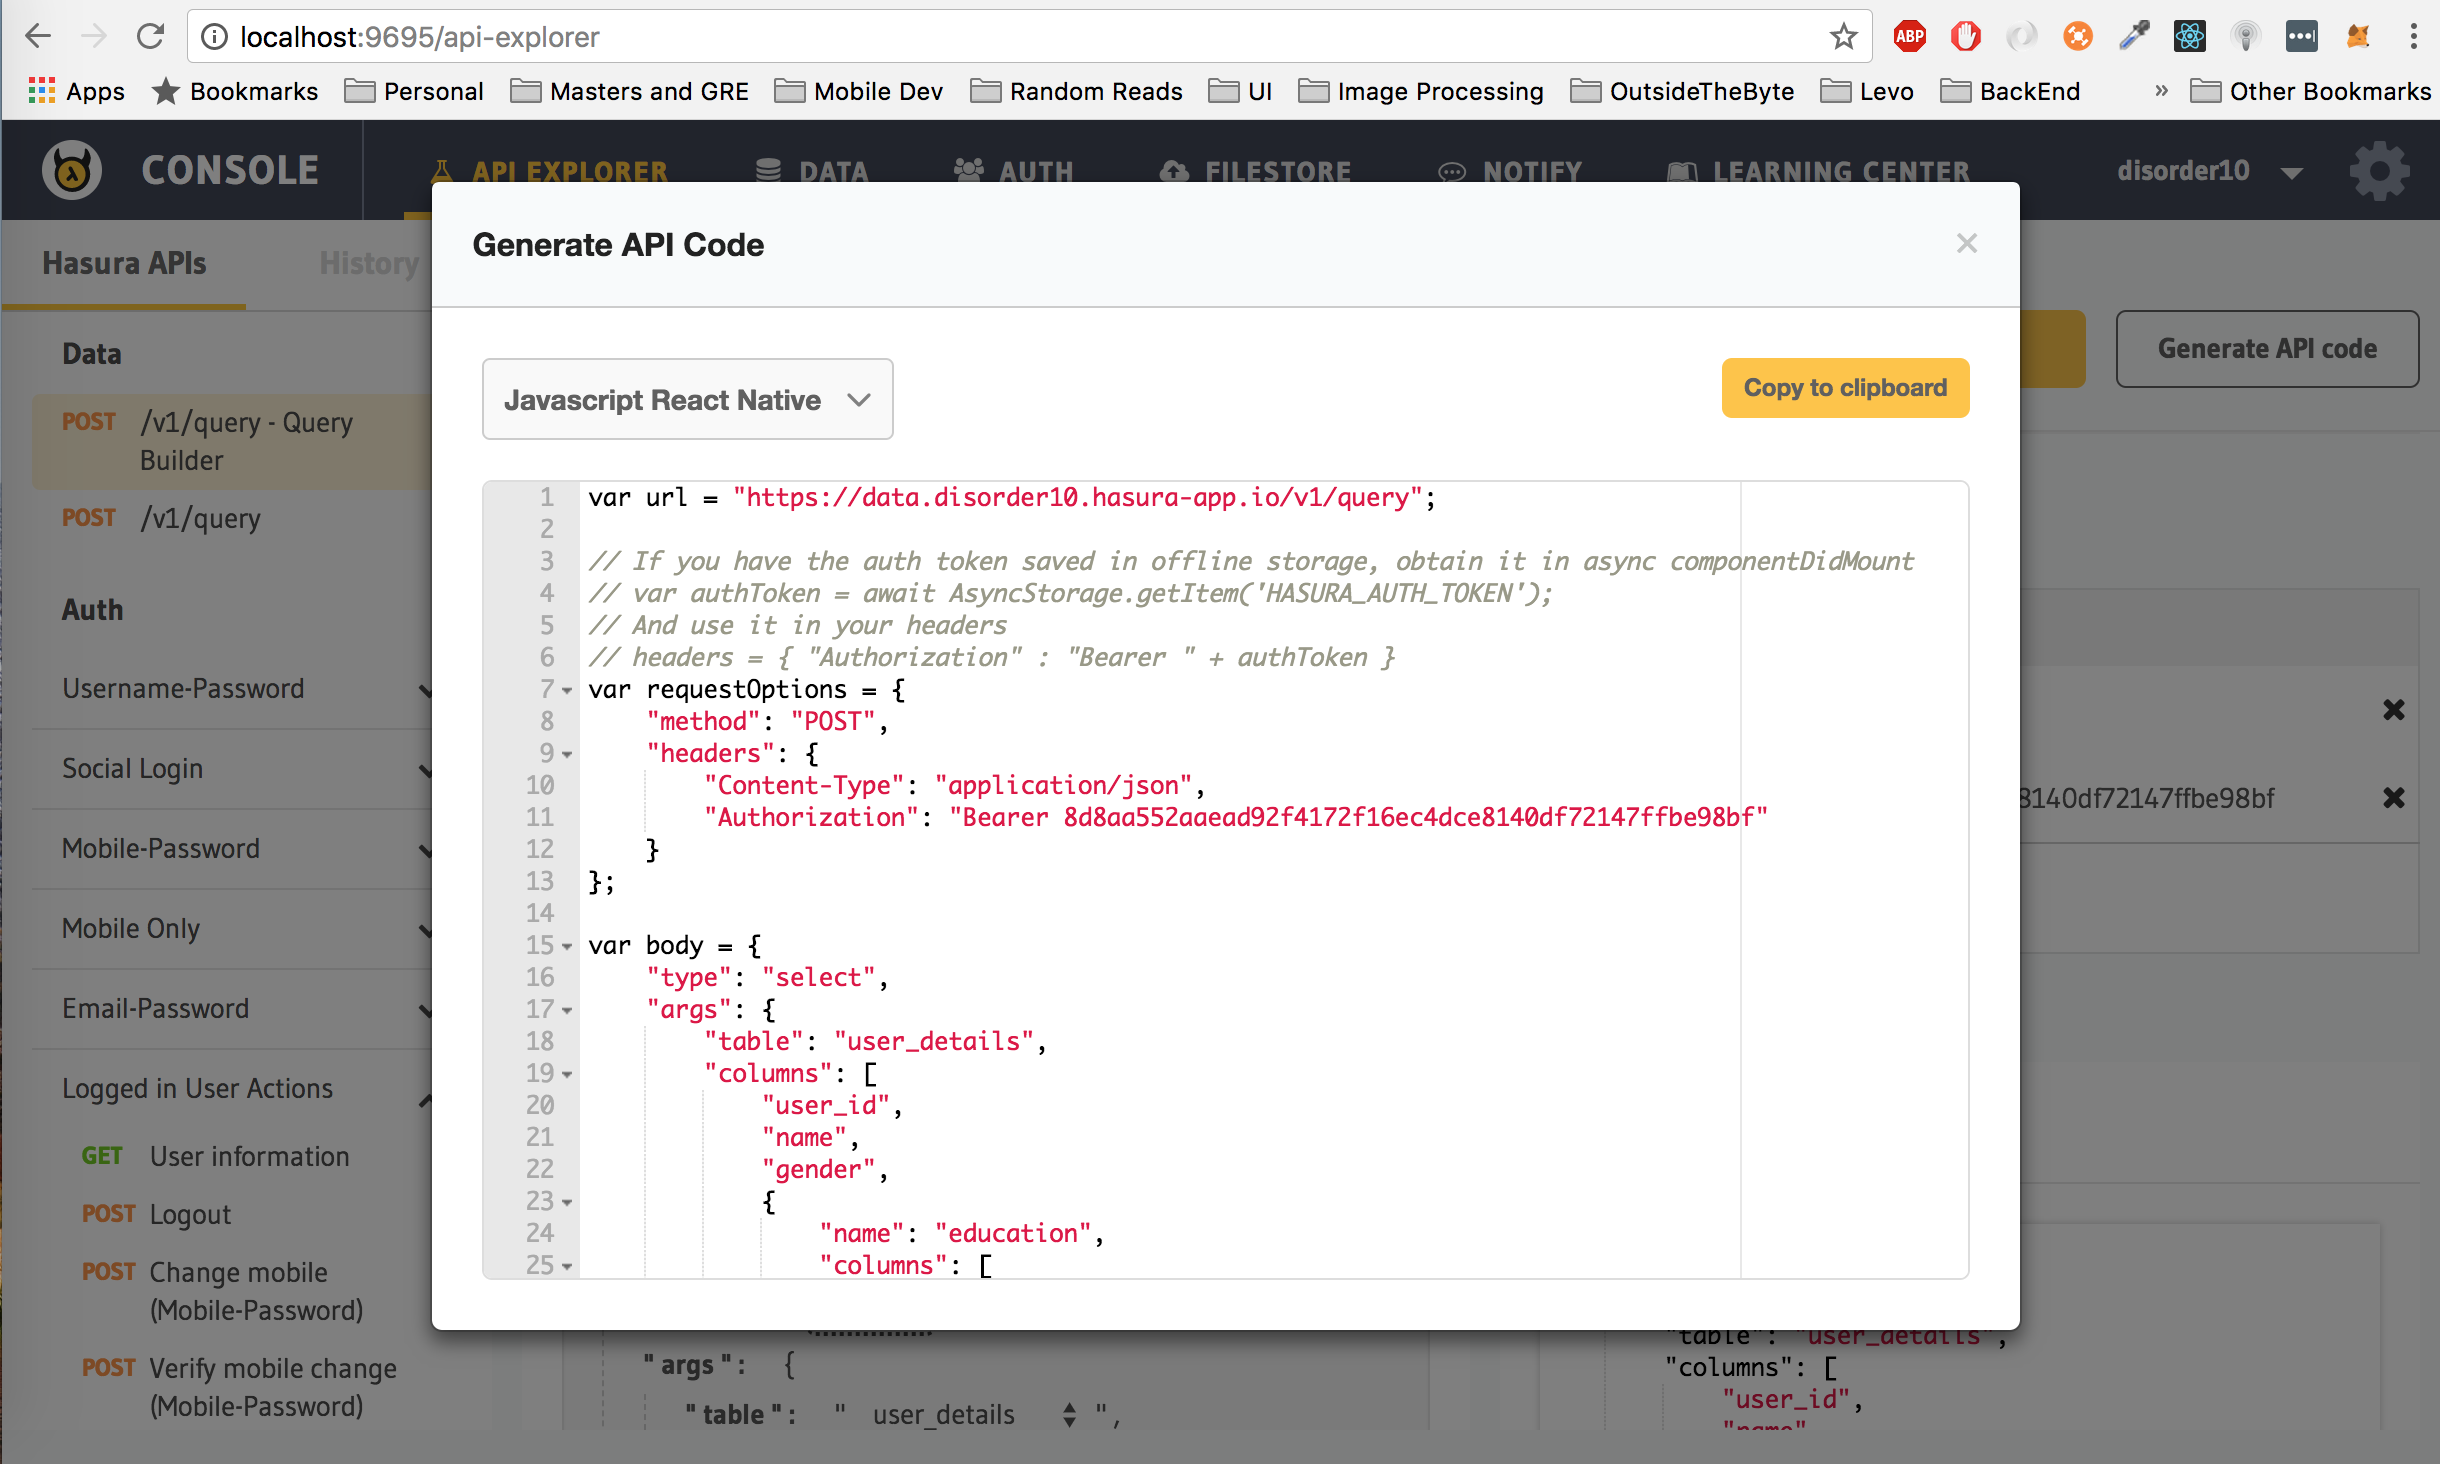
A nifty feature of the API Console is the Code Generator. For every request that you want to try out on the API Console, you can generate the client side code for it. As an example, let's generate the code to make a login request. Click on the login endpoint and then click on the Generate API Code button the top right corner.
Select your required language and library from the drop down on the left.
- For Android select
Java Android
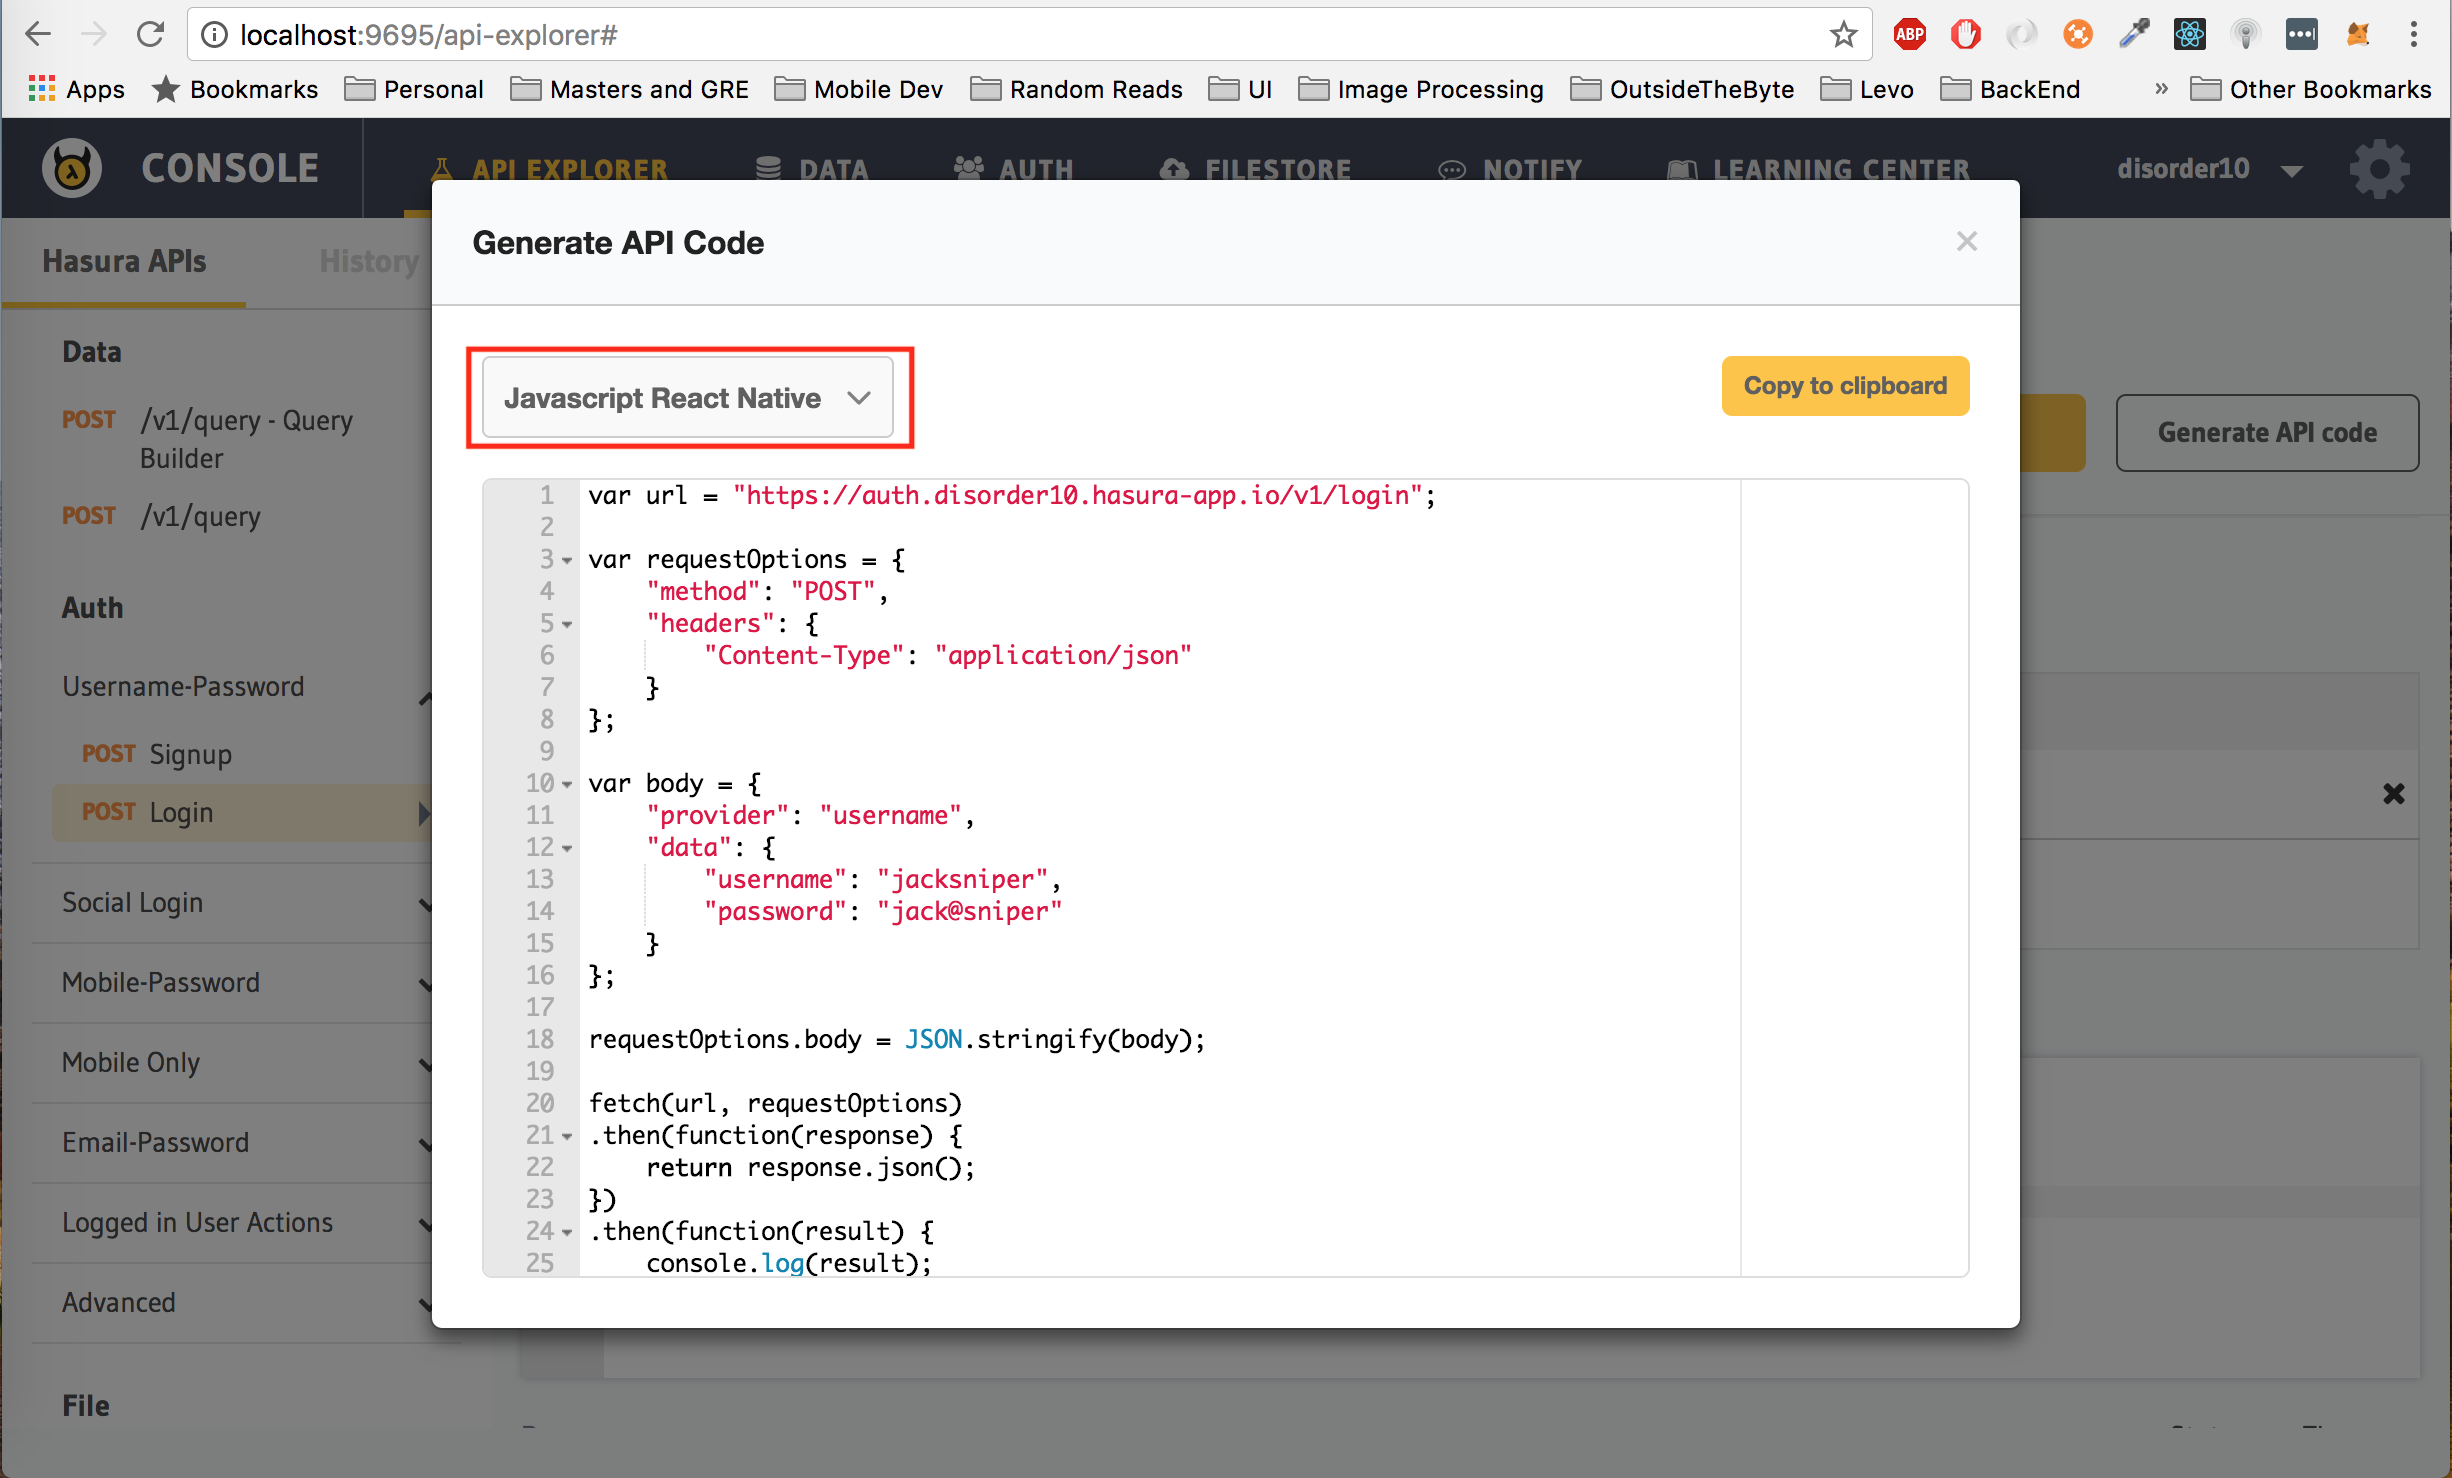
You can now copy and paste this into your client. Similarly, you can use the code generator for every request on the API Explorer.
- Run the Android app
- Click on
Authenticationin the landing screen to see a working example of Authentication. - The code for Authentication can be found in the
AuthActivity.
Advanced use cases:
- Other authentication providers
- Understanding how the auth session works
- Auth Configuration
- Admin user actions
- Authentication user actions
Most apps require a database to store and retrieve information from. This can be user specific information or contextual data in general which you do not want to store locally in your app or you maybe want to share a certain set of data with every user of your app. Ideally, you would want to store this in a database on the cloud and access or modify it based on certain events on your app.
Let's explore how we can do this on Hasura. Head back to the API Console and ensure that you are on the Data tab.
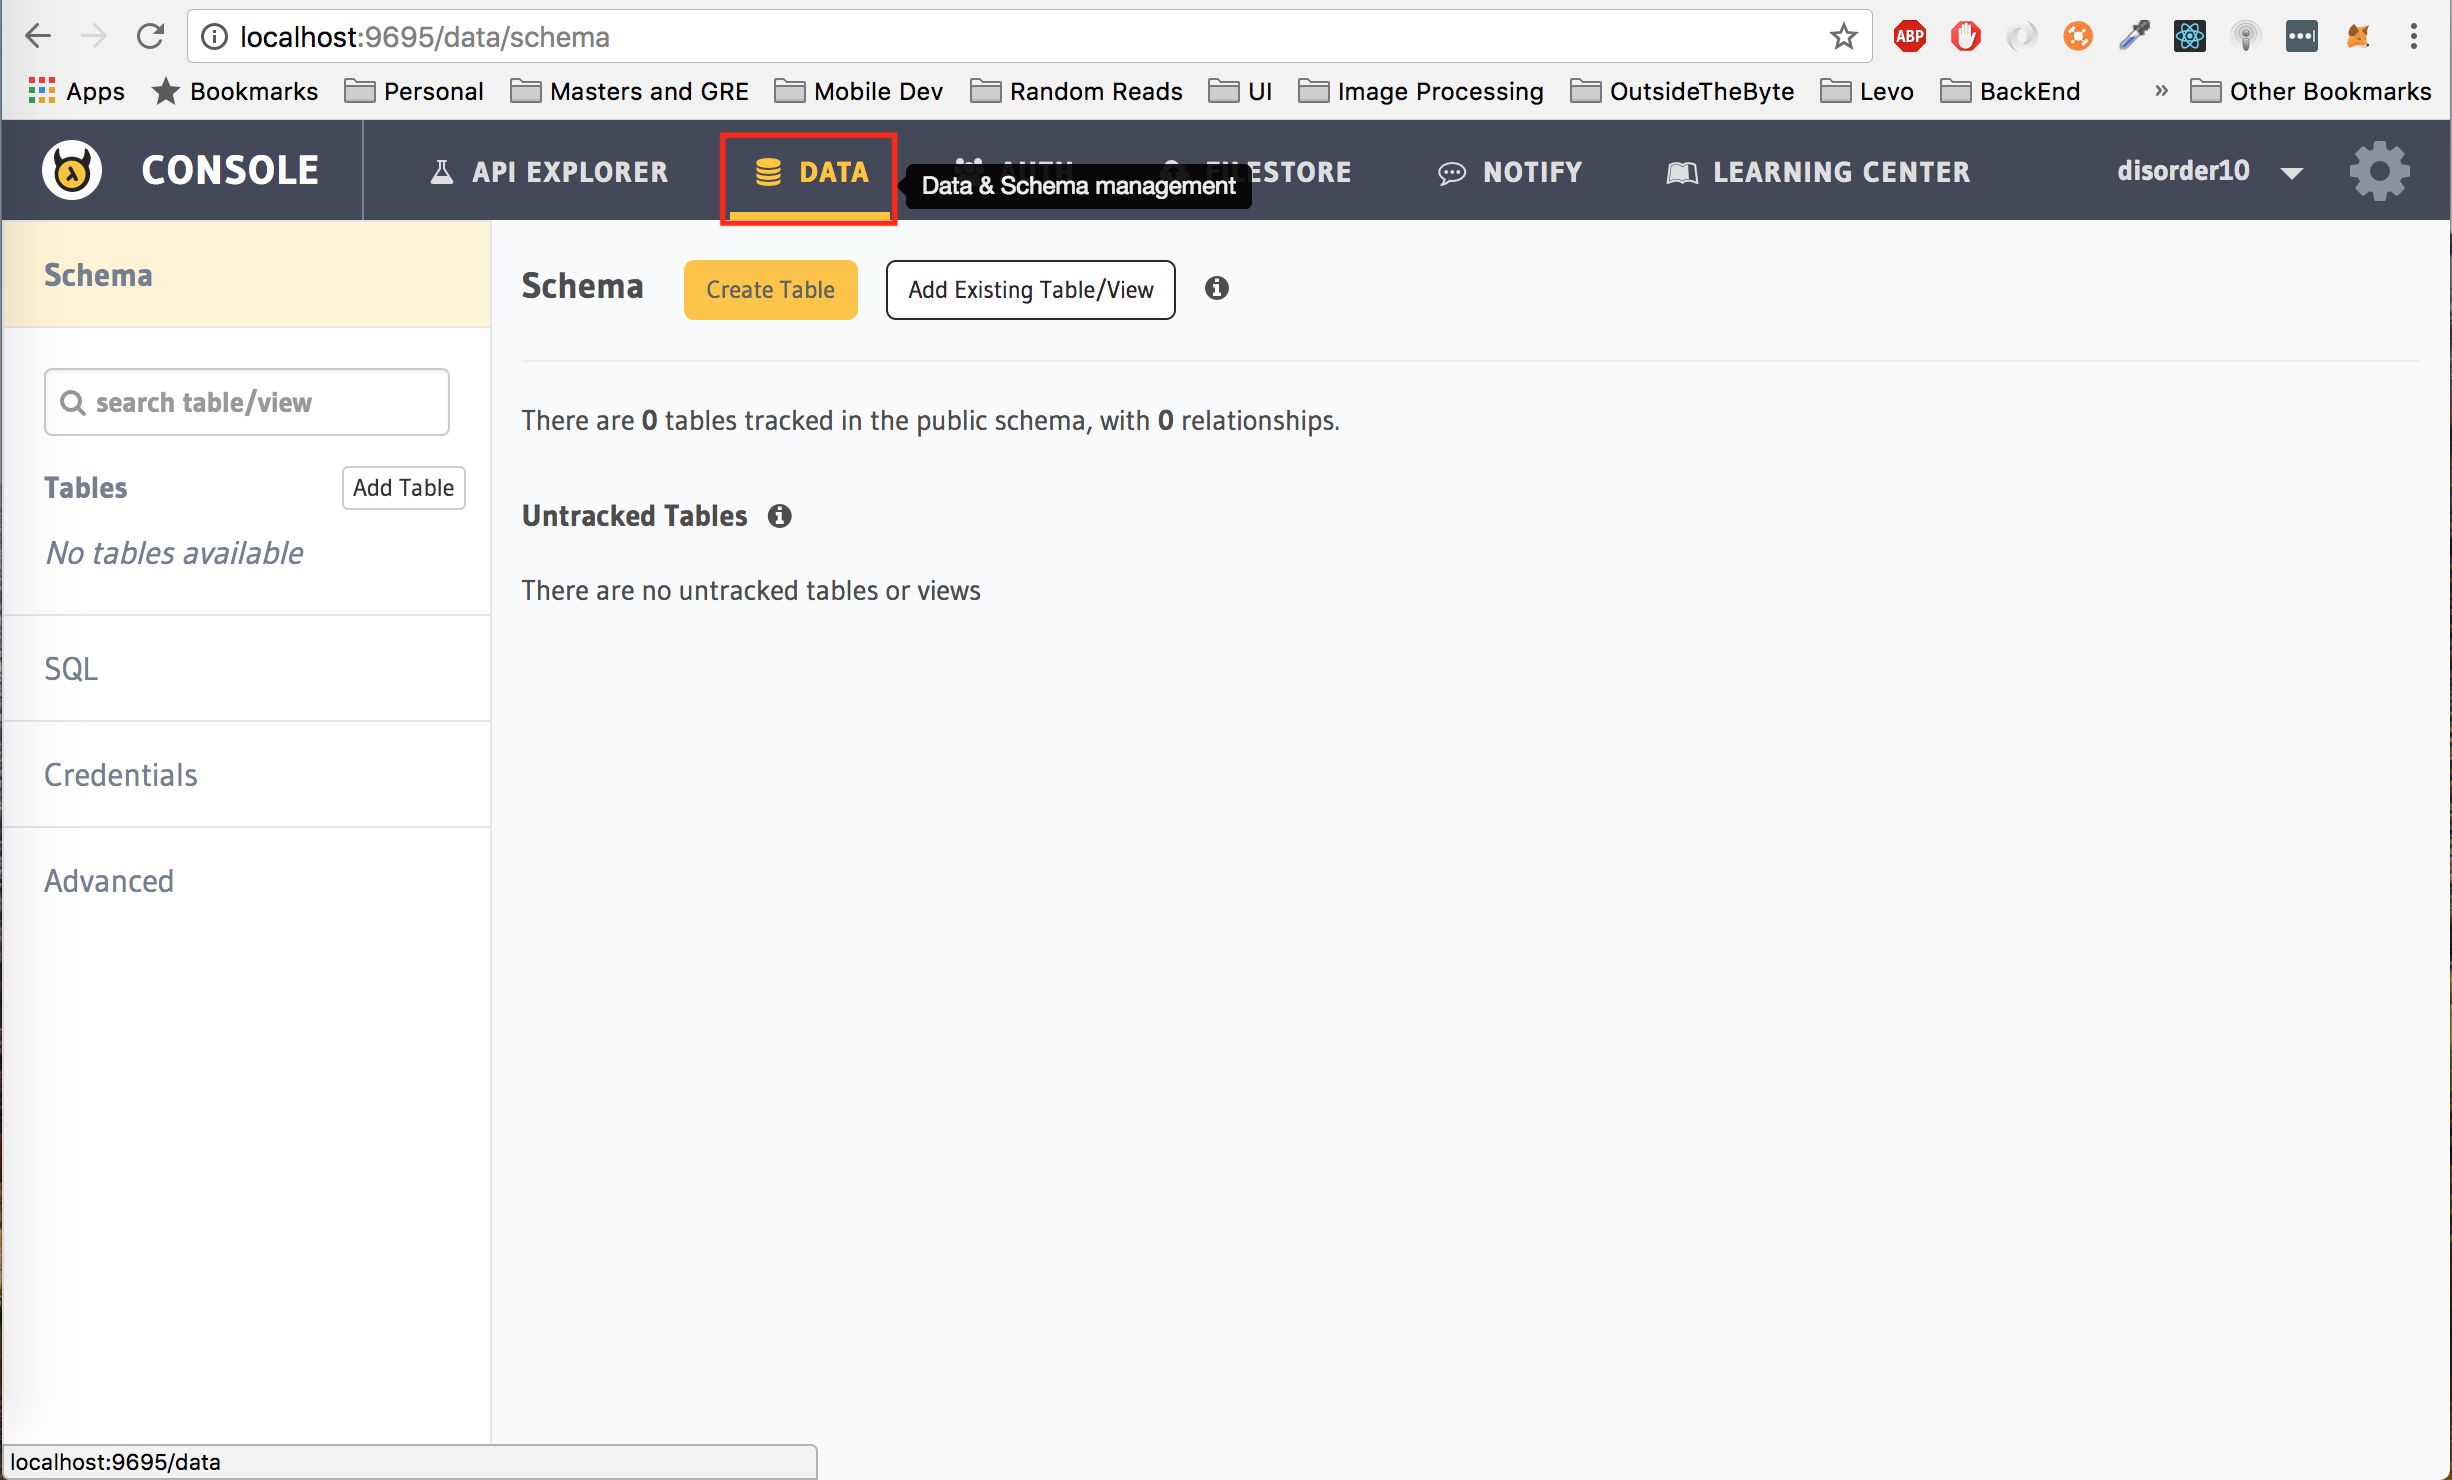
Click on the Create Table button. Let's start off with a table called user_details which we will use to store extra information about a user, like their name and gender. We will also be adding an additional column user_id to store the hasura_id of the user. user_id will also be our primary key as the hasura_id for every user is always unique.
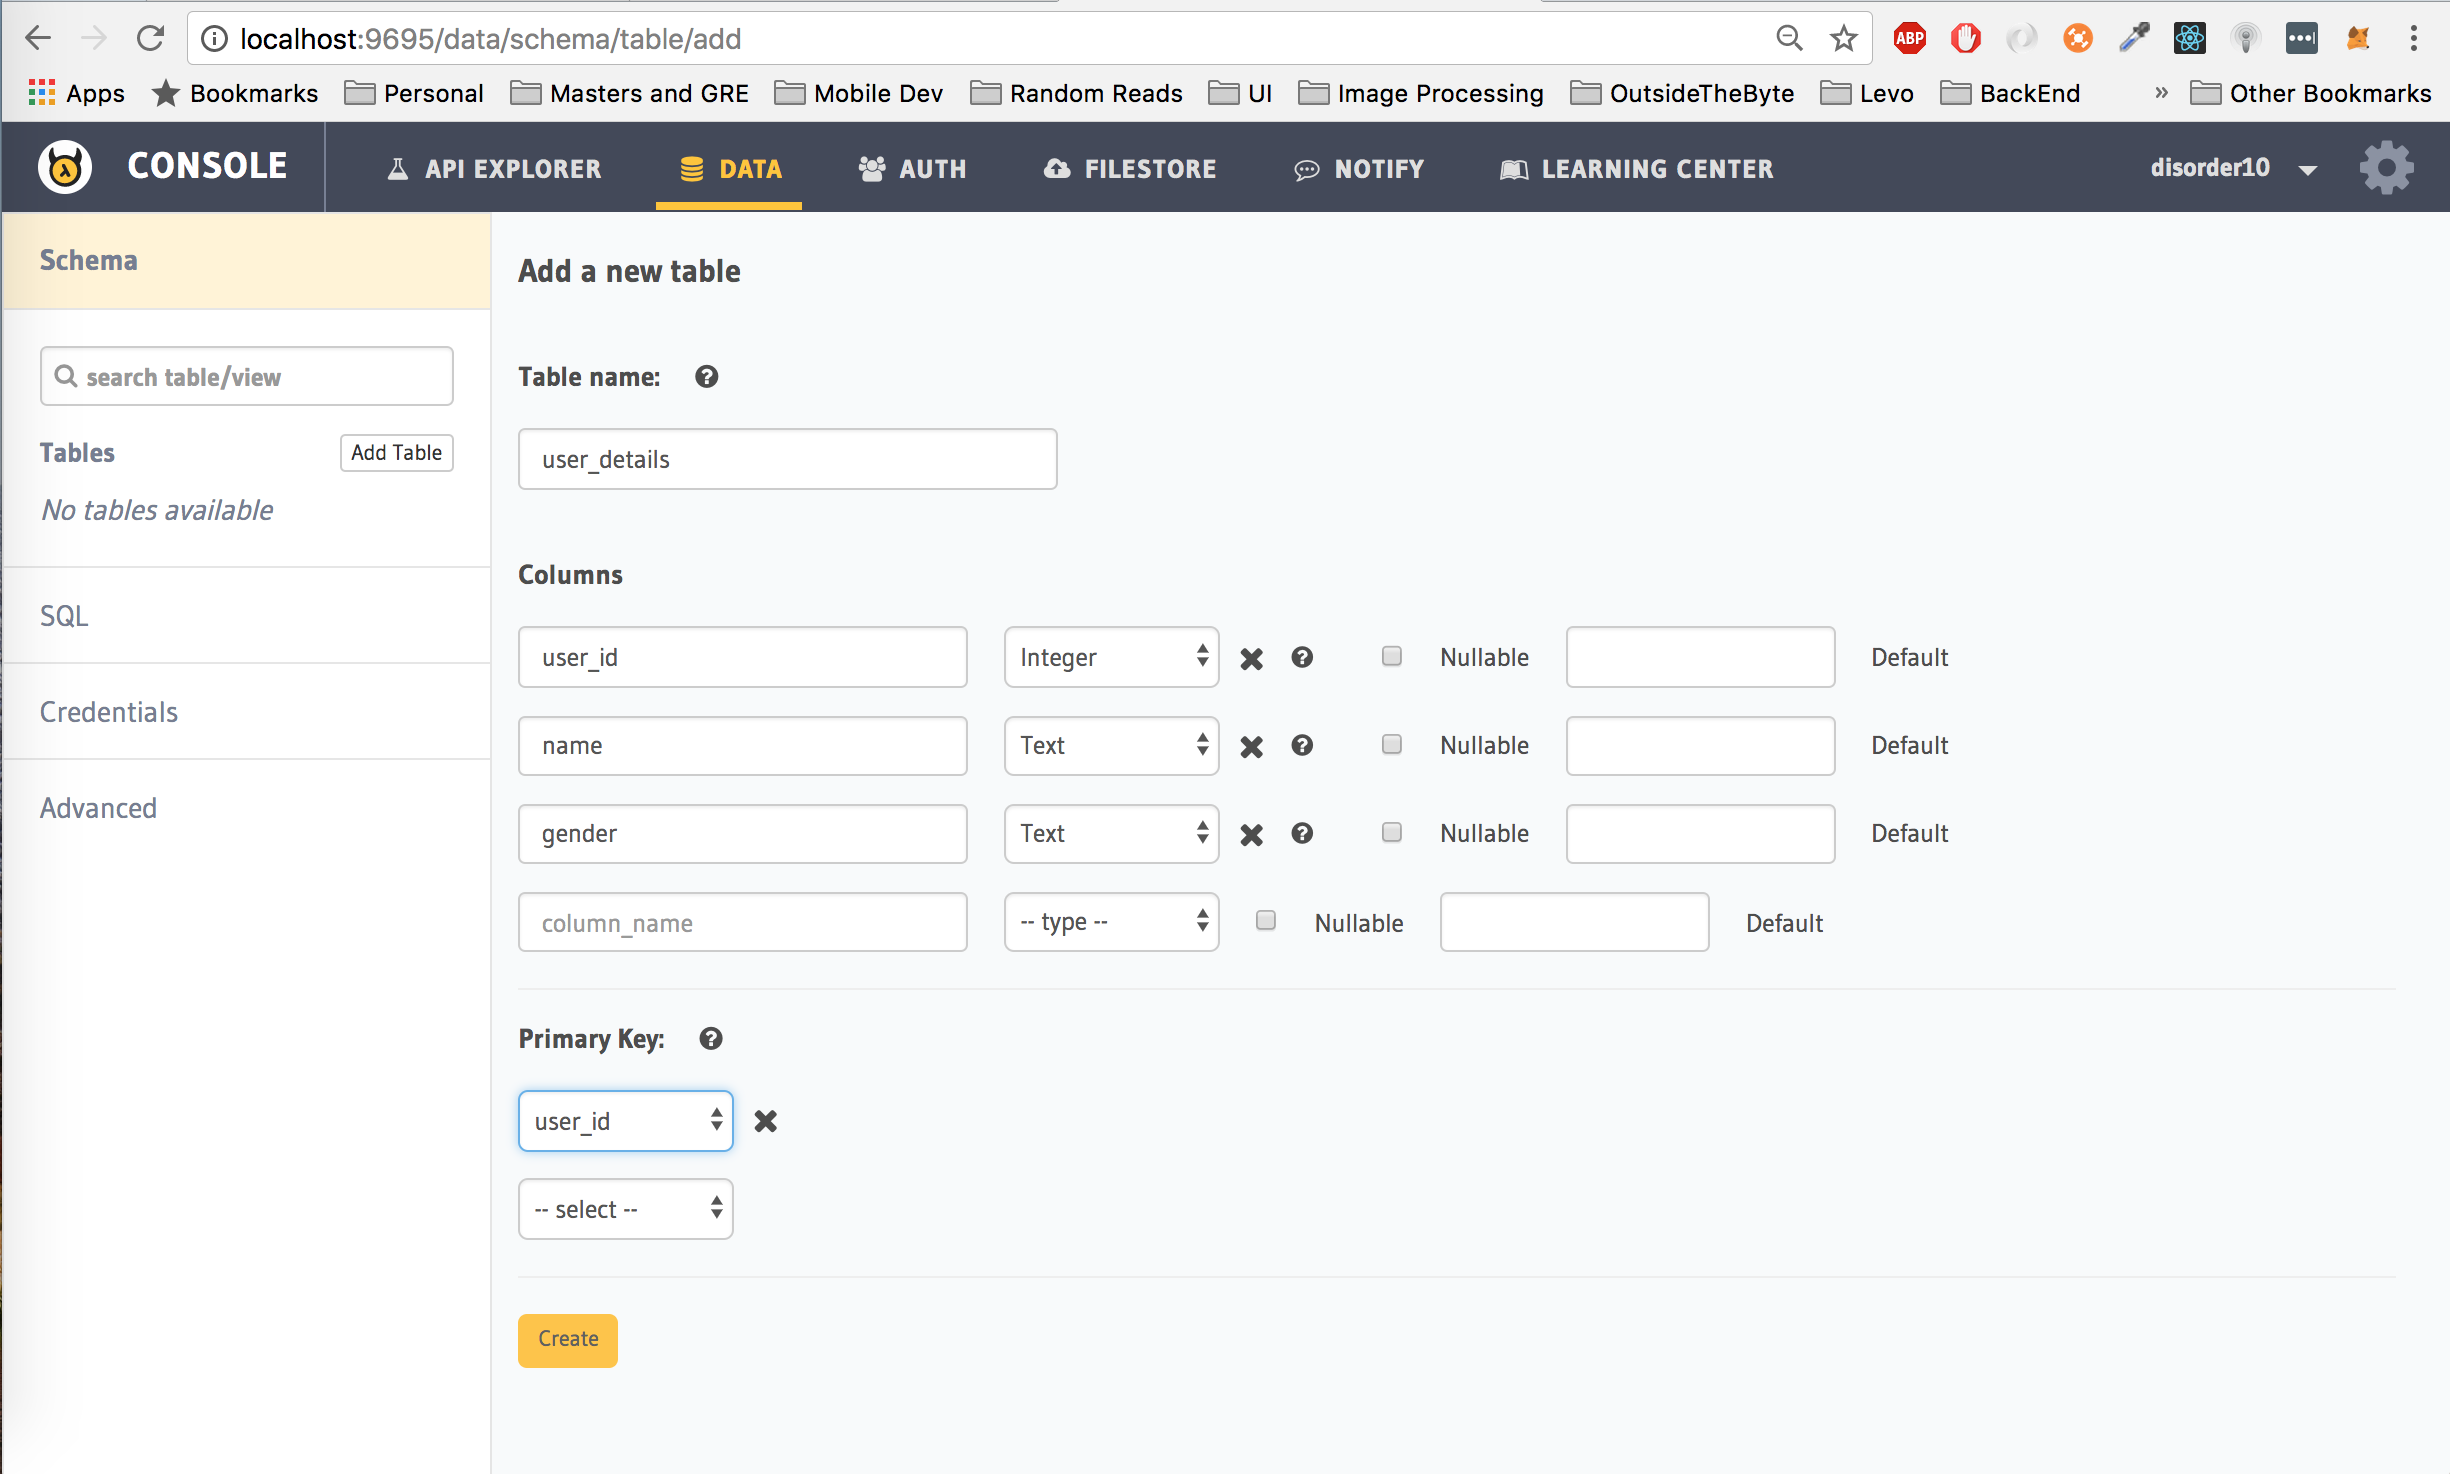
Click the Create button to create the table.
Every table created on Hasura can only be accessed by users with an admin role. Ergo, the user we created earlier will not be able to access the user_details table (since the role associated with that user was user). This is done to ensure security on all tables, so that nobody can randomly access data from your database unless you specifically allow that.
You can read more about roles here.
In our case, user_details table is used to store user specific data. We want to give every logged in user, permission to insert and select their own data from the user_details table. Moreover, as an extra security measure, they should not be able to fetch another users data either.
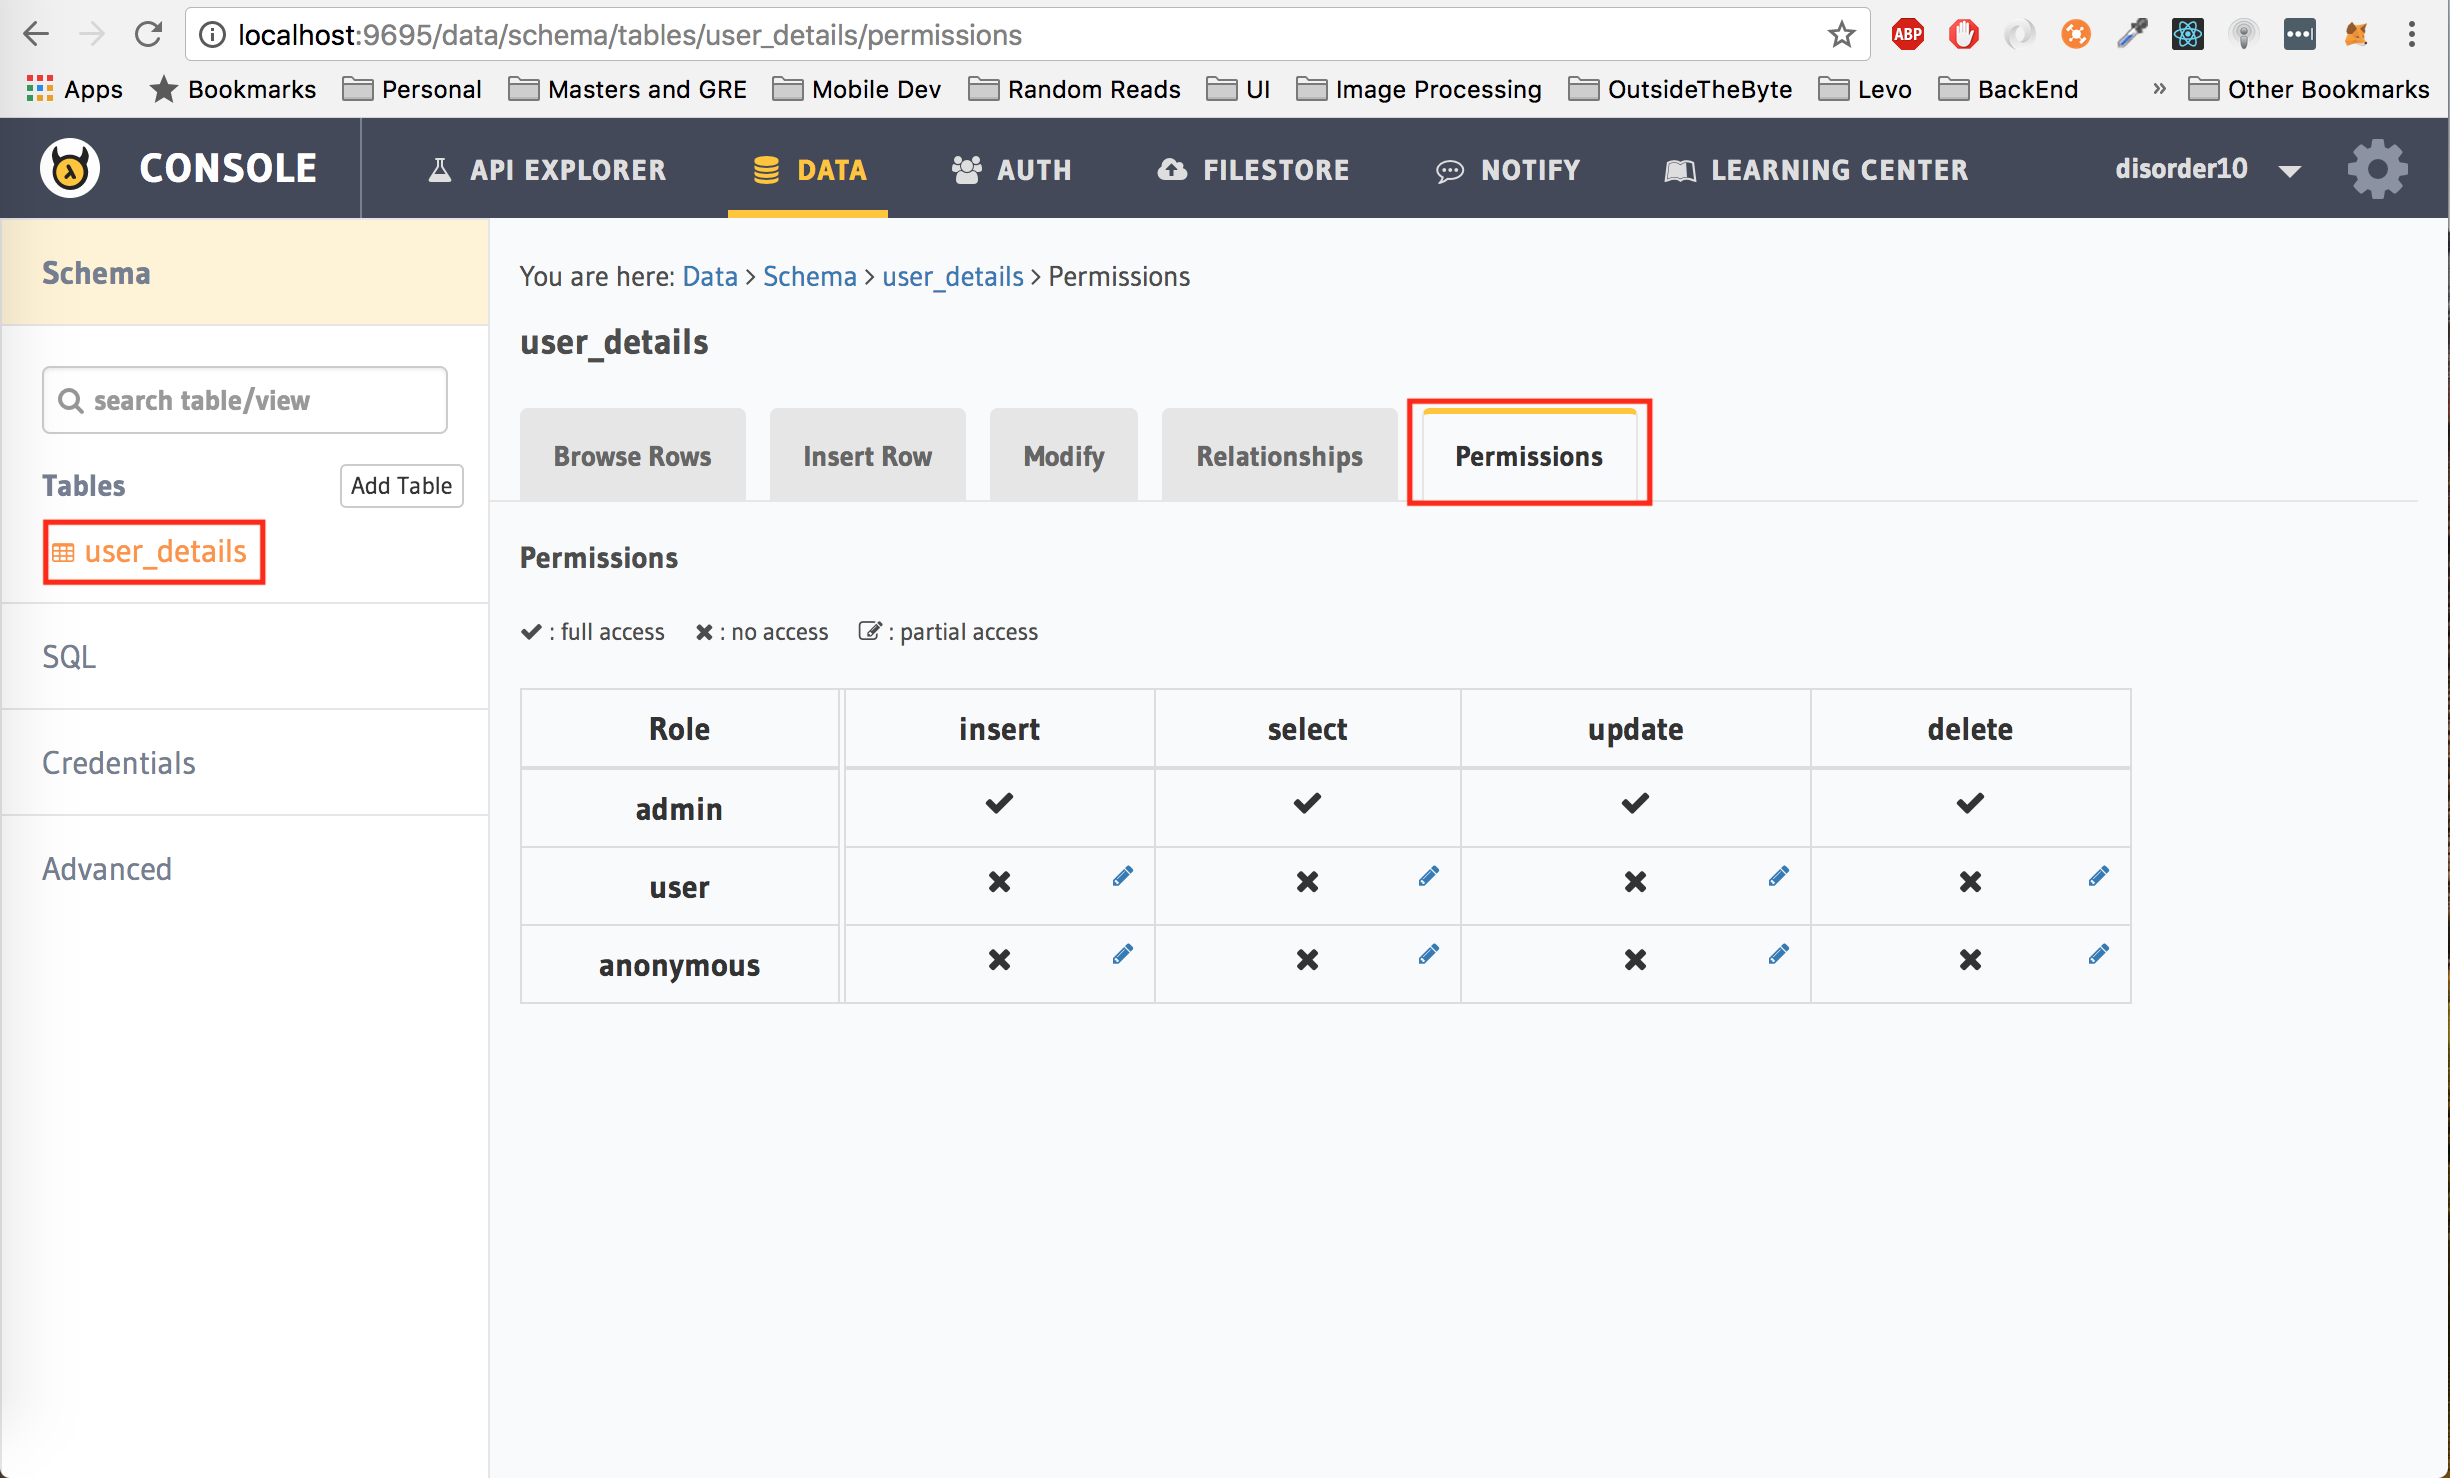
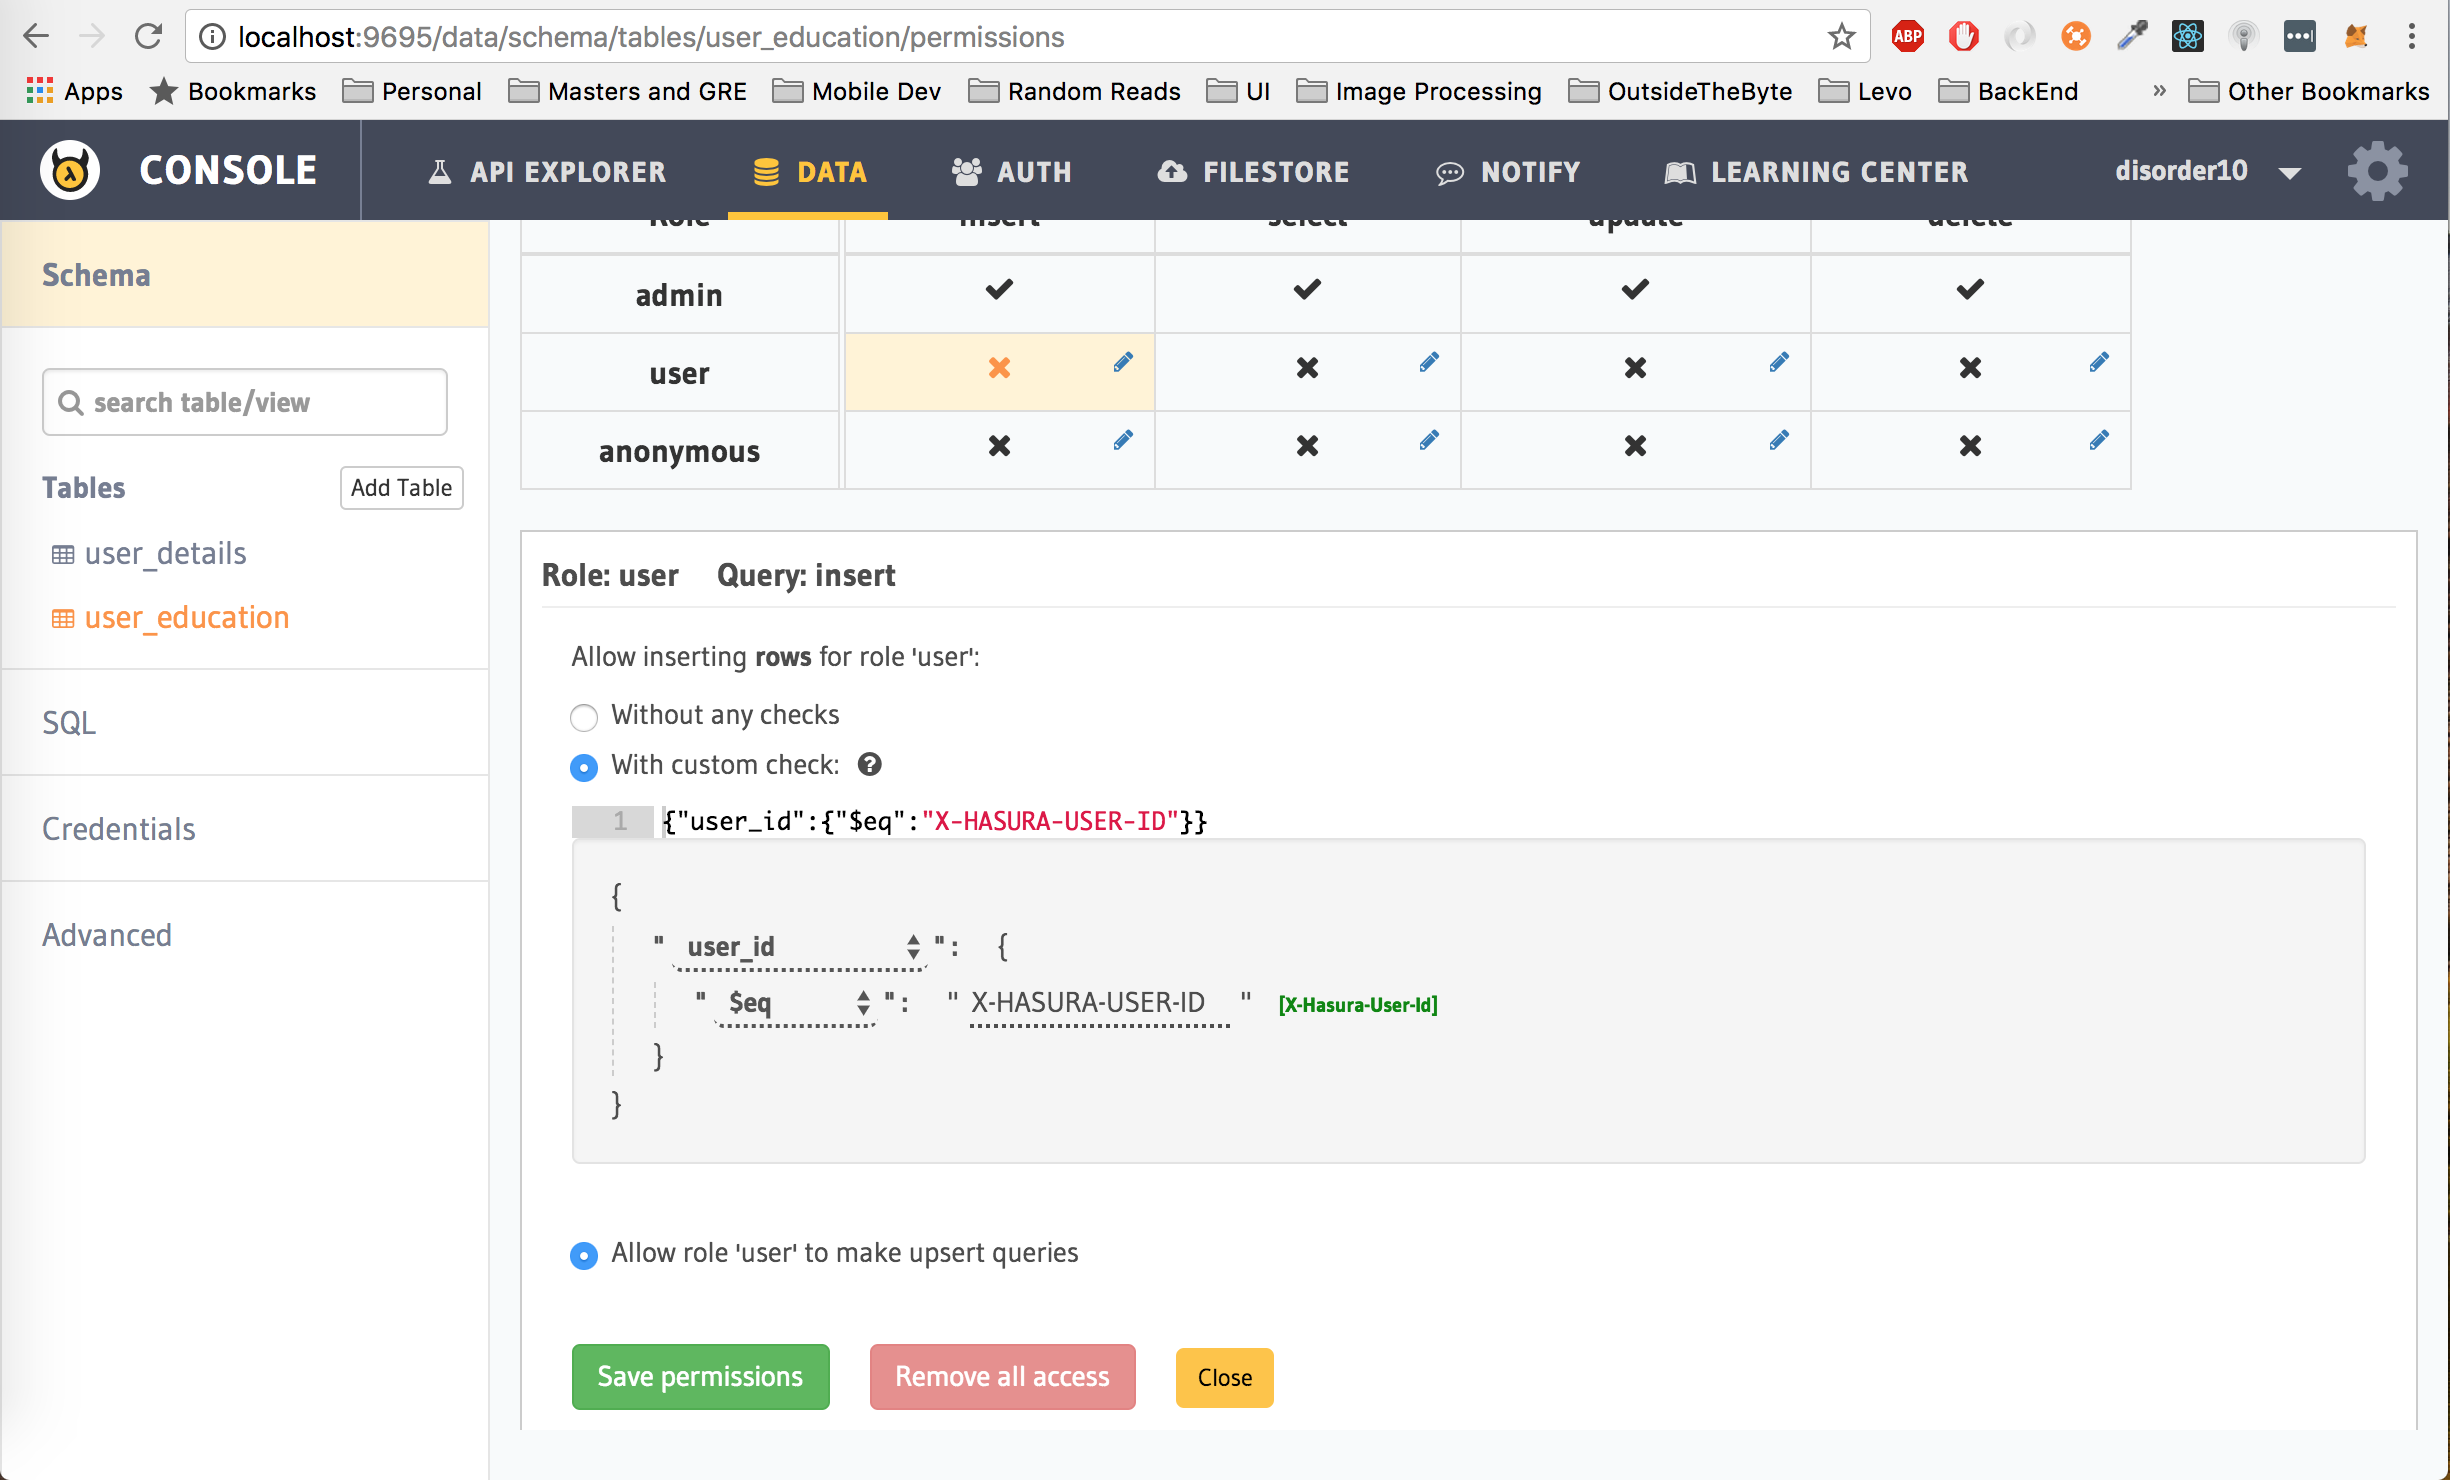
Under the Data tab of the API Console, select user_details from the left panel and then click on the Permissions tab on the right to set permissions for the table. As you can see, an admin role has complete permission over the table. No other role has any permission.
First, lets give the user role permission to insert data into the table. To do this, click on insert next to user row, check the with custom check option, choose user_id from the drop down and then select $eq and finally click on X-Hasura-User-Id. Click on Save Permissions.
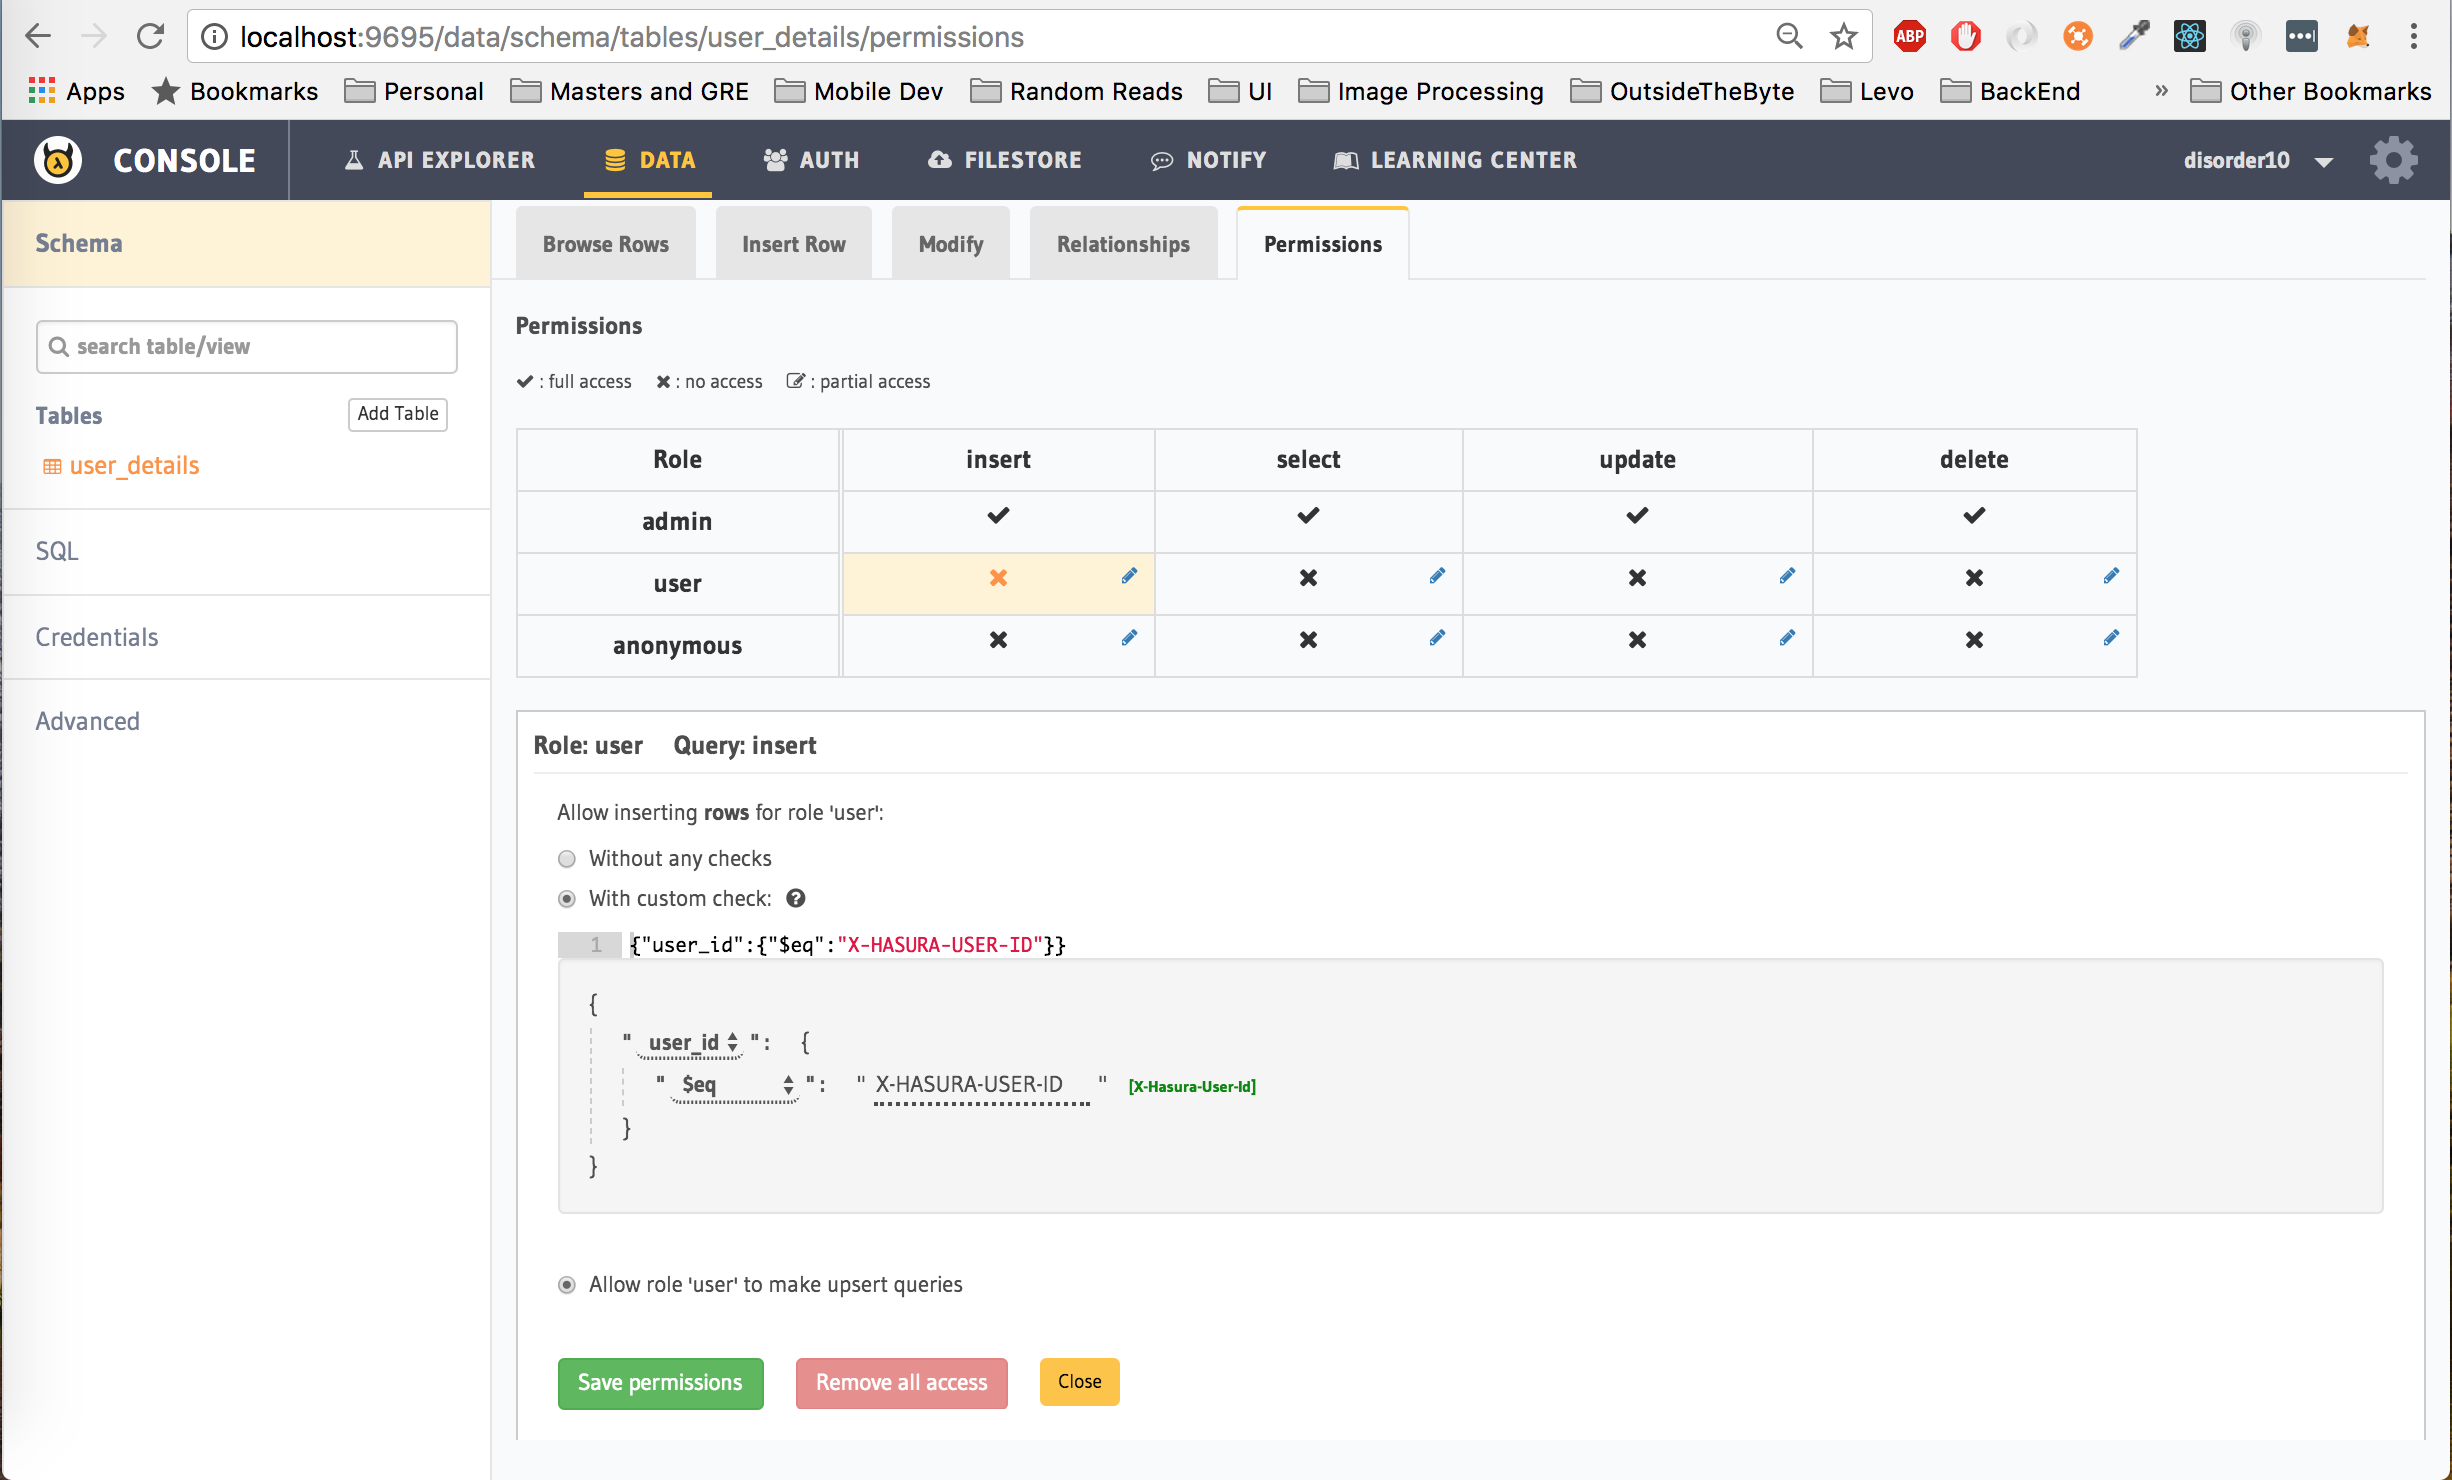
The permissions set above translates to: Allow a user to insert into the user_details table only if the user_id being inserted is the same as the hasura_id associated with the user's auth_token which is passed as the Authorization token in the header
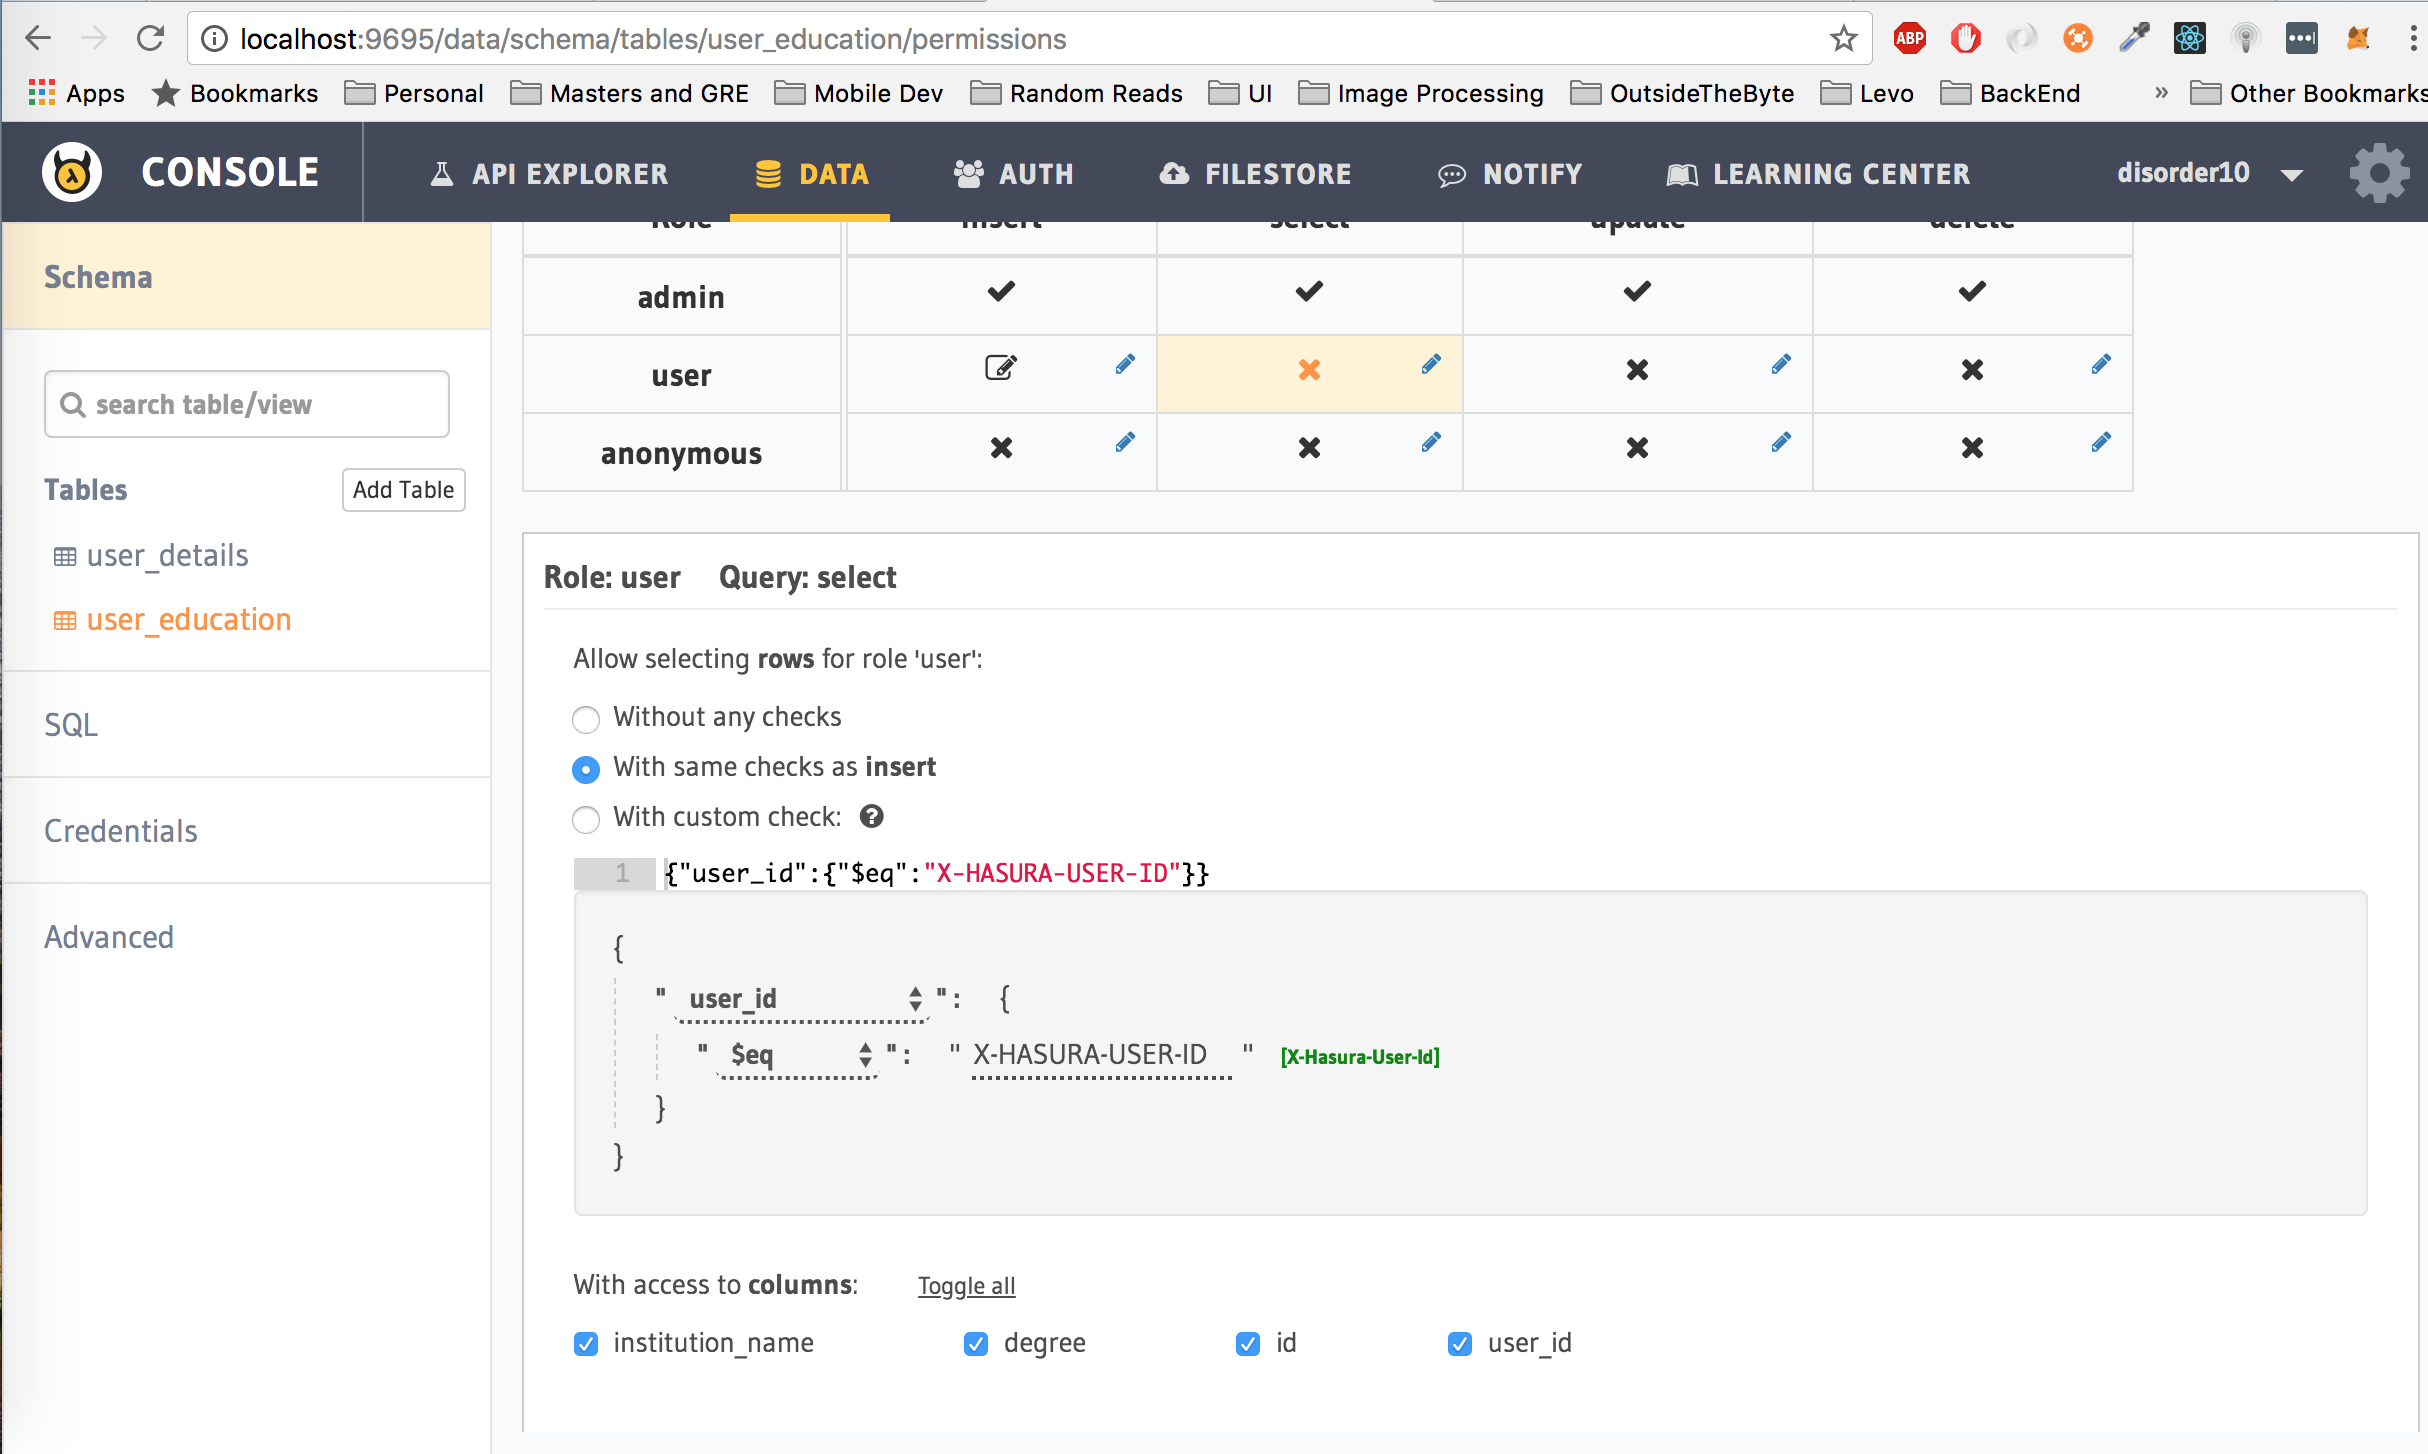
Second, lets give the user role permission to get their data from the table. Click on select next to the user row, check the with same checks as insert, also click on the Toggle All button next to With Access to columns. Click on Save Permissions.

The permissions set above translates to: Let the user only read rows from the user_details table where the user_id is equal to the hasura_id of the user which is passed as the Authorization token in the header. Moreover, allow the user to only read the selected columns, in this case, user_id, name and gender
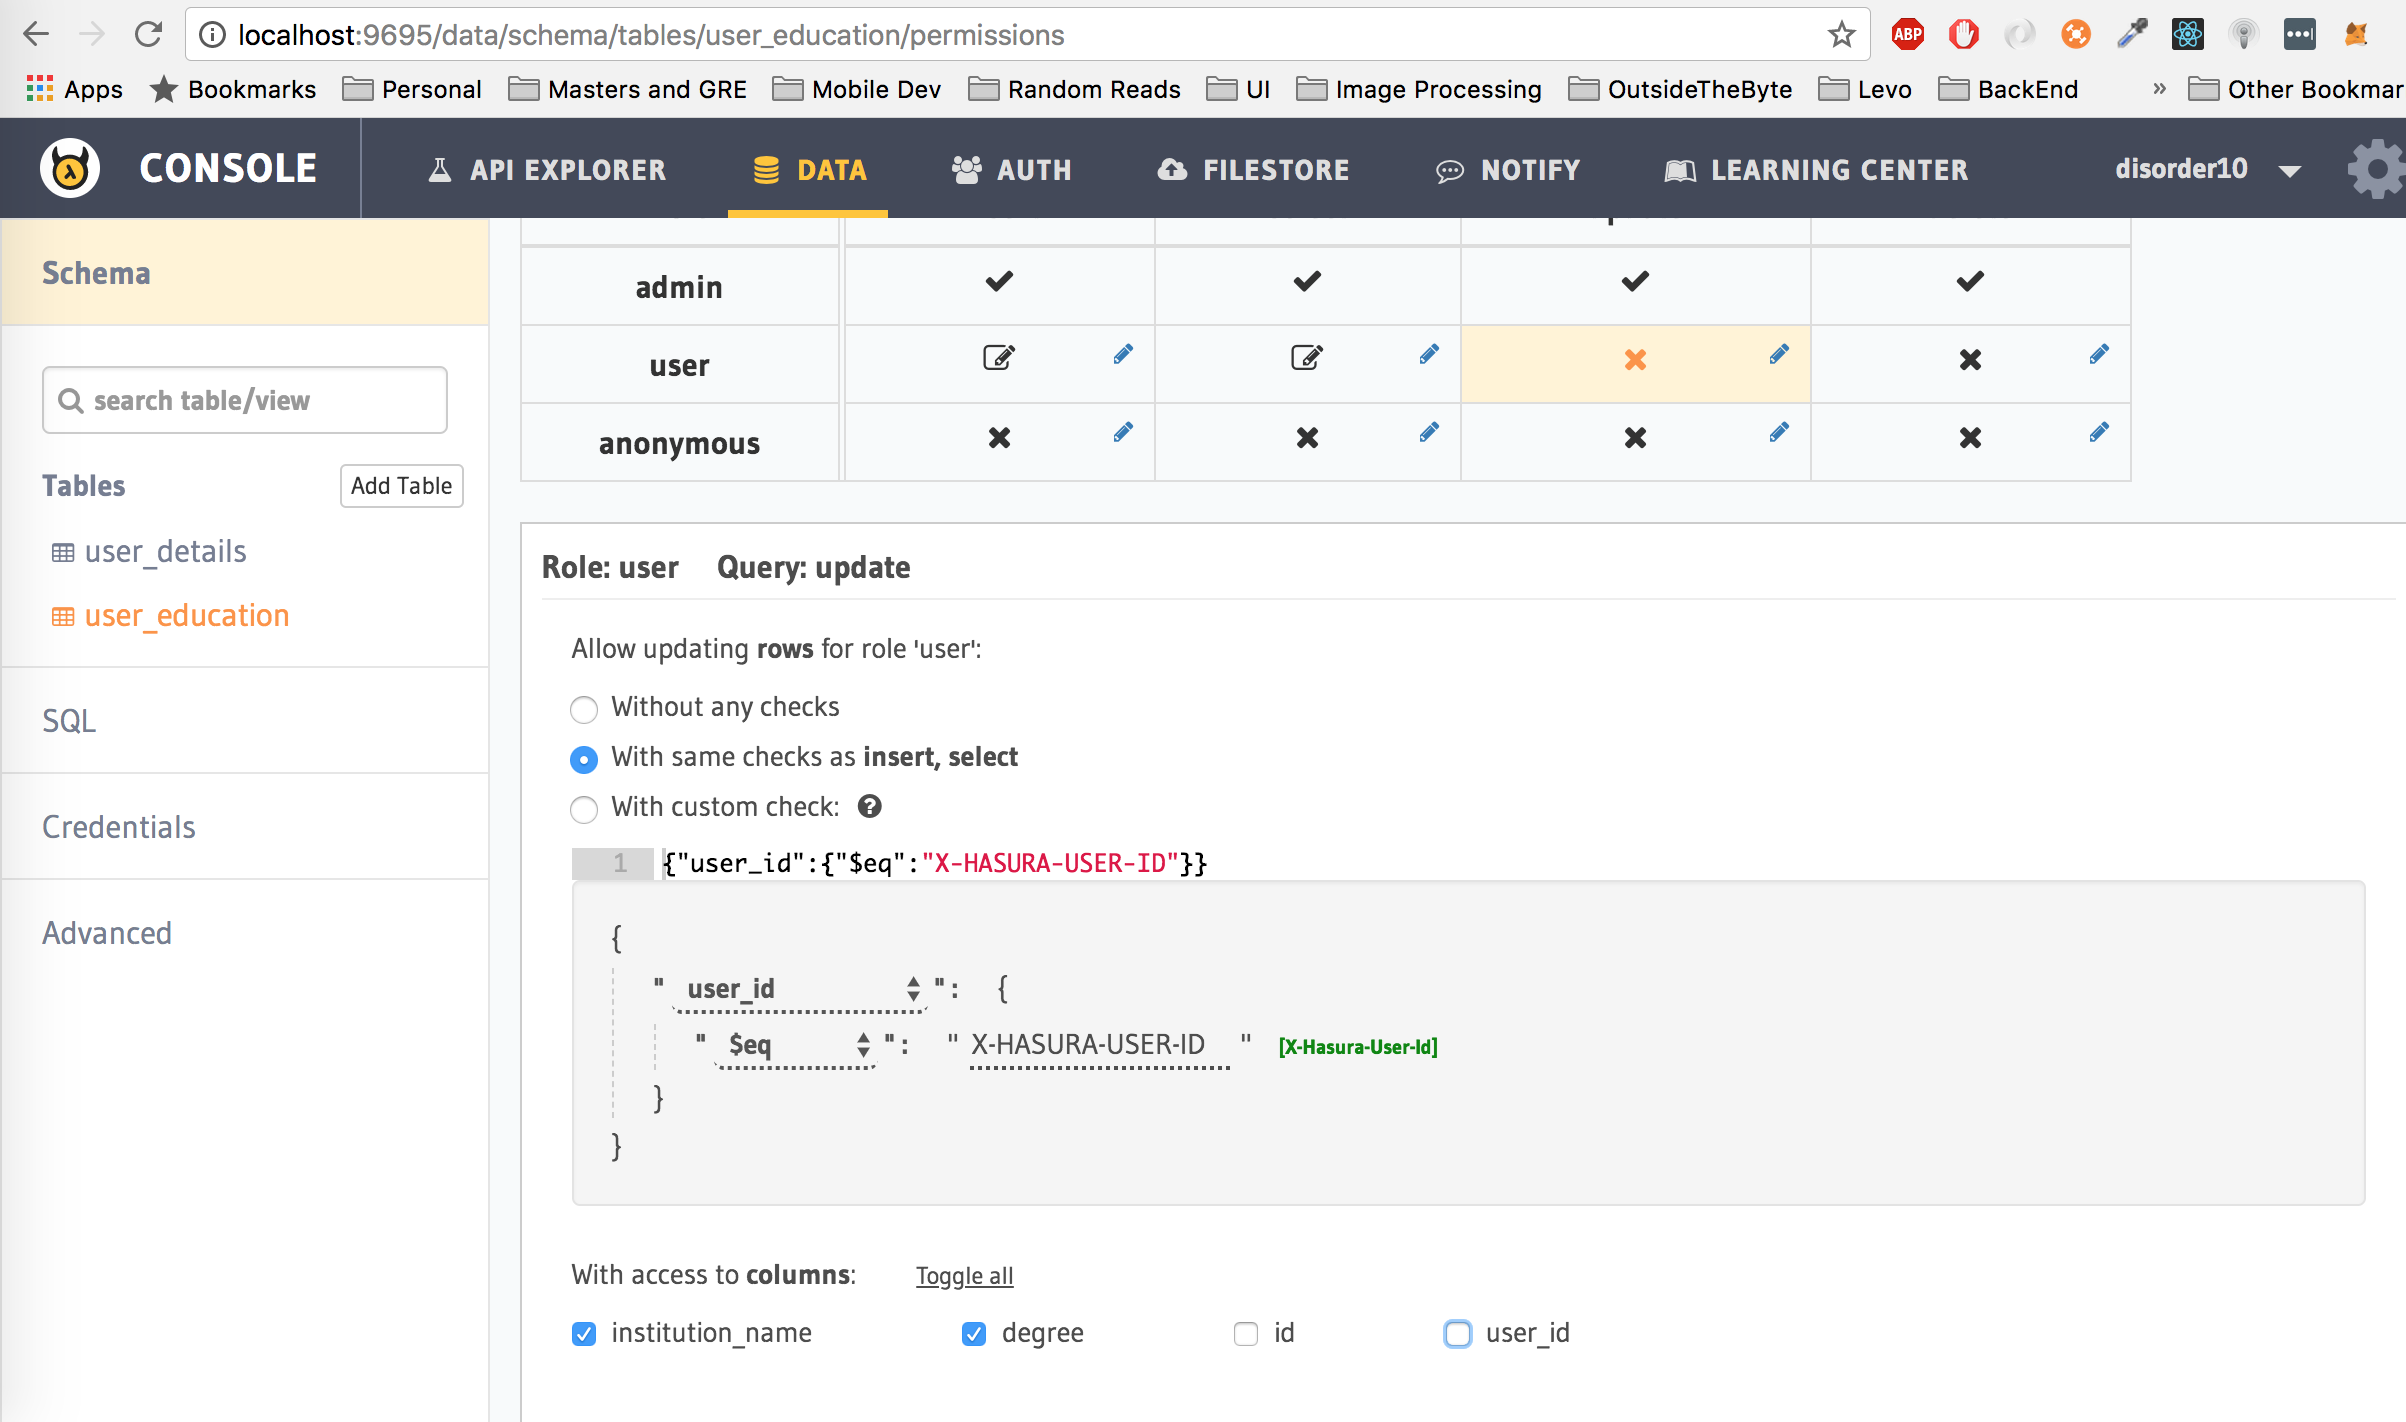
Third, update permissions
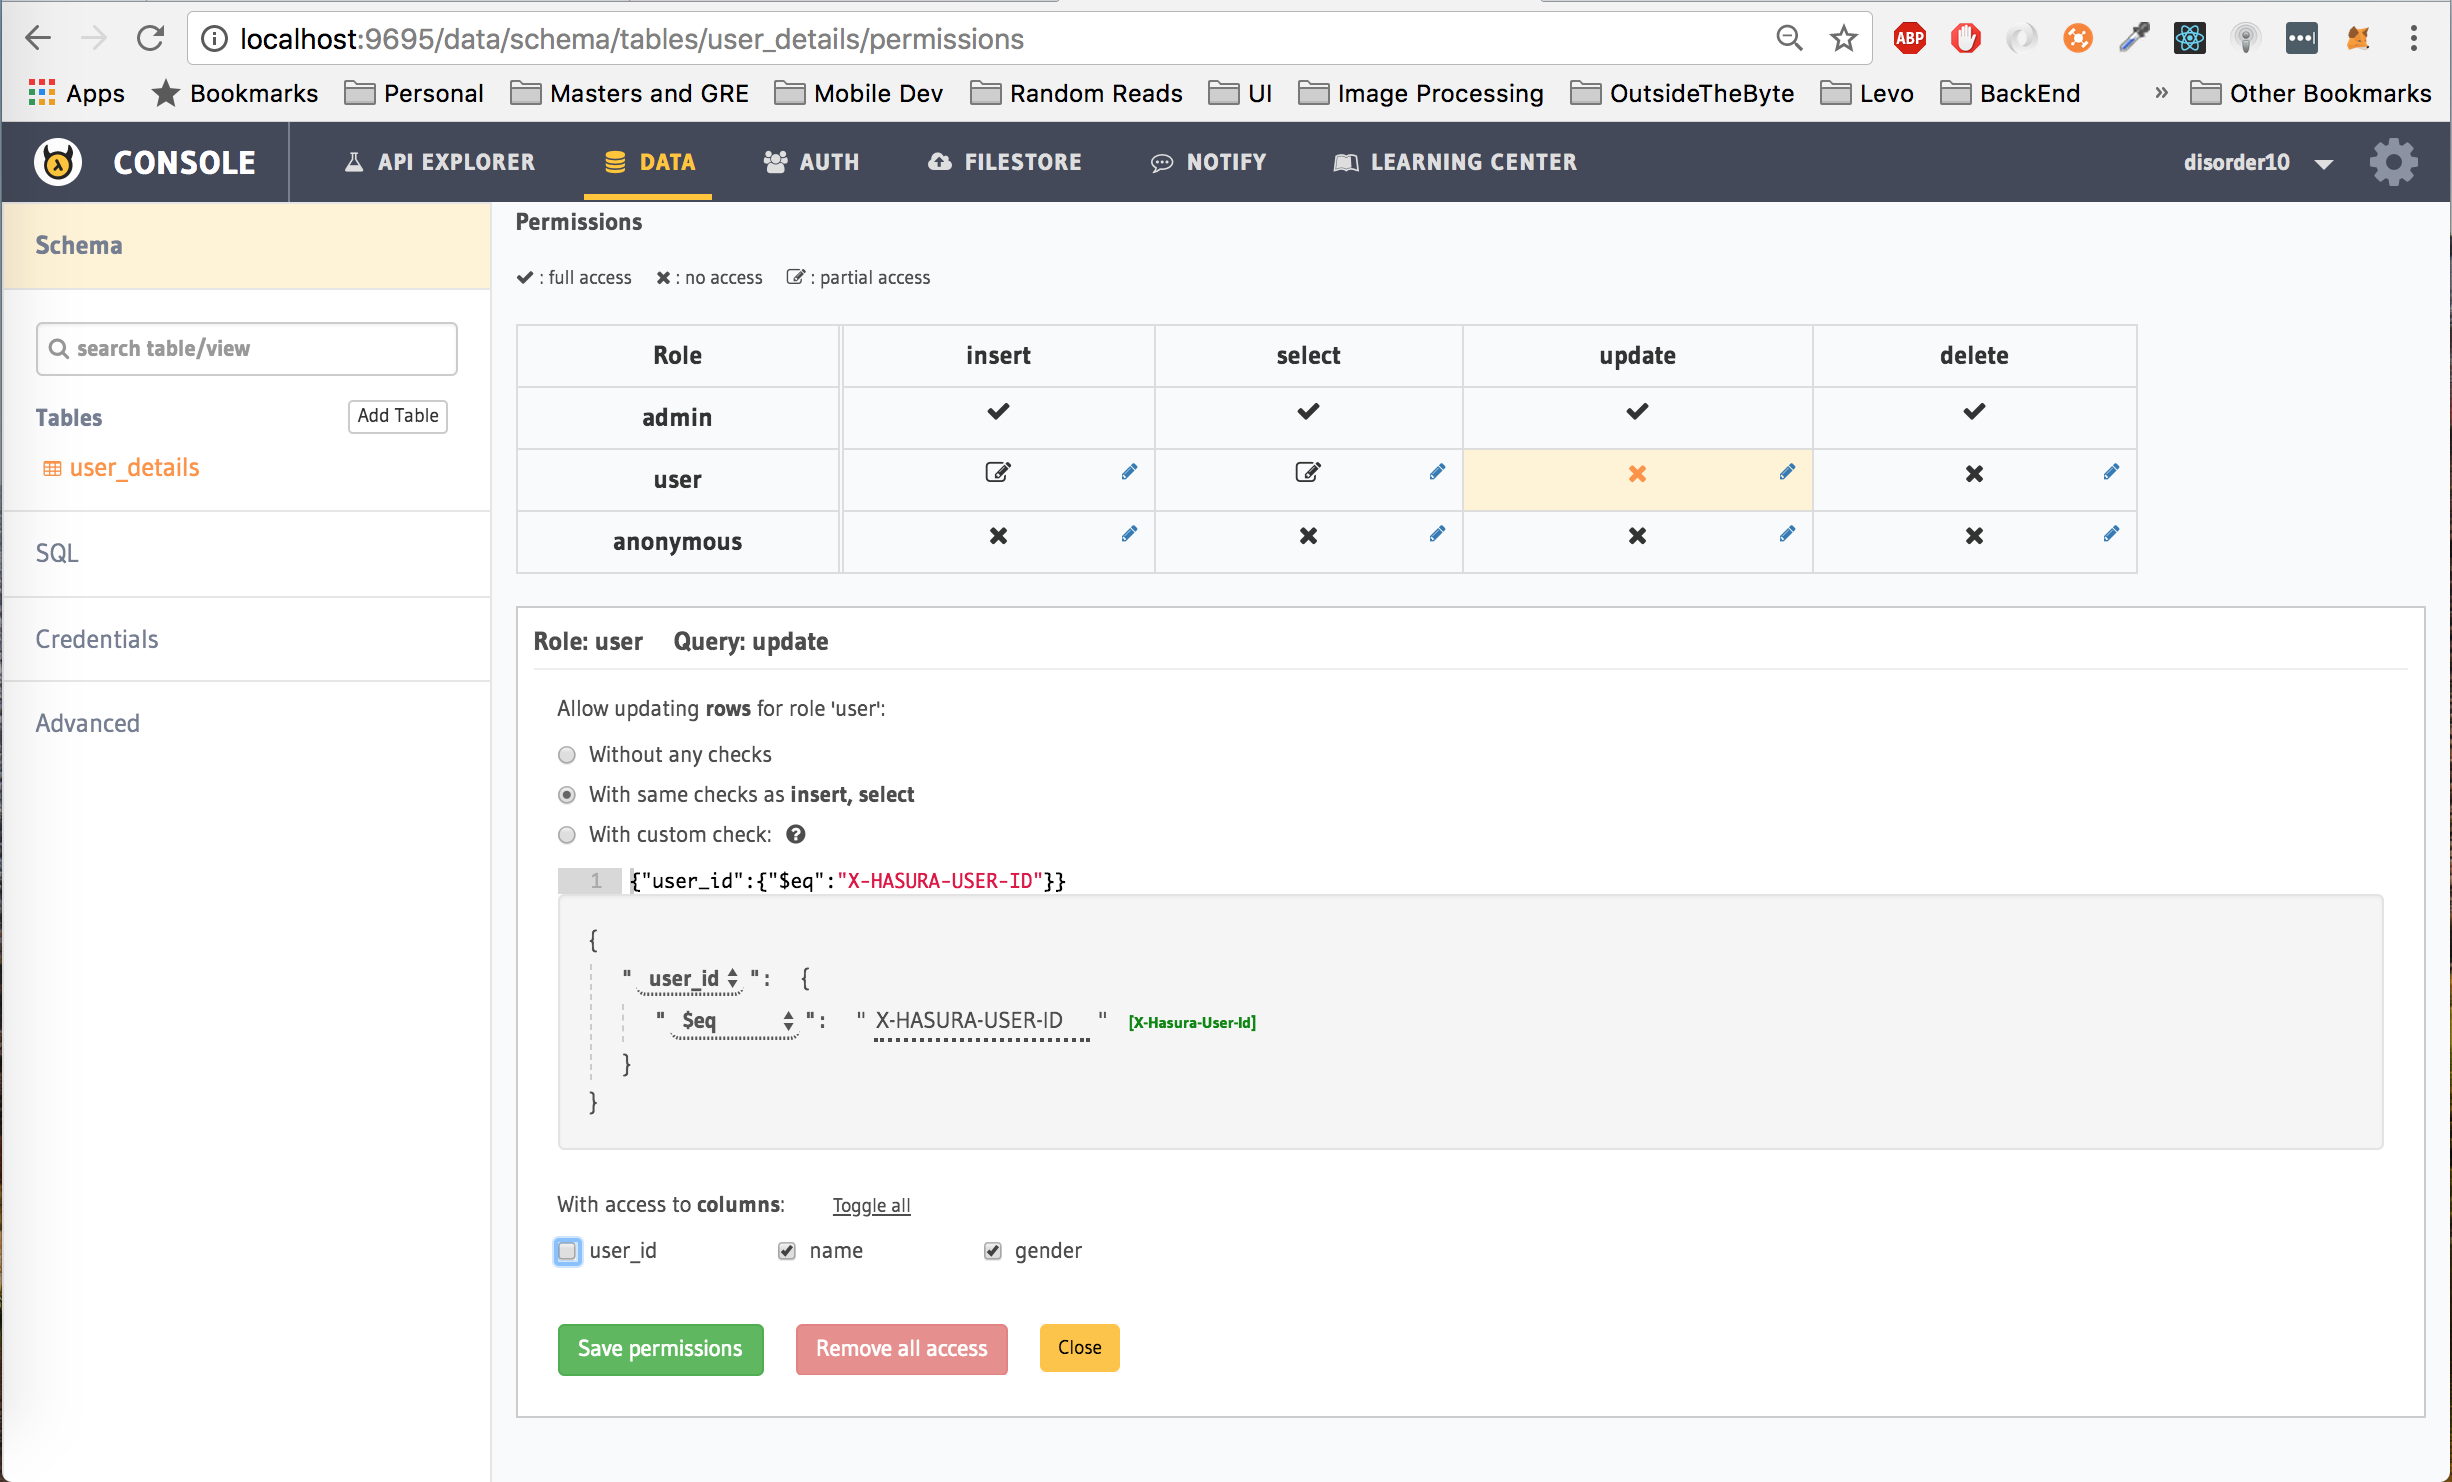
Translation: Let the user only update rows from the user_details table where the user_id is equal to the hasura_id of the user which is passed as the Authorization token in the header. Moreover, allow the user to only update the selected columns, in this case, the user cannot modify the user_id
Click on Save Permissions.
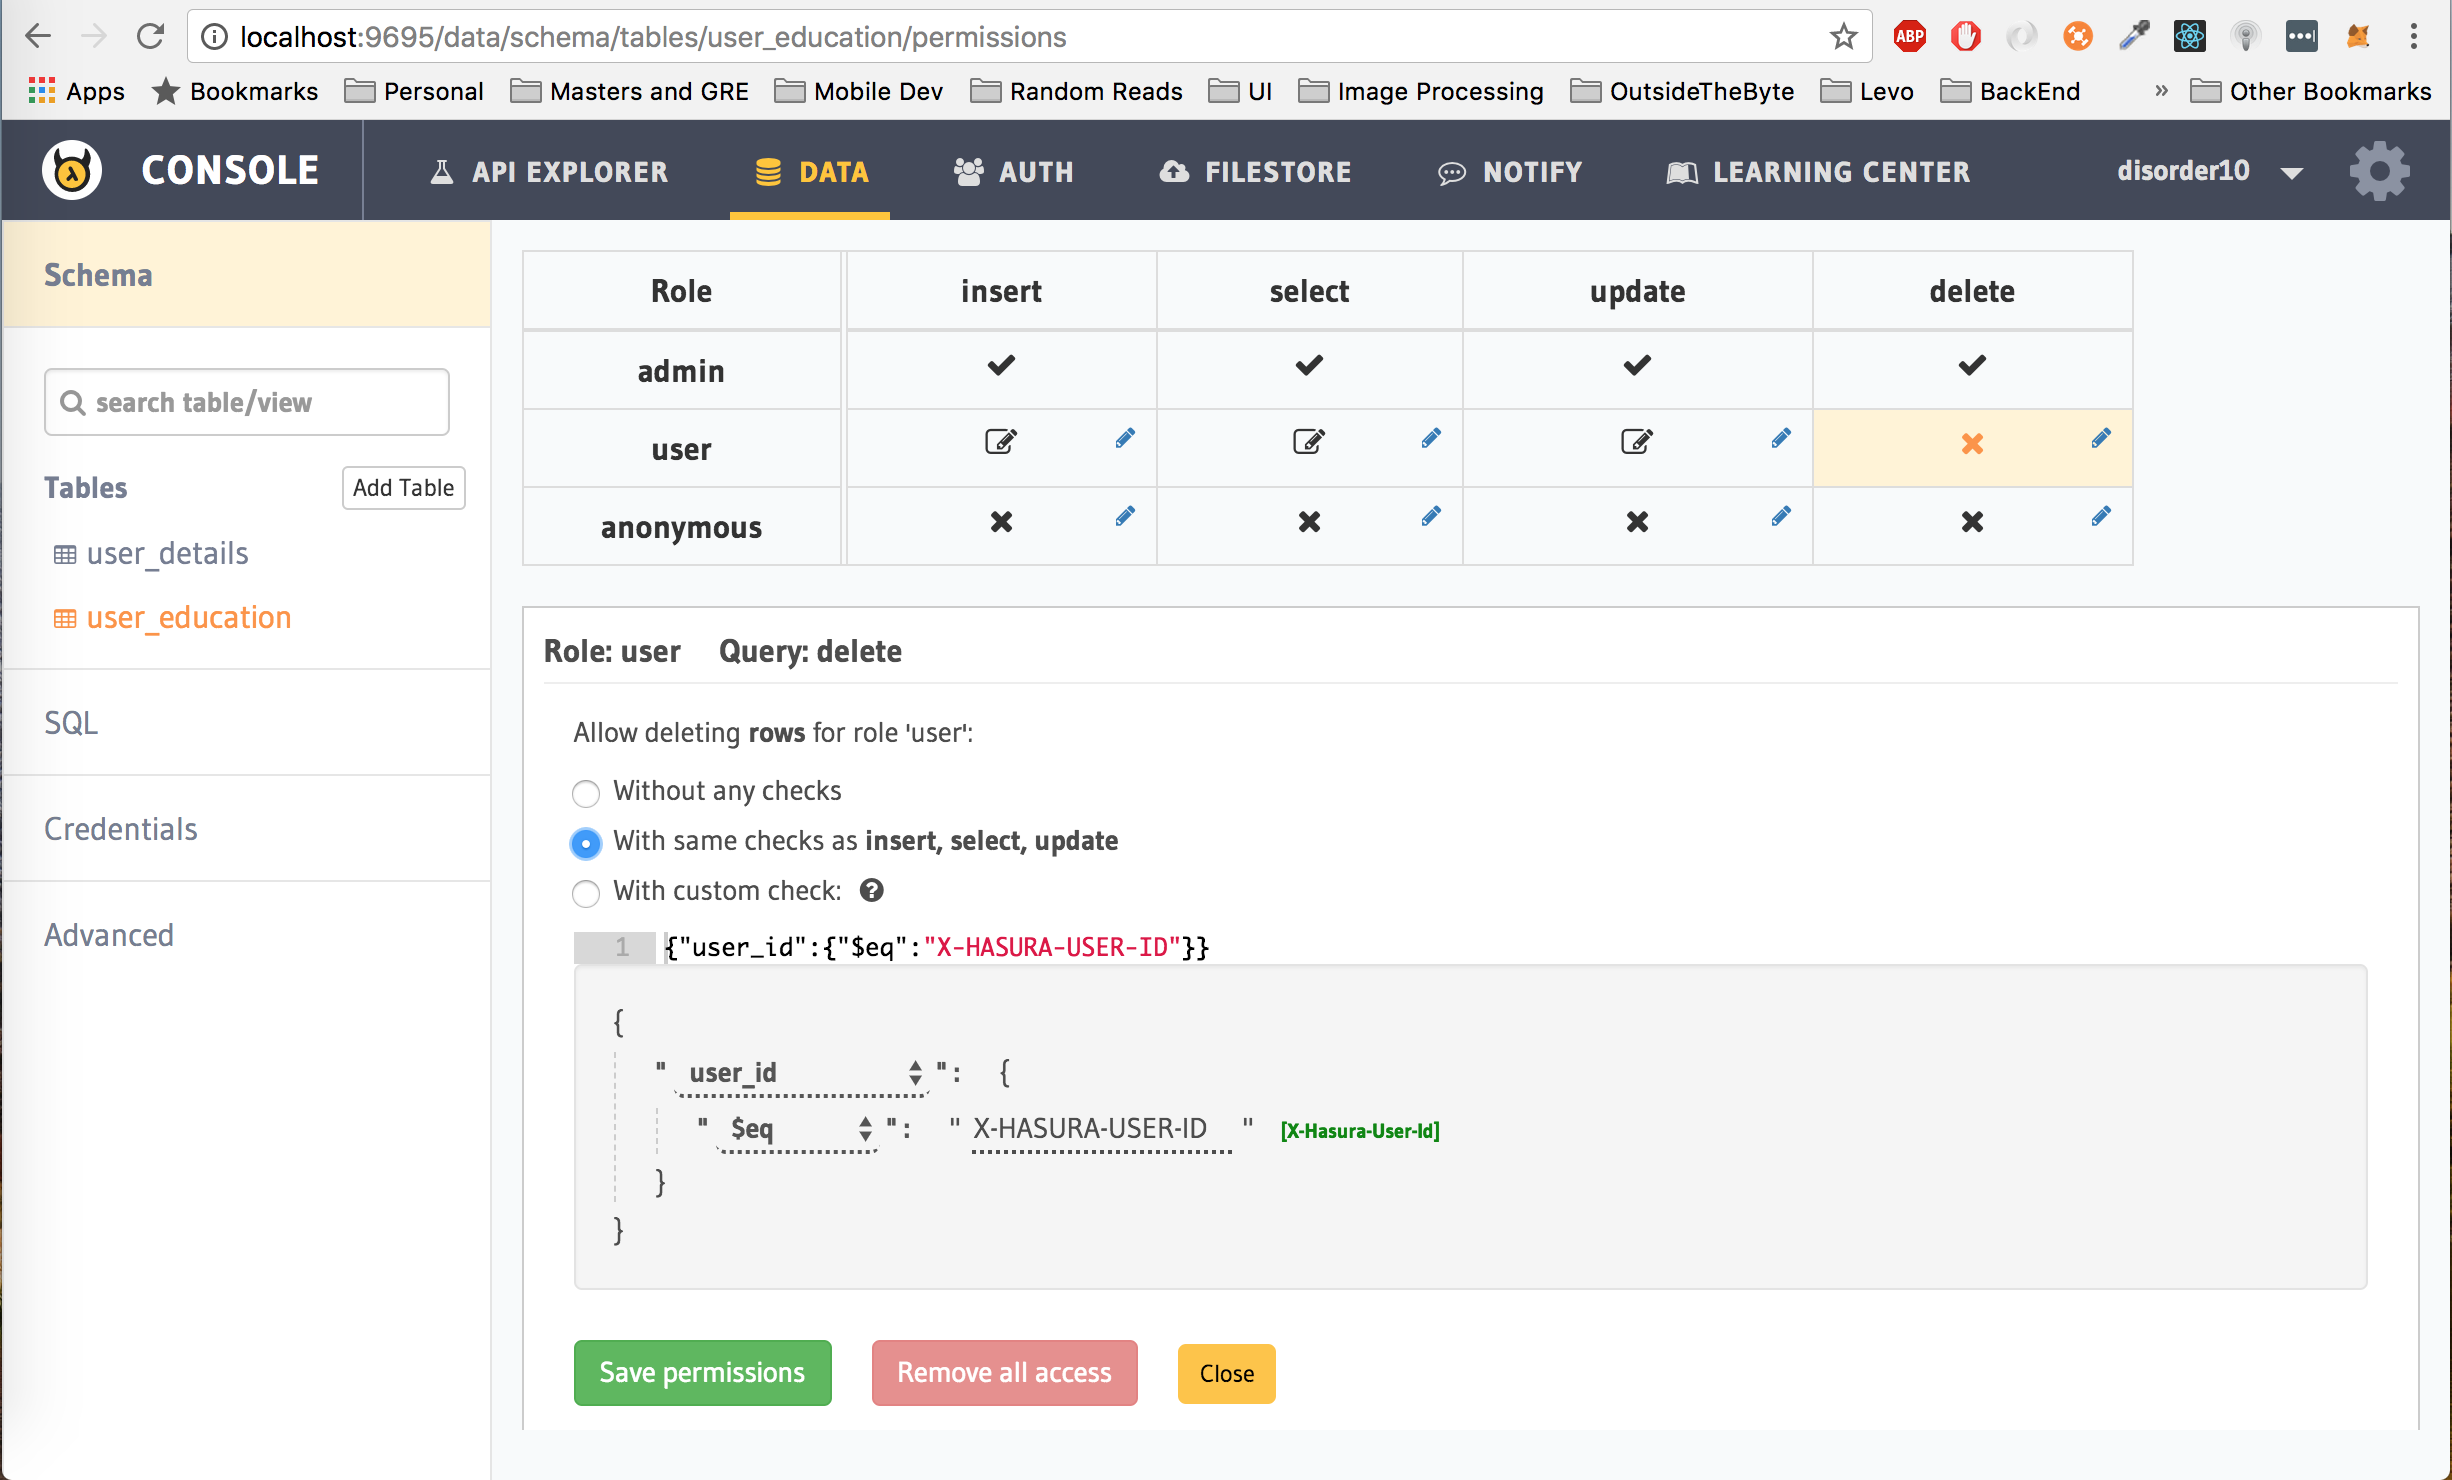
Finally, delete permissions
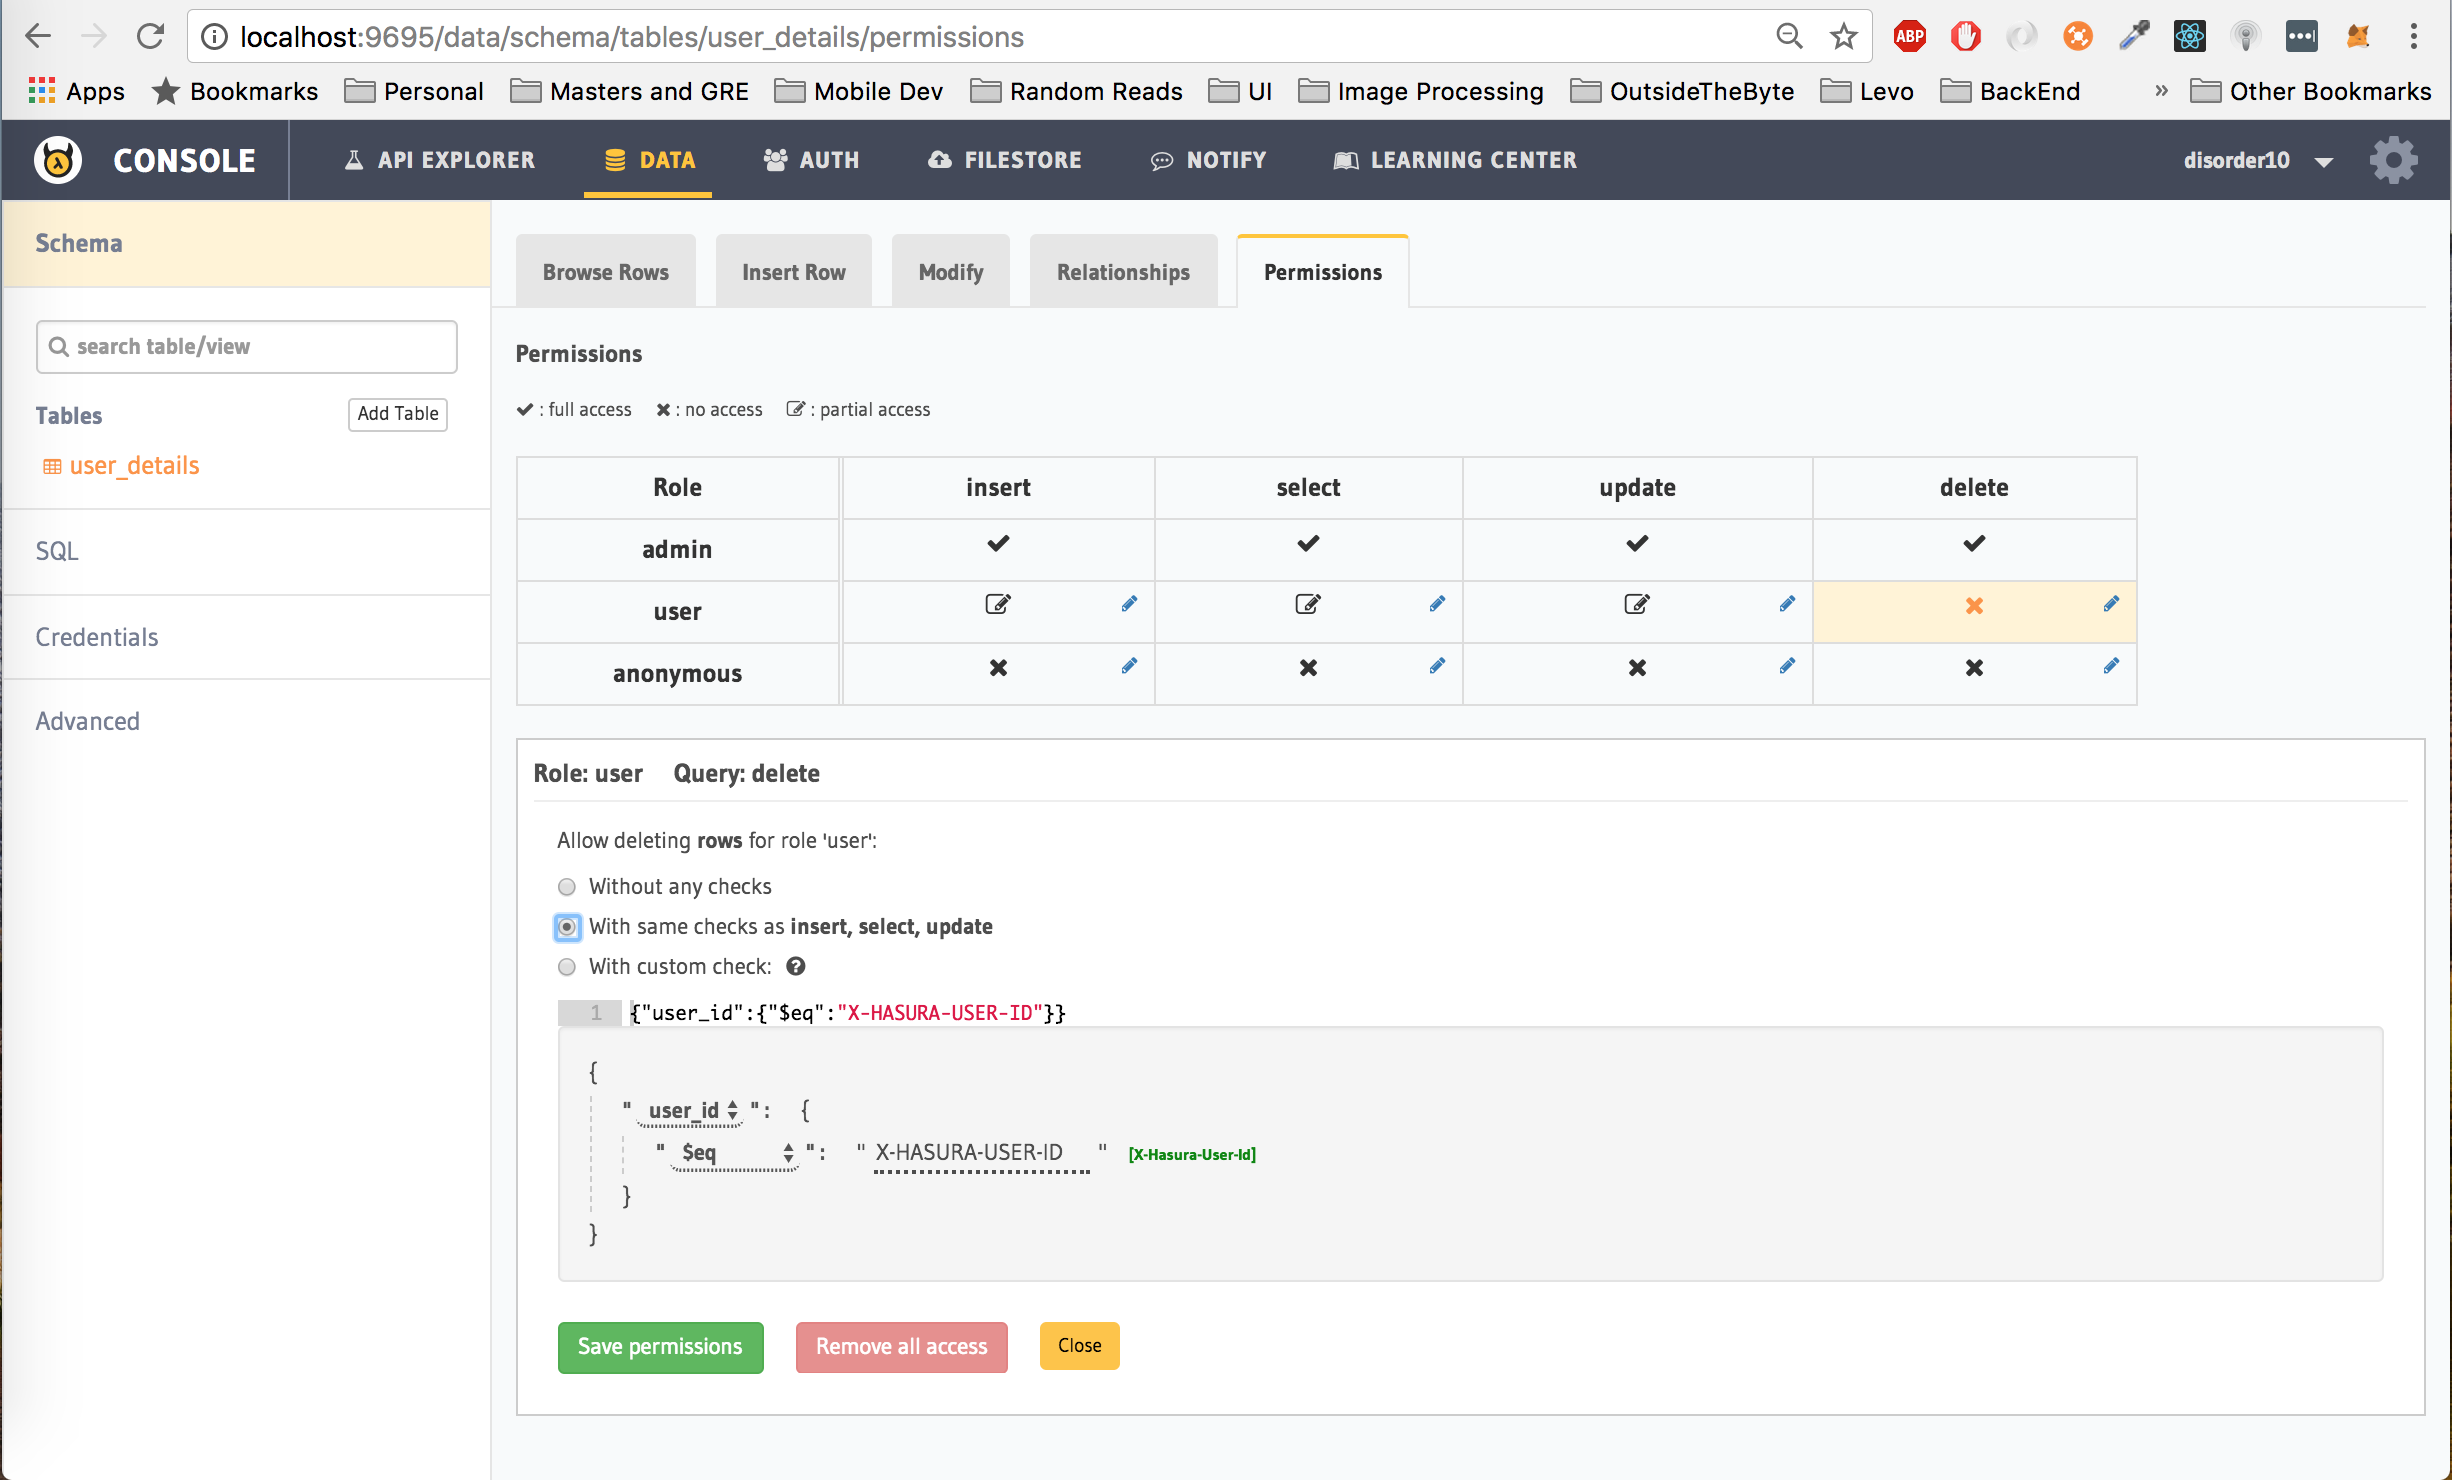
Translation: Let the user only delete rows from the user_details table where the user_id is equal to the hasura_id of the user which is passed as the Authorization token in the header.
Click on Save Permissions.
There can also be times where you want
anonymouspermissions on your table. Foe eg: if you are building an e-commerce app, you would want your users to be able to browse through your products regardless of whether they are logged in or not. You can read more about Data permissions and Access control here.
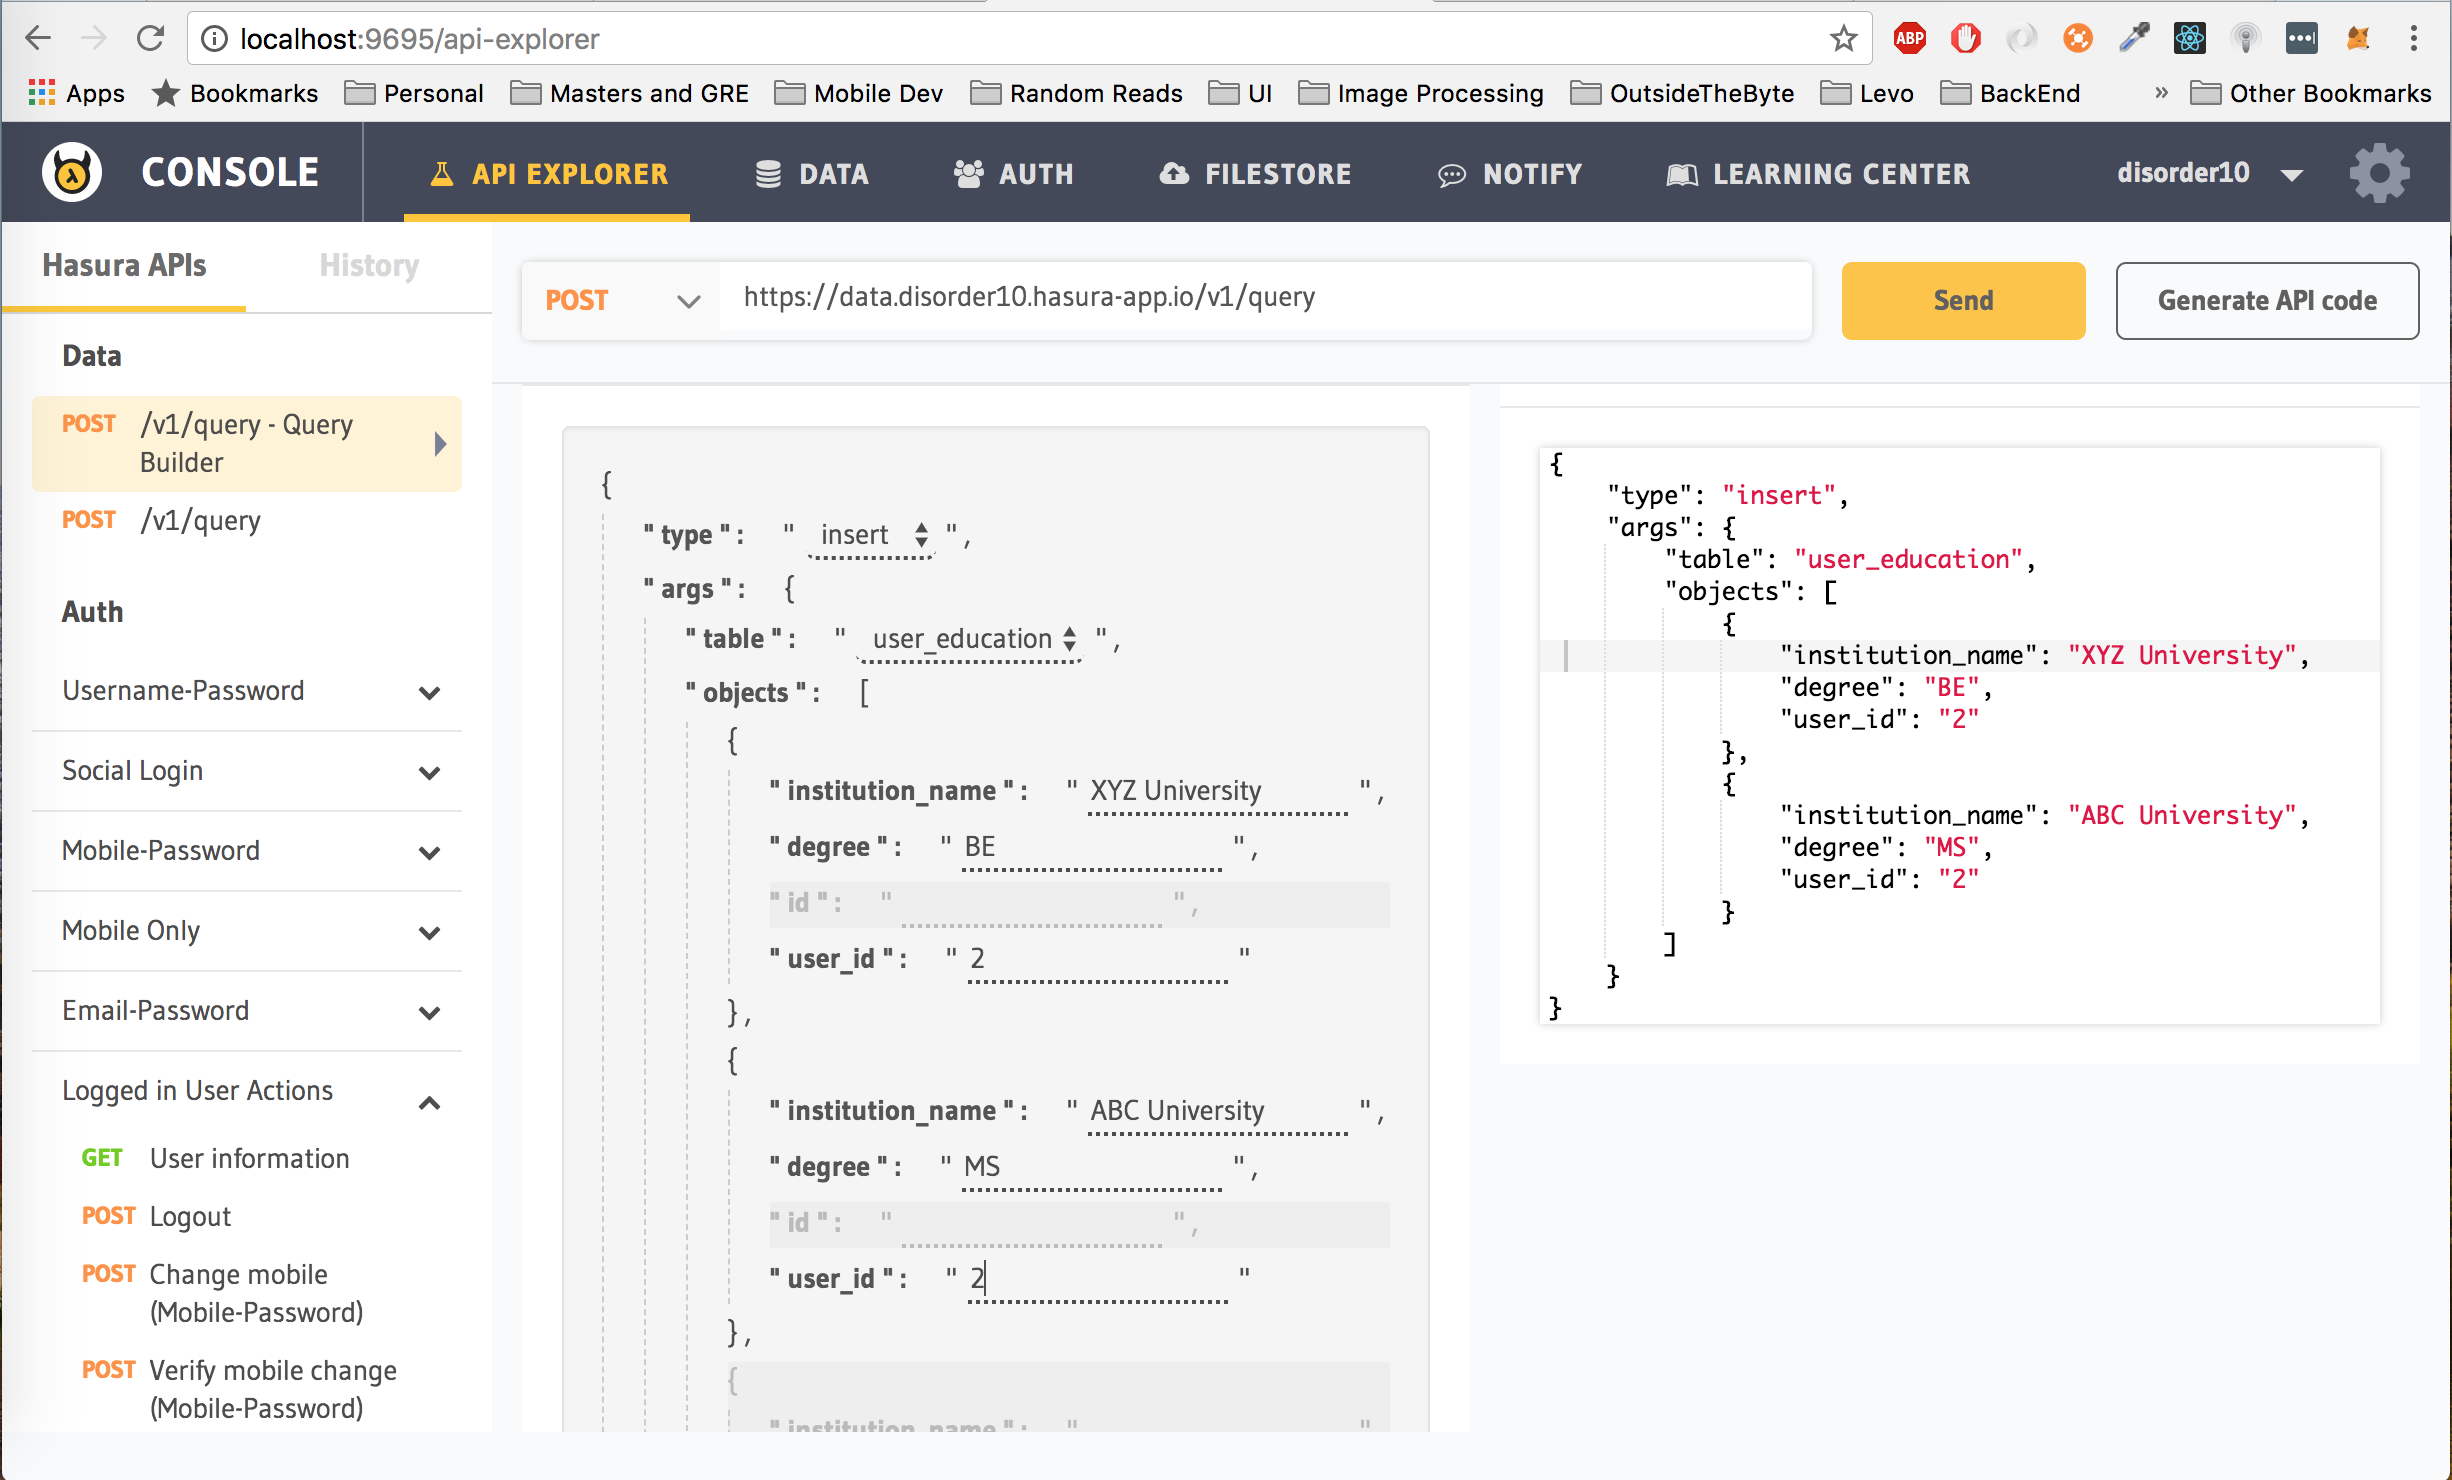
Now that we have created our table and also given it permissions, let's see how the API to insert data into the table looks like.
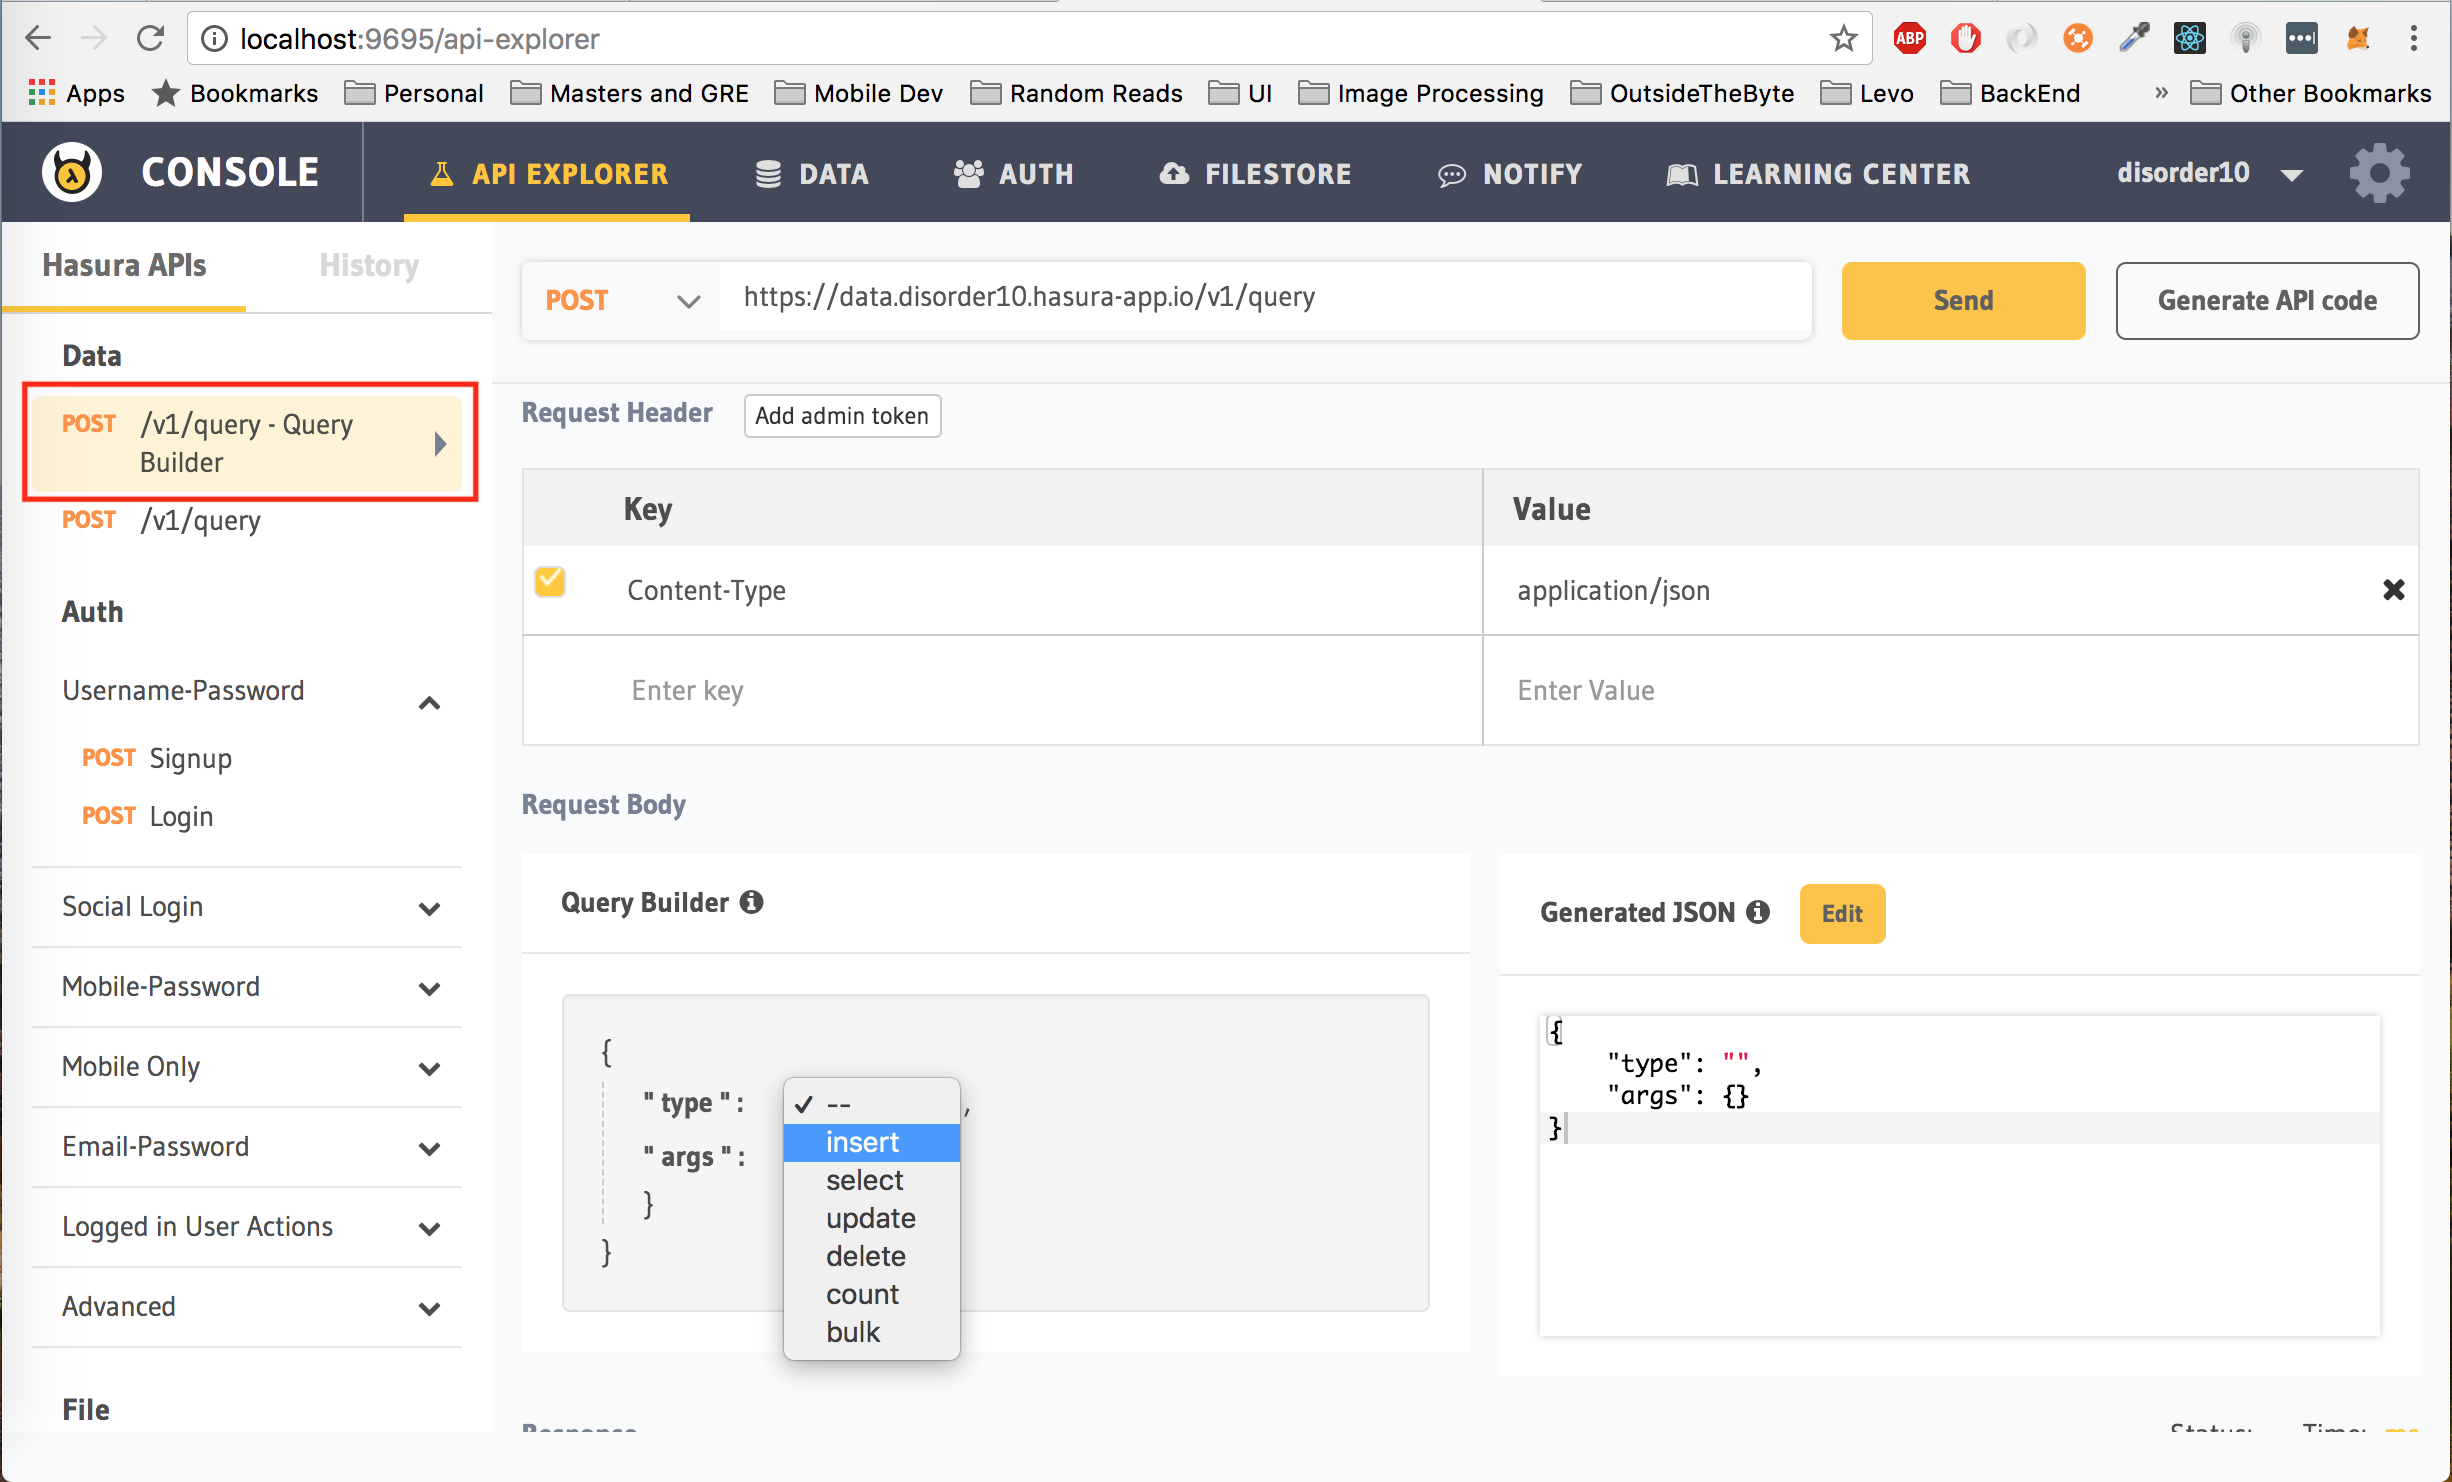
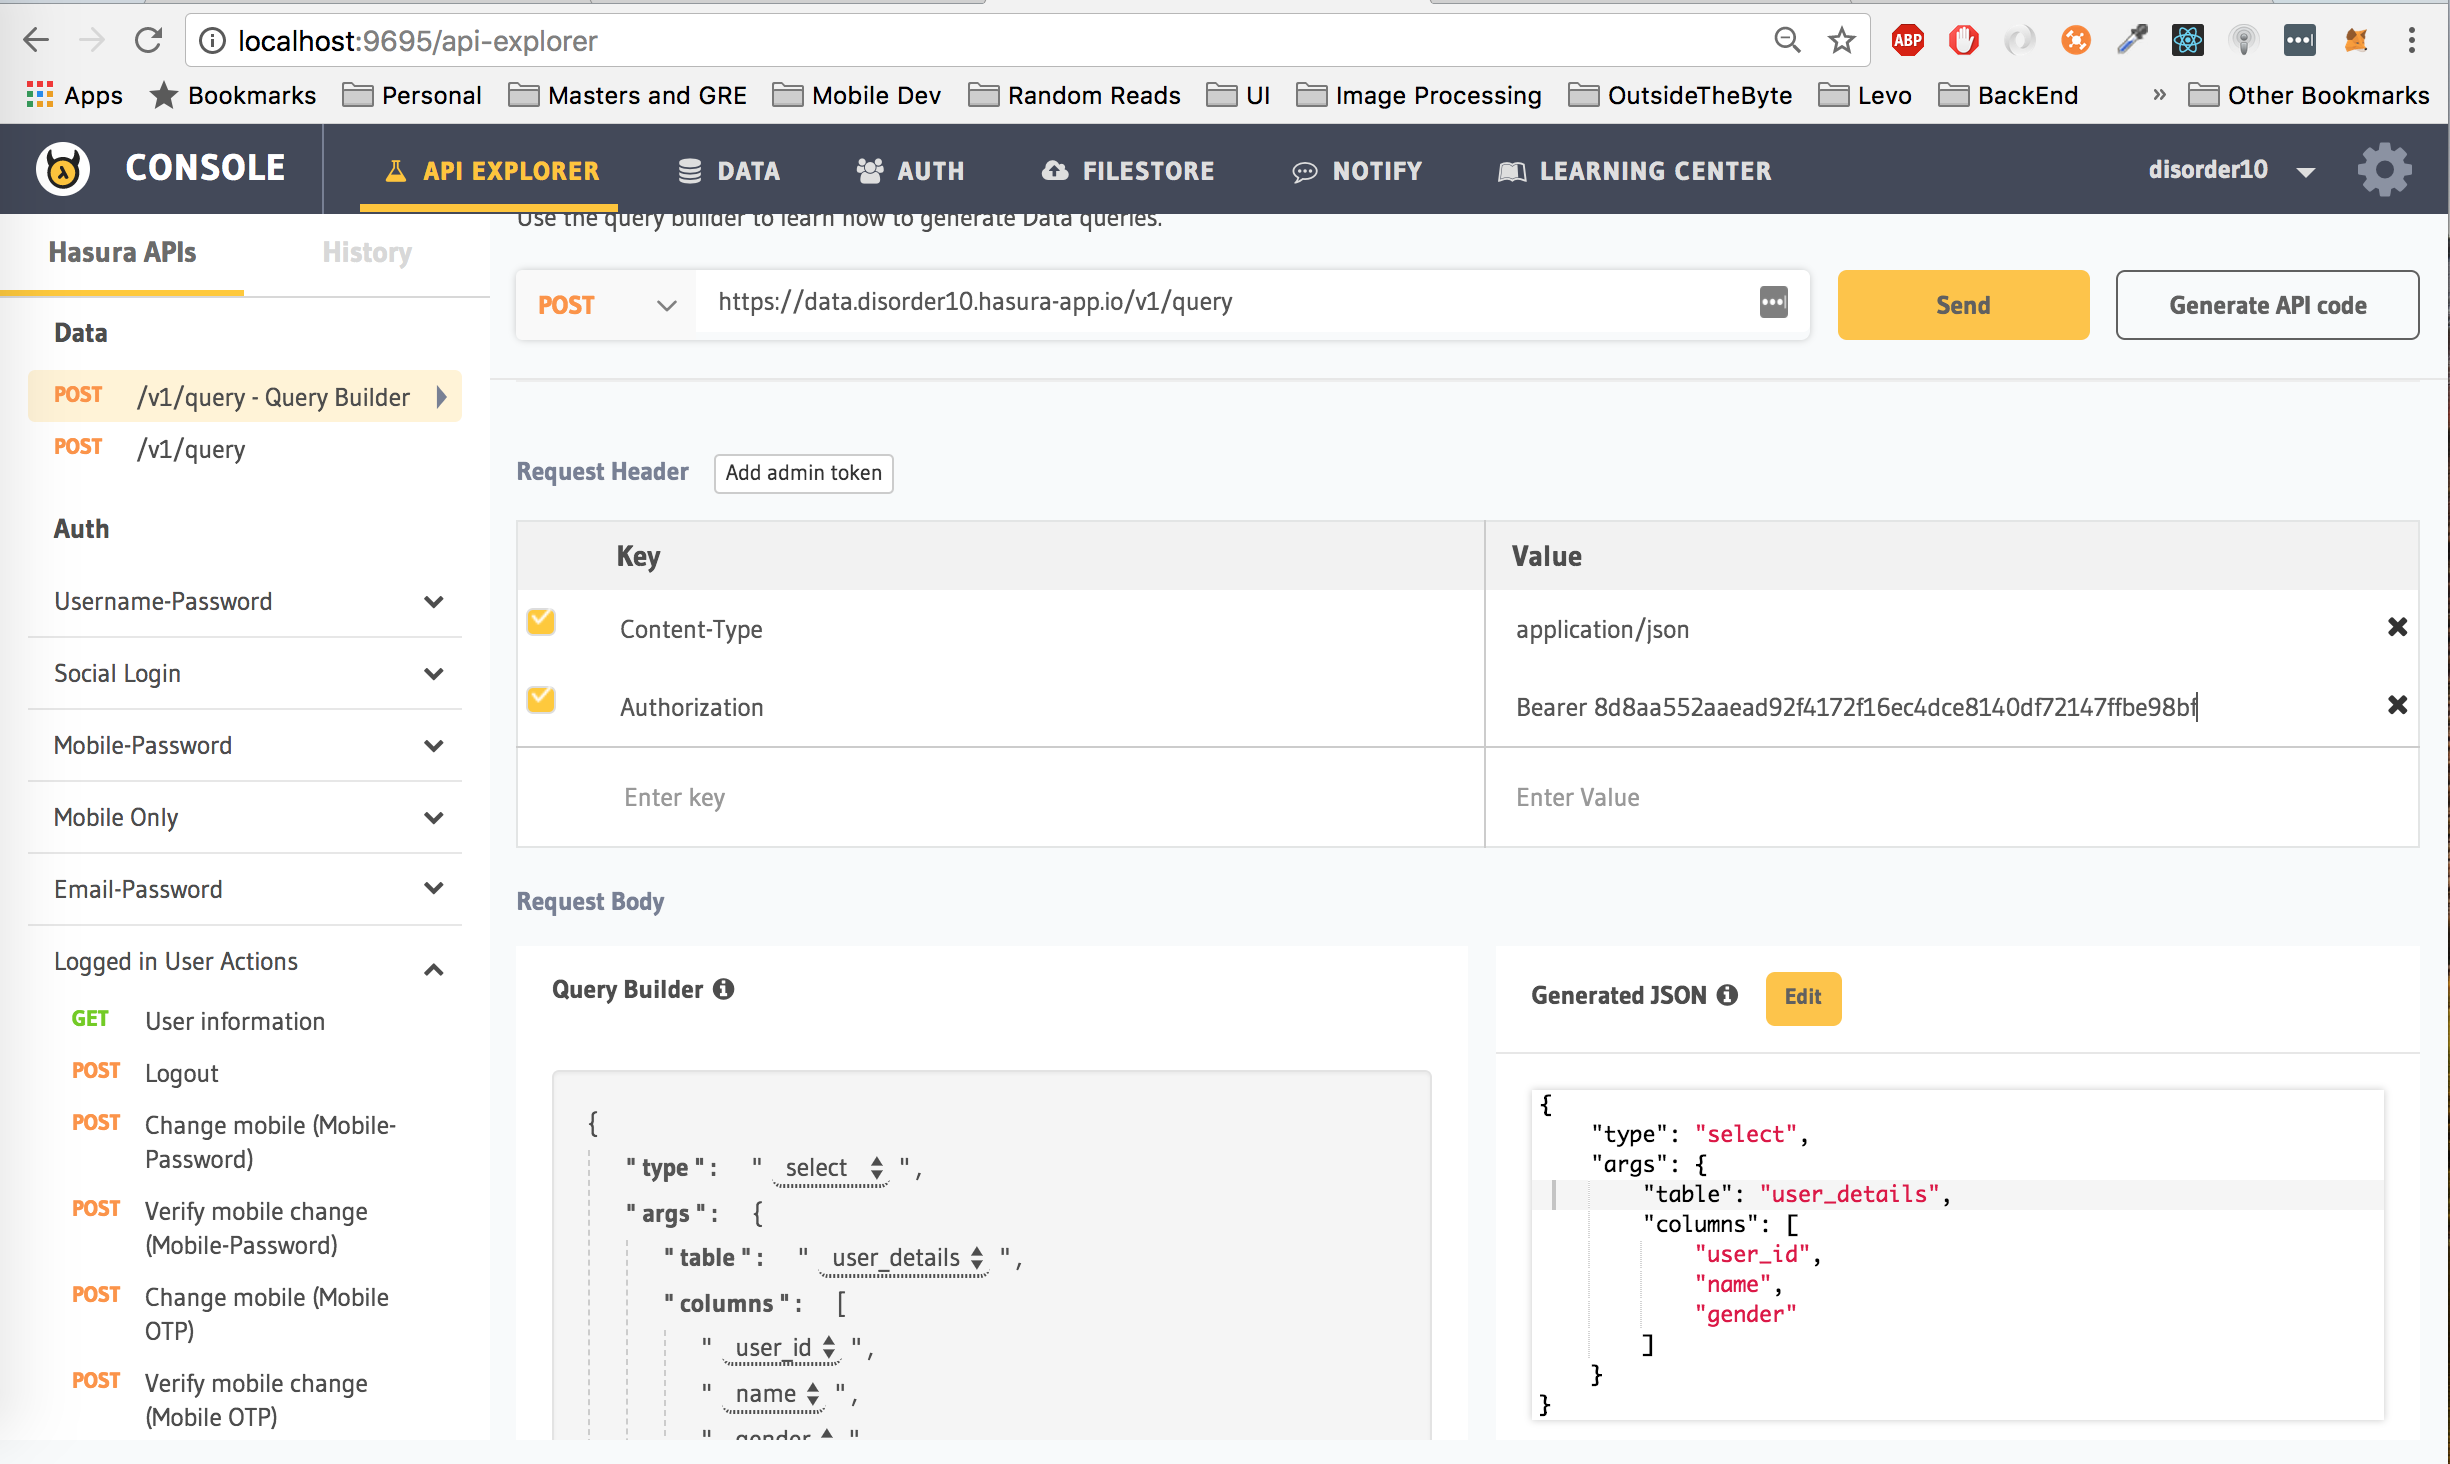
Head to the API Explorer tab and click on v1/query - Query Builder on the left panel. Click on type and select insert to insert into a table.
Next, click on table and select user_details from the list. Fill in the objects array with data you want inserted into the table. In the picture shown below, we are adding data for the user we signed up with (hasura_id: 2)
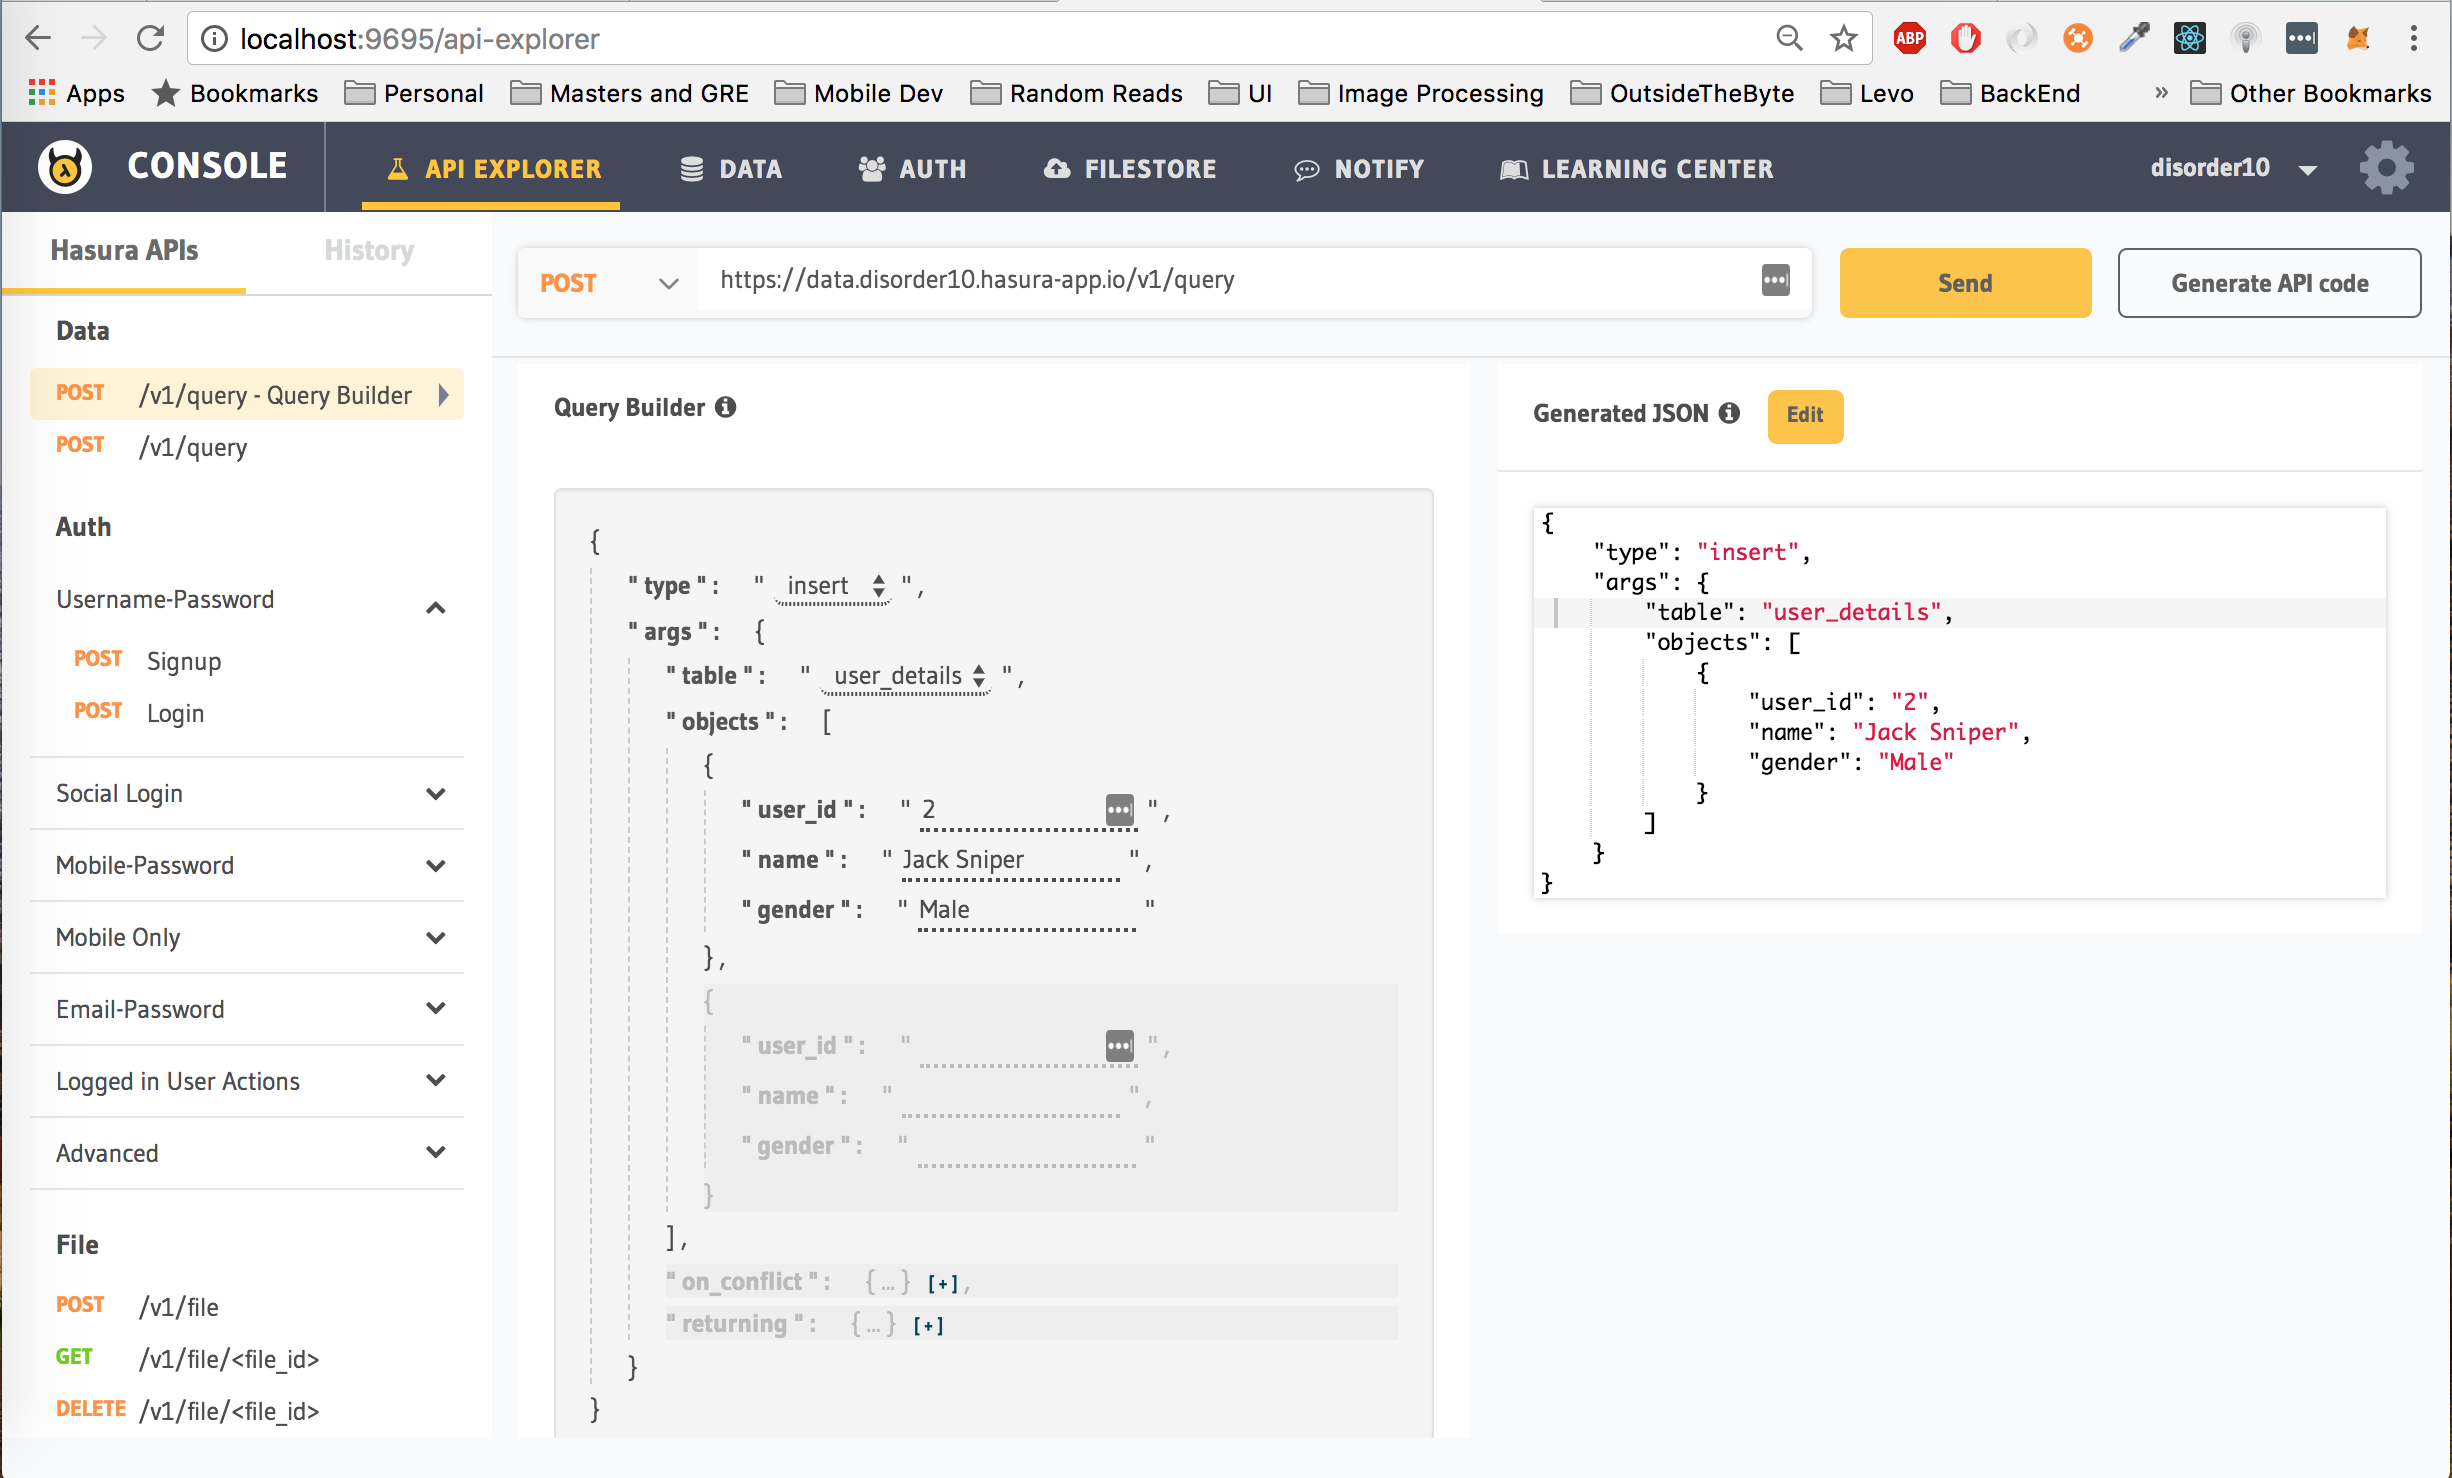
Since we have given user role permission to the user_details table, we have to add the Authorization header to the insert query. (Add key Authorization and value Bearer <auth_token> to the header. If you do not have the )
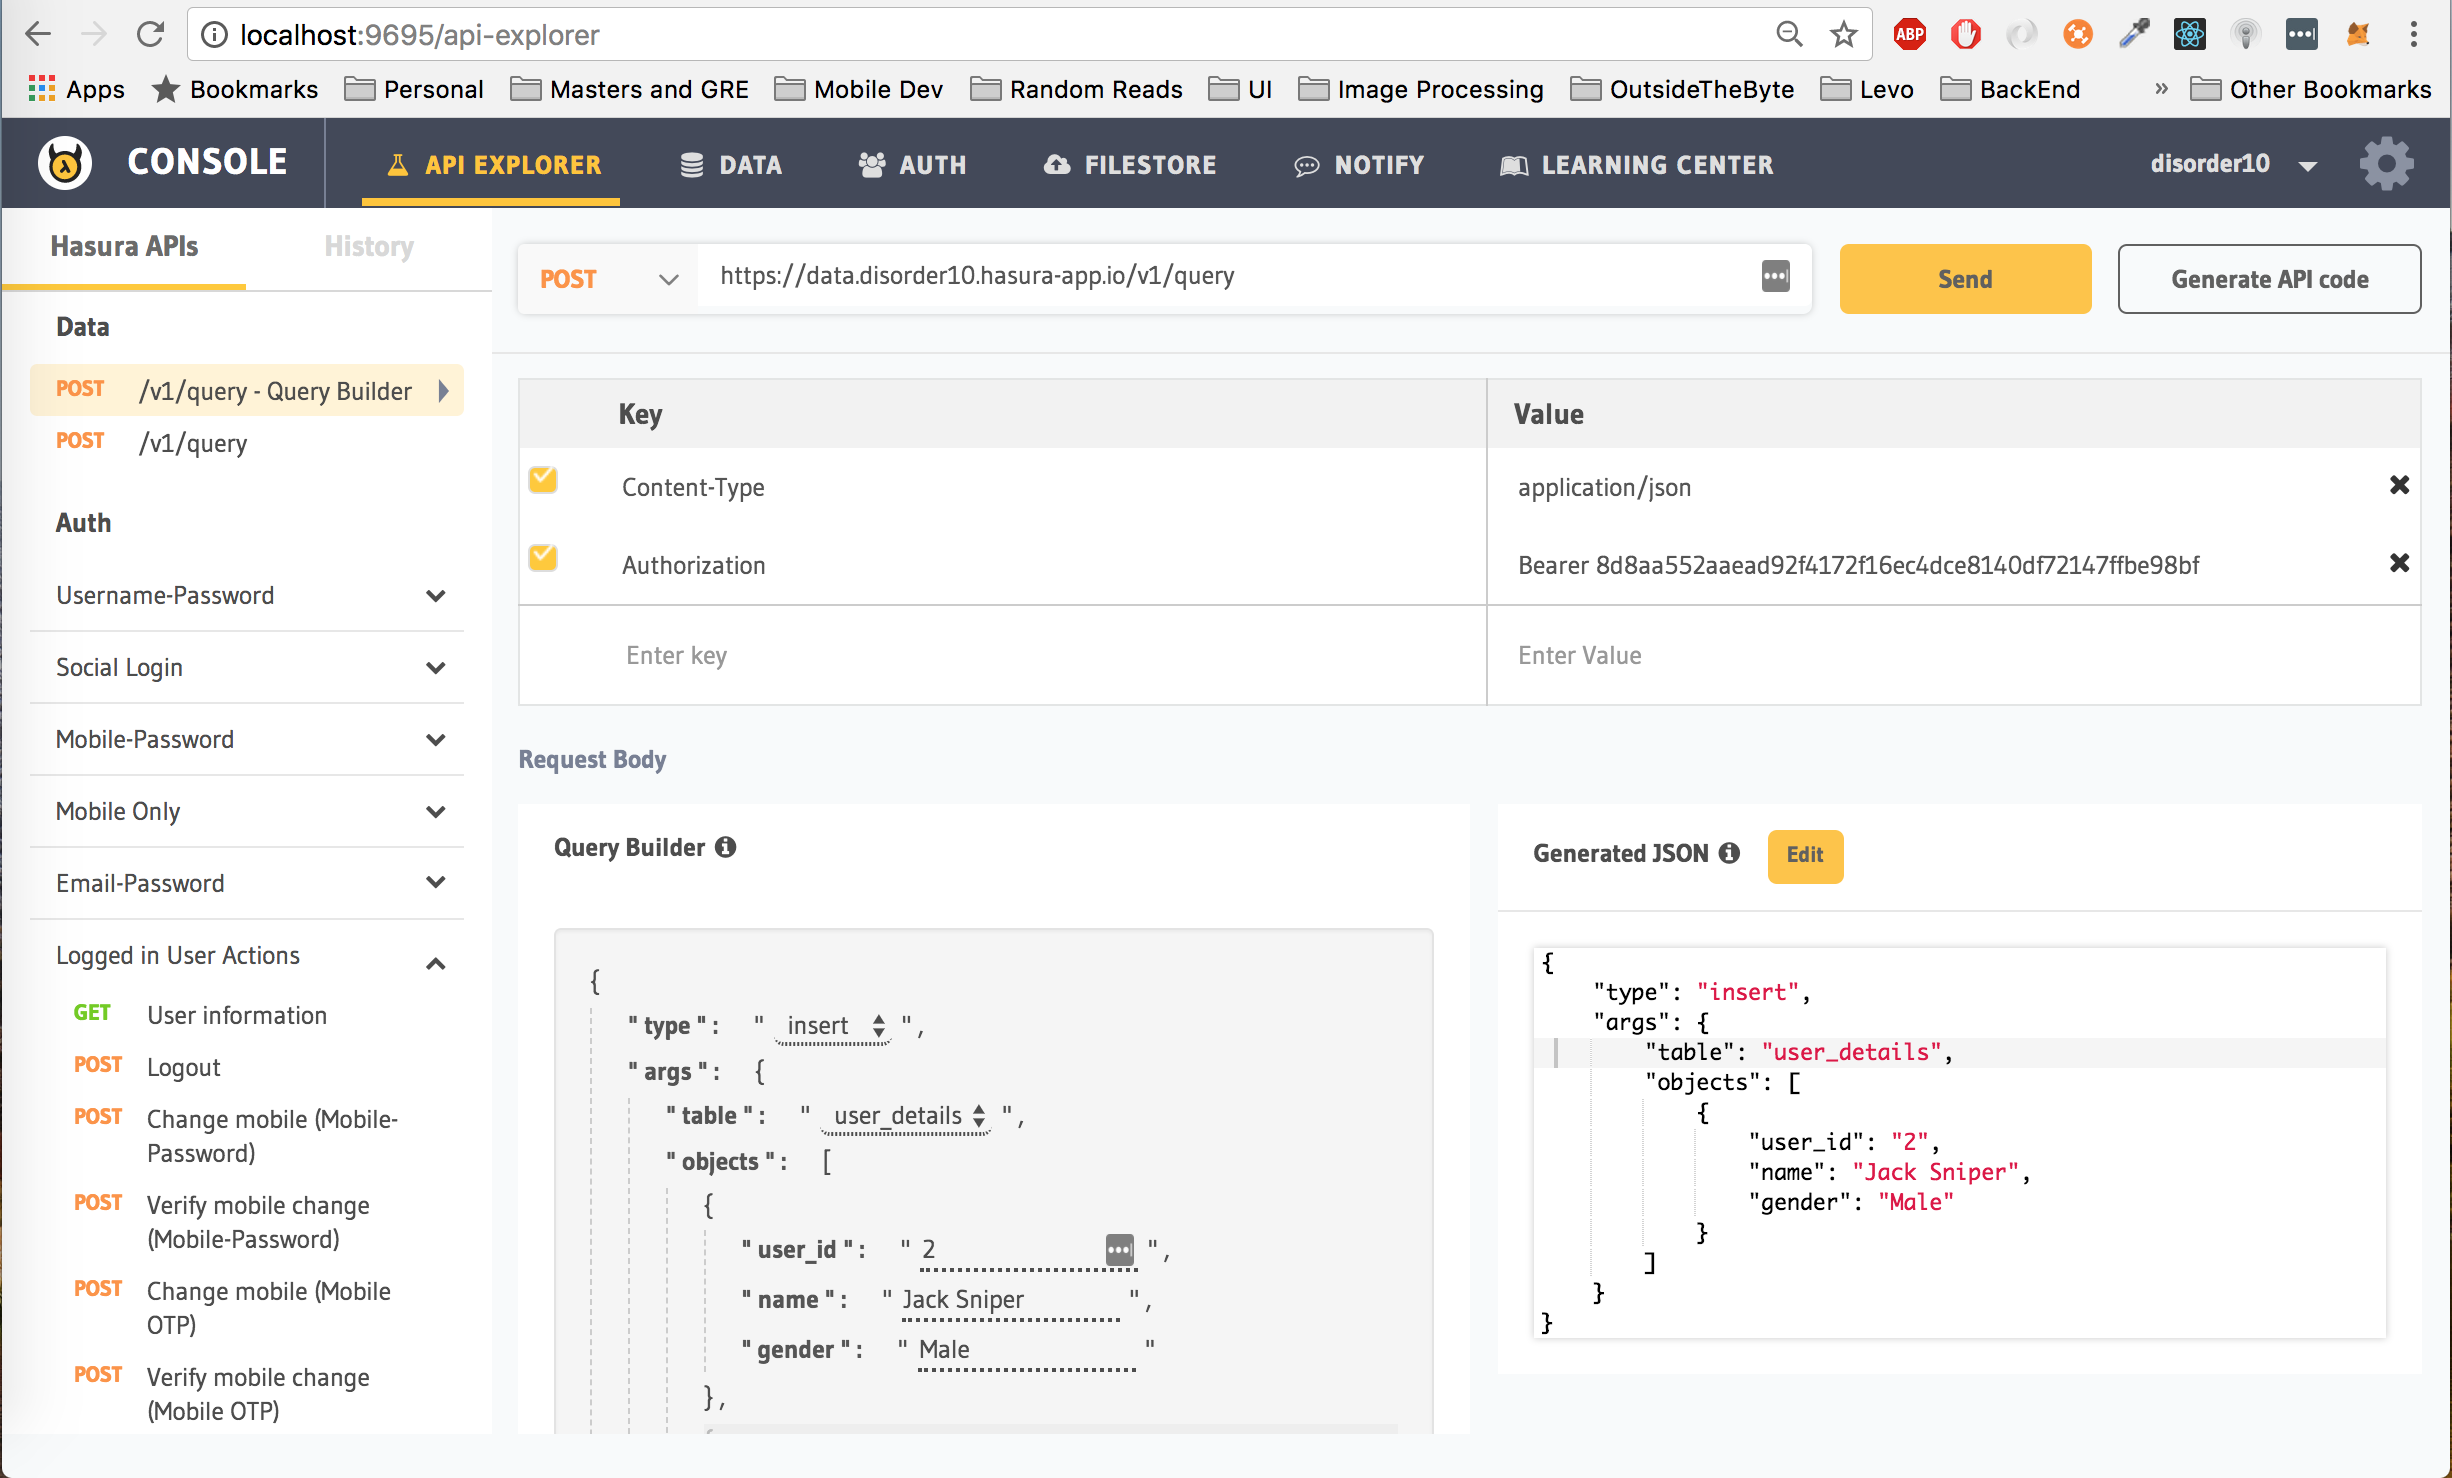
If you try to insert into the
user_detailstable with auser_idwhich is not the same as thehasura_idas the user making the request, it will fail. This is because of the permissions we set on theuser_detailstable.
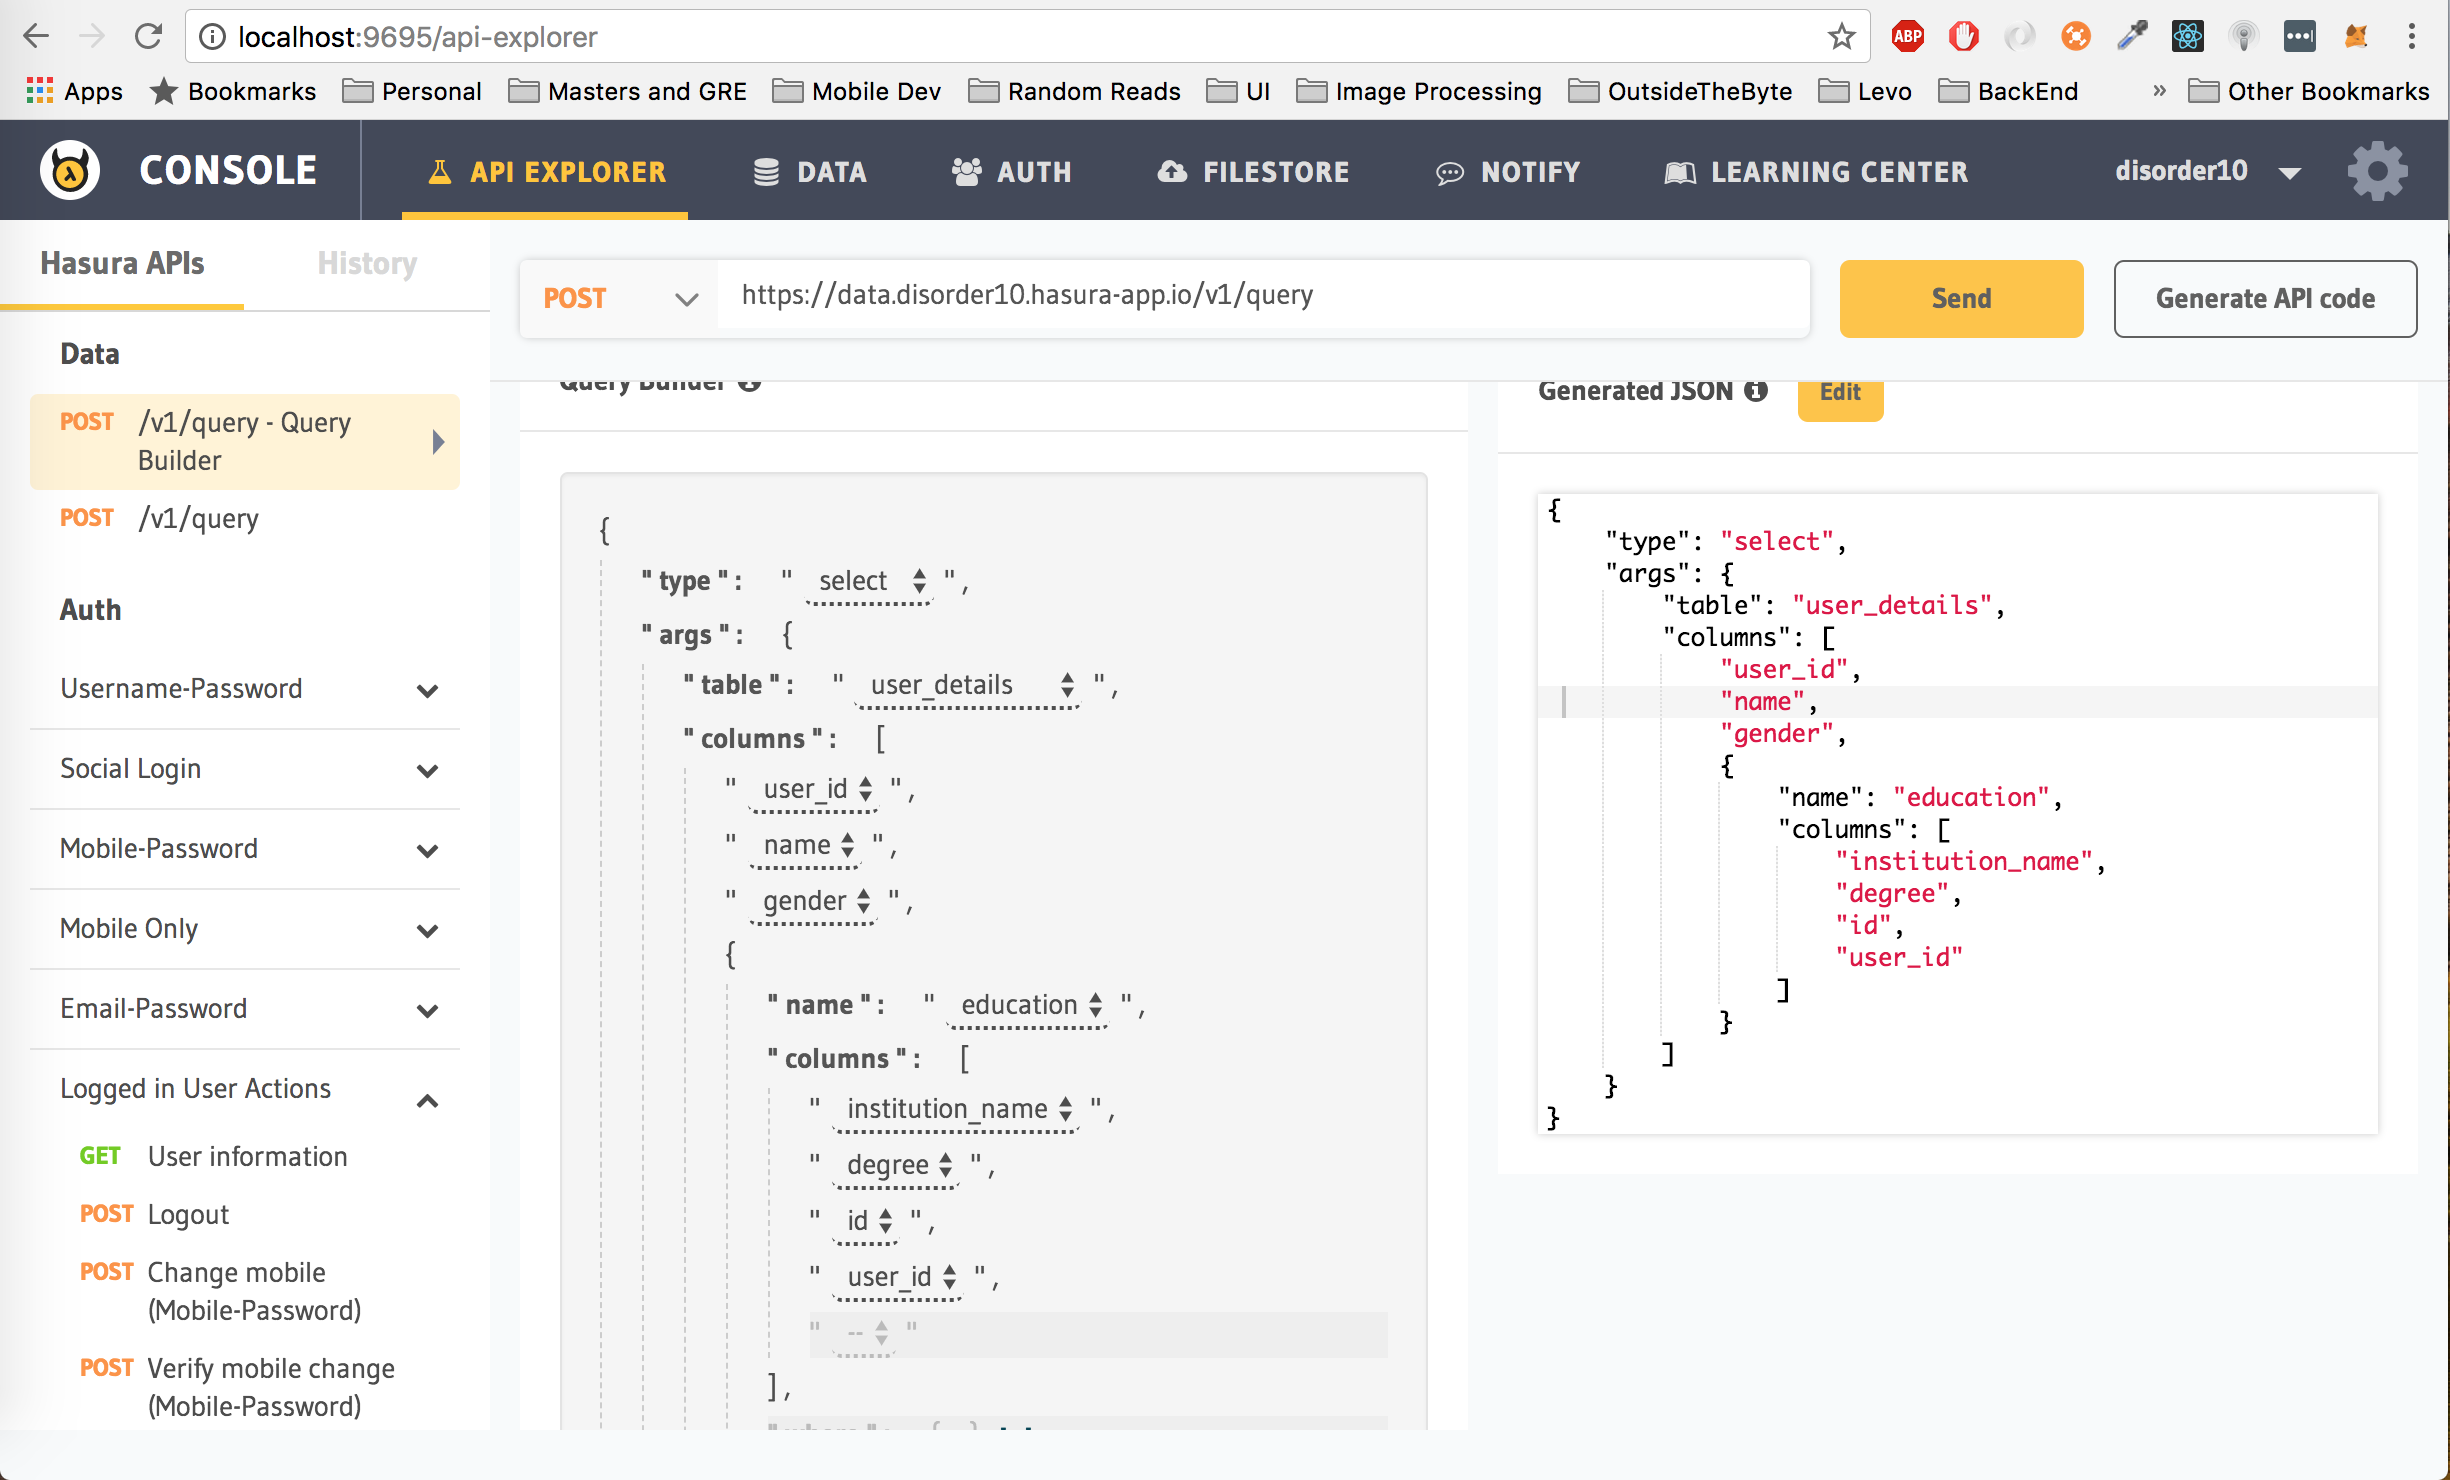
Head to the API Explorer and click on v1/query - Query Builder on the left panel. Click on type and select select to select from a table. Next, click on table and select user_details from the list. Select user_id, name and gender for the columns.
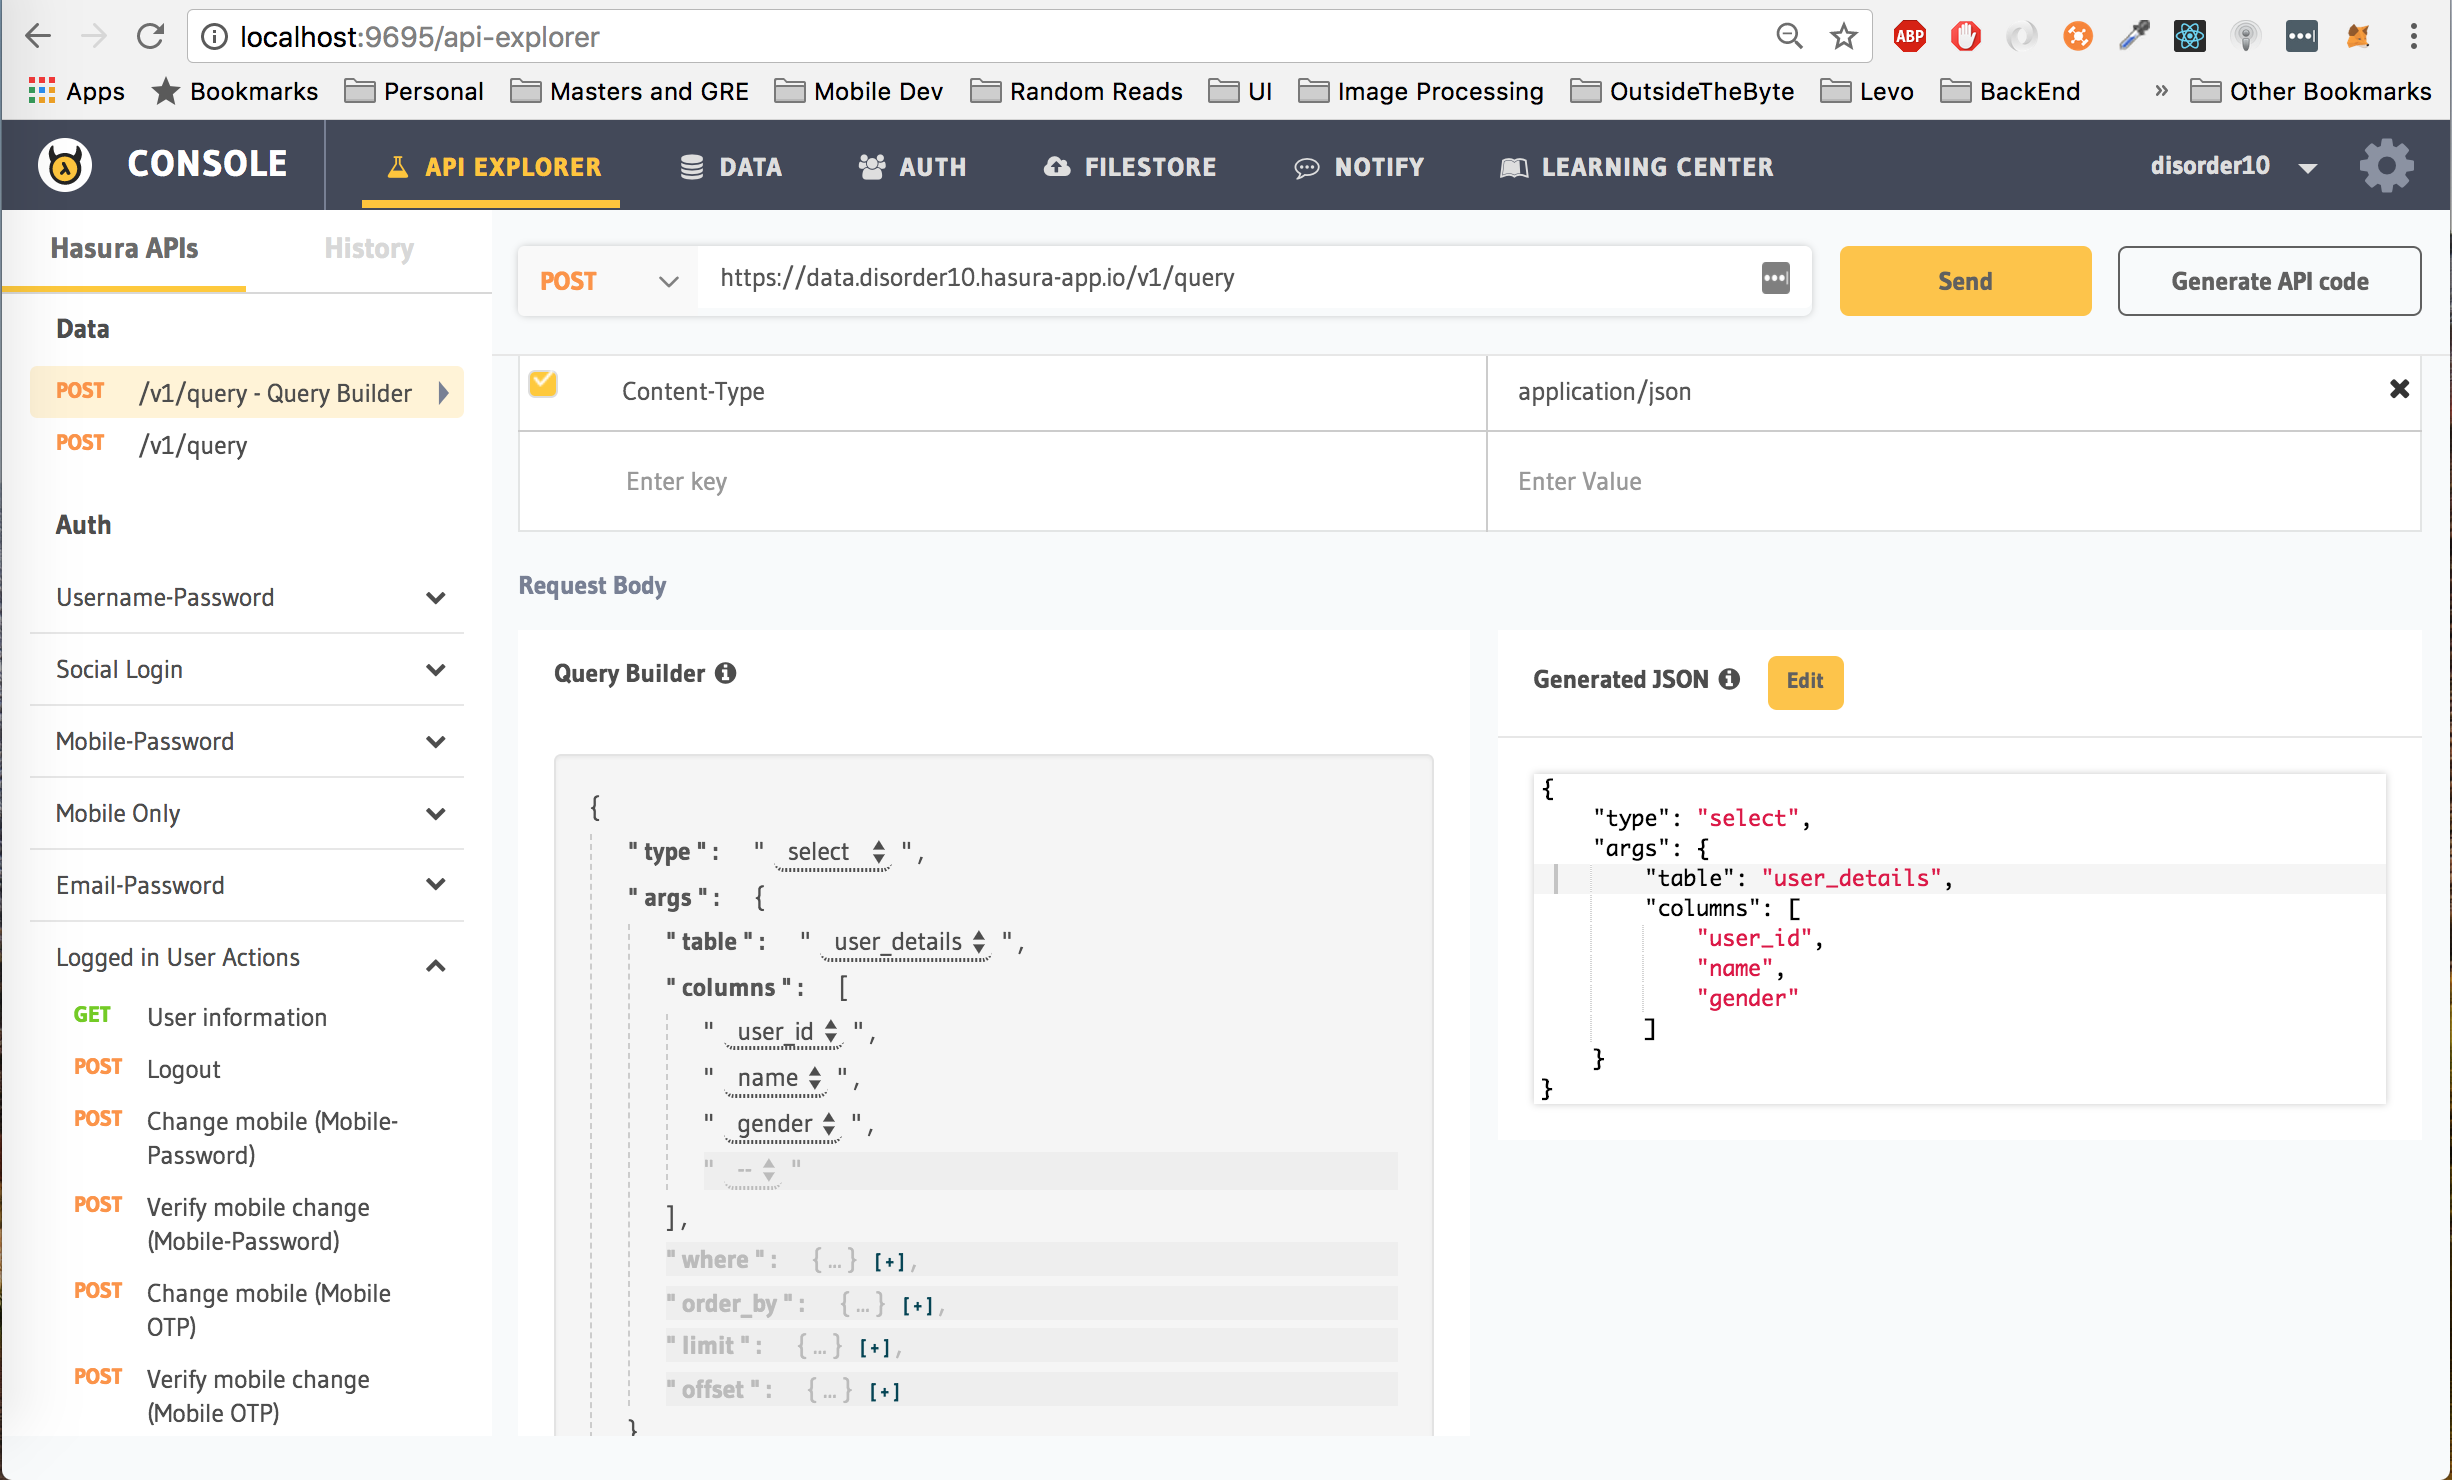
Since we have given user role permission to the user_details table, we have to add the Authorization header to the select query (Add key Authorization and value Bearer <auth_token> to the header). Hit the Send button to make this request.
You can also create connections between various tables through foreign key constraints. These can be used to build more complex relationships, which can be used to fetch related data alongside the columns queried, as pseudo columns.
To explore this feature, let's create a new table called user_education to store information about each user's educational background like institution_name and degree. We will also have an additional column id of type Integer (auto increment) and a user_id column to store the hasura_id of the user. id will be the primary key for this table.
It is not a good idea to set
user_idas the primary key as a user can have multiple addresses and settinguser_idas the primary key will not let us enter more than address for a particular user.
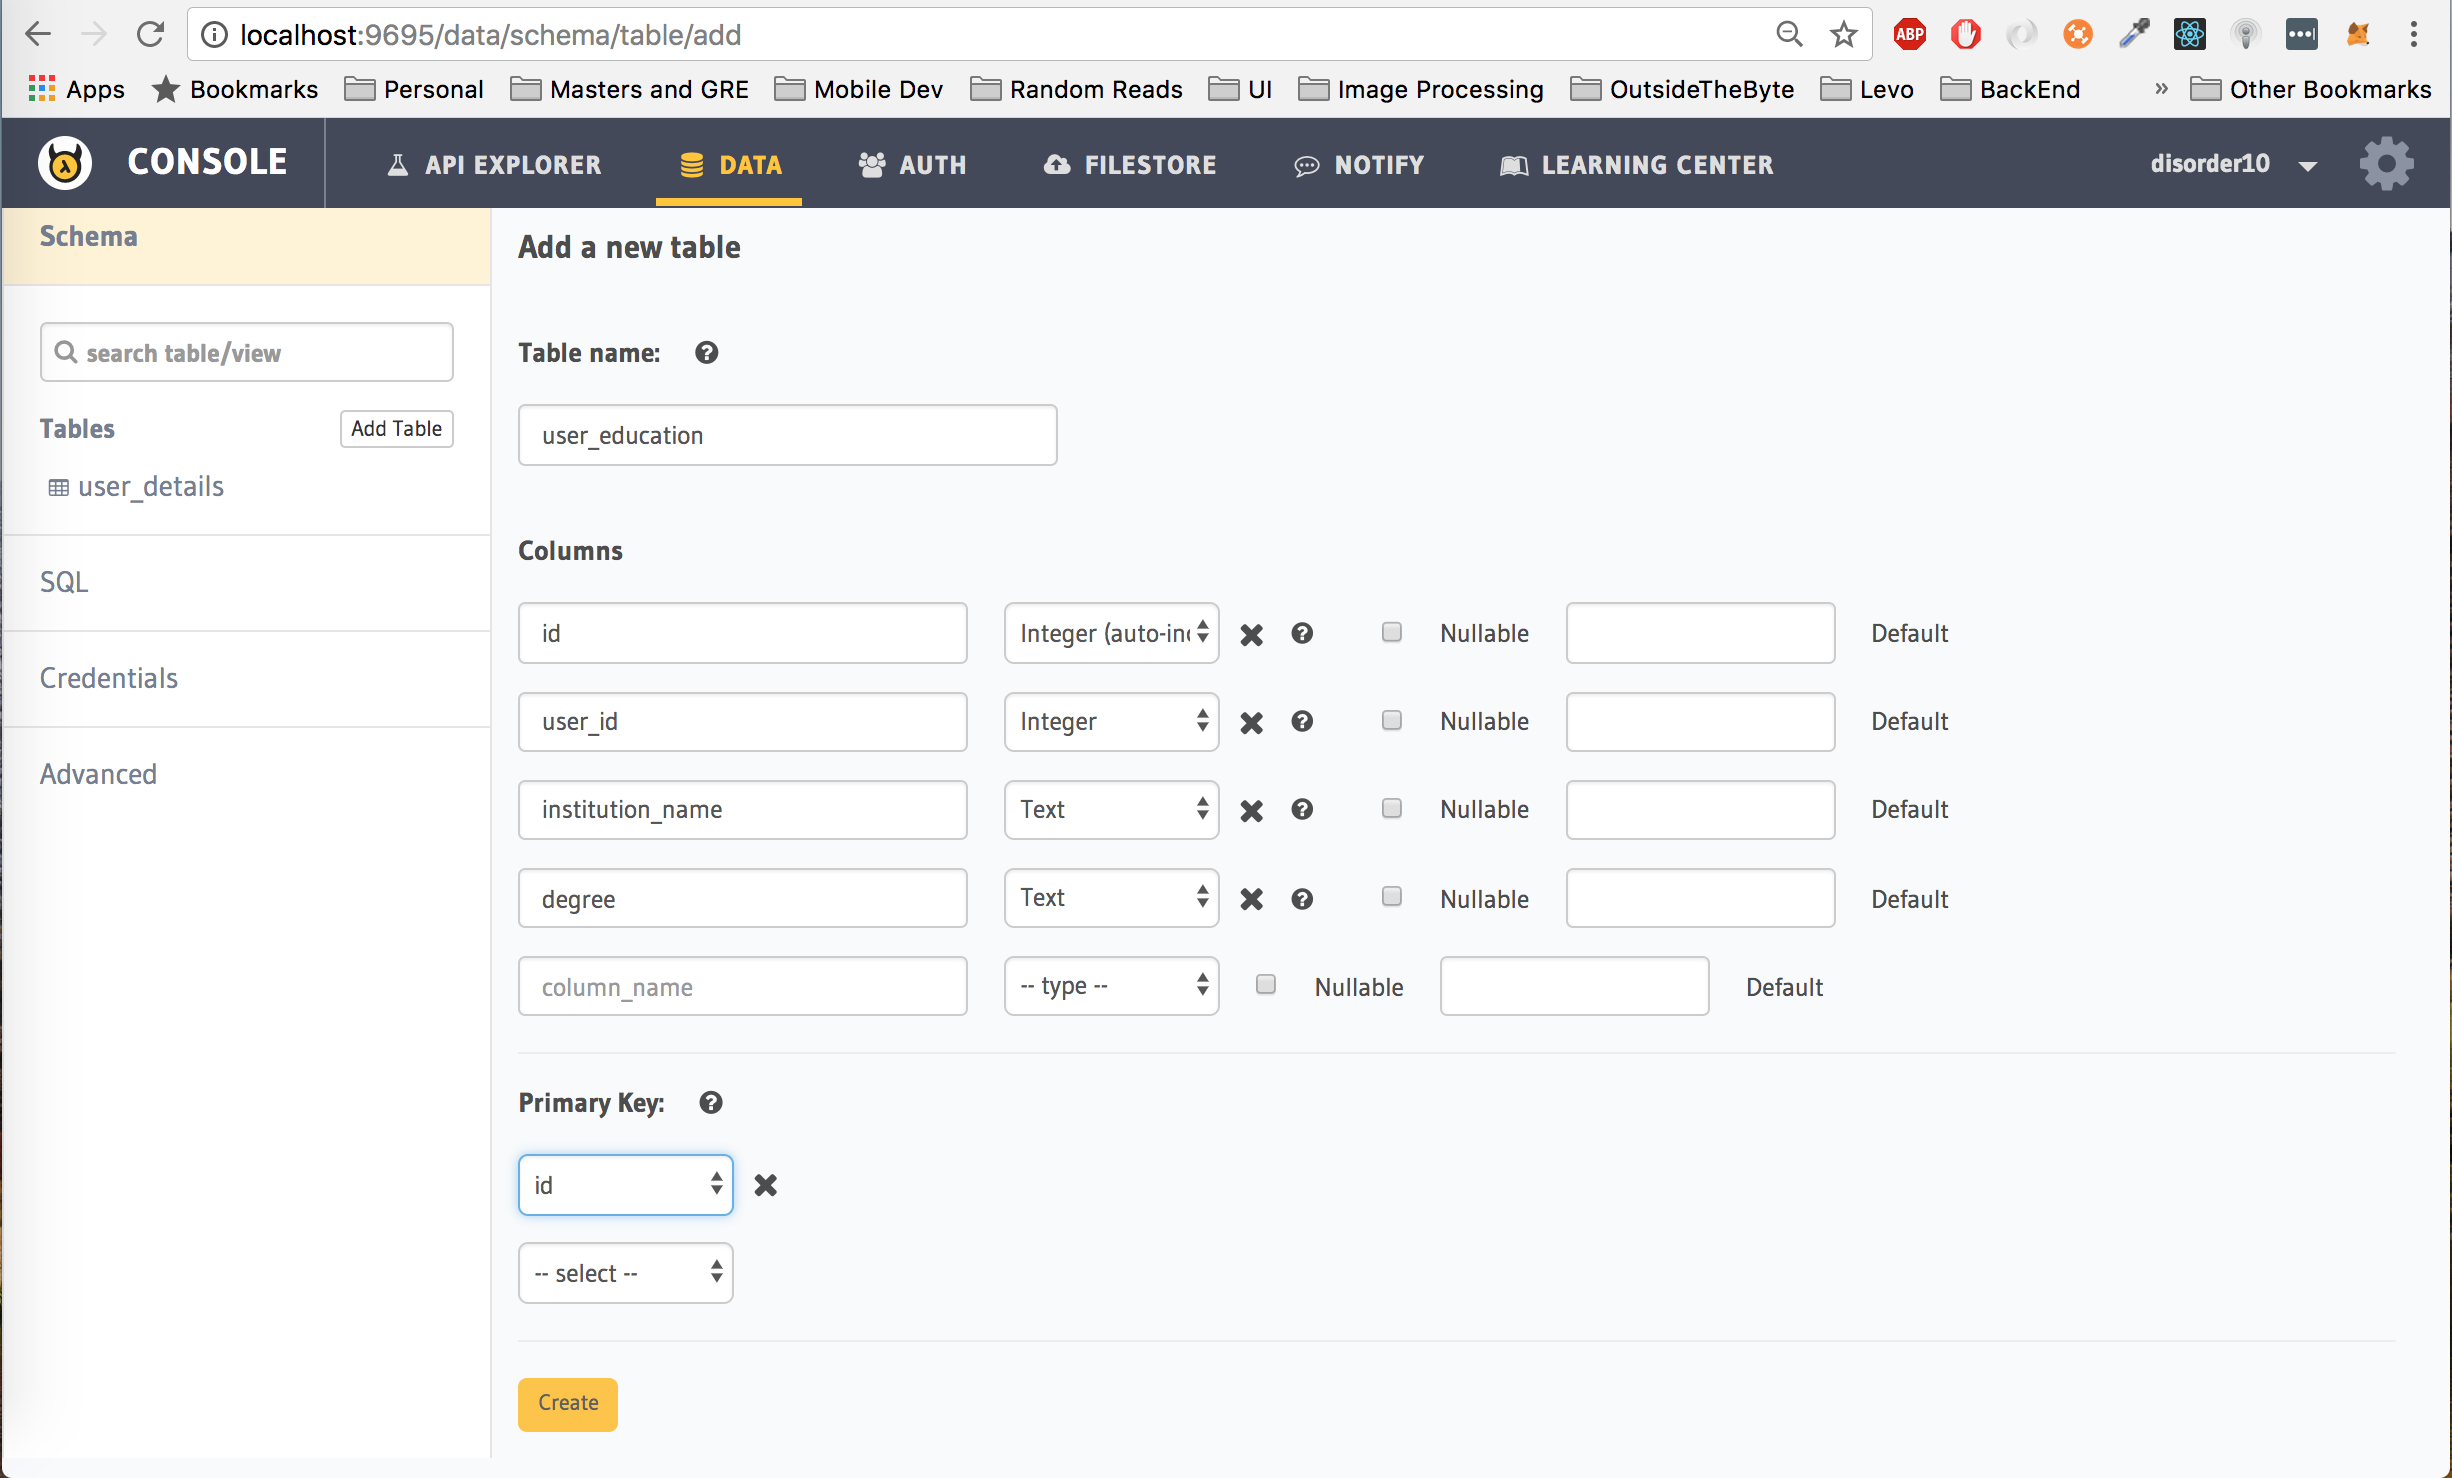
Click on the Create button.
Similar to user_details table, add user permissions on the user_education table.
What we want to achieve now is that when we fetch user details from the user_details table, we should also get the respective education data for the user.
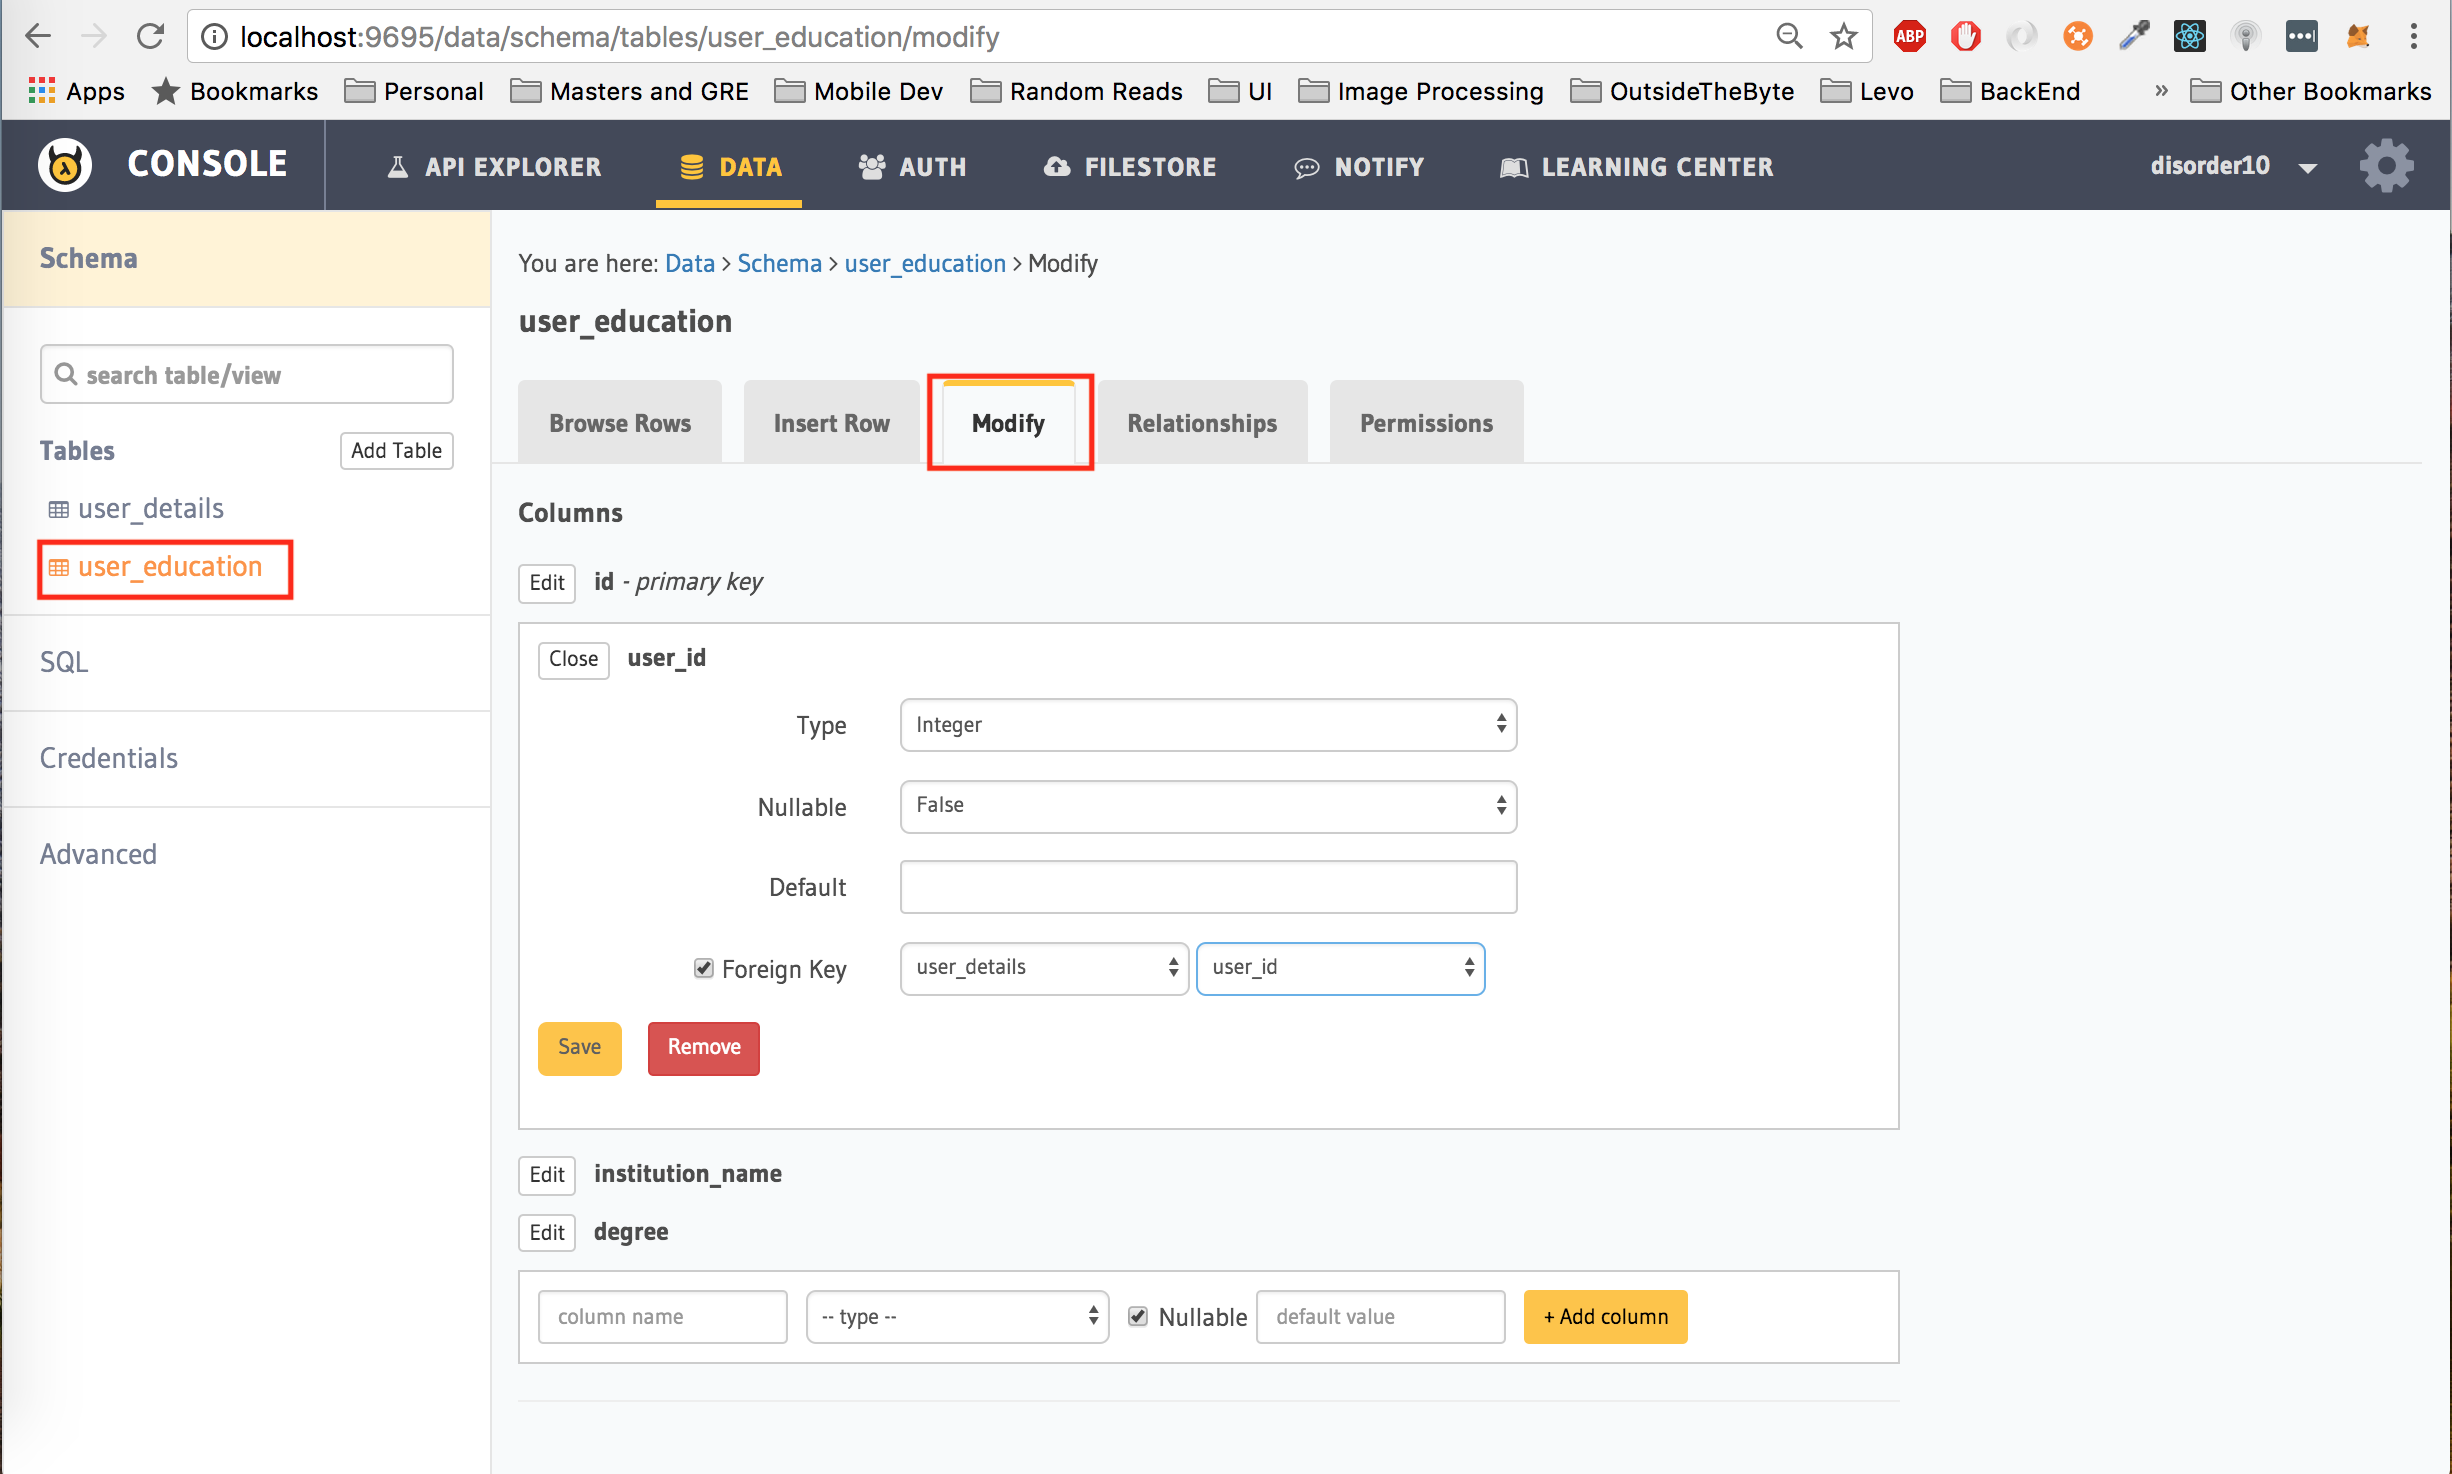
For this, we are going to create an array relationship from the user_details table to the user_education table. To create a relationship:
First, add a foreign key constraint from the user_id column of the user_education table to the user_id column of the user_details table. To do this, under the Modify tab, click on edit next to user_id, choose user_details as the reference table and user_id as the reference column. Click on Save to add this foreign key constraint.
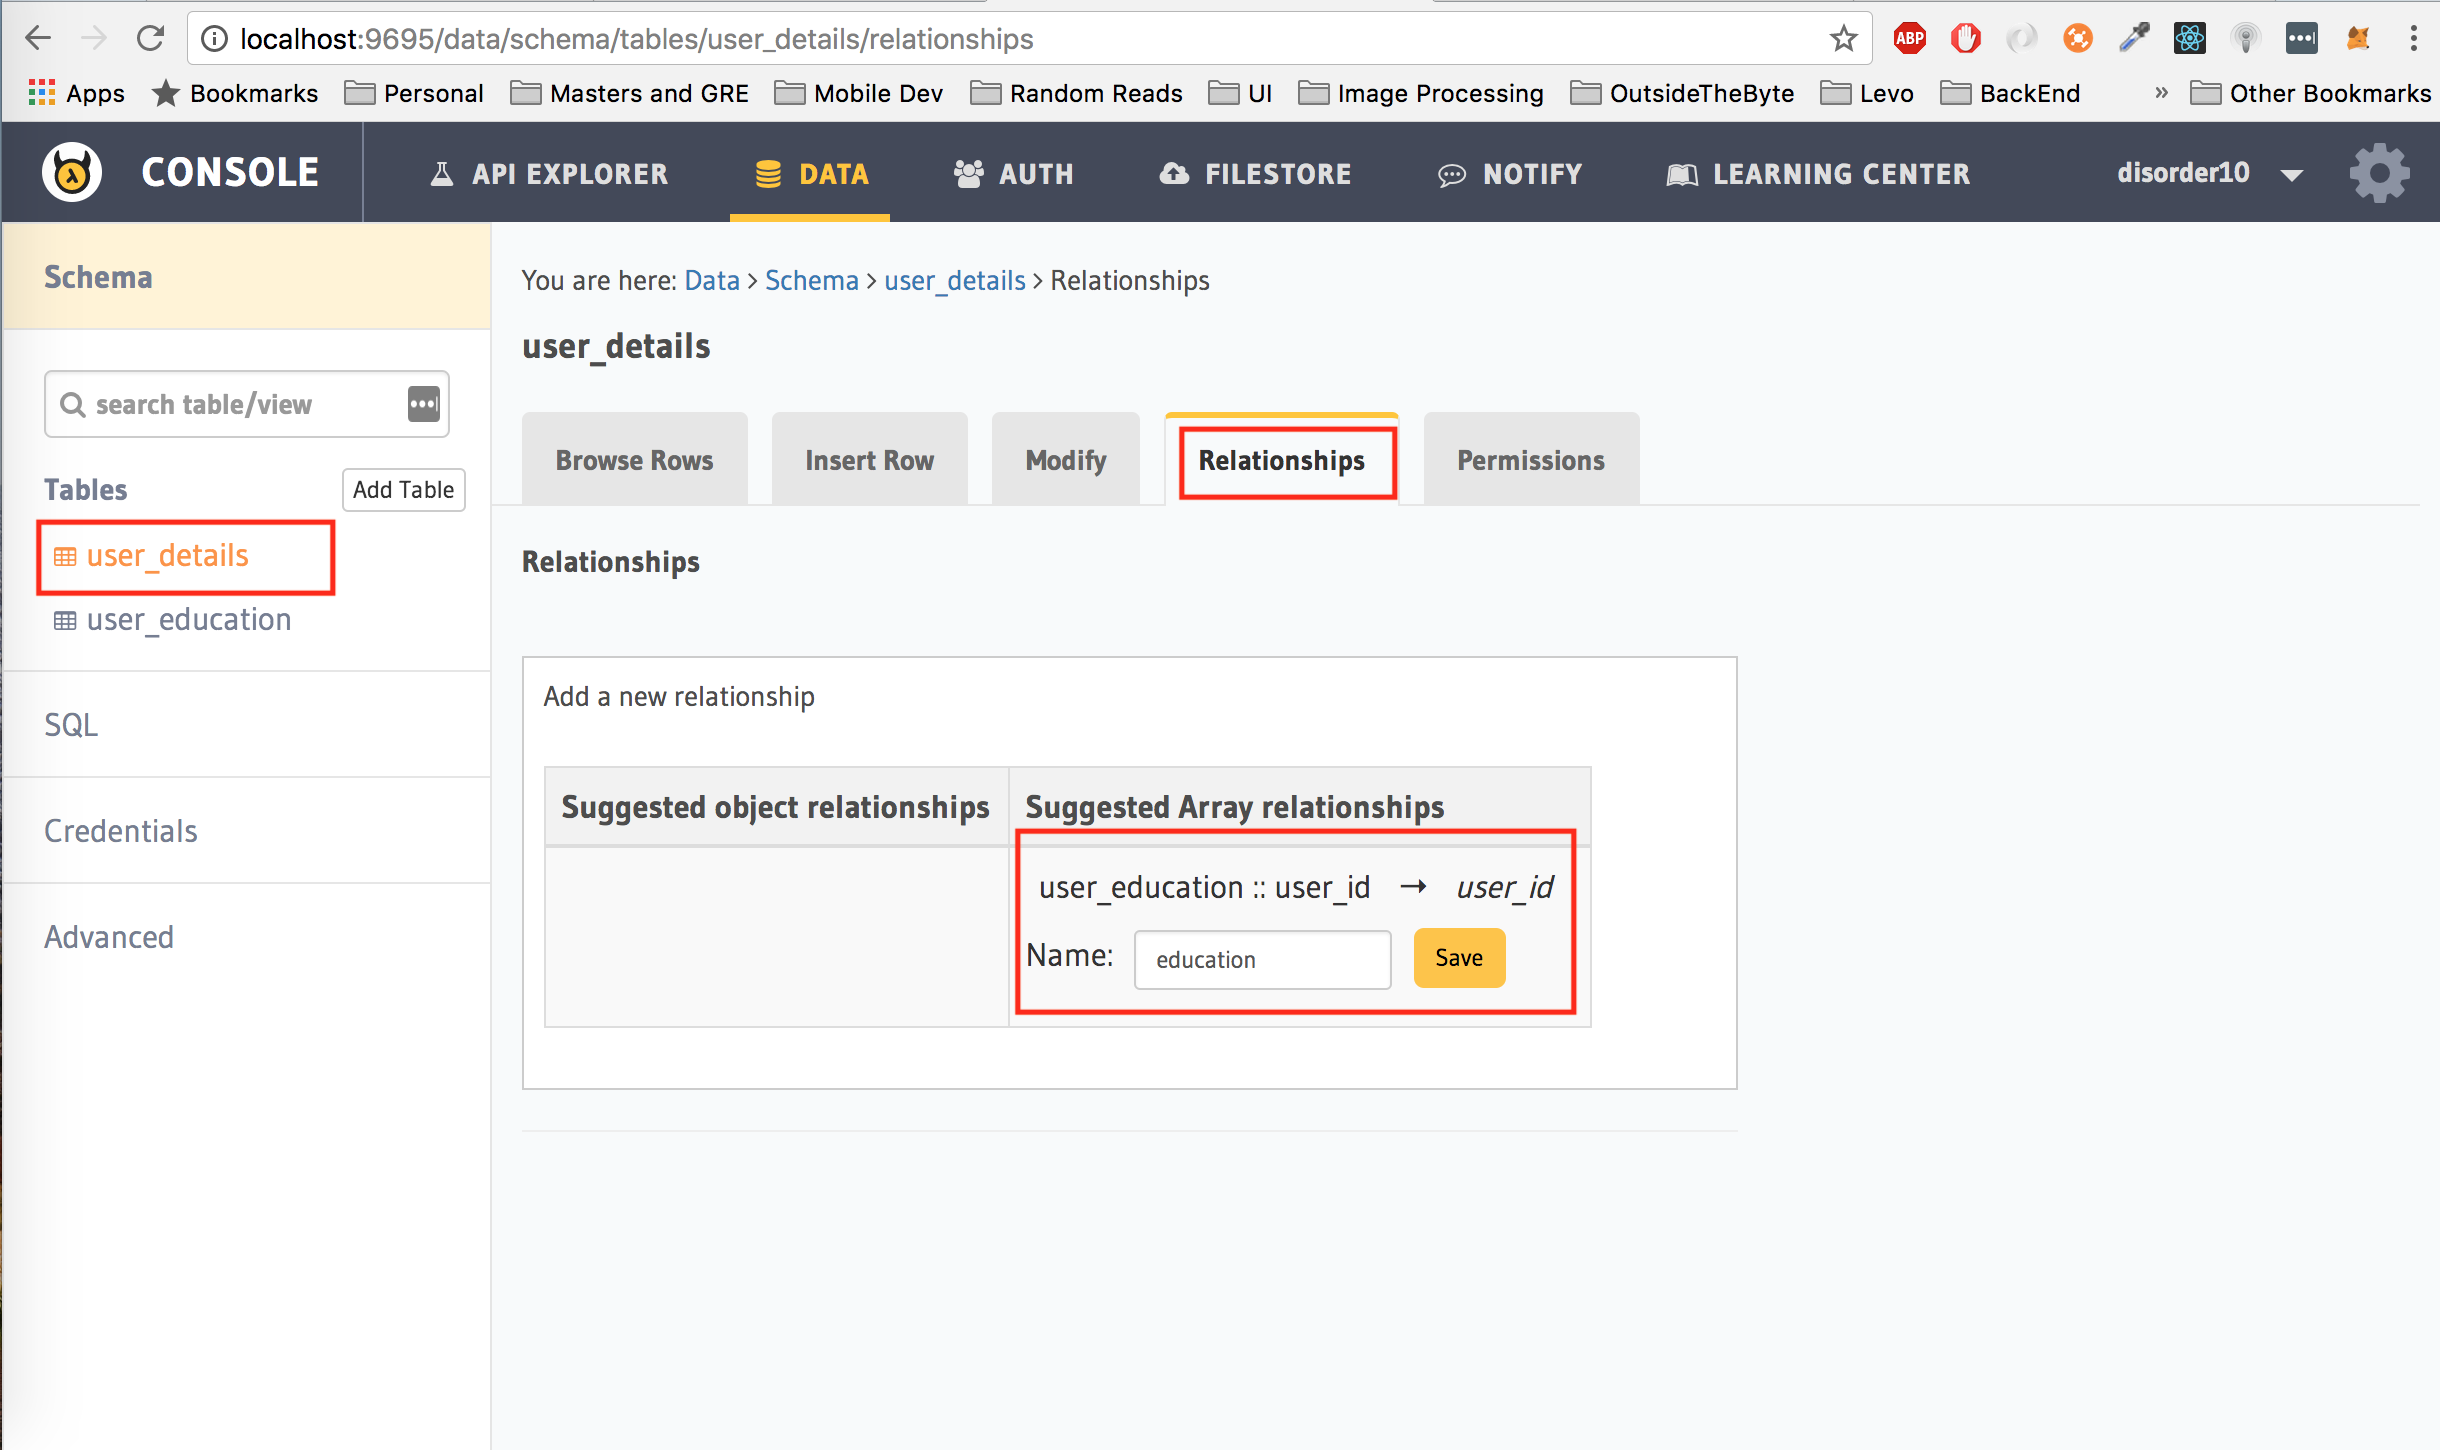
Next, open up the user_details table from the left panel and click on the Relationships tab. If you have followed the instructions above correctly, you will now have an entry under the Suggested Array Relationship column. Click on Add and name the relationship education and hit Save.
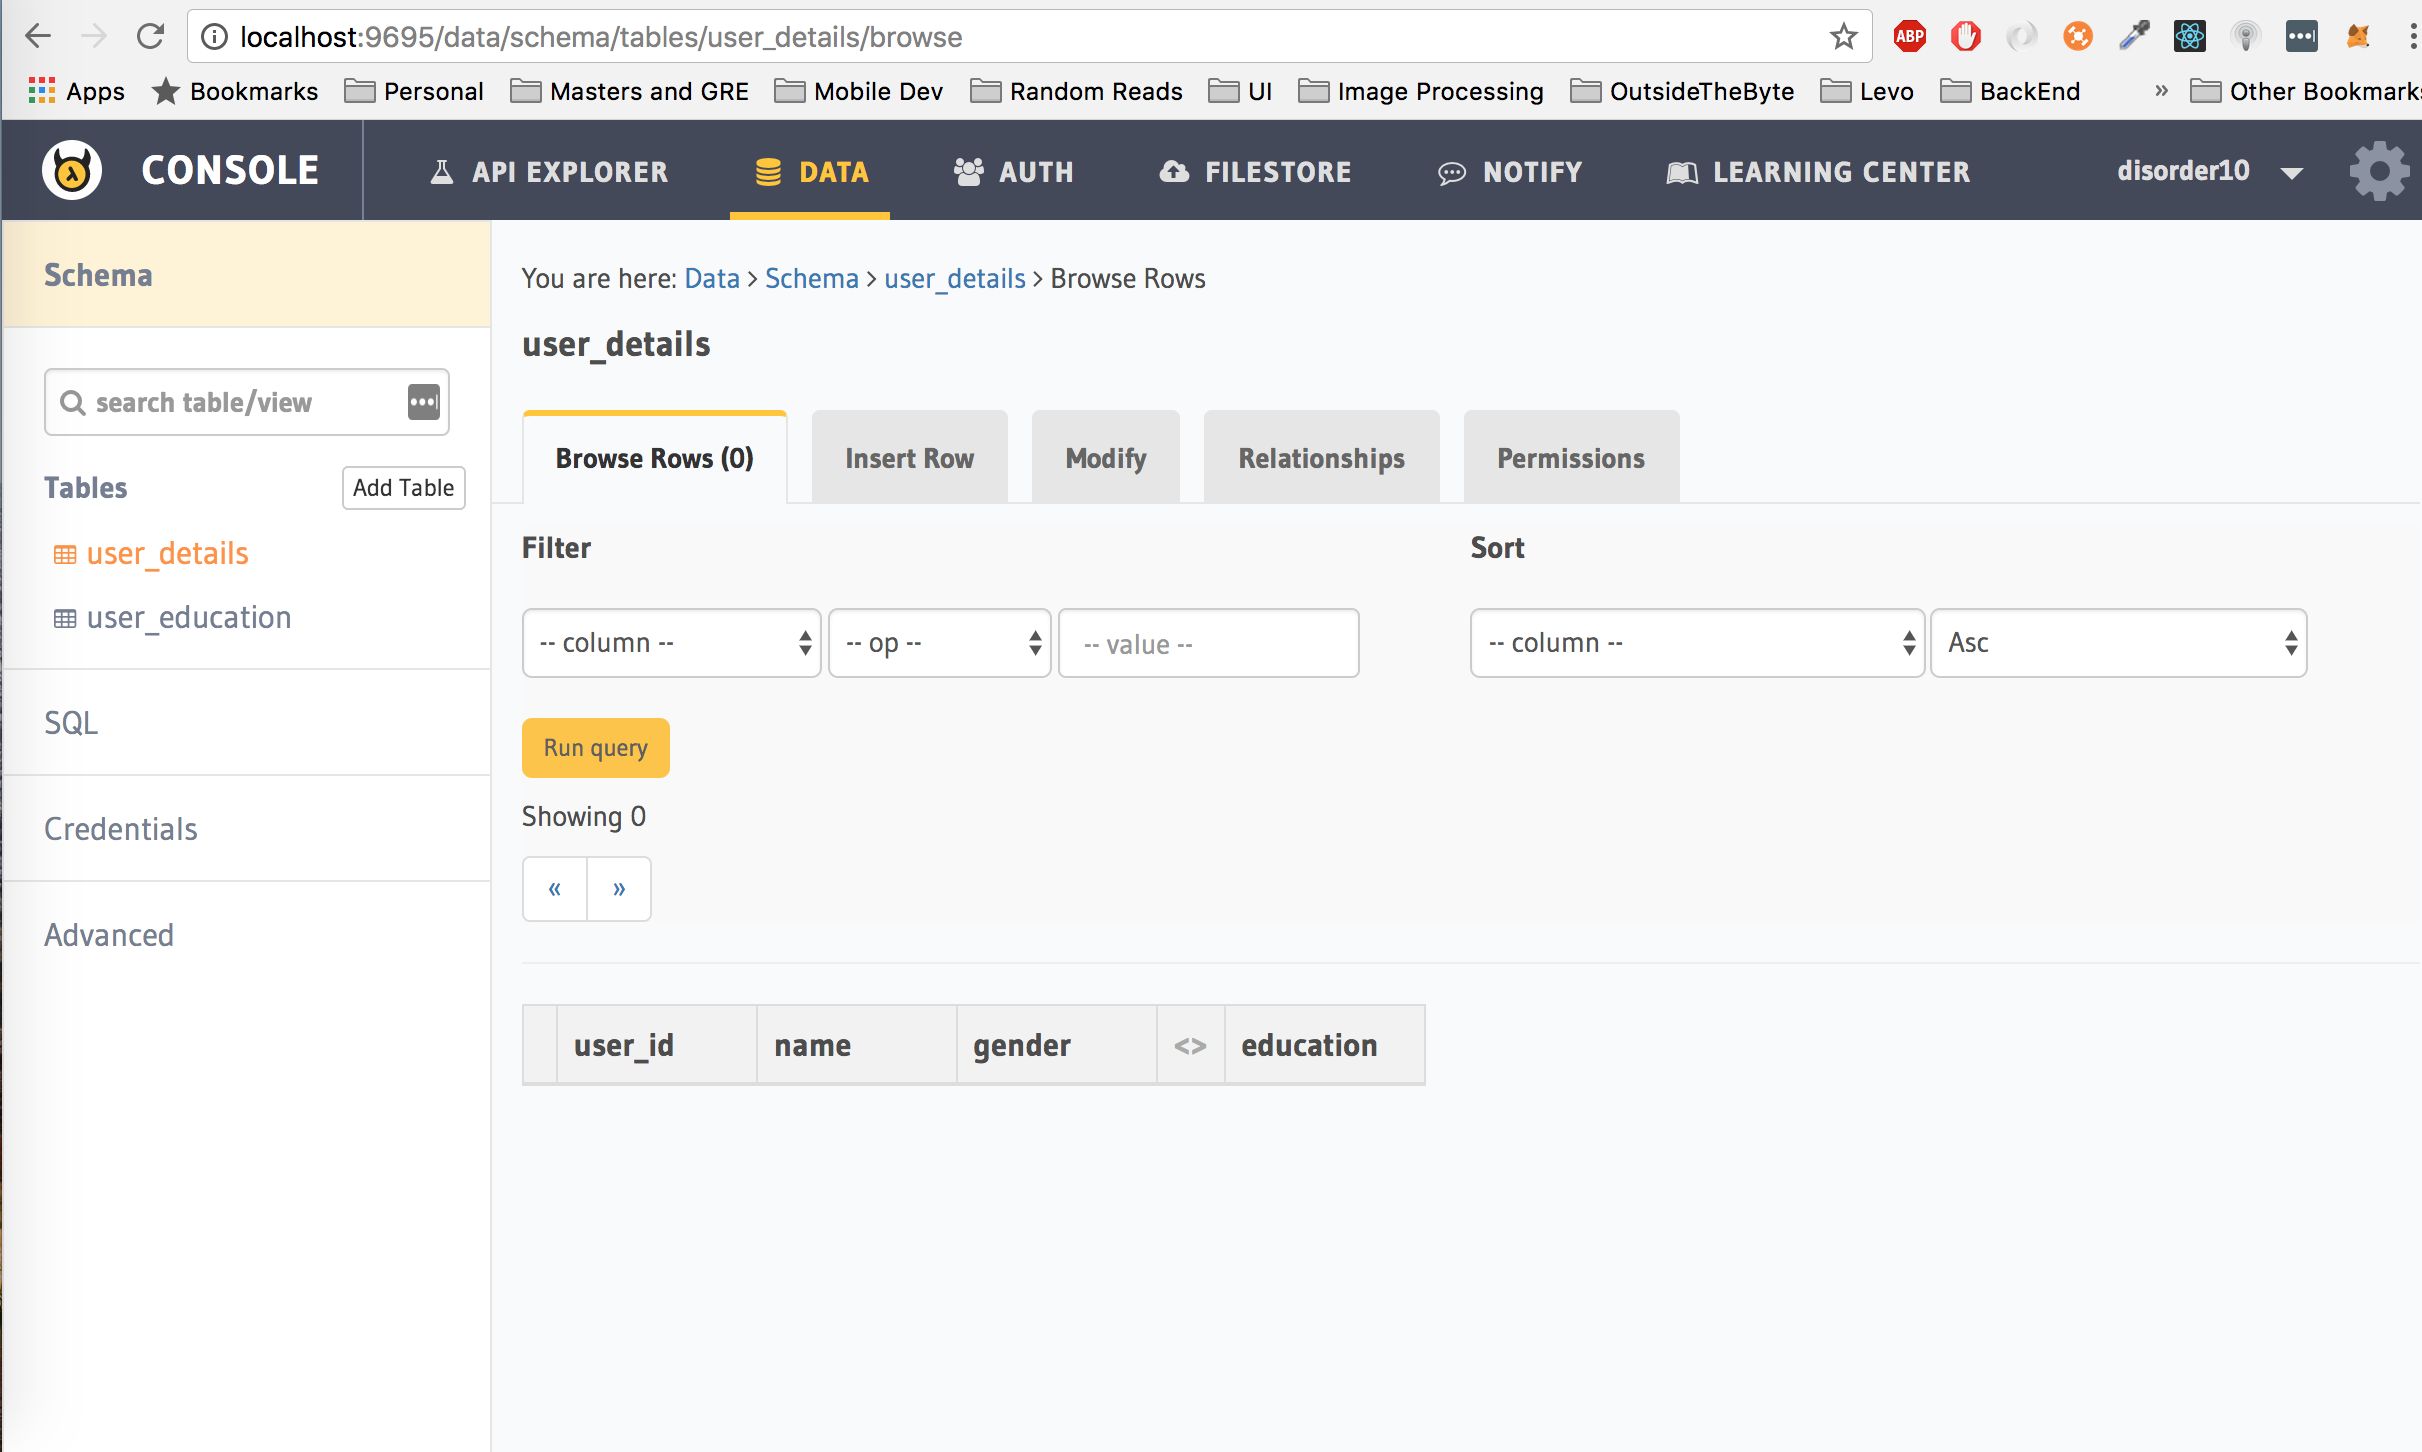
Click on Browse Rows and you will now see another column called education for the user_details table.
educationis not really a column, but a pseudo column. You can now use the Data APIs to fetch data from this table which includes education data as well.
Head to the API Explorer and add some data into the user_education table for our user (hasura_id 2). Ensure that you have added the Authorization header.
We can now fetch the education details for each user from the user_details table like so (again, Authorization header is mandatory to fetch data from the user_details table):
Your response will look like the following:
[
    {
        "user_id": 2,
        "name": "Jack Sniper",
        "gender": "Male",
        "education": [
            {
                "institution_name": "XYZ University",
                "degree": "BE",
                "id": 1,
                "user_id": 2
            },
            {
                "institution_name": "ABC University",
                "degree": "MS",
                "id": 2,
                "user_id": 2
            }
        ]
    }
]Similar to Authentication, you are encouraged to use the Code Generator to generate the client side code to make these requests. For eg, this is what it will look like for the our last request:
- Run the Android app
- Click on
Datain the landing screen to see a working example of fetching user details. - The code for Data can be found in the
DataActivity.javafile.
For advanced use cases, it is recommended to go through our docs.
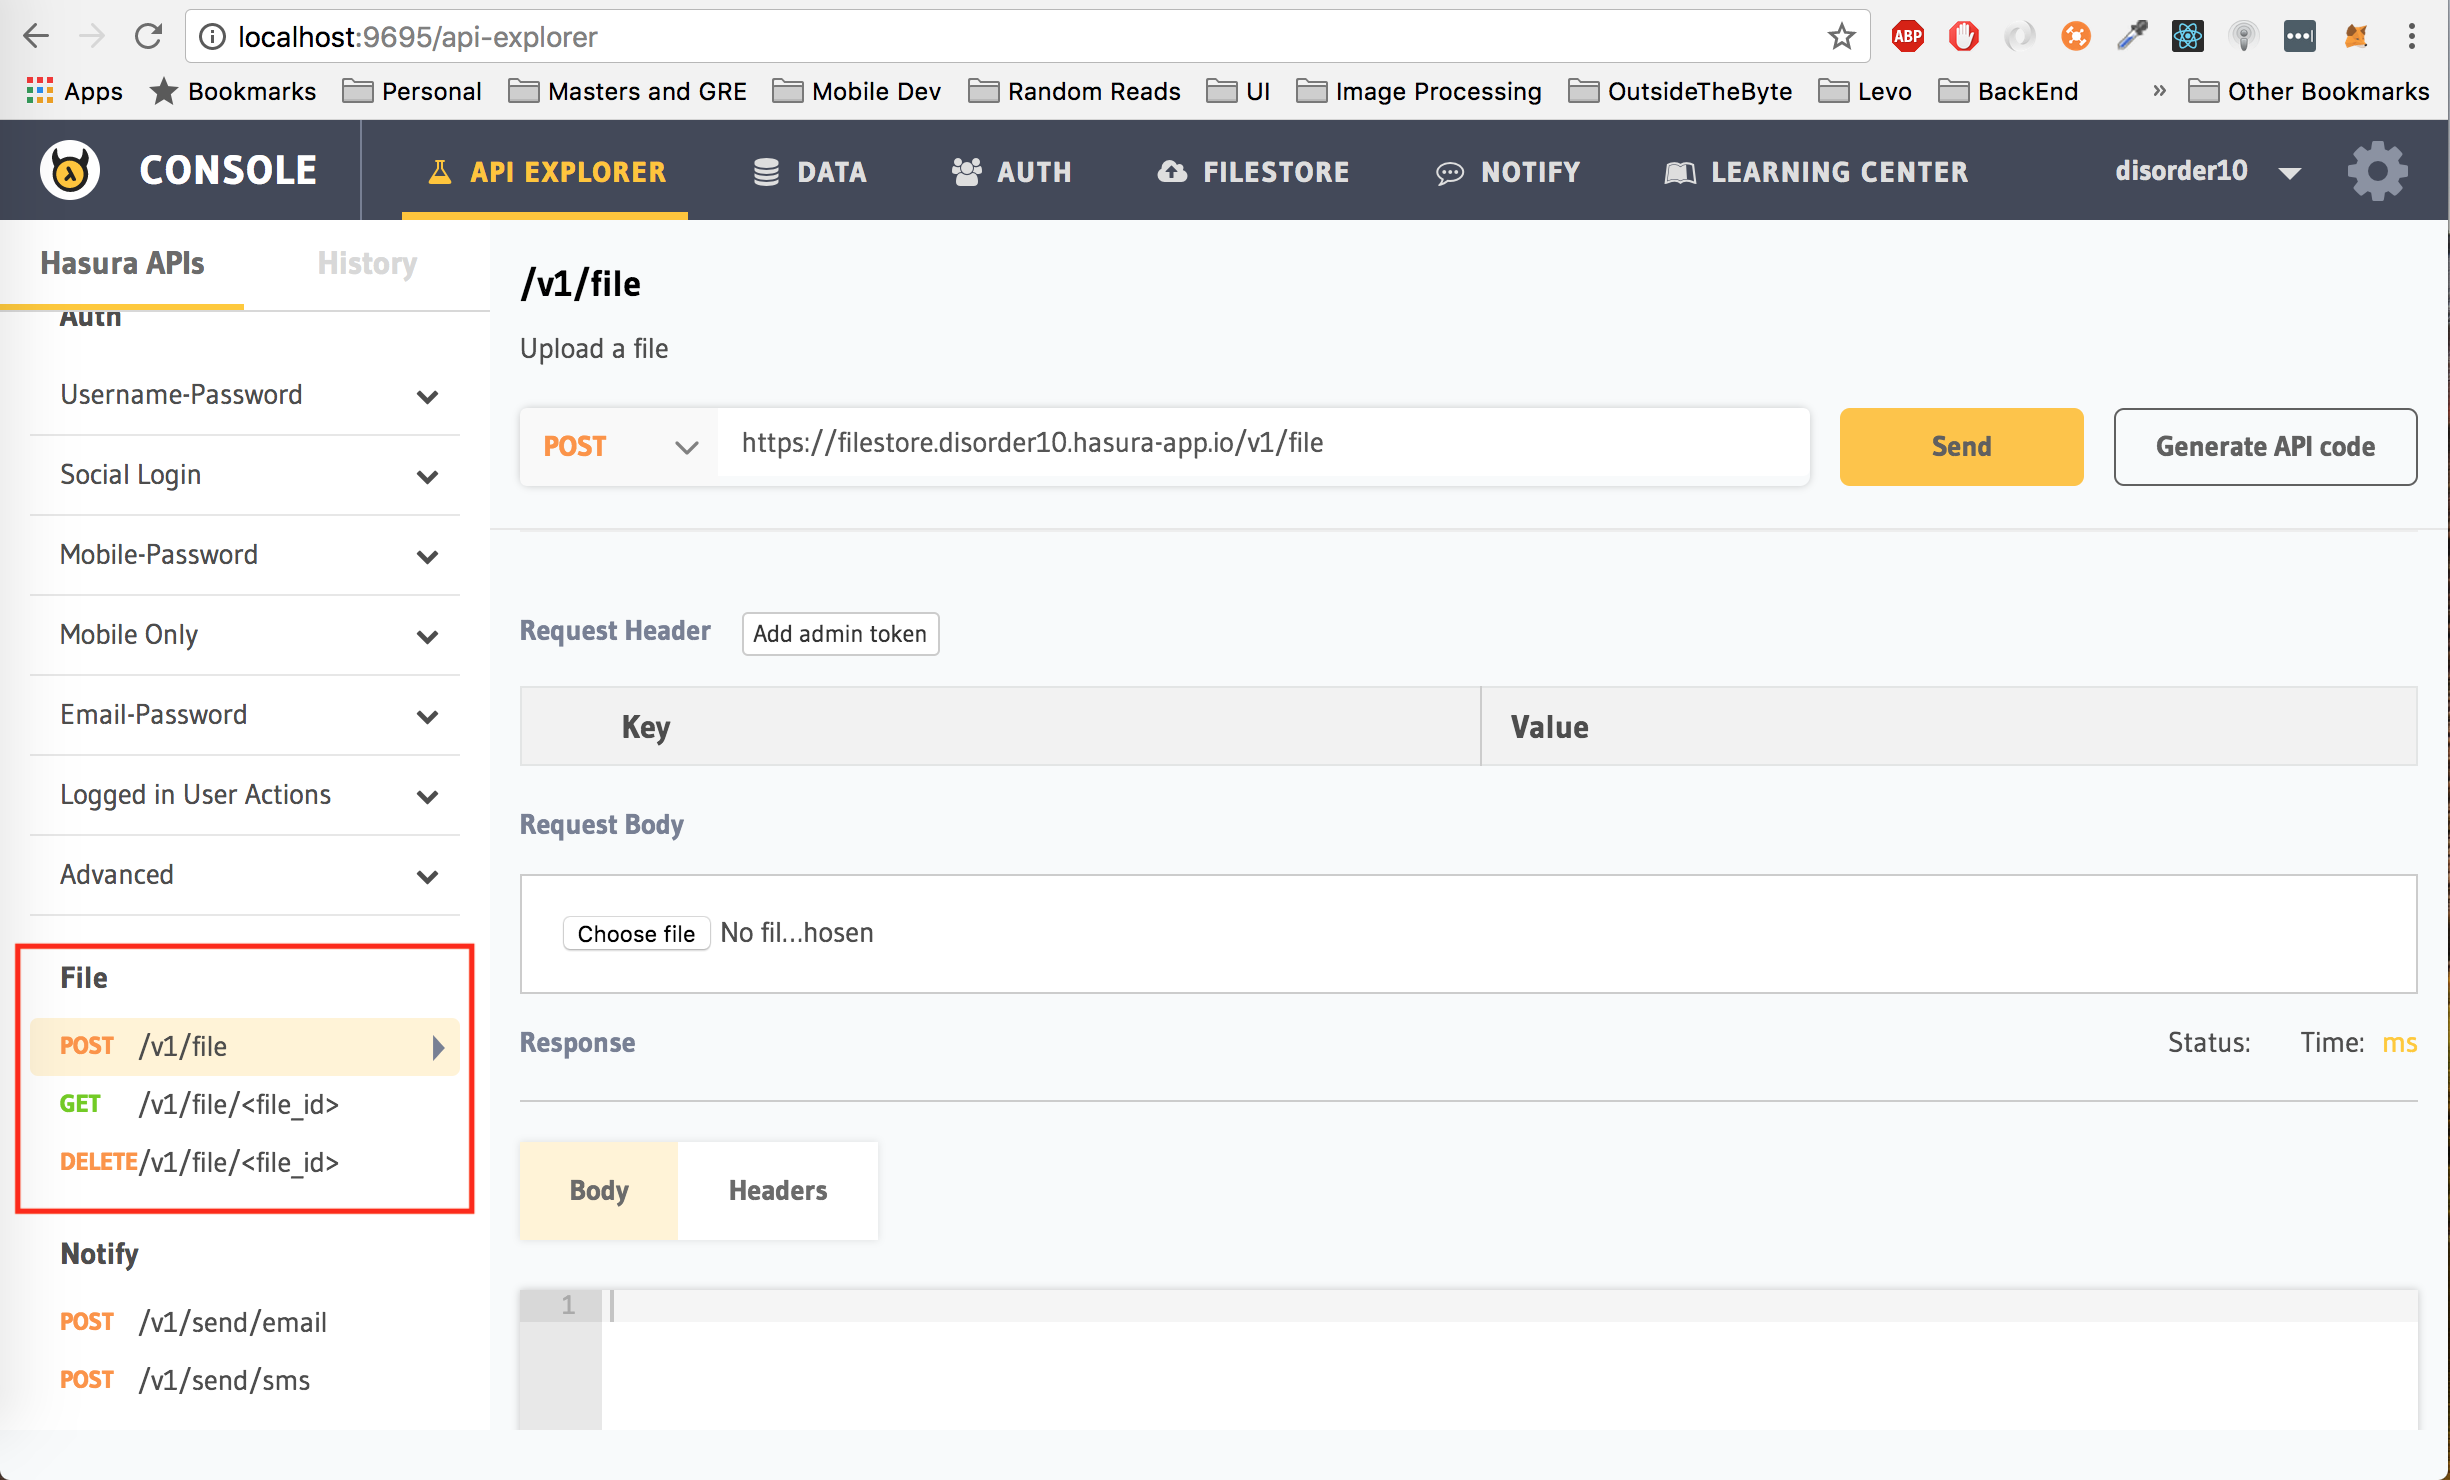
Some apps require the ability to upload and download files, for eg: storing user profile pictures or if you are building an app like google drive. Hasura provides easy to use APIs to upload and download files as well. Under the API Explorer tab, explore the APIs under File
You can test out the filestore APIs on the API Explorer and use the Code Generator to include it in your client side code.
- Run the Android app
- Click on
Filestorein the landing screen to see a working example of this. - The code can be found in the
FilestoreActivity.javafile.
Go though the docs, to know more about the filestore and to understand how you can set permissions on it. Currently, the permission defaults to allowing anyone to download files but only authenticated users are allowed to upload files.
Although, Hasura provides backend components, there are times when you might want to write your own custom logic and for this write your own server. Common use cases of this include, sending push notifications to the users mobile device when a certain event happens, doing some sort of calculation or data manipulation for some event.
For this, you would want to create a custom microservice on Hasura. This project comes with one such microservice which runs on the api subdomain. This microservice is a simple Nodejs Express server which includes boilerplate code for the following:
- Writing custom endpoints
- Push notifications
- Websockets
You can open the url to this microservice on your web browser by running the following in your terminal
$ hasura microservice open apiEvery Hasura cluster comes with a few default microservices, all the backend feature we have used until now is a Microservice. Authentication is provided by the
authmicroservice, the data APIS by thedatamicroservice, file upload and download by thefilestoremicroservice. To take a look at the available microservices, run$ hasura microservice liston your terminal, inside the project directory. Hence, it is only natural that if you want additional features, you would simply create a new microservice. All custom microservices can be found inside themicroservicesdirectory. You can learn more about microservices on Hasura here.
The code for this microservice can be found inside the microservices/api/src
Navigate to microservices/api/src/custom-logic/routes.js to see how to define a custom route. There are two examples in it, one is a definition for a GET request at "/" and the other for a POST request at "/echo". The "/" route just returns a "Hello World" and the "/echo" endpoint just returns whatever you send to it.
FirebaseCloudMessaging(FCM) are used to send push notifications to Android devices. This project makes use of FCM for its push notification needs. Follow the instructions given in their docs to integrate Firebase into your Android app.
FCM has APIs that you need to hit to send push notifications to devices. Each device is identified by a unique token by fcm, hence, you need to ensure that you save the token for each device and associate it with a user's hasura_id. There are multiple ways to handle this:
- Add a new column to the
user_detailstable, calledfcm_tokenand store the token for each user there. - Create a new table, for eg:
user_fcm_tokenswith columnsuser_idandtoken.
Basically, in the callback method of Firebase where you receive the fcm token, you should make a data api to store the fcm_token and associate that with the user. You can either write a custom endpoint to do this or make the data api directly in your client code.
The
apimicroservice includes an example of writing a custom endpoint for doing this atmicroservices/api/src/push-notif/routesdefined as the"/register_device"route.
For Android, that would be
@Override
public void onTokenRefresh() {
    super.onTokenRefresh();
    // Get updated InstanceID token.
    String refreshedToken = FirebaseInstanceId.getInstance().getToken();
    Log.d(TAG, "Refreshed token: " + refreshedToken);

    String url = "https://data.disorder10.hasura-app.io/v1/query";

    try {
      OkHttpClient client = new OkHttpClient();

      MediaType mediaType = MediaType.parse("application/json");
      JSONObject jsonObject = new JSONObject()
      .put("type", "insert")
      .put("args", new JSONObject()
        .put("table", "user_fcm_tokens")
        .put("objects", new JSONArray()
          .put(new JSONObject()
            .put("token", refreshedToken)
            .put("user_id", "2")
          )
        )
      );

      RequestBody body = RequestBody.create(mediaType, jsonObject.toString());
      // If you have the auth token saved in shared prefs
      // SharedPreferences prefs = context.getSharedPreferences("PREFS_NAME", Context.MODE_PRIVATE);
      // String authToken = prefs.getString("HASURA_AUTH_TOKEN", null);
      // You can now use this auth token in your header like so,
      // .addHeader(Authorization, "Bearer " + authToken);
      Request request = new Request.Builder()
        .url(url)
        .post(body)
        .addHeader("Authorization", "Bearer 150405479bf396921f336ec08261e73eae4554718700a548")
        .build();

      client.newCall(request).enqueue(new Callback() {
        @Override
        public void onFailure(okhttp3.Call call, IOException e) {
          //Handle failure
        }

        @Override
        public void onResponse(okhttp3.Call call, Response response) throws IOException {
          // Handle success
        }
      });

    } catch (JSONException e) {
      e.printStackTrace();
    }
}
Now, whenever you want to send a push notification to a user, you will fetch the associated fcm token from the user's user_id and then hit the fcm api to send the push notification.
There is an example of doing this in the
apimicroservice, you can find the code for it atmicroservices/api/src/push-notif/routesdefined as the"/test_push".
Note: You need to set the Web API Key from your Firebase Project Settings on the Firebase Cloud Console and add it to the fcmKey variable at microservices/api/src/push-notif/routes.
Ideally, you should pass the FCM key as an environment variable to the server and not hard code it in the source code. To do this, you need to add the key as a secret into Hasura and then edit the k8s.yaml file inside microservices/api/ to pass that as an environment variable.
Step 1: Add FCM key to Hasura secrets
$ # Replace <WEB API KEY> with the FCM Key
$ $ hasura secret update fcm.key "<WEB API KEY>"
Step 2: Edit k8s.yaml file
Run the following from the root directory of the project.
$ cp microservices/api/k8s.fcm.yaml microservices/api/k8s.yamlStep 3: Access the fcm key in code as an environment variable
Open the file utils.js in microservices/api/src/push-notif and make the following change:
const fcmKey = process.env.FCM_KEY;WebSockets are a technology that makes it possible to open an interactive communication session between a client app and a server. With this API, you can send messages to a server and receive event-driven responses without having to poll the server for a reply.
Chat apps are the most common use cases for Websockets. We are going to use Socket.io, which is basically a Javascript framework implementing the Websockets protocol.
microservices/api/src/server.js has a simple setup done using socket.io.
The socket listens at https:api.<cluster-name>.hasura-app.io (replace <cluster_name> with the name of your cluster). It listens to the topic "message" and responds with an echo of whatever you send.
- Run the Android app
- Click on
Websocketsin the landing screen to see a working example of websockets. Currently, the server will just respond with a "The message your sent is: ". - You can find the code in the
WebsocketActivity.swiftfile.
For more information on using socket.io, it is recommended to check their docs.