In this workship we are going to focus on these main use cases:
- Dynamic Service Graph for run-time visualization of flow and policies
- Kibana dashboards for quick troubleshooting
- Dynamic Packet Capture to analyze traffic on a pod or collection of pods live
- Application (L7) observability
Goal: Explore Calico observability tools.
If you are interested in enabling collection of application layer metrics for your workloads, refer to Configure L7 logs documentation to enable application layer metrics collection.
-
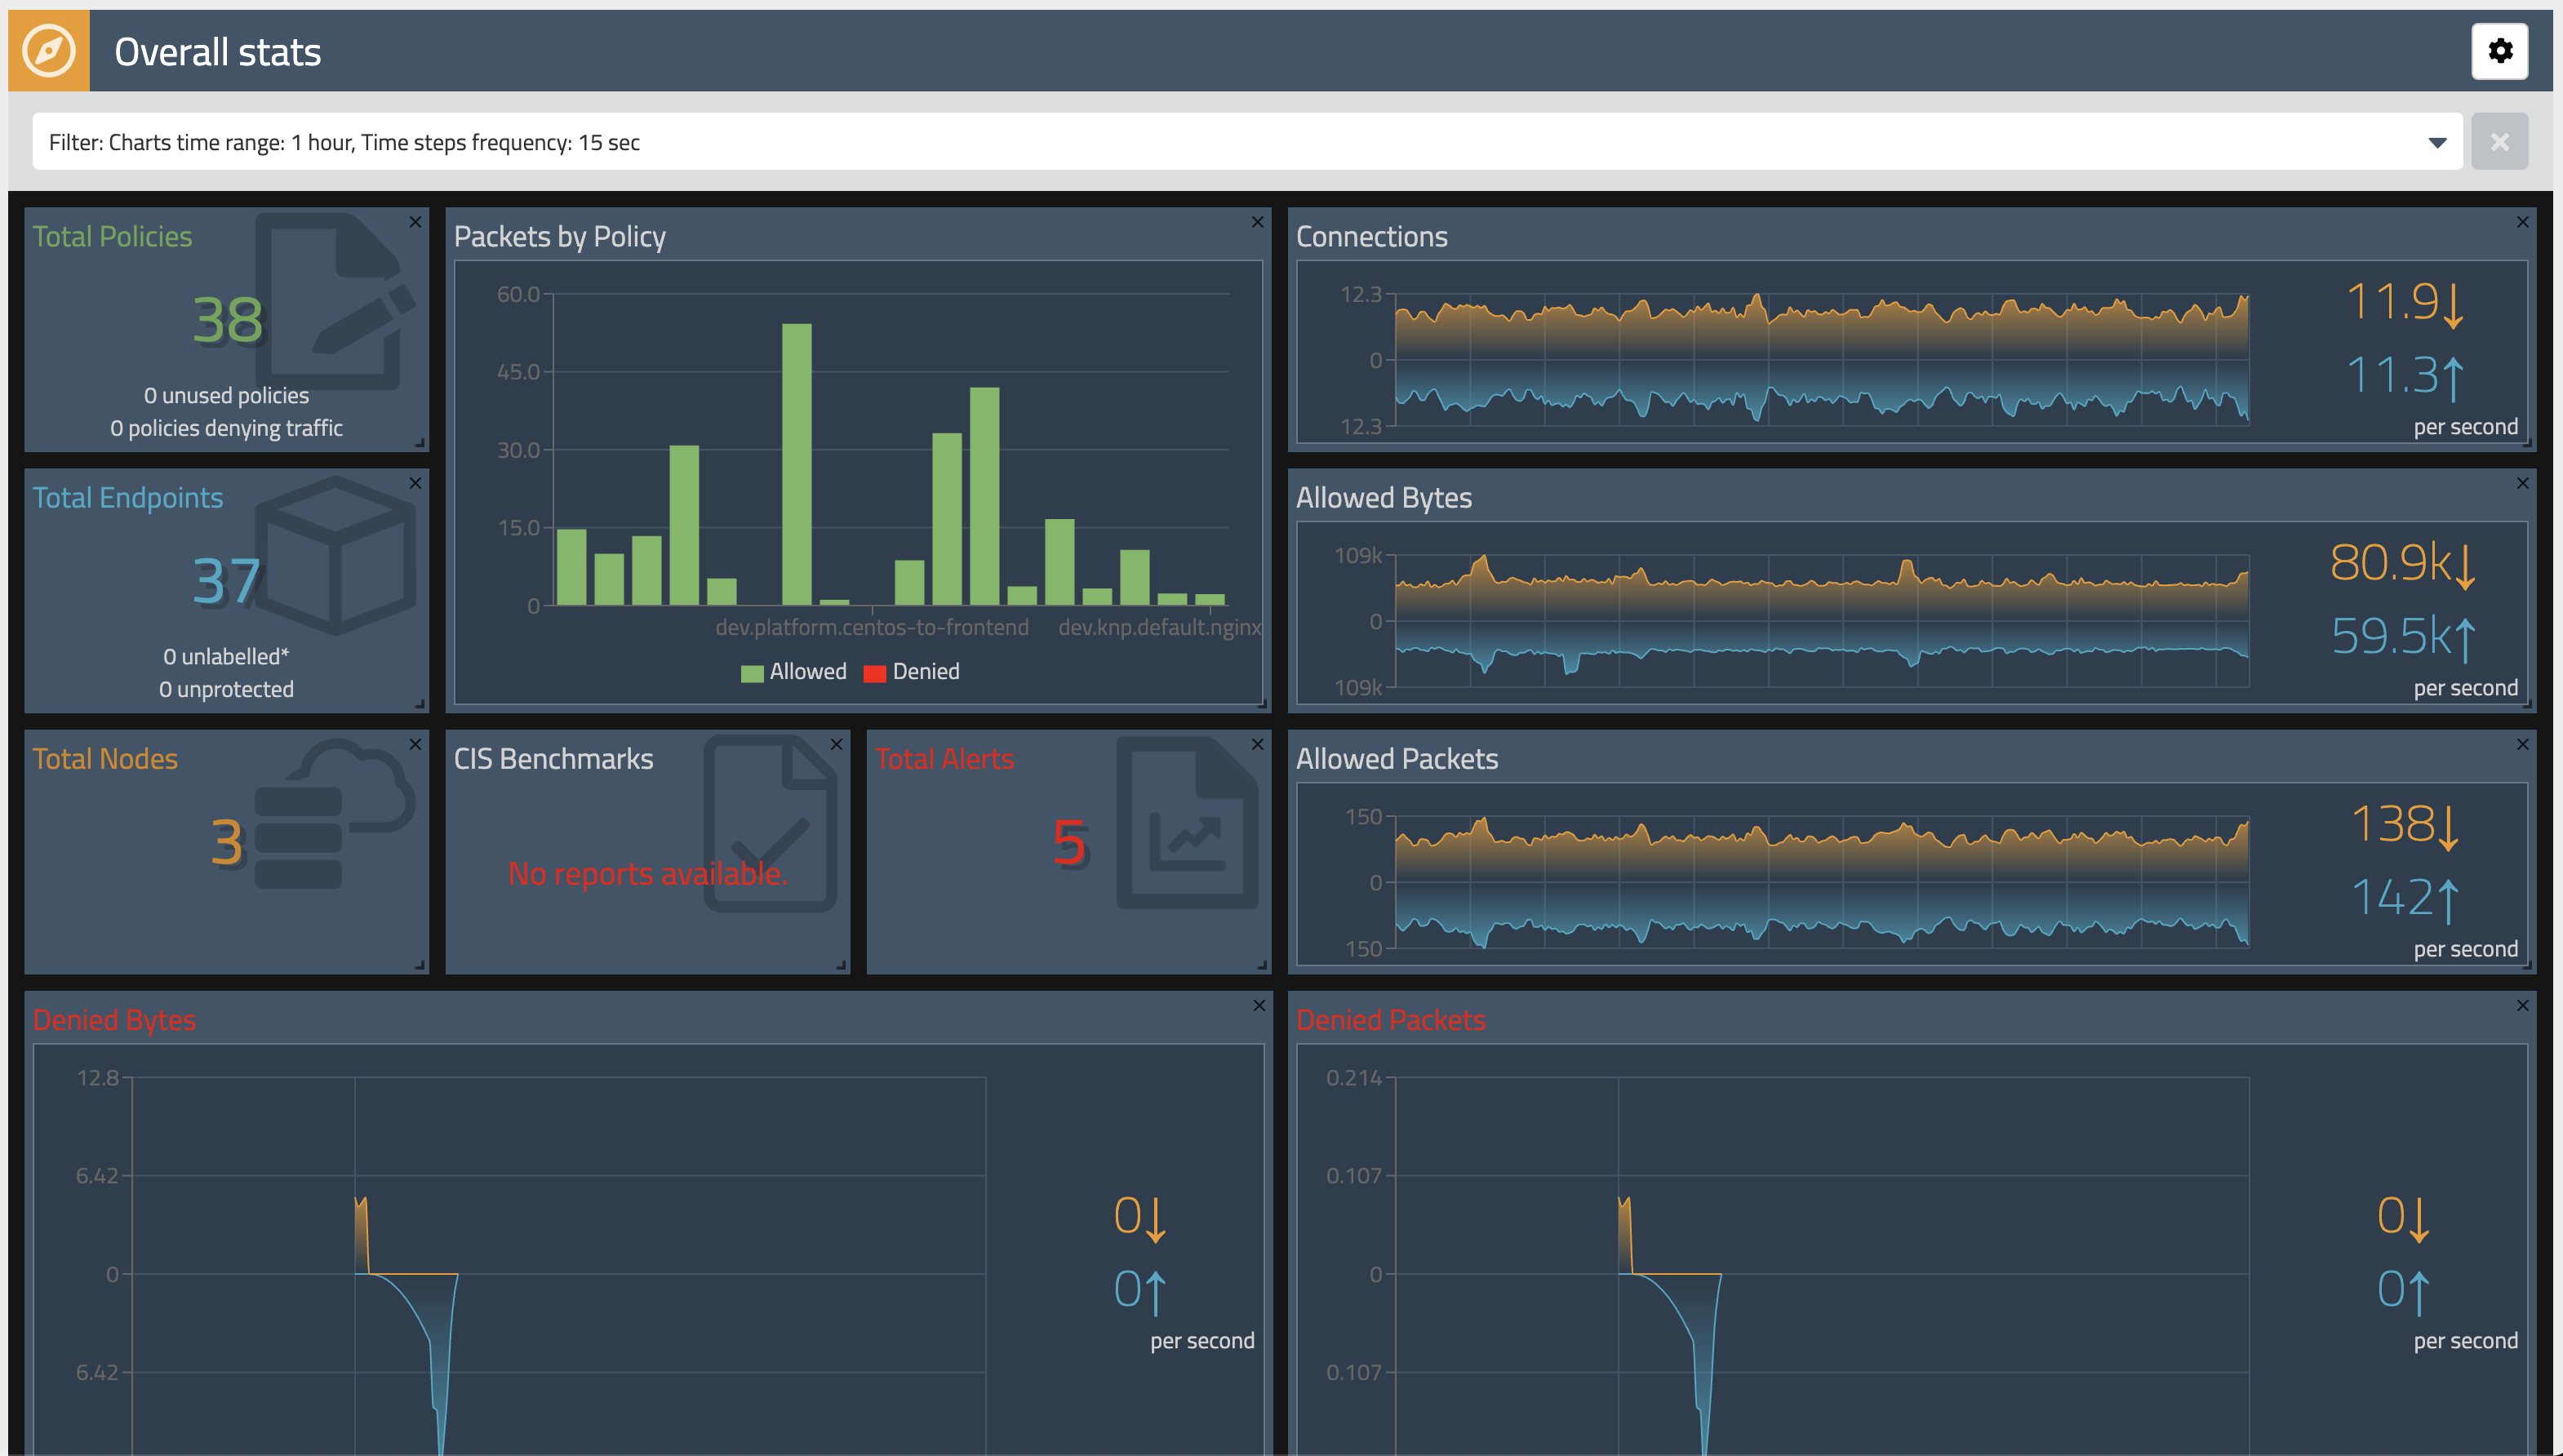
Dashboard
The
Dashboardview in the Enterprise Manager UI presents high level overview of what's going on in your cluster. The view shows the following information:- Connections, Allowed Bytes and Packets
- Denied Bytes and Packets
- Total number of Policies, Endpoints and Nodes
- Summary of CIS benchmarks
- Count of triggered alerts
- Packets by Policy histogram that shows allowed and denied traffic as it is being evaluated by network policies
-
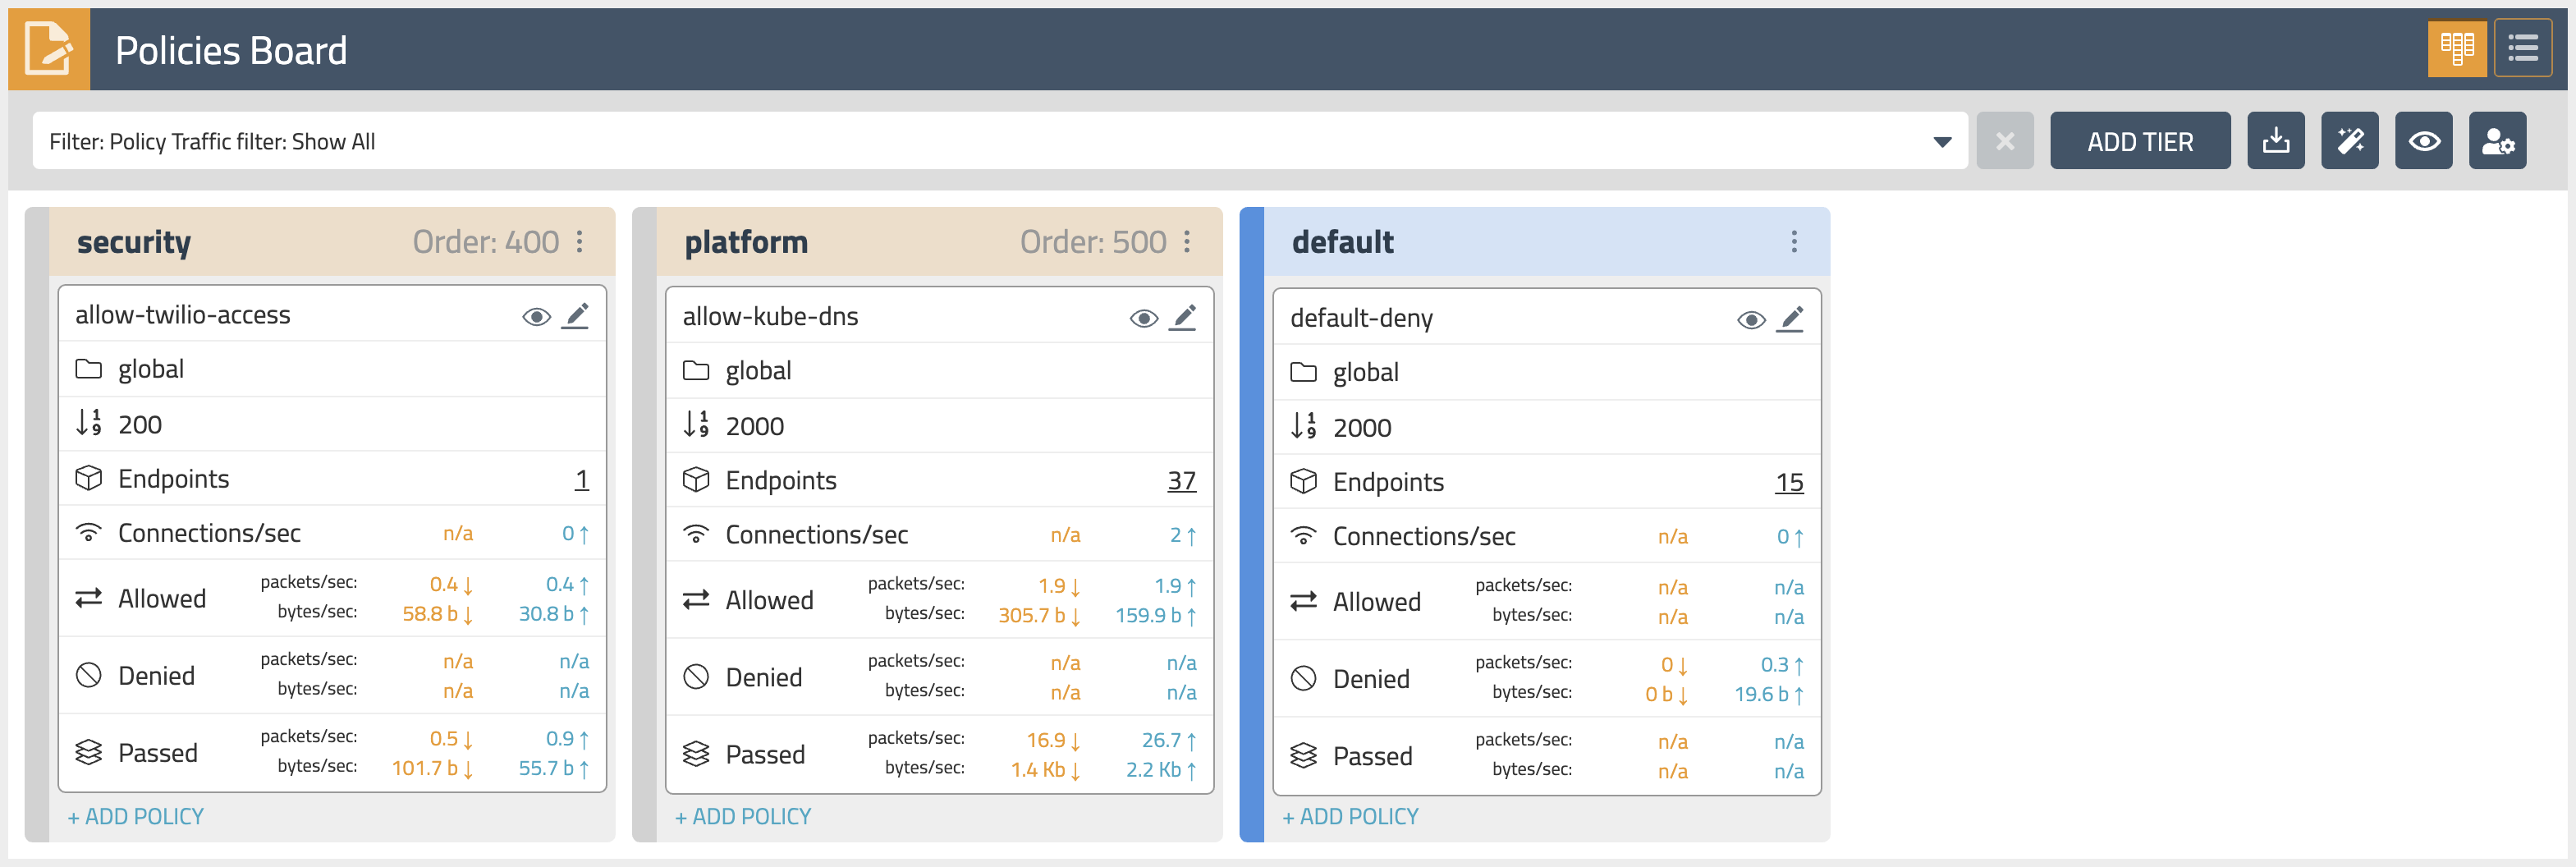
Policies Board
The
Policies Boardshows all policies deployed in the cluster and organized intopolicy tiers. You can control what a user can see and do by configuring Kubernetes RBAC roles which determine what the user can see in this view. You can also use controls to hide away tiers you're not interested in at any given time.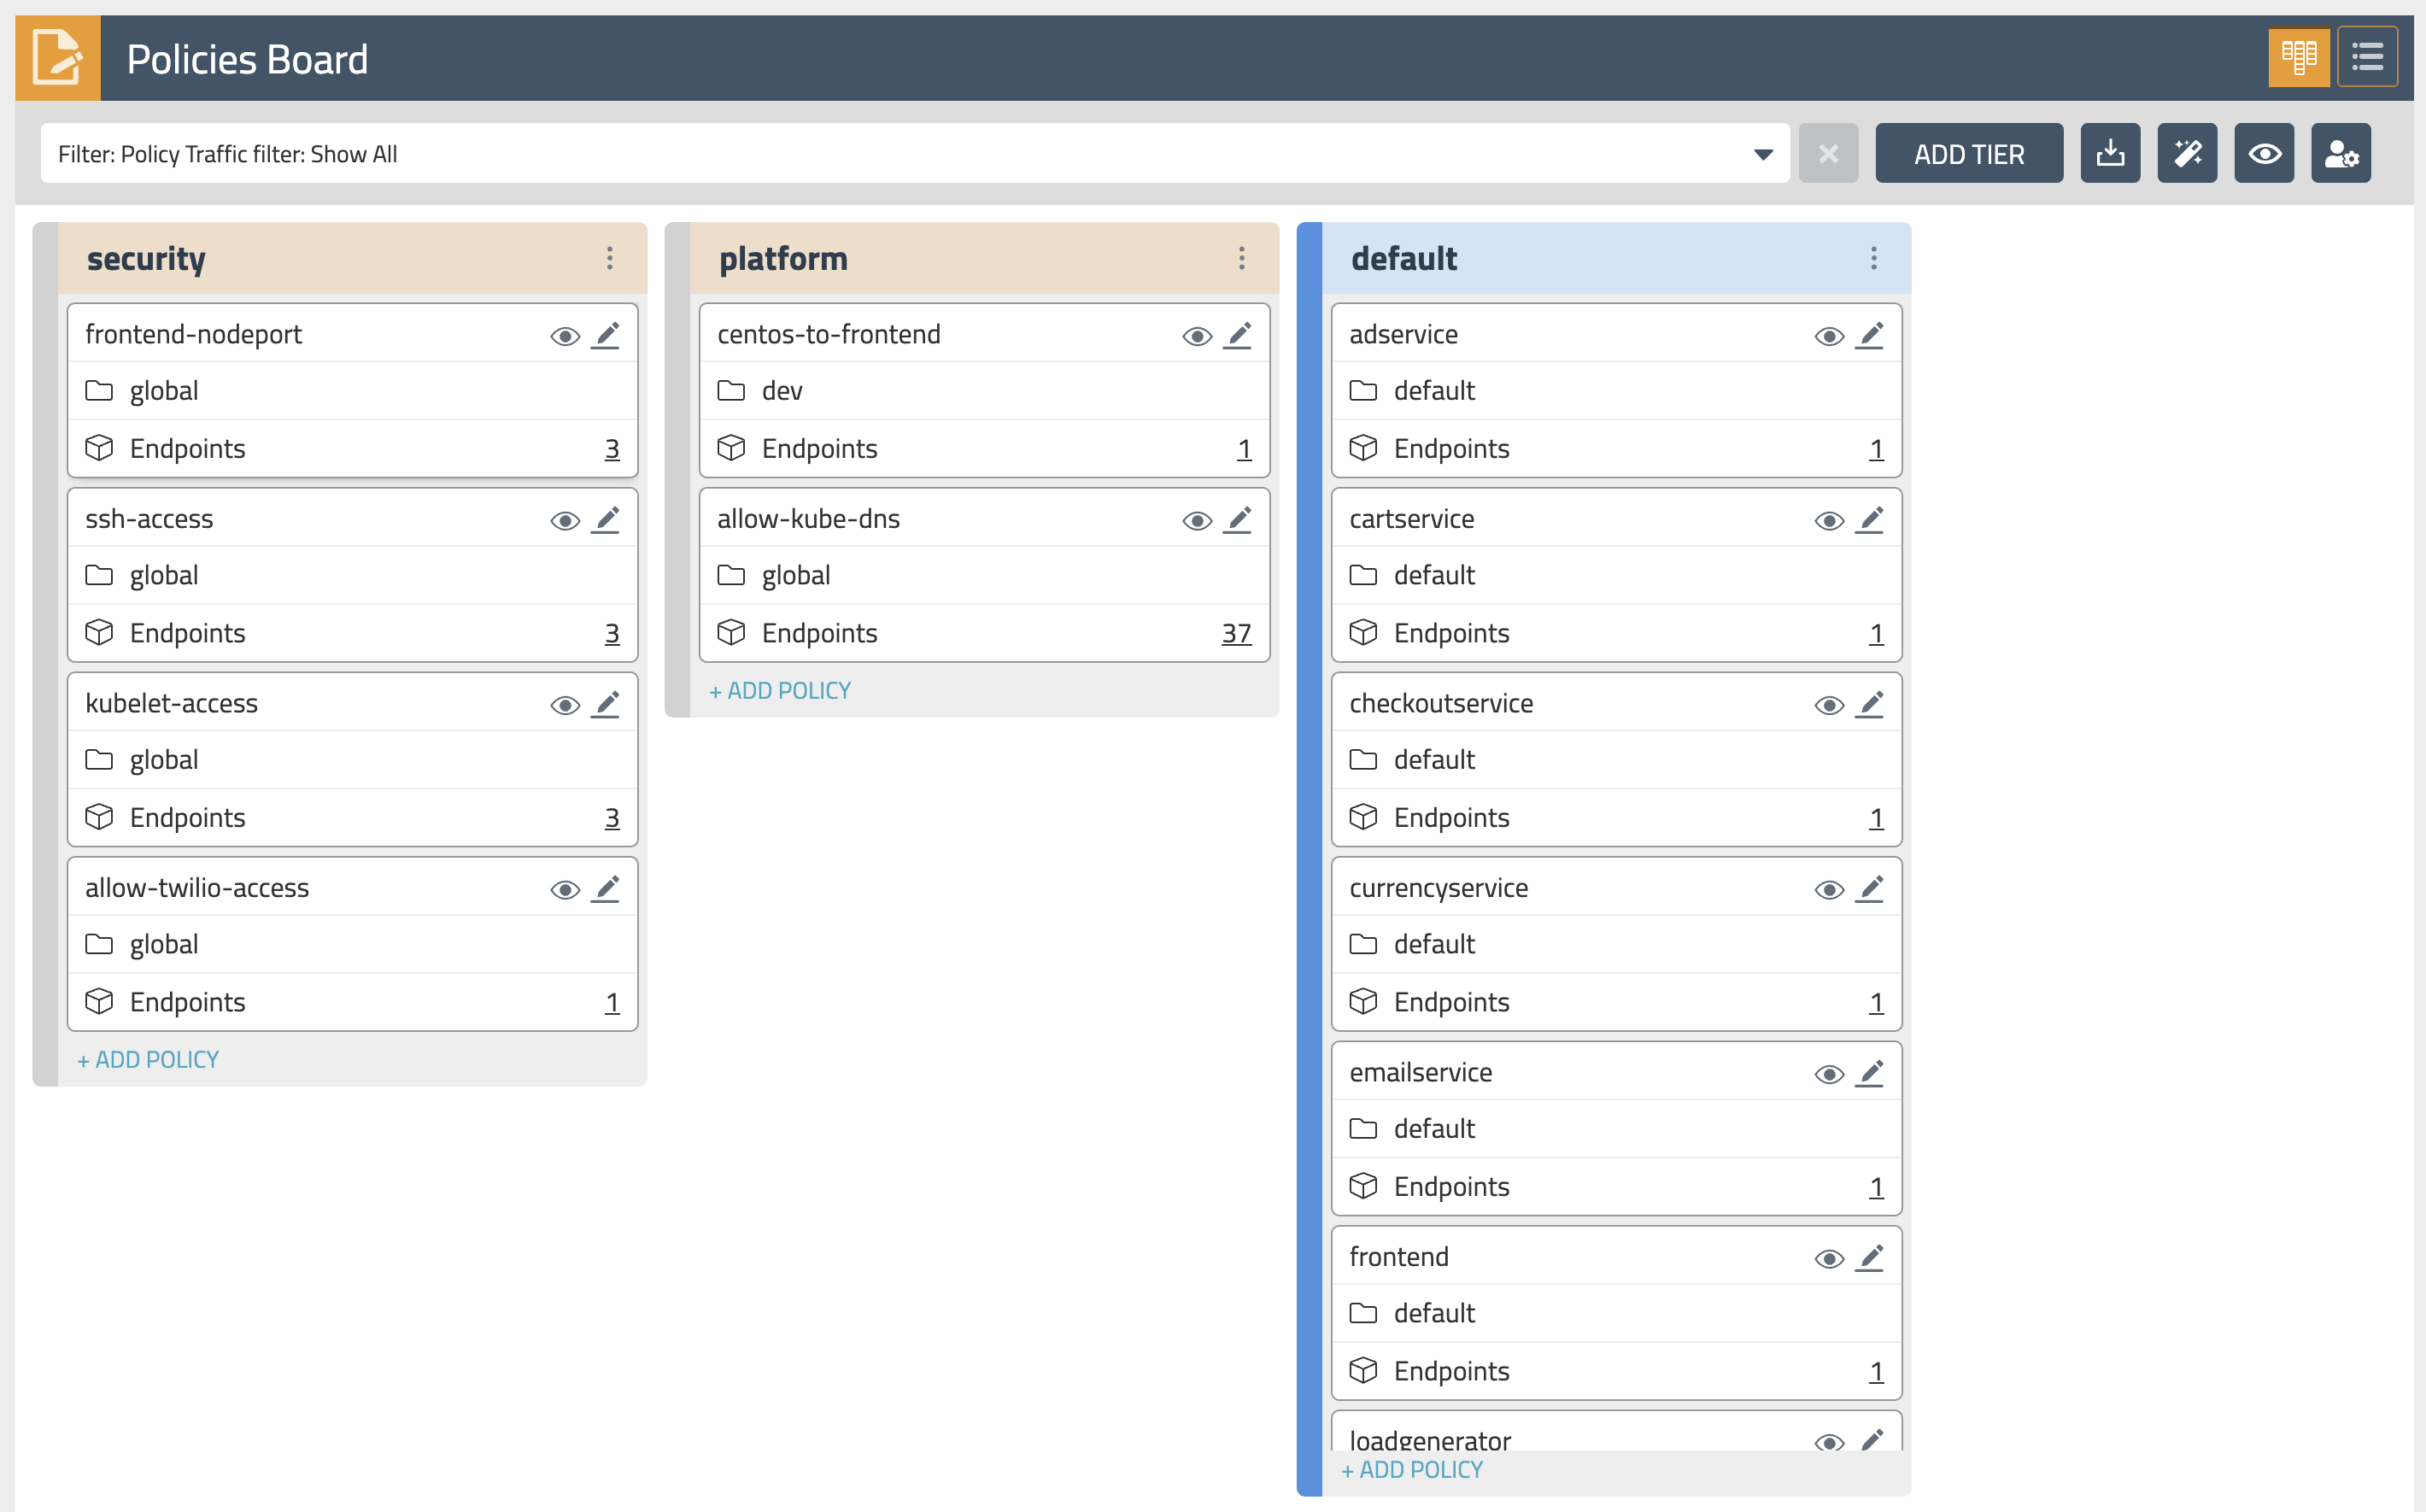
By leveraging stats controls you can toggle additional metrics to be listed for each shown policy.
-
Audit timeline
The
Timelineview shows audit trail of created, deleted, or modified resources.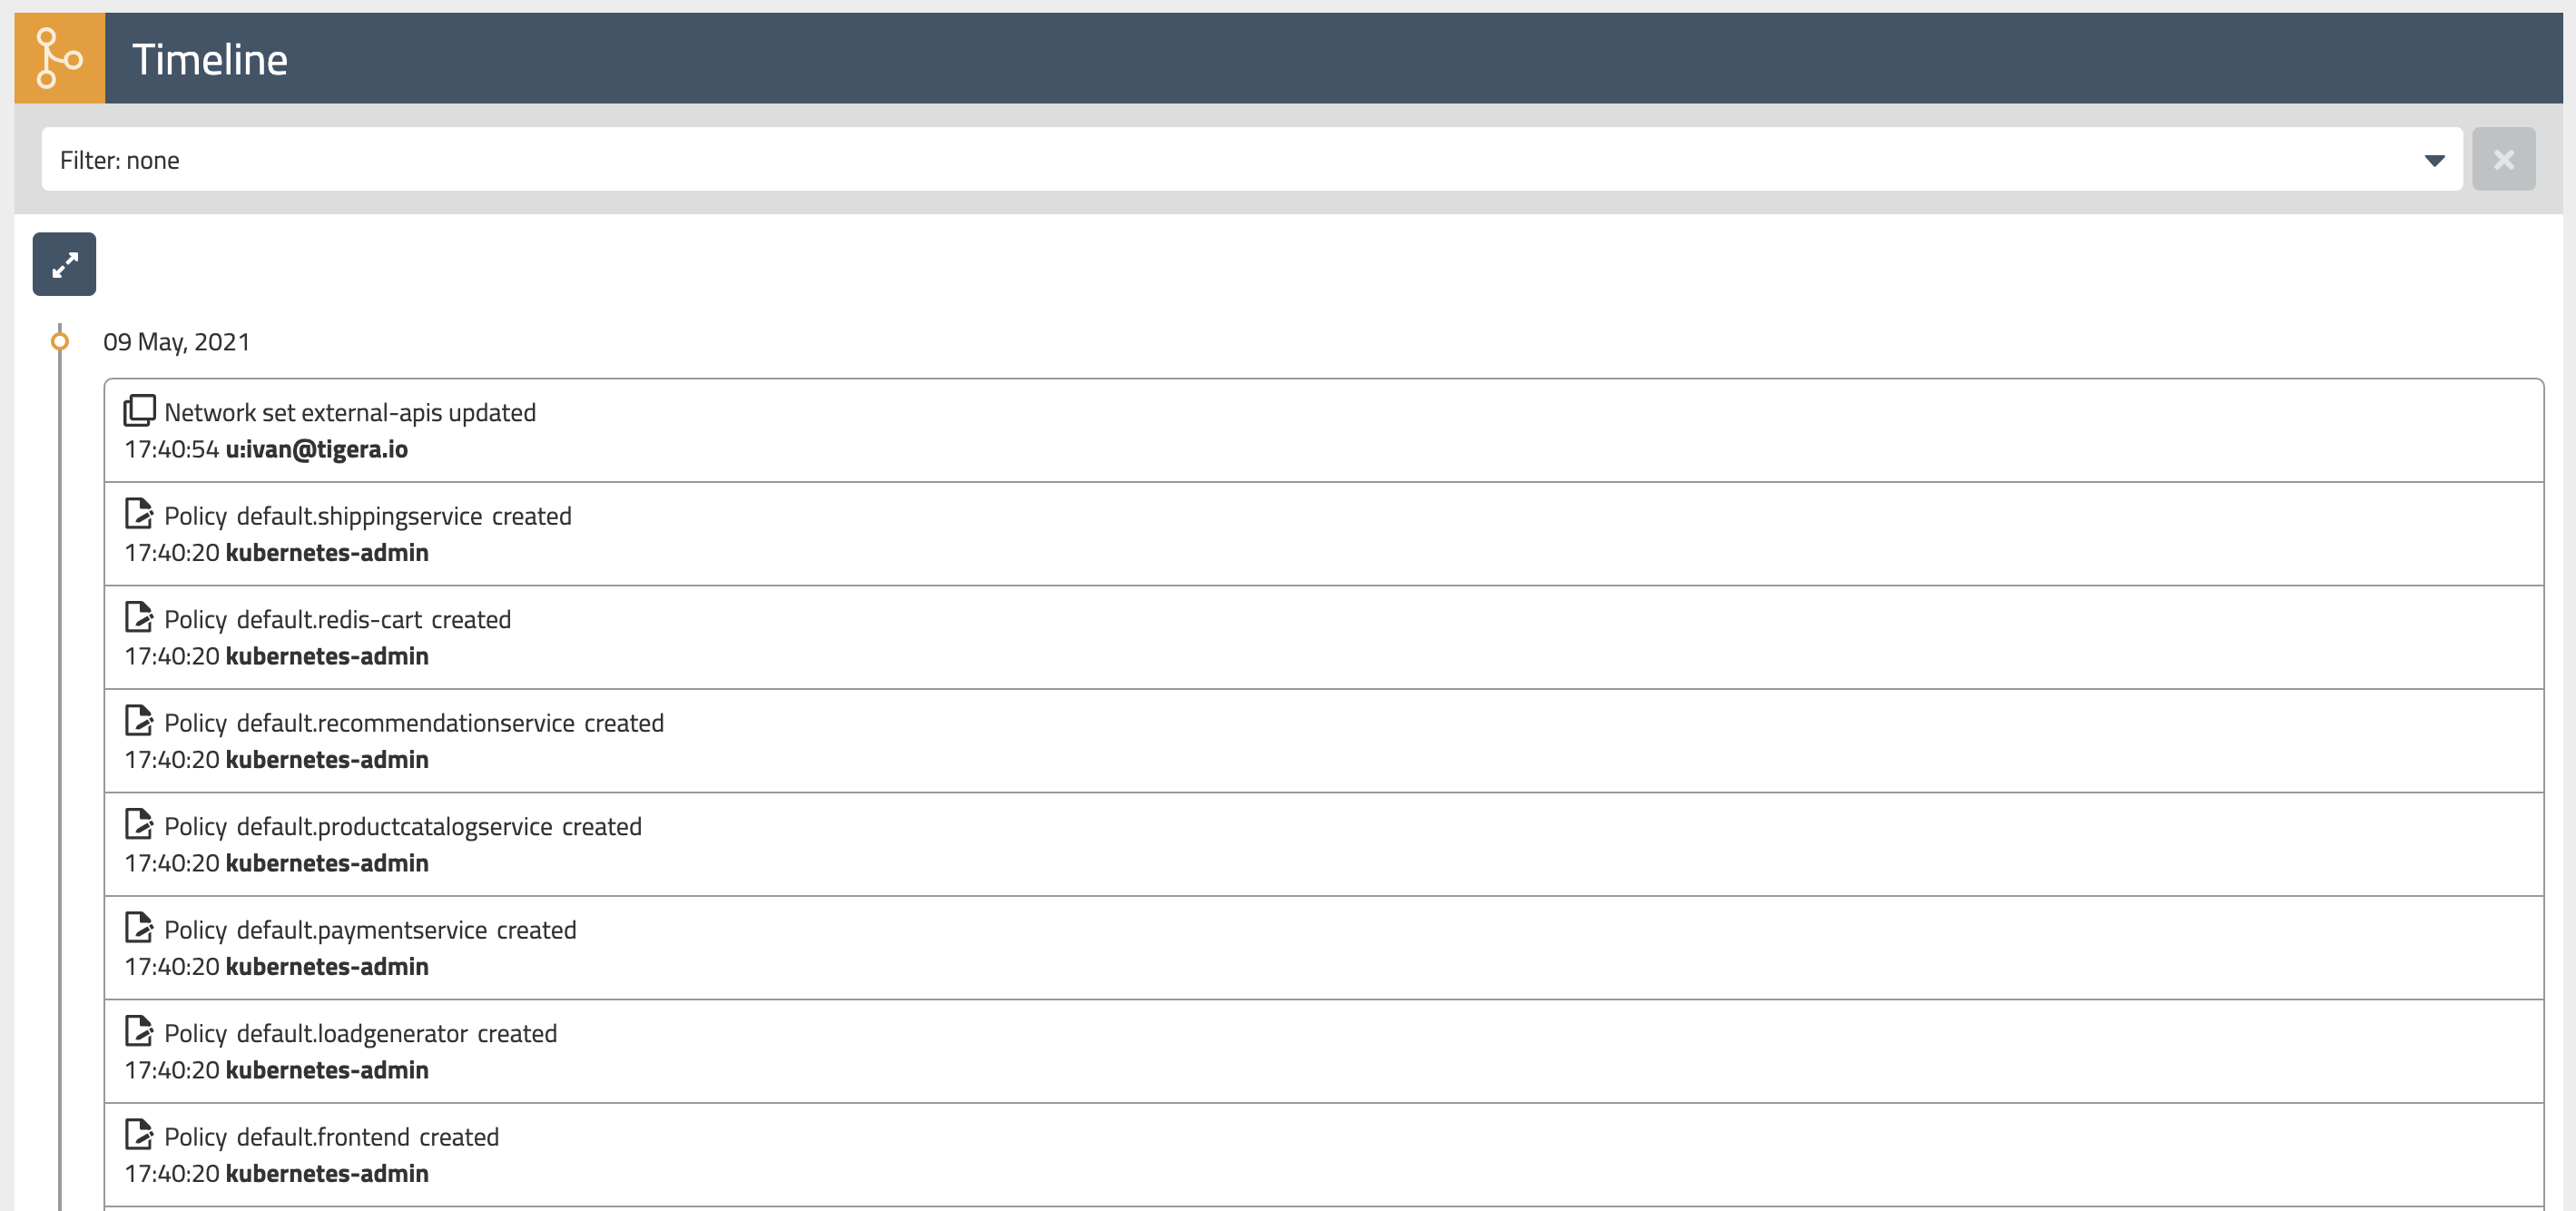
-
Endpoints
The
Endpointsview lists all endpoints known to Calico. It includes all Kubernetes endpoints, such as Pods, as well as Host endpoints that can represent a Kubernetes host or an external VM or bare metal machine.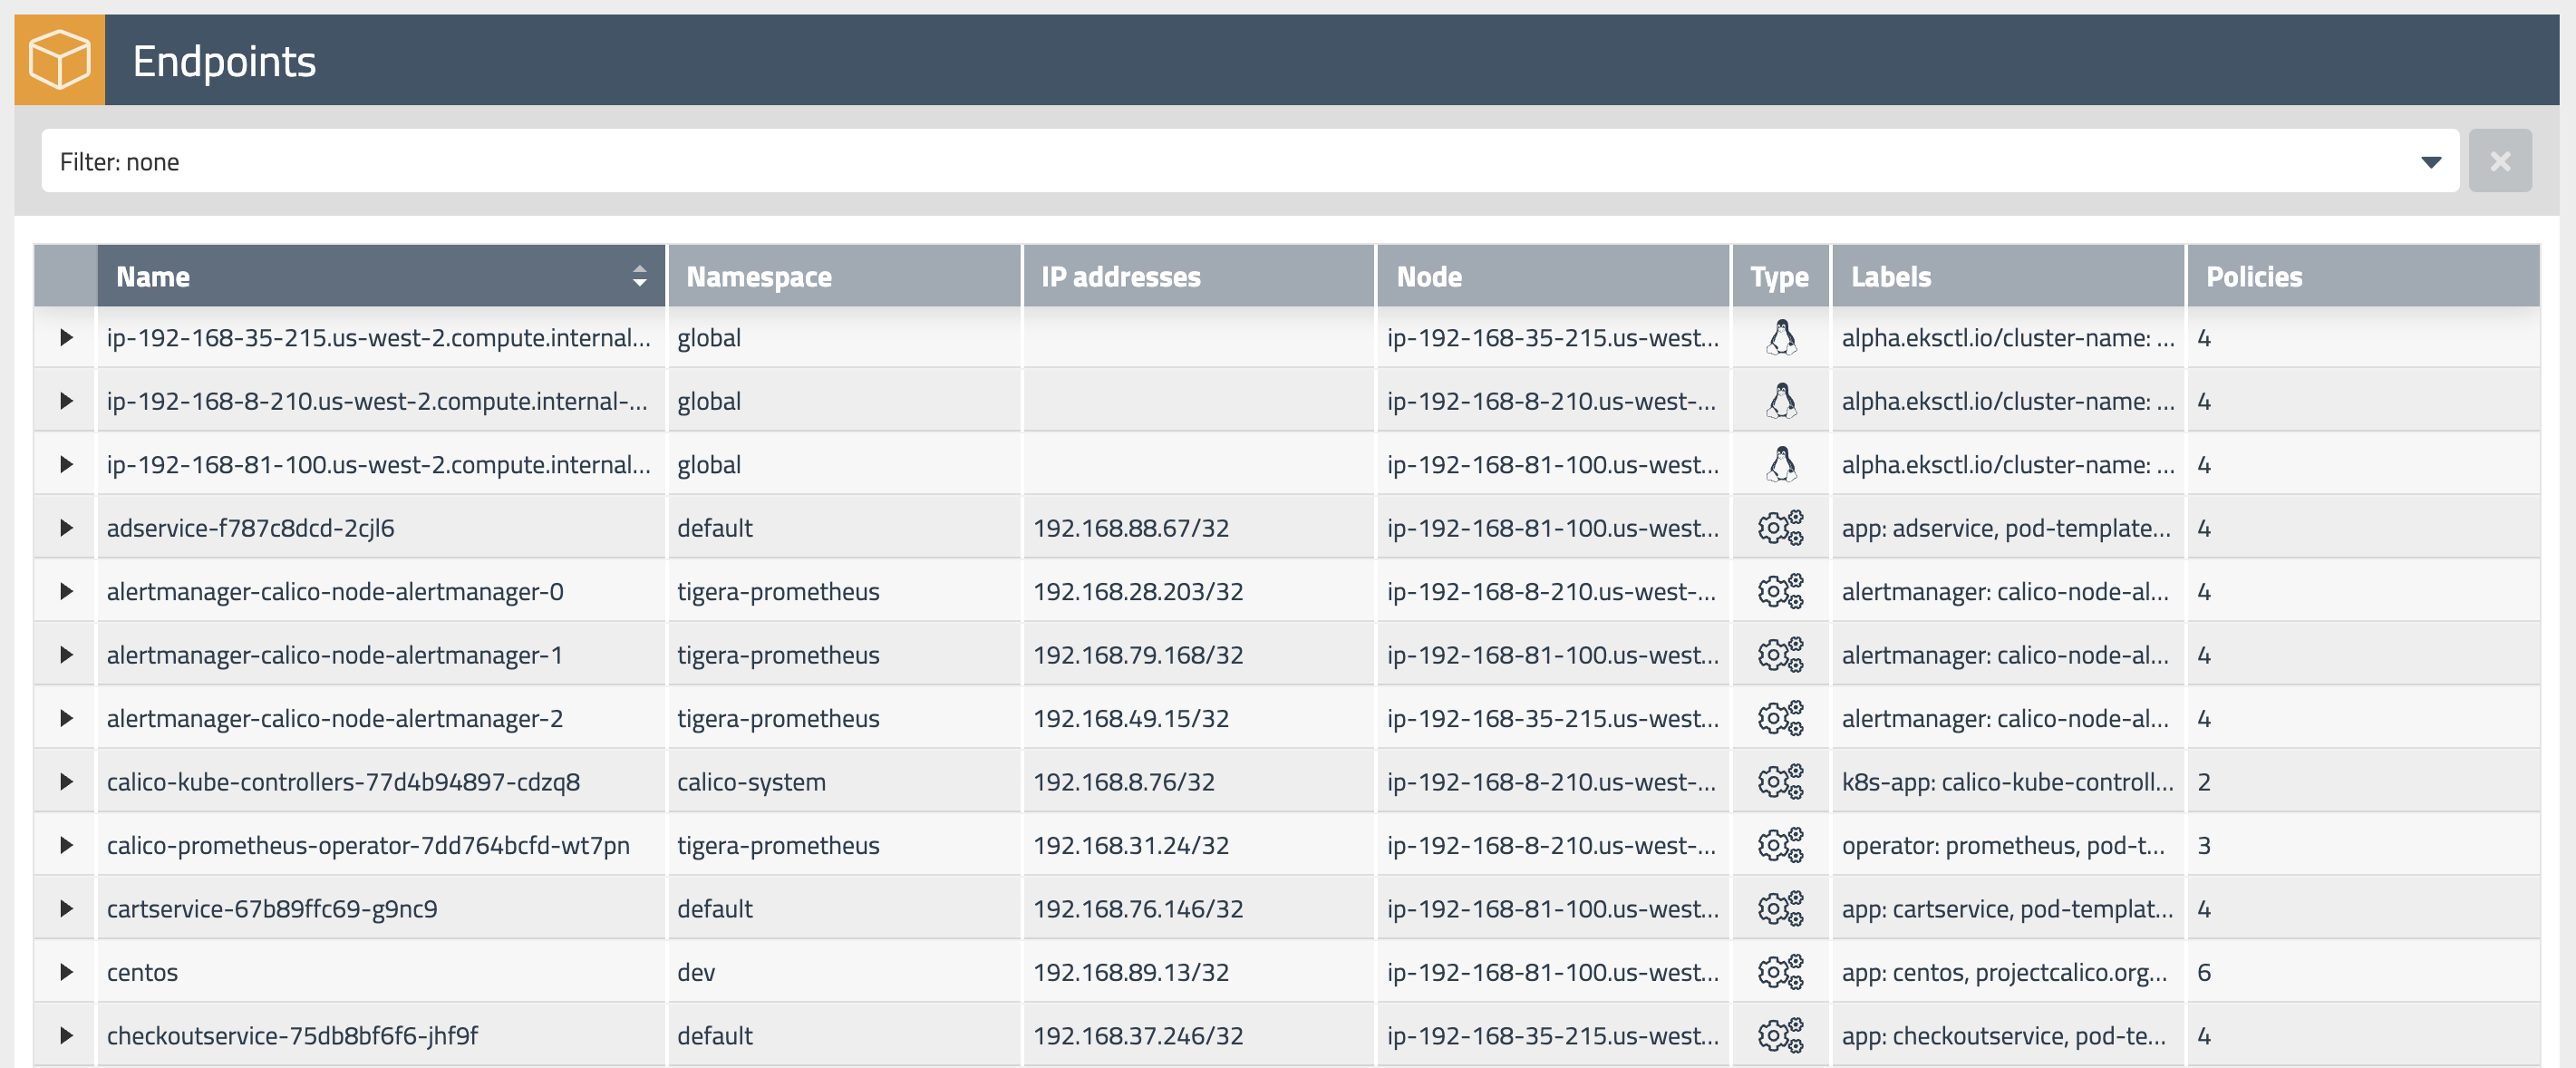
-
Service Graph
The dynamic
Service Graphpresents network flows from service level perspective. Top level view shows how traffic flows between namespaces as well as external and internal endpoints.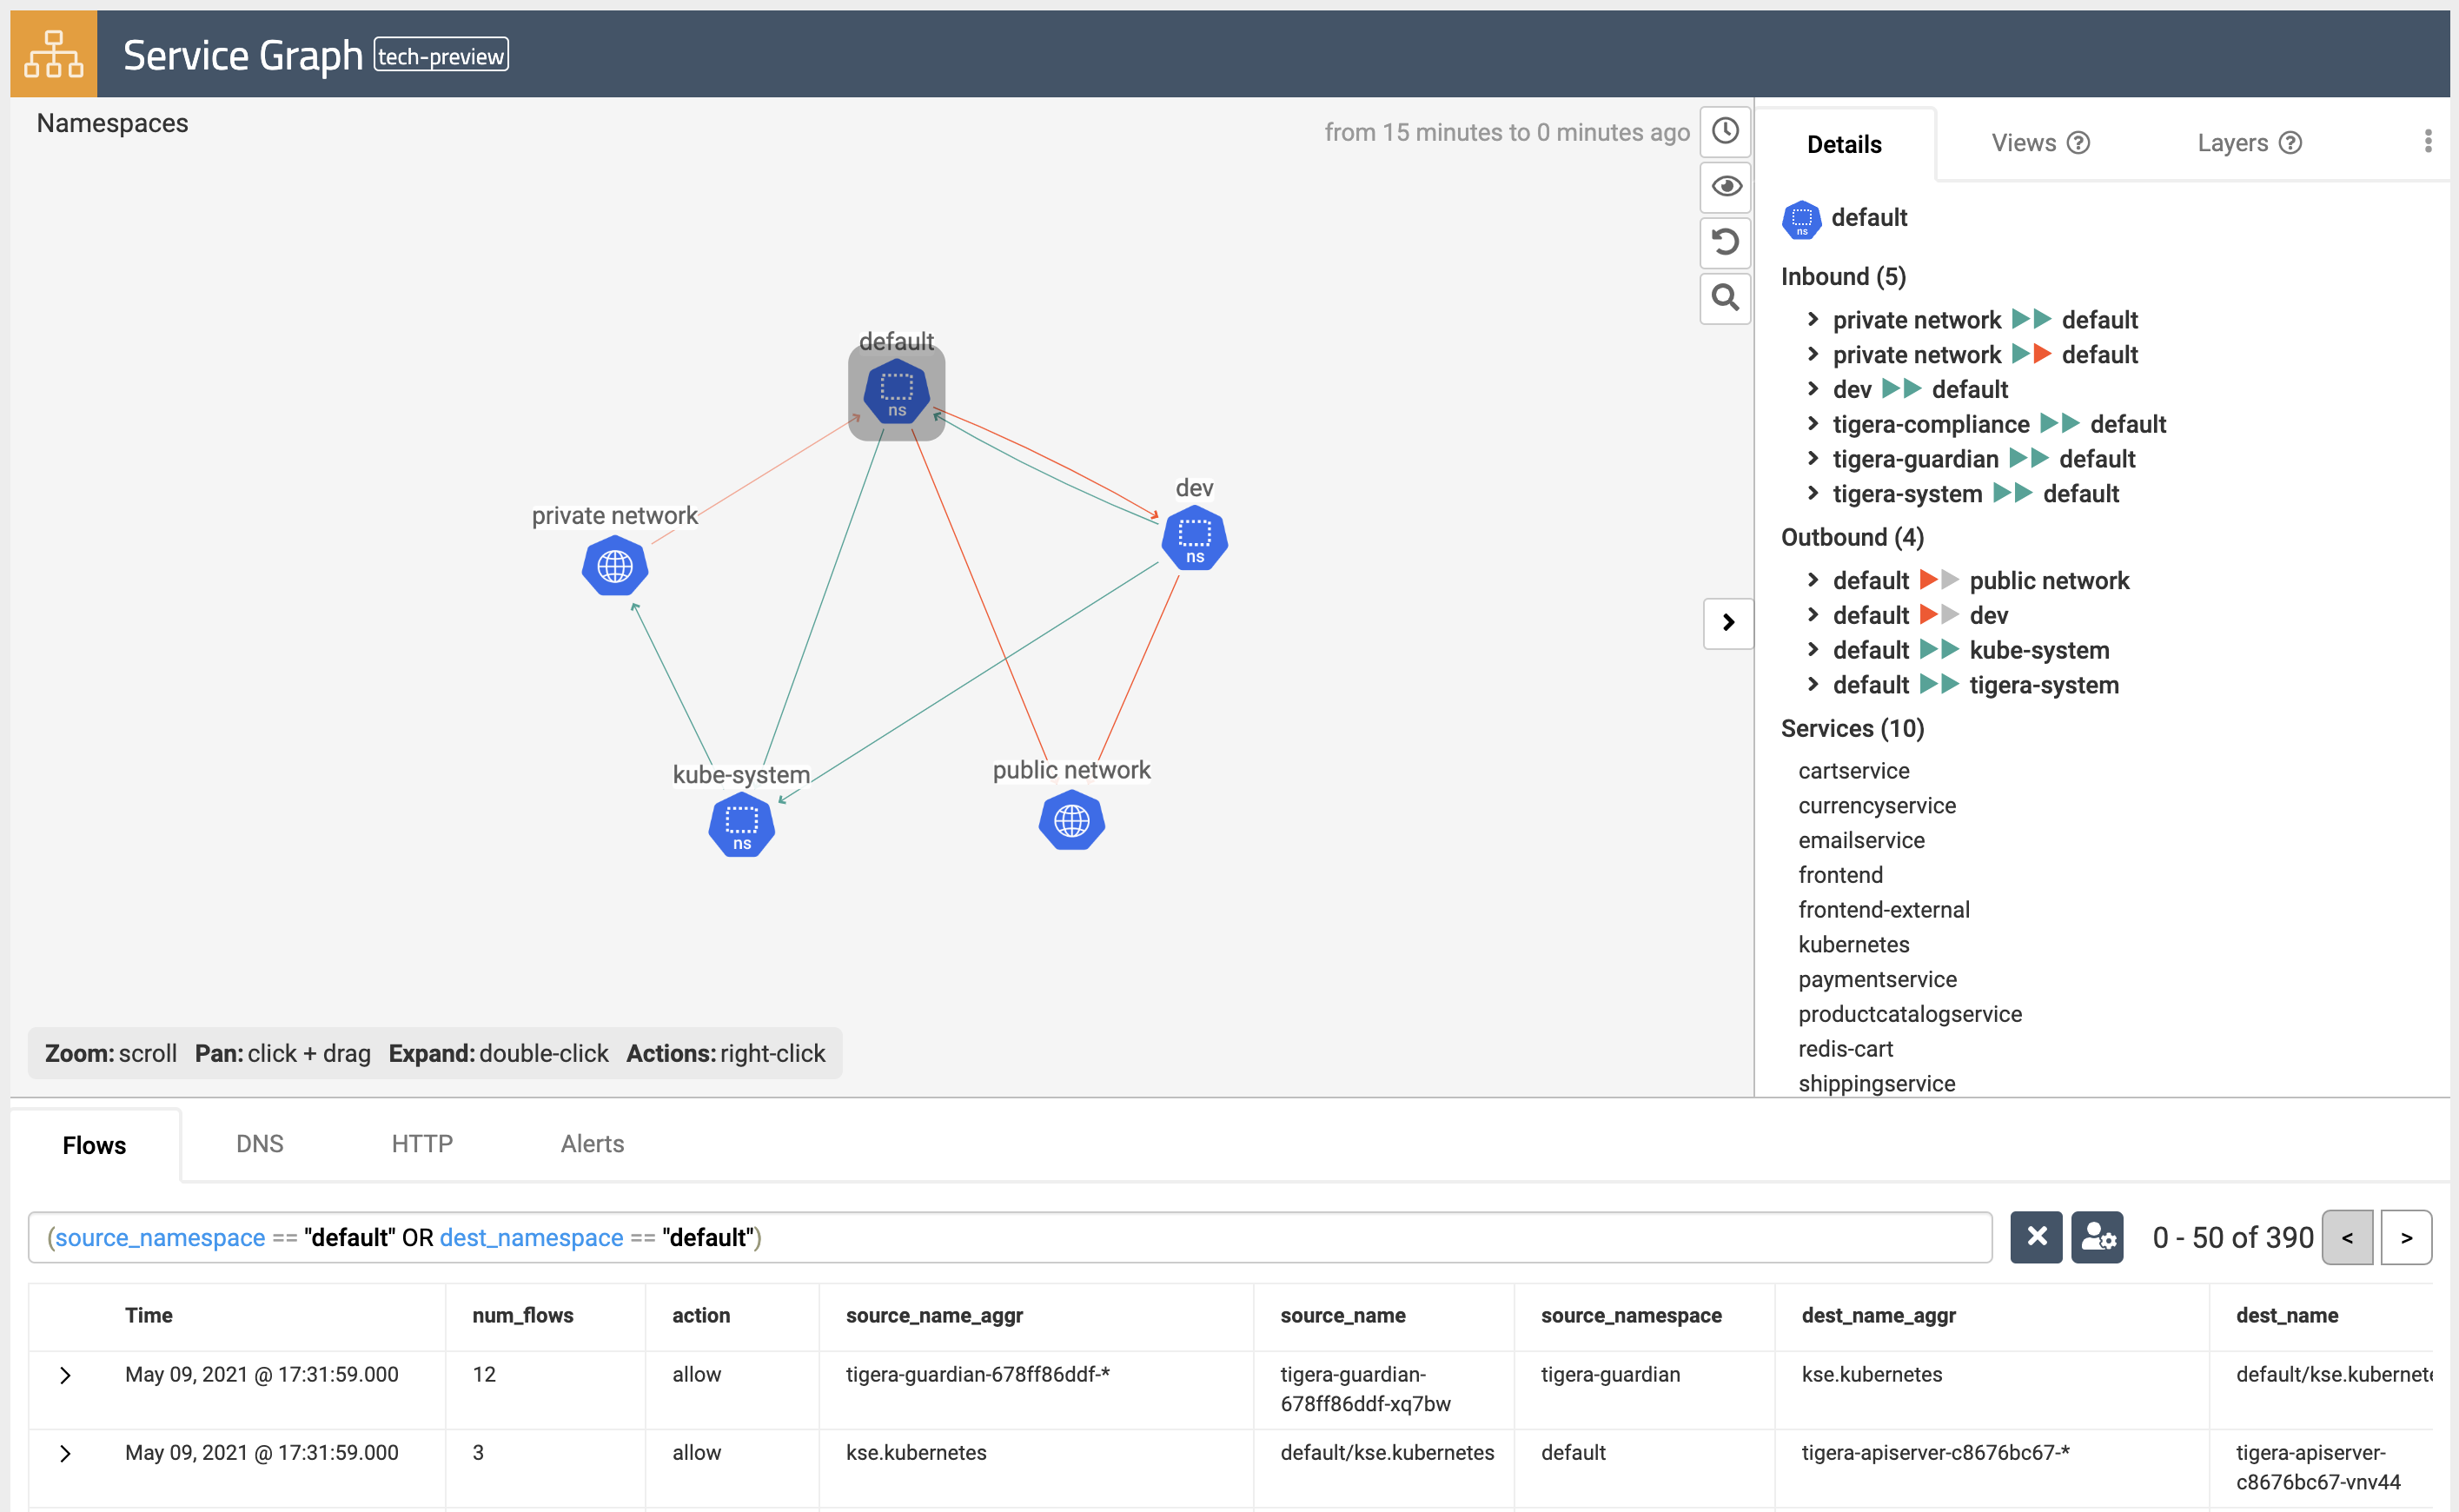
- When you select any node representing a namespace, you will get additional details about the namespace, such as incoming and outgoing traffic, policies evaluating each flow, and DNS metrics.
- When you select any edge, you will get details about the flows representing that edge.
- If you expand a namespace by double-clicking on it, you will get the view of all components of the namespace.
-
Flow Visualizations
The
Flow Visualizationsview shows all point-to-point flows in the cluster. It allows you to see the cluster traffic from the network point of view.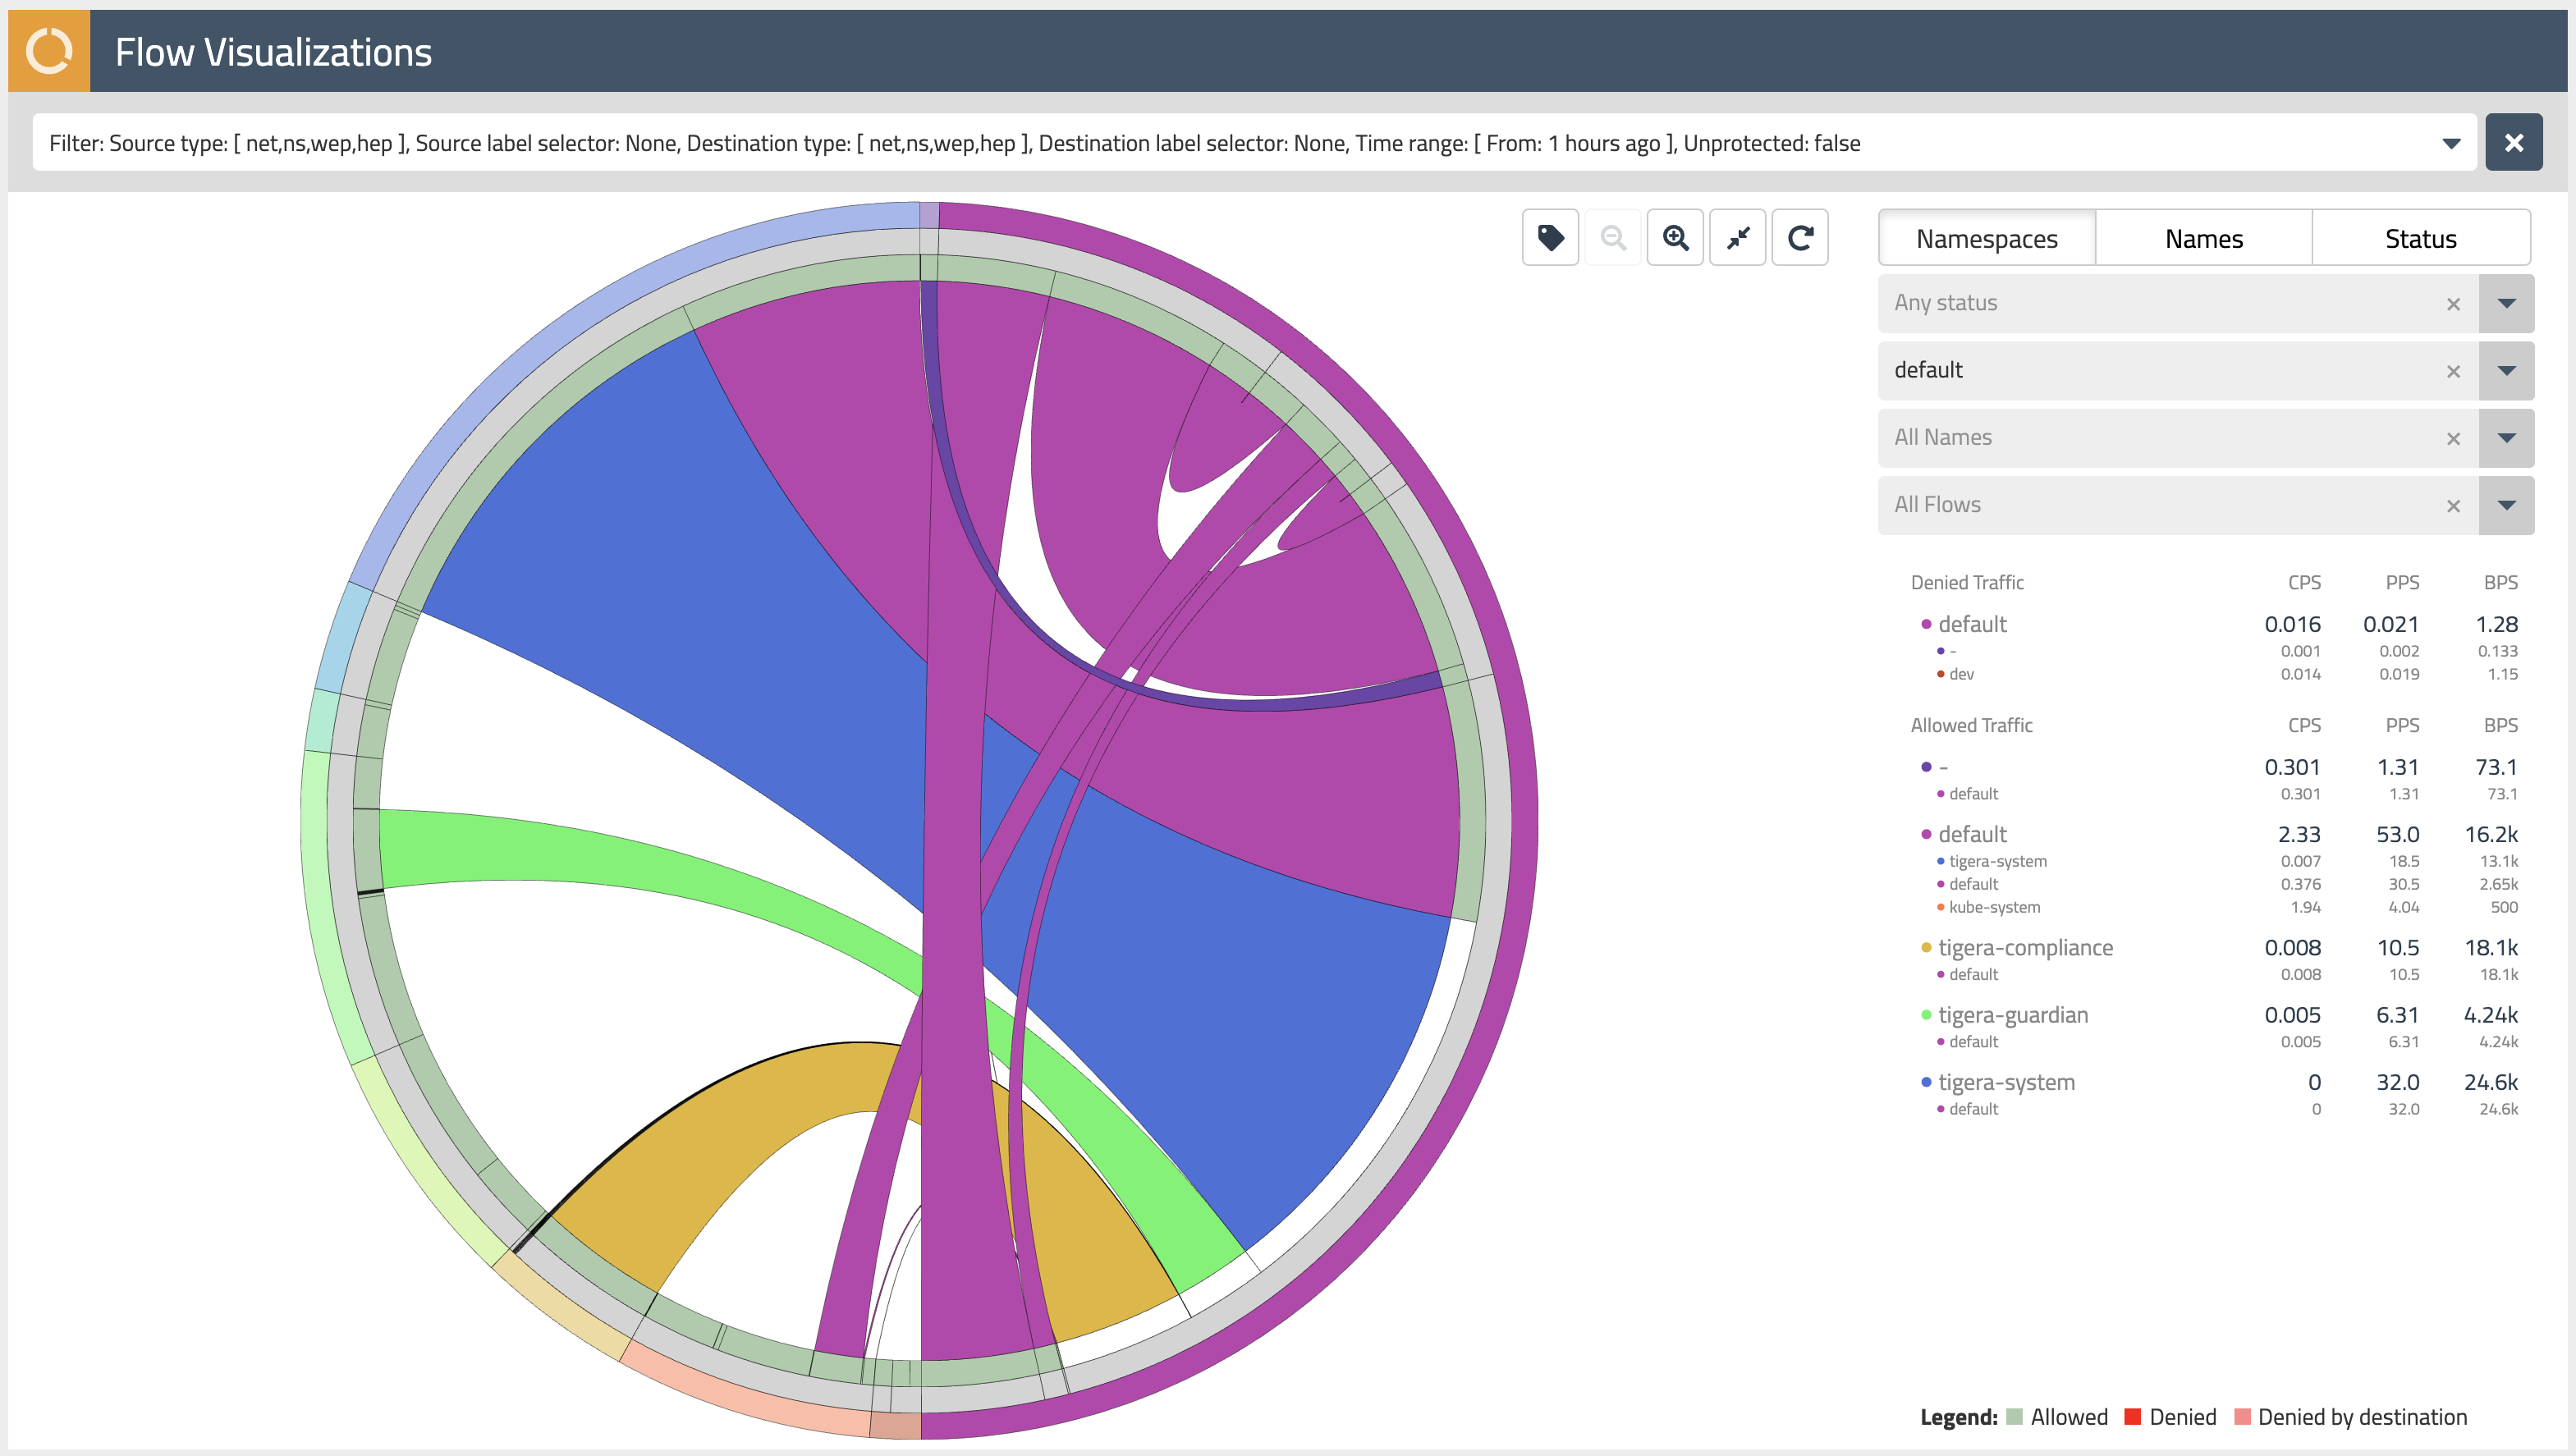
-
Kibana dashboards
The
Kibanacomponents comes with Calico commercial offerings and provides you access to raw flow, audit, and dns logs, as well as ability to visualize the collected data in various dashboards.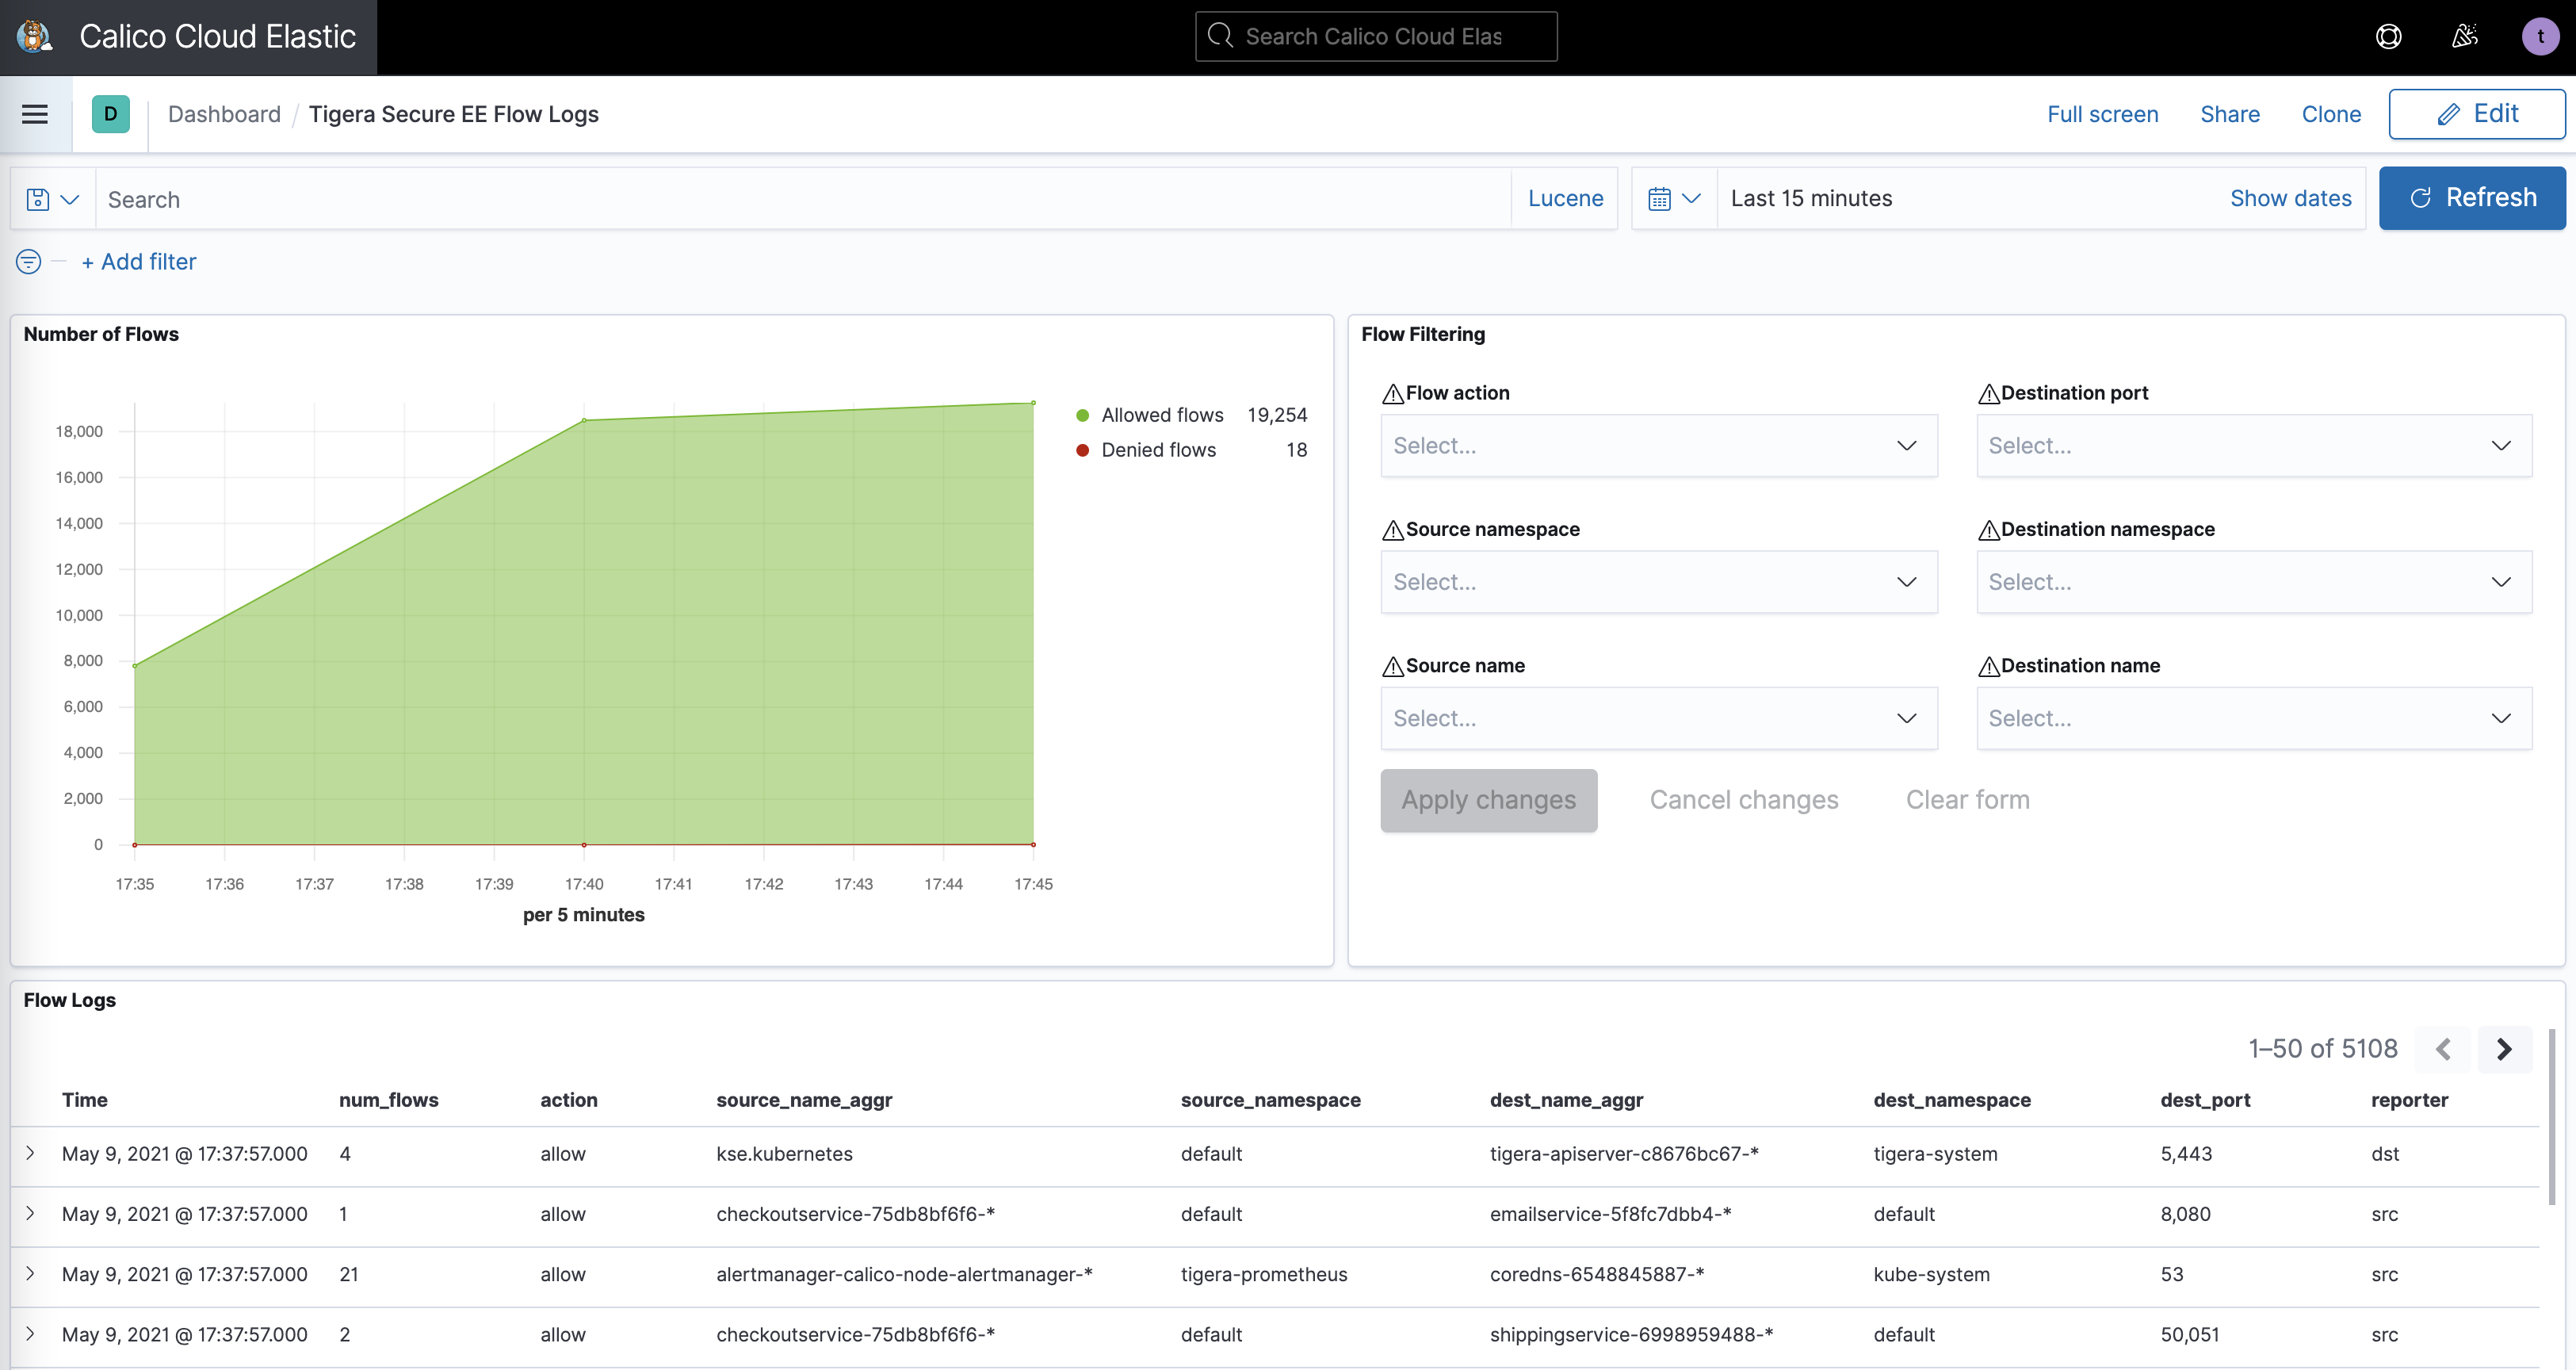


Some of the default dashboards you get access to are DNS Logs, Flow Logs, Audit Logs, Kuernetes API calls, L7 HTTP metrics, and others.
- Download this repo into your environment:
git clone https://github.com/JosephYostos/Hands-on-workshop-for-Kubernetes-observability.git - Configure log aggregation and flush intervals.
 kubectl patch felixconfiguration.p default -p '{"spec":{"flowLogsFlushInterval":"10s"}}'
 kubectl patch felixconfiguration.p default -p '{"spec":{"dnsLogsFlushInterval":"10s"}}'
kubectl patch felixconfiguration.p default -p '{"spec":{"flowLogsFileAggregationKindForAllowed":1}}'-
Configure Felix for log data collection.
Felix is one of Calico components that is responsible for configuring routes, ACLs, and anything else required on the host to provide desired connectivity for the endpoints on that host.
kubectl patch felixconfiguration default --type='merge' -p '{"spec":{"policySyncPathPrefix":"/var/run/nodeagent","l7LogsFileEnabled":true}}'- security and Kubernetes platform policies should be evaluated before any other policies.
- kubernetes platform team require an explicitly allow workloads to connect to kubernetes DNS component.
- online boutique microservices application to be deployed in default namespace & dev application to be deployed in dev namespace.
-
Deploy policy tiers.
We are going to deploy some policies into policy tier to take advantage of hierarcical policy management.
kubectl apply -f demo/tiers/tiers.yaml
This will add tiers
securityandplatformto the Calico cluster. -
Deploy base policy.
In order to explicitly allow workloads to connect to the Kubernetes DNS component, we are going to implement a policy that controls such traffic.
kubectl apply -f demo/10-security-controls/allow-kube-dns.yaml
-
Deploy applications.
# deploy dev app stack
kubectl apply -f demo/dev/app.manifests.yaml

# deploy boutiqueshop app stack
kubectl apply -f https://raw.githubusercontent.com/GoogleCloudPlatform/microservices-demo/master/release/kubernetes-manifests.yaml
-
Deploy global alerts.
The alerts will be explored in a later lab.
kubectl apply -f demo/50-alerts/globalnetworkset.changed.yaml
kubectl apply -f demo/50-alerts/unsanctioned.dns.access.yaml
kubectl apply -f demo/50-alerts/unsanctioned.lateral.access.yaml
L7 logs capture application interactions from HTTP header data in requests. Data shows what is actually sent in communications between specific pods, providing more specificity than flow logs. (Flow logs capture data only from connections for workload interactions).
Calico collects L7 logs by sending the selected traffic through an Envoy proxy.
- Enable L7 logging on frontend deployment in default ns and dev-nginx in dev ns.
-
create a Kubernetes pull secret for accessing Calico images, this should be provided by Tigera Team
kubectl create secret generic tigera-pull-secret -n <application pod namespace> --from-file=.dockerconfigjson=<path/to/pull/secret> --type kubernetes.io/dockerconfigjson
-
Download the patch file to patch-envoy.yaml.
curl https://docs.tigera.io/v3.7/manifests/l7/patch-envoy.yaml -O
-
Download the Envoy config.
curl https://docs.tigera.io/v3.7/manifests/l7/envoy-config.yaml -O
-
Create the Envoy config.
kubectl create configmap envoy-config -n <application pod namespace> --from-file=envoy-config.yaml
-
Configure Felix for log data collection.
kubectl patch felixconfiguration default --type='merge' -p '{"spec":{"policySyncPathPrefix":"/var/run/nodeagent"}}'
-
Install the envoy log collector
kubectl patch deployment <name of application deployment> -n <namespace> --patch "$(cat patch-envoy.yaml)"
After completeing module 3 some traffic should be generated, go check the "L7 HTTP" dashboard in Kibana also the HTTP logs under the service graph section.


Goal: Leverage network policies to segment connections within Kubernetes cluster and prevent known bad actors from accessing the workloads.
- Security Team require applying rule to disable all traffic by default.
- DevOps team provided their application traffic reqirements and only connections between the components within each namespaces should be allowed as configured by the policies.
-
Test connectivity between application components and across application stacks.
a. Test connectivity between workloads within each namespace.
kubectl -n dev exec -t centos -- sh -c 'curl -m3 -sI http://nginx-svc 2>/dev/null | grep -i http'

kubectl exec -it $(kubectl get po -l app=loadgenerator -ojsonpath='{.items[0].metadata.name}') -- sh -c 'curl -m3 -sI frontend 2>/dev/null | grep -i http'

kubectl exec -it $(kubectl get po -l app=frontend -ojsonpath='{.items[0].metadata.name}') -c server -- sh -c 'nc -zv productcatalogservice 3550'
b. Test connectivity across namespaces.
kubectl -n dev exec -t centos -- sh -c 'curl -m3 -sI http://frontend.default 2>/dev/null | grep -i http'
kubectl exec -it $(kubectl get po -l app=loadgenerator -ojsonpath='{.items[0].metadata.name}') -- sh -c 'curl -m3 -sI http://nginx-svc.dev 2>/dev/null | grep -i http'
c. Test connectivity from each namespace to the Internet.
# test connectivity from dev namespace to the Internet
kubectl -n dev exec -t centos -- sh -c 'curl -m3 -sI http://www.google.com 2>/dev/null | grep -i http'

# test connectivity from default namespace to the Internet
kubectl exec -it $(kubectl get po -l app=loadgenerator -ojsonpath='{.items[0].metadata.name}') -- sh -c 'curl -m3 -sI www.google.com 2>/dev/null | grep -i http'
All of these tests should succeed if there are no policies in place to govern the traffic for
devanddefaultnamespaces. -
Apply staged
default-denypolicy.Staged
default-denypolicy is a good way of catching any traffic that is not explicitly allowed by a policy without explicitly blocking it.kubectl apply -f demo/10-security-controls/staged.default-deny.yaml
You should be able to view the potential affect of the staged
default-denypolicy if you navigate to theDashboardview in the Enterprise Manager UI and look at thePackets by Policyhistogram.# make a request across namespaces and view Packets by Policy histogram for i in {1..10}; do kubectl -n dev exec -t centos -- sh -c 'curl -m3 -sI http://frontend.default 2>/dev/null | grep -i http'; sleep 2; done
The staged policy does not affect the traffic directly but allows you to view the policy impact if it were to be enforced.
-
Apply network policies to control East-West traffic.
# deploy dev policies
kubectl apply -f demo/dev/policies.yaml

# deploy boutiqueshop policies
kubectl apply -f demo/boutiqueshop/policies.yaml
Now as we have proper policies in place, we can enforce
default-denypolicy moving closer to zero-trust security approach. You can either enforced the already deployed stageddefault-denypolicy using thePolicies Boardview in the Enterirpse Manager UI, or you can apply an enforcingdefault-denypolicy manifest.# apply enforcing default-deny policy manifest kubectl apply -f demo/10-security-controls/default-deny.yaml # you can delete staged default-deny policy kubectl delete -f demo/10-security-controls/staged.default-deny.yaml
-
Test connectivity with policies in place.
a. The only connections between the components within each namespaces should be allowed as configured by the policies.
# test connectivity within dev namespace
kubectl -n dev exec -t centos -- sh -c 'curl -m3 -sI http://nginx-svc 2>/dev/null | grep -i http'

# test connectivity within default namespace
kubectl exec -it $(kubectl get po -l app=loadgenerator -ojsonpath='{.items[0].metadata.name}') -- sh -c 'curl -m3 -sI frontend 2>/dev/null | grep -i http'
b. The connections across
devanddefaultnamespaces should be blocked by the globaldefault-denypolicy.# test connectivity from dev namespace to default namespace kubectl -n dev exec -t centos -- sh -c 'curl -m3 -sI http://frontend.default 2>/dev/null | grep -i http' # test connectivity from default namespace to dev namespace kubectl exec -it $(kubectl get po -l app=loadgenerator -ojsonpath='{.items[0].metadata.name}') -- sh -c 'curl -m3 -sI http://nginx-svc.dev 2>/dev/null | grep -i http'
c. The connections to the Internet should be blocked by the configured policies.
# test connectivity from dev namespace to the Internet
kubectl -n dev exec -t centos -- sh -c 'curl -m3 -sI http://www.google.com 2>/dev/null | grep -i http'

# test connectivity from default namespace to the Internet
kubectl exec -it $(kubectl get po -l app=loadgenerator -ojsonpath='{.items[0].metadata.name}') -- sh -c 'curl -m3 -sI www.google.com 2>/dev/null | grep -i http'
Goal: Use global alerts to notify security and operations teams about unsanctioned or suspicious activity.
- Some alerts have been triggered. Examine these alerts and identify what suspicious activity led to this.
-
View triggered alerts.
We implemented alerts in one of the first labs in order to see how our activity can trigger them.
Open
Alertsview to see all triggered alerts in the cluster. Review the generated alerts.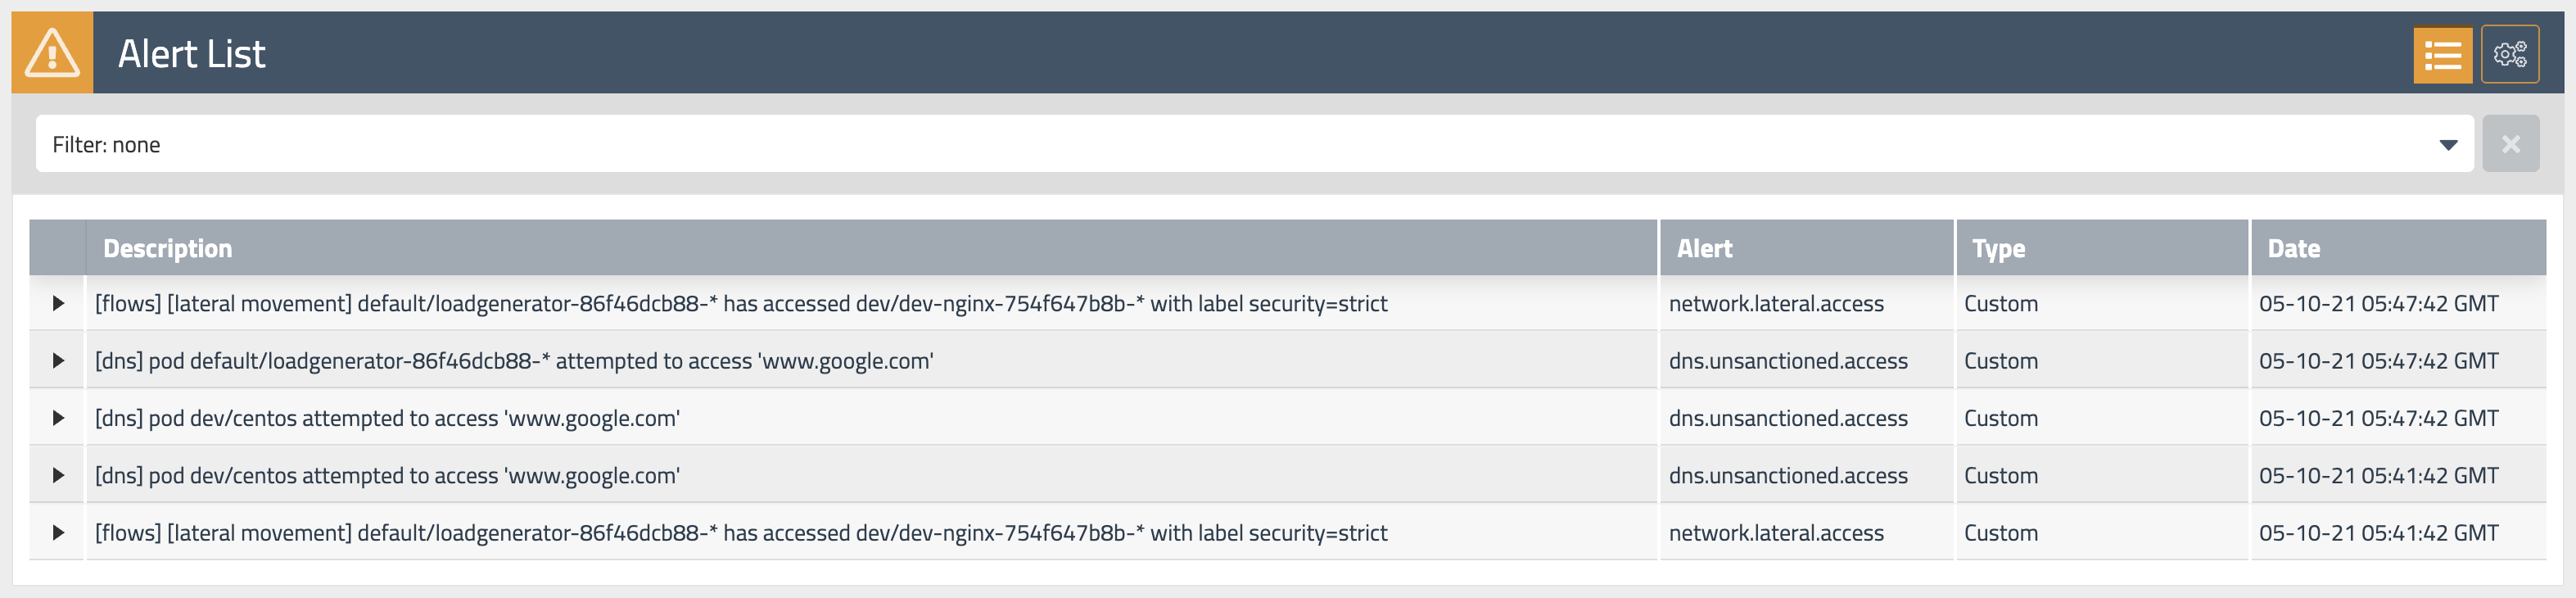
You can also review the alerts configuration and templates by navigating to alerts configuration in the top right corner.
-
Review alerts manifests.
Navigate to
demo/50-alertsand review YAML manifests that represent alerts definitions. Each file containes an alert template and alert definition. Alerts templates can be used to quickly create an alert definition in the UI.

- Dev team raised a request to allow traffic between dev and default namspaces as they are developing a new service to integrate with the boutiqueshop app, use flow visualization to identify which pods are trying to talk to each other.
- it is also requested to allow centos pod to access api.twilio.com externally.
-
Test connectivity within the cluster and to the external endpoint.
a. Test connectivity between
dev/centospod anddefault/frontendpod.# test connectivity from dev namespace to default namespace for i in {1..10}; do kubectl -n dev exec -t centos -- sh -c 'curl -m3 -sI http://frontend.default 2>/dev/null | grep -i http'; sleep 2; done
b. Test connectivity from
dev/centosto the external endpoint.# test connectivity from dev namespace to the Internet kubectl -n dev exec -t centos -- sh -c 'curl -m3 -sI http://www.google.com 2>/dev/null | grep -i http'
The access should be denied as the policies configured in previous module do not allow it.
-
Navigate in the flow visualizations chart to find out the source and destinations pods, also you can use policy recommendations to create the new policies.

-
Implement egress policy to allow egress access from a workload in one namespace, e.g.
dev/centos, to a service in another namespace, e.g.default/frontend.a. Deploy egress policy.
kubectl apply -f demo/20-egress-access-controls/centos-to-frontend.yaml
b. Test connectivity between
dev/centospod anddefault/frontendservice.kubectl -n dev exec -t centos -- sh -c 'curl -m3 -sI http://frontend.default 2>/dev/null | grep -i http'
The access should be allowed once the egress policy is in place.
-
Implement DNS policy to allow the external endpoint access from a specific workload, e.g.
dev/centos.a. Apply a policy to allow access to
api.twilio.comendpoint using DNS rule.# deploy dns policy kubectl apply -f demo/20-egress-access-controls/dns-policy.yaml # test egress access to api.twilio.com kubectl -n dev exec -t centos -- sh -c 'curl -m3 -skI https://api.twilio.com 2>/dev/null | grep -i http' # test egress access to www.google.com kubectl -n dev exec -t centos -- sh -c 'curl -m3 -skI https://www.google.com 2>/dev/null | grep -i http'
Access to the
api.twilio.comendpoint should be allowed by the DNS policy but not to any other external endpoints likewww.google.comunless we modify the policy to include that domain name.b. Edit the policy to use a
NetworkSetinstead of inline DNS rule.# deploy network set kubectl apply -f demo/20-egress-access-controls/netset.external-apis.yaml # deploy DNS policy using the network set kubectl apply -f demo/20-egress-access-controls/dns-policy.netset.yaml
As a bonus example, you can modify the
external-apisnetwork set to include*.google.comdomain name which would allow access to Google subdomains. If you do it, you can would allow acess to subdomains likewww.google.com,docs.google.com, etc.
Goal: Configure packet capture for specific pods and review captured payload.
-
Configure packet capture.
Navigate to
demo/60-packet-captureand review YAML manifests that represent packet capture definition. Each packet capture is configured by deploing aPacketCaptureresource that targets endpoints usingselectorandlabels.Deploy packet capture definition to capture packets for
dev/nginxpods.kubectl apply -f demo/60-packet-capture/nginx-pcap.yaml
Once the
PacketCaptureresource is deployed, Calico starts capturing packets for all endpoints configured in theselectorfield. -
Install
calicoctlCLIThe easiest way to retrieve captured
*.pcapfiles is to use calicoctl CLI.# download and configure calicoctl curl -o calicoctl -O -L https://docs.tigera.io/download/binaries/v3.7.0/calicoctl chmod +x calicoctl sudo mv calicoctl /usr/local/bin/ calicoctl version -
Fetch and review captured payload.
The captured
*.pcapfiles are stored on the hosts where pods are running at the time thePacketCaptureresource is active.Retrieve captured
*.pcapfiles and review the content.# get pcap files calicoctl captured-packets copy dev-capture-nginx --namespace dev ls dev-nginx* # view *.pcap content tcpdump -Xr dev-nginx-XXXXXX.pcap
-
Stop packet capture
Stop packet capture by removing the
PacketCaptureresource.kubectl delete -f demo/60-packet-capture/nginx-pcap.yaml
Congratulations! You have finished all the labs in the workshop.