Obsei is a low code AI powered automation tool. It can be used in various business flows like social listening, AI based alerting, brand image analysis, comparative study and more .
Note: Obsei is still in alpha stage hence carefully use it in Production. Also as it is constantly undergoing development hence master branch may contains many breaking changes. Please use released version.
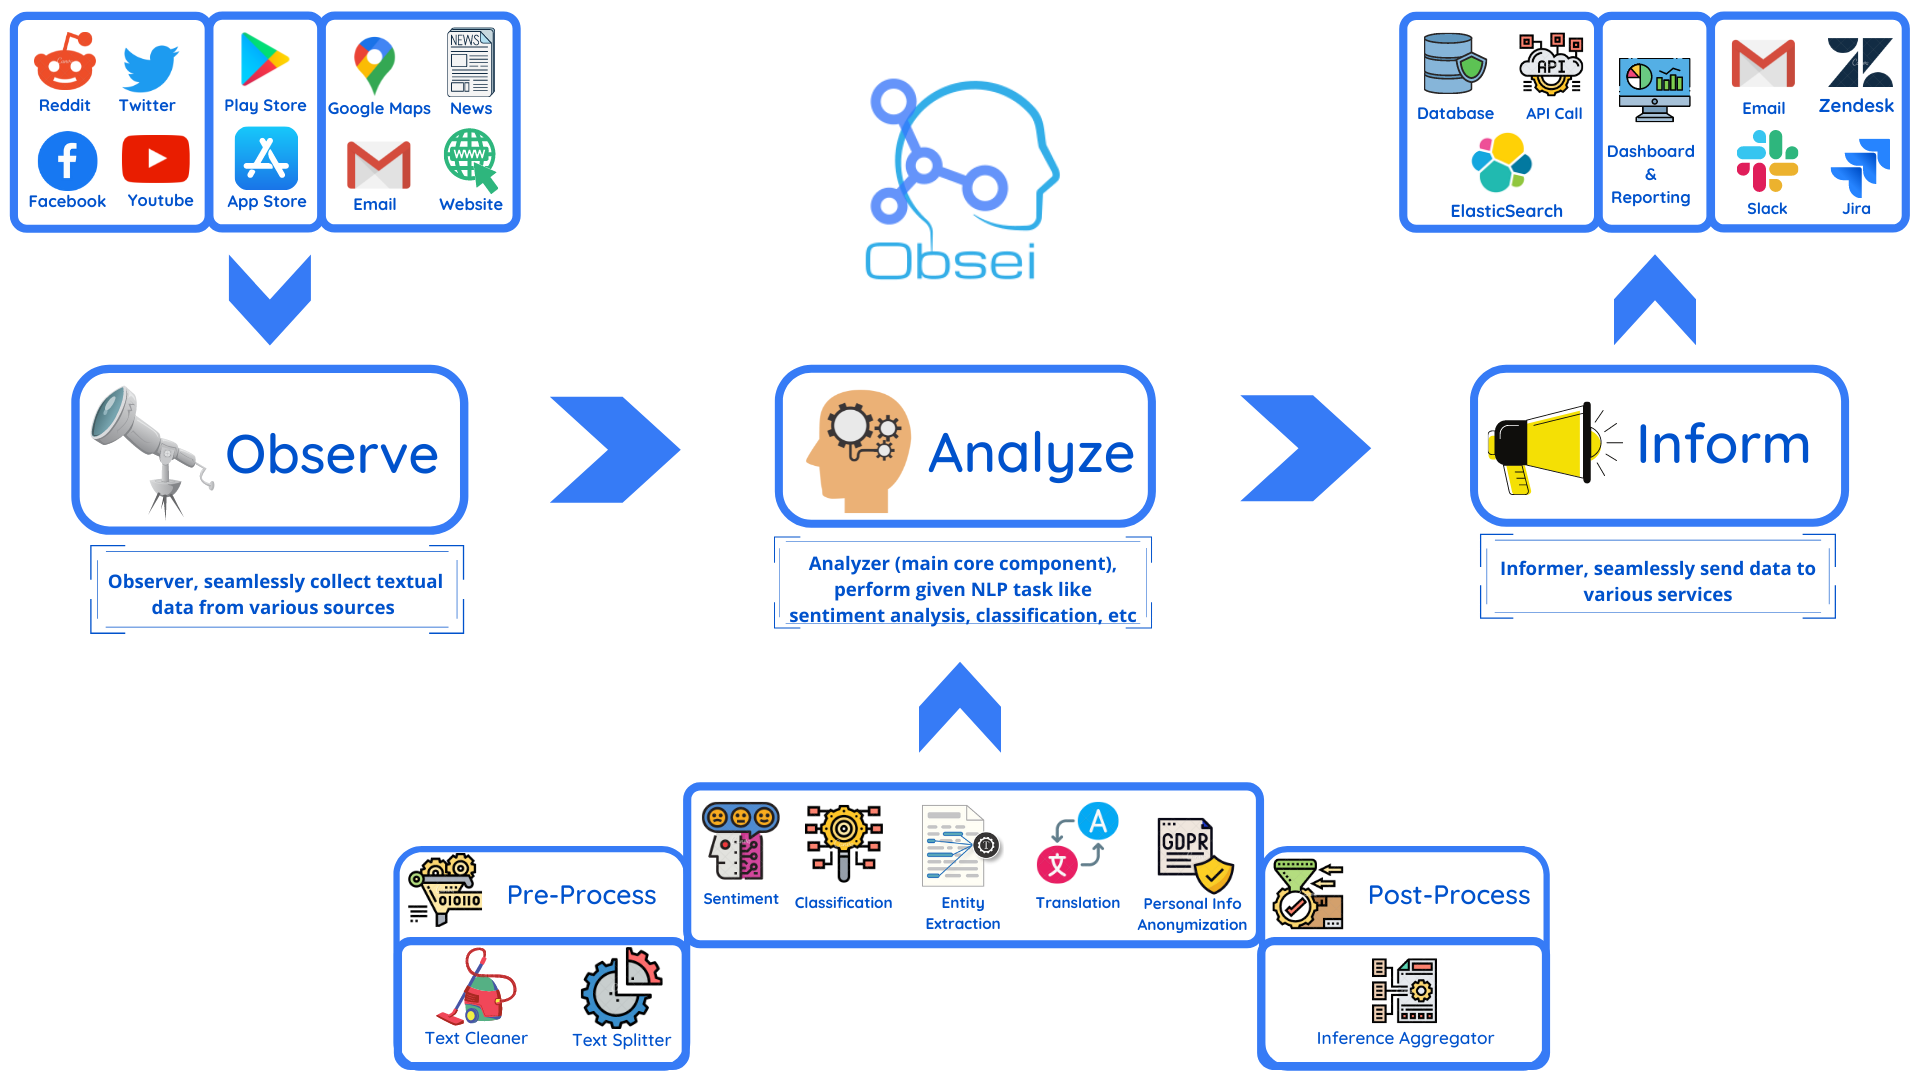
Obsei is an open-source low-code AI powered automation tool. Obsei consist of -
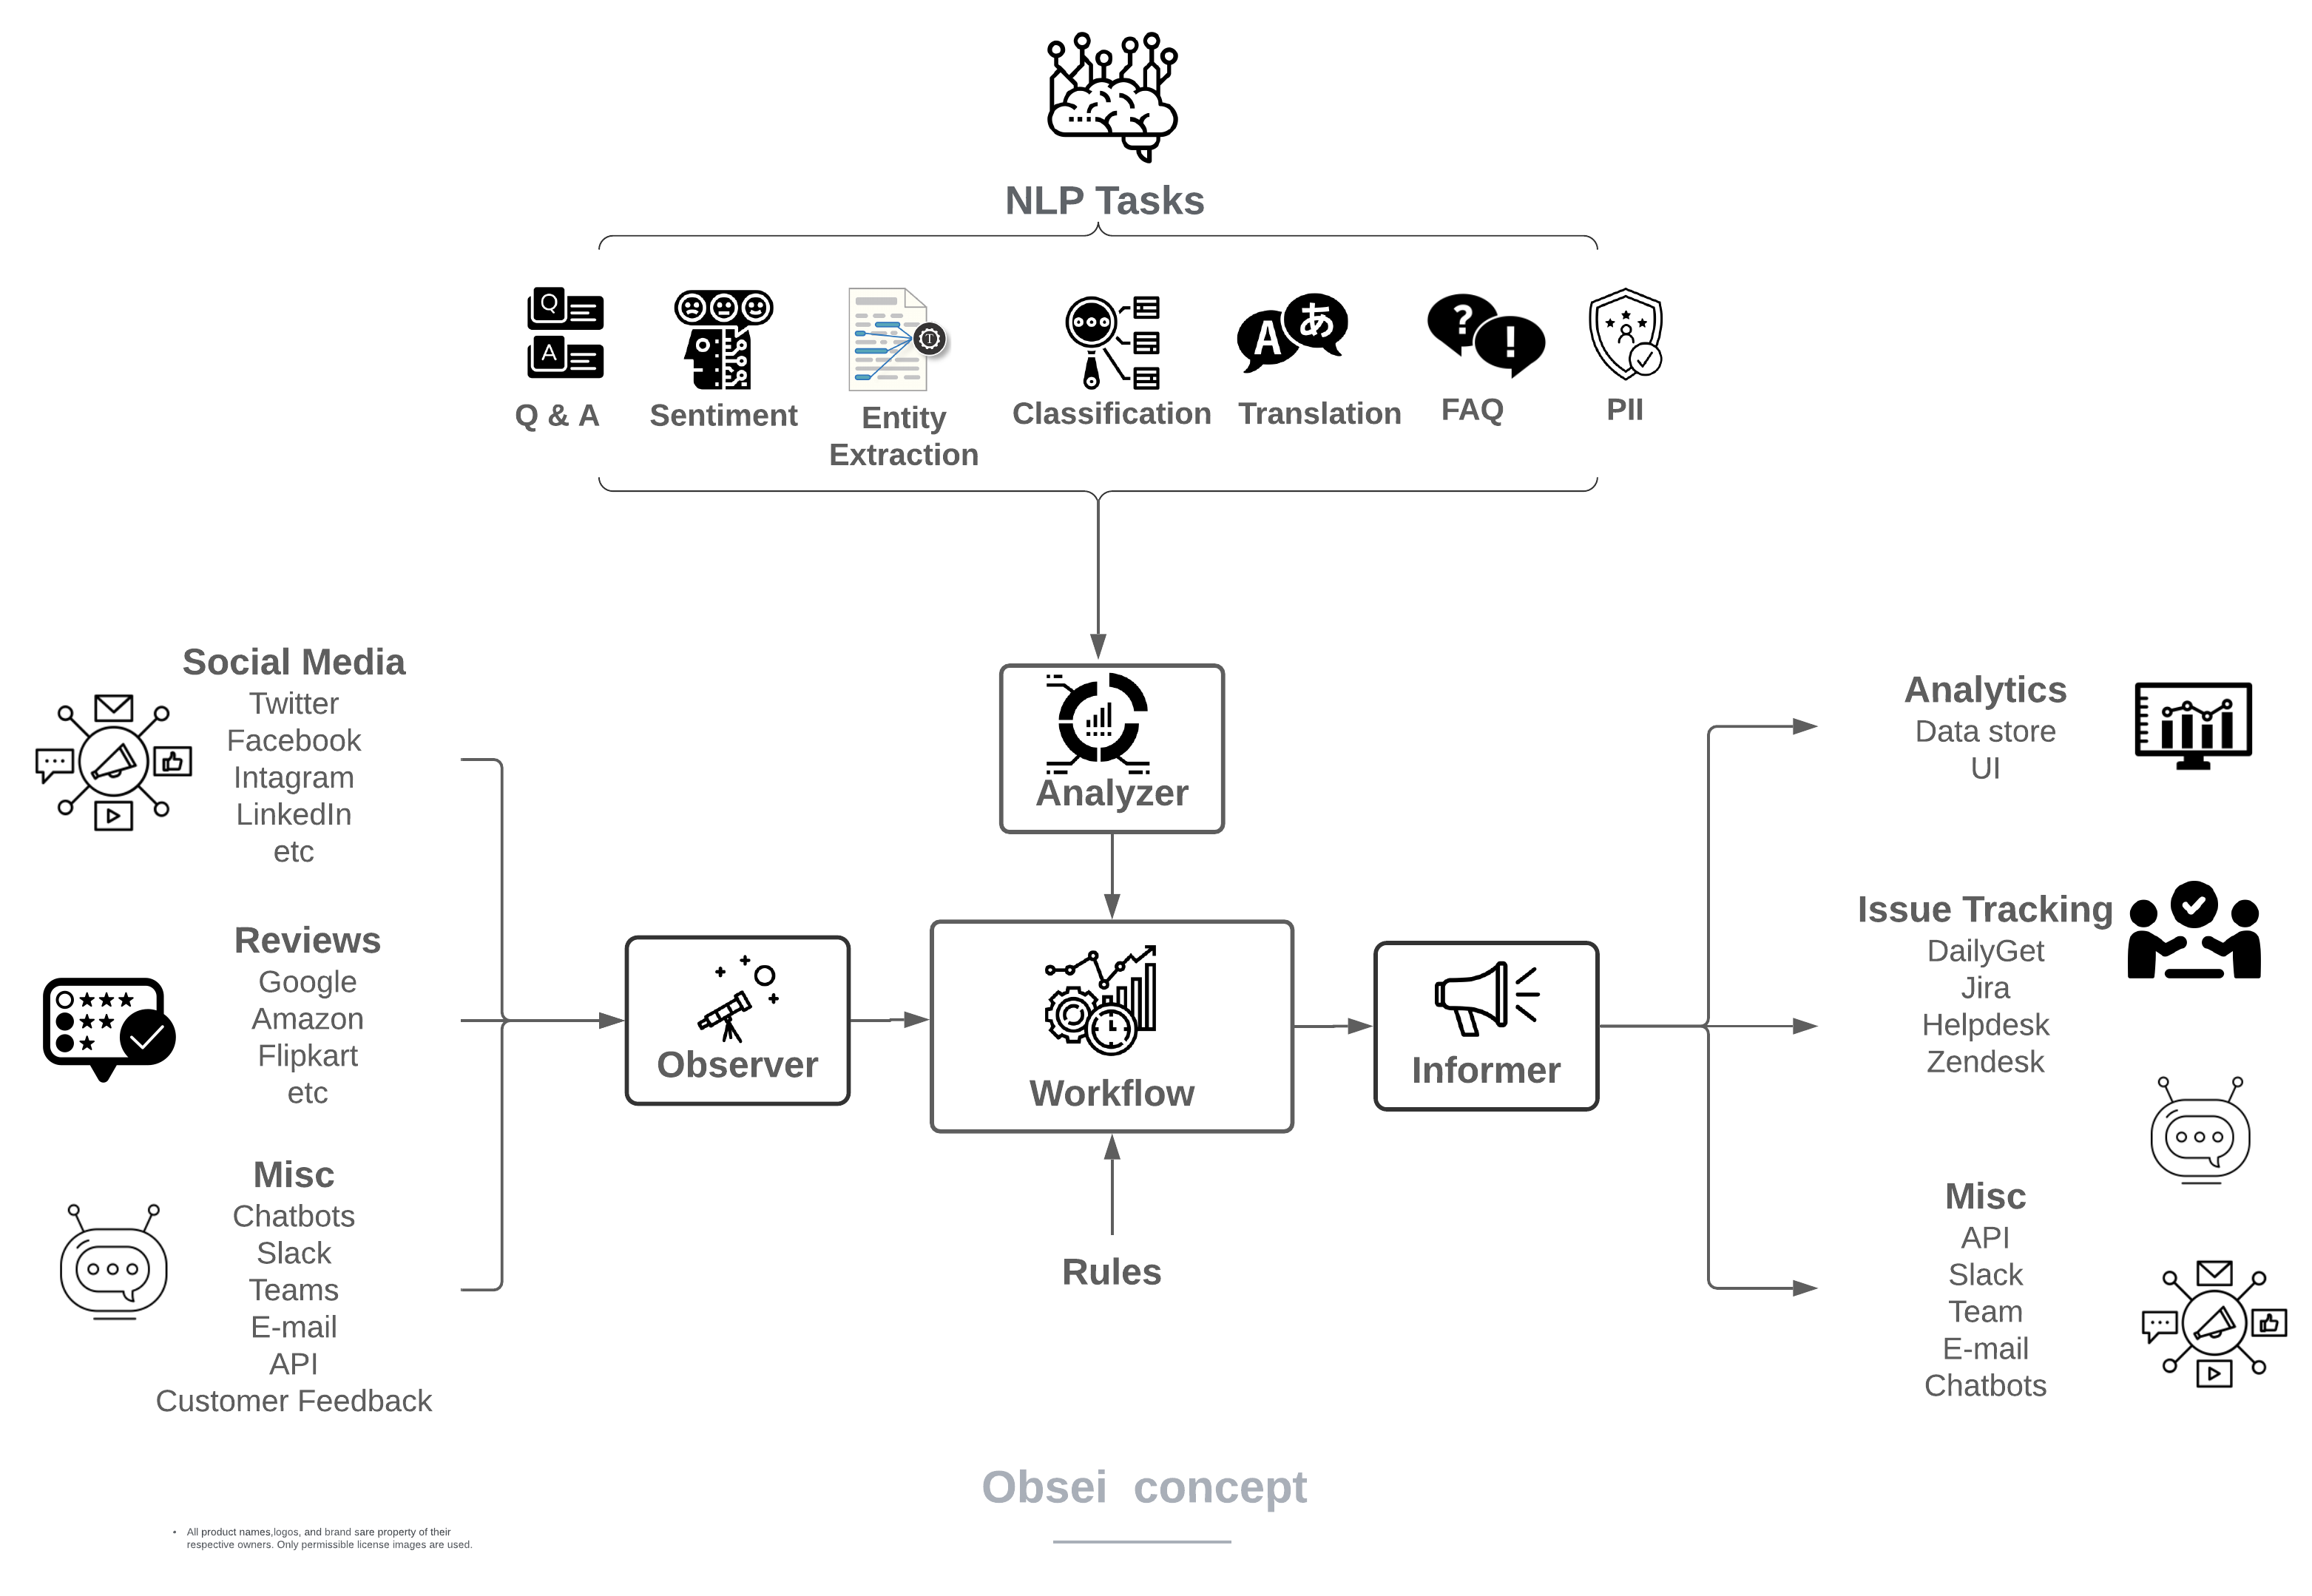
Observer, observes platform like Twitter, Facebook, App Stores, Google reviews, Amazon reviews, News, Website etc and feed that information to,
Analyzer, which perform text analysis like classification, sentiment, translation, PII etc and feed that information to,
Informer, which send it to ticketing system, data store, dataframe etc for further action and analysis.
Future thoughts -
Text, Image, Audio, Documents and Video oriented workflows
Collect data from every possible private and public channels
Add each possible to AI piece which can automate manual cognitive workflows
Introductory demo video
Use cases
Obsei use cases are following, but not limited to -
Social listening
Alerting/Notification when user complaints on social media
Automatic customer issue creation based on sentiment analysis (reduction of MTTD)
Proper tagging of ticket based for example login issue, signup issue, delivery issue etc (reduction of MTTR)
Checking effectiveness of social media marketing campaign
Extraction of deeper insight from feedbacks on various platforms
Research purpose
Many more based on creativity 💡
Companies/Projects using Obsei
Here are some companies/projects (alphabetical order) using Obsei. To add your company/project to the list, please raise a PR or contact us via email.
1Page: Giving a better context in meetings and calls
Observe app reviews from Google play store, Analyze them via performing text classification and then Inform them on console via logger
PlayStore Reviews → Classification → Logger
2
Observe app reviews from Google play store, PreProcess text via various text cleaning function, Analyze them via performing text classification, Inform them to Pandas DataFrame and store resultant CSV to Google Drive
PlayStore Reviews → PreProcessing → Classification → Pandas DataFrame → CSV in Google Drive
3
Observe app reviews from Apple app store, PreProcess text via various text cleaning function, Analyze them via performing text classification, Inform them to Pandas DataFrame and store resultant CSV to Google Drive
AppStore Reviews → PreProcessing → Classification → Pandas DataFrame → CSV in Google Drive
4
Observe news article from Google news, PreProcess text via various text cleaning function, Analyze them via performing text classification while splitting text in small chunks and later computing final inference using given formula
Google News → Text Cleaner → Text Splitter → Classification → Inference Aggregator
Demo
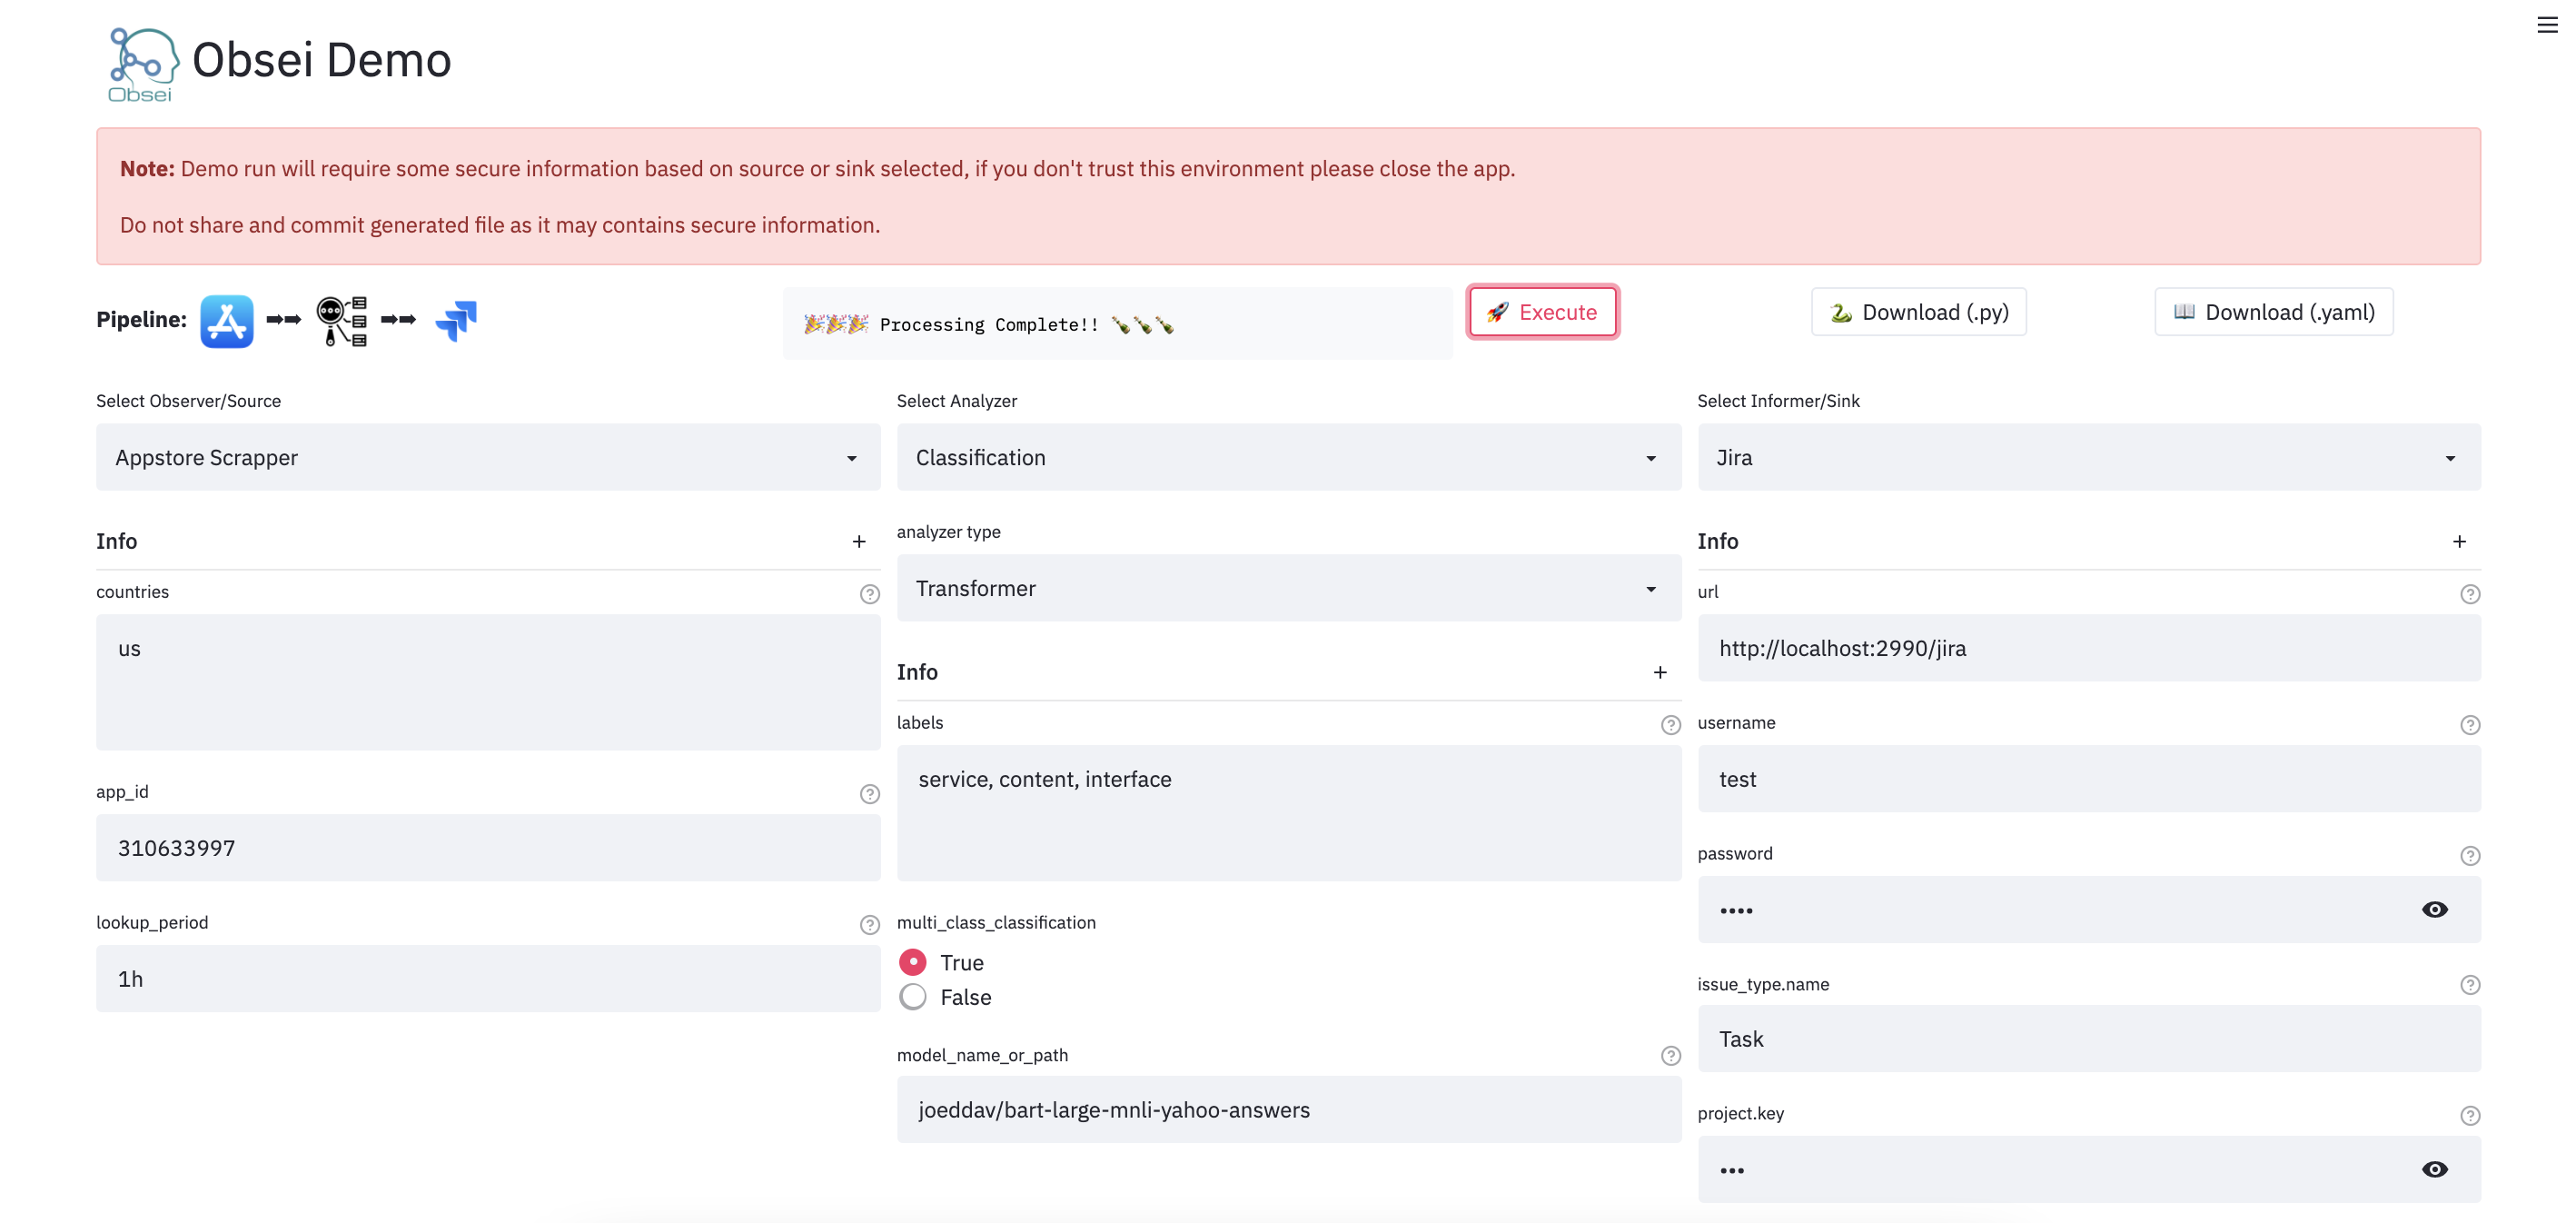
We have a minimal streamlit based UI that you can use to test Obsei.
Install from master branch (if you want to try the latest features):
git clone https://github.com/obsei/obsei.git
cd obsei
pip install --editable .
Install via Conda:
To install latest released version -
conda install -c lalitpagaria obsei
Install from master branch (if you want to try the latest features):
git clone https://github.com/obsei/obsei.git
cd obsei
conda env create -f conda/environment.yml
For GPU based local environment -
git clone https://github.com/obsei/obsei.git
cd obsei
conda env create -f conda/gpu-environment.yml
Step 3: Configure Source/Observer
Twitter
fromobsei.source.twitter_sourceimportTwitterCredentials, TwitterSource, TwitterSourceConfig# initialize twitter source configsource_config=TwitterSourceConfig(
keywords=["issue"], # Keywords, @user or #hashtagslookup_period="1h", # Lookup period from current time, format: `<number><d|h|m>` (day|hour|minute)cred_info=TwitterCredentials(
# Enter your twitter consumer key and secret. Get it from https://developer.twitter.com/en/apply-for-accessconsumer_key="<twitter_consumer_key>",
consumer_secret="<twitter_consumer_secret>",
bearer_token='<ENTER BEARER TOKEN>',
)
)
# initialize tweets retrieversource=TwitterSource()
Facebook
fromobsei.source.facebook_sourceimportFacebookCredentials, FacebookSource, FacebookSourceConfig# initialize facebook source configsource_config=FacebookSourceConfig(
page_id="110844591144719", # Facebook page id, for example this one for Obseilookup_period="1h", # Lookup period from current time, format: `<number><d|h|m>` (day|hour|minute)cred_info=FacebookCredentials(
# Enter your facebook app_id, app_secret and long_term_token. Get it from https://developers.facebook.com/apps/app_id="<facebook_app_id>",
app_secret="<facebook_app_secret>",
long_term_token="<facebook_long_term_token>",
)
)
# initialize facebook post comments retrieversource=FacebookSource()
Email
fromobsei.source.email_sourceimportEmailConfig, EmailCredInfo, EmailSource# initialize email source configsource_config=EmailConfig(
# List of IMAP servers for most commonly used email providers# https://www.systoolsgroup.com/imap/# Also, if you're using a Gmail account then make sure you allow less secure apps on your account -# https://myaccount.google.com/lesssecureapps?pli=1# Also enable IMAP access -# https://mail.google.com/mail/u/0/#settings/fwdandpopimap_server="imap.gmail.com", # Enter IMAP servercred_info=EmailCredInfo(
# Enter your email account username and passwordusername="<email_username>",
password="<email_password>"
),
lookup_period="1h"# Lookup period from current time, format: `<number><d|h|m>` (day|hour|minute)
)
# initialize email retrieversource=EmailSource()
Google Maps Reviews Scrapper
fromobsei.sourceimportOSGoogleMapsReviewsSource, OSGoogleMapsReviewsConfig# initialize Outscrapper Maps review source configsource_config=OSGoogleMapsReviewsConfig(
# Collect API key from https://outscraper.com/api_key="<Enter Your API Key>",
# Enter Google Maps link or place id# For example below is for the "Taj Mahal"queries=["https://www.google.co.in/maps/place/Taj+Mahal/@27.1751496,78.0399535,17z/data=!4m5!3m4!1s0x39747121d702ff6d:0xdd2ae4803f767dde!8m2!3d27.1751448!4d78.0421422"],
number_of_reviews=10,
)
# initialize Outscrapper Maps review retrieversource=OSGoogleMapsReviewsSource()
AppStore Reviews Scrapper
fromobsei.source.appstore_scrapperimportAppStoreScrapperConfig, AppStoreScrapperSource# initialize app store source configsource_config=AppStoreScrapperConfig(
# Need two parameters app_id and country.# `app_id` can be found at the end of the url of app in app store.# For example - https://apps.apple.com/us/app/xcode/id497799835# `310633997` is the app_id for xcode and `us` is country.countries=["us"],
app_id="310633997",
lookup_period="1h"# Lookup period from current time, format: `<number><d|h|m>` (day|hour|minute)
)
# initialize app store reviews retrieversource=AppStoreScrapperSource()
Play Store Reviews Scrapper
fromobsei.source.playstore_scrapperimportPlayStoreScrapperConfig, PlayStoreScrapperSource# initialize play store source configsource_config=PlayStoreScrapperConfig(
# Need two parameters package_name and country.# `package_name` can be found at the end of the url of app in play store.# For example - https://play.google.com/store/apps/details?id=com.google.android.gm&hl=en&gl=US# `com.google.android.gm` is the package_name for xcode and `us` is country.countries=["us"],
package_name="com.google.android.gm",
lookup_period="1h"# Lookup period from current time, format: `<number><d|h|m>` (day|hour|minute)
)
# initialize play store reviews retrieversource=PlayStoreScrapperSource()
Reddit
fromobsei.source.reddit_sourceimportRedditConfig, RedditSource, RedditCredInfo# initialize reddit source configsource_config=RedditConfig(
subreddits=["wallstreetbets"], # List of subreddits# Reddit account username and password# You can also enter reddit client_id and client_secret or refresh_token# Create credential at https://www.reddit.com/prefs/apps# Also refer https://praw.readthedocs.io/en/latest/getting_started/authentication.html# Currently Password Flow, Read Only Mode and Saved Refresh Token Mode are supportedcred_info=RedditCredInfo(
username="<reddit_username>",
password="<reddit_password>"
),
lookup_period="1h"# Lookup period from current time, format: `<number><d|h|m>` (day|hour|minute)
)
# initialize reddit retrieversource=RedditSource()
Reddit Scrapper
Note: Reddit heavily rate limit scrappers, hence use it to fetch small data during long period
fromobsei.source.reddit_scrapperimportRedditScrapperConfig, RedditScrapperSource# initialize reddit scrapper source configsource_config=RedditScrapperConfig(
# Reddit subreddit, search etc rss url. For proper url refer following link -# Refer https://www.reddit.com/r/pathogendavid/comments/tv8m9/pathogendavids_guide_to_rss_and_reddit/url="https://www.reddit.com/r/wallstreetbets/comments/.rss?sort=new",
lookup_period="1h"# Lookup period from current time, format: `<number><d|h|m>` (day|hour|minute)
)
# initialize reddit retrieversource=RedditScrapperSource()
Google News
fromobsei.source.google_news_sourceimportGoogleNewsConfig, GoogleNewsSource# initialize Google News source configsource_config=GoogleNewsConfig(
query='bitcoin',
max_results=5,
# To fetch full article text enable `fetch_article` flag# By default google news gives title and highlightfetch_article=True,
)
# initialize Google News retrieversource=GoogleNewsSource()
importpandasaspdfromobsei.source.pandas_sourceimportPandasSource, PandasSourceConfig# Initialize your Pandas DataFrame from your sources like csv, excel, sql etc# In following example we are reading csv which have two columns title and textcsv_file="https://raw.githubusercontent.com/deepset-ai/haystack/master/tutorials/small_generator_dataset.csv"dataframe=pd.read_csv(csv_file)
# initialize pandas sink configsink_config=PandasSourceConfig(
dataframe=dataframe,
include_columns=["score"],
text_columns=["name", "degree"],
)
# initialize pandas sinksink=PandasSource()
Some analyzer support GPU and to utilize pass device parameter.
List of possible values of device parameter (default value auto):
auto: GPU (cuda:0) will be used if available otherwise CPU will be used
cpu: CPU will be used
cuda:{id} - GPU will be used with provided CUDA device id
Text Classification
Text classification, classify text into user provided categories.
fromobsei.analyzer.classification_analyzerimportClassificationAnalyzerConfig, ZeroShotClassificationAnalyzer# initialize classification analyzer config# It can also detect sentiments if "positive" and "negative" labels are added.analyzer_config=ClassificationAnalyzerConfig(
labels=["service", "delay", "performance"],
)
# initialize classification analyzer# For supported models refer https://huggingface.co/models?filter=zero-shot-classificationtext_analyzer=ZeroShotClassificationAnalyzer(
model_name_or_path="typeform/mobilebert-uncased-mnli",
device="auto"
)
Sentiment Analyzer
Sentiment Analyzer, detect the sentiment of the text. Text classification can also perform sentiment analysis but if you don't want to use heavy-duty NLP model then use less resource hungry dictionary based Vader Sentiment detector.
fromobsei.analyzer.sentiment_analyzerimportVaderSentimentAnalyzer# Vader does not need any configuration settingsanalyzer_config=None# initialize vader sentiment analyzertext_analyzer=VaderSentimentAnalyzer()
NER Analyzer
NER (Named-Entity Recognition) Analyzer, extract information and classify named entities mentioned in text into pre-defined categories such as person names, organizations, locations, medical codes, time expressions, quantities, monetary values, percentages, etc
fromobsei.analyzer.ner_analyzerimportNERAnalyzer# NER analyzer does not need configuration settingsanalyzer_config=None# initialize ner analyzer# For supported models refer https://huggingface.co/models?filter=token-classificationtext_analyzer=NERAnalyzer(
model_name_or_path="elastic/distilbert-base-cased-finetuned-conll03-english",
device="auto"
)
Translator
fromobsei.analyzer.translation_analyzerimportTranslationAnalyzer# Translator does not need analyzer configanalyzer_config=None# initialize translator# For supported models refer https://huggingface.co/models?pipeline_tag=translationanalyzer=TranslationAnalyzer(
model_name_or_path="Helsinki-NLP/opus-mt-hi-en",
device="auto"
)
PII Anonymizer
fromobsei.analyzer.pii_analyzerimportPresidioEngineConfig, PresidioModelConfig, \
PresidioPIIAnalyzer, PresidioPIIAnalyzerConfig# initialize pii analyzer's configanalyzer_config=PresidioPIIAnalyzerConfig(
# Whether to return only pii analysis or anonymize textanalyze_only=False,
# Whether to return detail information about anonymization decisionreturn_decision_process=True
)
# initialize pii analyzeranalyzer=PresidioPIIAnalyzer(
engine_config=PresidioEngineConfig(
# spacy and stanza nlp engines are supported# For more info refer# https://microsoft.github.io/presidio/analyzer/developing_recognizers/#utilize-spacy-or-stanzanlp_engine_name="spacy",
# Update desired spacy model and languagemodels=[PresidioModelConfig(model_name="en_core_web_lg", lang_code="en")]
)
)
Dummy Analyzer
Dummy Analyzer, do nothing it simply used for transforming input (TextPayload) to output (TextPayload) also adding user supplied dummy data.
fromobsei.sink.slack_sinkimportSlackSink, SlackSinkConfig# initialize slack sink configsink_config=SlackSinkConfig(
# Provide slack bot/app token# For more detail refer https://slack.com/intl/en-de/help/articles/215770388-Create-and-regenerate-API-tokensslack_token="<Slack_app_token>",
# To get channel id refer https://stackoverflow.com/questions/40940327/what-is-the-simplest-way-to-find-a-slack-team-id-and-a-channel-idchannel_id="C01LRS6CT9Q"
)
# initialize slack sinksink=SlackSink()
Zendesk
fromobsei.sink.zendesk_sinkimportZendeskSink, ZendeskSinkConfig, ZendeskCredInfo# initialize zendesk sink configsink_config=ZendeskSinkConfig(
# For custom domain refer http://docs.facetoe.com.au/zenpy.html#custom-domains# Mainly you can do this by setting the environment variables:# ZENPY_FORCE_NETLOC# ZENPY_FORCE_SCHEME (default to https)# when set it will force request on:# {scheme}://{netloc}/endpoint# provide zendesk domaindomain="zendesk.com",
# provide subdomain if you have onesubdomain=None,
# Enter zendesk user detailscred_info=ZendeskCredInfo(
email="<zendesk_user_email>",
password="<zendesk_password>"
)
)
# initialize zendesk sinksink=ZendeskSink()
Jira
fromobsei.sink.jira_sinkimportJiraSink, JiraSinkConfig# For testing purpose you can start jira server locally# Refer https://developer.atlassian.com/server/framework/atlassian-sdk/atlas-run-standalone/# initialize Jira sink configsink_config=JiraSinkConfig(
url="http://localhost:2990/jira", # Jira server url# Jira username & password for user who have permission to create issueusername="<username>",
password="<password>",
# Which type of issue to be created# For more information refer https://support.atlassian.com/jira-cloud-administration/docs/what-are-issue-types/issue_type={"name": "Task"},
# Under which project issue to be created# For more information refer https://support.atlassian.com/jira-software-cloud/docs/what-is-a-jira-software-project/project={"key": "CUS"},
)
# initialize Jira sinksink=JiraSink()
ElasticSearch
fromobsei.sink.elasticsearch_sinkimportElasticSearchSink, ElasticSearchSinkConfig# For testing purpose you can start Elasticsearch server locally via docker# `docker run -d --name elasticsearch -p 9200:9200 -e "discovery.type=single-node" elasticsearch:7.9.2`# initialize Elasticsearch sink configsink_config=ElasticSearchSinkConfig(
# Elasticsearch server hostnamehost="localhost",
# Elasticsearch server portport=9200,
# Index name, it will create if not existindex_name="test",
)
# initialize Elasticsearch sinksink=ElasticSearchSink()
Http
fromobsei.sink.http_sinkimportHttpSink, HttpSinkConfig# For testing purpose you can create mock http server via postman# For more details refer https://learning.postman.com/docs/designing-and-developing-your-api/mocking-data/setting-up-mock/# initialize http sink config (Currently only POST call is supported)sink_config=HttpSinkConfig(
# provide http server urlurl="https://localhost:8080/api/path",
# Here you can add headers you would like to pass with requestheaders={
"Content-type": "application/json"
}
)
# To modify or converting the payload, create convertor class# Refer obsei.sink.dailyget_sink.PayloadConvertor for example# initialize http sinksink=HttpSink()
source will fetch data from selected the source, then feed that to analyzer for processing, whose output we feed into sink to get notified at that sink.
# Uncomment if you want logger# import logging# import sys# logger = logging.getLogger(__name__)# logging.basicConfig(stream=sys.stdout, level=logging.INFO)# This will fetch information from configured source ie twitter, app store etcsource_response_list=source.lookup(source_config)
# Uncomment if you want to log source response# for idx, source_response in enumerate(source_response_list):# logger.info(f"source_response#'{idx}'='{source_response.__dict__}'")# This will execute analyzer (Sentiment, classification etc) on source data with provided analyzer_configanalyzer_response_list=text_analyzer.analyze_input(
source_response_list=source_response_list,
analyzer_config=analyzer_config
)
# Uncomment if you want to log analyzer response# for idx, an_response in enumerate(analyzer_response_list):# logger.info(f"analyzer_response#'{idx}'='{an_response.__dict__}'")# Analyzer output added to segmented_data# Uncomment inorder to log it# for idx, an_response in enumerate(analyzer_response_list):# logger.info(f"analyzed_data#'{idx}'='{an_response.segmented_data.__dict__}'")# This will send analyzed output to configure sink ie Slack, Zendesk etcsink_response_list=sink.send_data(analyzer_response_list, sink_config)
# Uncomment if you want to log sink response# for sink_response in sink_response_list:# if sink_response is not None:# logger.info(f"sink_response='{sink_response}'")
Step 7: Execute workflow
Copy code snippets from Step 3 to Step 6 into python file for example example.py and execute following command -
First off, thank you for even considering contributing to this package, every contribution big or small is greatly appreciated.
Please refer our Contribution Guideline and Code of Conduct.
We would like to thank DailyGet for continuous support and encouragement.
Please check DailyGet out. it is a platform which can easily be configured to solve any business process automation requirements.
About
Obsei is a low code AI powered automation tool. It can be used in various business flows like social listening, AI based alerting, brand image analysis, comparative study and more .