This is a modified version for Windows use. All credits still belong to the original researchers.
[Paper] [Project Website] [Google Colab]
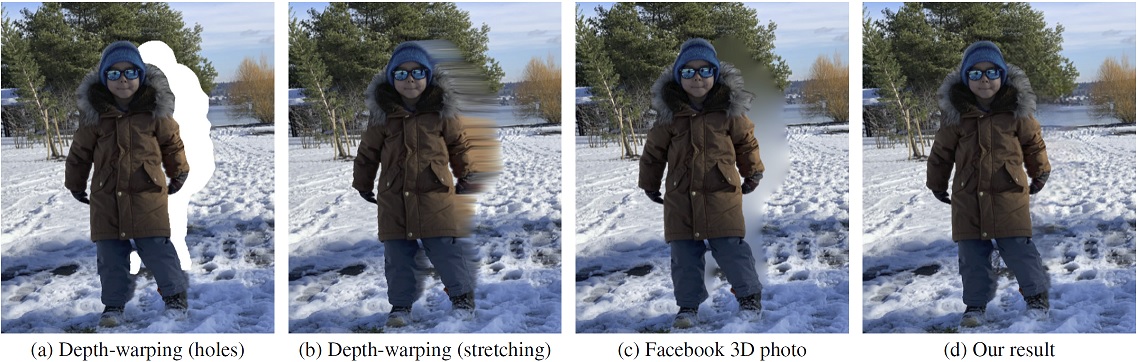
We propose a method for converting a single RGB-D input image into a 3D photo, i.e., a multi-layer representation for novel view synthesis that contains hallucinated color and depth structures in regions occluded in the original view. We use a Layered Depth Image with explicit pixel connectivity as underlying representation, and present a learning-based inpainting model that iteratively synthesizes new local color-and-depth content into the occluded region in a spatial context-aware manner. The resulting 3D photos can be efficiently rendered with motion parallax using standard graphics engines. We validate the effectiveness of our method on a wide range of challenging everyday scenes and show fewer artifacts when compared with the state-of-the-arts.
3D Photography using Context-aware Layered Depth Inpainting
Meng-Li Shih,
Shih-Yang Su,
Johannes Kopf, and
Jia-Bin Huang
In IEEE Conference on Computer Vision and Pattern Recognition (CVPR), 2020.
You can follow a video tutorial here if it's more convenient for you.
-
To get started, please run the following steps:
-
Clone this page
-
Clone this page
Unzip, drag and drop it here, follow the below folder structure(change the file names too):
📂3d-photo-inpainting/
├── 📂BoostingMonocularDepth/ <--
│...
Change your Anaconda directory to that folder with cd YOUR_FILE_DIRECTORY/3d-photo-inpainting/
-
Next, follow these installation steps under Anaconda Prompt:
conda create -n 3DP python=3.7
conda activate 3DP
For any other GPU that's < RTX 30 series:
conda install pytorch==1.5.0 torchvision==0.6.0 cudatoolkit=10.2 -c pytorch
For any RTX 30 series:
conda install pytorch torchvision torchaudio cudatoolkit=11.1 -c pytorch -c conda-forge
Continue:
pip install decorator
pip install -r requirements.txt
pip install pyyaml
pip install cython
pip install pyqt5
If you cannot install Cython, cynetworkx successfully, please install VS C++ Toolkit. Tutorial here.
-
Next, please download the following models & weights and put them in the right file directory (from my backup IceDrive):
📂3d-photo-inpainting/
├── 📂checkpoints/
│   ├── 📜color-model.pth
│   ├── 📜depth-model.pth
│   └── 📜edge-model.pth
├── 📂MiDaS/
│   └── 📜model.pt
├── 📂BoostingMonocularDepth/
│   ├── 📂midas/
│   │   └── 📜model-f46da743.pt (rename to model.pt after dragged in)
│   └── 📂pix2pix/
│       └── 📂checkpoints/
│           └── 📂mergemodel/
│               └── 📜latest_net_G.pth
│...
Please follow the instructions in this section.
This should allow to execute our results.
For more detailed instructions, please refer to DOCUMENTATION.md.
- Put
.jpgfiles (e.g., test.jpg) into theimagefolder. Don't use any space in the image name (eg. "image 1.jpg" would not work)- E.g.,
image/moon.jpg
- E.g.,
- Run the following command
python main.py --config argument.yml
- Note: The 3D photo generation process usually takes about 2-3 minutes depending on the available computing resources.
- The results are stored in the following directories:
- Corresponding depth map estimated by MiDaS
- E.g.
depth/moon.npy,depth/moon.png - User could edit
depth/moon.pngmanually.- Remember to set the following two flags as listed below if user wants to use manually edited
depth/moon.pngas input for 3D Photo.depth_format: '.png'require_midas: False
- Remember to set the following two flags as listed below if user wants to use manually edited
- E.g.
- Inpainted 3D mesh (Optional: User need to switch on the flag
save_ply)- E.g.
mesh/moon.ply
- E.g.
- Rendered videos with zoom-in motion
- E.g.
video/moon_zoom-in.mp4
- E.g.
- Rendered videos with swing motion
- E.g.
video/moon_swing.mp4
- E.g.
- Rendered videos with circle motion
- E.g.
video/moon_circle.mp4
- E.g.
- Rendered videos with dolly zoom-in effect
- E.g.
video/moon_dolly-zoom-in.mp4 - Note: We assume that the object of focus is located at the center of the image.
- E.g.
- Corresponding depth map estimated by MiDaS
- (Optional) If you want to change the default configuration. Please read
DOCUMENTATION.mdand modifiedargument.yml.
This work is licensed under MIT License. See LICENSE for details.
If you find our code/models useful, please consider citing our paper:
@inproceedings{Shih3DP20,
  author = {Shih, Meng-Li and Su, Shih-Yang and Kopf, Johannes and Huang, Jia-Bin},
  title = {3D Photography using Context-aware Layered Depth Inpainting},
  booktitle = {IEEE Conference on Computer Vision and Pattern Recognition (CVPR)},
  year = {2020}
}
- We thank Pratul Srinivasan for providing clarification of the method Srinivasan et al. CVPR 2019.
- We thank the author of Zhou et al. 2018, Choi et al. 2019, Mildenhall et al. 2019, Srinivasan et al. 2019, Wiles et al. 2020, Niklaus et al. 2019 for providing their implementations online.
- Our code builds upon EdgeConnect, MiDaS and pytorch-inpainting-with-partial-conv