raspberry-wifi-conf
A Node application which makes connecting your RaspberryPi to your home wifi easier
Why?
When unable to connect to a wifi network, this service will turn the RPI into a wireless AP. This allows us to connect to it via a phone or other device and configure our home wifi network (for example).
Once configured, it prompts the PI to reboot with the appropriate wifi credentials. If this process fails, it immediately re-enables the PI as an AP which can be configurable again.
This project broadly follows these instructions in setting up a RaspberryPi as a wireless AP.
Requirements
The NodeJS modules required are pretty much just underscore, async, and express.
The web application requires angular and font-awesome to render correctly. To make the deployment of this easy, one of the other requirements is bower.
If you do not have bower installed already, you can install it globally by running: sudo npm install bower -g.
Install
$git clone git@github.com:sabhiram/raspberry-wifi-conf.git
$cd raspberry-wifi-conf
$npm update
$bower install
$sudo npm run-script provision
$sudo npm start
Setup the app as a service
There is a startup script included to make the server starting and stopping easier. Do remember that the application is assumed to be installed under /home/pi/raspberry-wifi-conf. Feel free to change this in the assets/init.d/raspberry-wifi-conf file.
$sudo cp assets/init.d/raspberry-wifi-conf /etc/init.d/raspberry-wifi-conf
$sudo chmod +x /etc/init.d/raspberry-wifi-conf
$sudo update-rc.d raspberry-wifi-conf defaults
Gotchas
The hostapd application does not like to behave itself on some wifi adapters (RTL8192CU et al). This link does a good job explaining the issue and the remedy: Edimax Wifi Issues. The gist of what you need to do is as follows:
# run iw to detect if you have a rtl871xdrv or nl80211 driver
$iw list
If the above says nl80211 not found. it means you are running the rtl871xdrv driver and probably need to update the hostapd binary as follows:
$cd raspberry-wifi-conf
$sudo mv /usr/sbin/hostapd /usr/sbin/hostapd.OLD
$sudo mv assets/bin/hostapd.rtl871xdrv /usr/sbin/hostapd
$sudo chmod 755 /usr/sbin/hostapd
Note that the wifi_driver_type config variable is defaulted to the nl80211 driver. However, if iw list fails on the app startup, it will automatically set the driver type of rtl871xdrv. Remember that even though you do not need to update the config / default value - you will need to use the updated hostapd binary bundled with this app.
TODO: Automatically maintain the correct version of hostapd based on the wifi_driver_type.
Usage
This is approximately what occurs when we run this app:
- Check to see if we are connected to a wifi AP
- If connected to a wifi, do nothing -> exit
- (if not wifi, then) Convert RPI to act as an AP (with a configurable SSID)
- Host a lightweight HTTP server which allows for the user to connect and configure the RPIs wifi connection. The interfaces exposed are RESTy so other applications can similarly implement their own UIs around the data returned.
- Once the RPI is successfully configured, reset it to act as a wifi device (not AP anymore), and setup it's wifi network based on what the user selected.
- At this stage, the RPI is named, and has a valid wifi connection which it is now bound to.
Typically, I have the following line in my /etc/rc.local file:
cd /home/pi/raspberry-wifi-conf
sudo /usr/bin/node server.js
Note that this is run in a blocking fashion, in that this script will have to exit before we can proceed with others defined in rc.local. This way I can guarantee that other services which might rely on wifi will have said connection before being run. If this is not the case for you, and you just want this to run (if needed) in the background, then you can do:
cd /home/pi/raspberry-wifi-conf
sudo /usr/bin/node server.js < /dev/null &
User Interface
In my config file, I have set up the static ip for my PI when in AP mode to 192.168.44.1 and the AP's broadcast SSID to rpi-config-ap. These are images captured from my osx dev box.
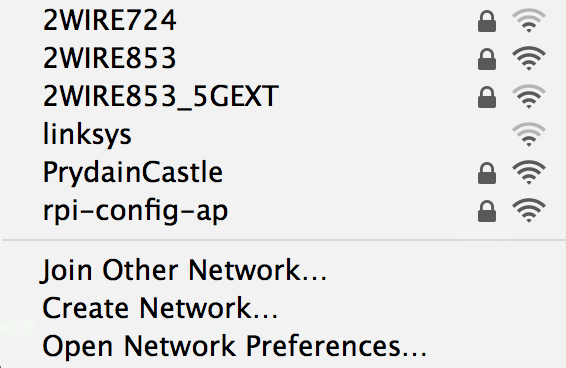
Step 1: Power on Pi which runs this app on startup (assume it is not configured for a wifi connection). Once it boots up, you will see rpi-config-ap among the wifi connections. The password is configured in config.json.
Step 2: Join the above network, and navigate to the static IP and port we set in config.json (http://192.168.44.1:88), you will see:
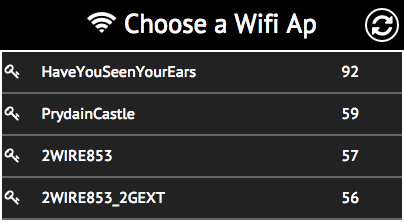
Step 3: Select your home (or whatever) network, punch in the wifi passcode if any, and click Submit. You are done! Your Pi is now on your home wifi!!
Testing
TODO
TODO
- Automate the deployment of alternate
hostapdapplication - Automate provisioning of the application dependencies
- Make the running of scripts cleaner and more easy to read
- ifup should never be allowed to fail... same w/ the "start" pieces of various services. Perhaps we need to tease the restart into stop and start and allow the stop to fail.
- Add tests
- Add travis ci / coveralls hook(s)