A lightweight media manager and thumbnail generator for Node.js
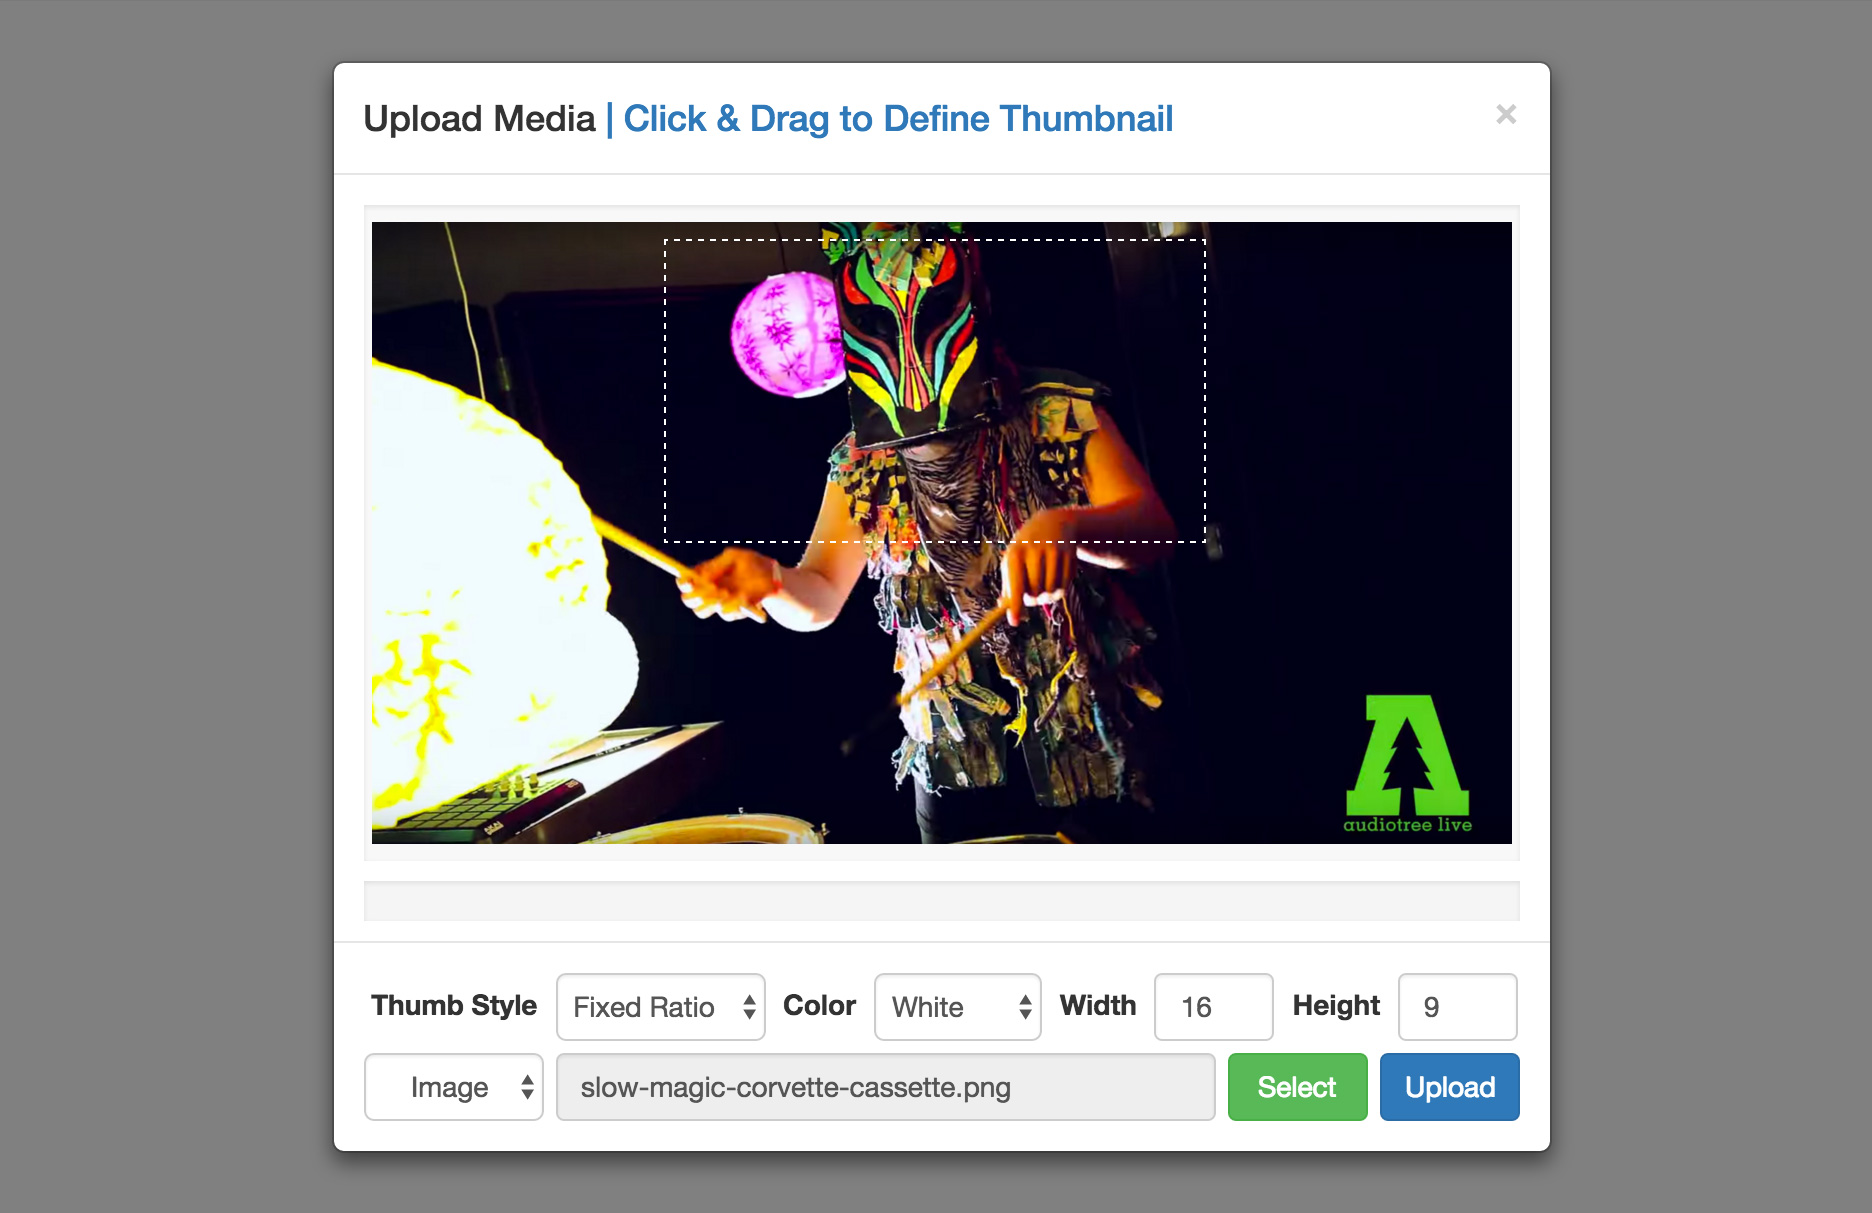
pushpop.js allows you to upload images and generate custom thumbnails for them using a marquee/crop tool similar to the one found in Photoshop.
Image thumbnails are defined within the modal window you see above and are then sent to the server where they are processed and saved to the local disk or one of the supported cloud storage providers.
Metadata about each image such as when it was created and any projects it may be associated with are automatically saved to a Mongo database. You can also save videos hosted on YouTube & Vimeo.
The repository includes a sample-app that you can use as a starting point for your project.
To run the sample-app first make sure MongoDB is installed & running on your system then:
git clone git@github.com:braitsch/pushpop.js.git
cd sample-app
npm install
node app
Fire up a browser window and point it at localhost:3000
To add pushpop.js to an existing project:
-
Install the npm module
npm install --save pushpop -
Copy the client side JavaScript & CSS files in
/sample-app/publicto an appropriate location in your project./sample-app/public/css
- pushpop.min.css
- bootstrap.min.css
/sample-app/public/javascripts
- pushpop.min.js
- jquery-2.1.4.min.js
- jquery.form.min.js
- bootstrap.min.js
pushpop uses a very small subset of Twitter Bootstrap to render the modal windows and the jQuery Form Plugin to handle the image uploads.
-
Add the modal window markup & JS hooks to your HTML files. The markup is also provided as a pug (jade) template for convenience. In the sample-app the markup files are located in the server directory.
- /sample-app/server/pushpop.html
- /sample-app/server/pushpop.pug
Instantiate a new instance of pushpop.js by adding the following line of JavaScript to your HTML after you've included the client library:
<script src="pushpop.min.js"></script>
<script>
	var pushpop = new PushPop();
</script>
By default uploads will be sent to http://yoursite.com/upload & requests to delete content will be sent to http://yoursite.com/delete. You can change this by overriding the default API endpoints:
var pushpop = new pushpop({
	api:{
		upload:'/api/upload',
		delete:'/api/delete',
	}
});
Additionally you can limit the size of uploads (as is done in the live demo) by passing in a limit in megabytes.
var pushpop = new pushpop({
	maxFileSize = 5; // limit image uploads to 5 megabytes
});
By default no file size limit is imposed by the library.
Configuration on the server is simply a matter of requiring the module and telling it where you want to save your uploaded images. You do this by passing your settings to the config method.
var pushpop = require('pushpop');

pushpop.config({
// [required] set the global upload directory //
	uploads:'./uploads',

// [optional] overwrite the incoming file name with a global unique identifier
	uniqueIds:true,

// [optional] enable logging //
	enableLogs:true,

// [optional] save files to gcloud instead of the local filesystem //
	service: { name:'gcloud', bucket:'pushpop'}
});
Tip: See the Cloud Services section for info on how to connect pushpop to your Google Cloud Storage account.
The pushpop.js client library provides two modal windows that allow you to upload (push) content to your server as well as delete (pop) it off later if desired.
pushpop.openPushModal();pushpop.openPopModal(target);
To display the push window simply tell pushpop to show it whenever an event is triggered such as a button click.
var pushpop = new pushpop();
$('#add-new-item').click(function(){
	pushpop.openPushModal();
});
This will display the push window that will allow you to upload an image and define a thumbnail for it or save a video to the database.
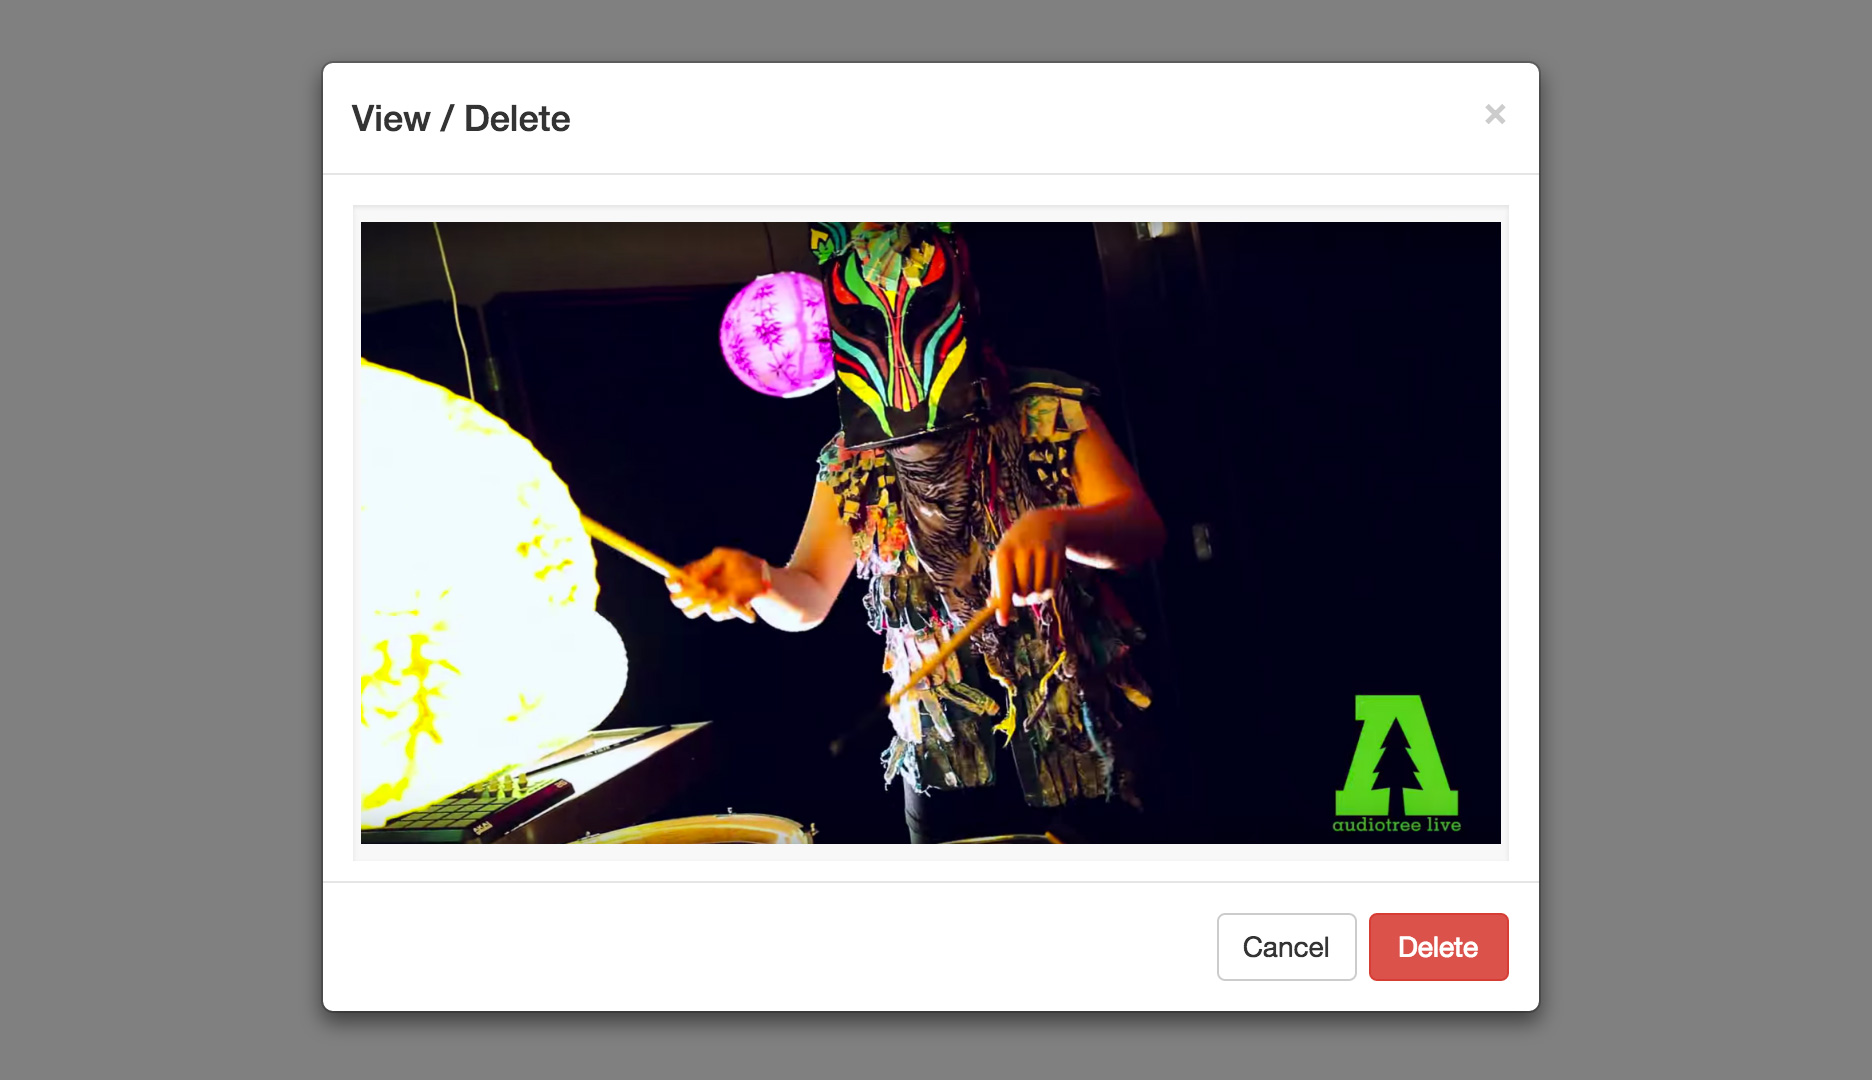
pushpop also provides a pop window that allows you to delete anything you've previously saved.
var pushpop = new pushpop();
$('#add-new-item-button').click(function(){
	pushpop.openPushModal();
});
$('.media').click(function(){
	pushpop.openPopModal(this);
});
The openPopModal function takes a reference to the DOM element that contains the media asset that you want to view. This DOM element should have a data-attribute named meta that describes the asset as discussed next.
When an image or a video is saved metadata is generated that describes the asset:
metadata = {
	type: 'image',
	project: 'portfolio',
	image: '47f62ee9-5164-4681-8d06-2a515a237997.png',
	preview: '47f62ee9-5164-4681-8d06-2a515a237997_sm.png',
	host: 'https://storage.googleapis.com/my-bucket',
	date: '2016-04-13T23:55:42.104Z',
}

metadata = {
	type: 'video',
	project: 'portfolio',
	video: 'https://player.vimeo.com/video/158160346',
	preview: 'https://i.vimeocdn.com/video/559617660_640.jpg',
	date: '2016-04-13T23:55:42.104Z',
}
This metadata is saved and sent back to the client whenever an asset or collection of assets are requested.
app.get('/', function (req, res)
{
	pushpop.getAll(function(metadata){
		res.render('pushpop', { media : metadata });
	});
});
The metadata for each asset is bundled into an array called media which you can iterate over to generate your HTML
for(var i=0; i<media.length; i++){
	var data = media[i]; // metadata //
	.media(data-meta=data)
	if (asset.type == 'image'){
	// assemble the preview url //
		img(src=data.host+'/'+data.project+'/'+data.preview')
	}	else if (data.type == 'video'){
		img(src=data.preview')
	}
}
The above snippet will produce HTML similar to the following for every media asset in the array.
<div class="media" data-meta="{
	type: 'image',
	project: 'portfolio',
	image: '47f62ee9-5164-4681-8d06-2a515a237997.png',
	preview: '47f62ee9-5164-4681-8d06-2a515a237997_sm.png',
	host: 'https://storage.googleapis.com/my-bucket',
	date: '2016-04-13T23:55:42.104Z'}">
	<img src="/gallery/b3e0e92b-4fb0-4bb4-86a5-2f61e1ea15f9_sm.jpg">
</div>
To view (and delete) an asset simply bind a click handler to your class that contains your asset and pass it into the openPopModal function.
$('.media').click(function(){
	pushpop.openPopModal(this);
});
pushpop groups your media assets together into containers called projects
The default project is called gallery although you can easily change this to anything you want by calling:
pushpop.setProject('client-review');
All assets saved after a call to setProject will have the new project name saved in their metadata.
A simple way to change the project could be by hitting a URL with the project name, for example:
app.get('/project/:id', function(req, res)
{
	pushpop.setProject(req.params['id'], function(metadata){
		res.render('gallery', { media : metadata });
	});
});
However if you're using pushpop within a CMS you'll want to bind the currently selected project to the logged in user and allow it to be changed only via a POST request:
app.post('/set-project', function(req, res){
	if (req.session.user == null){
		res.redirect('/');
	}	else{
		req.session.project = req.body['project'];
		pushpop.setProject(req.session.project, function(metadata){
			res.render('gallery', { media : metadata });
		});
	}
});
The array of metadata that is returned by setProject can be used to generate your HTML as explained above in the Metadata section.
pushpop on the server is middleware that intercepts incoming POST requests that contain image data and generates a thumbnail from information contained in the request. It then saves both the source image and thumbnail to a local or remote location of your choosing.
To handle an incoming upload simply add the middleware to your POST request handler like so:
/sample-app/server/routes.js
var pushpop = require('pushpop');

app.post('/upload', pushpop.upload, function(req, res)
{
	if (!pushpop.error){
		res.send('ok').status(200);
	}	else{
		res.send(pushpop.error).status(500);
	}
});
Adding a delete handler is as simple as:
app.post('/delete', pushpop.delete, function(req, res)
{
	if (!pushpop.error){
		res.send('ok').status(200);
	}	else{
		res.send(pushpop.error).status(500);
	}
});
pushpop also provides methods to set & retrieve the currently active project as well as reset the database.
pushpop.setProject(projectName, function(metadata){
	res.render('gallery', { media : metadata });
});

pushpop.getProject(projectName, function(metadata){
	res.render('gallery', { media : metadata });
});
To get every asset stored in the database:
pushpop.getAll(function(metadata){
	res.render('pushpop', { media : metadata });
});
To delete all saved images & clear the database:
pushpop.reset(function(){
	res.redirect('/');
});
pushpop currently only supports MongoDB however support for Redis is in the works.
To connect to your database instance set the following environment variables:
process.env.DB_NAME || 'pushpop';
process.env.DB_HOST || 'localhost';
process.env.DB_PORT || 27017;
If you need to authenticate be sure to also set:
process.env.DB_USER || 'braitsch'
process.env.DB_PASS	|| '1234'
You can configure pushpop to save your images to your Google Cloud Storage account by enabling the gloud service and telling it which bucket you want to use.
pushpop.config({
	service: { name:'gcloud', bucket:'portfolio'}
});
pushpop also uses environment variables to connect to your GCS account:
process.env.GCLOUD_PROJECT = 'grape-spaceship-123'
process.env.GCLOUD_KEY_FILE = '/path/to/keyfile.json'
If you're running on Heroku you'll need to convert the contents of your keyfile into a string and then set that string as a separate GCLOUD_JSON environment variable.
process.env.GCLOUD_JSON = '{
	"private_key_id": "...",
	"private_key": "...",
	"client_email": "...",
	"client_id": "...",
	"type": "service_account"
}'
- support for Redis
- support for Amazon S3
- support for Azure Storage
Questions, feedback, feature requests and ideas for improvement are all very much welcome. Please open an issue to help facilitate a community discussion instead of sending me an email. Thanks!