Remix K-pop Stack

Deployed Site: kpop-stack.netlify.app
Learn more about Remix Stacks.
npx create-remix --template netlify-templates/kpop-stack
Click this button to create a new Github repo, new Netlify project and deploy this stack to a CDN.

What's in the stack
- Netlify deployment to the Edge + deploy previews and CI/CD
- Supabase database and authentication
- Tailwind for styling
- Cypress end-to-end testing
- Prettier code formatting
- ESLint linting
- TypeScript static typing
Not a fan of bits of the stack? Fork it, change it, and use npx create-remix --template your/repo! Make it your own.
Development
-
Install all dependencies & the Netlify CLI:
npm install
npm install netlify-cli -g
-
Create or connect to your Netlify project by running through the Netlify
initscript:netlify init
-
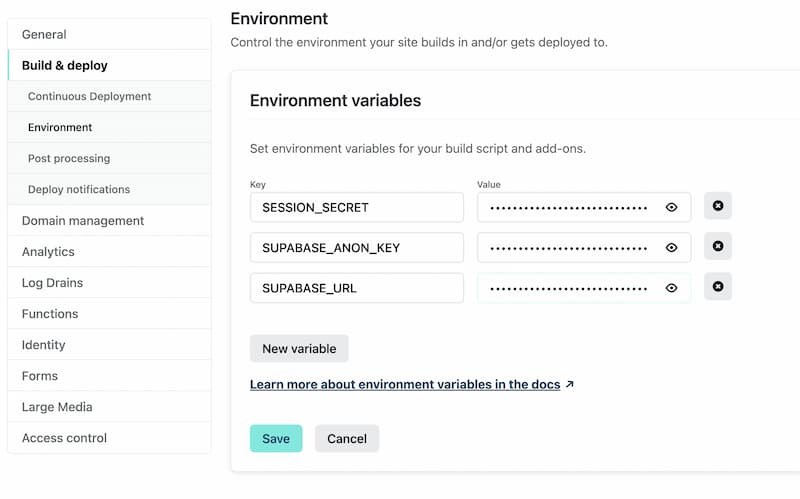
Add your Supabase and session environment variables to a
.envfile like.env.samplefile or through the Netlify project dashboard at https://app.netlify.com/ Site settings/Build & deploy/Environment:SUPABASE_URL="" SUPABASE_ANON_KEY="" SESSION_SECRET=""
There is more information about the Supabase variables in the Database section below. The initial
create-remixcommand will create theSESSION_SECRETvariable which is a random string of 16 characters, so feel free to just set a random 16 chars if not runningremix-create.
Environment Variable list in project dashboard.
-
Start dev server:
npm run dev
This starts your app in development mode, rebuilding assets on file changes.
Running Locally
Running npm run dev will also trigger the Netlify local development environment which will pull in all the environment variables of your Netlify project. You can learn more about this project's Supabase environment variables in the Database section below. With Netlify dev you can also:
- test functions
- test redirects
- share a live session via url with
netlify dev --live - and more :)
Relevant code:
This is a pretty simple note-taking app, but it's a good example of how you can build a full stack app with Remix and Supabase. The main functionality is creating users, logging in and out, and creating and deleting notes.
- creating users, and logging in and out ./app/models/user.server.ts
- user sessions, and verifying them ./app/session.server.ts
- creating, and deleting notes ./app/models/note.server.ts
Database
This project uses Supabase for data storage and user authentication.
Environment Variables
You will need these 2 environment variables to connect to your Supabase instance:
-
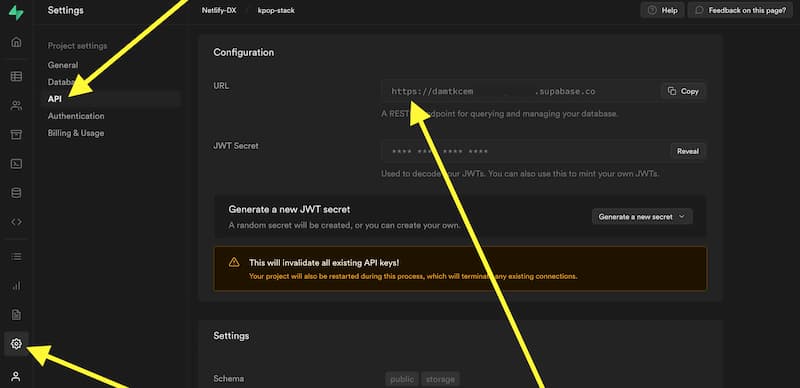
SUPABASE_ANON_KEY:Found in Settings/API/Project API keys
See screenshot
-
SUPABASE_URL:Found in Settings/API/Configuration/URL
See screenshot

You can add your environment variables to an .env file (like shown in the sample .env.sample) which will not be committed publicly because it is added to the .gitignore file. Or you can add it to your Netlify project environment variables (Site settings/Build & deploy/Environment) as shown in the Development section so that they can be easily shared with teammates.
Database creation
-
You can sign up with Supabase with your GitHub credentials
-
Create a new project on the 'Project' page

-
Next you will need to name the database and makes sure to save the password you select, then you will want to choose a region closes to you

-
It will take some time for the project to be fully scaffold so you will need to wait before the next steps.
SQL Queries
-
In your Supabase project dashboard, you can find the SQL Editor here

-
Select "New Query"

-
Here are the SQL queries used in the K-pop Stack
-- Create public profile table that references our auth.user
create table public.profiles (
  id uuid references auth.users not null,
  created_at timestamptz not null default current_timestamp,
  email varchar not null,

  primary key (id)
);

-- Create public notes table
create table public.notes (
  id uuid not null default uuid_generate_v4(),
  title text,
  body text,
  created_at timestamp default current_timestamp,
  updated_at timestamp default current_timestamp,
  profile_id uuid references public.profiles not null,

  primary key (id)
);

-- inserts a row into public.users
create or replace function public.handle_new_user()
returns trigger
language plpgsql
security definer set search_path = public
as $$
begin
  insert into public.profiles (id, email)
  values (new.id, new.email);
  return new;
end;
$$;

-- trigger the function every time a user is created
drop trigger if exists on_auth_user_created on auth.user;
create trigger on_auth_user_created
  after insert on auth.users
  for each row execute procedure public.handle_new_user();
-
You can copy these over to the SQL Editor and click the 'Run' button

-
Lastly, you will need to go to 'Authentication and Settings', and switch off "Enable email confirmations" for the project

Deployment
This stack has the Netlify configuration file (netlify.toml) that contains all the information needed to deploy your project to Netlify's edge nodes.
Want to deploy immediately? Click this button
Clicking this button will start the setup for a new project and deployment.
Deploy from the Command Line
Clone this repo with the git clone command. Then install the Netlify CLI tool and run netlify init.
git clone https://github.com/netlify-templates/kpop-stack

npm install netlify-cli -g # to install the Netlify CLI tool globally

netlify init # initialize a new Netlify project & deploy
CI/CD
Using the 'Deploy to Netlify' button or the init process will also set up continuous deployment for your project so that a new build will be triggered & deployed when you push code to the repo (you can change this from your project dashboard: Site Settings/Build & deploy/Continuous Deployment).
You can also use netlify deploy or netlify deploy --prod to manually deploy then netlify open to open your project dashboard.
💡 If you don't use
--prodon the deploy command you will deploy a preview of your application with a link to share with teammates to see the site deployed without deploying to production
Testing
Cypress
We have set up the basic configuration files for Cypress End-to-End tests in this project. You'll find those in the cypress directory. As you make changes, add to an existing file or create a new file in the cypress/integrations directory to test your changes.
We use @testing-library/cypress for selecting elements on the page semantically.
To run these tests in development, run npm run e2e-test which will start the dev server for the app as well as the Cypress client.
To other example of Cypress tests specifically on Remix stacks, check out the cypress directory in the Remix Grunge Stack example.
Type Checking
This project uses TypeScript. It's recommended to get TypeScript set up for your editor to get a really great in-editor experience with type checking and auto-complete. To run type checking across the whole project, run npm run typecheck.
Linting
This project uses ESLint for linting. That is configured in .eslintrc.js.
Formatting
We use Prettier for auto-formatting in this project. It's recommended to install an editor plugin (like the VSCode Prettier plugin) to get auto-formatting on save. There's also a npm run format script you can run to format all files in the project.