Field Play
Vector fields explorer. Made with WebGL, love and passion.


What?
Let's assign to every point on a grid a vector (1, 0). This means
we have an arrow, pointing to the right:

Let's pretend these vectors represent velocity. What if we drop a thousand particles onto this grid? How would they move?
When we assigned a vector to each point on the plain, we created a mathematical structure
called Vector Field.
Let's create a bit more interesting vector field:
- Points with even
ycoordinate get vector(1, 0); - Points with odd
ycoordinate get an opposite vector(-1, 0);

Again we drop a few thousands particles and see what happens:
The field above can be written in a single formula:
v.x = -2.0 * mod(floor(y), 2.0) + 1.0;
v.y = 0.0;
The remainder after integer division y/2 can be either 1 or 0.
Then we transform the remainder, so that the final vector is either (-1, 0) or (1, 0).
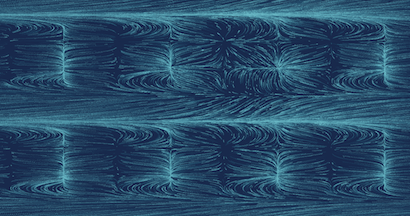
So far, we've used only one component of the velocity vector v.x. And particles
moved only horizontally. Let's try to set both components and see what happens
v.x = -2.0 * mod(floor(y), 2.0) + 1.0;
v.y = -2.0 * mod(floor(x), 2.0) + 1.0;


Wow! Two simple operations, and the final animation looks like an art piece!

Vector fields turns out to be very flexible generative framework.
How this project works?
This project is inspired by Vladimir Agafonkin's article: How I built a wind map with WebGL. Vladimir shows how to render up to a million particles at 60 frames per second, entirely on GPU.
I used almost the same technique with a few modifications:
- The vector field is defined in shader language with GLSL code, so that mathematical formulas can be expressed in free form
- Position of a particle is computed with 4th order Runge-Kutta method on GPU
- Each dimension X and Y is computed independently, so that we can store positions more accurately
- Added pan/zoom with panzoom library
- The vector field definition is saved in the URL with query-state library. So that you can bookmark/share your vector fields easily
GLSL code for vector field
Every time when vector field code is changed I compile a new shader:
The biggest challenge here was... to provide informative error messages when code is wrong. Web browser gives basic info, which can be confusing sometimes.
For example, the following code has a tiny error:
vec2 velocity(vec2 p) {
  return p
}
If we compile this shader, the browser will say: ERROR: 0:3: '}' : syntax error.
What's wrong? - There is a missing semicolon on line 2, the correct version is:
vec2 velocity(vec2 p) {
  return p;
}
It would be better if I could just tell that the semicolon is missing.
Luckily, there is a great glsl type checker and minifier evanw/glslx. It is written in Skew, and provides great many more feature than I needed.
After several hours of playing with code, I extracted parsing bits specific to type checking, and got validation (fingers crossed) more intuitive:
Page load time
Unfortunately, GLSL parsing came at cost - the library is ~64KB of compressed javascript. Together with vue.js (~26KB) users would have to download almost 90KB of code, that is not immediately needed to render the vector field.
At the same time, the code that loads vector field from query string, compiles it, and shows it on the
screen is very small. Less than 28KB.
For a regular Wi-Fi connection this may seem like not a big deal. But when you try to open the website on slow 3G mobile network, the difference between extra 90KB of code becomes painfully obvious.
So, how can we load the website faster?
I am using webpack vuejs template, and solution came almost trivial. I just needed to split library into chunks.
The main website's entry point would be my small WebGL renderer, which initializes the scene and kicks of download of vue.js immediately:
initVectorFieldApp(canvas);

// Tell webpack to split bundle, and download settings UI later.
require.ensure('@/vueApp.js', () => {
  // Settings UI is ready, initialize vue.js application
  require('@/vueApp.js');
});
Similarly, the GLSL parser is lazy-loaded. By default I create a naive parser that assumes GLSL code is fine. Once the real parser is loaded, the naive parser is replaced:
var glslParser = {
  check(code) { return no errors }
};

// Load heavy-weight parser:
require.ensure('glsl-parser', () => {
  // ... and replace the naive parser with the real one.
  glslParser = require('glsl-parser');
});
You might be wondering what happens when the parser is being loaded? Well, if there are no errors we immediately show the vector field on the screen. If there are errors, the browser would not compile the shader, and the website visitors will not see informative error message until the real GLSL parser is loaded.
Was the split worth the effort?
I think so. On slow 3G network the vector field is visible in ~3,000ms. On my regular Wi-Fi network, the first frame with vector field is rendered in less than 500ms:

Screenshot is taken with Chrome's developer tools, disabled cache. Start time is counted from the navigation start
Float packing
The core idea of WebGL based computation is quite simple.
GPU can render images very fast. Each image is a collection of pixels. Each pixels is just a number, that represents color, usually written in 32 bits (RGBA format).
But who said that these 32 bits per pixel have to represent a color? Why can't we compute some number, and store it into 32 bits? This number could be, for example, position of a particle that follows along some velocity vector...
If we do so, the GPU would still treat these numbers as colors:
![]()
Luckily, we don't have to make this seemingly random images visible to the users. WebGL allows
to render things onto "virtual" screens, called frame buffers.
These virtual screens are just images (textures) in the video memory. With two textures we can trick GPU into solving math problems. On each frame the algorithm works like this:
1. Tell GPU, to read data from a "background" texture;
2. Tell GPU, to write data to a "screen" texture using frame buffer;
3. Swap "background" with "screen";
In theory this should work nice. In practice there is a problem. WebGL doesn't
let you write floating point numbers into textures. So we need to convert a float number into
RGBA format, with 8 bits per channel.
In his article, Vladimir used the following encoding/decoding schema:
// decode particle position (x, y) from pixel RGBA color
vec2 pos = vec2(
    color.r / 255.0 + color.b,
    color.g / 255.0 + color.a);
... // move the position
// encode the position back into RGBA
gl_FragColor = vec4(
    fract(pos * 255.0),
    floor(pos * 255.0) / 255.0);
Here both X and Y coordinate of the particle are stored into a single 32bit number.
I used this approach in the beginning, and it worked well on desktop and on my Android phone.
However, when I opened a website on iPhone, unpleasant surprise was waiting for me. Severe artifacts appeared without any apparent reason.
Compare. The same code runs on desktop (left) and on the iPhone (right)

What's even worse, when field is static (velocity is 0 everywhere), the particles on iPhone were kept moving:

I checked that requested floating point resolution was set to the highest available (highp). Yet the artifacts
were to obvious to let them be.
How can we fix this?
I didn't want to go the easiest path of enabling floating point textures. They are not as much widely supported as I'd like. Instead, I did what years of non-GPU programming told me not to do.
I decided to solve thousands of ordinary differential equations not just once per frame. But one time per each dimension. I'd pass an attribute to the shader, telling which dimension needs to be written as an output for this "draw" call:
if (u_out_coordinate == 0) gl_FragColor = encodeFloatRGBA(pos.x);
else if (u_out_coordinate == 1) gl_FragColor = encodeFloatRGBA(pos.y);
In pseudo-code it looks like this:
Frame 1:
  Step 1: Hey WebGL, set u_out_coordinate to 0 and render everything into `texture_x`;
  Step 2: Hey WebGL, set u_out_coordinate to 1 and render everything AGAIN into `texture_y`;
We solve the same problem and throw away everything but x component of the solution. Then repeat it for y.
It seemed crazy to me, as I thought this would kill performance. But even my low-end Android phone had no problems with this approach.
The encodeFloatRGBA() uses all 32 bits to encode float as RGBA vector. I found its implementation
somewhere on stackoverflow, and I'm not sure if it's the best possible way of packing
(if you know better, please let me know).
The good news is that artifacts were gone:

Sharing
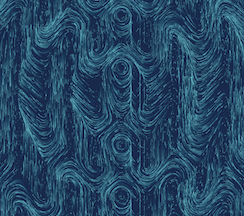
Many times I was amazed by how beautiful some vector fields are. To encourage exploration I created a very naive random vector field generator. You can trigger it by pressing "Randomize" button.

But please don't think that what generator can do is all there is. It's just a tip of an iceberg, and I hope you play with vector field yourself.
When you find something interesting - don't forget to share! Just copy the link and share it away. The link holds all necessary information to restore vector field state (this is done with help of query-state library).
Video recording
If you'd like to record a video with a vector tool, please refer to instructions in this file.
Auto Mode
You can have it automatically shuffle through a variety of interesting fields by using the
autotime URL param, which specifies how long to hold each field.
For instance autotime=30s will show a field for 30 seconds and then move to the next one.
You can use ms, s, m, or h to specify milliseconds, seconds, minutes, or hours, respectively.
You can also specify whether the fields are presets or generated or both, using autosource=presets,
autosource=generator, or autosource=both.
Give it a try!
Local development
Clone this repository, then:
# install dependencies
npm install

# serve with hot reload at http://localhost:8880
npm run dev
License
The project is released under the MIT license.
Thanks!
I learned a lot building this project. I hope you too liked this short voyage into world of vector fields, math and WebGL.
Please let me know what you think.
Have fun!