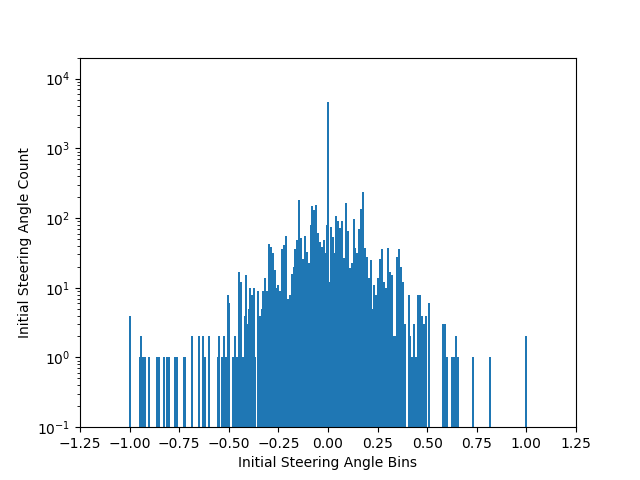
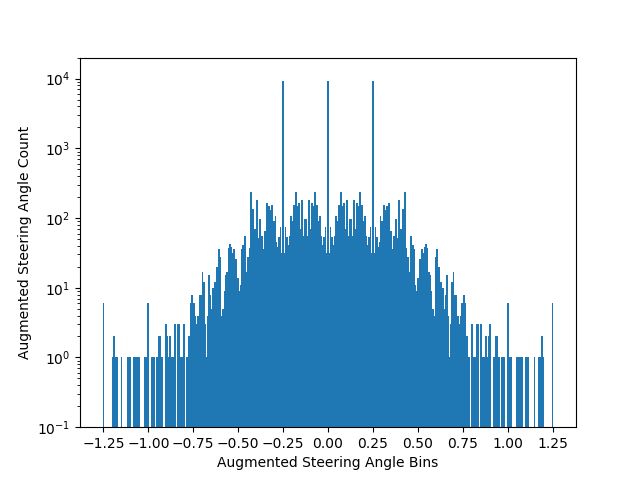
The goals / steps of this project are the following:
- Use the simulator to collect data of good driving behavior
- Build, a convolution neural network in Keras that predicts steering angles from images
- Train and validate the model with a training and validation set
- Test that the model successfully drives around track one without leaving the road
- Summarize the results with a written report
The project includes the following files:
- model.py containing the script to create and train the model
- model.h5 containing the final trained convolution neural network
- model.json containing the final convolutional neural network
- drive.py for driving the car in autonomous mode using model.h5
- video.py to create a video from images output from drive.py
- video.mp4 for the final video of the autonomously driven car
To run the code, the following resources are needed:
- a full Python 3.x, TensorFlow 1.x, Keras 2.x environment
- if using conda, run
conda env create -f conda-env.yml - here are environment files for macOS and AWS Ubuntu 16.04 p2.xlarge AMI
- if using conda, run
- the Udacity self driving car simulator for Linux, macOS, or Windows, or you can compile from source
- the sample training data
- the DRIVING_LOG location in line 16 of model.py needs to be changed to point to above data
To drive with the trained model, execute the following commands:
- Start the Udacity Self Driving Car Simulator & put it in Autonomous mode
- Start the drive code with the model, optionally with a directory to save the simulated images:
python drive.py model.h5 [image_directory]To create a video from the optional simulated image data:
python video.py image_directoryTo re-train the model, execute the following command:
python model.pyNB: This command really should be run on a GPU accelerated tensorflow-gpu machine like an AWS p2.xlarge or g2.2xlarge instance.
You will likely find that the sample data alone is insufficient for proper training, in which case you will need to run the simulator in Training mode, drive problematic portions of the track while recording, and augment the sample training data with the newly recorded data.
The initial code started with a very simple model (in function simple_test_model in model.py) to ensure the rest of the code ran properly. The first real model was the steering model written by comma.ai (implemented in function comma_ai_model in model.py) for their research. Though it trained reasonable well, it had over 3 million parameters and seemed inefficient.
The final implementation starts with the NVIDIA steering model (implemented in function nvidia_model in model.py) that had much a much lower number of parameters (250K according to the linked paper). In the implementation here, the size of the images were different due to cropping so the parameter space was larger, at about 350K. A ReLU activation function is used to introduce non-linearity even though the paper doesn't mention what activation function they used. The image data is normalized between -1 and +1 within a Keras Lambda() layer. Finally, the model uses an Adam optimizer so the learning rate is adaptive rather than fixed or simple decaying. The model is summarized in the table below.
| Layer (type) | Output Shape | Param # |
|---|---|---|
| lambda_1 (Lambda) | (None, 65, 320, 3) | 0 |
| conv2d_1 (Conv2D) | (None, 31, 158, 24) | 1824 |
| conv2d_2 (Conv2D) | (None, 14, 77, 36) | 21636 |
| conv2d_3 (Conv2D) | (None, 5, 37, 48) | 43248 |
| conv2d_4 (Conv2D) | (None, 3, 35, 64) | 27712 |
| conv2d_5 (Conv2D) | (None, 1, 33, 64) | 36928 |
| flatten_1 (Flatten) | (None, 2112) | 0 |
| dense_1 (Dense) | (None, 100) | 211300 |
| dense_2 (Dense) | (None, 50) | 5050 |
| dense_3 (Dense) | (None, 10) | 510 |
| dense_4 (Dense) | (None, 1) | 11 |
| Total params | 348,219 | |
| Trainable params | 348,219 | |
| Non-trainable params | 0 |
NB: I made one very crucial mistake in early implementations of the model, adding an extra Dense(1164) layer right after the Flatten(). It turns out that the Flatten layer in NVIDIA's case, with a 66x200x3 initial image size, ends up with 1164 outputs and that's what their diagram referred to. This caused the parameter space to blow up and I didn't realize it until I added the model.summary() to view the model back.
The model was trained using the center camera from the sample training data initially. Since the training data was based on a reasonably good driver, the model would quickly overfit to the data and result in lots of problem areas where the model would drive off the road. To fix this, the data was augmented using the following techniques.
- Left & right camera images were used, with a medium offset of 0.25 degrees to help steer away from the edges back to the center
- All center, left, and right images were flipped, along with their respective steering angles, to account for driving in either direction.
- Problem areas with non-standard roads (e.g., bridges) or shoulders (e.g., dirt) were driven again, this time from the edge with a sharp steering angle to ensure the model corrected well in those conditions.
The first two techniques were implemented as part of the preprocessing methods described below.
The first preprocessing done was within the Pandas DataFrame that contains the driving log. The DataFrame is duplicated for each of left and right images in addition to the center and then duplicated again for all their flipped versions, all while adjusting the steering angle appropriately. The DataFrame is also augmented with additional columns prescribing which camera image to use and whether or not to flip it. Rather than actually read and store all the images and their flipped versions, this was much more memory and compute efficient. The actual image read and optional flip was done in the generator described in the training section below.
The other preprocessing step done, again, in the generator, was to crop the top and bottom of the images since that only contains the sky or car hood and are not useful. This reduces the image sizes and model parameter space significantly.
To train the model, the data set was split into training and validation data randomly, with the validation set being 20% of the training set. However, this wasn't done in a traditional manner in an effort to save memory space. The implementation uses a generator (in function data_generator in model.py) that reads in the Pandas DataFrame with the regular driving log along with the additional columns on which camera angle and flip to use. This information is used to read the appropriate image, do the flip, crop the image, and yield the data back to the Keras model.fit_generator() routine for both the training and validation data sets.
Here are some ideas for future work to improve how the model generalizes. The lack of these features in the current implementation are likely the reasons why the model did so poorly on the second track.
- overall brightness and color temperature changes to simulate twilight, dusk, and night
- random shadows to simulate clouds, etc.
- random image shifts to account for new road formations
In addition, here are some ideas of how to speed up and improve the general operation of the training.
- checkpointing when validation loss improves
- early stopping to prevent long runs
Finally, it turns out that there are quite a few small steering angles, especially right around 0. This may cause the model to want to steer "drunk" with tiny, unnecessary corrections. Future implementations would experiment with filtering out these small angles.

