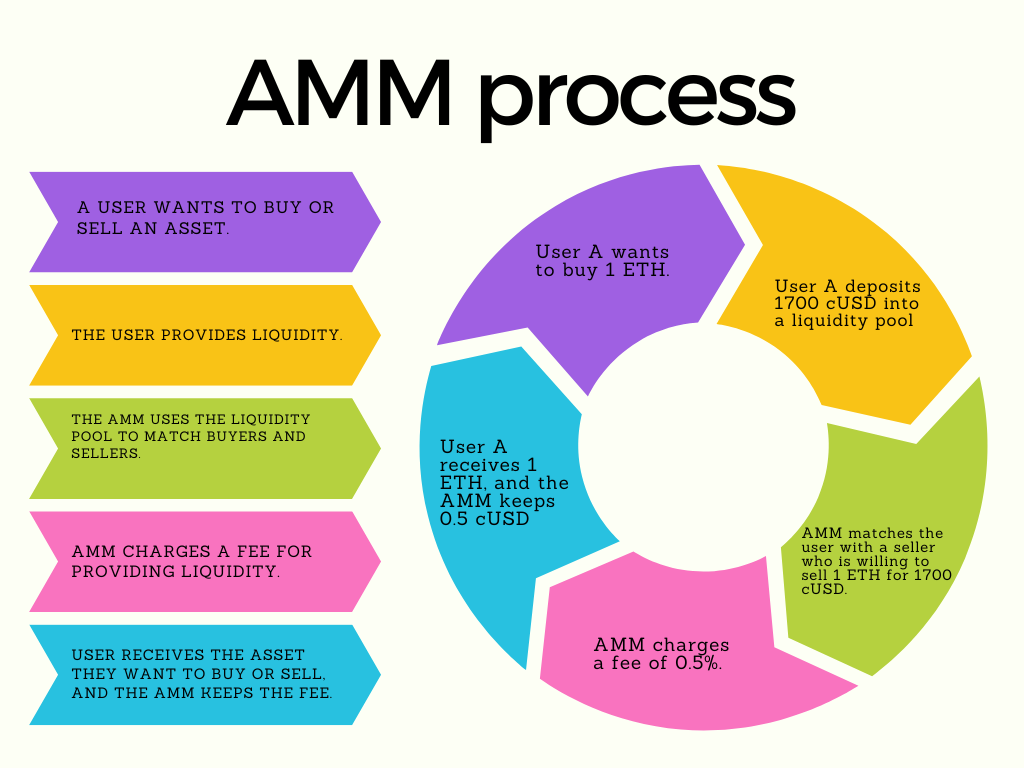
This tutorial will guide you as a developer through the process of building an Automated Market Maker (AMMs) on the Celo blockchain. Before we proceed, let us take a look at what Market Makers are. Market Makers are also called Liquidity Providers. They are companies that facilitate liquidity provision and trading in financial markets. Basically, they act as middle men that maintain an inventory of tradable assets. The employ the use of human traders and algorithms to carry out the trading activities and ensure that there is always liquidity in the market. One very popular market making company is Goldman Sachs. With this background knowledge, we can define Automated Market Makers as decentralized platforms or exchanges that facilitate liquidity provision and trading on the blockchain. AMMs do not need order books to operate instead they use liquidity pools. Uniswap is one of the leading DeXs that implements the concept of AMMs.
Here is a list of important things about AMMs you should know before building one
- Liquidity Pool: A liquidity pool is a collection of digital assets or funds that is held in a smart contract. These funds are provided by individuals or entities refered to as liquidity providers.
- Liquidity Provider: A liquidity provider refers to individuals or entities that deposit tokens into the liquidity pool thus serving as fund contributors.
- Constant Product Formula: This formula is a mathematical equation that ensures that the total assets value in a liquidity pool remains constant. The formula is defined below
(x * y = k) - Token Swaps: This is defined as the process of exchanging one token for another within a liquidity pool. The price during token swapping is usually dependent on the constant product formula and the current token balance available in the liquidity pool.
- Trading Fees: Most AMMs charge fees on every trade done. The fees varies across AMMs
The codebase for this tutorial is available here. You could also check out Uniswap
For this tutorial, you need to have the following installed on your computer
- A package manager such as
npmoryarn - Node js
- Celo Composer
Celo Composer is built on Celo to make it simple to build dApps using a variety of front-end frameworks, and libraries. For more information on how to start off your project with Celo Composer, visit here. Please keep in mind that these are the frameworks you should select while installing Celo Composer
- React
- Rainbow-kit celo
- Hardhat
- Subgraph
If you are stuck, kindly refer to the Celo Composer installation section of my previous tutorial here.
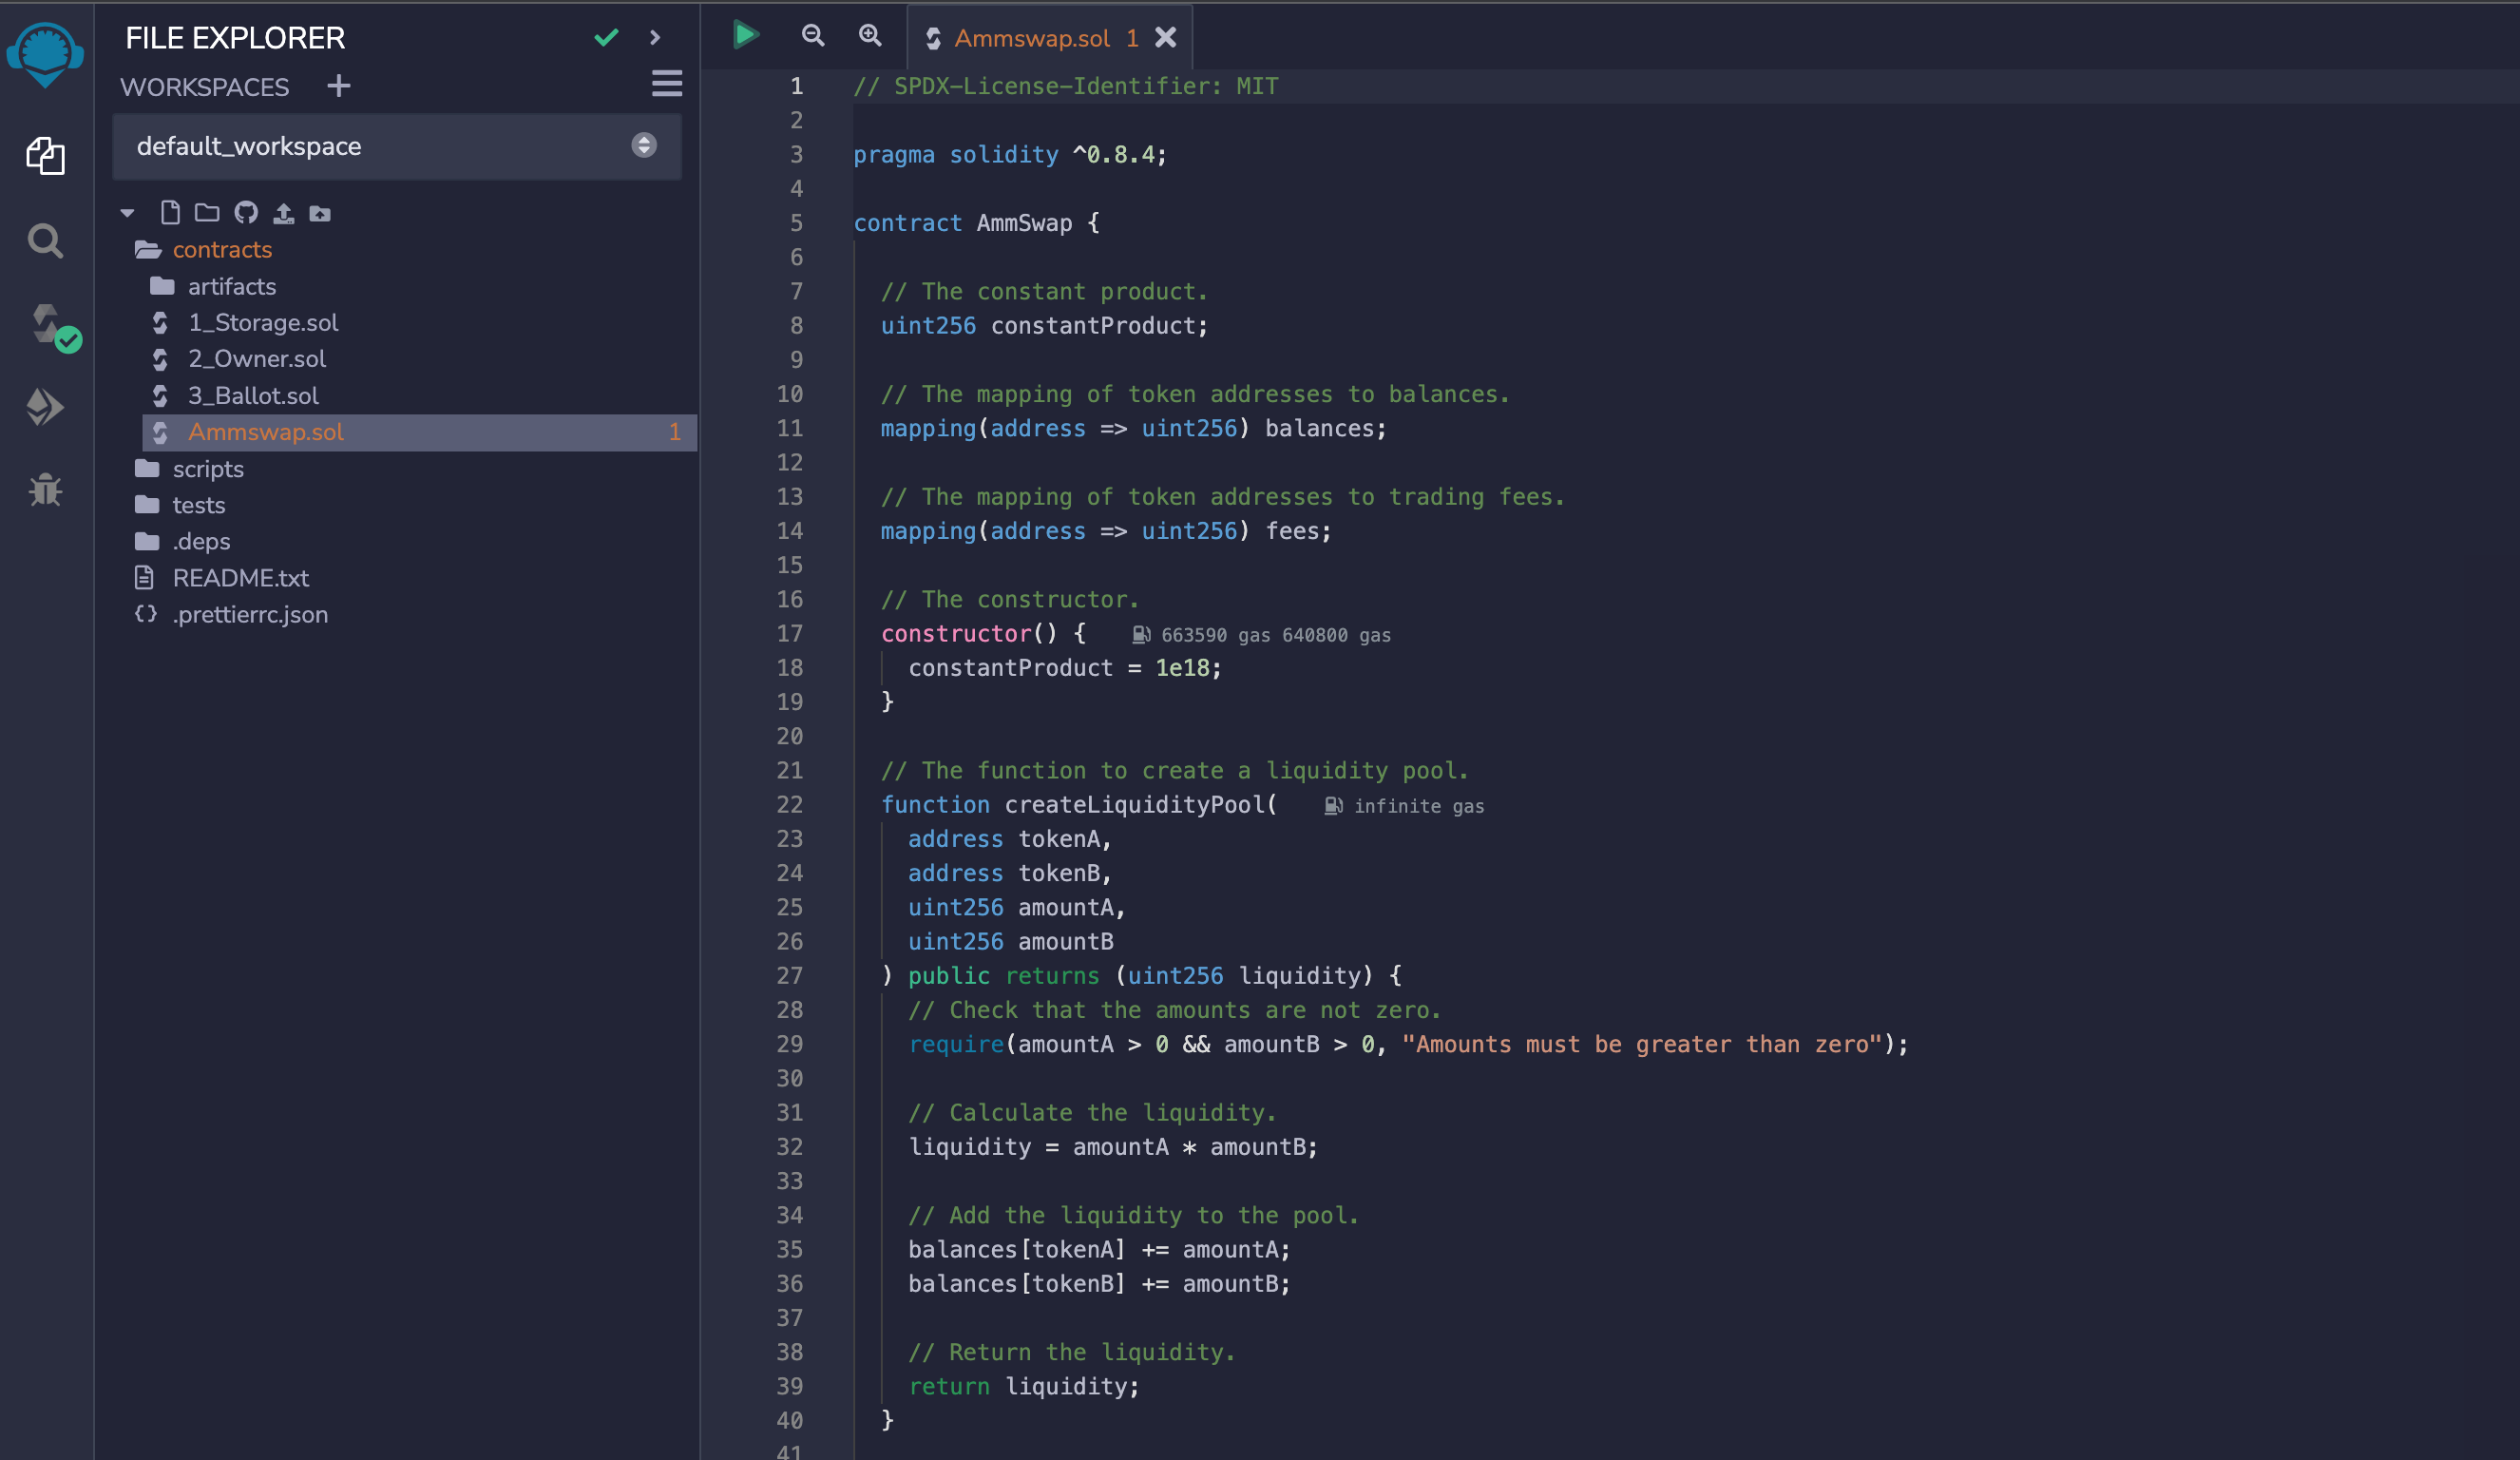
From your celo-composer template, navigate to the packages/hardhat/contracts folder and create a solidity file. Our smart contract will address major concepts such as creating a liquidity pool, swapping tokens, calculating the constant product and calculating trading fees. Use this code to guide you on how your contract should look like
// SPDX-License-Identifier: MIT

pragma solidity ^0.8.4;

contract AmmSwap {

  // The constant product.
  uint256 constantProduct;

  // The mapping of token addresses to balances.
  mapping(address => uint256) balances;

  // The mapping of token addresses to trading fees.
  mapping(address => uint256) fees;

  // The constructor.
  constructor() {
    constantProduct = 1e18;
  }

  // The function to create a liquidity pool.
  function createLiquidityPool(
    address tokenA,
    address tokenB,
    uint256 amountA,
    uint256 amountB
  ) public returns (uint256 liquidity) {
    // Check that the amounts are not zero.
    require(amountA > 0 && amountB > 0, "Amounts must be greater than zero");

    // Calculate the liquidity.
    liquidity = amountA * amountB;

    // Add the liquidity to the pool.
    balances[tokenA] += amountA;
    balances[tokenB] += amountB;

    // Return the liquidity.
    return liquidity;
  }

  // The function to swap tokens.
  function swap(
    address tokenA,
    address tokenB,
    uint256 amountA,
    uint256 minAmountB
  ) public returns (uint256 amountB) {
    // Check that the amounts are not zero.
    require(amountA > 0 && minAmountB > 0, "Amounts must be greater than zero");

    // Calculate the amount of B that will be received.
    amountB = calculateAmountB(amountA, minAmountB);

    // Check that the amount of B is not zero.
    require(amountB > 0, "Insufficient liquidity");

    // Swap the tokens.
    swapTokens(tokenA, amountA, tokenB, amountB);

    // Return the amount of B that was received.
    return amountB;
  }

function swapTokens(
    address tokenA,
    uint256 amountA,
    address tokenB,
    uint256 amountB
  ) internal {
    // Check that the amounts are not zero.
    require(amountA > 0 && amountB > 0, "Amounts must be greater than zero");

    // Calculate the new constant product.
    uint256 newConstantProduct = constantProduct - amountA * amountB;

    // Update the balances of the pool.
    balances[tokenA] -= amountA;
    balances[tokenB] += amountB;

    // Update the constant product.
    constantProduct = newConstantProduct;

    // Transfer the tokens to the user.

    (bool success, ) = tokenA.call(abi.encodePacked(amountA));
    require(success, "Failed to transfer tokens");

    (success, ) = tokenB.call(abi.encodePacked(amountB));
    require(success, "Failed to transfer tokens");
  }

  // The function to calculate the amount of B that will be received in a swap.
  function calculateAmountB(uint256 amountA, uint256 minAmountB) public view returns (uint256) {
    // Calculate the constant product.
    uint256 newConstantProduct = constantProduct - amountA * minAmountB;

    // Calculate the amount of B that will be received.
    uint256 amountB = newConstantProduct / amountA;

    // Ensure that the amount of B is not less than the minimum amount.
    amountB = amountB < minAmountB ? minAmountB : amountB;

    // Return the amount of B.
    return amountB;
  }

  // The function to calculate the trading fee.
  function calculateTradingFee(uint256 amount) public pure returns (uint256) {
    // The trading fee is 0.03%.
    uint256 fee = amount * 3e18 / 10000;
    // Return the trading fee.
    return fee;
  }

  // The function to calculate the price of a token.
  function calculatePrice(address tokenA, address tokenB) public view returns (uint256) {
    // Get the amounts of tokens in the pool.
    uint256 amountA = balances[tokenA];
    uint256 amountB = balances[tokenB];

    // Calculate the constant product.
    uint256 constantProduct = amountA * amountB;

    // Calculate the price of token A.
    uint256 priceA = constantProduct / amountB;

    // Return the price of token A.
    return priceA;
  }
}
From this contract, users can create liquidity pools by depositing tokens into the contract. This is what will be used to maintain the liquidity pool. The contract also automatically calculates the price of a swap and executes it with the swap function. You can track the price of tokens by calling the calculatePrice function on the contract, that way it's able to return the current price of the tokens.
To test this contract, let us go to the Remix Online IDE. Remix Online IDE is a tool for developing, debugging, deploying and testing smart contracts. Open Remix and create a file under the contracts folder. We are literally copying the same smart contract code as above
From here navigate to the Solidity compiler tab to compile the code
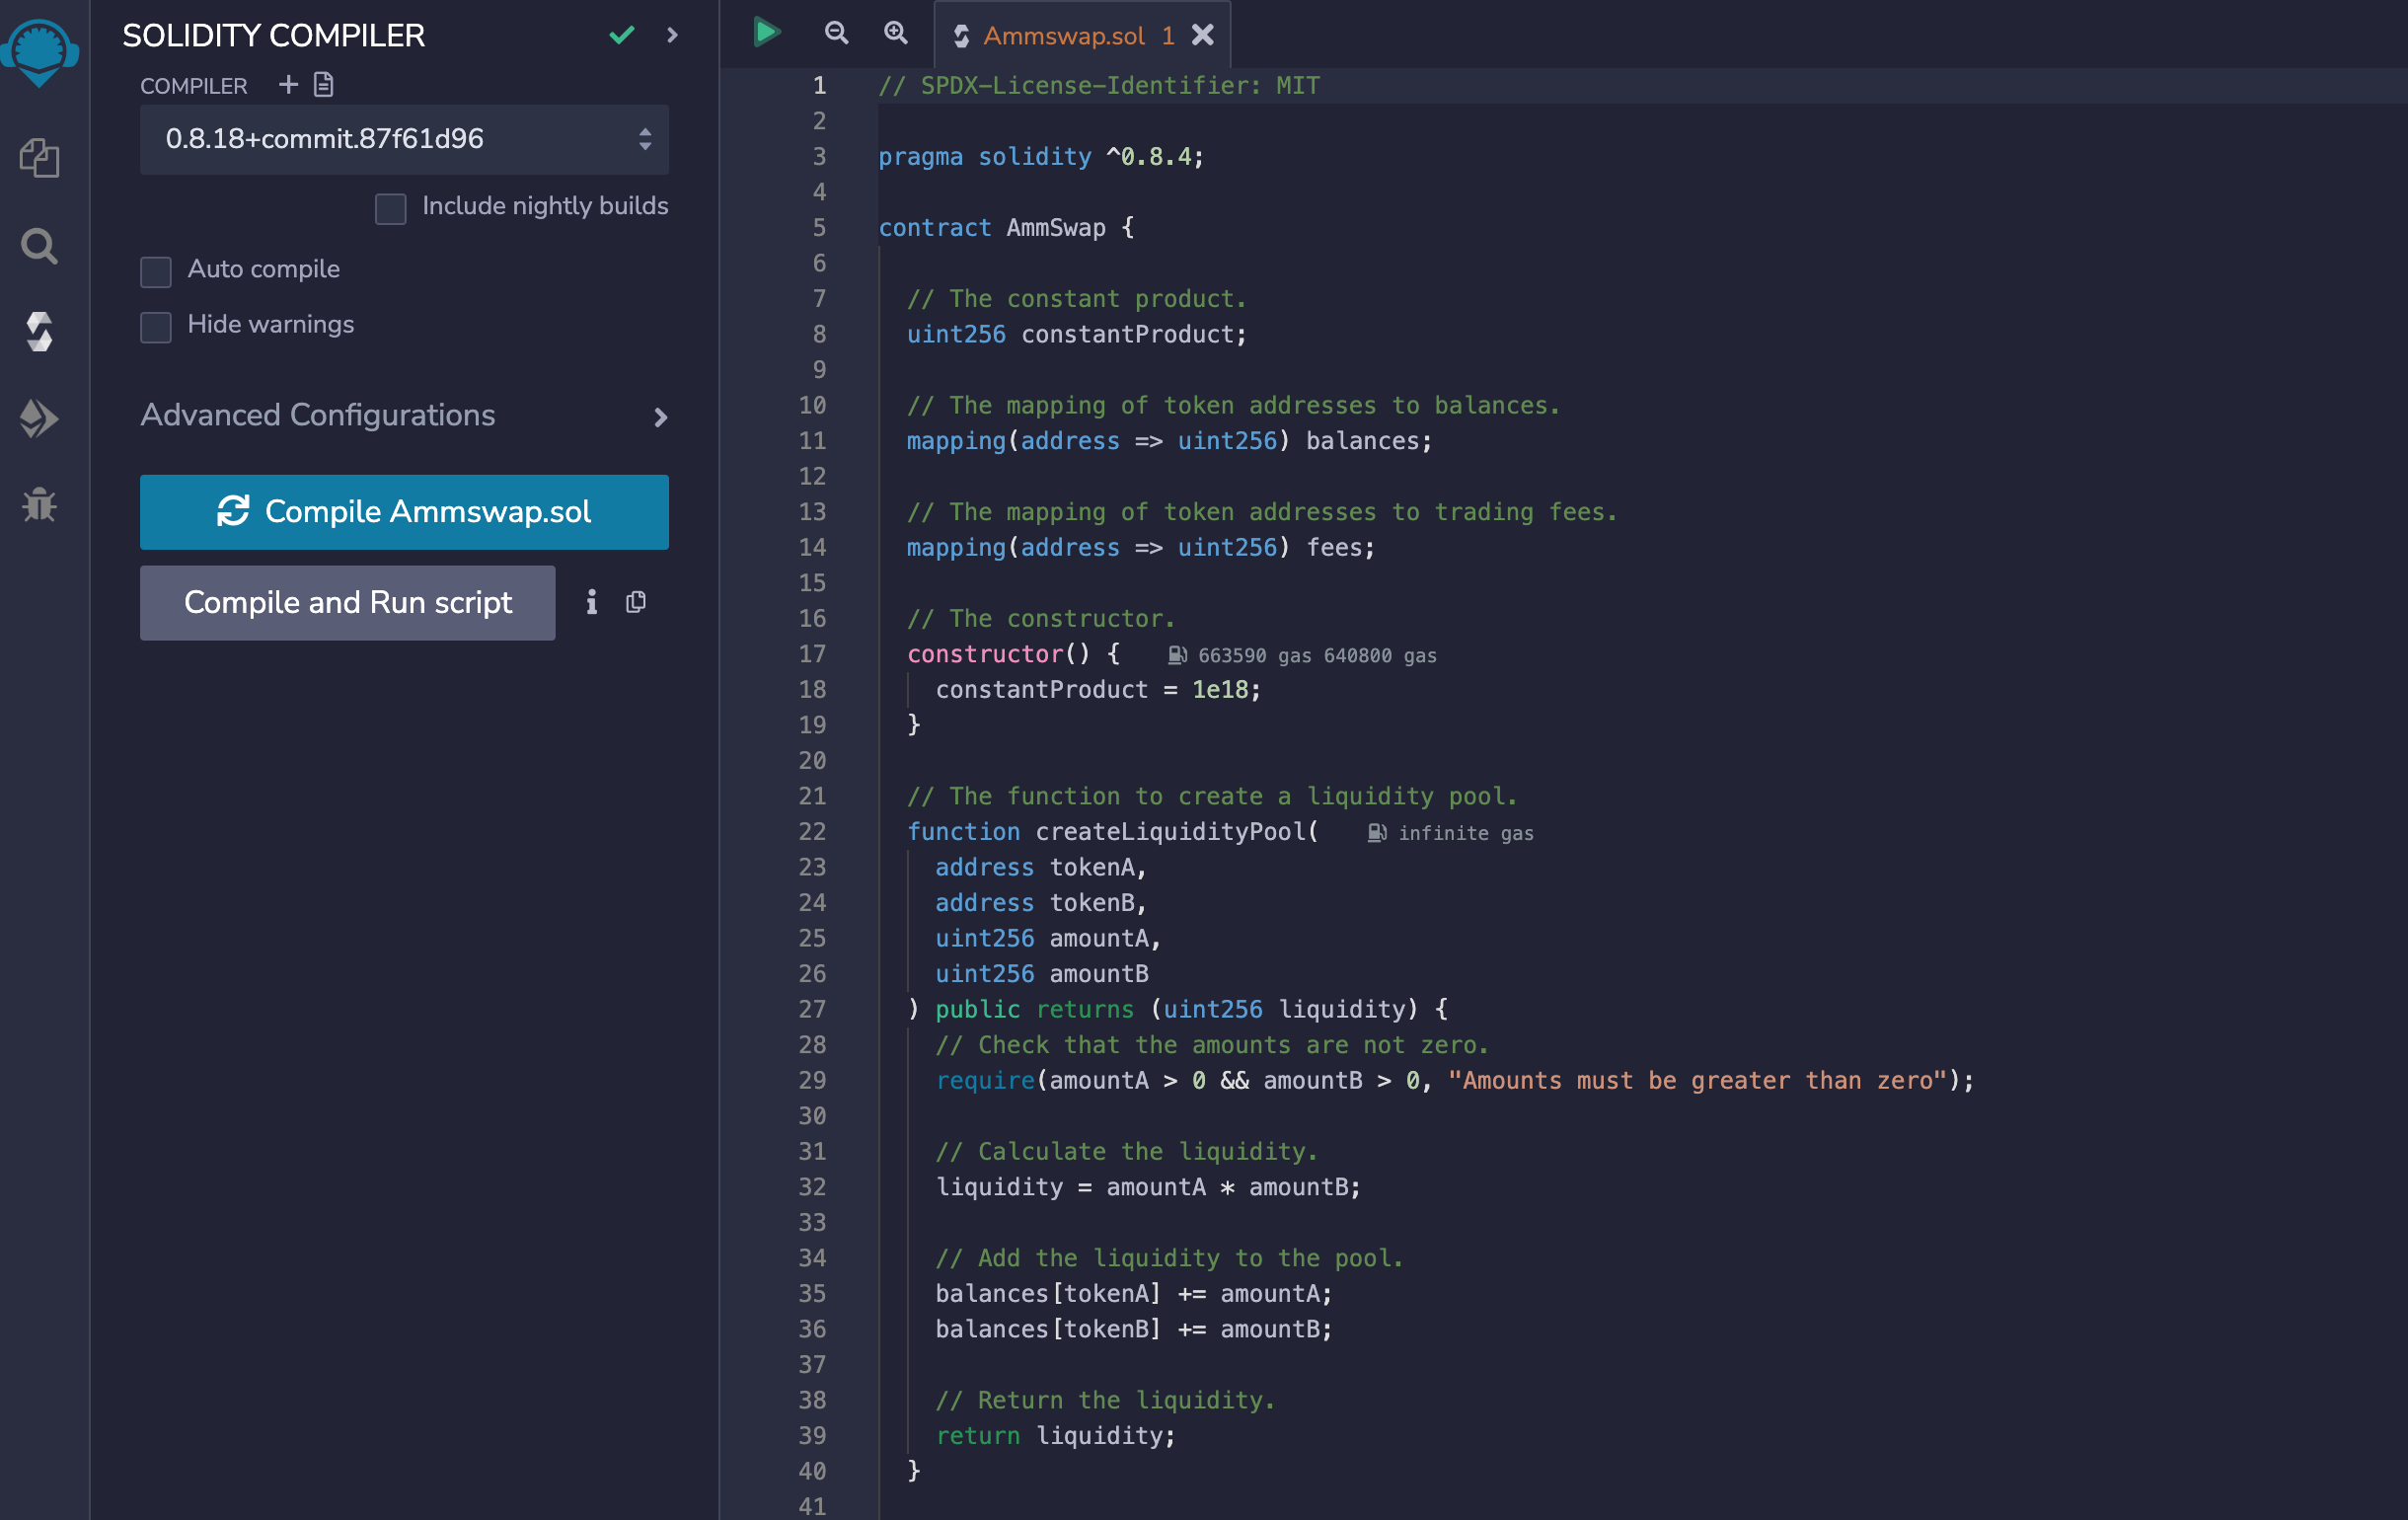
On a successful compilation, Remix will give several options such as publishing on ipfs or Swarm.

We don't need to do those so we can move to the next tab and deploy our contract.
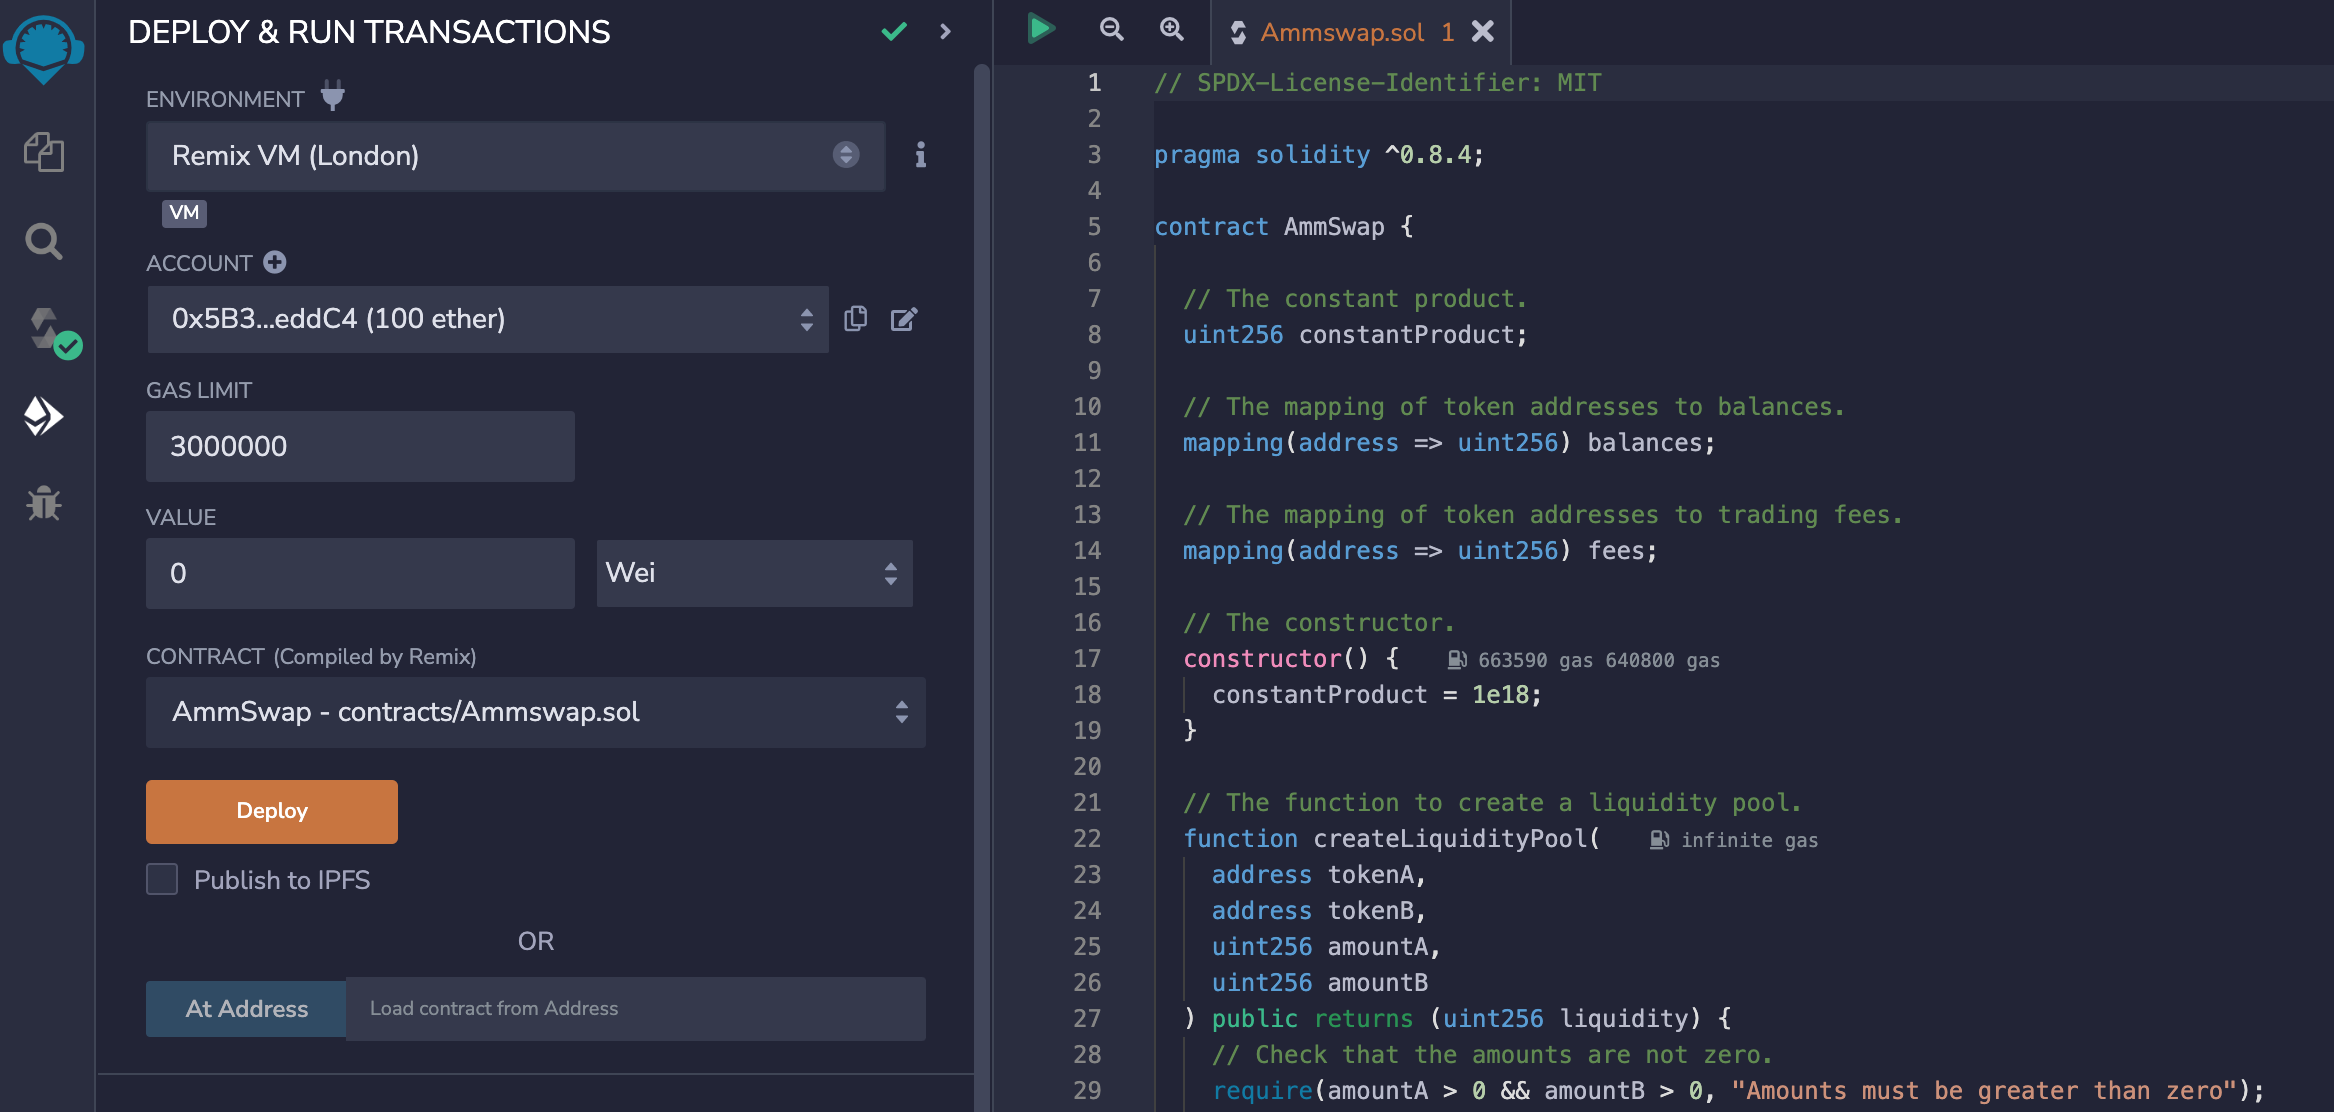
Click on the Deploy button
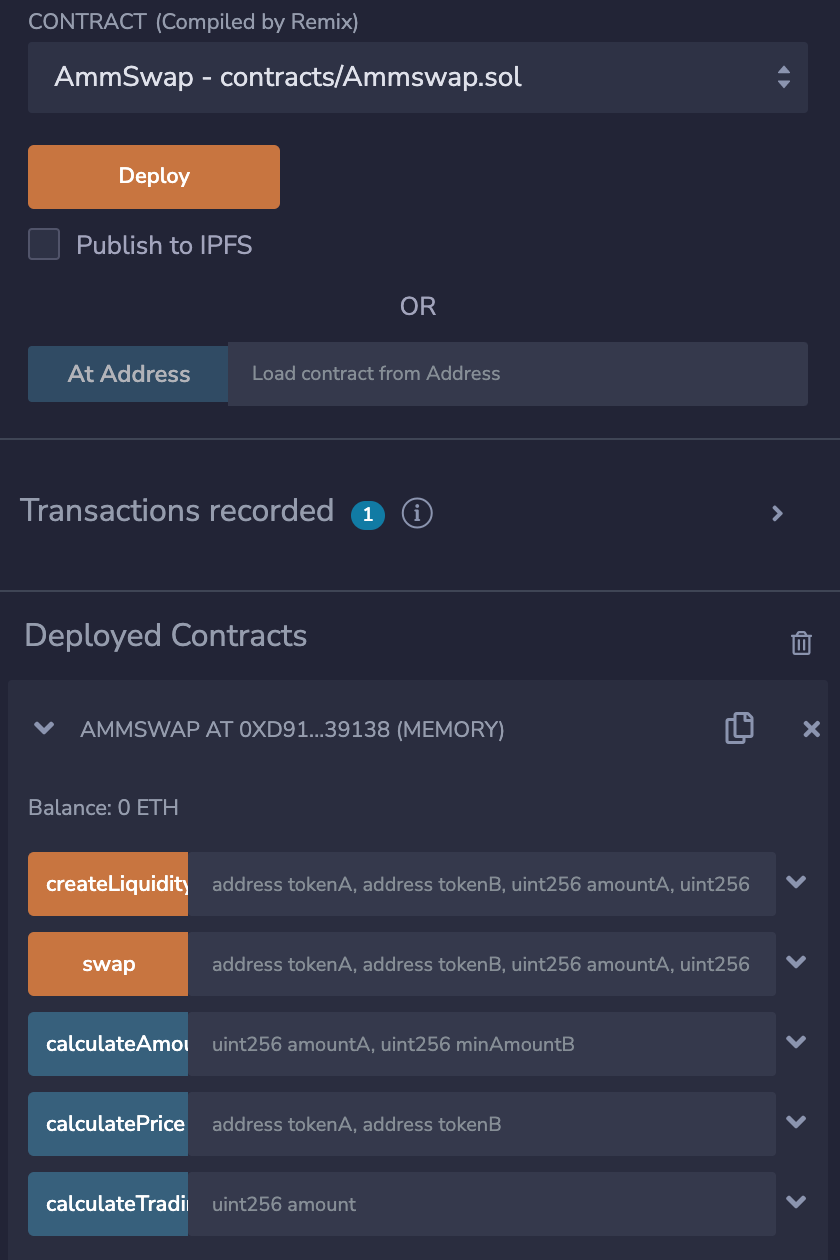
The first test we will do is create the liquidity pool
We will input the token addresses of tokenA and tokenB as well as the amount of the tokens. You can get test addresses from Remix from Account, so just navigate, copy and paste any two addresses

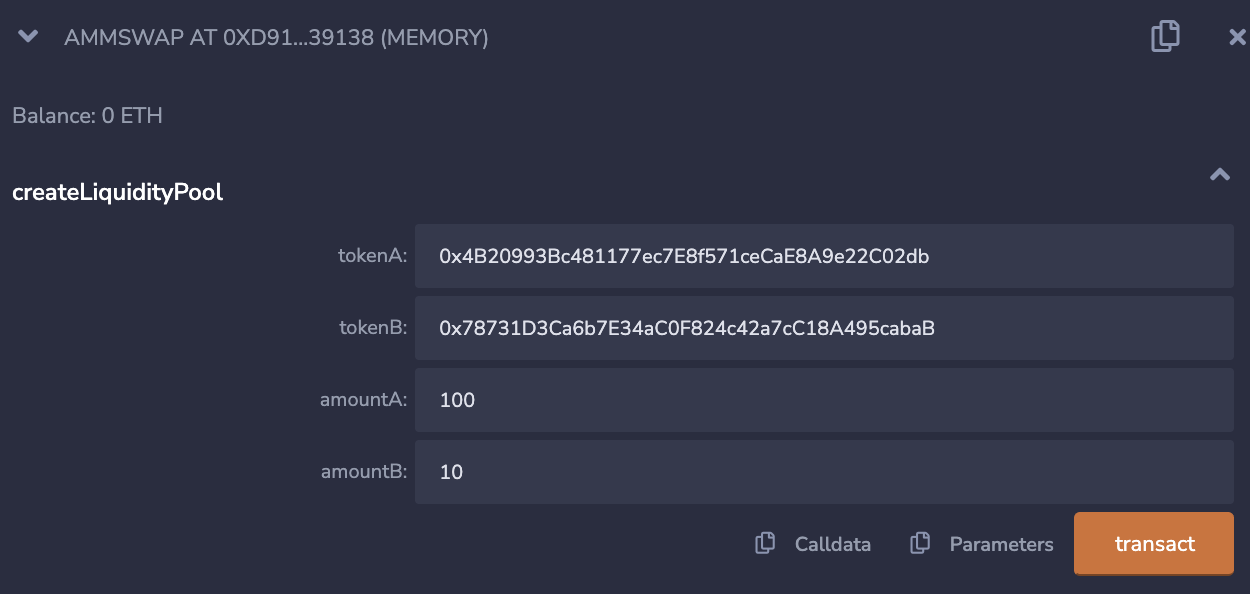
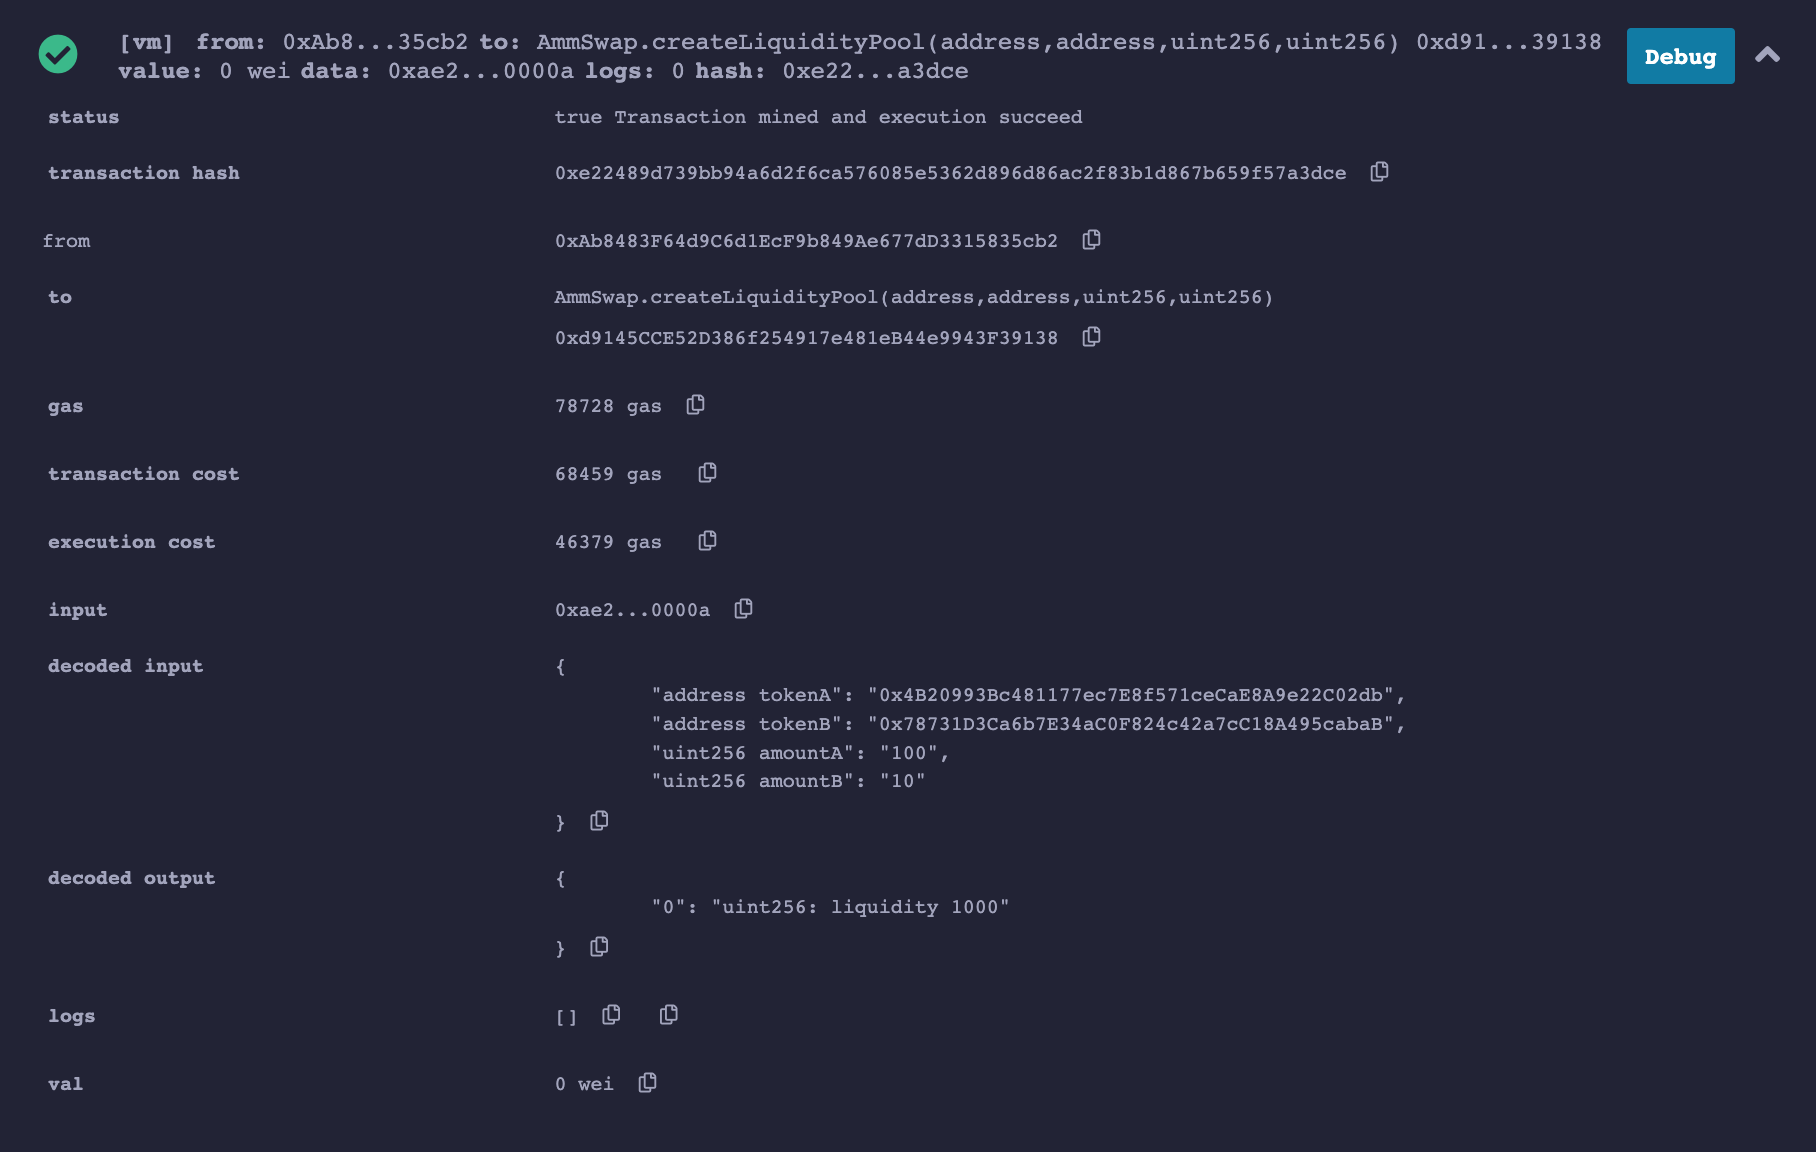
Click on transact and observe your output
From the image above, decoded output tells us how much liquidity we have of which it is 1000
The second test we can do is the swap function
Fill in all inputs and observe the output.

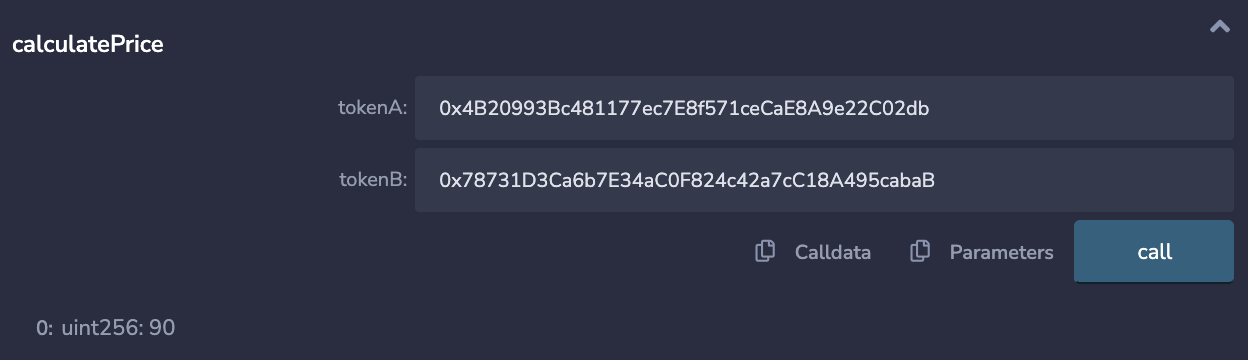
The third test we can do is calculate the price of a token after getting the amounts of tokens in the pool and calculating the constant product.
Now, that we have ran couple of tests, let's go back to our IDE and deploy our smart contract.
To deploy your contract, write a deploy script in the deploy folder
const hre = require("hardhat");

const main = async () => {
  const contractFactory = await hre.ethers.getContractFactory('AmmSwap');
  const contract = await contractFactory.deploy();
  await contract.deployed();
  console.log("Contract deployed to this address:", contract.address);

};

const runMain = async () => {
  try {
    await main();
    process.exit(0);
  } catch (error) {
    console.log(error);
    process.exit(1);
  }
};

runMain();
You can now head back to your terminal to run the following command
npx hardhat --network alfajores run deploy/deploy.jsYour output should look similar to this
Contract deployed to this address: 0x3E73365764fBBE4f58Eb0B6a62CA80FC706D851B
The next process is to verify your contract address with this command
npx hardhat --network alfajores verify 0x3E73365764fBBE4f58Eb0B6a62CA80FC706D851BFinally, your output should look like this after the verification
Nothing to compile
Successfully submitted source code for contract
contracts/AmmSwap.sol:AmmSwap at 0x3E73365764fBBE4f58Eb0B6a62CA80FC706D851B
for verification on the block explorer. Waiting for verification result...

Successfully verified contract AmmSwap on Etherscan.
https://alfajores.celoscan.io/address/0x3E73365764fBBE4f58Eb0B6a62CA80FC706D851B#codeI hope you enjoyed reading this article up to this point. Here is a recap of what you learnt so far
✔️ Overview of AMMs, basic terms and process flow
✔️ Understanding the constant product formula (x * y = k)
✔️ Using Remix IDE and its features
✔️ Implementing the AMM functionality using Solidity
✔️ Testing the functionality of the AMM contract using Remix
✔️ Deploying of the AMM contract via Celo composer
In the first part of this tutorial, we talked about what AMMs are, their importances, applications and relevant terms. We eventually wrote and deployed a smart contract to simulate the process. In this later part of the tutorial, we will build a front-end interface that implements our smart contract that way we can get a full mental picture of what an AMM should look like. This is going to be a sketchy UI, so feel free to tweak as you wish or find suitable. If you stumbled on this tutorial first, please read the first part of this tutorial for better context.
- Celo Composer: While setting up Celo-Composer, we selected React as our front-end framework so we will be writing in React specifically Next JS.
For a starter guide, you can check out the codebase here
You can find the demo of this tutorial here
Install the following dependencies to begin
npm i react-chartjs-2
npm i chart.js
npm i react-icons
Let's start with creating a Sidebar to handle all of our features. We will be having three features: Liquidity Pool Creation, Liquidity Pool Explorer, Token Price Chart.
Navigate to the react-app folder, here is where we will be doing all frontend changes. In the components folder, create a Sidebar.tsx file, in here input the following piece of code
import Link from "next/link";
import { useRouter } from "next/router";
import React, { useEffect, useRef } from "react";
import {
  FaChartPie,
  FaSwimmingPool,
  FaOpera,
  FaBalanceScale,
} from "react-icons/fa";

const Sidebar: React.FC = ({}) => {
  const router = useRouter();
  const ref = useRef<HTMLDivElement>(null);

  return (
    <>
      <div className="h-screen flex justify-between shadow-sm scrollbar-change flex-col overflow-y-auto w-60 border-r border-r-[#545252] ml-0">
        <div className="h-full flex flex-col justify-between">
          <div>
            <div className="flex items-center justify-center mx-auto py-4"></div>

            <div className="nav__inner mt-5">
              <div className="flex flex-col justify-between ">
                <Link
                  href="/"
                  className={`nav__link hover:bg-white transition-all ease-in duration-200 ${
                    router.asPath === "/" ? "bg-white active" : ""
                  } `}
                >
                  <div className="flex items-center gap-3 py-4 px-6 mx-auto border-b border-[#545252] text-sm relative">
                    <span>
                      <FaOpera />
                    </span>

                    <span className="nav_item">Liquidity Pool Creation</span>
                    <span className="right_border"></span>
                  </div>
                </Link>
                <Link
                  href="/pool"
                  className={`nav__link hover:bg-white transition-all ease-in duration-200 border-b border-[#545252] ${
                    router.asPath === "/pool" ||
                    router.pathname.startsWith("/pool")
                      ? "bg-white active"
                      : ""
                  }`}
                >
                  <div className="flex items-center gap-3 py-4 px-6 mx-auto text-sm relative">
                    <span>
                      <FaSwimmingPool />
                    </span>

                    <span className="nav_item">Liquidity Pool Explorer</span>

                    <span className="right_border"></span>
                  </div>
                </Link>
                <Link
                  href="/tokenchart"
                  className={`nav__link hover:bg-white transition-all ease-in duration-200 border-b border-[#545252] ${
                    router.asPath === "/tokenchart" ||
                    router.pathname.startsWith("/tokenchart")
                      ? "bg-white active"
                      : ""
                  }`}
                >
                  <div className="flex items-center gap-3 py-4 px-6 mx-auto text-sm relative">
                    <span>
                      <FaChartPie />
                    </span>

                    <span className="nav_item">Token Price Charts</span>

                    <span className="right_border"></span>
                  </div>
                </Link>
              </div>
            </div>
          </div>

          <div className="about_btn hover:bg-white transition-all ease-in duration-200 ">
            <Link href="/spaces">
              <div className="flex items-center gap-3 py-4 px-6 mx-auto text-sm">
                <span>
                  <FaBalanceScale />
                </span>

                <span className="nav_item">About</span>
              </div>
            </Link>
          </div>
        </div>
      </div>
    </>
  );
};

export default Sidebar;
Edit your Layout component, Layout.tsx by adding your SideBar menu. Here is the code
import { FC, ReactNode } from "react";
import Footer from "./Footer";
import Header from "./Header";
import Sidebar from "./Sidebar";

interface Props {
  children: ReactNode;
}
const Layout: FC<Props> = ({ children }) => {
  return (
    <>
      <div className="bg-gypsum overflow-hidden flex flex-col min-h-screen">
        <Header />
        <div className="flex flex-row">
          <Sidebar />
          {children}
        </div>
        <Footer />
      </div>
    </>
  );
};

export default Layout;
Before we continue, let us create a helper folder that will hold our contract's ABI and handle our contract's connection. This is the contract you deployed and verified in the previous article. Go to the alfajores explorer to export your ABI and copy it in a json file. I called mine AmmSwap.json. Create another file which could be a javascript file and copy the following code. The code imports our ABI and returns our contract.
import abiJSON from "./AmmSwap.json";
import { ethers } from "ethers";

function connectContract() {
  const contractAddress = "0x3E73365764fBBE4f58Eb0B6a62CA80FC706D851B";
  const contractABI = abiJSON.abi;
  let ammContract;
  try {
    const { ethereum } = window;

    if (ethereum.chainId === "0xaef3") {
      //checking for eth object in the window, see if they have wallet connected to Alfajeros network
      const provider = new ethers.providers.Web3Provider(ethereum);
      const signer = provider.getSigner();
      console.log("contractABI", contractABI);
      ammContract = new ethers.Contract(contractAddress, contractABI, signer); // instantiating new connection to the contract
    } else {
      throw new Error("Please connect to the Polygon Alfajeros network.");
    }
  } catch (error) {
    console.log("ERROR:", error);
  }
  return ammContract;
}

export default connectContract;
For next steps, notice that from the Sidebar component, the index page will handle the liquidity pool creation, so we will be editing the index.tsx page found in react-app/pages
import React, { useState } from "react";
import connectToContract from "../utils/connectContract";
import Alert from "../components/Alert";
import { ConnectButton } from "@rainbow-me/rainbowkit";
import { useAccount } from "wagmi";

export default function Home() {
  const { address } = useAccount();
  const [activeTab, setActiveTab] = useState("creation");
  const [tokenA, setTokenA] = useState("");
  const [tokenB, setTokenB] = useState("");
  const [amountA, setAmountA] = useState("");
  const [amountB, setAmountB] = useState("");
  const [liquidityPoolId, setLiquidityPoolId] = useState("");
  const [reserveA, setReserveA] = useState("");
  const [reserveB, setReserveB] = useState("");
  const [fees, setFees] = useState("");
  const [success, setSuccess] = useState<boolean | null>(null);
  const [message, setMessage] = useState<string | null>(null);
  const [loading, setLoading] = useState<boolean | null>(null);


  return (
    <div>
      <div className="flex flex-col items-center min-h-screen mt-10 ml-10">
        {loading && (
          <Alert
            alertType={"loading"}
            alertBody={"Please wait"}
            triggerAlert={true}
            color={"white"}
          />
        )}
        {success && (
          <Alert
            alertType={"success"}
            alertBody={message}
            triggerAlert={true}
            color={"palegreen"}
          />
        )}
        {success === false && (
          <Alert
            alertType={"failed"}
            alertBody={message}
            triggerAlert={true}
            color={"palevioletred"}
          />
        )}
        <h1 className="text-3xl font-bold mb-4">Create Liquidity Pool</h1>
        <form className="w-64" onSubmit={handleCreateLiquidityPool}>
          <div className="mb-4">
            <label htmlFor="tokenA" className="block mb-1 font-semibold">
              Token A (Address):
            </label>
            <input
              type="text"
              id="tokenA"
              className="w-full px-2 py-1 border border-gray-300 rounded"
              value={tokenA}
              onChange={(e) => setTokenA(e.target.value)}
            />
          </div>
          <div className="mb-4">
            <label htmlFor="tokenB" className="block mb-1 font-semibold">
              Token B (Address):
            </label>
            <input
              type="text"
              id="tokenB"
              className="w-full px-2 py-1 border border-gray-300 rounded"
              value={tokenB}
              onChange={(e) => setTokenB(e.target.value)}
            />
          </div>
          <div className="mb-4">
            <label htmlFor="amountA" className="block mb-1 font-semibold">
              Amount A:
            </label>
            <input
              type="number"
              id="amountA"
              className="w-full px-2 py-1 border border-gray-300 rounded"
              value={amountA}
              onChange={(e) => setAmountA(e.target.value)}
            />
          </div>
          <div className="mb-4">
            <label htmlFor="amountB" className="block mb-1 font-semibold">
              Amount B:
            </label>
            <input
              type="number"
              id="amountB"
              className="w-full px-2 py-1 border border-gray-300 rounded"
              value={amountB}
              onChange={(e) => setAmountB(e.target.value)}
            />
          </div>
          <button
            type="submit"
            className="w-full bg-blue-500 hover:bg-blue-600 text-white py-2 px-4 rounded"
          >
            Create Liquidity Pool
          </button>
        </form>

        {/* {liquidityPoolId && (
          <div className="mt-8">
            <h2 className="text-xl font-bold mb-2">Liquidity Pool Details</h2>
            <p>Liquidity Pool ID: {liquidityPoolId}</p>
            <p>Reserve A: {reserveA}</p>
            <p>Reserve B: {reserveB}</p>
            <p>Fees: {fees}</p>
          </div>
        )} */}
      </div>
    </div>
  );
}
This is a form that will handle the create liquidity pool feature.
We need to call the createLiquidityPool function from our contract so we can write an async function to do that
async function handleCreateLiquidityPool(
   e: React.FormEvent<HTMLFormElement>
 ): Promise<void> {
   e.preventDefault();
   const body = {
     tokenA: tokenA,
     tokenB: tokenB,
     amountA: amountA,
     amountB: amountB,
   };

   try {
     console.log("Form successfully submitted!");
     await createLiquidityPool();
   } catch (error) {
     alert(
       `Oops! Something went wrong. Please refresh and try again. Error ${error}`
     );
   }
 }

 const createLiquidityPool = async () => {
   try {
     const ammContract = connectToContract();
     console.log(ammContract);
     if (ammContract) {
       let txn = await ammContract.createLiquidityPool(
         tokenA,
         tokenB,
         amountA,
         amountB,
         { gasLimit: 900000 }
       );
       console.log(await txn);
       setLoading(true);
       console.log("Creating pool...", txn.hash);
       await txn.wait();
       console.log("Created -- ", txn.hash);
       setSuccess(true);
       setLoading(false);
       setMessage("Tokens have been added to liquidity pool successfully.");
     } else {
       console.log("Error getting contract.");
     }
   } catch (error) {
     setSuccess(false);
     setLoading(false);
     console.log(error);
   }
 };
Our full index.tsx code will then look like this
import React, { useState } from "react";
import connectToContract from "../utils/connectContract";
import Alert from "../components/Alert";
import { ConnectButton } from "@rainbow-me/rainbowkit";
import { useAccount } from "wagmi";

export default function Home() {
  const { address } = useAccount();
  const [activeTab, setActiveTab] = useState("creation");
  const [tokenA, setTokenA] = useState("");
  const [tokenB, setTokenB] = useState("");
  const [amountA, setAmountA] = useState("");
  const [amountB, setAmountB] = useState("");
  const [liquidityPoolId, setLiquidityPoolId] = useState("");
  const [reserveA, setReserveA] = useState("");
  const [reserveB, setReserveB] = useState("");
  const [fees, setFees] = useState("");
  const [success, setSuccess] = useState<boolean | null>(null);
  const [message, setMessage] = useState<string | null>(null);
  const [loading, setLoading] = useState<boolean | null>(null);

  // TODO: Perform input validation

  async function handleCreateLiquidityPool(
    e: React.FormEvent<HTMLFormElement>
  ): Promise<void> {
    e.preventDefault();
    const body = {
      tokenA: tokenA,
      tokenB: tokenB,
      amountA: amountA,
      amountB: amountB,
    };

    try {
      console.log("Form successfully submitted!");
      await createLiquidityPool();
    } catch (error) {
      alert(
        `Oops! Something went wrong. Please refresh and try again. Error ${error}`
      );
    }
  }

  const createLiquidityPool = async () => {
    try {
      const ammContract = connectToContract();
      console.log(ammContract);
      if (ammContract) {
        let txn = await ammContract.createLiquidityPool(
          tokenA,
          tokenB,
          amountA,
          amountB,
          { gasLimit: 900000 }
        );
        console.log(await txn);
        setLoading(true);
        console.log("Creating pool...", txn.hash);
        await txn.wait();
        console.log("Created -- ", txn.hash);
        setSuccess(true);
        setLoading(false);
        setMessage("Tokens have been added to liquidity pool successfully.");
      } else {
        console.log("Error getting contract.");
      }
    } catch (error) {
      setSuccess(false);
      setLoading(false);
      console.log(error);
    }
  };

  // Mock data - replace with actual implementation
  // const mockLiquidityPoolId = "123456789";
  // const mockReserveA = "1000";
  // const mockReserveB = "2000";
  // const mockFees = "0.03%";

  // // Update state with the created pool's details
  // setLiquidityPoolId(mockLiquidityPoolId);
  // setReserveA(mockReserveA);
  // setReserveB(mockReserveB);
  // setFees(mockFees);

  return (
    <div>
      <div className="flex flex-col items-center min-h-screen mt-10 ml-10">
        {loading && (
          <Alert
            alertType={"loading"}
            alertBody={"Please wait"}
            triggerAlert={true}
            color={"white"}
          />
        )}
        {success && (
          <Alert
            alertType={"success"}
            alertBody={message}
            triggerAlert={true}
            color={"palegreen"}
          />
        )}
        {success === false && (
          <Alert
            alertType={"failed"}
            alertBody={message}
            triggerAlert={true}
            color={"palevioletred"}
          />
        )}
        <h1 className="text-3xl font-bold mb-4">Create Liquidity Pool</h1>
        <form className="w-64" onSubmit={handleCreateLiquidityPool}>
          <div className="mb-4">
            <label htmlFor="tokenA" className="block mb-1 font-semibold">
              Token A (Address):
            </label>
            <input
              type="text"
              id="tokenA"
              className="w-full px-2 py-1 border border-gray-300 rounded"
              value={tokenA}
              onChange={(e) => setTokenA(e.target.value)}
            />
          </div>
          <div className="mb-4">
            <label htmlFor="tokenB" className="block mb-1 font-semibold">
              Token B (Address):
            </label>
            <input
              type="text"
              id="tokenB"
              className="w-full px-2 py-1 border border-gray-300 rounded"
              value={tokenB}
              onChange={(e) => setTokenB(e.target.value)}
            />
          </div>
          <div className="mb-4">
            <label htmlFor="amountA" className="block mb-1 font-semibold">
              Amount A:
            </label>
            <input
              type="number"
              id="amountA"
              className="w-full px-2 py-1 border border-gray-300 rounded"
              value={amountA}
              onChange={(e) => setAmountA(e.target.value)}
            />
          </div>
          <div className="mb-4">
            <label htmlFor="amountB" className="block mb-1 font-semibold">
              Amount B:
            </label>
            <input
              type="number"
              id="amountB"
              className="w-full px-2 py-1 border border-gray-300 rounded"
              value={amountB}
              onChange={(e) => setAmountB(e.target.value)}
            />
          </div>
          <button
            type="submit"
            className="w-full bg-blue-500 hover:bg-blue-600 text-white py-2 px-4 rounded"
          >
            Create Liquidity Pool
          </button>
        </form>

        {/* {liquidityPoolId && (
          <div className="mt-8">
            <h2 className="text-xl font-bold mb-2">Liquidity Pool Details</h2>
            <p>Liquidity Pool ID: {liquidityPoolId}</p>
            <p>Reserve A: {reserveA}</p>
            <p>Reserve B: {reserveB}</p>
            <p>Fees: {fees}</p>
          </div>
        )} */}
      </div>
    </div>
  );
}
You can go to the terminal to run the code we already have
npm run dev
Your output would run on localhost:3000 and look similar to this

Let's proceed to continue the other pages. Under the pages folder, create two new folders. You can name one pool and the other one tokenchart. In the pool folder, create a index file that will give the overview of all liquidity pools created. Your code could be like this
import React, { useState } from "react";

interface Pool {
  id: number;
  tokens: string;
  reserves: string;
  fees: number;
  liquidity: number;
  providers: number;
}

const LiquidityPoolExplorerPage: React.FC = () => {
  const [pools, setPools] = useState<Pool[]>([
    {
      id: 1,
      tokens: "Token A / Token B",
      reserves: "1000 / 2000",
      fees: 0.03,
      liquidity: 5000,
      providers: 10,
    },
    {
      id: 2,
      tokens: "Token C / Token D",
      reserves: "500 / 1000",
      fees: 0.02,
      liquidity: 3000,
      providers: 5,
    },
    // Add more pools here
  ]);
  const [sortBy, setSortBy] = useState("liquidity"); // Default sort by liquidity
  const [filterBy, setFilterBy] = useState(""); // Default no filter

  const handleSortChange = (event: React.ChangeEvent<HTMLSelectElement>) => {
    setSortBy(event.target.value);
  };

  const handleFilterChange = (event: React.ChangeEvent<HTMLInputElement>) => {
    setFilterBy(event.target.value);
  };

  const filteredPools = pools.filter((pool) =>
    pool.tokens.toLowerCase().includes(filterBy.toLowerCase())
  );

  const sortedPools = filteredPools.sort((a, b) => {
    if (sortBy === "liquidity") {
      return b.liquidity - a.liquidity;
    } else if (sortBy === "fees") {
      return b.fees - a.fees;
    }
    return 0;
  });

  return (
    <div className="container mx-auto p-4 mt-10">
      <h1 className="text-2xl font-bold mb-4">Liquidity Pool Explorer</h1>

      <div className="mb-4">
        <label htmlFor="sort" className="mr-2">
          Sort By:
        </label>
        <select
          id="sort"
          className="p-2 border rounded"
          value={sortBy}
          onChange={handleSortChange}
        >
          <option value="liquidity">Liquidity</option>
          <option value="fees">Fees</option>
        </select>
      </div>

      <div className="mb-4">
        <label htmlFor="filter" className="mr-2">
          Filter By Token:
        </label>
        <input
          type="text"
          id="filter"
          className="p-2 border rounded"
          value={filterBy}
          onChange={handleFilterChange}
        />
      </div>

      <table className="w-full border-collapse">
        <thead>
          <tr className="bg-gray-200">
            <th className="p-4 font-bold text-left">Tokens</th>
            <th className="p-4 font-bold text-left">Reserves</th>
            <th className="p-4 font-bold text-left">Fees</th>
            <th className="p-4 font-bold text-left">Liquidity</th>
            <th className="p-4 font-bold text-left">Liquidity Providers</th>
          </tr>
        </thead>
        <tbody>
          {sortedPools.map((pool) => (
            <tr key={pool.id} className="border-b">
              <td className="p-4">{pool.tokens}</td>
              <td className="p-4">{pool.reserves}</td>
              <td className="p-4">{pool.fees}</td>
              <td className="p-4">{pool.liquidity}</td>
              <td className="p-4">{pool.providers}</td>
            </tr>
          ))}
        </tbody>
      </table>
    </div>
  );
};

export default LiquidityPoolExplorerPage;
Ideally, you can use subgraphs to fetch your created pools. I talked about subgraphs in my previous tutorial
Go back to your broswer to see your updated user interface.
Click on Liquidity Pool Explorer

There's a filter function too that allows you to filter by the token you are searching for

For our last feature, in the tokenchart folder, create an index.tsx file. We will be using chart.js to create couple of charts that indicates the supply of tokens, this will be useful in making decisions when a user comes to use your Amm. Here is a sample of how the code can look like
import React, { useRef, useEffect } from "react";
import Chart, { ChartType, ChartOptions } from "chart.js/auto";
import { Pie, Doughnut, Line } from "react-chartjs-2";

const TokenSupplyChart = () => {
  const chartRef = useRef<HTMLCanvasElement | null>(null);
  const chartInstanceRef = useRef<Chart | undefined>();

  useEffect(() => {
    const createChart = () => {
      const chartCanvas = chartRef.current;

      if (chartCanvas) {
        // Destroy previous chart instance if it exists
        if (chartInstanceRef.current) {
          chartInstanceRef.current.destroy();
        }

        const chartOptions: ChartOptions = {
          responsive: true,
          maintainAspectRatio: false,
        };

        const chartData = {
          labels: ["Token A", "Token B", "Token C", "Token D"],
          datasets: [
            {
              label: "Total Supply",
              data: [1000, 2000, 1500, 3000],
              backgroundColor: "rgba(75, 192, 192, 0.2)",
              borderColor: "rgba(75, 192, 192, 1)",
              borderWidth: 2,
            },
          ],
        };

        chartInstanceRef.current = new Chart(chartCanvas, {
          type: "bar" as ChartType,
          data: chartData,
          options: chartOptions,
        });
      }
    };

    createChart();

    return () => {
      // Cleanup: Destroy chart instance
      if (chartInstanceRef.current) {
        chartInstanceRef.current.destroy();
        chartInstanceRef.current = undefined;
      }
    };
  }, []); // Empty dependency array

  const chartData = {
    labels: ["Token A", "Token B", "Token C", "Token D"],
    datasets: [
      {
        label: "Token Distribution",
        data: [30, 20, 25, 15],
        backgroundColor: [
          "rgba(255, 99, 132, 0.6)",
          "rgba(54, 162, 235, 0.6)",
          "rgba(255, 206, 86, 0.6)",
          "rgba(75, 192, 192, 0.6)",
        ],
        borderColor: [
          "rgba(255, 99, 132, 1)",
          "rgba(54, 162, 235, 1)",
          "rgba(255, 206, 86, 1)",
          "rgba(75, 192, 192, 1)",
        ],
        borderWidth: 1,
      },
    ],
  };

  const chartOptions: ChartOptions = {
    responsive: true,
    maintainAspectRatio: false,
  };

  return (
    <>
      <div className="mt-10 ml-10">
      <h1>Token Supply Chart</h1>
        <div className="mt-10" style={{ height: "400px" }}>
          <canvas ref={chartRef}></canvas>
        </div>
        <div className="flex flex-wrap">
          <div className="w-1/3 px-4">
            <div className="h-400" style={{ height: "400px" }}>
              <h2>Pie Chart</h2>
              <Pie data={chartData} options={chartOptions} />
            </div>
          </div>
          <div className="w-1/3 px-4">
            <div className="h-400" style={{ height: "400px" }}>
              <h2>Doughnut Chart</h2>
              <Doughnut data={chartData} options={chartOptions} />
            </div>
          </div>
          <div className="w-1/3 px-4">
            <div className="h-400" style={{ height: "400px" }}>
              <h2>Area Chart</h2>
              <Line data={chartData} options={chartOptions} />
            </div>
          </div>
        </div>
      </div>
    </>
  );
};

export default TokenSupplyChart;
Ideally, you can use subgraphs to fetch your chart data. I talked about subgraphs in my previous tutorial
Again, let's head back to our browser to see what this looks like. Here is what we see

Finally, we can go back to create a liquidity pool. Note that you are required to input the addresses of the tokens and their amounts

I hope this was a good starting point for you if you have been trying to understand and implement market makers on chain. There are several usecases with automated market makers and you should try and explore some of them maybe for a hackathon or a pet project. Kindly drop a comment if you have found my articles useful or want me to write anything on what might interest you.