Short Randomizable Signatures (PS Signatures) and EL PASSO Implementation in C++ and WebAssembly
![]()
![]()
Author: Zhiyi Zhang (zhiyi@cs.ucla.edu)
1. Overview
This library implements (i) PS Signature in C++ and WebAssembly and (ii) EL PASSO.
- PS Signature is a signature scheme that is efficient and randomizable. That is, after generating a PS signature, the signature can be randomized so that it cannot be related to its original presence. This can be widely used for privacy-preserving systems.
- EL PASSO is a privacy-preserving Single Sign-On (SSO) system. It implements anonymous credentials, enables selective attribute disclosure, and allows users to prove properties about their identity without revealing it in the clear.
A certificate based on PS Signature following EL PASSO protocol is privacy-preserving:
- The signer cannot learn the data being signed. The signer can only verify the correctness of the data through zero-knowledge proofs.
- Each certificate can be randomized so as to preserve certificate owner's privacy while a randomized certificate is still valid.
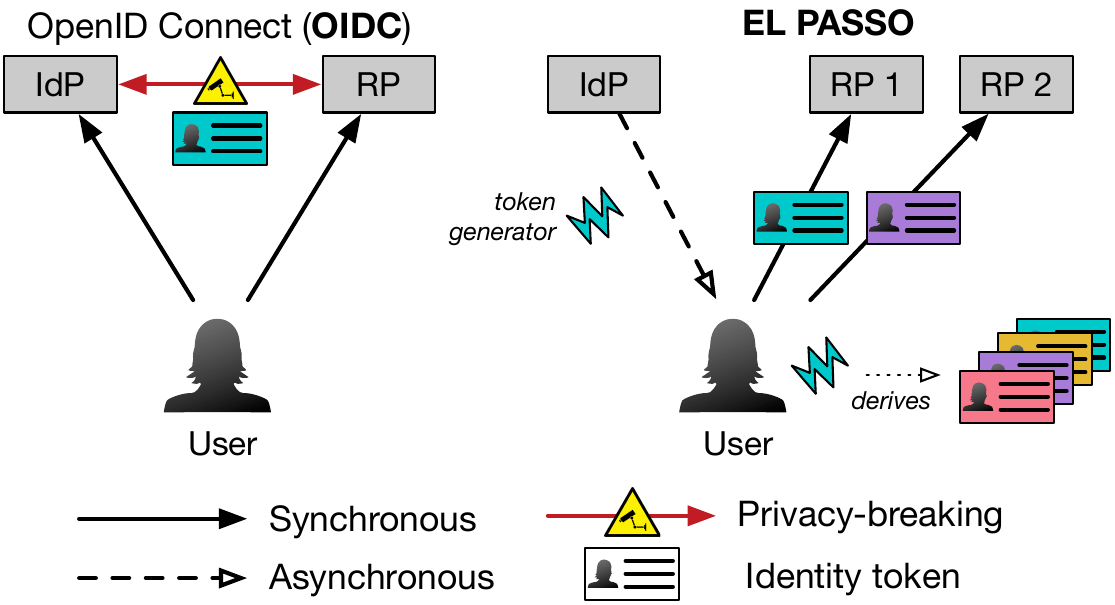
An overview of the difference between the current practice, Open ID Connect (OIDC), and EL PASSO is illustrated in the following figure.
1.1 An example application scenario
To illustrate the use of our system, let's assume a user Alice is a legit user of Facebook (an Identity Provider or IdP in short) and she wants to login to a website (a Relying Party or RP in short) with her Facebook account.
First, Alice can get a PS Signature certificate for her attributes secret-key:123, name: alice, email: alice@example.com, and age: 19.
When applying the certificate from Facebook, Alice can hide the value of secret-key:123 and prove the ownership of secret-key:123 to Facebook through zero-knowledge proofs.
After Facebook issues Alice the certificate, Alice can further randomize the certificate and use the randomized certificate to prove her identity to the website.
In addition, Alice can select which attributes to share with the website; for example, Alice can select only to share her name name: alice and at the same time, without sharing her age, proves her age is larger than 18.
The Website, by verifying the certificate with Facebook's public key, can ensure Alice is a legit user of Facebook and see the revealed attributes.
At the same time, Alice cannot register more than one account (sybil attack) on the website with the same certificate and Facebook cannot link the later certificate with Alice.
Based on the application scenario, EL PASSO can also be built to provide followings desired features with simple updates as stated in our paper:
- Two factor authentication (2FA).
- Lost recover when Alice lost her certificate.
- Identity information recovery with the help of one or a number of authorities in case a user misbehaves at the RP.
1.2 To cite our work
@article{zhang2020elpasso,
  title={EL PASSO: Efficient and Lightweight Privacy-preserving Single Sign On},
  author={Zhang, Zhiyi and Król, Michał and Sonnino, Alberto and Zhang, Lixia and Riviere, Etienne},
  journal={Proceedings on Privacy Enhancing Technologies},
  volume={2021},
  number={2},
  publisher={Sciendo}
}
2. Quick Start
2.1 Download
git clone --recurse-submodules https://github.com/Zhiyi-Zhang/PSSignature.git2.2 Build with Make
Build PSSignature and EL PASSO with the following command.
make allIf the submodule MCL cannot be found, you download/update the submodule with the following command.
git submodule update --initRun the tests with the following command.
make checkAfter that, a number of tests will be executed:
- Basic PS signature unit tests
- PS signature key pair generation
- Message signing with the private key
- Signature verification with the public key
- EL PASSO function unit tests
- EL PASSO IdP bootstrapping
- EL PASSO user's request of credential and IdP's credential issuance
- EL PASSO user's sign on request to the RP and RP's verification of user's credential
- EL PASSO encoding unit tests:
- Encoding/decoding of EL PASSO public parameters generated by the IdP
- Encoding/decoding of EL PASSO credential request and response
- Encoding/decoding of EL PASSO sign on request and response
- EL PASSO performance tests with different number of maximum supported attributes in credential
2.3 Build with WebAssembly
Our library supports the use of Web Assembly (WASM), which allows our implementation to provide both high efficiency and the ability to be delivered as a web resource Therefore, a user do not need to explicitly install EL PASSO software and can directly use EL PASSO with a standard browser.
If you don't want to install WASM, you can skip 2.3.1 and directly go to 2.3.2 and 3 because the complied files have been uploaded to ./wasm-build.
To compile with the WASM, you must first follow the instructions from the WASM's C++ download and install page to get emsdk ready.
You will also need to activate the emsdk and load the commands into your PATH.
After that, you should have the command em++ available in your path.
2.3.1 Install WASM depenencies and compile EL PASSO WASMs
To compile the PS signature test file into a HTML and test it with your browser, use the following command.
make wasmThen, it should generate (overwrite) a number of js, wasm, and html files in ./wasm-build.
2.3.2 Run WASM tests
To test the EL PASSO WASMs with your browser, you should first run a HTTP server. An easiest way is to use python's HTTP server.
cd wasm-build
python3 -m http.server 8080
You can now open your browser and visit http://0.0.0.0:8080/wasm-tests.html and click the button run-tests to run the tests.
The WASM version of the same unit tests as shown in 2.2 will be run.
Note that you can also find each individual module (i.e., IdP, RP, User) in wasm-build and develop your own JS code based on these modules for your own application needs.
2.4 Build with docker
You can run our codebase in docker as well. This require you must have installed docker.
First, create a new image tagged elpasso from the Dockerfile in the repo directory.
docker image build -t elpasso .Then, run the tests in a docker container.
docker run elpassoAfter starting the docker container, you should be able to see the same test results as when you build with make.
2.5 Codebase Structure
./
|--.github/workflows: used for automated test with GitHub Workflows
|-- html_template: a list of HTML template used to build EL PASSO htmls for WASM tests and demo
|-- src: C++ header and source files for PS Signature and EL PASSO
|-- test: C++ test source files
|-- third-parties: dependencies, which is MCL library
|-- wasm-build: Compiled WASM files and HTMLs that can directly be opened without the need to install WASM development tools
|-- wasm-src: WASM source files for PS Signature and EL PASSO (writen in C++)
|-- DockerFile: docker container configuration file
|-- entrypoint.sh: the entrypoint of the docker container
|-- action.yml: the action performed in the docker container in GitHub Workflows
|-- Makefile
|-- build-dependencies.sh: a shell script called by "make mcl" to build dependencies
|-- LICENSE
|-- .dockerignore
|-- .gitignore
|-- .gitmodules
3. A Demo of EL PASSO
We provide a demo of the EL PASSO protocol with the IdP, RP, and user. This does not require you compile or install anything. What you need is only a browser and a version of Python3.
To play with the demo, the first step is to serve the EL PASSO WASM modules with a HTTP server. An easiest way is to use Python3's HTTP server.
cd wasm-build
python3 -m http.server 8080
Then, open three new tabs in your browser with http://0.0.0.0:8080/idp.html, http://0.0.0.0:8080/user.html, and http://0.0.0.0:8080/rp.html.
Then you can follow the steps shown in these webpages to learn how EL PASSO works.
We also provide a brief description of the steps here:
- On IdP's page, initialize the IdP and copy its public key to both user and RP.
- On user's page, generate a credential request and copy it to IdP's page.
- On IdP's page, verify the credential request and issue a credential to the user.
- On user's page, load the credential issued by the IdP.
- On user's page, generate a sign on request to a RP.
- On RP's page, verify the sign on request from the user and finish the authentication of the user.
4. Documentation
See documentation page.
5. Issue report and Contribution
If you encounter any issues, please start a new issue here.
If you want to contribute to the codebase, please submit a new pull request here.