koa-router源码解读
SunShinewyf opened this issue · comments

继上一次的koa源码解读,今天来聊一下koa-router。
文件结构及内容关联
从源码文件中可以看到,koa-router只有两个文件,layer.js和router.js,分别定义了Router和Layer两个对象。相对于express的内置路由,koa-router少了一个route对象,使得逻辑更加简单,下面通过一张图来解释Router和Layer对象之间的关系。
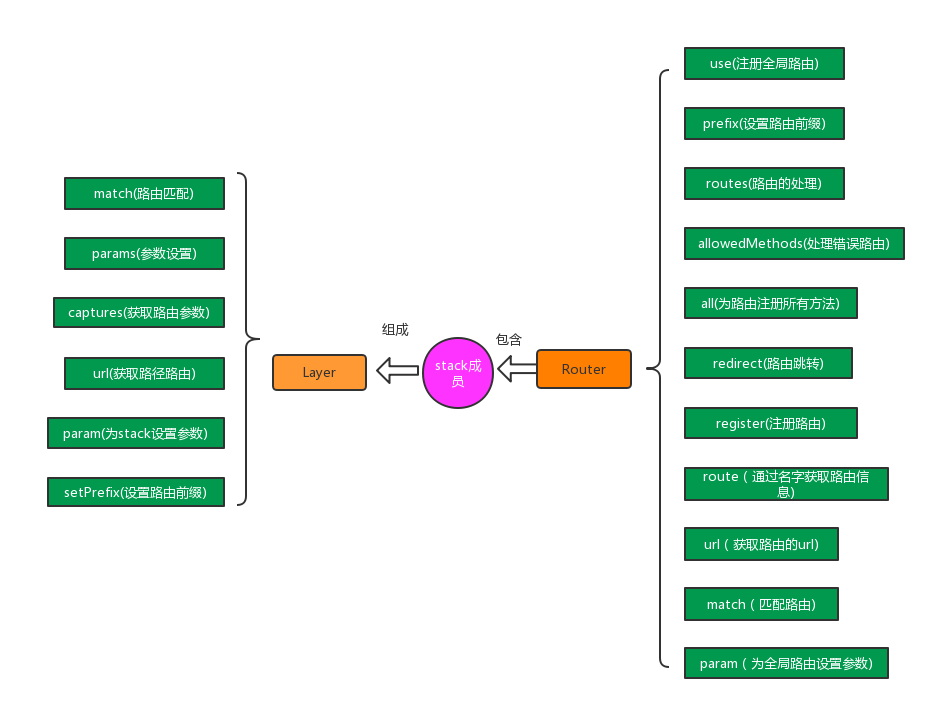
正如上图显示,Router对象中有一个stack的成员属性,而stack又是一个由Layer组成的数组,这样就使两者关联起来了。两个对象之间的原型函数函数也列举出来了,比较直观和简单。
运行流程
在我们的项目路由文件中引入koa-router的时候,如下:
const router = require('koa-router')()然后执行定义如下路由的时候:
router.get('/', async (ctx, next) => {
   await ctx.render('users/index',{
     title:'用户中心'
   })
})其实首先调用的是router.js/routes这个入口函数。下面为routes函数的源码:
Router.prototype.routes = Router.prototype.middleware = function () {
  var router = this;

  var dispatch = function dispatch(ctx, next) {
    debug('%s %s', ctx.method, ctx.path);

    var path = router.opts.routerPath || ctx.routerPath || ctx.path;
    var matched = router.match(path, ctx.method); //通过path=users/index和method=GET来判断匹配
    var layerChain, layer, i;

    if (ctx.matched) {
      ctx.matched.push.apply(ctx.matched, matched.path);
    } else {
      ctx.matched = matched.path;
    }

    ctx.router = router;

    if (!matched.route) return next();

    var matchedLayers = matched.pathAndMethod
    var mostSpecificLayer = matchedLayers[matchedLayers.length - 1]
    ctx._matchedRoute = mostSpecificLayer.path;
    if (mostSpecificLayer.name) {
      ctx._matchedRouteName = mostSpecificLayer.name;
    }

    layerChain = matchedLayers.reduce(function(memo, layer) {
      memo.push(function(ctx, next) {
        ctx.captures = layer.captures(path, ctx.captures);
        ctx.params = layer.params(path, ctx.captures, ctx.params);
        return next();
      });
      return memo.concat(layer.stack);
    }, []);

    return compose(layerChain)(ctx, next);
  };

  dispatch.router = this;

  return dispatch;
};其中定义了一个dispatch函数用来处理路由。其中this对象为当前文件定义的路由对象。例如w我的项目文件中定义了一个路由的user.js文件,并且内容如下:
const router = require('koa-router')()

router.prefix('/users')

router.get('/', async (ctx, next) => {
   await ctx.render('users/index',{
     title:'用户中心'
   })
})

router.get('/register/:id', async (ctx, next) => {
    await ctx.render('users/register',{
      title:'用户注册'
    })
})

router.get('/login',async (ctx,next) => {
   await ctx.render('users/login',{
     title:'用户登录'
   })
})

router.get('/setting',async (ctx,next) => {
   await ctx.render('users/setting',{
     title: '用户设置'
   })
})

module.exports = router那么这个router对象结构如下:
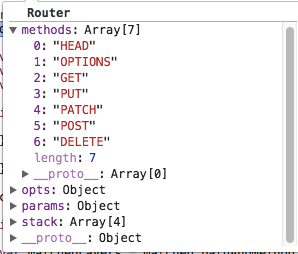
其中method为Router对象构造函数中定义的:
  this.methods = this.opts.methods || [
    'HEAD',
    'OPTIONS',
    'GET',
    'PUT',
    'PATCH',
    'POST',
    'DELETE'
];stack数组就是user.js中定义的四个Layer,接下来就是进行遍历并且匹配。找到可以匹配当前path和method的layer并且放到layerChain中。最后将这个layerChain交由compose去处理,也就是遍历中间件。
值得一提的是,在调用compose之前,会首先给matchedLayers添加一个中间件,具体代码如下:
 layerChain = matchedLayers.reduce(function(memo, layer) {
      memo.push(function(ctx, next) {
        ctx.captures = layer.captures(path, ctx.captures);
        ctx.params = layer.params(path, ctx.captures, ctx.params);
        return next();
      });
      return memo.concat(layer.stack);
}, []);这一段代码主要是给先给中间件数组添加一个中间件函数,用于获取路由中的参数并且赋值给ctx中的params。此时传入compose的middleware数组结构如下:
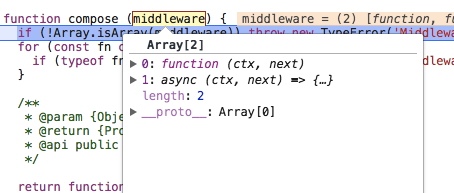
其中function(ctx,next)就是上面我们push进去的函数,然后下面的async (ctx,next) =>{}就是我们传入的中间件函数。
例如,对于下面这种情况:
router.get('/register/:id', async (ctx, next) => {
    await ctx.render('users/register',{
      title:'用户注册'
    })
})如我们访问127.0.0.1:3001/users/register/id=123就可以得出ctx.params为{id:123}的这个参数对象。
所以koa中首先会给每个路由添加一个获取路由参数的中间件,然后依次处理后面自定义的中间件。
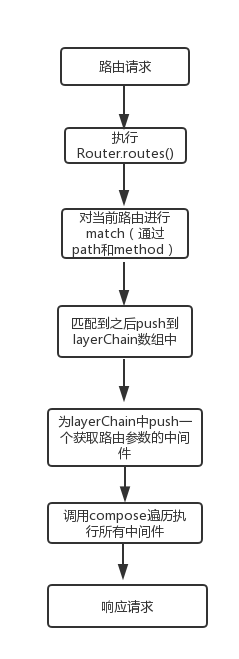
总结一下,正常的路由流程大概是如下图所示:
router.prototype.register()
代码如下:
Router.prototype.register = function (path, methods, middleware, opts) {
  opts = opts || {};

  var router = this;
  var stack = this.stack;

  // support array of paths
  if (Array.isArray(path)) {
    path.forEach(function (p) {
      router.register.call(router, p, methods, middleware, opts);
    });

    return this;
  }

  // create route
  var route = new Layer(path, methods, middleware, {
    end: opts.end === false ? opts.end : true,
    name: opts.name,
    sensitive: opts.sensitive || this.opts.sensitive || false,
    strict: opts.strict || this.opts.strict || false,
    prefix: opts.prefix || this.opts.prefix || "",
    ignoreCaptures: opts.ignoreCaptures
  });

  if (this.opts.prefix) {
    route.setPrefix(this.opts.prefix);
  }
  // add parameter middleware
  Object.keys(this.params).forEach(function (param) {
    route.param(param, this.params[param]);
  }, this);

  stack.push(route);

  return route;
};可以看到,这个函数还是比较简单的,首先是判断传进来的path是否是数组,否则就递归执行自身,直到数组中的每一个值都完成注册为止。否则就创建一个Layer对象push进当前router对象的
stack数组中。从而完成注册功能。
对于router中的其他原型函数,就不再具体分析了
上面只是个人的一些探索,若有不对的地方,欢迎私聊拍砖。
