Autoscaler tool for Cloud Spanner
An open source tool to autoscale Spanner instances
Home
·
Poller function
·
Scaler function
·
Forwarder function
·
Terraform configuration
Table of Contents
Overview
The Autoscaler tool for Cloud Spanner is a companion tool to Cloud Spanner that allows you to automatically increase or reduce the number of nodes in one or more Spanner instances, based on their utilization.
When you create a Cloud Spanner instance, you choose the number of nodes that provide compute resources for the instance. As the instance's workload changes, Cloud Spanner does not automatically adjust the number of nodes in the instance.
The Autoscaler monitors your instances and automatically adds or removes nodes to ensure that they stay within the recommended maximums for CPU utilization and the recommended limit for storage per node, plus or minus an allowed margin. Note that the recommended thresholds are different depending if a Spanner instance is regional or multi-region.
Architecture
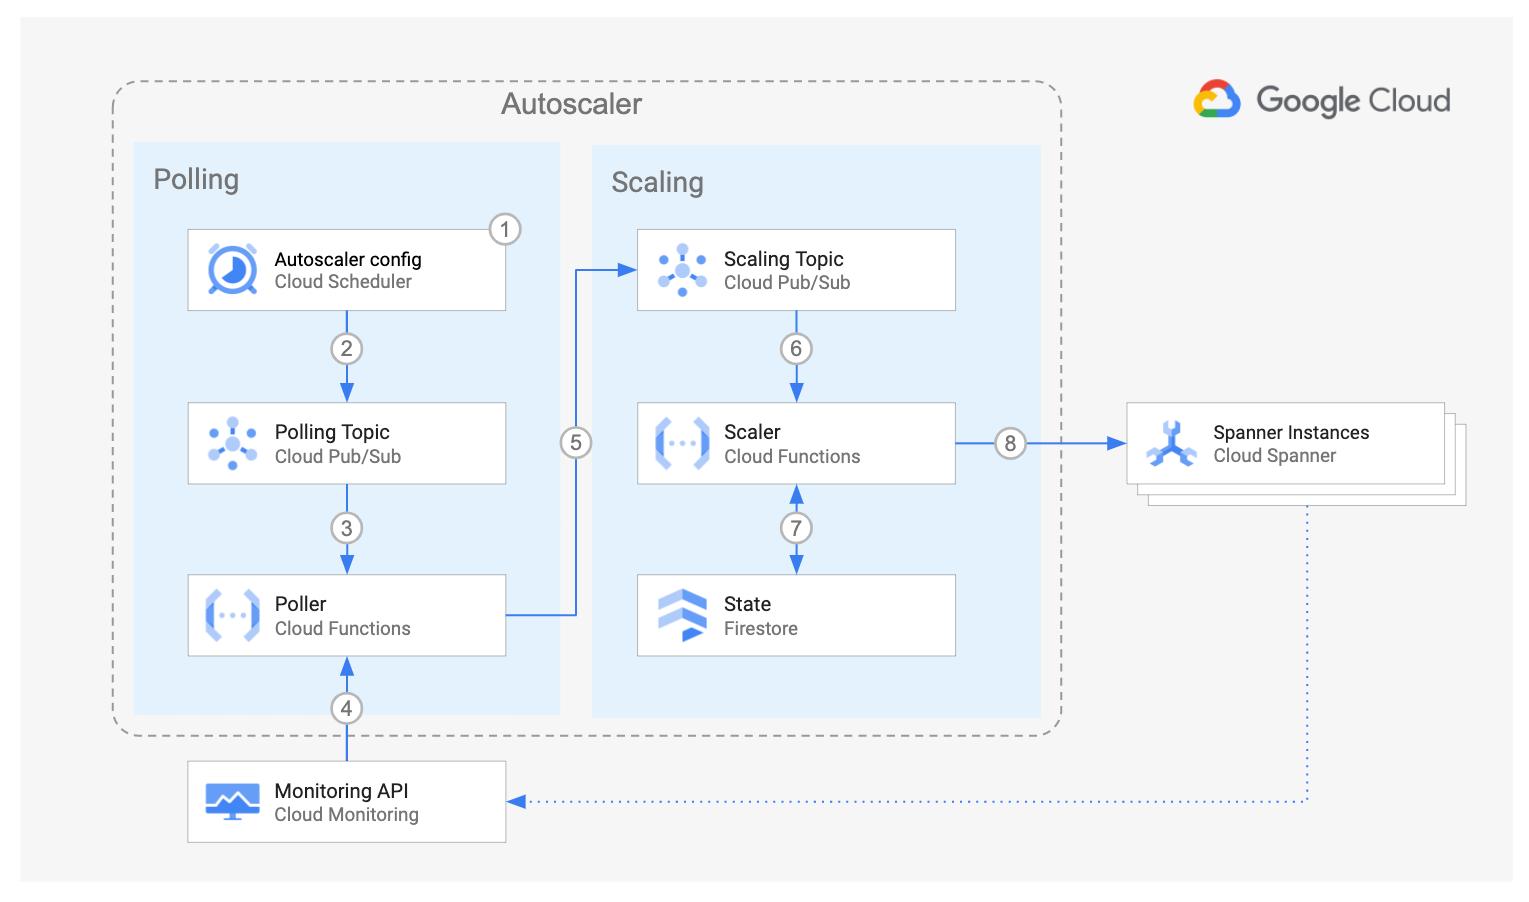
The diagram above shows the components of the Autoscaler and the interaction flow:
-
Using Cloud Scheduler you define how often one or more Spanner instances should be verified. You can define separate Cloud Scheduler jobs to check several Spanner instances with different schedules, or you can group many instances under a single schedule.
-
At the specified time and frequency, Cloud Scheduler pushes a message into the Polling Cloud Pub/Sub topic. The message contains a JSON payload with the Autoscaler configuration parameters that you defined for each Spanner instance.
-
When Cloud Scheduler pushes a message into the Poller topic, an instance of the Poller Cloud Function is created to handle the message.
-
The Poller function reads the message payload and queries the Cloud Monitoring API to retrieve the utilization metrics for each Spanner instance.
-
For each instance, the Poller function pushes one message into the Scaling Pub/Sub topic. The message payload contains the utilization metrics for the specific Spanner instance, and some of its corresponding configuration parameters.
-
For each message pushed into the Scaler topic, an instance of the Scaler Cloud Function is created to handle it.
Using the chosen scaling method, the Scaler function compares the Spanner instance metrics against the recommended thresholds, plus or minus an allowed margin and determines if the instance should be scaled, and the number of nodes that it should be scaled to. -
The Scaler function retrieves the time when the instance was last scaled from the state data stored in Cloud Firestore and compares it with the current database time.
-
If the configured cooldown period has passed, then the Scaler function requests the Spanner Instance to scale out or in.
Throughout the flow, the Autoscaler writes a step by step summary of its recommendations and actions to Cloud Logging for tracking and auditing.
Deployment
To deploy the Autoscaler, decide which of the following strategies is best adjusted to fulfill your technical and operational needs.
-
Per-Project deployment: all the components of the Autoscaler reside in the same project as your Spanner instances. This deployment is ideal for independent teams who want to self manage the configuration and infrastructure of their own Autoscalers. It is also a good entry point for testing the Autoscaler capabilities.
-
Centralized deployment: a slight departure from the pre-project deployment, where all the components of the Autoscaler reside in the same project, but the Spanner instances may be located in different projects. This deployment is suited for a team managing the configuration and infrastructure of several Autoscalers in a central place.
-
Distributed deployment: all the components of the Autoscaler reside in a single project, with the exception of Cloud Scheduler. This deployment is a hybrid where teams who own the Spanner instances want to manage only the Autoscaler configuration parameters for their instances, but the rest of the Autoscaler infrastructure is managed by a central team.
To deploy the Autoscaler infrastructure follow the instructions in the link for the chosen strategy.
Configuration
After deploying the Autoscaler, you are ready to configure its parameters.
-
Open the Cloud Scheduler console page.
-
Select the checkbox next to the name of the job created by the Autoscaler deployment:
poll-main-instance-metrics -
Click on Edit on the top bar.
-
Modify the Autoscaler parameters shown in the job payload.
The following is an example:
[
    {
        "projectId": "my-spanner-project",
        "instanceId": "spanner1",
        "scalerPubSubTopic": "projects/my-spanner-project/topics/spanner-scaling",
        "minNodes": 1,
        "maxNodes": 3
    },{
        "projectId": "different-project",
        "instanceId": "another-spanner1",
        "scalerPubSubTopic": "projects/my-spanner-project/topics/spanner-scaling",
        "minNodes": 5,
        "maxNodes": 30,
        "scalingMethod": "DIRECT"
    }
]
The payload is defined using a JSON array. Each element in the array represents a Spanner instance that will share the same Autoscaler job schedule.
Additionally, a single instance can have multiple Autoscaler configurations in different job schedules. This is useful for example if you want to have an instance configured with the linear method for normal operations, but also have another Autoscaler configuration with the direct method for planned batch workloads.
You can find the details about the parameters and their default values in the Poller component page.
- Click on Update at the bottom to save the changes.
The Autoscaler is now configured and will start monitoring and scaling your instances in the next scheduled job run.
Licensing
Copyright 2020 Google LLC

Licensed under the Apache License, Version 2.0 (the "License");
you may not use this file except in compliance with the License.
You may obtain a copy of the License at

    https://www.apache.org/licenses/LICENSE-2.0

Unless required by applicable law or agreed to in writing, software
distributed under the License is distributed on an "AS IS" BASIS,
WITHOUT WARRANTIES OR CONDITIONS OF ANY KIND, either express or implied.
See the License for the specific language governing permissions and
limitations under the License.

