![]()
AstroBin is an image hosting website for astrophotographers. The original production copy is run on https://www.astrobin.com/.
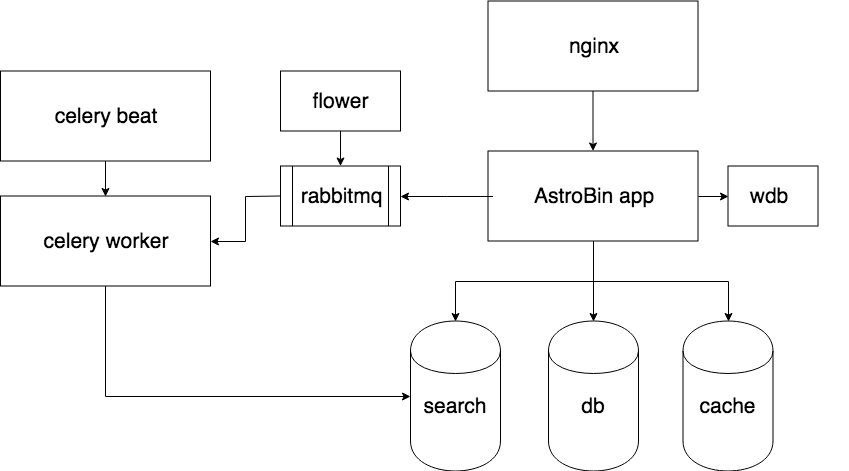
AstroBin is composed by several components. The following paragraphs shortly describes what they are, what they do, and what their relationships are.
The actual main app.
Used as broker and results backend for celery.
The periodic task scheduler. Think of it as a cron daemon.
The background task worker. Background tasks include:
- sending emails
- updating the search index
- doing some performance intensive tasks
- periodically cleaning up caches
The postgres database that holds all the data.
The redis daemon that store transient data for performance reasons.
The Elasticsearch engine that handles the search index. It's accessed by the AstroBin app directly for queries, and by the celery worker to update the index.
You can setup a development environment using Docker.
git clone https://github.com/astrobin/astrobin.git
cd astrobin
git submodule update --init --recursiveThe docker/astrobin.env file contains configuration information for
AWS, PayPal, Google Analytics, e-mail service, and others. The default
settings are sufficient to bring up a full Astrobin site on your
workstation, so you should not need to make any changes here at first.
But to avoid committing your passwords to the repository, remember to instruct git to ignore changes to this file:
git update-index --assume-unchanged docker/astrobin.envInstall Docker, and make sure you have the latest stable version of docker-compose installed.
The docker-compose-*.yml files contain all the instructions needed to bring up the
stack, including how to build the astrobin, celery, and beat containers.
You may want to create an alias to reference all the docker-compose files needed in development:
alias compose="docker-compose \
    -f docker/docker-compose-app.yml \
    -f docker/docker-compose-worker.yml \
    -f docker/docker-compose-scheduler.yml \
    -f docker/docker-compose-local.yml"
And then bring up the stack:
export ARCH=aarch64 # (or x86_64)
export DOCKER_REGISTRY=astrobin
export ASTROBIN_BUILD=dev
export ASTROBIN_GUNICORN_WORKERS=1
compose up -dThe first time you launch AstroBin (and only the first time), you will find that it's not quite working yet. Notably, accessing http://127.0.0.1/ brings up the site, but without any CSS or javascript. Also, the django framework is not yet set up.
These need to be initialized by running the following commands.
The init.sh script does some initial django initialization, like creating groups, a superuser,
and the "site" configuration.
compose run --no-deps --rm astrobin ./scripts/init.shThen, to make all the static files (CSS, javascript, images, etc.) available to the app, run:
compose run --no-deps --rm astrobin python manage.py collectstatic --noinputcompose psThis shows you the containers running. Check the State column and make sure
everything is Up. If you see Restarting or Exit that means the container didn't
start up properly on its own, and you may need to do some troubleshooting
in that container.
AstroBin is running! Visit http://127.0.0.1/accounts/login from your host. You can login with the following credentials:
astrobin_dev:astrobin_dev
For debugging purposes, it is recommended that you launch a simple development server on port 8084, and then access it directly.
docker exec -it astrobin python manage.py runserver 0.0.0.0:8084If something goes terribly wrong and you need to start over, or if you just want to validate that your code works properly with a "clean" build of the site, you will need to reset things.
Most of the "state" is stored in the docker_postgres-data volume, which contains the PostgreSQL
database. So a "lightweight" reset would be to do the following:
# bring down the stack
compose down

# delete the postgresql volume
docker volume rm docker_postgres-data

# bring the stack back up
compose up -d

# re-initialize django
compose run --no-deps --rm astrobin ./scripts/init.sh
But if you really want to start from scratch, for example to do a final thorough build and test of your new code, then you can do a "heavyweight" reset:
./scripts/docker-reset.shThis script will reset your Astrobin docker environment back to zero, so you can start over at "step 1" of the build instructions above.
Start in the urls.py file -- the urlpatterns list contains the routing rules for
the AstroBin site. For example, if you're going to be editing the Top Picks, note
the URL used in your browser (/explore/top-picks/) and then find the URL pattern that
matches it:
url(r'^explore/top-picks/$', explore_views.TopPicksView.as_view(), name='top_picks'),
This tells you that the Django View you're looking for is TopPicksView, in the
explore_views module.
$ grep "class TopPicksView" * -r
astrobin/views/explore.py:class TopPicksView(ListView):
Looking at the TopPicksView class, you can see the template associated with it:
class TopPicksView(ListView):
    template_name = 'top_picks.html'
Django uses a search path when looking for templates. Some templates might not be in this git repository, but rather included in 3rd party modules pulled in during the build process. So don't panic if you don't see a template referenced in the code, within the git repository.
In this case, as you might expect, top_picks.html is in the standard location for
Django templates:
$ find astrobin -name top_picks.html
astrobin/templates/top_picks.html
If you update one of the Django templates with text content, it needs to be localized.
In a template use the
trans template tag
to translate text. Note that the template must first {% load i18n %} for this to work.
For example, {% trans "foo" %}
The translations are stored in django.po files. Grep through these and if you're adding
just short text snippets, there may already be translations available. If not, the
localization files should be updated (see https://djangobook.com/localization-create-language-files/)
All primary stylesheets are defined canonically in the
astrobin/static/astrobin/scss/*.scss files. CSS files are generated using the compass
utility automatically, when you perform a collectstatic.
After you update the astrobin.scss or astrobin-mobile.scss file, you should
first collectstatic, and then be able to Shift+F5 in your browser to reload
the page with the new CSS (if you're running the development server as noted
above).
For convenience, you can save time by simply generating and copying the modified style file, e.g.:
docker cp astrobin/static/astrobin/scss/astrobin.scss docker_astrobin_1:/media/static/astrobin/scss/
docker exec -it docker_astrobin_1 \
    sass /media/static/astrobin/scss/astrobin.scss /media/static/astrobin/scss/astrobin.css
When collecting static files on AWS S3, a hash of their contents will be automatically added to their filenames, for cache-busting purposes.
Before you submit your code for review, you should run tests to ensure that your changes have not broken anything important. Run the test script by executing:
compose run --no-deps --rm astrobin ./scripts/test.sh
The following indexes are recommended for your Postgresql server (feel free to ignore this section for small or development installations):
create index on astrobin_image using btree (uploaded, id);
create index on astrobin_image using btree (moderator_decision, deleted);
create index on actstream_action using btree (timestamp);
create index on toggleproperties_toggleproperty using btree(property_type, content_type_id, object_id);
create index on toggleproperties_toggleproperty using btree(property_type, content_type_id, created_on);
create index object_id_integer_cast on toggleproperties_toggleproperty (cast(toggleproperties_toggleproperty.object_id as int))
create index persistent_messages_message_user_id_read_idx on persistent_messages_message (user_id, read);
create index persistent_messages_message_created_idx on persistent_messages_message (created);
create index on hitcount_hit_count using btree(object_pk, content_type_id);
create index on nested_comments_nestedcomment using btree(deleted, object_id);
You may want to configure work_mem to be your RAM in GB, times 16, divided by
the number of CPUs in your server.
To deploy with docker stack:
export ASTROBIN_GUNICORN_WORKERS=1 # or number of CPU cores + 1
docker swarm init
docker stack deploy \
    -c docker/docker-compose-app.yml \
    -c docker/docker-compose-worker.yml \
    -c docker/docker-compose-scheduler.yml \
    -c docker/docker-compose-local.yml \
dockerAstroBin accepts contributions. Please fork the project and submit pull requests! If you need support, please use the astrobin-dev Google Group.