Dreambooth Extension for Stable-Diffusion-WebUI
This is a WIP port of Shivam Shriao's Diffusers Repo, which is a modified version of the default Huggingface Diffusers Repo optimized for better performance on lower-VRAM GPUs.
It also adds several other features, including training multiple concepts simultaneously, and (Coming soon) Inpainting training.
Installation
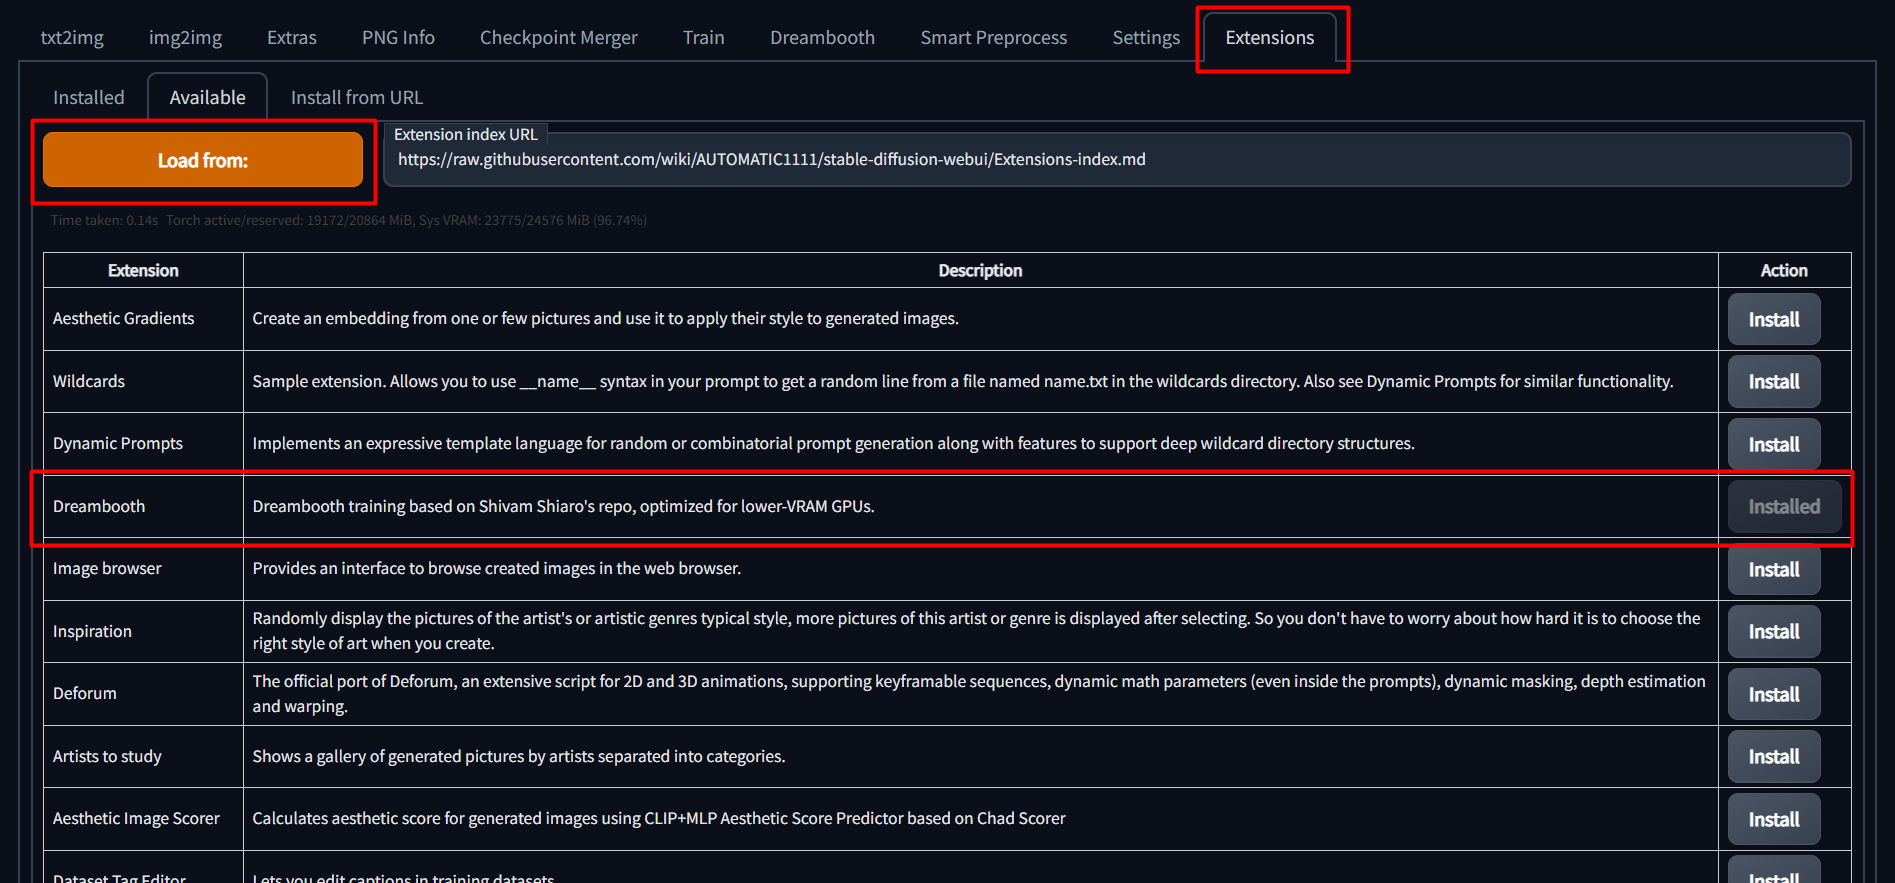
To install, simply go to the "Extensions" tab in the SD Web UI, select the "Available" sub-tab, pick "Load from:" to load the list of extensions, and finally, click "install" next to the Dreambooth entry.
Once installed, you must restart the Stable-Diffusion WebUI completely. Reloading the UI will not install the necessary requirements.
We also need a newer version of diffusers, as SD-WebUI uses version 0.3.0, while DB training requires >= 0.10.0. Not having the right diffusers version is the cause of the 'UNet2DConditionModel' object has no attribute ' enable_gradient_checkpointing' error message, as well as safety checker warnings.
To force sd-web-ui to only install one set of requirements, we can specify the command line argument:
set/export REQS_FILE=.\extensions\sd_dreambooth_extension\requirements.txt
Refer to the appropriate script below for extra flags to install requirements:
https://github.com/d8ahazard/sd_dreambooth_extension/blob/main/webui-user-dreambooth.bat https://github.com/d8ahazard/sd_dreambooth_extension/blob/main/webui-user-dreambooth.sh
And last, if you wish to completely skip the "native" install routine of Dreambooth, you can set the following environment flag: DREAMBOOTH_SKIP_INSTALL=True
This is ideal for "offline mode", where you don't want the script to constantly check things from pypi.
After installing via the WebUI, it is recommended to set the above flags and re-launch the entire Stable-diffusion-webui, not just reload it.
Usage
Create a Model
-
Go to the Dreambooth tab.
-
Under the "Create Model" sub-tab, enter a new model name and select the source checkpoint to train from. If you want to use a model from the HF Hub instead, specify the model URL and token. URL format should be ' runwayml/stable-diffusion-v1-5'
The source checkpoint will be extracted to models\dreambooth\MODELNAME\working.
-
Click "Create". This will take a minute or two, but when done, the UI should indicate that a new model directory has been set up.
Various Top Buttons
Save Params - Save current training parameters for the current model.
Load Params - Load training parameters from the currently selected model. Use this to copy params from one model to another.
Generate Ckpt - Generate a checkpoint from the currently saved weights at the current revision.
Cancel - Cancels training after the current step.
Train - Starts training.
Model Section
Model - The model to use. Training parameters will not be automatically loaded to the UI when changing models.
Half Model - Enable this to save the model using half precision. Results in a smaller checkpoint with little noticeable difference in image output.
Save Checkpoint to Subdirectory - Save the checkpoint to a subdirectory using the model name.
Training Wizard (Person) - Uses the selected learning rate and number of instance images to calculate the required number of epochs and classification images.
Training Wizard (Object/Style) - Uses the selected learning rate and number of instance images to calculate the required number of epochs. No class images will be generated.
Performance Wizard (WIP) - Tries to set the optimal training parameters based on the amount of VRAM for your GPU. Probably not perfect, but at least a good starting point.
Training Parameters
Intervals
This section contains parameters related to when things happen during training.
Training Steps Per Image (Epochs) - As the name would imply, an epoch is one training run over the entire set of instance images. So, if we want to train 100 steps per image, we can set this value to 100 and we're ready to go. No math required.
Max Training Steps - I honestly don't even know why we ever used this value, as it's confusing and requires more math. Set this value to 0 to use epochs. Setting it to any value > 0 will ignore epoch value and stop training after this many steps.
Pause After N Epochs - When set to a value higher than 0, training will pause for the time specified.
Amount of time to pause between Epochs, in Seconds - How long to pause between "N" epochs when N is greater than zero, in seconds.
Use Concepts - Whether to use a JSON file or string with multiple concepts, or the individual settings below.
Use Lifetime Steps/Epochs When Saving - When enabled, checkpoint and sample save frequencies will be based on the total number of steps the model has been trained on. When disabled, it will be based on the number of steps in the current training run.
Save Preview/Ckpt Every epoch - The save checkpoint and preview frequencies will be per epoch, not steps.
Save Checkpoint Frequency - How frequently to save a checkpoint from the trained data.
Save Preview(s) Frequency - How frequently will an image be generated as an example of training progress.
Batch
Batch size - How many training steps to process simultaneously. You probably want to leave this at 1.
Class batch size - How many classification images to generate simultaneously. Set this to whatever you can safely process at once using Txt2Image, or just leave it alone.
Learning Rate
This section contains parameters related to the learning rate.
Learning rate - The strength at which training impacts the new model. A higher learning rate requires less training steps, but can cause over-fitting more easily. Recommended between .000006 and .00000175
Scale Learning Rate - Adjusts the learning rate over time.
Learning Rate Scheduler - The scheduler used with the learning rate.
Learning Rate Warmup Steps - How many steps to run before scaling the learning rate. I think.
Image Processing
Here, you'll find settings related to the handling of images.
Resolution - The resolution your instance images are set to. This should probably be 512 or 768. Using a resolution higher than 512 will result in more vram usage.
Center Crop - Enable this to automatically use "dumb cropping" when input images are larger than the specified resolution.
Apply Horizontal Flip - When enabled, instance images will be randomly flipped horizontally during training. This can allow for better editability, but may require a larger number of training steps, as we're effectively increasing our dataset size.
Miscellaneous
Other random stuff that doesn't fit well into any other category.
Pretrained VAE Name or Path - Enter the full path to an existing vae .bin file, and it will be used instead of the VAE from the source checkpoint.
Use Concepts List - Enable this to ignore the concepts tab and load training data from a JSON file instead.
Concepts List - The path to a json file containing the concepts to train.
Advanced Settings
Here you will find more performance-related settings. Changing these will likely impact the amount of VRAM required for training.
Tuning
Use CPU Only - As indicated, this is more of a last resort if you can't get it to train with any other settings. Also, as indicated, it will be abysmally slow. Also, you cannot use 8Bit-Adam with CPU Training, or you'll have a bad time.
Use EMA - Use estimated moving averages when training the unet. Purportedly, this is better for generating images, but seems to have a minimal effect on training results. Uses more VRAM.
Use 8Bit Adam - Enable this to save VRAM. Should now work on both windows and Linux without needing WSL.
Mixed Precision - When using 8Bit Adam, you must set this to fp16 or bf16. Bf16 precision is only supported by newer GPUs, and enabled/disabled by default.
Memory Attention - Type of attention to use. Choices are: 'default': usually fastest, but use most VRAM; 'xformers': slower, uses less VRAM, can only be used with Mixed Precision = 'fp16'; 'flash_attention': slowest, requires lowest VRAM.
Don't Cache Latents - Why is this not just called "cache" latents? Because that's what the original script uses, and I'm trying to maintain the ability to update this as easily as possible. Anyway...when this box is checked latents will not be cached. When latents are not cached, you will save a bit of VRAM, but train slightly slower.
Train Text Encoder - Not required, but recommended. Requires more VRAM, may not work on <12 GB GPUs. Drastically improves output results.
Prior Loss Weight - The weight to use when calculating prior loss. You probably want to leave this at 1.
Center Crop - Crop images if they aren't the right dimensions? I don't use this, and I recommend you just crop your images "right".
Pad Tokens - Pads the text tokens to a longer length for some reason.
Shuffle Tags - Enable this to treat input prompts as a comma-separated list, and to shuffle that list, which can lead to better editability.
Max Token Length - raise the tokenizer's default limit above 75. Requires Pad Tokens for > 75.
Gradients
Gradient Checkpointing - Enable this to save VRAM at the cost of a bit of speed.
Gradient Accumulation Steps - This should probably be set to the same value as the training batch size.
Max Grad Norms - The maximum number of gradient normalizati
Adam Advanced
I literally have no idea what any of these do. Any advice/input is welcome.
Concepts
The UI exposes three concepts, which seemed like a reasonable number of items to train on at once.
If you wish to use more than three concepts at once, you can ignore this section entirely, and instead use the "Use Concepts List" option from the Miscellaneous section under the Parameters tab.
You can refer to the Example Concepts List for a sample of the JSON format. You can theoretically use any number of concepts this way.
Concept Parameters
Below is a list of the various parameters that can be used to train a concept.
Maximum Training Steps - The total number of lifetime training steps to train the concept until. Leave at -1 to use the global value.
Dataset Directory - The directory in which the instance images are located.
Classification Dataset Directory The directory in which class images are stored. Leave empty to save to model directory.
Filewords
The below values will be used in conjunction with the [filewords] tag in prompts to append/remove tags. See the 'Using [filewords]' section below for more information.
Instance Token The unique identifier for your subject. (sks, xyz). Leave blank for fine-tuning.
Class Token What your subject is. If a xyz is a person, this could be person/man/woman.
Prompts
Instance Prompt - A prompt used for your instance images. Use [filewords] to insert or combine existing tags with tokens.
Class Prompt - A prompt used for generating and training class images. Use [filewords] to insert or combine existing tags with tokens.
Classification Image Negative Prompt - When generating class images, this is the negative prompt that will be used to guide image generation.
Sample Image Prompt - A prompt used when generating sample images. Use [filewords] to insert or combine existing tags with tokens.
Sample Prompt Template File - An existing txt file used to generate sample images. [filewords] and [names] will be replaced with the instance token.
Sample Image Negative Prompt - When generating sample images, this is the negative prompt that will be used to guide image generation.
Image Generation
Total Number of Class/Reg Images - How many classification images will be generated. Leave at 0 to disable prior preservation.
Classification/Sample CFG Scale - The Classifier Free Guidance scale to use when generating images.
Classification/Sample Steps - The number of steps to use when generating respective images.
Number of Samples to Generate - How many sample images to generate.
Sample Seed - A seed to use for consistent sample generation. Set to -1 to use a random seed.
Using [filewords]
Each concept allows you to use prompts from image filenames or accompanying text files for instance and class images.
To instruct the trainer to use prompts from existing files, use '[filewords]' (no quotes) for the instance/class/sample prompts.
In order to properly insert and remove words from existing prompts, we need to let the trainer know what words indicate what our subject name and class are.
To do this, we specify an instance and class token. If your subject were called 'zxy' and it was a man, then your instance token would be 'zxy', and your class token would be 'man'.
Now, when building your respective prompts, the subject and class can be inserted or removed as necessary.
Debugging
Here's a bunch of random stuff I added that seemed useful, but didn't seem to fit anywhere else.
Preview Prompts - Return a JSON string of the prompts that will be used for training. It's not pretty, but you can tell if things are going to work right.
Generate Sample Image - Generate a sample using the specified seed and prompt below.
Sample Prompt - What the sample should be.
Sample Seed - The seed to use for your sample. Leave at -1 to use a random seed.
Train Imagic Only - Imagic is basically dreambooth, but uses only one image and is significantly faster.
If using Imagic, the first image in the first concept's Instance Data Dir will be used for training.
See here for more details:
https://github.com/ShivamShrirao/diffusers/tree/main/examples/imagic
Continuing Training
Once a model has been trained for any number of steps, a config file is saved which contains all of the parameters from the UI.
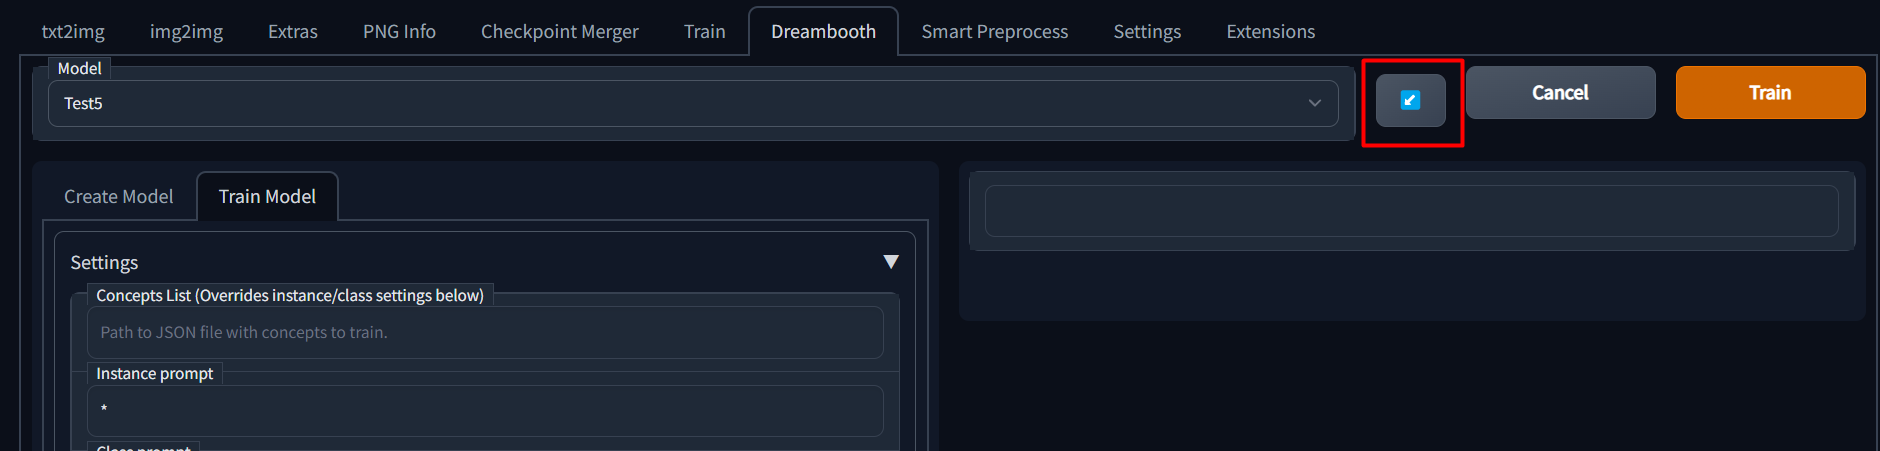
If you wish to continue training a model, you can simply select the model name from the dropdown and then click the blue button next to the model name dropdown to load previous parameters.
Memory and Optimization
As this is based on ShivamShiaro's repo, it should be able to run under the same GPU constraints, but is not guaranteed.
Please check out the discussions page to find some possible tips and tricks to help you get this running on your setup - or share what you've done to get it working.
Issues
Please be sure to use an issue template when asking for help. Some of the questions may be tedious, but I promise, they'll help me help you faster.
Credits
Huggingface.co - All the things
CloneOfSimo - LORA
ShivamShrirao - Multiple concepts, optimizations.
Bmalthais - Optimizations, Features
Automatic1111 - Base app