This repository contains an easy-to-use and flexibly customizable framework for training semantic segmentation models. The focus was put on being usable out of the box, without being a black box and giving the possibility to be adapted to individual projects. Therefore, this repository is designed to be extended with additional models and datasets, as well as other optimizers, schedulers, metrics, loss functions and data augmentation pipelines. In addition, new and popular packages such as Pytorch Lightning, Hydra and Albumentations were used to enable features, among others, such as multi-GPU, device independent and mixed precision training as well as easy job configuration and easy construction of data augmentation pipelines. Several architectures like High-Resolution Network (HRNet), Object Contextual Representation (OCR), Hierarchical Multi-Scale Attention (MS OCR), FCN, DeepLabv3 and UNet are already supported, as well as benchmark datasets like Cityscapes (coarse and fine) and PASCAL VOC2010 Context (59 and 60 classes). Additionally, Region Mutual Information (RMI) loss is included. All this together provides the ability to compare different state-of-the-art (SOTA) segmentation models under same conditions on different datasets.
The following contains information about how to set up the data and run the code. A comparison between different SOTA approaches (HRNet, OCR,OCR+ASPP, MS OCR) on the Cityscapes and PASCAL VOC Context datasets is shown in the experiments section. For an advanced use of this framework, the config/ folder contains a full explanation of all available configurations and how to customize the code to your needs.
Cityscapes
Overview about the results on the Cityscapes val set. The best result from three runs (mean intersection over union, mIoU) is reported. A more detailed analysis is given in the experiments section.
| Model | Baseline | RMI loss | Paddle weights | Mapillary pretrained | using Coarse Data | Mapillary + Coarse Data + RMI |
|---|---|---|---|---|---|---|
| HRNET | 81.44 | 81.89 | 81.74 | 83.02 | 82.03 | - |
| OCR | 81.37 | 82.08 | 81.89 | 83.37 | 82.24 | - |
| OCR + ASPP | 81.53 | 82.20 | - | - | - | - |
| MS OCR [0.5, 1.] | 81.49 | 82.59 | 82.18 | 83.63 | 82.26 | 84.80 |
| MS OCR [0.5, 1., 2.] | 82.30 | 82.88 | 82.79 | 84.31 | 82.95 | 85.31 |
Pascal VOC
Overview of the results on the PASCAL VOC2010 Context set. The best result from three runs (mean intersection over union, mIoU) is reported. A more detailed analysis is given in the experiments section. Models are tested with and without multiscale testing.
| Model | Baseline | PaddleClass | PaddleClass + RMI | Baseline * | PaddleClass * | PaddleClass + RMI * |
|---|---|---|---|---|---|---|
| HRNet | 50.61 | 54.19 | 54.55 | 53.21 | 56.31 | 56.67 |
| OCR | 51.68 | 55.98 | 57.20 | 53.94 | 58.18 | 59.34 |
| MS OCR [0.5, 1] | 52.00 | 56.03 | 57.54 | 54.24 | 58.10 | 59.58 |
| MS OCR [0.5, 1, 2] | 53.71 | 57.50 | 58.97 | 54.81 | 58.68 | 59.94 |
*Multi Scale Testing with Scales [0.5, 0.75, 1., 1.25, 1.5, 1.75, 2.] and flipping
This repository adopts code from the following sources:
- HRNet ( High-Resolution Representations for Semantic Segmentation, paper , source code)
- OCR (Object Contextual Representation, paper , source code)
- OCR + ASPP (Combines OCR with an ASPP module, source code)
- MS OCR (Hierarchical Multi-Scale Attention for Semantic Segmentation, paper , source code)
- UNet (paper, source code)
- RMI (Region Mutual Information Loss for Semantic Segmentation, paper , source code)
- DC+CE (combination from Dice and Cross Entropy Loss), TOPK, TOPK+DC are all from nnUNet (paper , source code)
Install the needed packages by the following command. You might need to adapt the cuda versions for torch and torchvision specified in requirements.txt. Find a pytorch installation guide for your system here.
pip install -r requirements.txtAfter Setting up a dataset, you can check if the installation was successful and everything is working, by running a small "unit test" using Pytorch Lightnings fast_dev_run:
python training.py dataset=<name.of.dataset> +pl_trainer.fast_dev_run=True
Among others, this repository is mainly built on the following packages. You may want to familiarize yourself with their basic use beforehand.
- Pytorch: The machine learning/deep learning library used in this repository.
- Pytorch Lightning: An open source framework for organizing Pytorch code and supporting machine learning development. It is automating most of the training loop and offers many useful features like mixed precision training. Lightning also makes code scalable to any hardware(CPU, GPU, TPU) without changing the code, as well as distributed training on multiple GPUs.
- Hydra: Framework to simplify the development, organization, and configuration of machine learning experiments. It provides the ability to dynamically create a hierarchical configuration by composition and override it through config files and the command line.
- Albumentations: Package for fast and flexible data augmentation in Semantic Segmentation (Albumentations is not limited to segmentation, but only that is used in this repository). Albumentations provides a lot of augmentations that can be used. Also random operations (e.g. random cropping) can be applied directly to images and masks.
- Torchmetrics: Collection of multiple PyTorch metrics and with a good integrity in Pytorch Lightning. Using torchmetrics makes it possible to use custom or predefined metrics and synchronization these between multiple devices.
- Black: Code Formatter used in this Repo. Check out the official docs on how to use Black or here on how to integrate Black into PyCharm.
Currently, the following datasets are supported: Cityscapes Dataset (fine and coarse) and Pascal Context Dataset (59 and 60 classes). Follow the instructions below to set up the respective datasets. Moreover, the customization section gives advice on adding further datasets.
Click to expand/collapse
Download the Cityscapes dataset from here. You have to create an account and afterward download: leftImg8bit_trainvaltest.zip (11GB) and gtFine_trainvaltest.zip (241MB). Unzip them and put them into a folder, the structure of the folder should now look like this:
cityscapes
    ├── leftImg8bit_trainvaltest
    │   └── leftImg8bit
    │       ├── train
    │       │   ├── aachen
    │       │   └── ...
    │       └── val
    │           ├── frankfurt
    │           └── ...
    └── gtFine_trainvaltest
        └── gtFine
            ├── test
            │   └── ...
            ├── train
            │   └── ...
            └── val
                └── ...
The cityscapes dataset contains 34 classes by default but only 19 of them are used in practices. To avoid doing this conversion at each training step, it is done in a preprocessing step. To do this preprocessing run the following code with adjusting the data_path to the location which contains the leftImg8bit_trainvaltest and gtFine_trainvaltest folders. This will create a new mask for each data sample with the converted class labeling which will be merged into the folder/data structure of the cityscapes dataset.
python datasets/Cityscapes/process_Cityscapes.py home/.../Datasets/cityscapes
After downloading and setting up the data, the last step is to adjust the path in the configuration. Open the file of the environment you are using (by default config/environment/local.yaml) and adopt the cityscapes path to the location of the folder where your gtFine_trainvaltest and leftImg8bit_trainvaltest are. For this example this would look like this:
config/environment/local.yaml
  ─────────────────────────────
...
paths:
cityscapes: /home/.../Datasets/cityscapesClick to expand/collapse
The cityscapes dataset provides 20k additional coarse labeled images. Since cityscapes_coarse contains no validation data the fine annotated validation set is used for this purpose. This is an extension to cityscapes rather than a separate dataset, so cityscapes should be set up first. Afterwards download the cityscapes_coarse dataset from here (leftImg8bit_trainextra.zip (44GB) and gtCoarse.zip (1.3GB)) and unzip them in the same folder as your cityscapes data. You then should end up with this:
cityscapes
    ├── leftImg8bit_trainvaltest
    │   └── leftImg8bit
    │       └── ...
    ├── gtFine_trainvaltest
    │   └── gtFine
    │       └── ...
    ├── leftImg8bit_trainextra
    │   └── leftImg8bit
    │       └── ...
    └── gtCoarse
        └── gtCoarse
            └── ...
Afterwards process the cityscapes_coarse dataset in the same way as it was done for cityscapes by:
python datasets/Cityscapes/process_Cityscapes_coarse.py home/.../Datasets/cityscapesClick to expand/collapse
Click here for directly downloading the labels or do it manually by downloading the file trainval.tar.gz (30.7 MB file) from PASCAL-Context. Click here for directly downloading the images or do it manually by downloading the file training/validation data (1.3GB tar file) from PASCAL VOC. Unzip both files and put them into a folder. The structure of you folders should look like this:
Datasets
    ├── VOCtrainval_03-May-2010/VOCdevkit/VOC2010
    │   ├── Annotations
    │   ├── ImageSets
    │   └── ...
    └── trainval
        └──trainval
            ├── *.mat
            └── ...
Since the VOC2010 dataset contains a lot of unnecessary stuff (unnecessary for this repo), only the required data is extracted and merged with the transformed label data from trainval/. Run the following script which creates a new folder structure with only the relevant and transformed data.
python datasets/VOC2010_Context/process_VOC2010_Context.py home/.../Datasets/Afterwards a new dataset is created and the data from trainval and VOCtrainval_03-May-2010 is not further needed. The new dataset looks like this:
Datasets
    └── VOC2010_Context
        ├── Annotations
        │   ├── train
        │   └── val
        └── Images
            ├── train
            └── val
After downloading and setting up the data, the last step is to adjust the path in the configuration. Open the file of the environment you are using (by default config/environment/local.yaml) and adopt the VOC2010_Context path to the location of the folder where your Images and Annotations are. For this example this would look like this:
config/environment/local.yaml
  ─────────────────────────────
...
paths:
VOC2010_Context: /home/.../Datasets/VOC2010_ContextPretrained weights for HRNet-based models (HRNet, OCR, MS OCR) are available on ImageNet, PadddleClas and Mapillary. Download the preferred weights (direct download links below) and put them in the pretrained/ folder.
- ImageNet weights: source, direct download
- PaddleClas weights: source, direct download
- Mapillary weights: source, direct download
The following is a Quickstart guide on how to run the code. To adopt the configuration you can edit the /config/baseline.yaml file directly or use the hydra commandline syntax. As you will see, the basic syntax of how to run and adopt the code is simple. The crucial part is to know which parameters you can configure and how. Therefore, the config/ folder explains in detail how the configuration is composed and which parameters it contains. There is also an explanation on how to add your own models/datasets etc. Some examples on how to execute code are given below in the experiment section.
After setting up the data and downloading the pretrained weights, you can directly run the baseline by:
python training.pyThis trains HRNet (pretrained on ImageNet) on the Cityscape Dataset with the following default settings: Stochastic Gradient Descent(SGD) Optimizer with weight decay of 0.0005 and a momentum of 0.9. The initial learning rate is set to 0.01 and a polynomial learning rate scheduler with exponent of 0.9 is used. It is trained for 400 epochs and a batch size of 6 per GPU (all available GPUs are used). Cross Entropy(CE) Loss is used as well as Mixed Precision and DDP with Synchronized Batch Normalization (only for multiple GPUS).
You can change the model by adopting the corresponding entry in /config/baseline.yaml or from the
commandline as shown below.
Available options for 'model' are: DeepLabv3, FCN, UNet, hrnet, hrnet_ocr, hrnet_ocr_aspp, hrnet_ocr_ms.
python training.py model=hrnet                      # High-Resolution Representations for Semantic Segmentation
python training.py model=hrnet_ocr                  # Object Contextual Representation
python training.py model=hrnet_ocr_aspp             # Combination of OCR with an ASPP module
python training.py model=hrnet_ocr_ms               # Hierarchical Multi-Scale Attention for Semantic Segmentation
python training.py model=FCN                        # torchvision version of FCN
python training.py model=DeepLabv3                  # torchvision version of DeepLabv3
python training.py model=UNet # UNetAvailable Pretrained Weights for each model:
- hrnet,hrnet_ocr, hrnet_ocr_aspp, hrnet_ocr_ms: ImageNet, PaddleClas, Mapillary
- FCN, DeepLabv3: Coco
- UNet: None
#For hrnet,hrnet_ocr, hrnet_ocr_aspp, hrnet_ocr_ms
python training.py MODEL.PRETRAINED=False           # Training from scratch without Pretraining
python training.py MODEL.pretrained_on=ImageNet     # (Default) Pretrained on ImageNet
python training.py MODEL.pretrained_on=Paddle       # Pretrained using PaddleClas weights
python training.py MODEL.pretrained_on=Mapillary    # Pretrained on Mapillary Dataset
#For FCN and DeepLab
python training.py model.pretrained=False           # Training from scratch without Pretraining
python training.py model.pretrained=True # (Default) Pretrained on CocoIn the same way as the model, also the dataset can be changed from the commandline.
For these provided datasets, the corresponding setting, hyperaparmeters (from config/experiment/) and
data augmentations (from config/data_augmentation/) are adapted automatically (see config/experiment/DatasetName.ymla).
Available options for 'dataset' are: Cityscapes, Cityscapes_coarse, Cityscapes_fine_coarse, VOC2010_Context, VOC2010_Context_60.
python training.py experiment=Cityscapes             # Cityscapes Dataset with 19 classes using fine annotated data and using the predefined settings
python training.py dataset=Cityscapes               # only use the dataset with default settings

# the same for the other datasets
python training.py dataset=Cityscapes_coarse        # Cityscapes Dataset with 19 classes using coarse annotated data
python training.py dataset=Cityscapes_fine_coarse   # Cityscapes Dataset with 19 classes using fine and coarse annotated data
python training.py dataset=VOC2010_Context          # VOC2010_Context Dataset with 59 classes setting
python training.py dataset=VOC2010_Context_60 # VOC2010_Context Dataset with 60 classes settingThe default hyperparameters are defined in config/experiment/default.yaml and are overwritten by the corresponding config/experiment/<dataset.name>.yaml for the predefined datasets. The basic hyperparameters needed for training can be set from the commandline as shown below (in the example the default values are shown):
python training.py epochs=400 batch_size=6 val_batch_size=6 num_workers=10 lr=0.001 wd=0.0005 momentum=0.9For each model output a separate loss function can be set/has to be set.
For a single output the loss function can be changed by lossfunction=RMI.
If the model has multiple outputs, pass a list of loss functions lossfunction=[RMI,CE,CE,CE],
with one entry for each model output.
The lossweight argument can be used analogues to weight the model outputs differently.
The provided models have the following number of outputs [model(num_putputs)]: DeepLabv3(1), FCN(1), UNet(1), hrnet(1), hrnet_ocr(2)
, hrnet_ocr_aspp(2), hrnet_ocr_ms(4).
Available options for 'lossfunction': CE, wCE, RMI, wRMI
python training.py lossfunction=CE                  # default Cross Entropy loss
python training.py lossfunction=wCE                 # including weights into Cross Entropy
python training.py lossfunction=RMI                 # using Region Mutual Information(RMI) Loss
python training.py lossfunction=wRMI                # using weighted RMI Loss
python training.py lossfunction=[wRMI,wCE]          # can be arbitrarily combined for multiple outputs
python training.py lossfunction=[CE,CE,CE,CE] lossweight=[1.0,0.4,0.05,0.05] # default settingsThe logging structure of the output folder is depicted below.
The LOGDIR=<some.folder.dir> argument defines the logging folder ("logs/" by default).
For a better overview, experiments can also be named by name="my_experiment" ("baseline"
by default).
The parameters which are logged are: Hyperparameters (like epochs, batch_size, initial lr,...),
metrics, loss (train+val), time (train+val) and learning rate as well as example predictions
during validation (can be disabled by setting num_example_predictions=0).
Checkpointing can be disabled/enabled by pl_trainer.enable_checkpointing= <True or False>.
To resume training from a checkpoint use the continue_from argument.
If you want to finetune from a checkpoint (only load the weights) use the finetune_from argument.
Both should lead to a model checkpoint, which is a *.ckpt file.
#Continue from Checkpoint + Example
python training.py +continue_from=<path.to.ckpt>
python training.py +continue_from=logs/.../checkpoints/last_epoch_74.ckpt
#Finetune from Checkpoint + Example
python training.py +finetune_from=<path.to.ckpt>
python training.py +finetune_from=logs/.../checkpoints/last_epoch_74.ckpt
LOGDIR # logs/ by default
└── Dataset # Name of the used Dataset
└──Model # Name of the used Model
└──experiment_overrides # Parameters that have been overwritten and differ from the baseline
└──Date # Date as unique identifier
├── checkpoints/ # If checkpointing is enabled this contains the best and the last epochs checkpoint
├── hydra/ # Contains hydra config files
├── testing/ # (Optional) only when model is tested - contains testing results
├── event.out... # Tensorboard log
├── training.log # Console logging file
└── hparams.yaml # Resolved config
Since Tensorboard is used for logging, you can view the logged results by the following command. Tensorboard will include all logs (.tfevents. files) found in any subdirectory of --logdir. This means by the level of the selected --logdir you can define which experiments (runs) should be included into the tensorboard session.
tensorboard --logdir=<some.dir>
# example for viewing a single experiment
tensorboard --logdir=/home/.../logs/Cityscapes/hrnet/run_.../2022-04-21_10-25-30
# example for viewing all runs in .../baseline
tensorboard --logdir=/home/.../logs/Cityscapes/hrnet/run_...Node: Tensorboard does not show the images for all epochs (like the example predictions or confusion matrix) by default.
If you need to see all images use tensorboard --logdir=<some.dir> --samples_per_plugin images=<num_epochs>
If a model should be tested or validated under different settings (e.g. additional scale for MS OCR, or multiscale testing for VOC2010_Context), the following script can be used.
Thereby the test dataset is loaded, this means if you don't have one, or you want to use the validation set instead,
your dataset class should return the validation set when getting the split=test input argument (see datasets/Cityscapes/Cityscapes.py).
For testing, the configuration used during training is reconstructed and composed with the arguments given by the command line.
Consider that checkpointing hast to be enabled during
training (python training.py .... pl_trainer.enable_checkpointing=True or set to True in '
baseline.yaml') to validate/test afterwards.
No public test set exists for the Cityscapes and VOC2010_Context datasets, so the validation set is used instead.
MS OCR and VOC2010_Context use a predefined validation setting. However, this setting can be
changed as shown here. Since the configuration is composed of different configs, it can
happen that hydra raises error because some attributes from the commandline didn't exist at the
current config. If this happens add a "++" in front of the argument (e.g. ... ++example=True) or
load the missing config group manually (e.g. ... model=mymodel MODEL.specific_parameter=X)
python testing.py ckpt_dir=<path.to.the.outputdir.of.training>
# eg python testing.py ckpt_dir="/../Semantic_Segmentation/logs/VOC2010_Context/hrnet/baseline_/2022-02-15_13-51-42"Node: For validation the same config is reconstructed which was used during training.
This means if you train and test on different devices you have to adapt the environment
parameter(python testing.py ckpt_dir=<some.dir> environment=some_env).
The framework can also be used in a light version (not all features and tools can be used) for doing Instance Segmentation. So far Mask RCNN (paper, code) is the only supported model and the only supported metric is Mean-Average Precision (MAP, docs). Some additional tutorials can be found here and how to set up the dataset is shown here. The integration of the PennFundan Dataset is shown as an example in datasets/PennFudan/PennFudan.py and config/dataset/PennFudan.yaml. For training an Instance Segmentation model adopt the following command:
python training.py model=Mask_RCNN metric=MAP trainer=InstSeg dataset=<some.inst.seg.dataset>
python training.py model=Mask_RCNN metric=MAP trainer=InstSeg dataset=PennFudanNode: The torchvision version of Mask RCNN contains a transformation layer which normalizes and resizes the data automatically.
This can be disabled by: model.disable_transforms=True. Then, however, the shape and normalisation of the data must be taken care of in the data augmentation pipeline.
The tools/ folder contains some additional and useful tools for developing and experimenting. It is not guaranteed that these tools will work for all kind of use-cases, datasets and datatypes but even then they can be used as a starting point and can be adapted with a few changes. The Scripts and tools are shortly listed in the following and explained in more detail in tools/.
-
predict.py: Script to Predict all images in a folder. Has to be adopted individually.
-
show_data.py: Load and Visualize the pytorch dataset which is defined in the dataset config.
- dataset: Name of the dataset config (see here)
pyhton tools/show_data.py dataset=<dataset.name>
pyhton tools/show_data.py dataset=Cityscapes
-
show_prediction.py: Show the predictions of a trained model. Basically has the same syntax as the validation/testing, but visualizes the result instead of calculating metrics.
- ckpt_dir: path to the checkpoint which should be used
python tools/show_prediction.py ckpt_dir=<path>
python tools/show_prediction.py ckpt_dir=ckpt_dir="/../Semantic_Segmentation/logs/VOC2010_Context/hrnet/baseline_/2022-02-15_13-51-42"
-
dataset_stats.py: Getting some basic stats and visualizations about the dataset like: mean and std for each channel, appearances and ratio of classes and potential class weights.
- dataset: Name of the dataset config (see here)
python tools/dataset_stats.py dataset=<dataset.name>
pyhton tools/dataset_stats.py dataset=Cityscapes
-
lr_finder.py: Script to use pytorch lightning's Learning Rate Finder to get some guidance when choosing an optimal initial lr (Should be used with caution, especially if random augmentations are used).
python tools/lr_finder.py
pyhton tools/lr_finder.py dataset=Cityscapes model=hrnet
The following experiments were performed under the following training settings and the reported results are for the Cityscapes validation set. Stochastic Gradient Descent(SGD) with momentum = 0.9 and weight decay = 0.0005 is used for optimization. The models are trained with an initial learning rate of 0.01 and a polynomial learning rate scheduler. These settings have established themselves as a standard setting for cityscapes and are therefore also used here. Additionally, the batch size is set to 12 and the number of epochs to 400 ( see Defining the Baseline). For data augmentation the images are randomly scaled to a range of [0.5, 2] and randomly cropped to a size of 1024x512 afterwards. Besides that, only random flipping and normalization is performed. By default the models are initialized using pretrained weights on ImageNet. Unless specified, training is performed on 2 GPUs (with a batch size of 6 per GPU) and each experiment was repeated 3 times. The MS OCR model is trained with two scales ([0.5, 1.]) during training and for inference a third ([0.5, 1., 2.]) is added. Typically, both settings are evaluated in the following experiments.
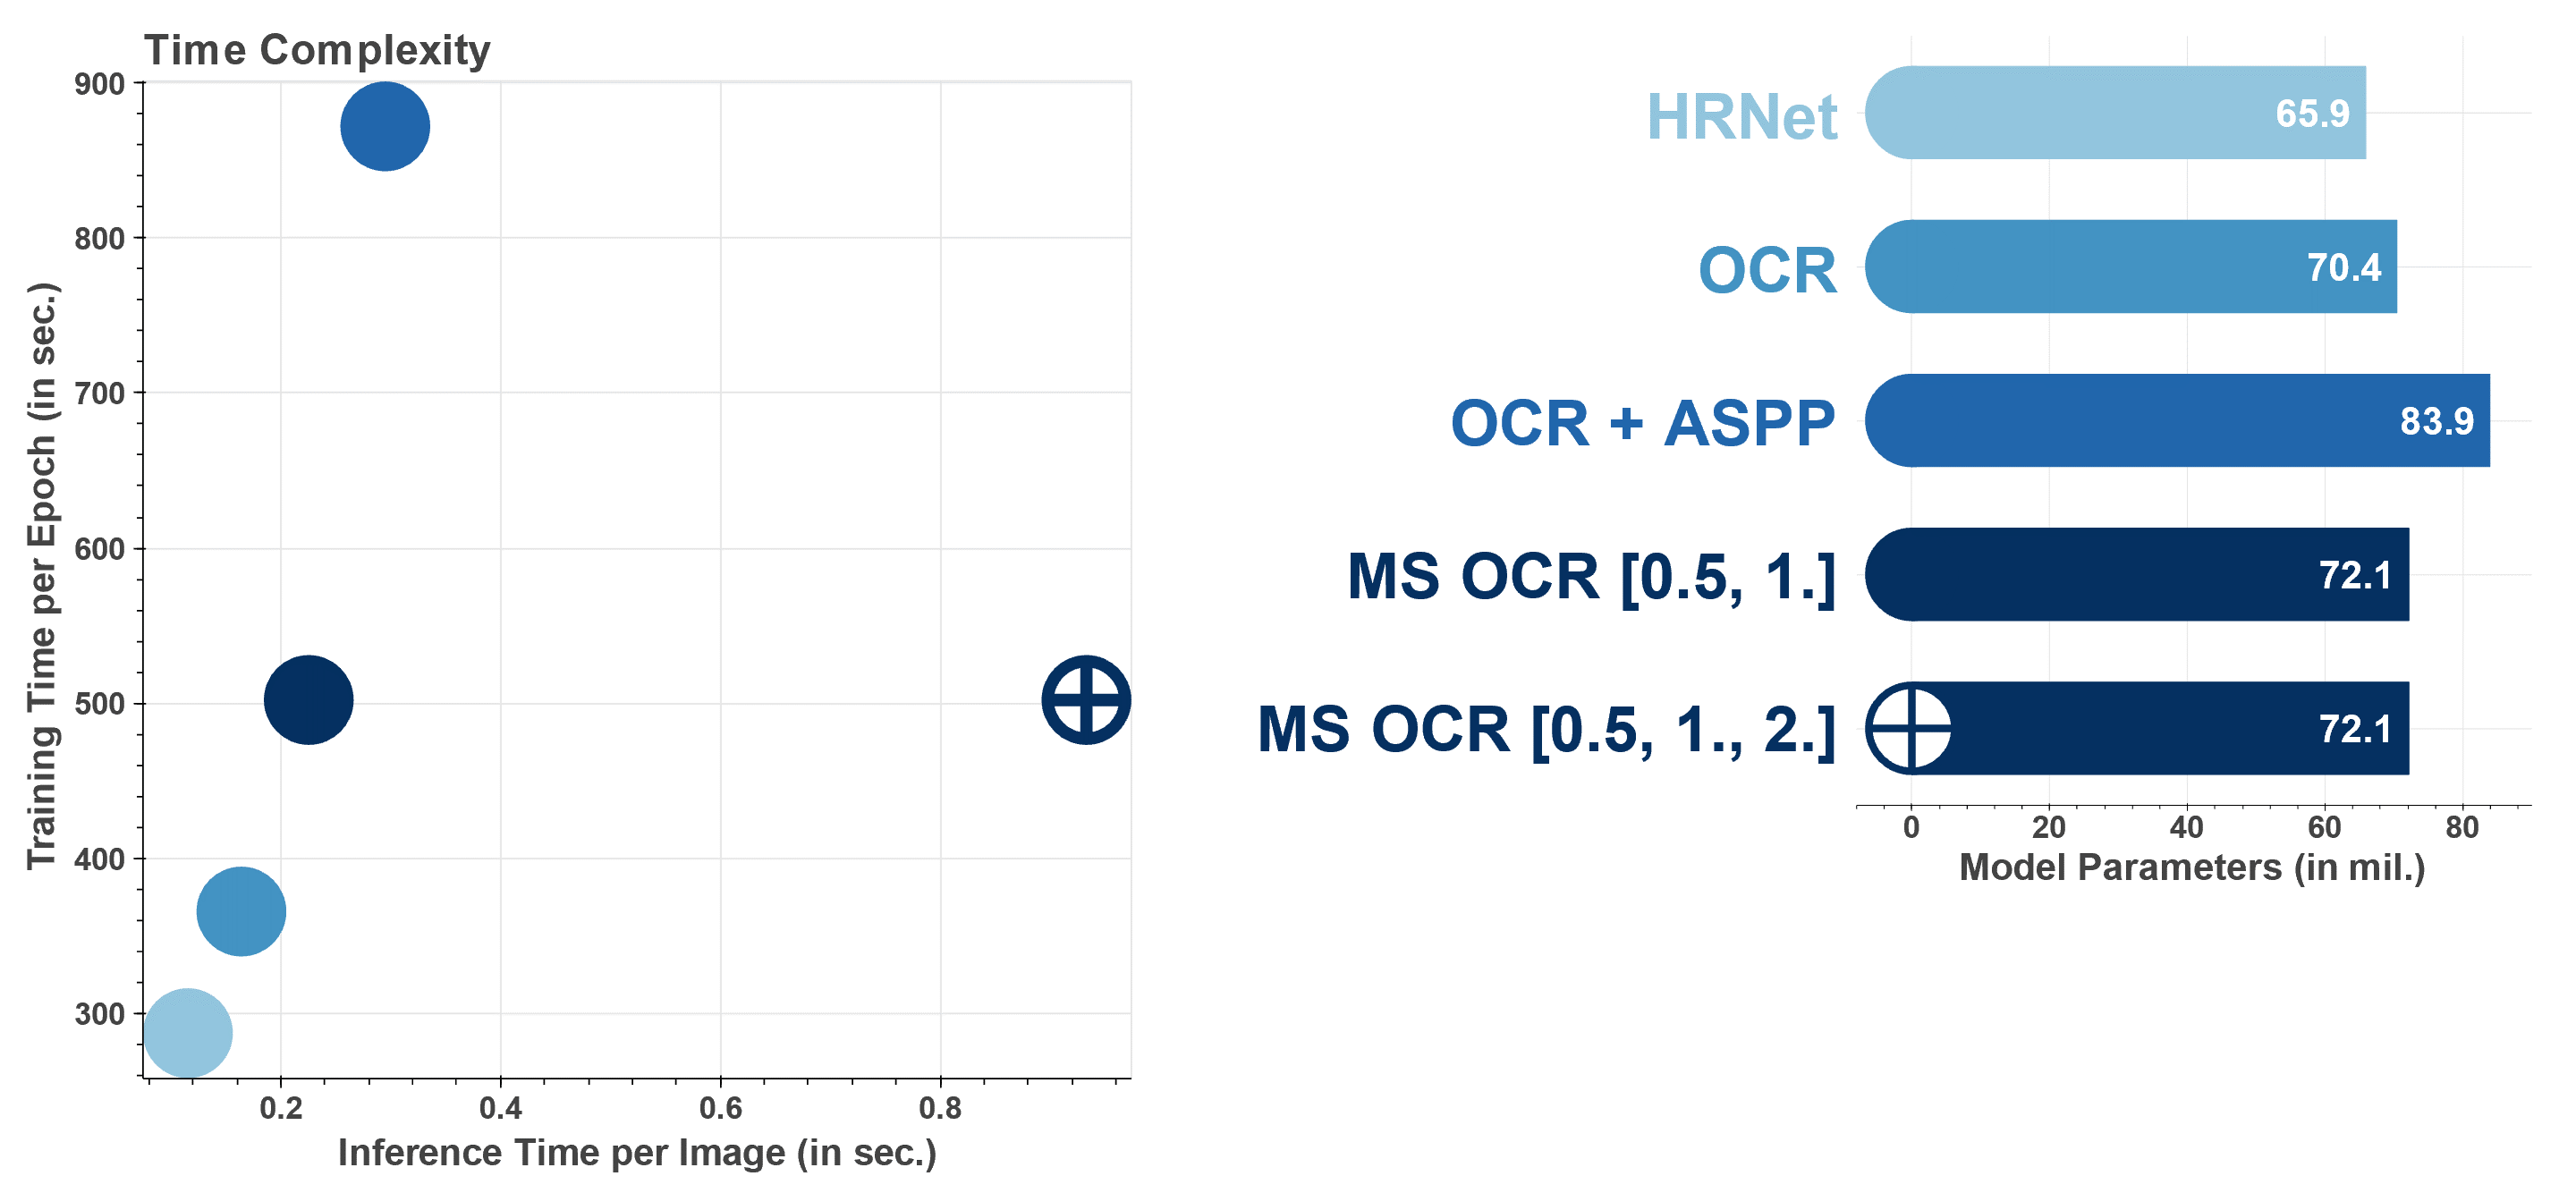
The following figure shows the training and inference time of each model, as well as the number of parameters. It can be seen that the number of parameters is in a similar range for all models, but still as the number of parameters increases, the time complexity of the models also increases. Thereby OCR-ASPP has by far the highest training time. Using an additional scale to MS OCR highly increases the inference time of the model. That's why MS OCR [0.5, 1.] is used for training and only for inference MS OCR [0.5, 1., 2.] is used (that's why both have the same training time) The runtime measurements are done using a single GPU (NVIDIA GeForce RTX 3090). To fit on a single GPU, the batch_size is reduced compared to the baseline.
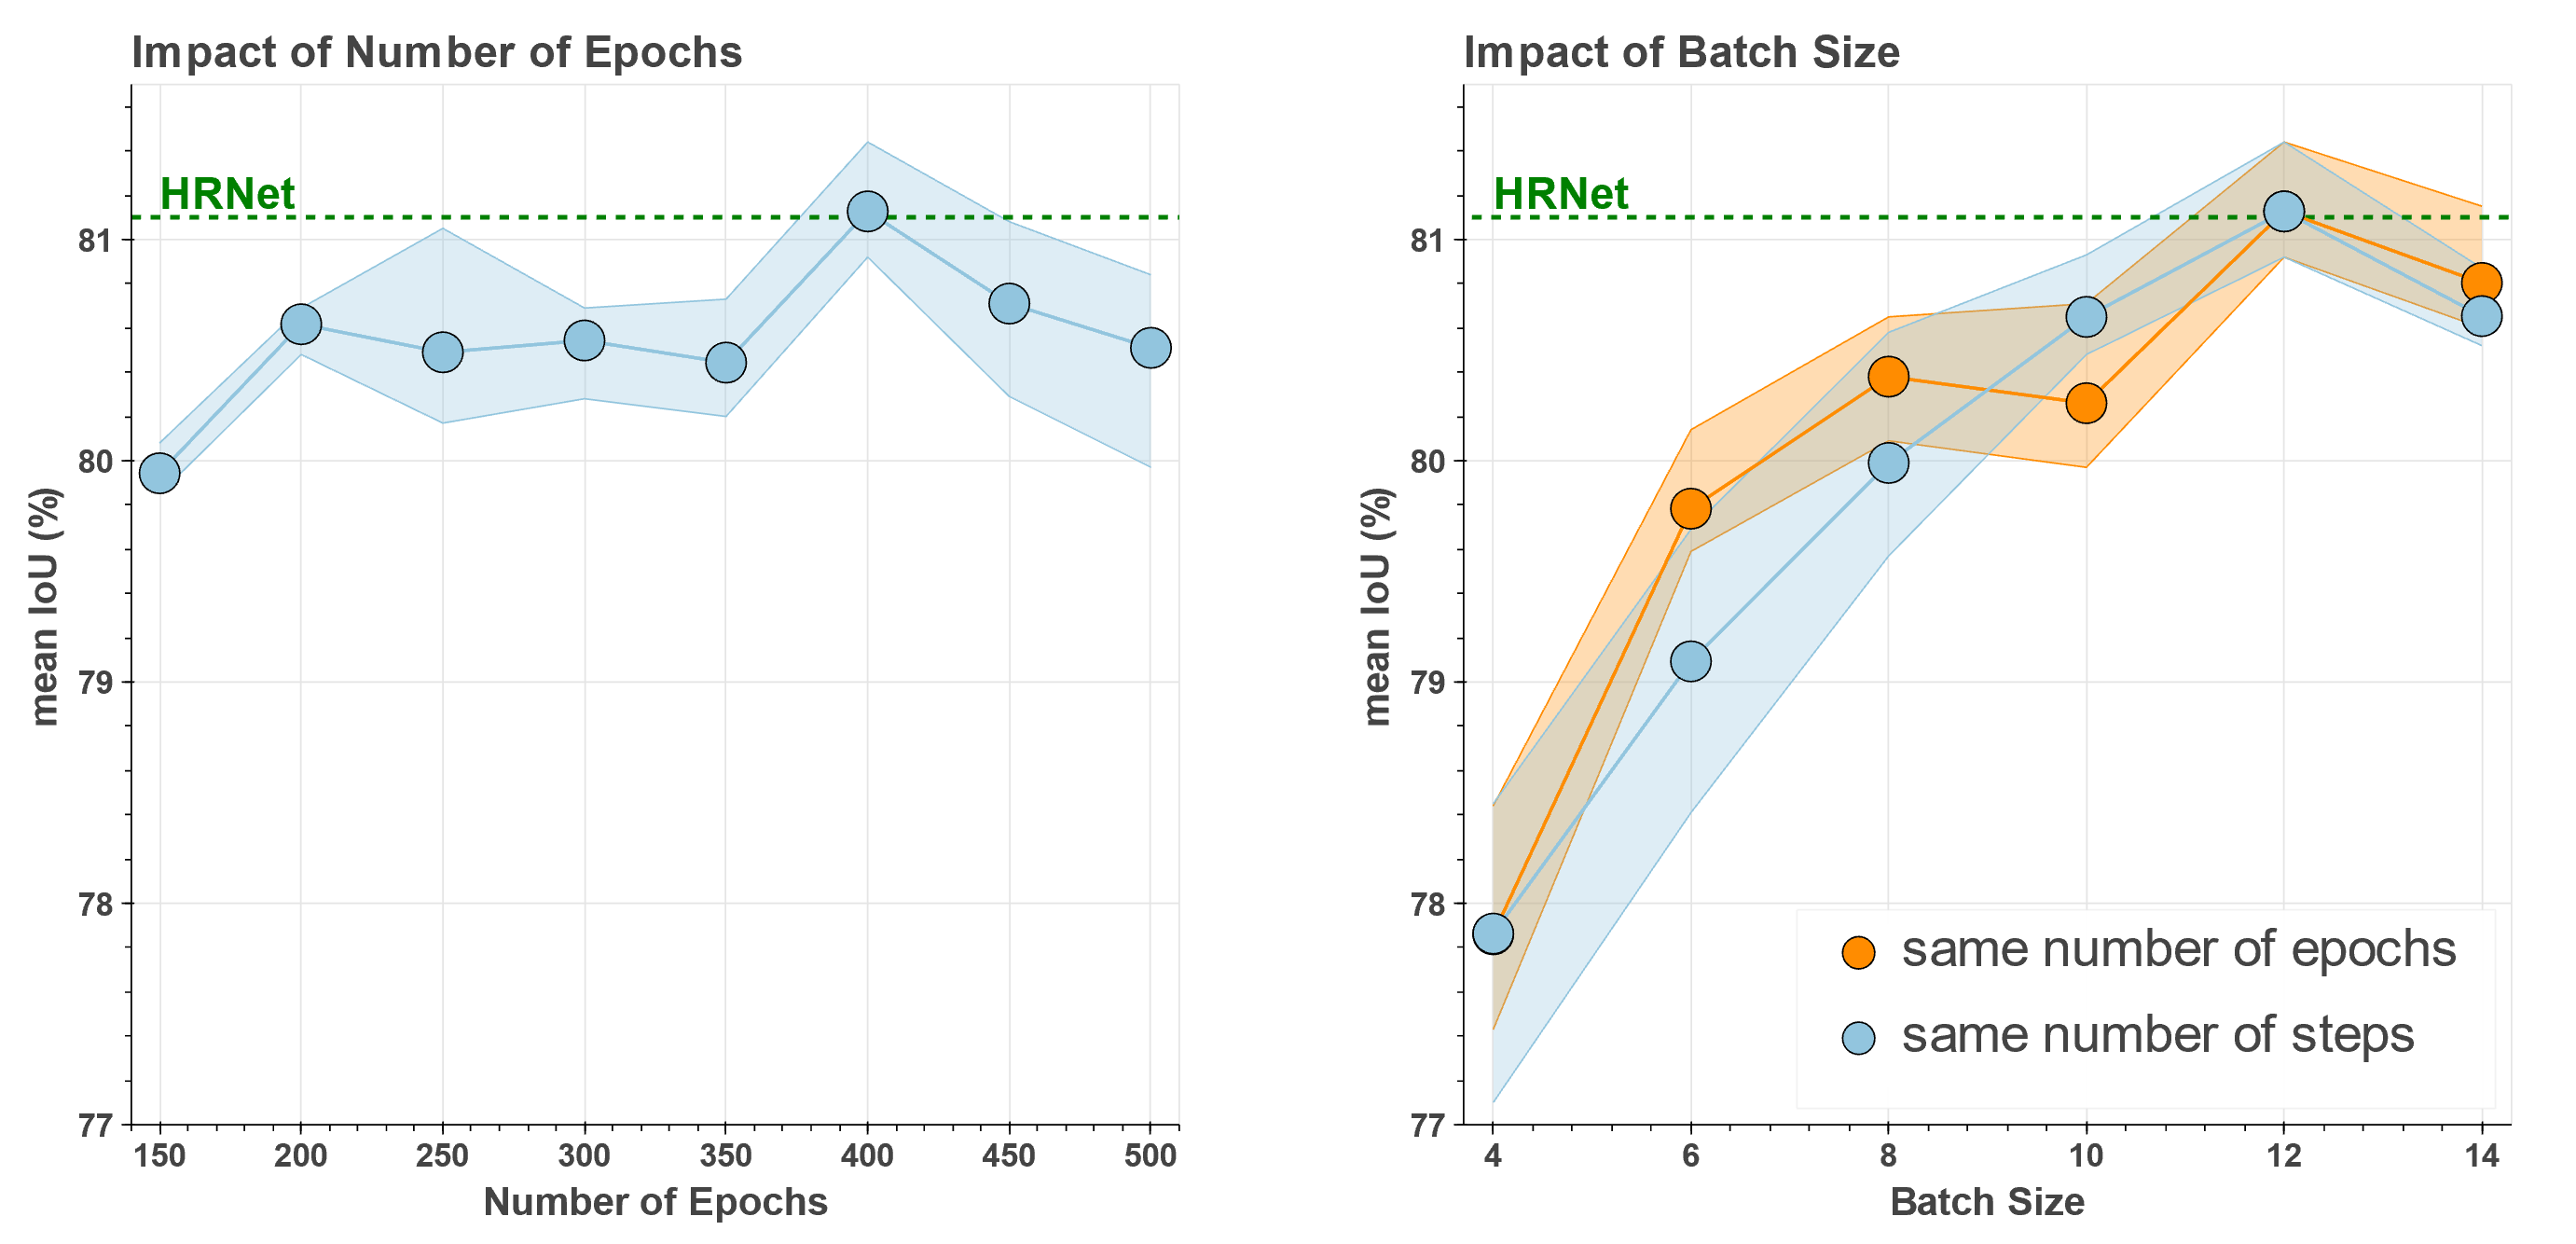
Looking at further hyperparameters, it can be seen that the batch size in particular is critical. For good results a large batch size is mandatory, so a GPU with sufficient memory or multiple GPUs with synchronized batch normalization should be used. If these hardware requirements cannot be fulfilled, accumulate gradient batches can be used instead. This will not have exactly the same effect but will still help to increase the effective batch size. With the number of epochs, the fluctuation is much smaller, but a suitable value is still important. In green, the HRNet results reported in the corresponding paper are shown for comparison. Resulting from the experiments, a batch size of 12 and 400 epochs are used for further experiments.
Scripts
Running HRNet for different number of epochs
python training.py epochs=150
python training.py epochs=200
python training.py epochs=250
python training.py epochs=300
python training.py epochs=350
python training.py epochs=400
python training.py epochs=450
python training.py epochs=500
Running HRNet with different batch sizes (on a single GPU)
#for the same number of epochs
python training.py batch_size=4 epochs=400
python training.py batch_size=6 epochs=400
python training.py batch_size=8 epochs=400
python training.py batch_size=10 epochs=400
python training.py batch_size=12 epochs=400
python training.py batch_size=14 epochs=400#for the same number of steps
python training.py batch_size=4 epochs=134
python training.py batch_size=6 epochs=201
python training.py batch_size=8 epochs=268
python training.py batch_size=10 epochs=334
python training.py batch_size=12 epochs=400
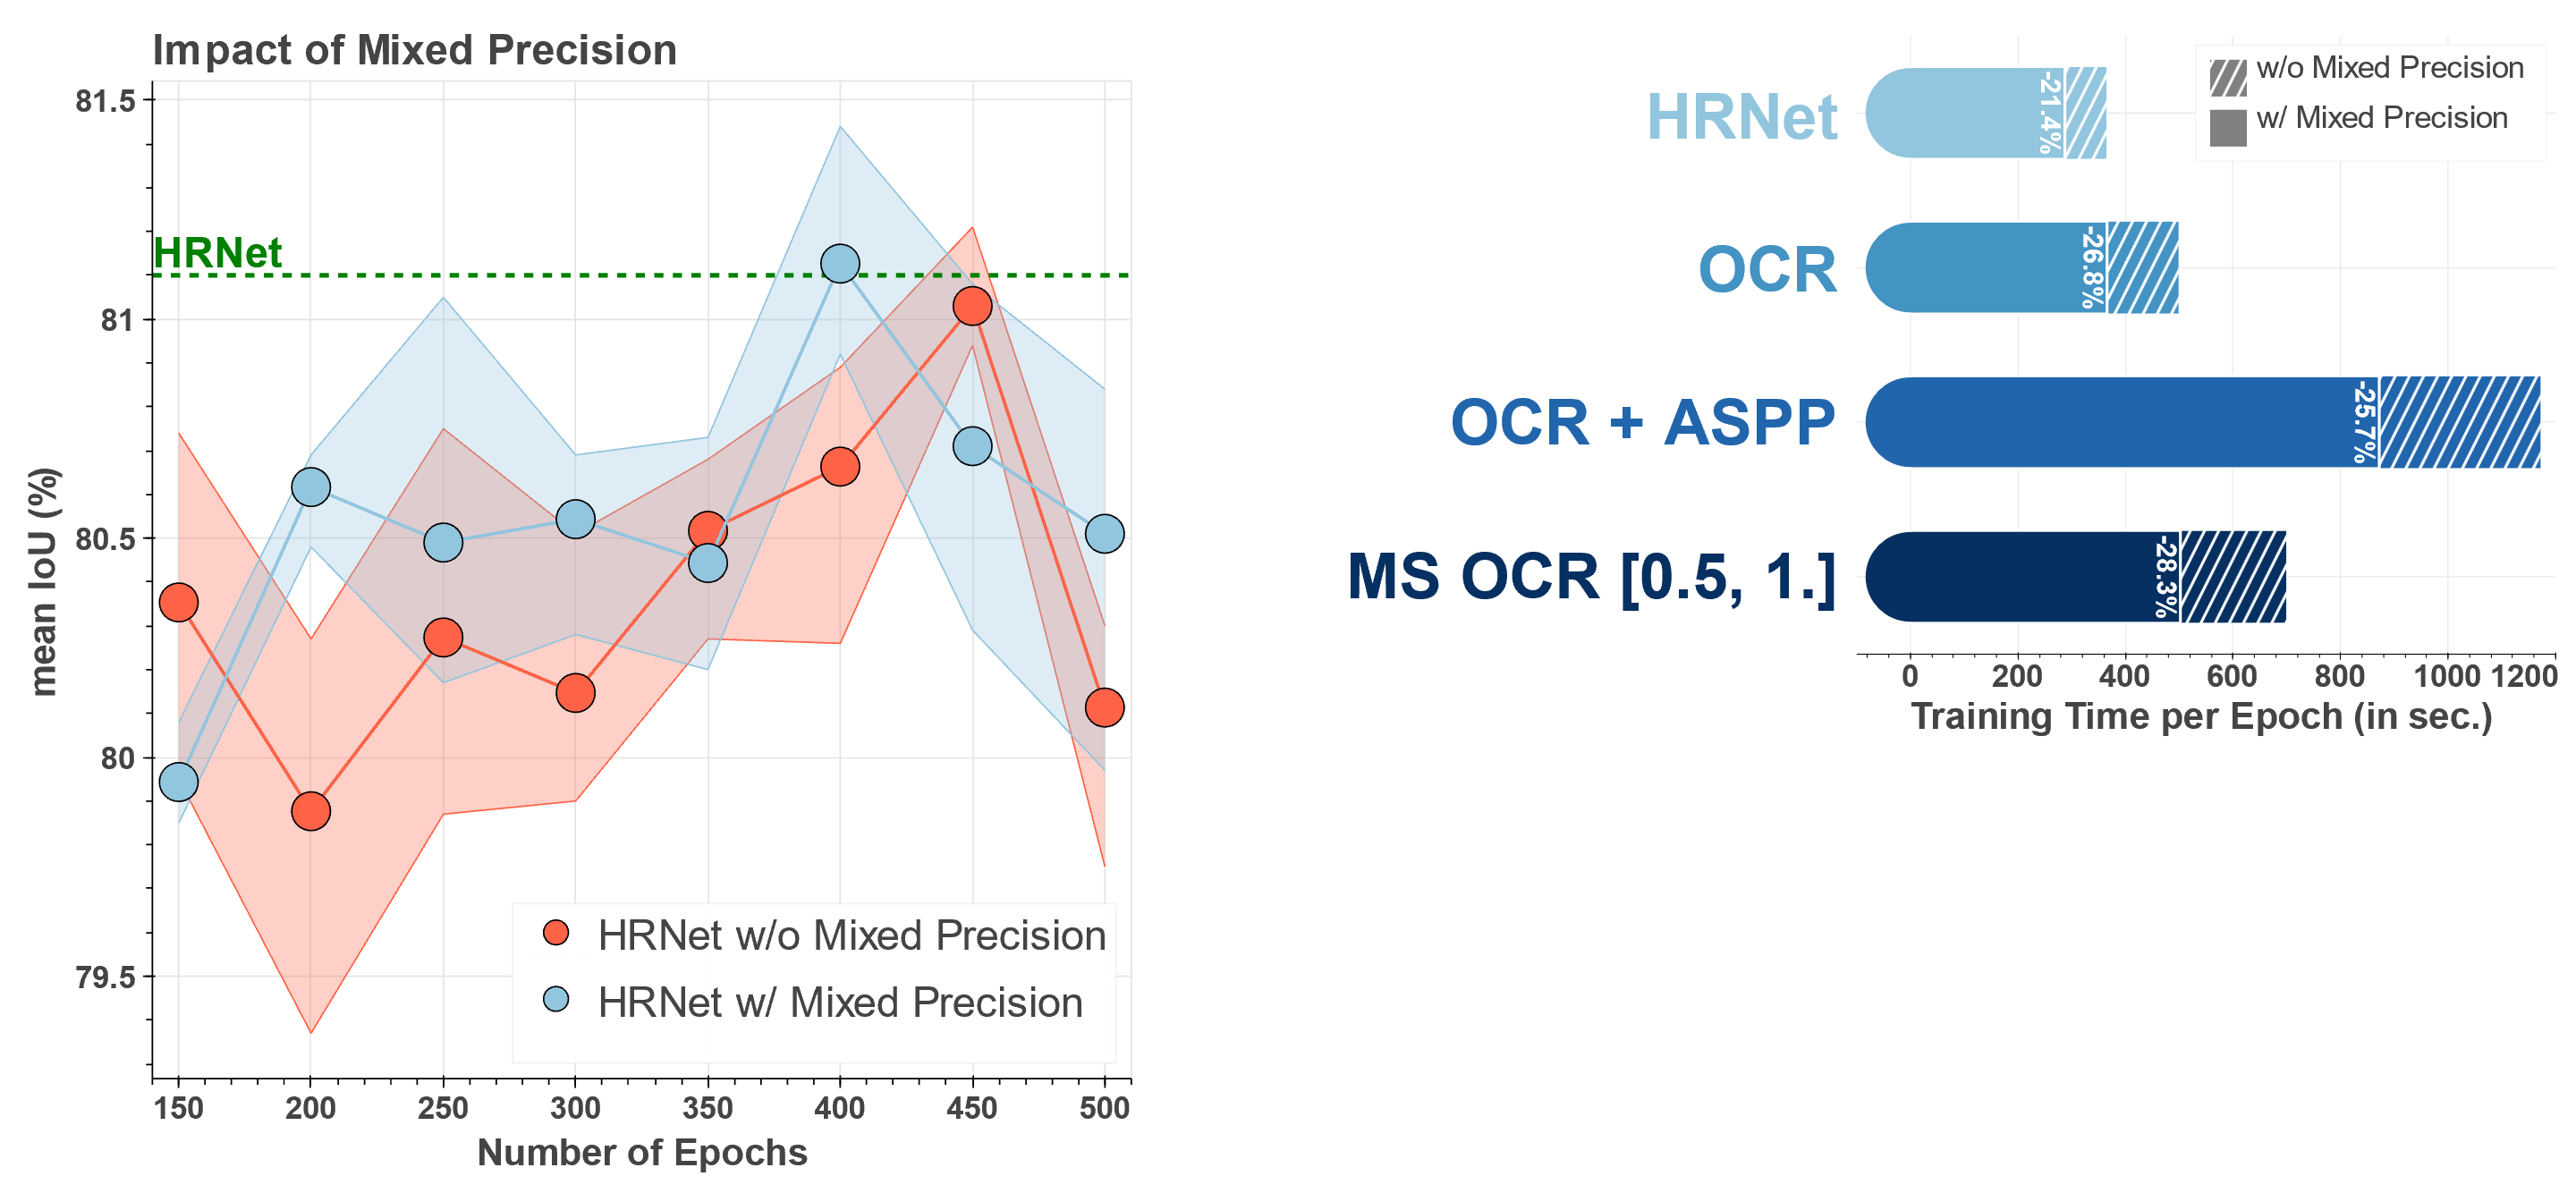
python training.py batch_size=14 epochs=468The use of Mixed Precision reduces the training time of the models by 20% to 30%. In addition, Mixed Precision was able to improve the results in these experiments (no generality). Since Mixed Precision drastically reduces the training time, Mixed Precision is used as default for further experiments.
Scripts
Training with Mixed Precision
python training.py epochs=150
python training.py epochs=200
python training.py epochs=250
python training.py epochs=300
python training.py epochs=350
python training.py epochs=400
python training.py epochs=450
python training.py epochs=500
Training without Mixed Precision
python training.py pl_trainer.precision=32 epochs=150
python training.py pl_trainer.precision=32 epochs=200
python training.py pl_trainer.precision=32 epochs=250
python training.py pl_trainer.precision=32 epochs=300
python training.py pl_trainer.precision=32 epochs=350
python training.py pl_trainer.precision=32 epochs=400
python training.py pl_trainer.precision=32 epochs=450
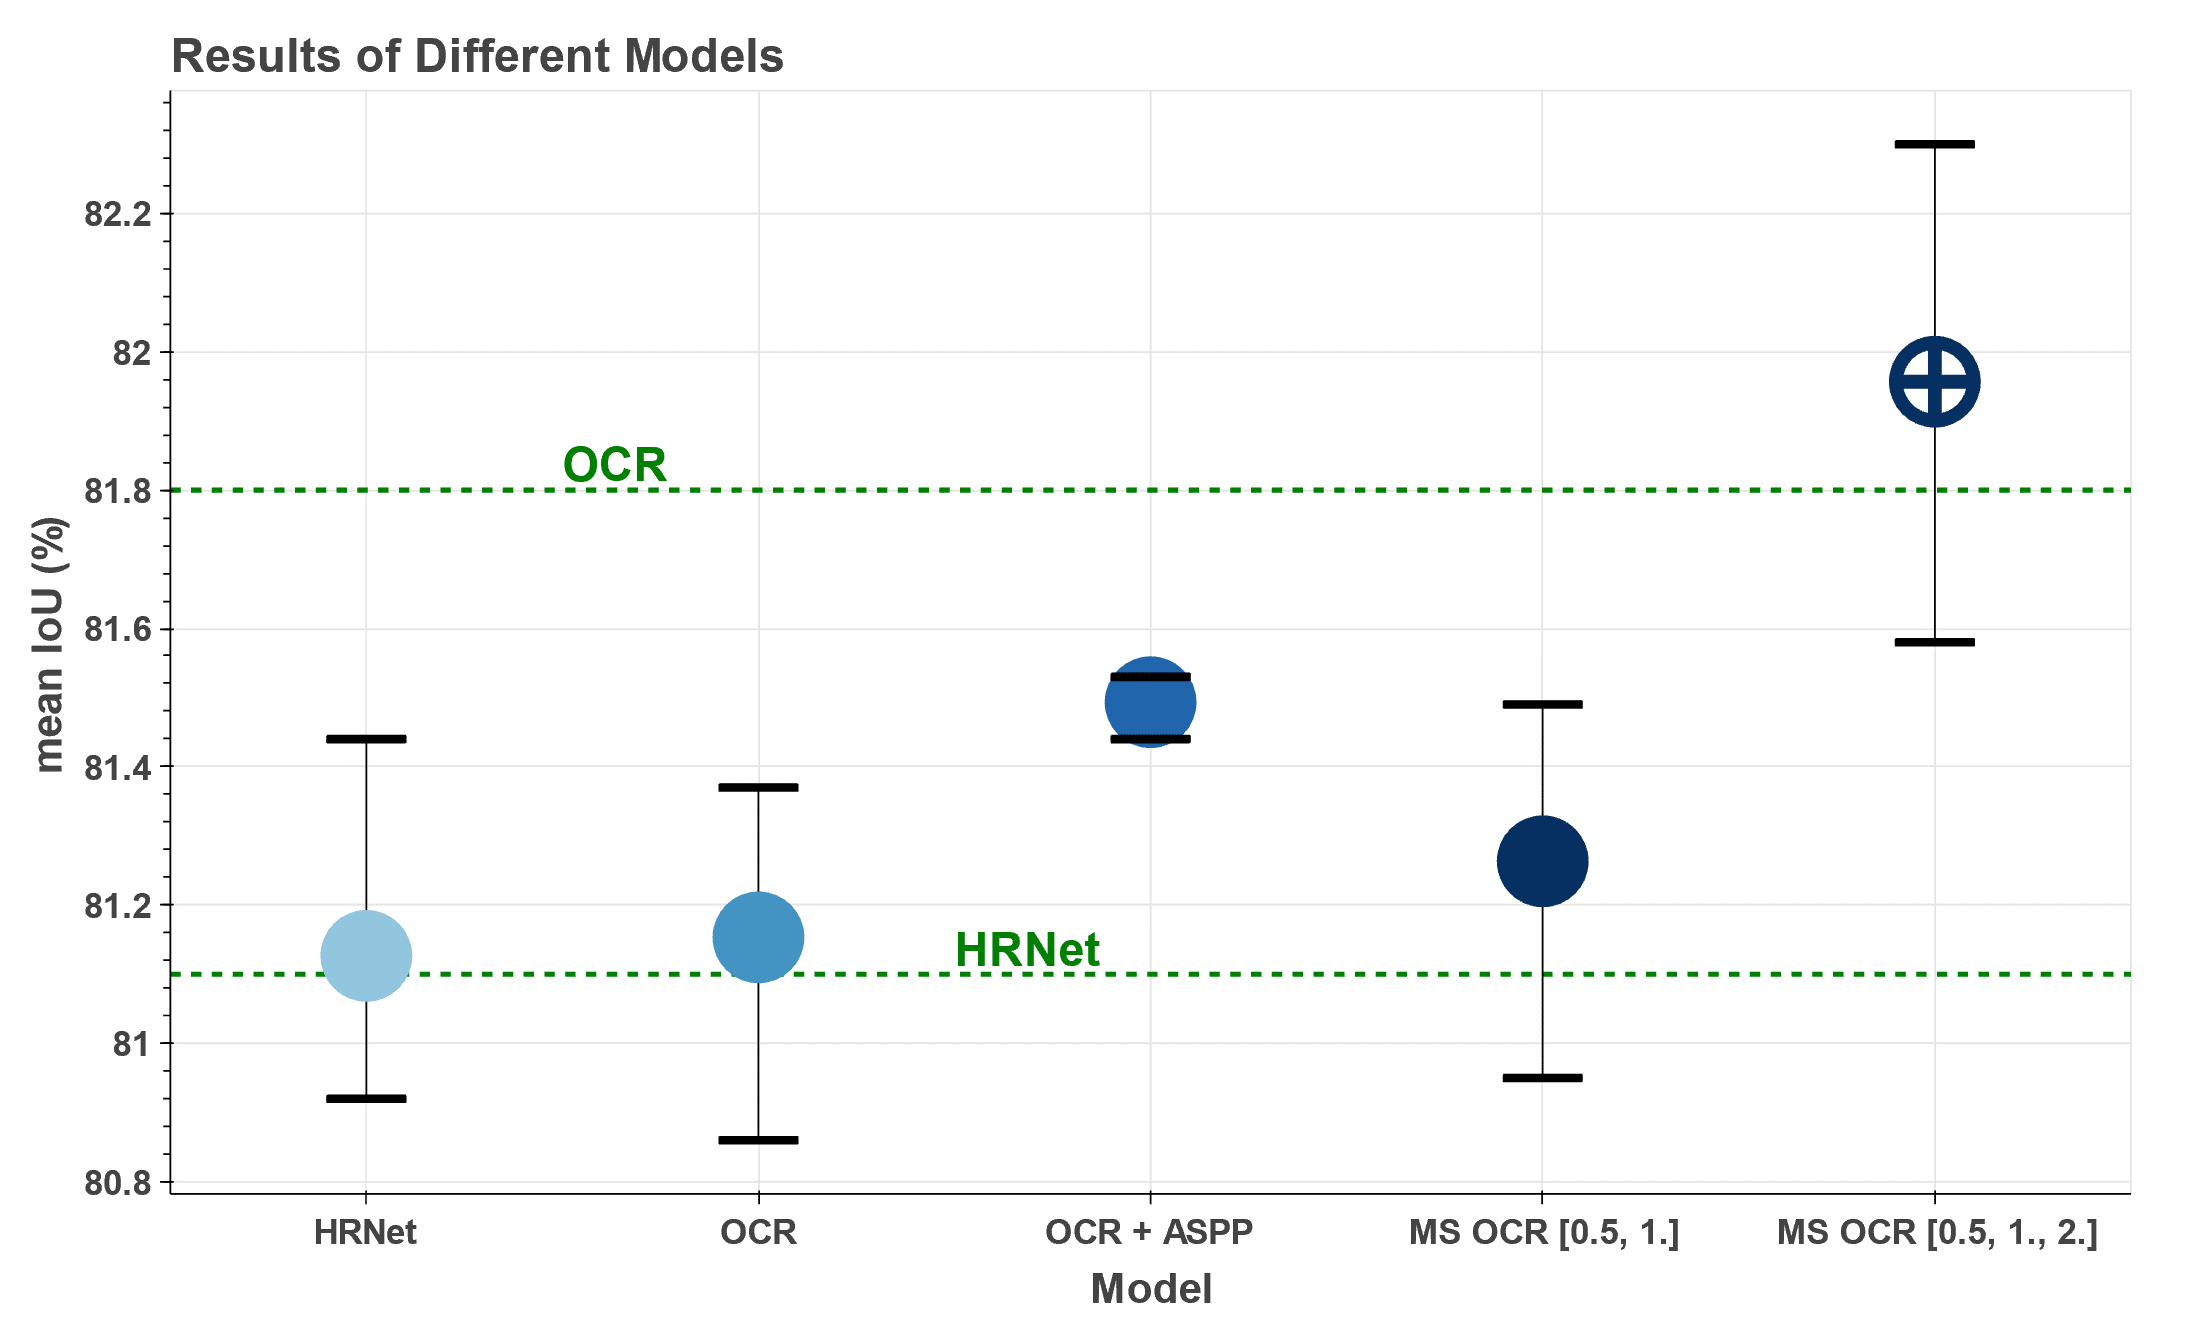
python training.py pl_trainer.precision=32 epochs=500After defining the baseline on HRNet, other models are also trained and validated under same conditions. As can be seen, OCR gives quite similar results to HRNet in these experiments. What is also noticeable, in contrast to HRNet, the results documented in the paper cannot be achieved with OCR (it must be said that the baseline used in the OCR paper is slightly different from the one used here). The use of an additional ASPP module leads to a slight improvement in the OCR results, but significantly increases the time complexity of the model. Using MS OCR with two scales gives similar results to the other networks, but adding a third scale gives by far the best results.
Appendix
| Model | Experiment | mean mIoU | mIoU per Run |
|---|---|---|---|
| HRNet | Baseline | 81.13 | 81.02, 81.44, 80.92 |
| OCR | Baseline | 81.15 | 81.37, 81.23, 80.86 |
| OCR + ASPP | Baseline | 81.49 | 81.44, 81.51, 81.53 |
| MS OCR [0.5, 1.] | Baseline | 81.26 | 80.95, 81.35, 81.49 |
| MS OCR [0.5, 1., 2.] | Baseline | 81.96 | 81.58, 81.99, 82.3 |
Scripts
Training the different Models
python training.py model=hrnet
python training.py model=hrnet_ocr
python training.py model=hrnet_ocr_aspp
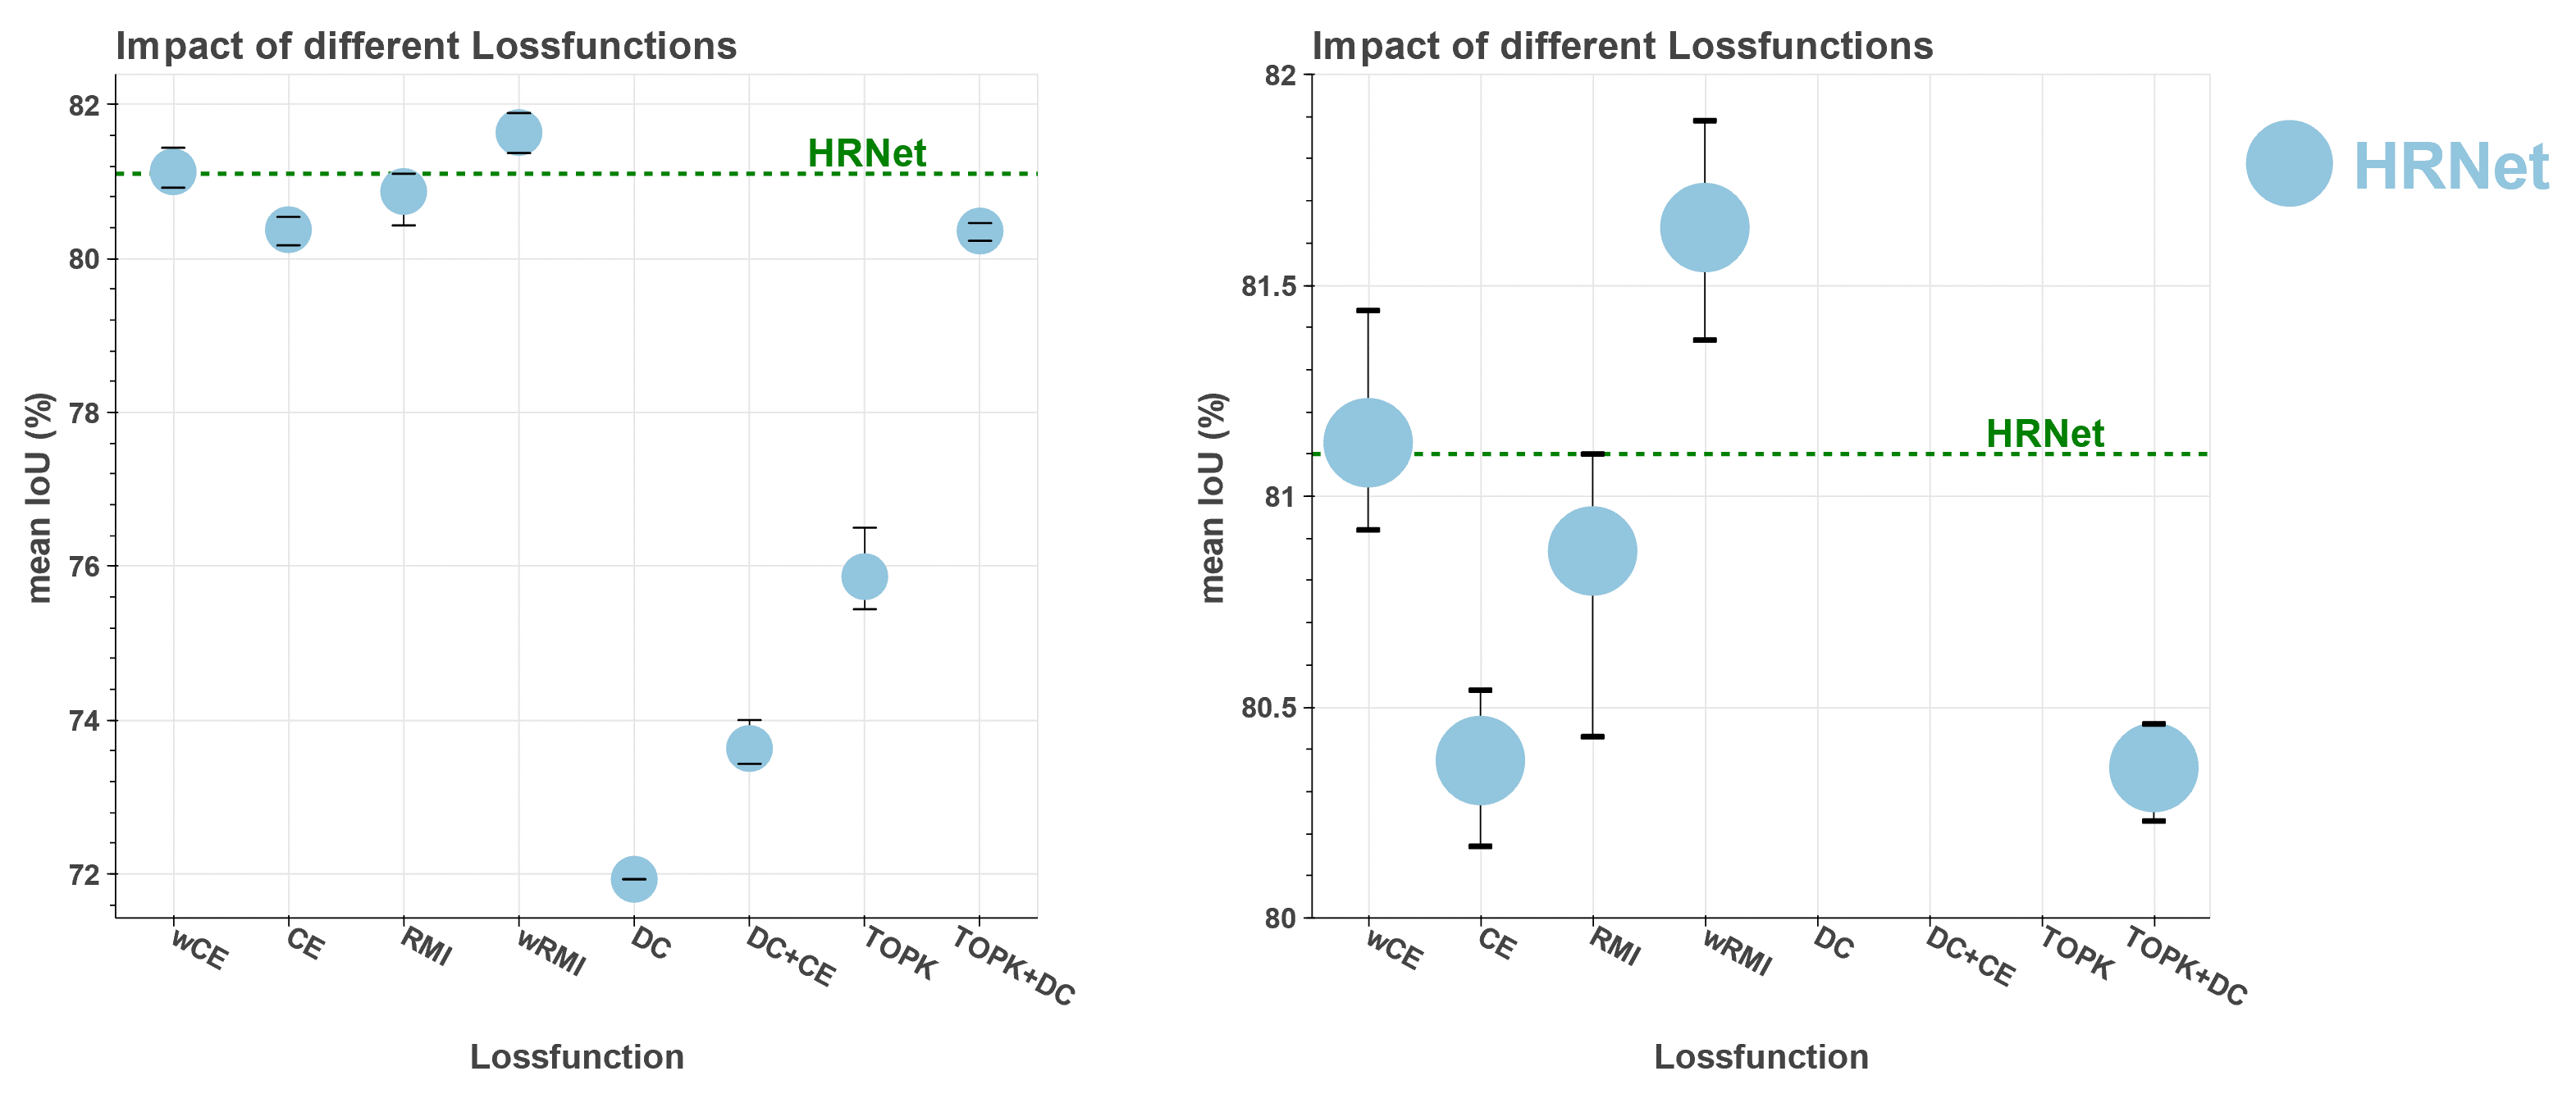
python training.py model=hrnet_ocr_msLooking at the different loss functions, it can be seen that the best results can be achieved with Cross-Entropy (CE) and Region Mutual Information (RMI) Loss. By contrast, Dice Loss based functions perform considerably worse in terms of mIOU. With changes to the learning rate and number of epochs, these can be tuned somewhat, but are still significantly worse. It can also be seen that the use of weights (wCE and wRMI) compensate the class imbalances in Cityscapes and significantly improve the results. Only HRNet is used for these experiments.
Appendix
| Model | Experiment | mean mIoU | mIoU per Run |
|---|---|---|---|
| HRNet | CE | 80.37 | 80.54, 80.41, 80.17 |
| HRNet | wCE | 81.13 | 81.02, 81.44, 80.92 |
| HRNet | RMI | 80.87 | 81.1, 80.43, 81.08 |
| HRNet | wRMI | 81.63 | 81.89, 81.37, 81.65 |
| HRNet | DC | - | - |
| HRNet | DC+CE | 73.63 | 74.0, 73.46, 73.43 |
| HRNet | TOPK | 75.86 | 75.44, 75.65, 76.5 |
| HRNet | TOPK+DC | 80.36 | 80.38, 80.46, 80.23 |
Scripts
Training HRNet with different loss functions
python training.py lossfunction=CE
python training.py lossfunction=wCE
python training.py lossfunction=RMI
python training.py lossfunction=wRMI
python training.py lossfunction=DC
python training.py lossfunction=DC_CE
python training.py lossfunction=TOPK
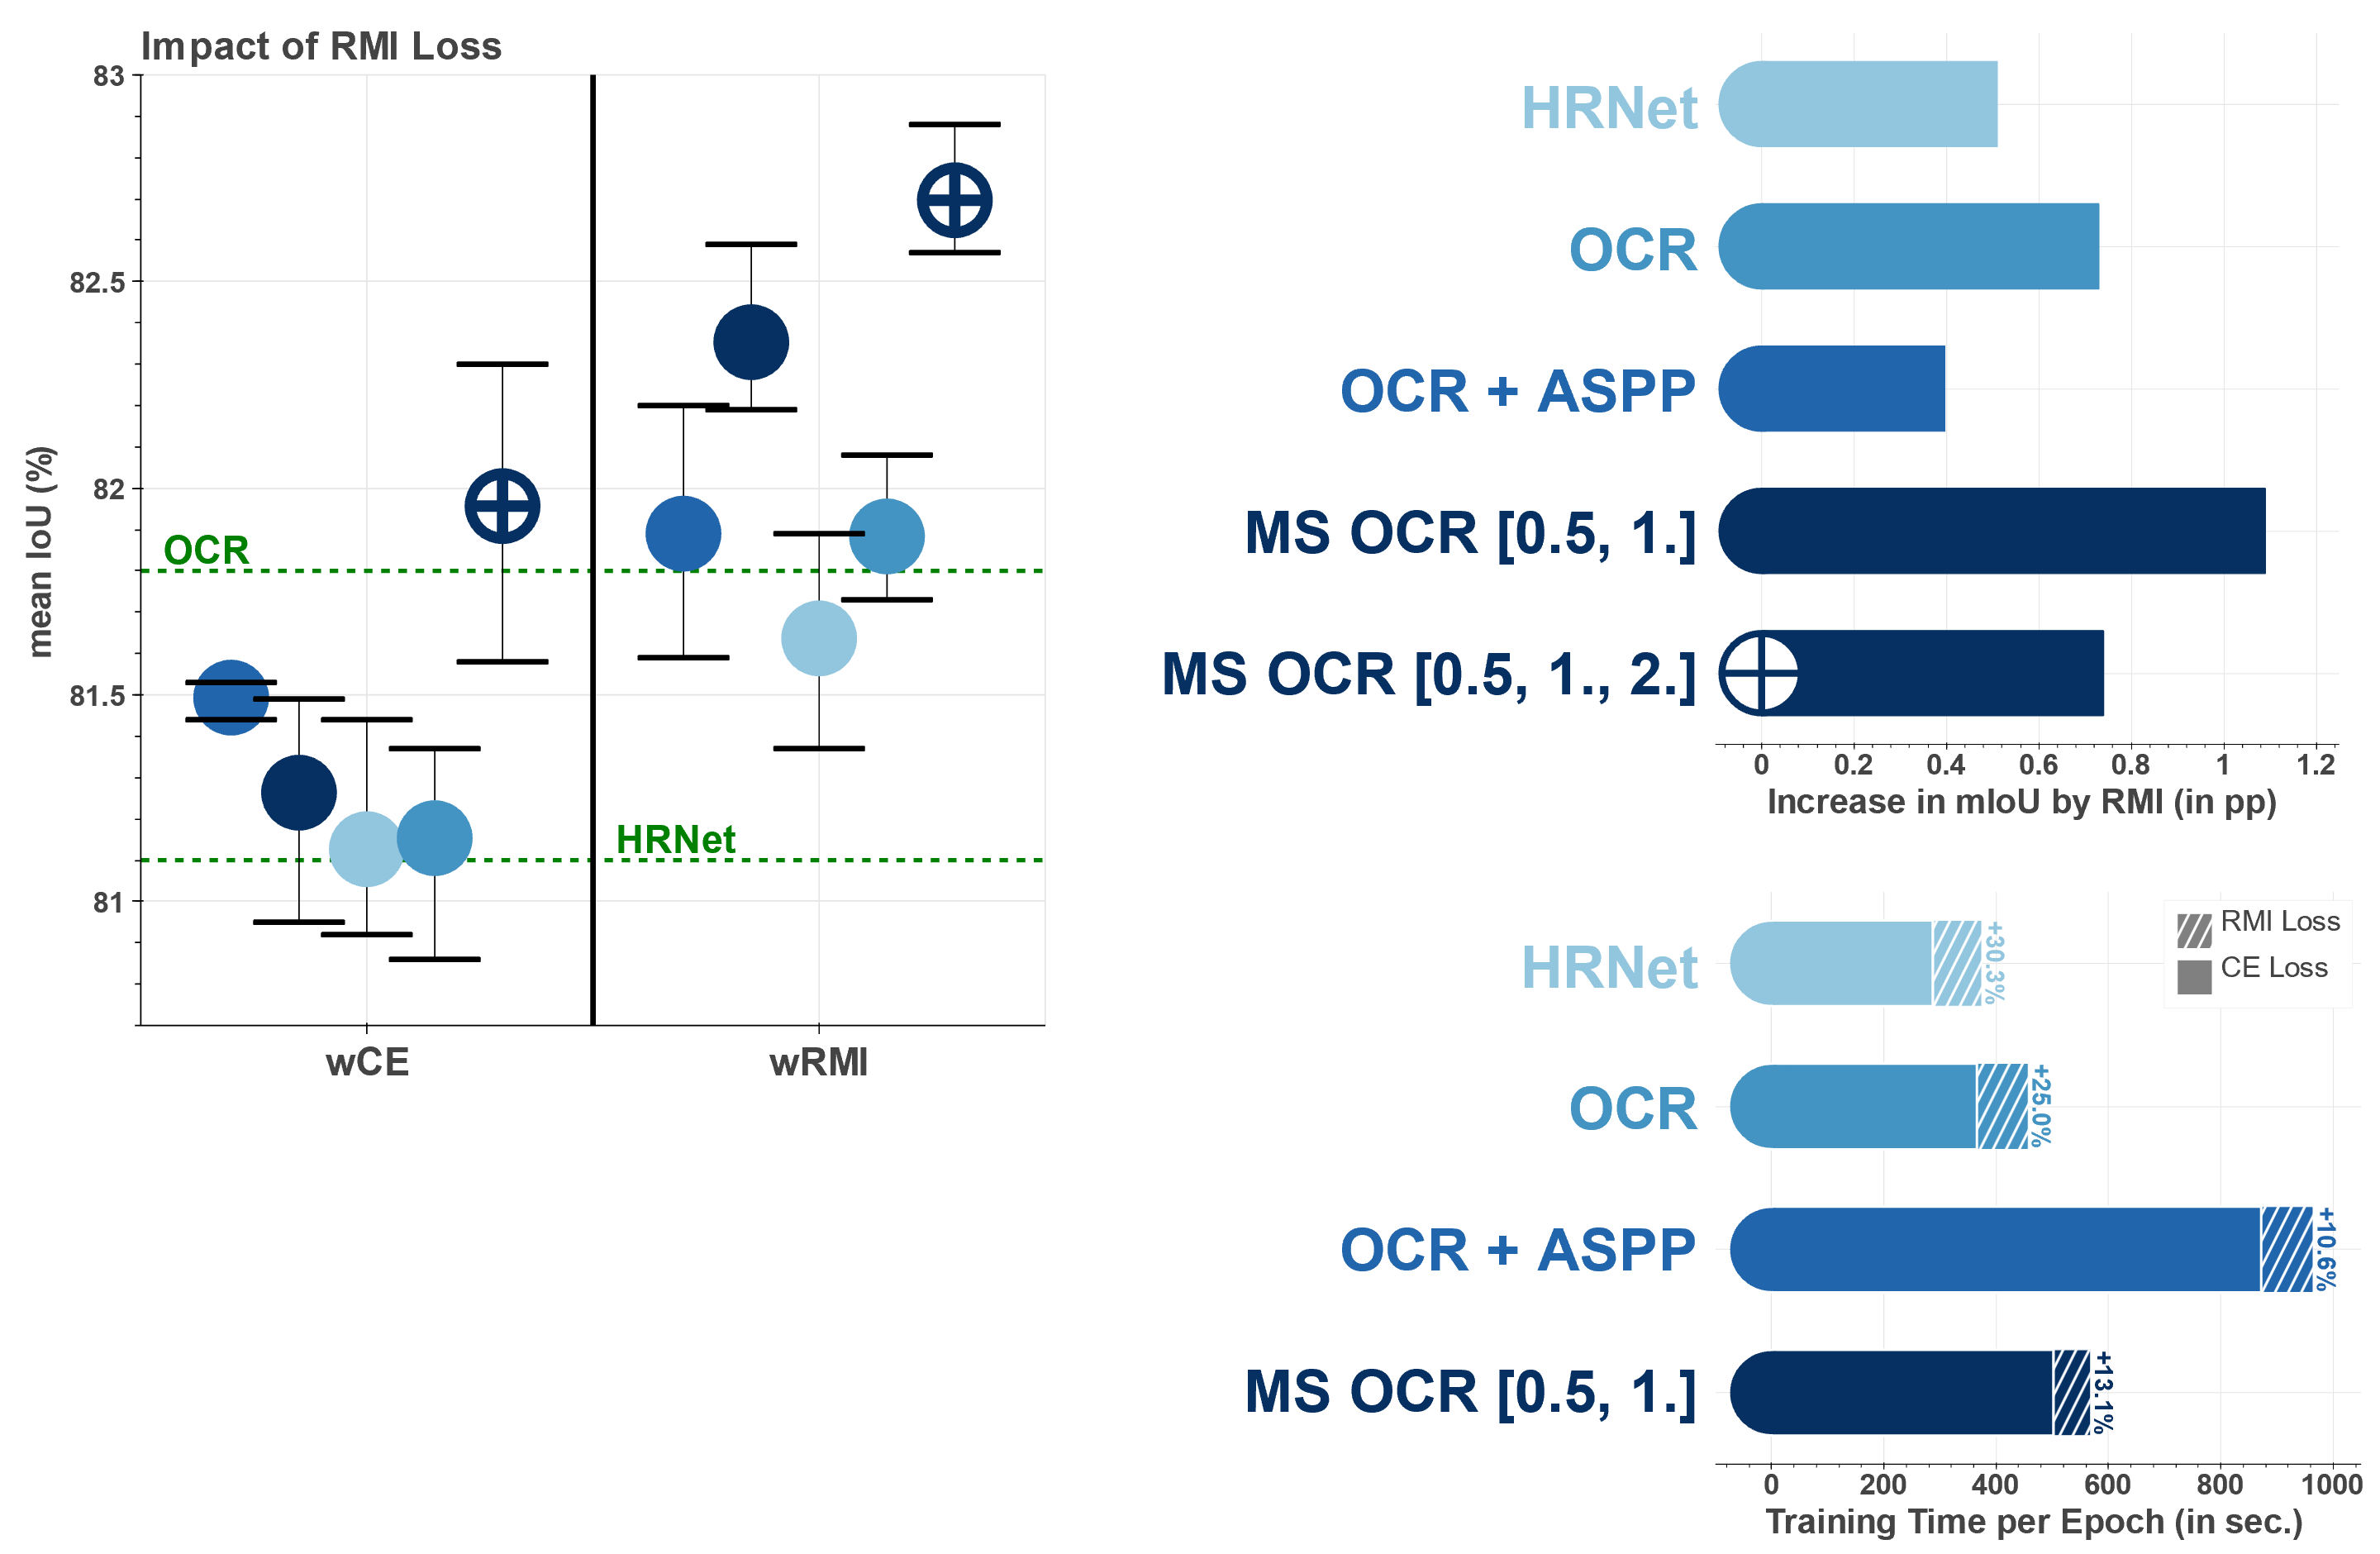
python training.py lossfunction=DC_TOPKAs seen in the previous experiments, using the RMI loss gives the best results, so this is tested with the other models as well. RMI loss results in significantly increased mIoU (compared to CE) for all models. However, it also leads to an increased runtime. To keep this increase as low as possible, RMI loss is only used during training and CE loss is still used during validation (validation loss).
Appendix
| Model | Experiment | mean mIoU | mIoU per Run |
|---|---|---|---|
| HRNet | wCE | 81.13 | 81.02, 81.44, 80.92 |
| HRNet | wRMI | 81.64 | 81.89, 81.37, 81.65 |
| OCR | wCE | 81.15 | 81.37, 81.23, 80.86 |
| OCR | wRMI | 81.88 | 81.84, 82.08, 81.73 |
| OCR + ASPP | wCE | 81.49 | 81.44, 81.51, 81.53 |
| OCR + ASPP | wRMI | 81.89 | 81.59, 82.20, 81.88 |
| MS OCR [0.5, 1.] | wCE | 81.26 | 80.95, 81.35, 81.49 |
| MS OCR [0.5, 1.] | wRMI | 82.35 | 82.19, 82.28, 82.59 |
| MS OCR [0.5, 1., 2.] | wCE | 81.96 | 81.58, 81.99, 82.30 |
| MS OCR [0.5, 1., 2.] | wRMI | 82.70 | 82.57, 82.88, 82.64 |
Scripts
#Running HRNet with CE and RMI loss
python training.py lossfunction=wCE
python training.py lossfunction=wRMI
#Running OCR with CE and RMI loss
python training.py model=hrnet_ocr lossfunction=[wCE,wCE]
python training.py model=hrnet_ocr lossfunction=[wRMI,wCE]
#Running OCR + ASPP with CE and RMI loss
python training.py model=hrnet_ocr_aspp lossfunction=[wCE,wCE]
python training.py model=hrnet_ocr_aspp lossfunction=[wRMI,wCE]
#Running MS OCR with CE and RMI loss
python training.py model=hrnet_ocr_ms lossfunction=[wCE,wCE,wCE,wCE]
python training.py model=hrnet_ocr_ms lossfunction=[wRMI,wCE,wCE,wCE]Since the previous experiments focused on model and training parameters, a closer look at the used data is given here. For the baseline so far ImageNet pretrained weights are used. Comparison of the results with models without additional data (trained from scratch) show that the use of pretrained weights has a large impact in these experiments. The use of PaddleClas weights can further enhance results, and the best results can be achieved by pretraining on Mapillary. The reason for this is the similarity of Mapillary to Cityscapes (both urban setting). Besides this, the use of the coarse cityscapes data can also improve the results. Three different strategies on how to integrate the additional data are tested. The best result is achieved with strategy 2 when the model is first trained on fine annotated data, afterwards the model is finetuned (with reduced lr) with only the coarse annotated data and finally the model is finetuned again (with reduced lr) on the fine annotated data. The experiments show that there are strong differences in the results, depending on which data is used.
Appendix
| Model | Experiment | mean mIoU | mIoU per Run |
|---|---|---|---|
| HRNet | From Scratch | 77.19 | 76.99, 77.64, 76.95 |
| HRNet | ImageNet | 81.13 | 81.02, 81.44, 80.92 |
| HRNet | PaddleClas | 81.63 | 81.74, 81.69, 81.45 |
| HRNet | Mapillary | 82.74 | 82.80, 82.41, 83.02 |
| HRNet | Coarse Data | 81.91 | 82.03, 81.79, 81.91 |
| OCR | From Scratch | 78.03 | 78.60, 77.43, 78.06 |
| OCR | ImageNet | 81.15 | 81.37, 81.23, 80.86 |
| OCR | PaddleClas | 81.85 | 81.80, 81.85, 81.89 |
| OCR | Mapillary | 83.20 | 82.87, 83.37, 83.36 |
| OCR | Coarse Data | 82.09 | 82.16, 82.24, 81.86 |
| MS OCR [0.5, 1.] | From Scratch | 78.13 | 77.76, 78.17, 78.46 |
| MS OCR [0.5, 1.] | ImageNet | 81.26 | 80.95, 81.35, 81.49 |
| MS OCR [0.5, 1.] | PaddleClas | 81.94 | 82.18, 82.09, 81.55 |
| MS OCR [0.5, 1.] | Mapillary | 83.44 | 83.52, 83.63, 83.18 |
| MS OCR [0.5, 1.] | Coarse Data | 82.15 | 82.08, 82.26, 82.11 |
| MS OCR [0.5, 1., 2.] | From Scratch | 79.12 | 78.59, 79.38, 79.39 |
| MS OCR [0.5, 1., 2.] | ImageNet | 81.96 | 81.58, 81.99, 82.30 |
| MS OCR [0.5, 1., 2.] | PaddleClas | 82.58 | 82.79, 82.71, 82.23 |
| MS OCR [0.5, 1., 2.] | Mapillary | 84.06 | 84.31, 84.15, 83.73 |
| MS OCR [0.5, 1., 2.] | Coarse Data | 82.91 | 82.91, 82.95, 82.86 |
Scripts
Training Models with and without different pretrained weights
#Training from Scratch
python training.py model=hrnet MODEL.PRETRAINED=False
python training.py model=hrnet_ocr MODEL.PRETRAINED=False
python training.py model=hrnet_ocr_aspp MODEL.PRETRAINED=False
python training.py model=hrnet_ocr_ms MODEL.PRETRAINED=False
#Pretrained on ImageNet
python training.py model=hrnet MODEL.pretrained_on=ImageNet
python training.py model=hrnet_ocr MODEL.pretrained_on=ImageNet
python training.py model=hrnet_ocr_aspp MODEL.pretrained_on=ImageNet
python training.py model=hrnet_ocr_ms MODEL.pretrained_on=ImageNet
#Pretrained with PaddleClas
python training.py model=hrnet MODEL.pretrained_on=Paddle
python training.py model=hrnet_ocr MODEL.pretrained_on=Paddle
python training.py model=hrnet_ocr_aspp MODEL.pretrained_on=Paddle
python training.py model=hrnet_ocr_ms MODEL.pretrained_on=Paddle
#Pretrained on Mapillary
python training.py model=hrnet MODEL.pretrained_on=Mapillary epochs=75
python training.py model=hrnet_ocr MODEL.pretrained_on=Mapillary epochs=75
python training.py model=hrnet_ocr_aspp MODEL.pretrained_on=Mapillary epochs=75
python training.py model=hrnet_ocr_ms MODEL.pretrained_on=Mapillary epoch=75
Training Models with coarse data
#HRNET
python training.py model=hrnet
python training.py model=hrnet epochs=25 lr=0.001 dataset=Cityscapes_coarse +finetune_from=<path.to.ckpt.of.previous.line>
python training.py model=hrnet epochs=65 lr=0.001 +finetune_from=<path.to.ckpt.of.previous.line>
#HRNET OCR
python training.py model=hrnet_ocr
python training.py model=hrnet_ocr epochs=25 lr=0.001 dataset=Cityscapes_coarse +finetune_from=<path.to.ckpt.of.previous.line>
python training.py model=hrnet_ocr epochs=65 lr=0.001 +finetune_from=<path.to.ckpt.of.previous.line>
#MS OCR
python training.py model=hrnet_ocr_ms
python training.py model=hrnet_ocr_ms epochs=25 lr=0.001 dataset=Cityscapes_coarse +finetune_from=<path.to.ckpt.of.previous.line>
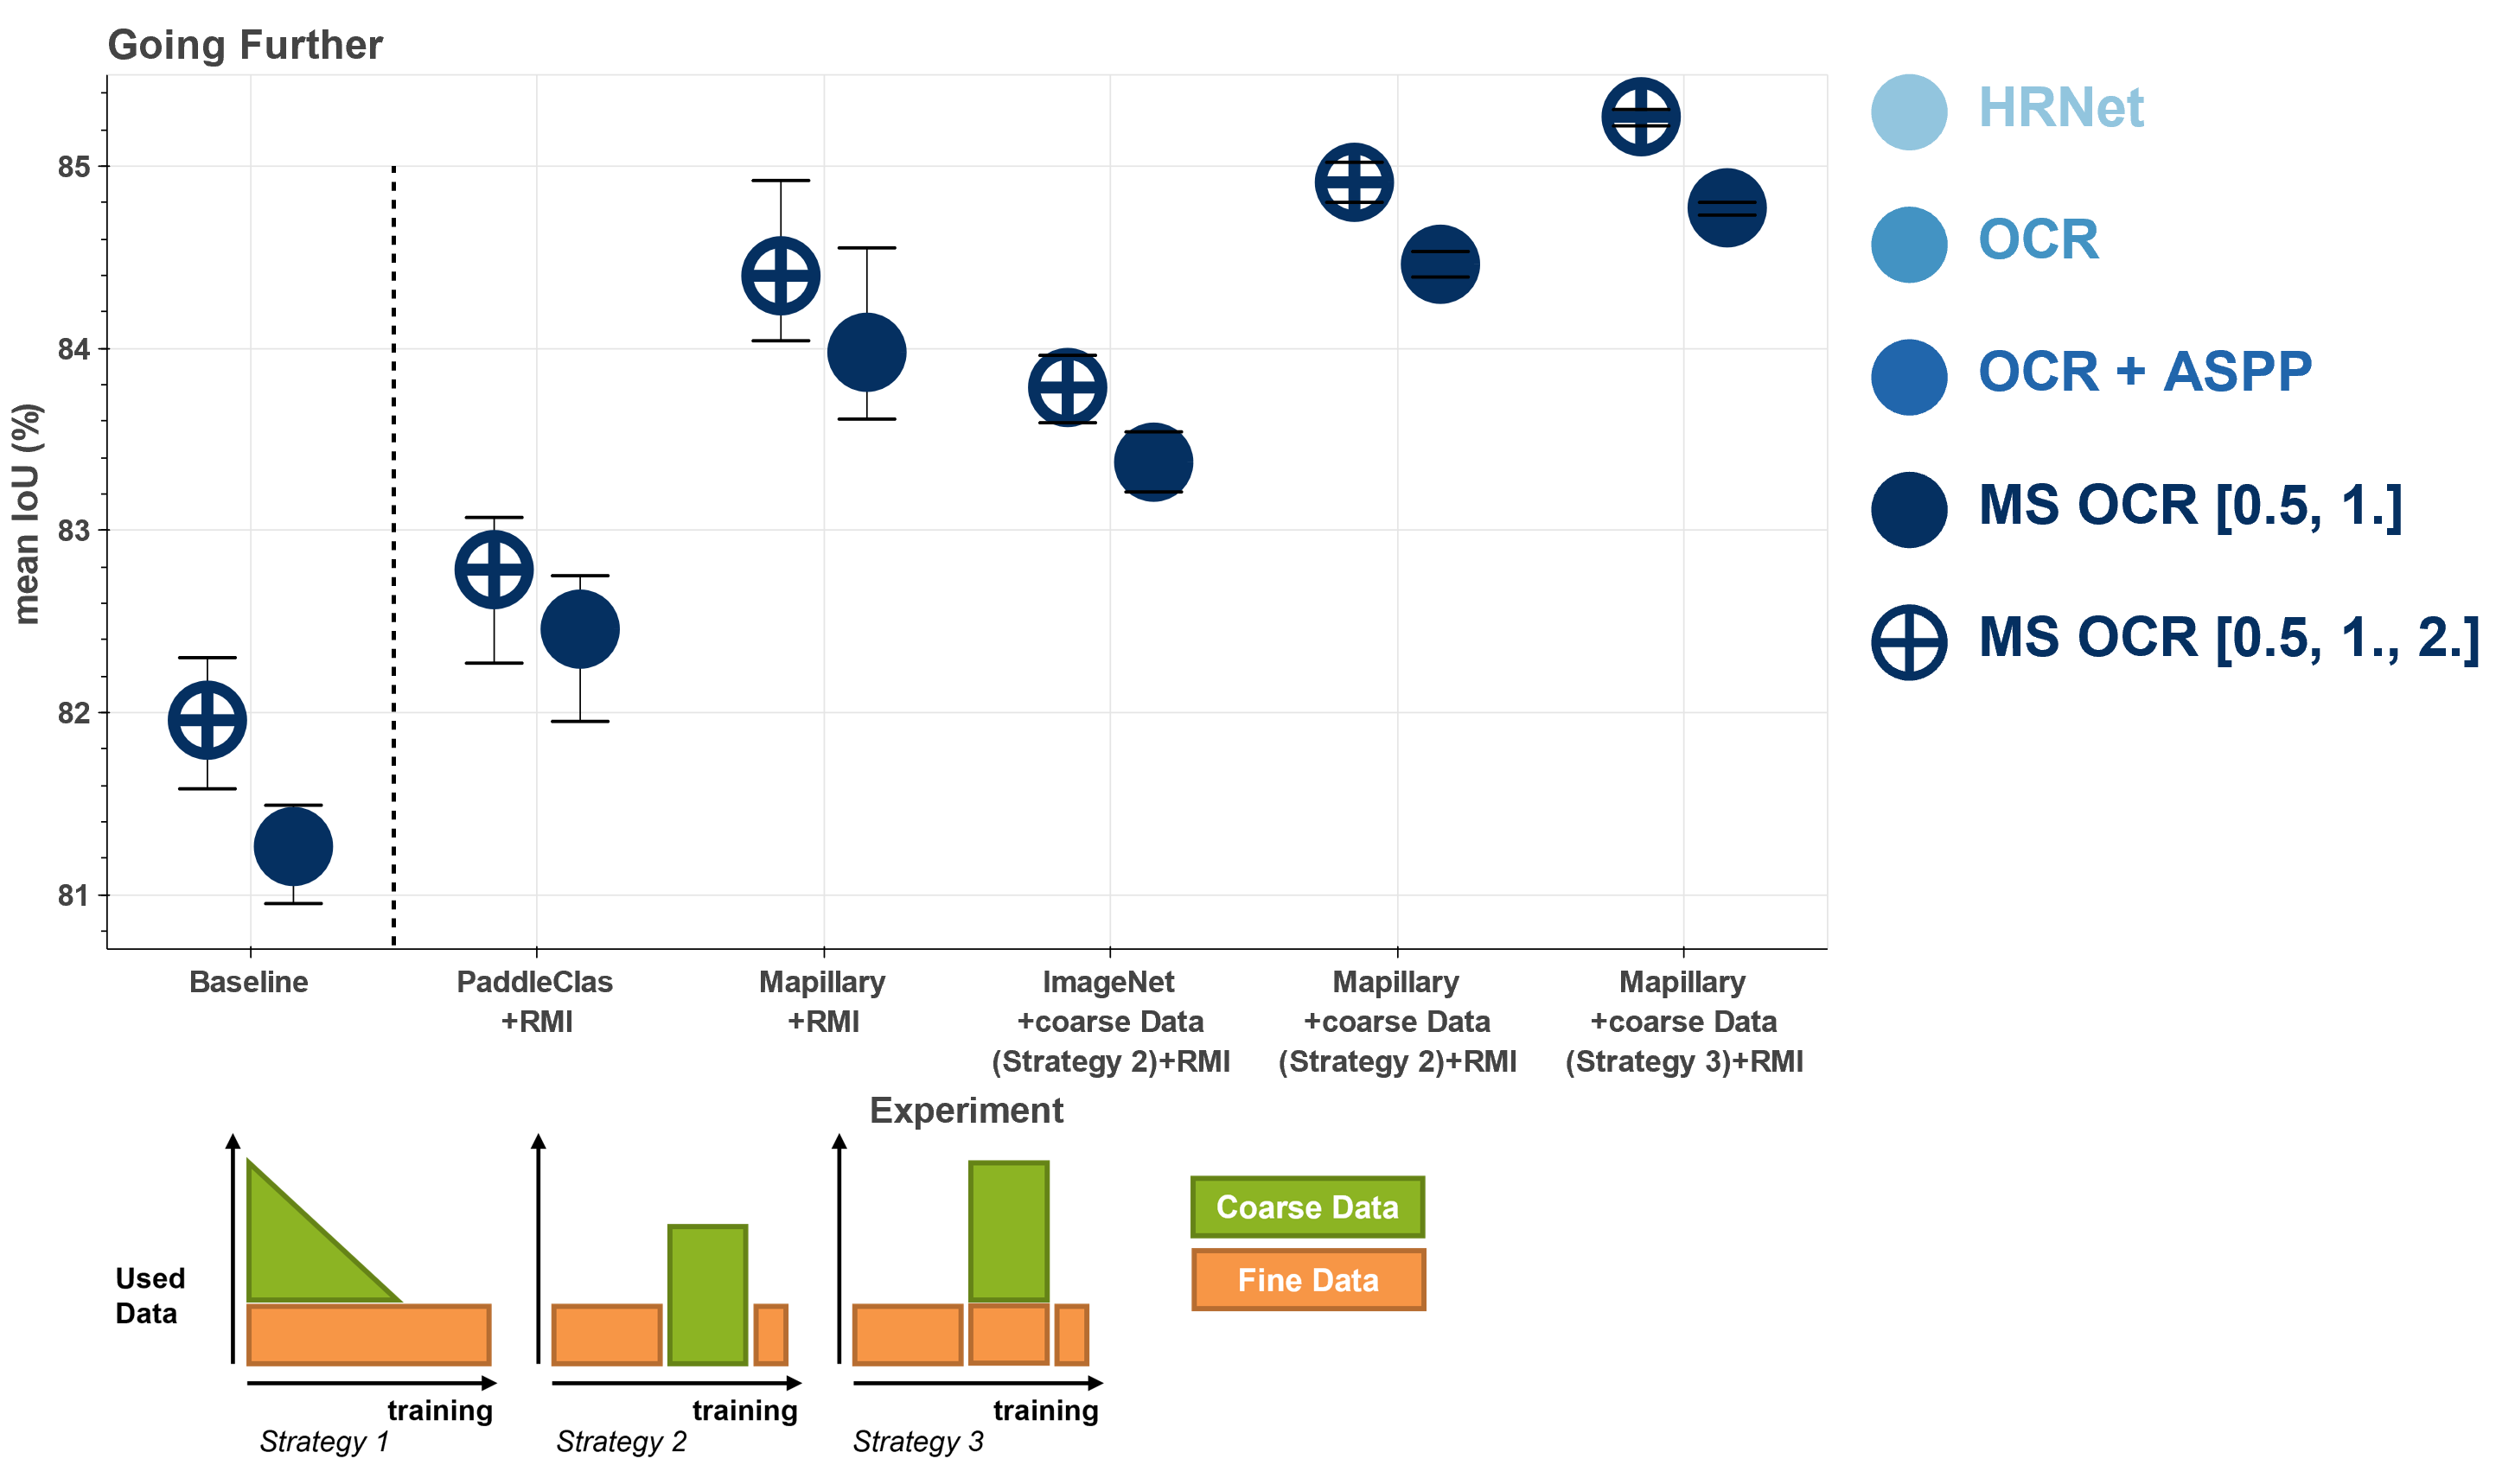
python training.py model=hrnet_ocr_ms epochs=65 lr=0.001 +finetune_from=<path.to.ckpt.of.previous.line>The previous experiments have shown different methods to improve the results. These methods are combined in this section. The experiments have shown that MS OCR provides the best results, which is why the focus is on this model. First, the use of the additional data is combined with the RMI loss which leads to highly increased results. The RMI loss was only used in the training blocks with the fine annotated data, because the experiments showed that the RMI loss does not work well with the coarse data. Mapillary and PaddleClas pretraining gave better results than using ImageNet weight, so they will be tested in combination with RMI loss too. Again, an increase in performance can be seen, with the best results for pretraining with Mapillary and RMI loss. Finally, Mapillariy pretraining, RMI loss and the use of coarse annotated data are combined. In the previous experiments, using strategy 2 to include coarse data produced the best results. But for this, strategy 3 delivers better results, which are also the absolute highscores in these experiments.
Appendix
| Model | Experiment | mean mIoU | mIoU per Run |
|---|---|---|---|
| MS OCR [0.5, 1.] | Baseline | 81.26 | 80.95, 81.35, 81.49 |
| MS OCR [0.5, 1.] | Paddle + RMI | 82.46 | 82.75,82.67,81.95 |
| MS OCR [0.5, 1.] | Mapillary + RMI | 83.98 | 84.55, 83.61, 83.77 |
| MS OCR [0.5, 1.] | Coarse + RMI | 83.37 | 83.54, 83.37, 83.21 |
| MS OCR [0.5, 1.] | Mapillary + RMI + Coarse | 84.77 | 84.80, 84.78, 84.73 |
| MS OCR [0.5, 1., 2.] | Baseline | 81.96 | 81.58, 81.99, 82.30 |
| MS OCR [0.5, 1., 2.] | Paddle + RMI | 82.78 | 83.01,83.07,82.27 |
| MS OCR [0.5, 1., 2.] | Mapillary + RMI | 84.37 | 84.92, 84.04, 84.23 |
| MS OCR [0.5, 1., 2.] | Coarse + RMI | 83.78 | 83.96, 83.80, 83.59 |
| MS OCR [0.5, 1., 2.] | Mapillary + RMI +Coarse | 85.27 | 85.31, 85.28, 85.22 |
Scripts
#Paddle + RMI
python training.py model=hrnet_ocr_ms lossfunction=[wRMI,wCE,wCE,wCE] MODEL.pretrained_on=Paddle
#Mapillary + RMI
python training.py model=hrnet_ocr_ms lossfunction=[wRMI,wCE,wCE,wCE] MODEL.pretrained_on=Mapillary epochs=75
#Mapillary + RMI + coarse Data (Strategy 2)
python training.py model=hrnet_ocr_ms epochs=75 lossfunction=[wRMI,wCE,wCE,wCE]
python training.py model=hrnet_ocr_ms epochs=25 lr=0.001 dataset=Cityscapes_coarse +finetune_from=<path.to.ckpt.of.previous.line>
python training.py model=hrnet_ocr_ms epochs=20 lr=0.001 lossfunction=[wRMI,wCE,wCE,wCE] +finetune_from=<path.to.ckpt.of.previous.line>
#Mapillary + RMI + coarse Data (Strategy 3)
python training.py model=hrnet_ocr_ms epochs=75 lossfunction=[wRMI,wCE,wCE,wCE]
python training.py model=hrnet_ocr_ms epochs=25 lr=0.001 dataset=Cityscapes_fine_coarse +finetune_from=<path.to.ckpt.of.previous.line>
python training.py model=hrnet_ocr_ms epochs=15 lr=0.001 lossfunction=[wRMI,wCE,wCE,wCE] +finetune_from=<path.to.ckpt.of.previous.line>Some experiments are repeated using another dataset, which is the Pascal VOC2010 Context dataset. This dataset contains natural images and no longer the urban setting as in cityscapes. However, the focus is not on achieving the highest possible scores, but rather on verifying the results of the experiments on cityscapes. Therefore the hyperparameters were taken from other experiments on PASCAL VOC2010 Context and only barely optimized. Stochastic Gradient Descent(SGD) with momentum = 0.9 and weight decay = 0.0001 is used for optimization. The models are trained with an initial learning rate of 0.004 for HRNet and an initial learning rate of 0.001 for OCR and MS OCR. A polynomial learning rate scheduler is used as well as a batch size of 16 and the model is trained for 200 epochs. For data augmentation the images are resized and randomly scaled in the range [0.5, 2], resulting in a size of 520x520 pixels after random cropping. Besides that, only RGB-Shift, random flipping and normalization is performed. Similar as for the cityscapes experiments, the data augmentation is kept rather minimal. By default the models are initialized using pretrained weights on ImageNet. Unless specified, training is performed on 2 GPUs (with a batch size of 8 per GPU) and each experiment was repeated 3 times. The MS OCR model is trained with two scales ([0.5, 1.]) during training and for inference a third ([0.5, 1., 2.]) is added. Typically, both settings are evaluated in the following experiments. Since SOTA approaches typically report their results on VOC2010 using multiscale testing, both validation with and without multiscale testing is reported here. For multiscale Testing the scales [0.5, 0.75, 1., 1.25, 1.5, 1.75, 2.] and vertical flipping are used.
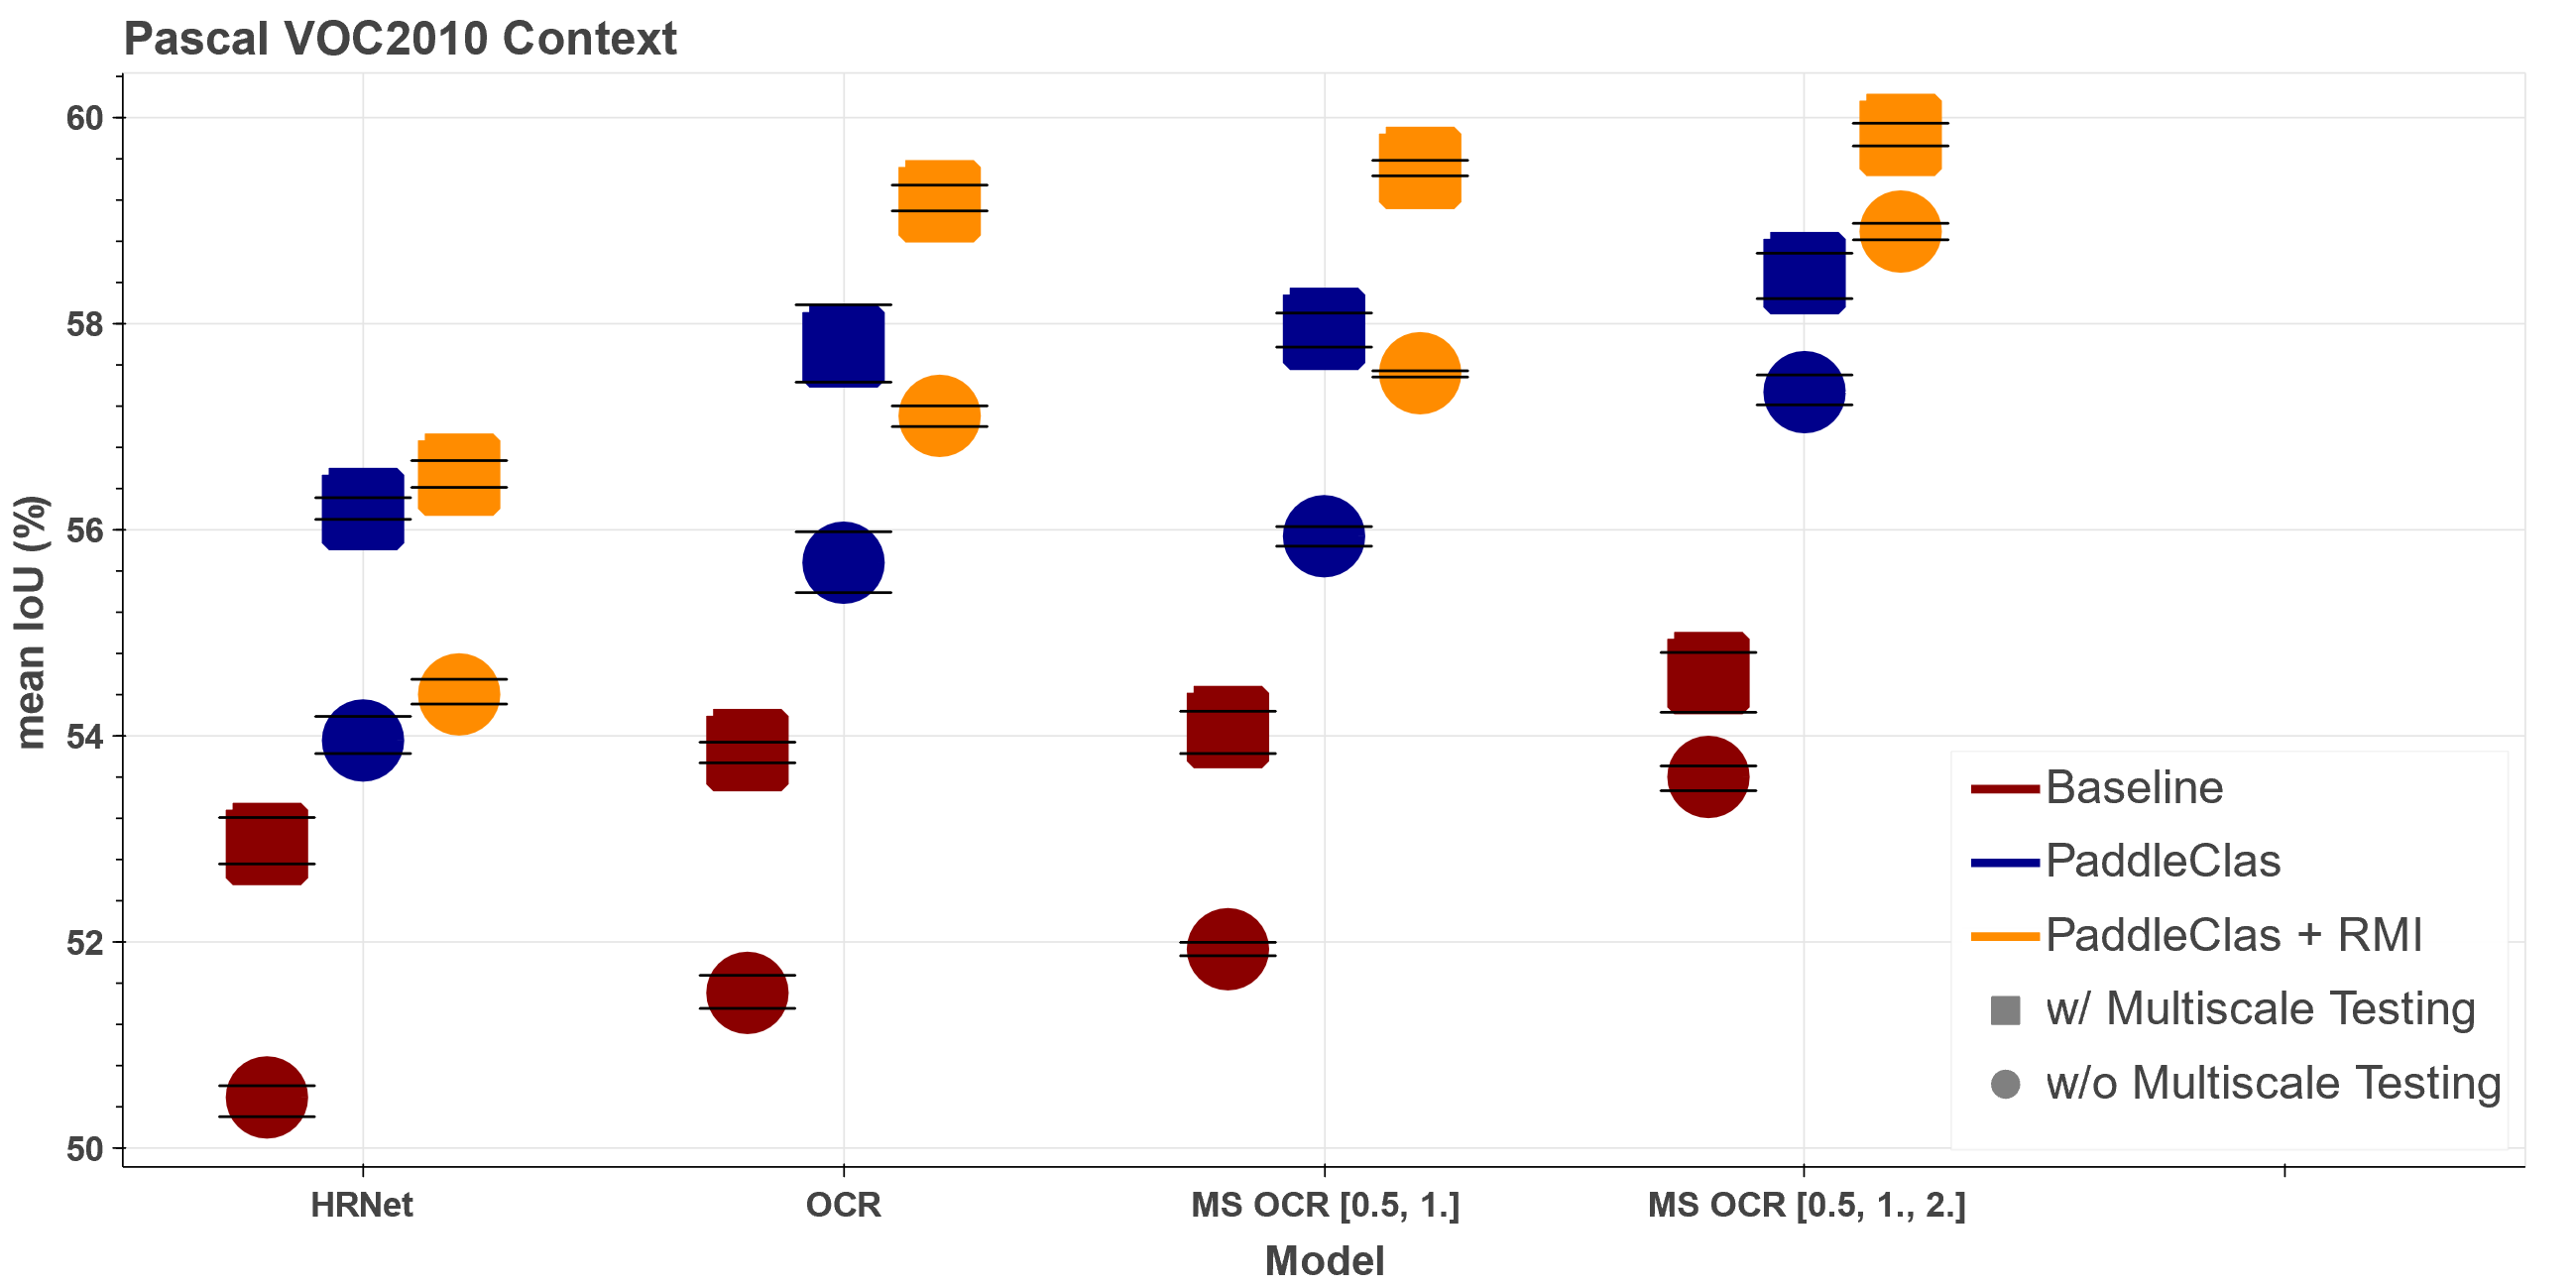
When looking at the results it can be seen that they are consistent to the previous ones on Cityscapes. Starting with the models, the results are getting better by increasing the complexity, starting with HRNet then OCR and finally MS OCR. Although it is worth noting that the difference between HRNet and OCR is more evident than for Cityscapes. For MS OCR again using the additional scale increases the results for each experiment. What is even more significant for VOC2010 than for Cityscapes, is the improvement through the PaddleClas weights. Furthermore, the RMI loss again leads to an improved result.
Appendix
| Model | Experiment | mean mIoU | mIoU per Run | mean mIoU (MS) | mIoU per Run (MS) |
|---|---|---|---|---|---|
| HRNet | Baseline | 50.50 | 50.61, 50.31, 50.57 | 52.95 | 53.21, 52.76, 52.89 |
| HRNet | PaddleClas | 53.96 | 53.85, 54.19, 53.83 | 56.20 | 56.19, 56.10, 56.31 |
| HRNet | RMI | 54.40 | 54.55, 54.35, 54.31 | 56.53 | 56.52, 56.41, 56.67 |
| OCR | Baseline | 51.51 | 51.49, 51.36, 51.68 | 53.86 | 53.74, 53.91, 53.94 |
| OCR | PaddleClas | 55.68 | 55.67, 55.98, 55.39 | 57.78 | 57.72, 58.18, 57.43 |
| OCR | RMI | 57.10 | 57.11, 57.00, 57.20 | 59.18 | 59.34, 59.12, 59.09 |
| MS OCR [0.5, 1.] | Baseline | 51.93 | 52.00, 51.87, 51.93 | 54.09 | 53.83, 54.24, 54.19 |
| MS OCR [0.5, 1.] | PaddleClas | 55.94 | 55.84, 55.94, 56.03 | 57.95 | 57.77, 58.10, 57.97 |
| MS OCR [0.5, 1.] | RMI | 57.52 | 57.54, 57.53, 57.48 | 59.51 | 59.51, 59.43, 59.58 |
| MS OCR [0.5, 1., 2.] | Baseline | 53.60 | 53.47, 53.63, 53.71 | 54.61 | 54.79, 54.23, 54.81 |
| MS OCR [0.5, 1., 2.] | PaddleClas | 57.33 | 57.50, 57.21, 57.29 | 58.49 | 58.68, 58.24, 58.54 |
| MS OCR [0.5, 1., 2.] | RMI | 58.89 | 58.81, 58.89, 58.97 | 59.83 | 59.72, 59.94, 59.82 |
Scripts
How to train and validate the models correctly. Consider disabling cuda benchmark for (multi-scale)
testing by pl_trainer.benchmark=False.
#HRNet
python training.py model=hrnet dataset=VOC2010                                                               # Baseline
python training.py model=hrnet dataset=VOC2010 MODEL.pretrained_on=Paddle                                    # using PaddleClas weights
python training.py model=hrnet dataset=VOC2010 MODEL.pretrained_on=Paddle lossfunction=RMI                   # using PaddleClas + RMI
### Since some pseudo validation is used for runtime reduction during training, the models have to be validated seperatly ###
###<path.to.output.dir> would look similar to this: /home/.../VOC2010/hrnet/baseline_.../2022-01-18_16-05-09
python testing.py ckpt_dir==<path.to.output.dir> TESTING.SCALES=[1.0]  TESTING.FLIP=False  # testing without Multiscale
python testing.py ckpt_dir==<path.to.output.dir>                                           # testing with Multiscale

#OCR
python training.py model=hrnet_ocr dataset=VOC2010                                                          # Baseline
python training.py model=hrnet_ocr dataset=VOC2010 MODEL.pretrained_on=Paddle                               # using PaddleClas weights
python training.py model=hrnet_ocr dataset=VOC2010 MODEL.pretrained_on=Paddle lossfunction=[RMI,CE]         # using PaddleClas + RMI
### Since some pseudo validation is used for runtime reduction during training, the models have to be validated seperatly ###
###<path.to.output.dir> would look similar to this: /home/.../VOC2010/hrnet_ocr/baseline_.../2022-01-18_16-05-09
python testing.py ckpt_dir==<path.to.output.dir> TESTING.SCALES=[1.0]  TESTING.FLIP=False  # testing without Multiscale
python testing.py ckpt_dir==<path.to.output.dir>                                           # testing with Multiscale

#MS OCR
python training.py model=hrnet_ocr_ms dataset=VOC2010                                                       # Baseline
python training.py model=hrnet_ocr_ms dataset=VOC2010 MODEL.pretrained_on=Paddle                            # using PaddleClas weights
python training.py model=hrnet_ocr_ms dataset=VOC2010 MODEL.pretrained_on=Paddle lossfunction=[RMI,CE,CE,CE]   # using PaddleClas + RMI
### Since some pseudo validation is used for runtime reduction during training, the models have to be validated seperatly ###
###<path.to.output.dir> would look similar to this: /home/.../VOC2010/hrnet_ocr_ms/baseline_.../2022-01-18_16-05-09
#MS OCR[0.5,1]
python testing.py ckpt_dir==<path.to.output.dir> MODEL.MSCALE_INFERENCE=False TESTING.SCALES=[1.0]  TESTING.FLIP=False  # testing without Multiscale
python testing.py ckpt_dir==<path.to.output.dir> MODEL.MSCALE_INFERENCE=False              # testing with Multiscale
#MS OCR[0.5,1,2]
python testing.py ckpt_dir==<path.to.output.dir> TESTING.SCALES=[1.0]  TESTING.FLIP=False  # testing without Multiscale
python testing.py ckpt_dir==<path.to.output.dir> # testing with Multiscale This Repository is developed and maintained by the Applied Computer Vision Lab (ACVL) of Helmholtz Imaging.


