
The Mini-AfterSherpa is an alternate toolhead for Voron V0.1 and similar printers (Micron, Flying Zero, Salad Fork, etc) that use the Mini-Afterburner-style X carriage. It offers flexibility and extruder choice with additional convenience.
With the Mini-AfterSherpa, you can choose from multiple direct-drive extruders.
- Sherpa Mini
- Sherpa Micro (Via untested adapter)
- Sailfin
- Reverse Pocketwatch V2, a modified version of the original Pocketwatch V2
- Orbiter V1.5/V2.0 (V1.5 supported, V2 TBD)
- Jetpack (coming soon, maybe someday)
Or, instead, you can use a Bowden adapter to pair the Mini-AfterSherpa with any standard 1.75mm-filament Bowden extruder, including the Voron M4.
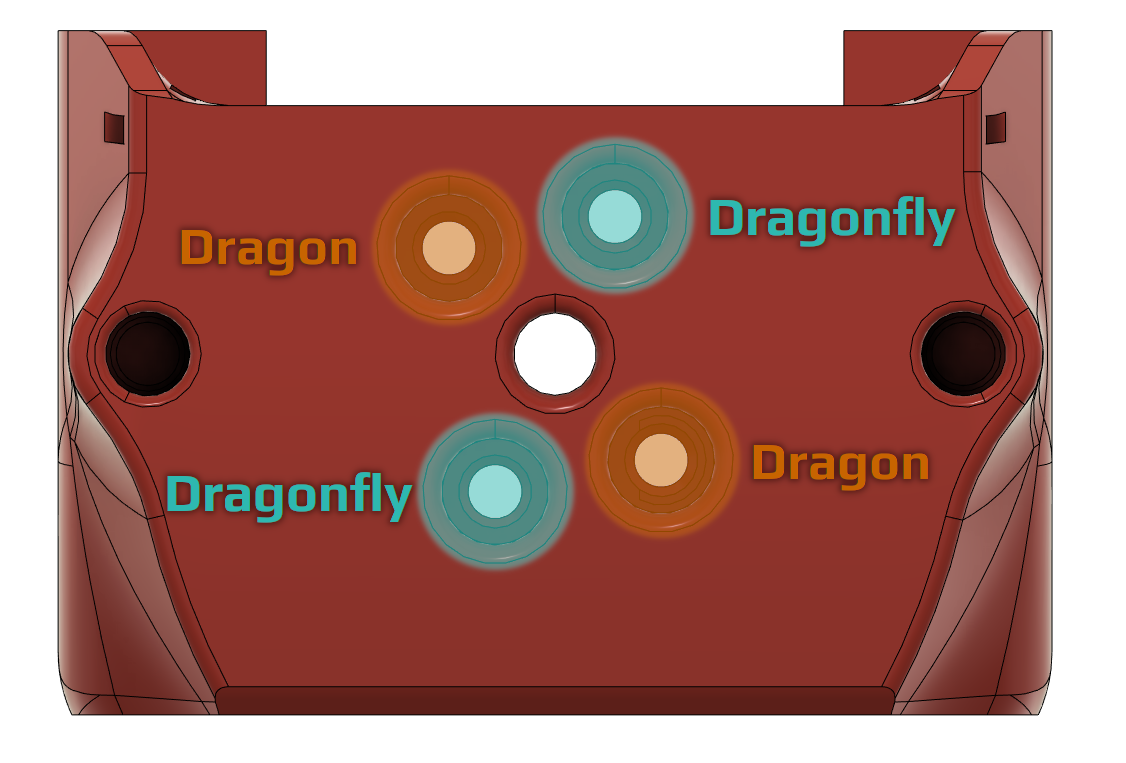
- The Phaetus and TriangleLab Dragons and Phaetus Dragonfly BMO share the same body.
- The groove-mount E3D V6 and Zodiac Dragonfly BMO also both share a main body, but you have to print the slide-in mount that goes with your hotend.
- The Slice Engineering Mosquito and Mellow NF Crazy both share a main body as well.
- Support is here for Zodiac and Phaetus Dragonfly BMS, as well as Revo Micro (and more…)
[insert_Revo Micro here] [insert Revo Voron here] [insert V6_Zodiac_BMO here]

The Mini-AfterSherpa includes two slots for zip ties to aid in cable management and strain relief. They're much easier to access and route cables through than the zip tie slots on the X carriage (and if you're using an aluminum X carriage like the one from Funssor, then it doesn't even have any zip tie slots!)
- 2×: M2.5×8mm BHCS/SHCS (to connect the hotend)
- 2×: M3×5×4mm heatset inserts (to connect the extruder or Bowden adapter)
- 3×: M3×35mm FHCS, BHCS, or SHCS
- 2×: 3010 blower fans (same as Mini-Afterburner)
- 1×: 3007 axial fan (same as Mini-Afterburner)
For Bowden setups:
- 1×: ECAS04 Bowden collet and clip
- 1×: 2mm innner diameter/4mm outer diameter PTFE tubing, 25mm long
- Install both heatset inserts on the holes far to the sides of the top of the Mini-AfterSherpa.
- Install fans following the instructions on page 109 of the V0.1 manual.
- Install the hotend.
- For Dragon or Phaetus Dragonfly BMO, use the M2.5 bolts that came with the hotend. The following diagram will help determine which holes to use for your hotend.
- For the groove-mount V6 or the Zodiac Dragonfly BMO, slide the groove at the top of the heatsink into the main Mini-AfterSherpa body, then secure it in place by sliding the other mount part in behind the toolhead.

- Attach the Mini-AfterSherpa to your X carriage with the M3×35mm bolts. Route the hotend wires to either side of the toolhead, and make sure not to crush them when you're tightening the M3 bolts.
- Use zip ties to secure the wires on the sides of the Mini-AfterSherpa.

- Install your extruder or Bowden adapter.
Made by Kyrios, based on the AfterSherpa by smolboi.