- Link to Google Maps
- Static files not loading
- Styling map template
- Hero image styling
- Road cleared in traffic alerts
- UK postcode search
- Navbar Current Link
- New traffic alert
- Journey form errors
- Geocoordinates
- Postcode extraction
- Edit_journey
- Traffic_msg_list pagination
- Pre-populated Journey Form
- Button descendant of anchor
- Source code
- Form Fields Styling
- Bugs left
- Deployment to heroku
- Forking the GitHub Respository
- Making a Local Clone
- Setting up your local enviroment
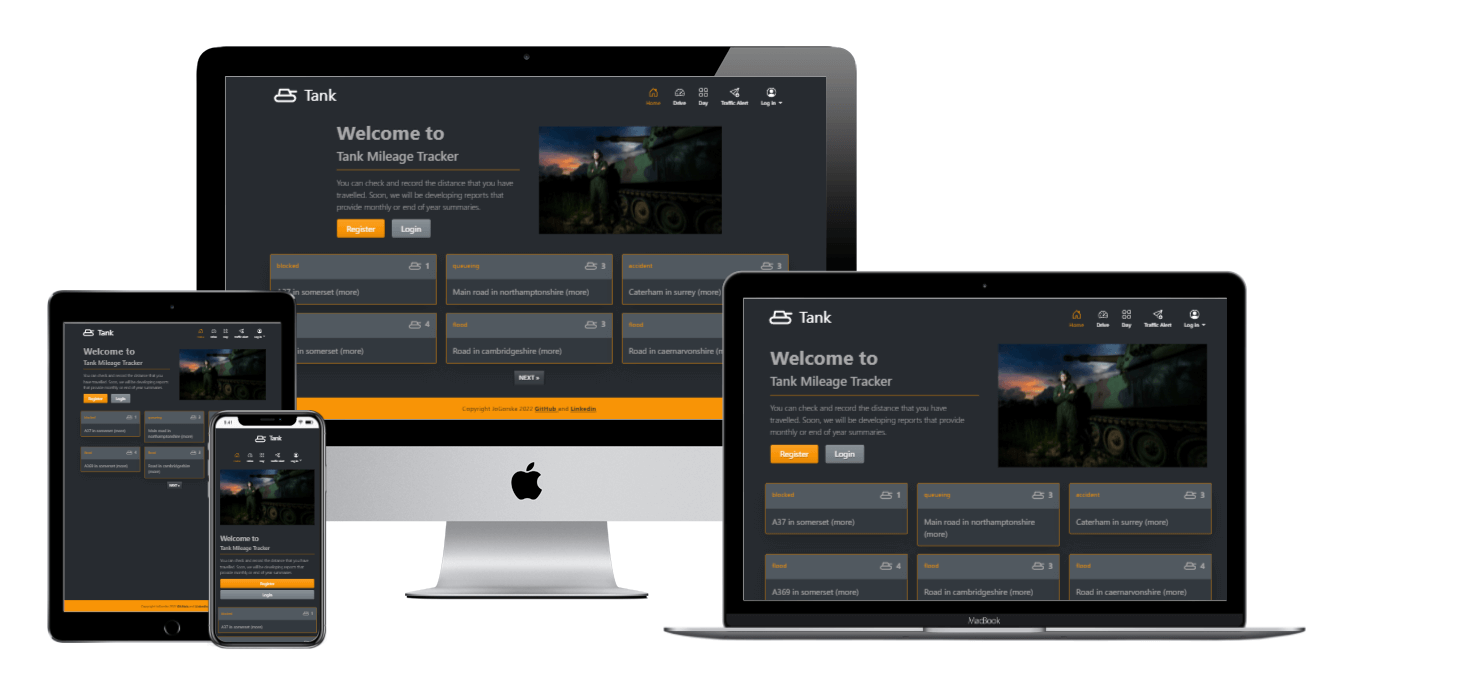
Click here to live site.
Tanks are known for using lots of fuel. If you were driving a tank, you would really like your mileage to be calculated with military precision.
Tank mileage tracker accurately tracks and logs business miles by car. User can record mileage on the go, he can also save historic record or calculate mileage for the future journeys. It can be used within UK, it enables users to search via postcode, first line of address or town. Records are being stored in database.
The app conforms with mobile first approach - many of the design decisions were driven by the way the app looks and works for a user of a small mobile phone.
GitHub issues were used to record the user stories. The user stories were categorised into different priorities, as below from highest to lowest: "Should Have" "Must Have" "Could Have" "Might Have" "Won't Have"
The following user stories were satisfied by creation of visits app, including the features:
- adding postcodes to the database as a journey
- google maps button
- saving journeys to database
- edit journey function
- view day report - displays the list of journeys for the day
- button Drive - to submit to database when user is ready
- unlimited amount of journeys can be saved for each day
- summary of miles for the day feature visible in drive and day view
#1 As a driver I can add postcodes to a list for the current day so that see where I have been on the day
#2 As a driver I can have a button to copy postcode and transfer me to google maps so that I can follow google maps without typing postcode second time
#3 As a driver I can save each daily route so that do my monthly reporting for my employer database day postcodes miles
#13 As a driver I can edit my route that I drove a few days ago so that I can correct any errors
#15 As a driver I can have the route I drove automatically calculated so that I know how many miles I drove this day
#17 As a frequent visitor I can see the previous routes that I travelled so that I can have the record of my journeys
#22 As a driver I can record lots of postcodes that I visited so that have whole of my journey saved
#74 As a frequent user I can click on a button to get the maps so that I control when I am transferred to map
#86 As a frequent user I can choose the date when adding the journey so that I only have to change it once when I update all my journeys for yesterday
#107 As a regular user I can see the summary of miles for the day so that I can put this number in my report, I can check it against the clock on my car
The following user stories were satisfied by creation of users app, including the features:
- user ability to register as a user for this website
- build in django feature that makes the user remained logged in, even when the website is closed and re opened again.
#16 As a returning visitor I can have my own profile so that data I put in is kept private
#20 As a frequent visitor I can stay logged in so that I don't have to type in my login and password every time I visit the website
The following user stories were satisfied by creation of traffic app, including the features:
- adding new traffic alert for other drivers
- display a list off traffic alerts to the users
- "thank you" button allowing drivers to show appreciation for the traffic alert
- "road clear" buttton allowing drivers to notify that the road has cleared (feature later removed due to testers raising concer that the use of the button is unclear and that google maps shows most up to date road cleard information)
- traffic alert list displayed on home page as well as in drive view
- pagination of traffic alerts on home page and displaying only 3 alerts on drive view limits long scrolling on mobile phone
- information label by the little tank button explaining it is a button to "thank you"
#18 As a drivers I can leave messages on the portal about problems on the road so that other drivers can avoid the area
#19 As a driver I can see if other drivers have posted any messages about traffic issues in the area so that I could avoid getting stuck
#23 As a driver I can say thank you in response to the message about traffic warning so that I can show my gratitude to fellow drivers
#28 As a driver I can thank the driver that posted the traffic alert so that the other driver feels appreciated
#24 As a driver I can mark traffic warning message as out of date so that other fellow drivers know that the traffic issue was resolved and the area is safe
#29 As a driver I can mark the traffic alert - road clear so that other drivers know that the alert doesn't apply any more
#47 As a driver I can see traffic alerts all the time, when I use app so that I know if there is anything new going on need to add traffic messages view to Drive view
#88 As a frequent user I can see which messages I thanked for so that I don't have to click again to thank them
#106 As a driver I can have my traffic messages signed with my first name so that my email is kept private
#108 As a regular driver I can have only few newest messages when I type my postcodes so that limit endless scrolling
#64 As a new user I can see some kind of description so that *understand the meaning of little tanks in the corner of the traffic alert
The following user stories were satisfied, including the features:
- accessibility including aria-labels
- responsivness of all elements of the page, simple design easy to use on mobile
- page deployed to heroku so it can be browsed by members of the public
- fully responsive nav bar with hamburger button for mobile phone users
- footer with short information about site owner
- detailed readme including va
#25 As a visually impaired visitor I can the project to accommodate my needs so that I can use it with the help of my screen reader
#26 As a driver I can access the app on my phone so that I can use it while on the go
#27 As a first time user I can browse to find this app publicly available so that use it and share it
#71 As a mobile phone user I can hide nav bar in hamburger button so that the nav bar doesn't hide the website
#72 As a new user I can see more details about the makers of the site in the footer so that I can find out more about them
The following user stories were marked as to be planned for next relese:
#4 As a driver I can have option to get an annual report so that submit my mileage to HRMC
#21 As a worker I can have additional safety measures, when accessing the reporting so that if unauthorised person gets hold of my phone, when I am logged in, they don't have access to historic data
#5 As a worker I can upload my monthly schedule so that see when is my day off and what time I start work
#6 As a worker I can have my schedule automatically applied to the future months so that I know what day off I will have in a few months time
#7 As a worker I can print out monthly time sheets on the basis on my schedule so that submit monthly timesheets to myemployer
#8 As a worker I can edit monthly time sheet report so that put down the extra days I was off so the report is accurate
#9 As a worker I can receive SMS reminders so that I remember to switch the app on before starting the shift
#10 As a worker I can receive sms reminders so that that monthly mileage report is due to be submitted to my employer
#11 As a employer I can see the recorded mileage of each worker so that I could see if someone is behind with their mileage tracking
#12 As a HR worker I can copy and paste reports so that I can easily update payroll system with the mileage for each employer
#30 As a site owner I can edit and delete the traffic alerts so that I can remove inappropriate content
#58 As a driver I can see traffic alerts added by other drivers displayed on a map so that see any problems in my area
However I have designed both desktop and mobile wireframes in the same time, but I have taken mobile first approach. This is an app for drivers and it has to look good and work well on a small mobile.
Wireframes created with Balsamiq. The project was developed from initial wireframes and some modifications were made during the development process to assure better usability.
Wireframes initial project Initial design was focused on monthly reporting. I decided to change this do daily reporting and put monthly reporting on the list for the next relese.
The design included a long form for user to type addresses in, one after another. This idea was dropped, as it could run into a danger of loosing the data half way through the journey. I thought it is important that user saves data immediately after he types it in.
The new design includes only one pair of start and destination address. After typing them in, the user saves them and can continue typing next address. In the new design uer can look up a day report that gives him a list of his visits for the day.

Github issues were used to create the User stories and group them according to MoSCoW prioritization technique. Link to the project with live issues can be found here. The issues are currently in two categories - done or for the next relese.
The issues were than closed automaticaly when the pull request was linked to the issue.
Navbar and footer has been copied from Bootstrap components and adjusted to the needs of the project
I have used a beautiful nav bar with icons found in bootstrap examples in headers. Unfortunately this nav bar didn't have the feature to collapse into hamburger menu. I tried adding the bootstrap's classess to create the hamburger menu but this has changed the look of the nav bar. The design was quite unique and bootstrap classes have hindered the design. I removed the nav bar classes and left the nav bar styled as oryginally copied from bootstrap examples - headers.
Since the app is designed for mobile phone users as a main group of clients - it needed a robust and well designed mobile nav bar. I decided to make a second nav bar for mobile phones only. I have used a different nav bar from bootstrap and I have used the same icons inside this design. This way the whole nav bar was collapsing into a hamburger button, which was much easier for mobile phone users.
Footer contains only minimal information about the author of the page. It stays at the bottom of the page. It does not contain any relevant information for the user and if it was made "sticky" it would just take up valuble space on mobile devices screen.
Home page consists of a hero with a short message with buttons and a little image reffering to Tank
Second part of the home page is the list of traffic alerts. The list is generated dynamicly as per most current alert first.
Traffic alert design - I've chosen a simple card design from bootstrap. Since this is an app for drivers I have taken the mobile first aproach. This app needs to be comfortable to use by someone that is using mobile phone only. This led to a decision to display only maximum of 6 alerts per page. This way the mobile phone user will not have to scroll down too much, but there is an option to go to the next page. The rest of messages is paginated and is available under a little nav menu with page numbers.
Date picker could have been really created as a seperate app. The date picker form is used for both drive and day view. This form enables user to choose the date once - at the beggining of the journey and than all subsequent journeys are added to the same date.
If the user is updating historic records - he needs to choose date that he needs to update - type all postcodes in and than go to next date that he needs to update.
I have asked myself qustion - Do I want to thoroughly validate date? Date picker is not validated in the way - it allows the users to put dates in the future or in the past or the current date. This is to allow the flexibility if the users want to record their future miles or the historic data.
I like the users to have the ability to add the dates in the past. The driver might have forgotted to add mileage daily and he will be forced to back date all entries.
Another question is if I should validate if the user inputs date in the future. I would like to think that this option might be usefull. Some drivers are required to give their employers predicted distance to claim petrol advance.
I have made the decision not to validate the date at all and allow users to put dates in the future or in the past or choose the current date. The mileage - tracker app can have so many uses that it would be a shame to limit it's usage.
Drive page is divided into 4 sections
- Current journey
- form to input start and destination address
- List of journeys for the current date
- List of traffic messages
Workflow for Drive Workflow version 1. App can be used every day for each journey and the driver can save each route as they go.
- log in
- go to "drive"
- put in start and destination of the journey
- be transfered to map preview page
- add to database
- click to go to maps (google maps on mobile or google maps website on desktop)
- they arrive at destination
- to go to next location, they need to go back to the Tank website (they would still be on map preview)
- go back to "drive"
- put in start and destinaton
This workflow required the driver to juggle beetween google maps and Tank website and the work app that tells him the next address. This workflow required too many steps, after speaking with my mentor Felippe Souza Alarcon I decided to rebuild the drive view completly.
I dropped the map view as it has not been bringing any value for a driver / mobile phone user. The driver needs an interactive map in a google maps app, not a display javascript map area inside a website.
Workflow version 2. App can be used for every day recording or recording past or future journeys:
- log in
- go to "drive"
- put in start and destination of the jouurney
- press "Drive!"
- page refreshes, you can see the journey you just saved in orange fonts and a link to google maps, if you need to use your phone as sat nav
- the form is set up with the start of journey so you only need to put in the next journey's address
- press "Drive!" again for the next journey
Because the Tank website forces the user to regular use every day during the whole shift and refres the whole page after each journey - it can be a good platform for:
- trafficc alerts
- in work messages
- tracking employer's progres in mileage reporting
- advertising (if app is to be used commercialy)
1. Current Journey
It is an orange div with orange borders and orange fonts and a little map icon.
This field displays only if user has come to drive after submitting another journey. The user gets data from the current journey variable.
The div also features an old google maps icon that was taken from here The icon is linked up with the destination address of the current journey.
The logic of this is that once the user types in start and destination address - the data gets saved in the database and he can now go to maps and drive (use google maps as sat nav). This works nicely on the mobile as user gets transferred to google maps with this address already inputed. This uses the geocoordinates to set the google maps up with destination.
The icon is featured with little description available for large and medium screens. This was due to the fact that on larger screens the div is so long that this icon gets lost at the end of it with a big gap in between the description of the journey and the icon. The div is stretching full width of the container - just to unify it's styling with the accordeons below.
For mobile phones this description was not needed as the responsive grid pushes the icon right next to the table which makes it quite intuitive.
2. Form to input start and destination address
The form input fields for start and destination address are the only visible elements of a Journey Form - that creates a journey object. The start and destination address can be typed by the user initialy, but than user needs to choose the address from a drop down box. The minute when the user clicks into drop down box - the javascript fetches google places API and gets the geocoordinates for this particular location.
At every stage of filling in the form the user is guided with javascript validation and djnago form validation. (more about validation here) The rest of Journey Form is hidden from user - it contains geocoordinates that are added by javascipt.
Drive! button initializes a set of actions. First the form is validated. Once the form is valid the function fetches google directions API to get distance for the journey. Next the object gets saved into the database and user gets redirected back to drive view with the current journey displayed in orange on top.
An issue has been spotted by a small mobile phone user that when the user types in address and has the keyboard covering half of the screen - he doesn't actually see the drop down box. He has to click into the website to get the keyboard disapear than he can see the drop down box. This might be hiderance for first time users. I have added focus for start address in attempt to move the input field to the top of the screen, but it wasn't high enough for small phones. In second instance the red description generated by javascript validation should help the user to resolve the issue and find the drop down box.
In this project I am using:
- Google Places
- Google Directions
- Google Maps link
1. Google Places API
A javascript function on input shows a drop down box with google logo that contains default addreses based on input so far. The user needs to click into the chosen field in this drop down box. Once the user clicks it the function fetches the geocordinates of this particular location as well as full address. User can change his mind and edit the field, he gets a new dropdown box to choose the address and the function will fetch new geocoordinates.
Initialy the function was allowing to search by what is called in UK - "fist line of the address" meaning door nubmer, street and town. This has proved to be too much for the UK drivers. They are used to getting the directions by using postcode only. After extensive reading on the subject I have found documentation indicating what the object that I am fetching consists of. Initialy I have found this article it describes in details - what data I am getting from google places API and what is available. The code was written in react, but the article gave me more in depth understanding of the issue. I have found Google documentation that describes the types of data I can get from google places.
As the result of the above discovery I have changed the function initAutocomplete from "types: [address]" to 'regions: ['postal_code']'
For reporting to the employee I had to make sure that the data I am collecting has postcode stored seperately. There is a way of obtaining postcode from the google places api result
    var place = autocomplete_a.getPlace();
    var postcode = place.address_components[0].long_name
    console.log(postcode)
Address_components object consists of a few objects that can be pulled out of it - like street name, name of the town and postcode as well. Unfortunately this method has proven not to be very efficient. It only worked if the user typed in the postcode in autocomplete box. If user typed the street number or name of the town, the postcode component did not apear at all. The results that I was getting were as below:
CM23 3DH
58
NN16 0AP
Edgware Road
As a result of this problem I decided on a different solution - to search the results of google places and google directions full address field for a postcode using a regex. Even this method has proven to return some errors. I have found that Victoria Station in London is not returning postcode whether in google places or google directions. In this case the user will get full address in their report instead of the postcode. Those situations are rare and most drivers in the UK use postcodes constantly and residential addresses, rather than train stations.
2. Google Directions API
A python function takes the geocoordinates from the form and gets the distance between two points on the map. Google Directions returns me a full address of start and destination in a slight different form than google Places. If I search google places for a town I get for examle "Northampton", while google directions would be a full address with street and postcode for a geocoordinates. This means that for the daily report I have a way of obtaining postcodes - either from googe places or google directions version of the full address.
Google directions returns also the distance between two points by car. The car drive mode is default. The returned distance is in km, I have put a function to change to miles and round up to one decimal place.
From google direction I can also get the time it will take to travel, but I didn't think this feature would be usefull for me.
3. Google maps link
For mobile phone users it is very important they don't have to type the destination address twice - once in the Tank app and second time in their sat nav. I am assuming most mobile phone users use google maps for their journeys. I have found how to create URL for the user to be transfered to google maps with the direction pre set for him. I am making the user of geocoordinates provided by Google Places API and I build the url using a variables with geocoordinates.
Forms validation:
- HTML validation using HTML atributes
- Javascript validation (only in Drive view)
- Django form validation
The drive view is the most complex part of the app and the most important one. I have focused on this view to make sure I have various levels of validation to help the user to submit the data correctly. Drive view consists of 2 input fields for start and destination adress. For correct functioning of both functions that are fetching google API user needs to input data in a specific way. The form validation guides the user through the process.
In the next release some features of this validation can be added to other forms especially the User profile view.
1. HTML validation
Some input fields are given attribute "required" to prevent the user from submitting the empty form.
2. javascript validation for Drive

I have added Javascript function detecting input on the start address and destination address fields. The function adds and removes classes showing the user in red and green if the field is filled in correctly.
The green text explaining "ok" status for both fields is added by the function handling google places api query. Once the query is completed and data is submited to the fields this function adds and removes classes so it shows user in green that geocoodinates have been found.
3. Django validation for Drive (AddJourney)

If user decides to ignore the above messages from JavaScript, the form gets submitted with some missing data, but django form validation function prevents the item to be submitted to database with missing data.
The user gets displayed a message describing the error.
The most common error will be submitting form with geocoordinates missing. I decided that I would preffer user not to see geocoordinates as it would be too much information for a little phone application. Geocoordinates would need to be inside not editable input elements anyway.
I am adding detailed message describing what to do if the drop down input field from google places api doesn't show up. I am also clearing the form data - hopefuly when user types both addresses again, he understands how to do this correctly.
Reporting app is divided to three main functionalities:
- display one day report, this is displayed as accordion with buttons pointing user to edit or delete the journey
- display a period report - this is displayed as table
- excel exporting - exports choosen period to mileage
The Traffic Alert app allows the users to add traffic alerts for other drivers to see. I have added a form that submits new traffic alerts to the database. The user can also interact with the traffic alerts - to add "thank you" by clicking a tank icon.
In my current employment the office uses internal in app messages to describe issue on the road for example "by the big Mcdonadls in Kettering" This explains the location very clearly for locals and co workers. The user can type the location of the incident in such descriptive way so it is understandable.
The traffic alerts are displayed as cards stacked in rows. The cards contain only minimal information - category and location. They need to be small to make them easy to view in a small mobile. There is availibity to see further details of the traffic alert by clicking into the card and a modal with details will show up.
User - build in django user model enables users to register log in and log out.
I have added a User Profile model and form to enable user to give us more data about themselves. This data will be useful for reporting the mileage to the employer. The profile asks about their employer details and email addres.
Another idea is to add a special Drive Home button for the user - once the user has submitted their private address in their user profile.
Having the visits data in the database allows the future development of various reports
- month
- week
- annual
This could enable driver easy monthly reporting of mileage to the employer or annual report to HMRC
Havig the visits data bears some risk as well. In the report the user can obtain a list of people's addresses including their house number and geolocation. The user stays logged all the time, so if the phone is stolen or lost - someone could access the data on the website. It would be advisable to secure the reporting app with additional safety features. Accessing a few addresses in current day view seems smaller risk, than accessing a full month or year worth of private addresses. Having that said, it might be a safer to get the user to type in password at least once a day for accessing the app.
Workers that have rolling shift patterns for their time shedule would find a feature of some kind of timesheets quite usefull.
- timesheets reporting - reporting to the employer the work time
- calendar view - for the worker to check when the next shift is due - having a 4 weekly rolling shedule makes it difficult to make any appointments, as each week is different. The calendar view - that would include the shift pattern would be a great help.
- adding abscences and overtime - for the purpose of time sheets reporting to the employer - the app can be set to communicate with visits app - to check if the user has been driving that day and what time. This way app could make suggestions if the worker was off or if he has done overtime.
Some drivers might find it helpfull to receive text message reminders to switch their app on when their shift is due to start. Another usefull feature would be to receive sms reminders that monthly / annual report is due.
This app can be very helpful for employers that need to have up to date view of their employees mileage. The employer could see if the workers are keeping their mileage records up to date. There is also a wide area of developing various reports that would help the employer to upload the data for payroll.
Further development of Traffic Alerts can include allowing the site owner to moderate the Traffic Alerts posted by the drivers and remove inapropriate content.
Another major change that many drivers might find interesting is to allow driver to point on the map where the traffic issue has occured, instead of typing the description.
The next step would be displaying the traffic alerts in a minature map for other drivers to see as markers or markers clusters.
The owner of the site will be charged by Google Places API and google Directions API depending on the usage of those APIs. If the cost proves to be great - it might be advisable to look into google AdSense and add some small fields for google ads. There should be also a further option for the users to have paid subscription without ads.
The google ads connected with cars are quite well priced and due to the repetetive nature of typing the mileage in the Drive page gets refreshed regulary, therefore even one user would generate lots of views of the ads.
- HTML5
- CSS3
- JavaScript
- jQuery
- Python
- Django
- GitHub The Git was used for version control Git issues were used for user stories GitPod was used as IDE to write the code and push to GitHub
- Heroku The page was initially deployed to Heroku
- Railway App The page was removed from Heroku and move to Railway
- PostgreSQL PostgreSQL was used as database for this project
- VSCode VSCode was used on the days when GitPod was down
- Google Cloud to get api key
- cloudinary storage for storing static files (later removed)
- whitenoise for soring static files to replace cloudinary
- Balsamiq: Balsamiq was used to create the wireframes during the design process.
- Bootstrap 5: Bootstrap was used to add style to the website.
- Bootswach: Bootswatch was added to change the standard styling and color pallette provided by bootstrap
- Bootstrap icons
- Django 3.2
I started tidying up HTML code by searching for a beautifyier for HTML code. I tired JS Beautifier and Prettier in VS code - both have edited django templating tags in the way they were no longer working. They were also splitting the attributes of html elements to seperate lines. This was visualy helpfull with some tags with wide variety of attributes, but for most tags it was confusing. In the end I used online HTML code Beautifier. It has visualy fixed issues with incorrect indentation inherited from copying from various sources.
I have right clicked on the rendered page and copied the code of each page into HTML validator
| Page | result |
|---|---|
| Index | No errors |
| Date pickeer | No errors |
| Drive | No errors |
| Day Report | No errors |
| New Traffic Alert | No errors |
| Login | No errors |
| Register | No errors |
| User Profile | No errors |
No errors were found when passing through the official W3C validator. The copy of the CSS report can be found here
Javascript code validation was complited on jshint Initialy it was returning errors in relation of ES6 syntax, which was resolved by adding this line to the beggining of the file
/*jshint esversion: 6*/
| Page | result |
|---|---|
| Google Places | two warnings |
| User Profile | two warnings |
Unfortunately it has been also returning errors connected with the use of JQuery, which I have not managed to resolve. It claims I have 3 undefined variables '$', 'google-api-key', 'google'.
I have left two warnings in the code, which do not seem to have affected the working of the code
252	Functions declared within loops referencing an outer scoped variable may lead to confusing semantics. (google, $, lat_id, long_id)
248	The body of a for in should be wrapped in an if statement to filter unwanted properties from the prototype.
All pages were initialy put through Python Formatter which automaticaly sorted most of the too long lines errors. Than the code was checked by pylint and problems were displayed in the console. Once the issues were cleared I have put all code though pep8 validator.
The PEP8 style rules were followed with exceptions specified in the files setup.cfg and .pylintrc. Those files were used to custom configure python validation. More about .pylintrc can be found here and about setup.cfg can be found here
| App name | file name | result |
|---|---|---|
| mileage-tracker | urls.py | all ok |
| traffic | admin.py | all ok |
| traffic | forms.py | all ok |
| traffic | models.py | all ok |
| traffic | urls.py | all ok |
| traffic | views.py | all ok |
| users | admin.py | all ok |
| users | forms.py | all ok |
| users | models.py | all ok |
| users | urls.py | all ok |
| users | views.py | all ok |
| visits | admin.py | all ok |
| visits | forms.py | all ok |
| visits | mixins.py | all ok |
| visits | models.py | all ok |
| visits | urls.py | all ok |
| visits | views.py | all ok |
Automated tests have not been created due to time constrains of the project.

The Lighthouse in Chrome dev tools has been run. The results indicated very positive outcome of testing Accessibility, Best Practice and SEO, unfortunately the Performance has been assesed very low.

It seems that perfo is hindered by the fact I have all bootstrap files in cludinary. I would normaly use cdn link provided by bootstrap. In the case of this project I used bootstwatch. This ment that I had to download all css files that bootstrap is made off and replace the main bootstrap.css with the one that is provide by bootstwatch.
Another hiderance in performance must have been heroku - as a free user I am provided with much slower performance than commercial websites.
The images were compressed - using tiny.png to prevent any issues.
Relese main fetures:
- users app - user was able to register and log in
- traffic app - user was able to add traffic alerts
- visits app - drive view: user was able to type in start and destination address, than he was automaticaly transfered to map pre view, where user could add the entry to database and click the link to go to google maps.
Reported issues:
- Initial version did not have submit button, but the form has been submitted automaticaly after the user chose the destination address from dropdown box, this was assessed negatively, as the user likes to have control over when he goes to the next page.
I have added the button to submit the addresses
- Initial version requred user to submit data on the address input form, than submit data on the map page. Users complained that the process is very complicated and, when user was observed interacting with the page, it became obvious that he is lost as to what to do on the Map page.
I have dropped the Map page and I have the one button fetching data from google directions and submitting to the database in one go. I also thought that javascript google map is not of any value to mobile phone user, as he can't use it to drive. User needs a button to click and be transfered to google maps and use it as Sat Nav.
User was unaware that he had the option to click into the link and be transfered to google maps. The link was white letters on dark background and didn't stand out.
I have added a google maps icon with geocoordinates for user to click so he can intuitivly use this option.
- Initial testing have revealed that google places drop down sometimes doesn't apear. It might have been caused by Dark Raider chrome extension, although further tests have excluded this.
I have added javascript validation on input that guides the user through helpfull messages
- Please click into the drop down field to choose the correct address
- This field is required
- We have found geocoordinates Positive message is in green, negative are in red.
Should the user still decide to submit the form with the red errors he gets a long message from django form validation that is customised, depending on error type.
- Users also noticed that new traffic alerts aren't showing on the traffic alerts list.
I have found the error in the code, new messages were submitted as "draft" not "published" therefore they were not shown on the list. I have made all new traffic alerts created with the status "published"
- Users pointed out that the "month" button in nav bar isn't working
This functionality wasn't ready for the first realease
-
Users appraised the dark theme of the website and the general design.
-
Users didn't like the fact that nav bar wasn't folding into a button for mobile phone. The fact that the icons were dropping down in un organized way was particulary distracting.
Since this app is directed for mobile phone users mainly I have build special dedicated nav bar for mobile only. I have used media query to show and hyde the nav bars appropriately.
Main features:
- Rebuild the drive view with drive button and removed map view.
- Added nav bar for mobile phones
Reported issues:
- user spotted error in the link in the button that is supposed to take him to the destination address on google maps. There was no coordinates in the link.
I've noticed that this link has variables that were in previous release, updated variables to up to dates, geocoordinates are now loading correctly.
- user was observed interacting with the app. As soon as he clicked onto the start adress input field, the keyboard showed up and the user started typing the postcode. The user didn't realised that under the keyboard there was a drop down box to click into.
The user was using particulary small phone - screen witdht 320px
I added autofocus to the start address input element. Hopefuly this will scroll the element automaticaly to the top of the page.
- footer was covering lots of content of the drive page, fotter was made non sticky as it doesn't contain any vital information that driver would need in every day use.
Main features:
- Added option to edit journey
- Improved footer, to get it to the bottom of each page.
- Added little description to explain tank incon and road clear icon in the traffic messages lists view.
Reporeted issues:
- edit_journey - was adding new journey, instead of editing it - I fixed this error
- footer is no longer covering content, but it floats half way through the page - like in date pickers, still floats on login page.
- user complained that his email is visible when he posts traffic alert - changed this to display first name only.
- drive template, current journey accodreon - when user clicks on the map - the accordeon automaticaly opens and there is too much information for a small mobile to display. Also once the accordeon on orange box current journey opens, the form to add next journey goes down below and user has to scroll. - changed to div.
On the journeys list down below on the page - the current journey is marked with orange fonts - this way user will see that his journey has been added to the list and he can edit or delete it there
-
user raised concern that two arrows up and down are not clear - only after you hover over them it becomes clear - that they reffer to road clear. User pointed out that any driver would see on google maps how is the current traffic situation and google maps will provide most up to date information if the road has cleared or not. Therefor the little icon and voting "road_clear" is irrelevant and confusing for some users. - I removed road clear icon from the traffic_msg_list template and the "road clear" button from the modal as well as view responsible for adding road clear. It seemed to acheve much cleaner look of the card containing the traffic alert.
-
user has expressed his worry - why one of the links on the nav bar have become inactive. This was the nav bar link becoming gray instead of white for the current page. It wasn't very intuitive for the user. I changed this feature so the nav link becomes orange for the current page - both for mobile and for desktop nav bar.
I had two issues with link to google maps. First issue is that the link opened with no coordinates. This was resolved after reading the documentation. The second issue is the random results of clicking into this link for desktop computer users.
When user typed in the start and destination addres and clicked drive, he has the current journey displayed in orange box with an icon of google maps. This icon contains the link. The user should be transferred to google app (on mobile) or google maps website (on desctop computer), unfortunately initialy the google app/website was opening but with no coordinates. The documentation about google maps urls can be found here.
To test the functionality that was described in the documentation I have created a sample url:
https://www.google.com/maps/place/47%C2%B035'42.6%22N+122%C2%B019'53.9%22W/@47.5951518,-122.3316393,17z/data=!3m1!4b1!4m5!3m4!1s0x0:0xca3d37fe916595c3!8m2!3d47.5951518!4d-122.3316393
This url opens google places and it would require for the user to click directions to be further transfered to google maps and use it as a sat nav.
I have learned what components the url consists of:
- beggining of the url:
https://www.google.com/maps/dir/?api=1 - the word origin:
&origin= - geocordinates for origin:
latitute%2Clongtitute - the word destination:
&destination= - geocordinates for destination:
latitute%2Clongtitute
The words latitude and longitude have to be replaced with variables - so the link is dynamicaly generated for each journey.
Another working example below takes the user to google directions, but both address start and destination is pre set for the user. This would create confusion for mobile phone users as they want to use the google maps as a sat nav.
https://www.google.com/maps/dir/?api=1&origin=51.8630529%2C0.1755065&destination=52.5000791%2C-0.7110285
The final version of the url contains only destination geocoordinates. This works exactly as planned for mobile phone - the user gets transfered to google maps with the destination pre-filled, while the start address google maps fetches from user's location. The user can immediately use google maps as sat nav.
https://www.google.com/maps/dir/52.5000892,-0.7110479/52.3970259,-0.7309219/@52.4478939,-0.7700209,12z/data=!3m1!4b1!4m4!4m3!1m1!4e1!1m0
The link might behive in unpredictable way for desktop computer users. The google directions will try to obtain the user's location - if the user enabled location the app might get his actual location, otherwise it can get start address from unknown source or historic data. This was pointed out by one of the testers. I was unable to recreate this issue on my computer as it is clearly set to see my current location. For desktop computer users - the link should be changed to fetch both start and destination address and display the whole journey for the user.
The app was not designed or tested for other apps that can be used as sat nav for mobile phone as google maps is most popular app, widely used.
I deployed page to heroku. Page was displaying white without any css or js files loaded.

The below error was displaying on console:

Tried several solutions:
Not worked:
-
import mimetypes - solution found here
-
changes to file path in settings and / or in base.html file, which was suggested in one of the answeres here
-
assumption that the problem is caused by CSS library starting with comments - solution found here
Worked:
-
change
DEBUG = False- solution found here. -
make DEBUG variable dependable on development variable. If app can find development variable in enviroment - it sets the debug to the value of the variable, if no development variable found - the debug goes to False as default. Solution proposed in this Code Institute video.
development = os.environ.get('DEVELOPMENT', False)

DEBUG = development

if development:
    ALLOWED_HOSTS = ['localhost', '127.0.0.1', '127.0.0.1:8000']
else:
    ALLOWED_HOSTS = ["tank.up.railway.app"]
os.environ["DEVELOPMENT"] = "True" variable needs to be added to env.py file, while in heroku - do not add this variable at all.
In the first release of the project - the user had a possibility to see a map preview. I had initialy lots of problems to make the javascript map load. The google javascript api map requires special setting on the body and element that will hold the map:
#map-route {
height: 100%;
After this settings was applied - the map rendered. Unfortunately once the bootstrap css have been added, this setting was not correct for page to render the map. I have tried to add !important but this has not worked. I tried all settings that were working from oryginal map-only.css and set them all as !important but this has not worked either. I could see on the developer's tools that map's div was rendering, but the div size was 0px hight. I tried various different settings in dev tools in chrome but none gave right scale of the map. I wasn't able to locate which part of bootstrap's styling needs to be overriden.
In the end I decided to style this page similarly as bootstrap looks - same background color and fonts. I have also styled javascript map in night mode to blend into the overall style of the app.
In the next relese of the app - I decided to drop the map pre-view all together as it was not bringing any value to a mobile phone user and it was forcing the user to do multiple clicks before data was saved and he could input next journey.
The hero was copied from Bootstrap examples as a whole item with all styling already applied by bootstra's classes. I've noticed when testing responsivness on chrome dev tools that hero image on index.html is moving to the left of the screen, doesn't stay in the middle. I have tested in dev tools various different bootstrap classes and different css properties. The solution was adding some more classes in row div to control the number of columns depending on the screen size (row row-cols-1 row-cols-sm-1 row-cols-md-1 row-cols-lg-2), while the col divs will have only col class. Previously img div had set col width depending on screen size, while text col div had only settings for large screens. They did not seem to add up to 12 as per bootstrap's standard. I copied the classes from dev tools to the template, which has resolved the issue.
The traffic alerts had oryginaly two buttons that were resembling "like" functionality on social media platforms. Tank icon is representing "thank you" and two arrows were supposed to represent "road cleared". I have come accross lots of issues with my "road cleared" functionality.
- the number of road cleared has not been displaying on the messages list view - found error in spelling, which has resolved the issue
- the view that was supposed to submit the
clearedto the database was returning various different errors. I found missingfiltermethod in the view - number of Thanks wasn't increasing after the button to thank was clicked. I found that closing tag for form was missing.
- this feature was removed in the final release as the meaning of the icon wasn't obvious and it didn't seem to bring any value to the user. The user can easily check the up to date traffic on google maps.
Drivers in UK are using postcodes (combination of letters and numbers) to get to next location. In UK postcode area is relatively small and google maps takes you ony a few doors down from the right address. It is much quicker to input postccode than type number, road and town.
Initial function that I found at "Bobby did Coding" has been using full address. After reading extensive documentation I have found out that I only need to replace the word "address" with "postal code".
The function started getting the longtitude and latitude of the given postcode, but I've lost autocomplete functionality. I added the "postal code" as a second argument together with address and now user has ability to input full address and use drop down box or postal code.
After this modification user had to click into the field and press enter. This would not work right on the mobile.
This article about has helped me understand what sort of data I am getting from google places API. Google documentation can be found here that describes exactly what types I can get.
I replaced the word "address" with "regions" and I had full functionality of autocomplete back and also user had ability to search by
- postcode
- first line of address
- name of the town
I wanted to ensure that user understands where in the structure of the page he currently is. I have added a feature that changes the color of navbar icon when the user is in the given url. I've done it with multiple if else statements.
In attempt to simplyfy the template I tried to use if .. or .. or . The line of code became very long and unconvenient to read or modify. I tried to split if... or to seperate lines. This resulted in an error:
Error Invalid block tag on line 113: 'endif', expected 'endblock'.
I decided that I preffer to have a repeated if else statement, rather than an extremly long line of if or statement. I have come back to if else statement for most of the navbar elements.
One of the testers reported that a new traffic alert is not displaying on the list of messages. I tested if the new messages were being added to database - they were. I logged in to amin and I could see those new messages in the database. I found that the new messages have been created as "draft" rater than "published". The filter to display messages checks only for "published".
I have changed the view function that posts the new messages to the database that it sets the published property automaticaly for every new message. The error with displaying new messages was fixed. The functionality of "draft" and "published" might be expanded in the future to allow user to save draft messages in the future, but due to high paste of changes of traffic I doubt there will be a need for this.
I have created quite robust form validation for the journey form. To have very clear communication to the user - as to what has happened - I have decided to use messages to display errors to the user. Unfortunately for some reason the for loop {% for message in messages %} was generating a few red fields with identical messages. I tried to manipulate with the form_errors object, but the {% forloop.first %} seemed quickest solution.
The final solution was that user was transfered to empty form with one message displayed in red square - informing the user of the errors list.
As a part of manual testing I have added "Victoria Station" in London to address destination and once I tried to submit it I have got error that no latitute or longitude was found. I have added a print statement to get the full list of errors. The error was that the latitude was longer than 10 decimal places, while model was letting maximum of 10.
I have tried to reaserch how many maximum decimal places can be in geocoodinates returned by google places api, but I was not able to find definite answer.
I have changed the model. I have increased the number of decimal places to 20. I have tested Victoria station in London and the error was cleared.
I have noticed that postcode saved in journey object was different than google places.
I have tested postcode "CM23 3DH" and chosen this postcode from drop down list. When I saved the journey, the journey's postcode was showing "CM23 3DP". It is probably somewhere near by, but it is not the postcode I've chosen from drop down box.
I have changed extract_postcode function in mixins to priorotise extracting postcode from google places full address, only if this one doesn't return postcode, check google directions full address. Once they both fail, the postcode is returned as google places full address. During testing I often chose randomly a town or a venue and in some cases the google places on drop down field did not have postcode at all.
It is likely that the app would be used by driver typing one postcode after another, not type name of the town as a destination, as it wouldn't be specific enough. When user types the postcode to search google places - the google places object always contains that particular postcode. This way postcode extraction function will extract exactly intended postcode.
Clicking Submit on the Edit_journey url has been adding new journey, not editing the current journey
After testing lots of solutions within EditJourney Class post method I have realised that the form is set to AddJourney class every time the page renders. I have added an if statement for the <form> element. When url contains edit_journey it will post data to edit_journey url, otherwise it will post data to add_journey url.
After fixing this issue I have realised that Edit Journey post method return render / return redirect are getting various errors. I couldn't display drive template due to those errors.
To fix this issue I have decided that once the user has submitted the changes to the journey, he will need to see the overview of all journeys for the day, therefore I am redirecting him to day report with the date passed as a slug. It is likely that if user edited one visit in the middle of his run, other visits might need updating as well. This way the user will have overview of how the updated list of journeys look for this day.
The traffic_msg_list template was being paginated only on index.html page. I have tried various settings to enable the pagination, but nothing seemed to have worked. After using the app at a small mobile phone I have decided that it would be a benefit for the user if there is only 3 messages displayed at the time. This seemed a better solution than 6 paginated messages.
To fix this error - index page remained paginated, while in drive, the user can only see first 3 messages. I also added links to home page to see more messages if user wishes to.
The drive.html template that displays journey form contained multiple if else statements that was making various versions of the page depending on the url on which user currently was. The complexity of the changes made by if else statements was quite significant. The html code became unclear and confusing.
I have decided to duplicate the form three times and include 3 versions of the whole form, rather than split each part of the form to if else statements. This makes much cleaner structure and comment make it easy to see what is happening where. It is also much easier to spot any html errors if they occur.
W3W validator returned <button> must not be descendant of <a>. Solution found on stack overflow This has cleared the error from each page.
W3W validator returning errors on drive and user profile pages:
I struggled with one error and a several warnings in this view. The screenshots of the issues can be found here and the text with marked problematic areas can be found here.
- The error shows up for
<meta charset="utf-8">from the head. w3w validator is complaining that it was found after first 1024 bytes. It seeems that w3w is expecting this to be the first tag in the head. Unfortunately javascript places seems to inject styling at the beggining of the head and pushes meta charset down below it. I found interesting article here why this tag is important.
I tried to reasearch about google autocomplete causing errors when validating HTML, but all results have been pointing to errors within google autocomplete, not HTML validation errors.
- It seems that jquery cdn script is injecting the script below the title inside the head. This script contains the below expressions, which showed up as warnings in html validator:
- charset attribute on the script being obselete
- type attribute is unnecessary for JavaScript resources. I tried various different cdn links for jquery, they all had same effect as this one.
Solution was found by another student Dom Quail He has suggested to right click on the page and get to source code and copy the html from there. I was copying the HTML code from inspect the page -> edit as HTML and paste it to validator. Once I copied HTML from the source code - the validator wasn't raising the above errors.
Problem with displaying form fields using |as_bootstrap.
Forms with added |as_bootstrap display neatly on the page, unified with the style of the app. Unfortunately displaying form|as_bootstrap causes that fields display without proper gap between each line. The fields stick too close one above another. The label is nearly touching the field above.
First tried to loop through each field and use |as_bootstrap, but it was returning error. This ment that I had to prepare the whole html structure of label + input + help + wrapping div with bootstrap classes to acheve bootstrap styling. I added id, name, label information using field..
          {% for field in traffic_msg_form %}
            <div class="mb-3">

                <label for="{{ field.id_for_label }}" class="form-label">{{ field.label }}</label>
                <input type="field.widget_type" class="form-control" id="{{ field.id_for_label }}" aria-describedby="{{ field.id_for_label }}-help" name="{{ field.html_name }}">

                <div id="{{ field.id_for_label }}-help" class="form-text">{{field.errors}}</div>

             </div>
          {% endfor %}
All this seemed to work and generated all fields that were needed by django model and set by forms.py, except of input type. The fields with text area or select input type just rendered as if the input type was set to text.
I tried to loop through each field, but the input type doesn't change. Django documentation about input type field (here) mentiones that field.widget_type should return the type of input.
django documentation provides example:
  {% for field in form %}
      {% if field.widget_type == 'checkbox' %}
          # render one way
      {% else %}
          # render another way
      {% endif %}
    {% endfor %}
when I wrote <input type="field.widget_type"> the page rendered with exactly the same <input type="field.widget_type">. It did not fill in the apropriate input type for each field. I might have to adjust forms.py to add widgets.
Even if the above works I would still have to loop throuogh options to display options in drop down.
For now I decided to leave the forms |as_bootstraps - because they actualy work and display the content and input type correctly. This might need addressing in further development of the site.
Out of the above list bugs that were left to be delt with in the next release:
-
styling of some of the forms could be improved as default |as_bootstrap styling of the form leaves too small gap between the label and the next input field above
-
traffic list pagination - not working on drive - this was changed into a feature - the list of traffic message for drive is only 3 messages long - to limit scrolling the screen on mobile phones
-
link to google maps - it gives random results for some desktop computers as the google maps might struggle to obtain user's current location, as unlike mobile phones - no automatic data is provided.
In your app
- add the list of requirements by writing in the terminal "pip3 freeze --local > requirements.txt"
- Git add and git commit the changes made
Log into heroku
-
Log into Heroku or create a new account and log in
-
top right-hand corner click "New" and choose the option Create new app, if you are a new user, the "Create new app" button will appear in the middle of the screen
-
Write app name - it has to be unique, it cannot be the same as this app
-
Choose Region - I am in Europe
-
Click "Create App"
The page of your project opens.
-
Go to Resources Tab, Add-ons, search and add Heroku Postgres
-
Choose "settings" from the menu on the top of the page
-
Go to section "Config Vars" and click button "Reveal Config Vars".
-
Add the below variables to the list
- Database URL will be added automaticaly
- Secret_key - is the djnago secret key can be generated here.
- Cloudinary URL can be obtained from cloudinary follow the steps on the website to register.
- Google API key can be obtained here you will have to register with google and create new app to get the API key. Follow the instructions on the website.
Go back to your code
- Procfile needs to be created in your app
web: gunicorn PROJ_NAME.wsgi
-
In settings in your app add Heroku to ALLOWED_HOSTS
-
Add and commit the changes in your code and push to github
Final step - deployment
-
Next go to "Deploy" in the menu bar on the top
-
Go to section "deployment method", choose "GitHub"
-
New section will appear "Connect to GitHub" - Search for the repository to connect to
-
type the name of your repository and click "search"
-
once Heroku finds your repository - click "connect"
-
Scroll down to the section "Automatic Deploys"
-
Click "Enable automatic deploys" or choose "Deploy branch" and manually deploy
-
Click "Deploy branch"
Once the program runs: you should see the message "the app was sussesfully deployed"
- Click the button "View"
The live link can be found here, but currently deployed to Railway - as described below.
Due to heroku starting to charge for deploying full stack application I moved my app to railway app I needed to change the way env variables are refered in settings.py
Needed to add runtime.txt that was stating what version of python the app runs.
I copied env variables to heroku and deployed on Railway appp
By forking the GitHub Repository you will be able to make a copy of the original repository on your own GitHub account allowing you to view and/or make changes without affecting the original repository by using the following steps:
- Log in to GitHub and locate the GitHub Repository
- At the top of the Repository (not top of page) just above the "Settings" button on the menu, locate the "Fork" button.
- You should now have a copy of the original repository in your GitHub account.
- Log in to GitHub and locate the GitHub Repository
- Under the repository name, click "Clone or download".
- To clone the repository using HTTPS, under "Clone with HTTPS", copy the link.
- Open commandline interface on your computer
- Change the current working directory to the location where you want the cloned directory to be made.
- Type
git clone, and then paste the URL you copied in Step 3.
$ git clone https://github.com/JoGorska/mileage-tracker
- Press Enter. Your local clone will be created.
-
Create Virtual enviroment on your computer or use gitpod built in virtual enviroment feature.
-
Create .env file. Place in inside mileage_tracker folder. It needs to contain those 4 variables.
- Database URL can be obtained from railway app, add PostgreSQL as an add on when creating an app.
- Secret_key - is the djnago secret key can be generated here.
- Google API key can be obtained here you will have to register with google and create new app to get the API key. Follow the instructions on the website.
DATABASE_URL = ...
SECRET_KEY = ...
GOOGLE_API_KEY = ...
DEVELOPMENT = True
- Run command
pip3 install -r requirements.txt
-
The project walkthrough I Think Therefore I Blog tutorial provided instpiration for traffic alerts the repository can be found here
-
Django Google API by Bobby did coding tutorial provided clear guidance how to use google API in a django project, how to fetch data and how to use them within the project.
-
Django Google API tutorial repository can be found here
-
Hello Django tutorial by Mr Zielinski. Link to repository can be found here This helped me to understand various Django errors.
-
Igor_ci for explaining how to do django forms styled by bootstrap
-
Mr Zielinski for creating tutorial and showing bugs on the way
-
Dave Horrocks, Kamil Kwiatkowski, Daisy Gunn - for intense testing of the App and valuble suggestions for improvement
-
Felipe Souza Alarcon - for mentoring, suggestions and encouragement